
Chapter 37. Building and Deploying Applications for Windows Azure
In This Chapter
• Overview of the Windows Azure Platform
• Registering for the Windows Azure Developer Portal
• Downloading and Installing Tools for Visual Studio
• Deploying Applications to Windows Azure
Maintaining servers and data centers has costs and requires a company to have people specifically working on maintenance and administration. To reduce costs, a new way of thinking about data and web applications working on data is cloud computing. The idea of cloud computing is that you eliminate physical servers and data centers from your company’s location and deploy your web applications to servers that are elsewhere in the world and maintained by another company, using network connections for accessing your data. Microsoft has been working hard since 2008 on its own cloud computing platform, known as Windows Azure Platform, which is now a mature platform. This platform is composed of several services, such as applications hosted on a 64-bit operating system, SQL Server data access, and .NET services. A deep discussion on Azure would certainly require an entire book; in this chapter you learn what Windows Azure is and how you can build and deploy Visual Basic web applications to Azure using Visual Studio 2012; further discussions on the numerous offered services are available in the MSDN official documentation.
Overview of the Windows Azure Platform
The Windows Azure Platform is the cloud computing platform from Microsoft. It offers an infrastructure for scaling applications on the Internet where services and applications are hosted on Microsoft data centers. With Windows Azure, you do not need physical servers in your company because data and applications are hosted by Microsoft servers. Windows Azure is instead just a part of the Azure Platform and is a 64-bit operating system providing the runtime and the environment for hosting your applications and the platform’s services and for managing the applications’ lifecycle. You are not limited to .NET applications; you can host PHP, Java, and other kinds of web applications on Azure as well. In this chapter, though, you learn only about .NET. One of the biggest benefits in developing for Windows Azure is that you can keep your existing skills in developing ASP.NET and Silverlight web applications and WCF services with just slight modifications due to the platform infrastructure, still utilizing Visual Studio 2012 as the development environment. The goal of this chapter is introducing you to developing and deploying your Visual Basic applications to the Azure platform. In-depth discussions are not possible here, although it is important to understand how you use Visual Studio 2012 to build and deploy Visual Basic applications. The Windows Azure Platform offers several services other than the Windows Azure operating system, which can be summarized as follows:
• Websites—These represent ASP.NET web applications, and their development fully integrates with Visual Studio and is available for several programming languages, not only in the .NET family, such as PHP, Java, and Python. With Websites, Windows Azure offers a service hosting space that runs applications and a Storage Account service where you place your data.
• Cloud Services—These include, among the others, a full SQL relational database (formerly known as SQL Azure) and APIs to connect public cloud networks with private networks.
• Virtual Machines—An environment to easily migrate existing Windows or Linux virtual machines to Windows Azure without the need of changing existing code, it also enables you to connect an on-premise network to virtual machines running on the cloud.
• Application Building Blocks—These include a number of useful additions to the platform such as media streaming, Cloud Storage (see the following bulleted list), identity support for corporate log-ins, the Windows Azure Marketplace (an easy way to sell your applications or data sets), and content delivery based on network availability.
With particular regard to Application Building Blocks, the Cloud Storage, which is enabled when you create your account, is composed by the following areas:
• Blob Storage—Here, you can place files and streams that you can reach via HTTP and HTTPS addresses.
• Tables Storage—Here, you can organize data within tables.
• Local Storage—The space on the disk in the virtual machine hosting your Windows Azure applications that your code can access for your needs.
• Windows Azure Drives—Virtual VHD disks that your code running on the virtual machine can mount and that are backed by a blob.
• Queues Storage—Service for sending and receiving messages on the network.
The Blob Storage is particularly useful when you need to store some files, which can be of any kind, to use in your applications. The Windows Azure Developer Center contains hundreds of learning resources about all the previously mentioned services. You can find it here: http://msdn.microsoft.com/en-us/azure/default.aspx. This chapter explains the tools necessary for building and deploying web applications to Azure, but before getting your hands dirty writing code, it is important to mention how you can register to the Windows Azure Platform.
Registering for the Windows Azure Developer Portal
To deploy hosted applications to Windows Azure, you first need to register and get an account. Windows Azure and related services are paid services, and you pay only for resources that you actually consume, which is the biggest benefit of a cloud-based solution (pay-per-use). Fortunately, you can request a 90-day free trial and decide to purchase a subscription later. You can request your free trial at http://www.windowsazure.com/en-us/pricing/free-trial/. At the expiration of the trial period, if you are interested in Microsoft cloud computing and in purchasing services, ensure you read this page about pricing first: http://www.windowsazure.com/en-us/pricing/purchase-options/. Only if you decide to pay for cloud computing services, follow the instructions provided in the Azure’s website. Assuming you have chosen either a trial subscription or a paid subscription, you need to log in with a valid Windows Live ID. After you’ve logged in, follow the instructions shown to get your tokens. You will also receive an email with instructions to follow to activate your token on Windows Azure. Only when you are a registered user can you visit the Windows Azure Developer portal that is located at the following address: https://manage.windowsazure.com. Your new account will give you access to three main features: the Cloud Services, which is where you will publish your applications; SQL Databases, which represents the SQL database instance that hosts your databases on the cloud; and the Storage account, where you will have access to the blog storage, queues, and tables. Later in this chapter you see how to manage applications within the Windows Azure Developer Portal. Before going into that, you need to enable Visual Studio 2012 for cloud development.
Downloading and Installing Tools for Visual Studio
Visual Studio 2012 is the premier development environment for Windows Azure. To enable the IDE, you need to download and install Windows Azure SDK for .NET and Visual Studio 2012. You can find it at the following link: https://www.windowsazure.com/en-us/develop/net/. Click the Install button and choose the version of Visual Studio (2010 or 2012) you want to target. Installing the SDK will make some tools for Visual Studio available on your machine, which enables you to create and manage projects the usual way, and the Windows Azure SDK. The Windows Azure SDK is composed by the Compute Emulator, a tool that locally reproduces the hosting services on the cloud and that is required for running your applications locally; the Storage Emulator, which reproduces locally the environment for publishing blobs, queues, and messages; and the documentation. The Windows Azure SDK also contains sample applications with full source code for further studies. Also be sure to periodically check out the official Cloud Computing tools team blog from Microsoft, available here: http://blogs.msdn.com/cloud/.
Using Visual Studio 2012 Express for Web
You can use the free Visual Studio 2012 Express for Web to build applications for Windows Azure using Visual Basic. This edition is free of charge and can be downloaded and installed (including the Windows Azure SDK for .NET) via the Web Platform Installer, available at http://www.microsoft.com/web/downloads/platform.aspx.
Additional Tools
With the growing diffusion of Windows Azure, lots of tools are coming out. Particularly there is a need for client tools for managing the Cloud Storage, especially when you need to manage files in the Blob Storage both locally and online. Following is a list of client applications that provide the ability to easily manage the cloud storage:
• Cloud Storage Studio from Cerebrata—A professional WPF application that manages not only blobs, but also tables and queues; it also enables you to manage permissions, show analytics, and handle multiple accounts. This application is paid, but it is probably the most complete and professional. Download a trial at: http://www.cerebrata.com/products/CloudStorageStudio.
• CloudBerry Explorer for Windows Azure—A freeware client that enables you to manage blobs and that supports synchronization between local files and online blobs. You can find it at http://www.cloudberrylab.com/free-microsoft-azure-explorer.aspx.
• Azure Blob Studio 2011—A free client written by me and available for free on CodePlex.com. This client is available both as a standalone WPF application and as an add-on for Visual Studio. It supports Blob Storage only, but it is completely written in Visual Basic. You can find it at http://azureblobstudio.codeplex.com.
• Azure Storage Explorer—Another free client with source code available on CodePlex (http://azurestorageexplorer.codeplex.com), which enables you to manage blobs, queues, and tables.
It is important for you to have one of these applications in your toolbox because you will often need to manage your cloud storage in case you want to start developing professional applications for Windows Azure.
Creating a Demo Project
Supported Frameworks
At the time this chapter is being written, Windows Azure does not support the .NET Framework 4.5 yet. This means that you can certainly use Visual Studio 2012 to build cloud-based applications, but the current chapter will provide an example based on the .NET Framework 4.0. This example will be still useful when .NET 4.5 is supported by Azure.
Creating applications for Windows Azure is something that affects a plethora of scenarios because you can build and deploy any kind of web applications. This chapter provides an example of a Silverlight web application to show how different technologies (ASP.NET, Silverlight, and Azure) can coexist in the cloud development. With that said, run Visual Studio 2012 and open the New Project dialog box.
Visual Studio Requires Elevated Privileges
To test your Windows Azure applications locally, Visual Studio needs to be run with elevated privileges (Run as Administrator). This is required because Visual Studio needs to launch the Development Fabric, which also needs to be run with elevated privileges.
Click the Visual Basic folder, click the Cloud subfolder, and select the Windows Azure Cloud Service project template. Name the new project as AzureBookstore. See Figure 37.1 for details.
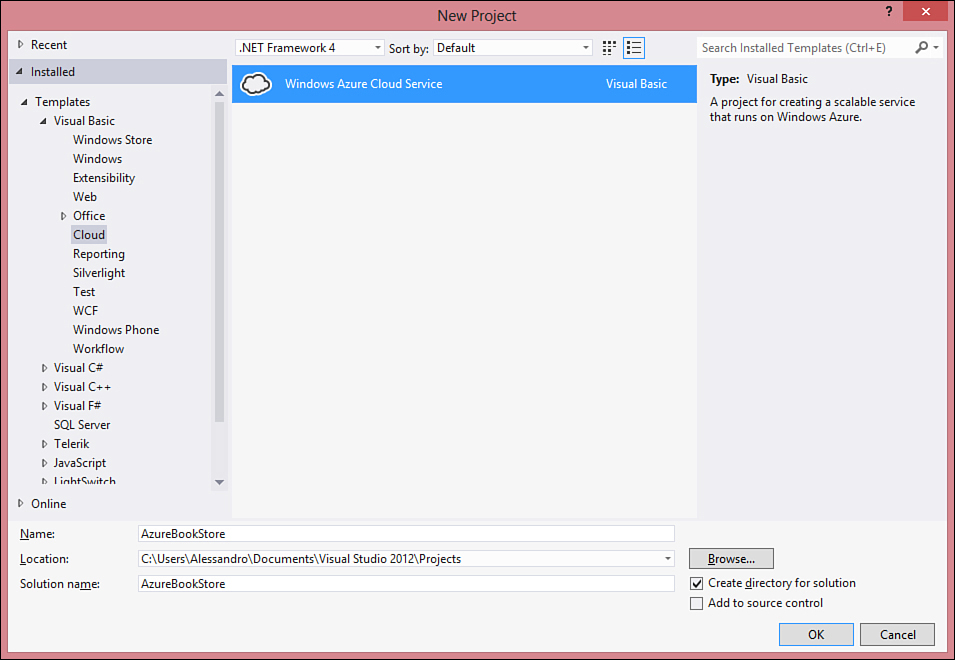
Figure 37.1. Creating the new project.
After you click OK, another dialog box displays requesting you to specify the application type. You can select different kinds of projects, such as ASP.NET Web Role, ASP.NET MVC Web Roles, WCF Services, Worker Roles, and Silverlight business applications. The ASP.NET Web Role is the most common template for classic ASP.NET applications; you learn more about roles in the next subsection. In this dialog box, select the Silverlight Business Application option and press the right arrow so that everything appears as in Figure 37.2. Notice that Visual Studio 2012 generates Silverlight 5 projects at this point. Move the mouse pointer over the item in the right column and click the pencil icon to rename the project into BookStore; finally click OK. After this, Visual Studio generates a new solution storing two projects: The first project is the Cloud service that stores information for the Windows Azure hosting service. The second project is the ASP.NET web application that you actually work on. As you know, Silverlight projects include an ASP.NET web application to host the rich client. Before putting hands on the code, an explanation about both projects is required.
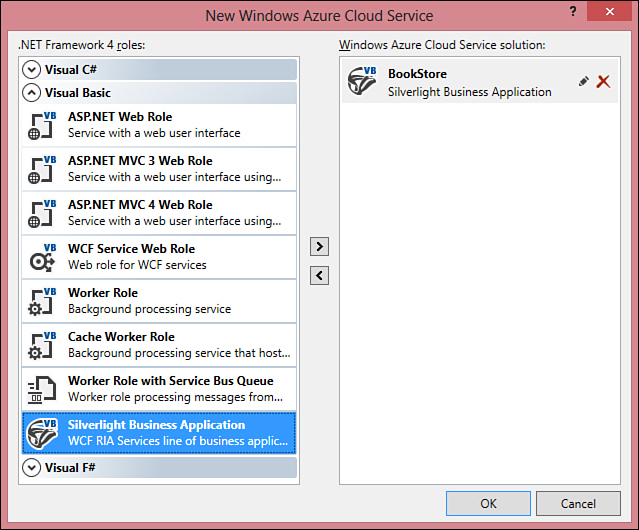
Figure 37.2. Selecting the project type.
Understanding Web Roles and Web Configuration
A key concept in Windows Azure development is the role, which is typically a single component running in the Azure environment and built in managed code. Roles can be of two types: web roles and worker roles. A web role is an ASP.NET web application, like the case of our sample scenario in which a Silverlight application is hosted within an ASP.NET website. As you might remember from Figure 37.2, additional web roles are available for WCF applications. You might instead think of worker roles as services running behind the scenes, like in the case of Windows services, in the cloud. An Azure project can have multiple roles and multiple instances of one role; moreover, you can configure roles as required. When you create new cloud projects, the new solution will contain a web role project (an ASP.NET web project) and a service project where you can configure role properties. To access roles configuration, in Solution Explorer right-click the BookStore.Web role and select Properties. At this point, a special implementation of the My Project designer will pop up. Figure 37.3 shows what you will see on the screen.
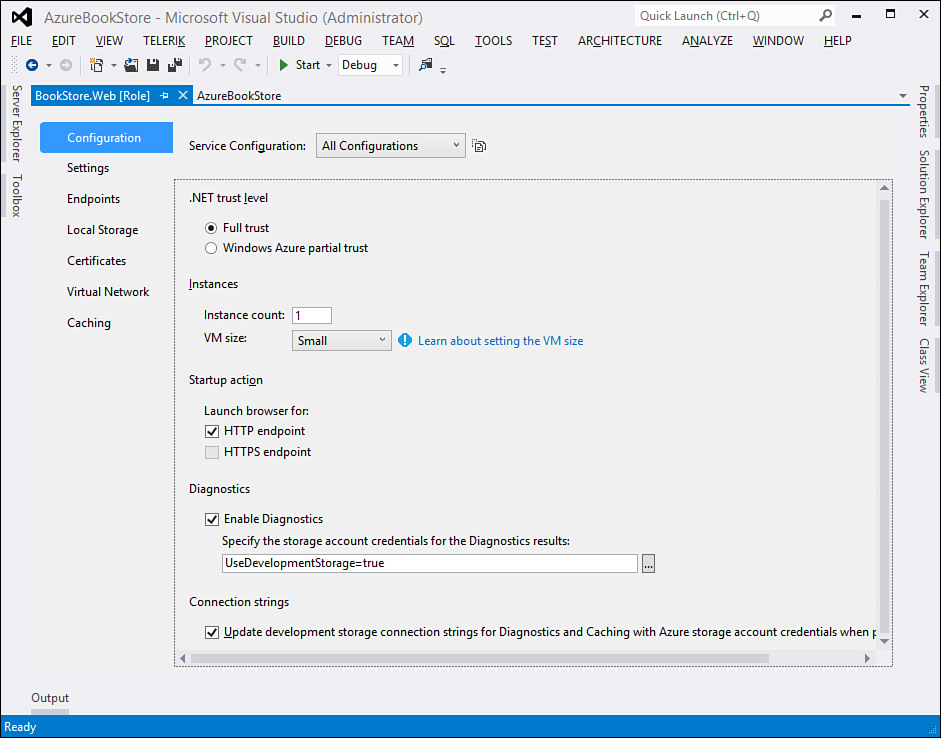
Figure 37.3. Accessing role configuration options.
The Configuration tab enables you to first set the .NET trust level for roles. By default, the trust level is Full Trust. The Windows Azure Partial Trust level has some limitations and denies your role access to some resources, such as the Registry, isolated storage, printing, and OleDb connections. The full restrictions list is available here: http://msdn.microsoft.com/en-us/library/dd573355.aspx. The Instance Count field enables you to set how many instances of the role are permitted, and VM Size enables you to specify the size of the virtual machine hosting your service. The virtual machines’ size and power have changed during the years and will probably evolve as time goes on, so you should take a look at the official website for detailed information: http://www.windowsazure.com/en-us/pricing/calculator/?scenario=virtual-machines
Just remember that a small virtual machine is a good choice if you have an MSDN subscription with Windows Azure benefits included. The Startup action group enables you to specify whether debugging should be launched via an HTTP or HTTPS endpoint (which must be defined in the Endpoints tab). In the Settings tab, you can define settings that you can access via the Windows Azure SDK Runtime API. By default, each role has a DiagnosticsConnectionString that defines whether you need access to the local storage or the online services. In the Endpoints tab, you can define endpoints for your application (you can retrieve endpoints in the Management Portal). Deciding to apply for an HTTPS endpoint also requires a valid SSL certificate. You add certificates to your deployment via the Certificates tab. The Local Storage tab enables you to configure the file system storage resources local for each instance. All the preceding options and settings are reflected into the ServiceConfiguration.cscfg and ServiceDefinition.csdef files that you can see in Solution Explorer and that are XML representations of settings.
Adding Multiple Roles and 64-bit Considerations
You can add multiple web roles and worker roles by right-clicking the Roles folder in Solution Explorer. Another consideration that you need to keep in mind is that Windows Azure is a 64-bit operating system, so take care if you plan to invoke unmanaged code that might fail.
The Certificates tab allows you to configure certificate installation for the instance of the currently selected role; certificates must be uploaded to Windows Azure using the Management Portal. The Virtual Network tab enables you to activate Windows Azure Connect, which enables connecting the role to local computers. Click the appropriate hyperlink to get information about Windows Azure Connect. Finally, the Caching tab enables in-memory caching for multiple instances of the role for faster data access. This is not needed for the current example, and the IDE shows a hyperlink you can click to get further information. The default role for the new project is associated with the ASP.NET project that will actually run the application. You can therefore build your application directly within the web project or add a Silverlight project, as explained in next section.
Building the Silverlight 5 Project
The goal of this chapter is building a Silverlight application capable of showing and editing a list of books within a DataGrid control and providing the ability to read and save data to XML using the isolated storage. Visual Studio 2012 generated a full Silverlight 5 project, so you need to write some code and generate the user interface. Because we use LINQ to XML for listing and saving books, and because this will be accomplished using a DataGrid control, add references to the System.XML.Linq.dll and System.Windows.Controls.Data.dll assemblies. Both assemblies are available in the Extension node of the Reference Manager dialog box, as shown in Figure 37.4.
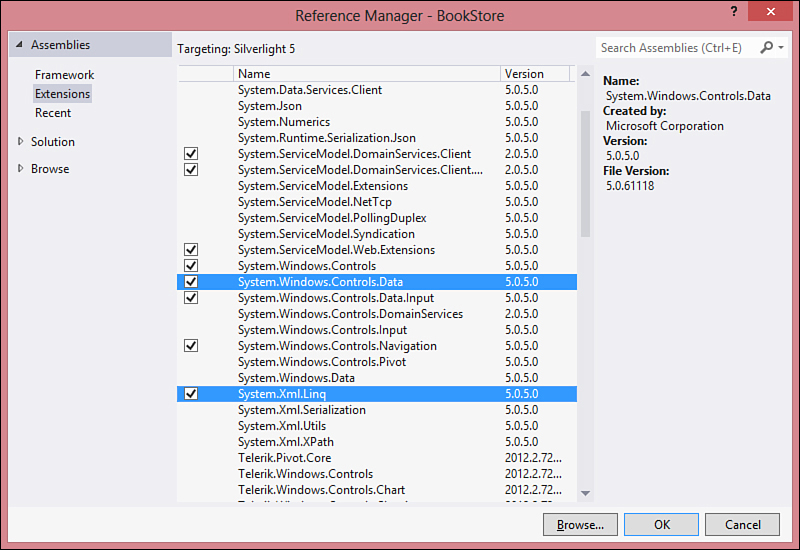
Figure 37.4. Adding references to the Silverlight 5 project.
You now need to implement a Book class representing one book and a BooksCollection class representing a typed collection of books, so add a new code file to the Silverlight project named Book.vb. The code in Listing 37.1 demonstrates this.
Listing 37.1. Implementing Classes for Representing Books
Imports System.Collections.ObjectModel
Public Class Book
Public Property Title As String
Public Property Author As String
Public Property DatePublished As Date
Public Property ISBN As String
End Class
Public Class BooksCollection
Inherits ObservableCollection(Of Book)
Public Sub New(ByVal source As IEnumerable(Of Book))
For Each b As Book In source
Me.Add(b)
Next
End Sub
Public Sub New()
End Sub
End Class
For the sake of clarity, open the Home.xaml page (which is stored in the Views folder) and implement just a DataGrid and a Button for saving data. The following XAML code must replace the Grid definition:
<Grid x:Name="LayoutRoot">
<ScrollViewer x:Name="PageScrollViewer" Style="{StaticResource PageScrollViewerStyle}">
<StackPanel x:Name="ContentStackPanel" Style="{StaticResource ContentStackPanelStyle}">
<TextBlock x:Name="HeaderText" Style="{StaticResource HeaderTextStyle}"
Text="{Binding Strings.HomePageTitle, Source={StaticResource ApplicationResources}}"/>
<Grid Background="Green">
<Grid.RowDefinitions>
<RowDefinition/>
<RowDefinition Height="50"/>
</Grid.RowDefinitions>
<sdk:DataGrid Name="BooksGrid" Grid.Row="0" ItemsSource="{Binding}"
AutoGenerateColumns="True" />
<StackPanel Grid.Row="1" Orientation="Horizontal">
<Button Width="100" Height="40" Margin="5"
Content="Save" Name="SaveButton"/>
</StackPanel>
</Grid>
</StackPanel>
</ScrollViewer>
</Grid>
The DataGrid is defined within the System.Windows.Controls.Data namespace; because of this, you need to add the following XML namespace declaration at page level to use it:
xmlns:sdk="http://schemas.microsoft.com/winfx/2006/xaml/presentation/sdk"
Now it is time to write Visual Basic code. Our goal is reading data from an XML file containing the books’ definitions, which is stored in the Silverlight’s isolated storage. If the file is not found, which is the case of the first run, an empty books collection is defined. Finally, the code provides the capability of saving data to the isolated storage. Listing 37.2 shows all these operations (read comments within code for explanations).
Listing 37.2. Defining Code for Retrieving, Showing, and Saving Books Definitions
Imports System.Windows.Controls
Imports System.Windows.Navigation
Imports System.Xml.Linq
Imports System.IO.IsolatedStorage
Imports System.IO
''' <summary>
''' Home page for the application.
''' </summary>
Partial Public Class Home
Inherits Page
''' <summary>
''' Creates a new <see cref="Home"/> instance.
''' </summary>
Public Sub New()
InitializeComponent()
Me.Title = ApplicationStrings.HomePageTitle
End Sub
''' <summary>
''' Executes when the user navigates to this page.
''' </summary>
Protected Overloads Overrides Sub OnNavigatedTo(ByVal e As NavigationEventArgs)
End Sub
'Declaring a books collection
Private MyBooks As BooksCollection
'Required for understanding if the DataGrid
'is in edit mode
Private isEditing As Boolean = False
'Used to generate data if the data file is not
'found
Private Function CreateData() As BooksCollection
Dim b As New Book With {.ISBN = "0000000"}
Dim bc As New BooksCollection
bc.Add(b)
Return bc
End Function
'Attempts to read the data file from the isolated storage
'If found, with a LINQ to Xml query a new books collection
'is returned. If not found, a new empty collection is
'generated and returned
Private Function GetBooks() As BooksCollection
Try
Dim doc As XDocument
Using store As IsolatedStorageFile = IsolatedStorageFile.
GetUserStoreForApplication
Dim st As IsolatedStorageFileStream = _
store.OpenFile("Books.xml", FileMode.Open)
doc = XDocument.Load(st)
st.Close()
End Using
Dim query = From pbook In doc...<Book>
Select New Book With {.Author = pbook.@Author,
.Title = pbook.@Title,
.DatePublished = Date.
Parse(pbook.@DatePublished),
.ISBN = pbook.@ISBN
}
Return New BooksCollection(query)
Catch ex As Exception
Return CreateData()
End Try
End Function
'Saves data to the isolated storage. The Xml data is generated
'with LINQ to Xml embedded-expressions
Private Sub SaveButton_Click(ByVal sender As System.Object,
ByVal e As System.Windows.
RoutedEventArgs) Handles SaveButton.Click
Dim data = <?xml version="1.0" encoding="utf-8"?>
<Books>
<%= From b In MyBooks
Select <Book Author=<%= b.Author %>
Title=<%= b.Title %>
ISBN=<%= b.ISBN %>
DatePublished=<%= b.DatePublished.
ToString %>/>
%>
</Books>
Using store As IsolatedStorageFile = IsolatedStorageFile.
GetUserStoreForApplication
Dim st As IsolatedStorageFileStream = _
store.OpenFile("Books.xml", FileMode.Create)
data.Save(st)
st.Close()
End Using
End Sub
Private Sub Home_Loaded(sender As Object, e As RoutedEventArgs) Handles Me.Loaded
'Populates data
Me.MyBooks = GetBooks()
'Sets data-binding
Me.DataContext = Me.MyBooks
End Sub
Private Sub BooksGrid_BeginningEdit(ByVal sender As Object,
ByVal e As System.Windows.Controls.
DataGridBeginningEditEventArgs) _
Handles BooksGrid.BeginningEdit
isEditing = True
End Sub
'Allows DataGrid editing
Private Sub BooksGrid_KeyDown(ByVal sender As Object,
ByVal e As System.Windows.Input.
KeyEventArgs) Handles BooksGrid.KeyDown
If isEditing = False Then
'If the user press Delete, removes the selected item
If e.Key = Key.Delete Then
If Me.BooksGrid.SelectedItem IsNot Nothing Then
Me.MyBooks.Remove(CType(Me.BooksGrid.SelectedItem, Book))
End If
'If the user press Insert, adds a new empty item to the collection
ElseIf e.Key = Key.Insert Then
Dim b As New Book With {.DatePublished = Today}
Dim index As Integer = MyBooks.IndexOf(CType(Me.BooksGrid.
SelectedItem, Book))
MyBooks.Insert(index + 1, b)
BooksGrid.SelectedIndex = index
BooksGrid.BeginEdit()
End If
End If
End Sub
Private Sub BooksGrid_RowEditEnding(ByVal sender As Object,
ByVal e As System.Windows.Controls.
DataGridRowEditEndingEventArgs) _
Handles BooksGrid.RowEditEnding
isEditing = False
End Sub
End Class
Our application is now ready to be started. One of the biggest benefits of the Windows Azure SDK tools is that you can test your application locally before you deploy it to the cloud. This is possible because of the Windows Azure debugging environment that is a full-featured environment locally reproducing the cloud system.
Testing the Application Locally
When you run an Azure application locally for the first time, the environment needs to be initialized. Fortunately, Visual Studio and the Windows Azure SDK will do the work for you. When you press F5, the Windows Azure debugging environment is started and a local developer account is created to replicate on your development machine what you can activate on the online services. After the build process completes, you can see the application correctly running in your web browser. Figure 37.5 demonstrates this.
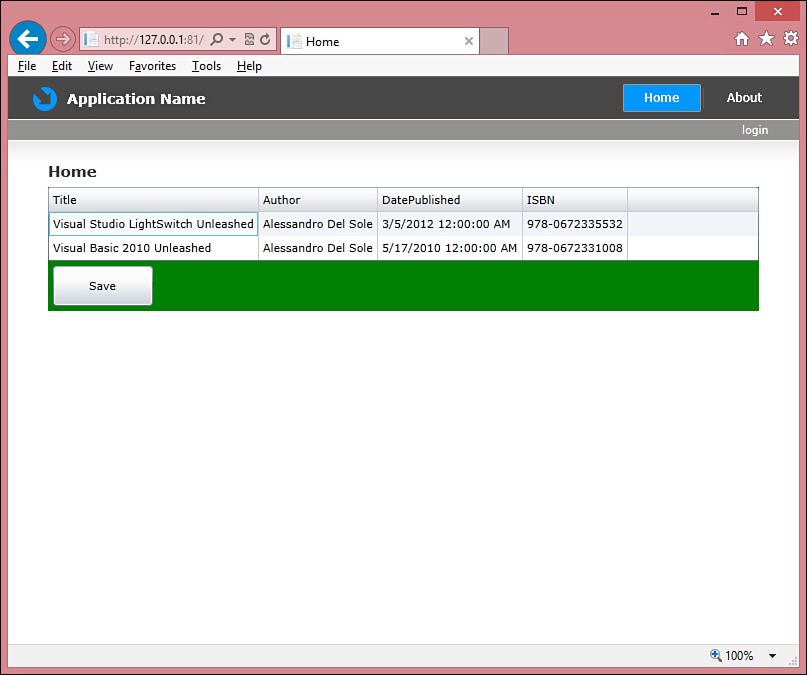
Figure 37.5. The application running locally.
You can now try to add or delete other books and finally save changes. So we reached our objective locally. The next step should be deploying the application to the cloud, but before doing this, here’s some brief information about the Debugging Environment tools. The Debugging Environment is essentially composed of two main tools: the Storage Emulator, which is used for locally storing blobs, tables, and queues, and the Compute Emulator, which is useful for monitoring running services. This environment provides a tray bar icon that you can right-click to access both tools. Figure 37.6 displays how the Compute Emulator gives information about the running application.
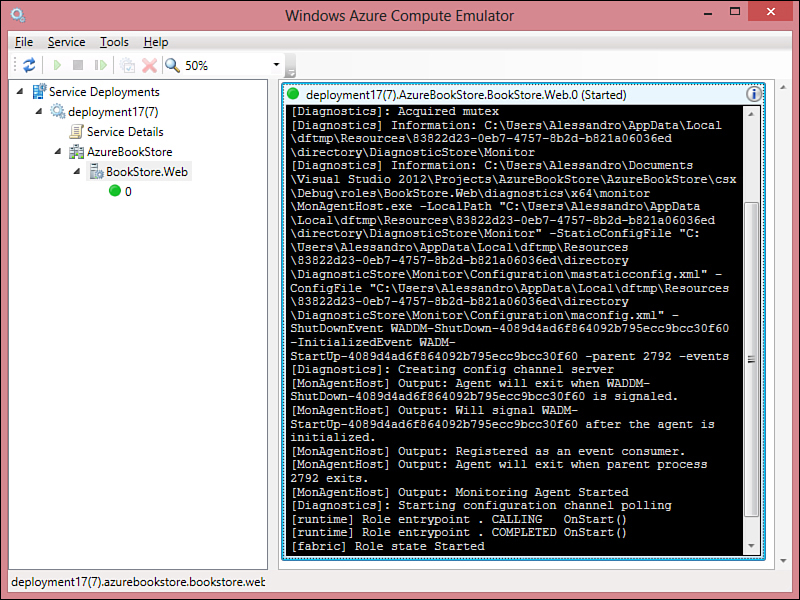
Figure 37.6. The Compute Emulator shows services information.
It is worth mentioning that the Compute Emulator can show information about multiple running Azure services. Figure 37.7 instead shows the Storage Emulator UI. Here you can just enable or disable endpoints for blobs, tables, and queues, but the suggestion is to leave the default settings unchanged.
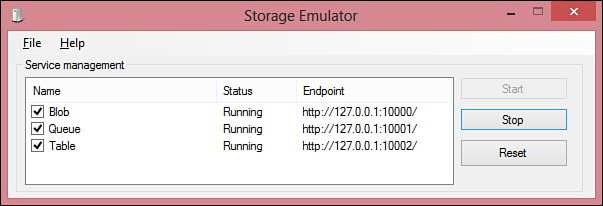
Figure 37.7. The Storage Emulator user interface.
Because the application runs correctly, we can now deploy it to the cloud environment of Windows Azure.
Deploying Applications to Windows Azure
Deploying applications to Windows Azure has been dramatically simplified in Visual Studio 2012 so that the IDE will do most of the work for you, avoiding several manual operations in the Management Portal as was required in the past. To deploy an application, you have to right-click the Cloud project in Solution Explorer (in our example it is AzureBookStore) and then click Publish in the pop-up menu. This will launch the Publish Windows Azure Application wizard, where you must enter both subscription and application settings. In the first dialog box, click Sign in to download credentials, so that Visual Studio will open the Windows Azure website, allowing you to download your subscription information without the need of entering such information manually. You will be asked to enter your Windows Live ID and your password; then the website will automatically invite you to download a file containing settings of your subscription. Figure 37.8 shows things at this point.
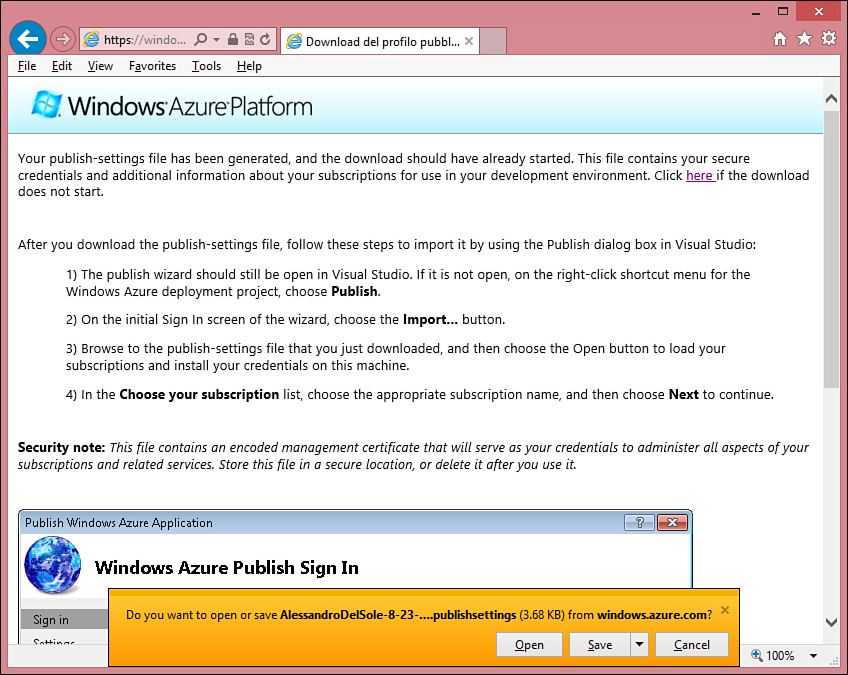
Figure 37.8. Downloading subscription information from Windows Azure.
At this point, go back to Visual Studio 2012 and click Import. Then select the downloaded settings file. Figure 37.9 shows the dialog box, demonstrating how subscription settings have been imported.
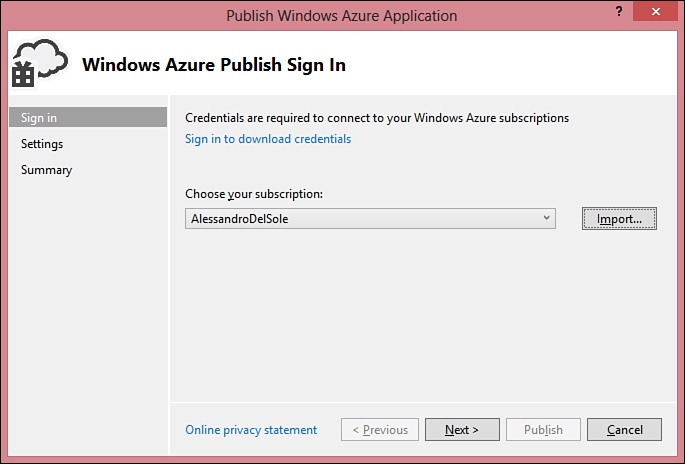
Figure 37.9. Settings for your Windows Azure subscription have been automatically imported.
If you did not import your settings in this way, you had to create a new profile manually, entering all the subscription information such as the subscription ID, which would probably involve opening the Management Portal and, consequently, wasting time. Visual Studio 2012 enables you to manage multiple subscriptions by selecting the Manage item in the Choose Your Subscription combo box. Click Next to access the Settings tab. Here you have to specify settings for your cloud service, which is the application. If this is the first time you deploy an application to Azure, you will have to create a new service. Expand the Cloud Service combo box and select Create New. In the Create Windows Azure Services dialog box, enter a name for your service and select the nearest location to you (in my case I chose West Europe because I live in Italy), as shown in Figure 37.10.
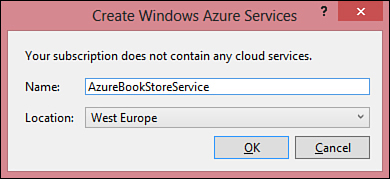
Figure 37.10. Creating a new cloud service.
When you click OK, the Common Settings tab shows basic information about the deployment. In this case you should change the value of the Environment combo box from Production to Staging. The Staging deployment is intended for configuration and testing purposes. This change is useful to show how to use the Management Portal because otherwise you could publish the application to production without any interaction with the portal (which is very different from the past). Figure 37.11 shows how Common Settings appear now.
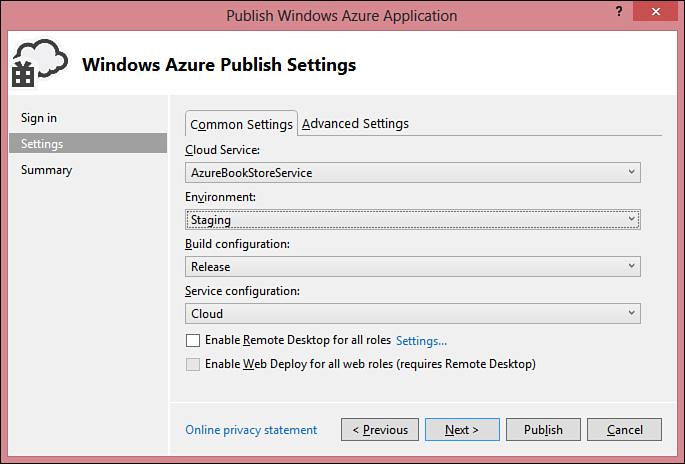
Figure 37.11. Common Settings for the current cloud service.
You can also make a local deployment by replacing the value of the Service configuration combo box from Cloud to Local, and you can enable remote desktop connections for roles in the solution. The Advanced Settings tab lets you enable a number of interesting features (see Figure 37.12).
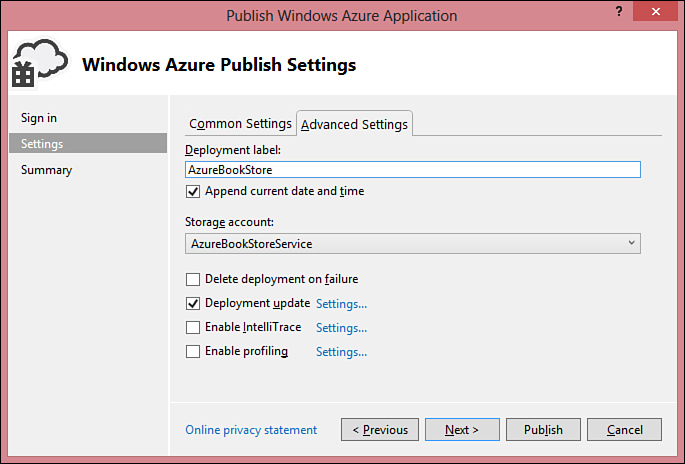
Figure 37.12. Advanced Settings for the current cloud project.
The Deployment Label is a name used to identify the deployment among all the deployments you have in your subscription. When you deploy an application to Azure, Visual Studio 2012 automatically generates a new storage account, which is necessary to host application files. If you have existing storage accounts, you can choose one of them instead of generating a new one. You can specify the way your application will be updated (one instance at a time or all instances); you can also enable IntelliTrace and profiling tools. Both IntelliTrace and the Profiler are discussed in Chapter 55, “Advanced Analysis Tools.” If you click Next you go to the Summary page, which is just a summary of the deployment settings, as represented in Figure 37.13.
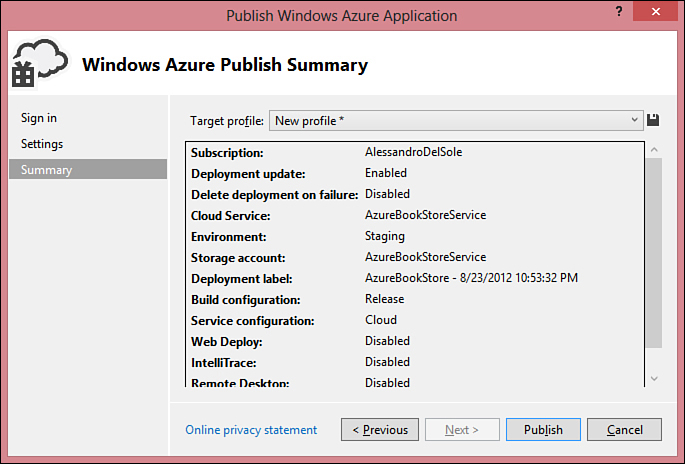
Figure 37.13. Deployment summary information.
When ready, click Publish. Visual Studio 2012 now starts deploying your Visual Basic application to Windows Azure. The duration of the process might vary depending on the strength of your Internet connection and on the size of your application. The Windows Azure Activity Log tool window will keep you informed on the deployment progress. When this task is completed, a tool window highlights its status as Completed and shows information, including the website URL. Figure 37.14 provides an example based on the current project.
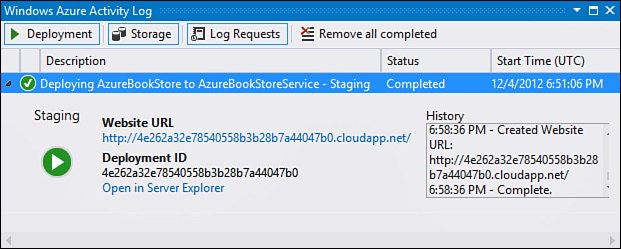
Figure 37.14. The Windows Azure Activity Log window shows information on the deployment progress.
Remember that you are in a staging environment, so the URL you see is temporary; however, you can use it to ensure that the application works correctly (and remember to add the name of the BookStoreTestPage.aspx at the end of the URL). Assuming you have checked that your application is working well, you can move it to the Production state. You have two ways for moving an application from Staging to Production:
• Republish the application from Visual Studio, changing the environment from Staging to Production in the Settings dialog box.
• From within the Windows Azure Management Portal.
Although with specific regard to the current simple example, the first way could be easier; I want instead to introduce the Management Portal.
Introducing the Windows Azure Management Portal
A New Management Portal
In this chapter we cover the new version of the Management Portal, which is actually still a preview but that has been built with HTML5. If you worked with previous recent versions of the portal, you know they were Silverlight-based applications. The reason we cover the preview of the new portal is that it will be available in the future with full features and it can be accessed from any device (due to HTML portability).
That said, open your web browser and launch the portal by typing the following address: https://manage.windowsazure.com. The first thing you see when you access the portal is the full list of cloud services, storage accounts, and SQL databases running inside your subscription. Figure 37.15 shows an example based on my subscription, where you can see how the current sample application is running (sensitive information has been removed for privacy reasons in this figure and the next ones).
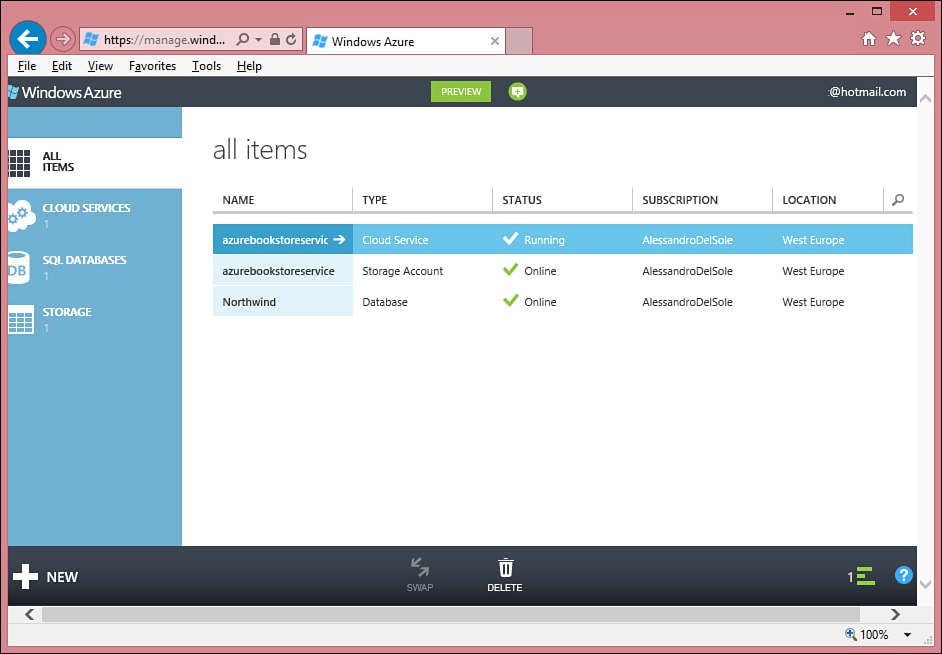
Figure 37.15. List of running items in the Windows Azure subscription.
In whatever page of the management portal you are, you can promote an application from staging to deployment by clicking the Swap button at the bottom of the page. When you click this button, Windows Azure will ask your confirmation, providing some information about what it is going to do, as represented in Figure 37.16.

Figure 37.16. Promoting applications from staging to production.
Click Yes and wait for the process to complete. A specific page will be shown at the end of the process. You can now launch the application using the URL generated for you. Remember that, if you do not provide a Default.aspx page in your web project (as in the current case), you will have to supply the full URL including the page name. This means that the application can be launched with the following URL: http://azurebookstoreservices.cloudapp.net/BookStoreTestPage.aspx.
This will show the application running in your web browser and working as expected, as demonstrated in Figure 37.17.
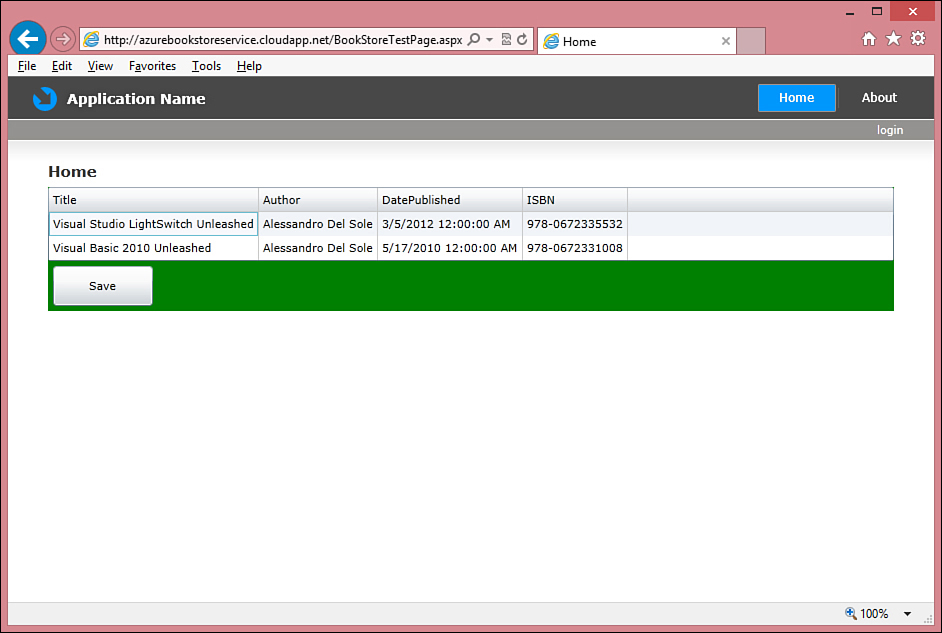
Figure 37.17. The sample application finally running in the cloud.
Replacing the Default.Aspx Page
If you want to make your Silverlight application start automatically, in Solution Explorer rename the test page for Silverlight (in our example it is named BookStoreTestPage.Aspx) into Default.Aspx and set it as the start page.
With a few steps, you successfully published a web application to Windows Azure making it reachable from the Internet. If you plan on building datacentric applications requiring SQL Server database, be sure to visit the Windows Azure Developer Center where you can find lots of information about creating and consuming databases on the cloud. You can find the portal here: http://www.windowsazure.com/en-us/develop/overview/. After the application is running in production, the management portal offers a number of useful tools. For instance, you can use the Monitor tab to see the CPU usage percentage (see Figure 37.18) or the Dashboard tab to see more complex usage metrics, enable Team Foundation Server on the cloud, and get information on your cloud application.
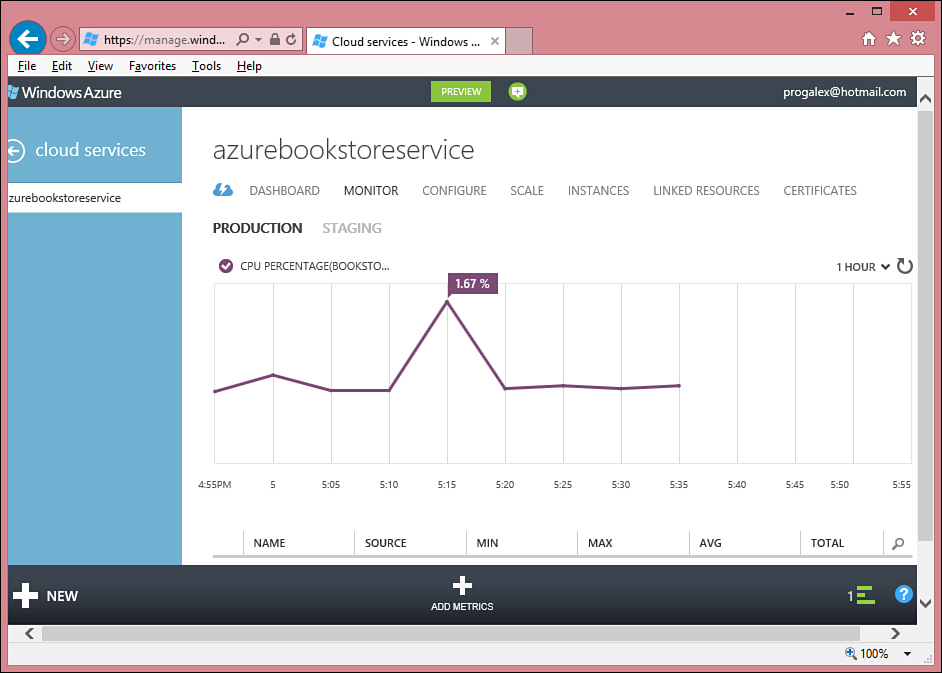
Figure 37.18. Understanding the virtual machine’s CPU usage.
You can also easily configure the number of instances for your roles and the virtual machine size through the Instances tab, as shown in Figure 37.19. Be particularly careful when making changes in this place: Remember that increasing the number of instances and the size of your virtual machine can also change the costs of your services.
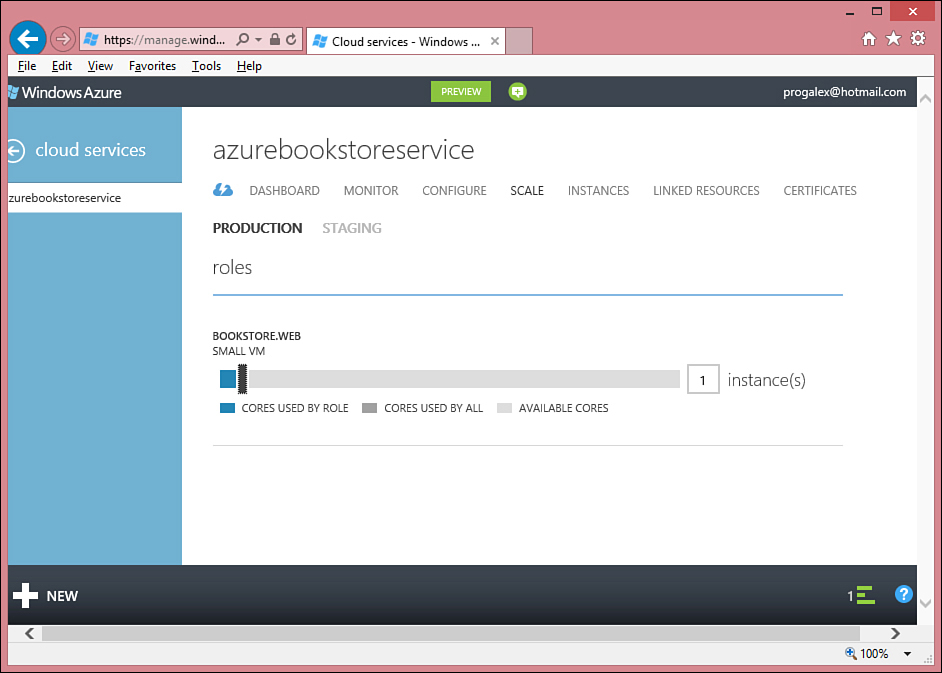
Figure 37.19. Configuring the role instances and virtual machine size.
The Management Portal offers a huge number of useful tools to configure and maintain your applications running on Windows Azure, but you got a good overview of what you can do without having a physical server, a networking infrastructure, and personnel working for maintenance of an on-premise solution.
Delete your Test Cloud Services!
Do not forget to completely delete cloud services, databases, and storage accounts that you no longer use to avoid the risk of paying extra money. Also, remember that you will still be charged for services that are stopped. The only way to avoid the risk of paying extra money is by deleting services.
Summary
The Windows Azure platform is the cloud computing platform by Microsoft and includes several services such as the Windows Azure operating system, a SQL database, websites, and application building blocks. Windows Azure is a 64-bit operating system enabling web applications to be hosted and running in a cloud environment. To develop applications for the cloud, you use Visual Studio 2012, which must be enabled by installing the appropriate tools. After you install these tools and register for the Windows Azure services, you can begin developing and deploying applications. You can create ASP.NET web applications or Silverlight applications that can be deployed to Azure. You can test your applications locally before deployment, due to the presence of the Windows Azure Debugging Environment that includes tools for locally running applications with the same environment that is on the cloud. This tooling is installed together with the Windows Azure SDK for .NET and Visual Studio 2012. To publish a web application to the Azure platform, you use Visual Studio instrumentation; then you can still use the IDE or the Windows Azure Management Portal to edit, configure, and maintain your applications and data on the cloud.