
Chapter 51. Setup and Deployment Projects with InstallShield for Visual Studio
In This Chapter
• Configuring the Setup Project
• Building and Deploying the Windows Installer Package
When you deliver your application to your customers, you do not tell them it supports the XCopy deployment and you do not provide technical explanations on how .NET applications work. This is because modern applications require a convenient setup procedure that can install them in a professional fashion, put files in the appropriate places, create shortcuts in the Windows user interface, check for system requirements, and perform components registration. The users are just required to select the target folder and what options in your applications they want to be installed on their machine. Creating a user-friendly setup procedure is something that increases professionalism and gives customers the first good impression of your work. The .NET-based applications, like the ones you create with Visual Basic 2012, can be deployed in several modes. One of these is taking advantage of the Windows Installer engine that provides great flexibility over installation requirements and takes the maximum from integration with the operating system. Visual Studio 2012 breaks with the past, discontinuing the Setup & Deployment projects that were available until version 2010 and replacing these by introducing into the development environment a new tool for creating setup projects based on Windows Installer—InstallShield Limited Edition (LE). This has an important consequence—existing Setup & Deployment projects built with previous editions of Visual Studio are no longer supported and cannot be opened in Visual Studio 2012. Fortunately, InstallShield LE has an option that allows converting old projects into InstallShield projects. In this chapter, you will learn how to create a setup project for Windows Installer using InstallShield and Visual Studio 2012 so you can deploy your Visual Basic applications in the most professional way possible. Even though you now use InstallShield, this still relies on the Windows Installer engine and generates MSI packages. For this reason, an overview of Windows Installer can be useful, especially if you do not have technical experience with an installation engine.
About Windows 8 Store Apps
Windows 8 Store Apps have their own specific mechanism for installation, so they cannot be installed with Windows Installer or ClickOnce.
Windows Installer Overview
Windows Installer is the Microsoft technology for deploying applications. This technology has been part of the Windows operating system for many years and can be considered as an engine for installing .msi packages. An .msi package, or installer package, contains all files to be installed with your application and other important information including shortcuts, icons, license agreements, other redistributable packages, and key/values to be written to the Windows Registry.
Windows Installer is the most powerful technology for deploying .NET applications with Visual Studio 2012. This is because Windows Installer has few limitations, whereas it brings many benefits. Windows Installer makes it difficult to provide updates, so if you plan to release frequent updates for your applications, you should consider ClickOnce, which is discussed in the next chapter. You should choose Windows Installer as the deployment system for your application if you meet one or more of the following requirements:
• Adding values to the Windows Registry
• Customizing installation folders
• Installing assemblies to the Global Assembly Cache or installing and registering COM components
• Installing Windows services and peripheral drivers
• Executing custom actions and specifying launch conditions
• Managing ODBC components
• Creating custom shortcuts in the Windows user interface
• Elevated permissions and deeper interaction with the user
In scenarios different from the ones listed, you might consider ClickOnce. Visual Studio 2012 is the perfect environment for creating projects that can build Windows Installer packages that install your applications on target machines the most appropriate way. In the next section, you can see how to accomplish this.
Introducing InstallShield
InstallShield is software for creating Windows Installer packages. It has been very popular for many years because it has been the first fully-featured environment for building complete MSI packages via a very powerful instrumentation. Other tools existed in the past for creating Windows Installer packages, but InstallShield has always been a step ahead. InstallShield is produced by Flexera (www.flexera.com) and is available both as a standalone environment and as an add-on for Visual Studio 2012. In fact, this is not the first time that InstallShield enters Visual Studio’s life. InstallShield LE existed for Visual Studio 2010, but was just an alternative to other deployment technologies. In Visual Studio 2012, however, it is the only way for generating packages for Windows Installer.
Obtaining Your Copy of InstallShield LE
InstallShield is not available by default in Visual Studio 2012, so you need to download it separately. The easiest way to request InstallShield is going in Visual Studio and select File, New Project. When the New Project dialog box appears, expand the Other Project Types node and select Setup and Deployment. At this point, you will see an item called Enable InstallShield Limited Edition, as demonstrated in Figure 51.1.
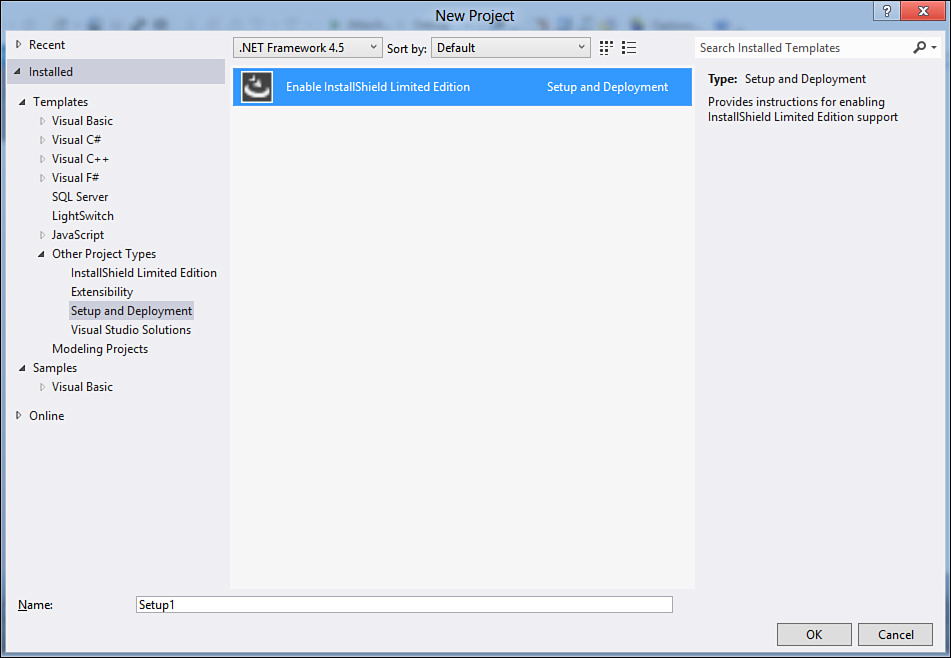
Figure 51.1. Enabling InstallShield LE.
At this point, an HTML document already residing on your machine will open. Follow the instructions to download a copy of InstallShield LE and store the activation key that is sent to you via email. This is important for activating InstallShield at the first project. Once you have downloaded your copy, close Visual Studio 2012 and launch the installation of InstallShield. When the installation completes, restart Visual Studio 2012.
Creating a Setup Project
The goal of this chapter is to demonstrate how you create a setup project for a Windows client application. First, create a new WPF project with Visual Basic and name it DeploymentDemo. This project just serves as the demo application to be deployed. When the new project is ready, right-click the solution name in Solution Explorer and select Add, New Project. In the New Project dialog box, select the Other Project Types, Setup and Deployment, InstallShield Limited Edition templates subfolder and select the InstalShield Limited Edition Project template, as shown in Figure 51.2. Name the new project SetupExample and click OK.
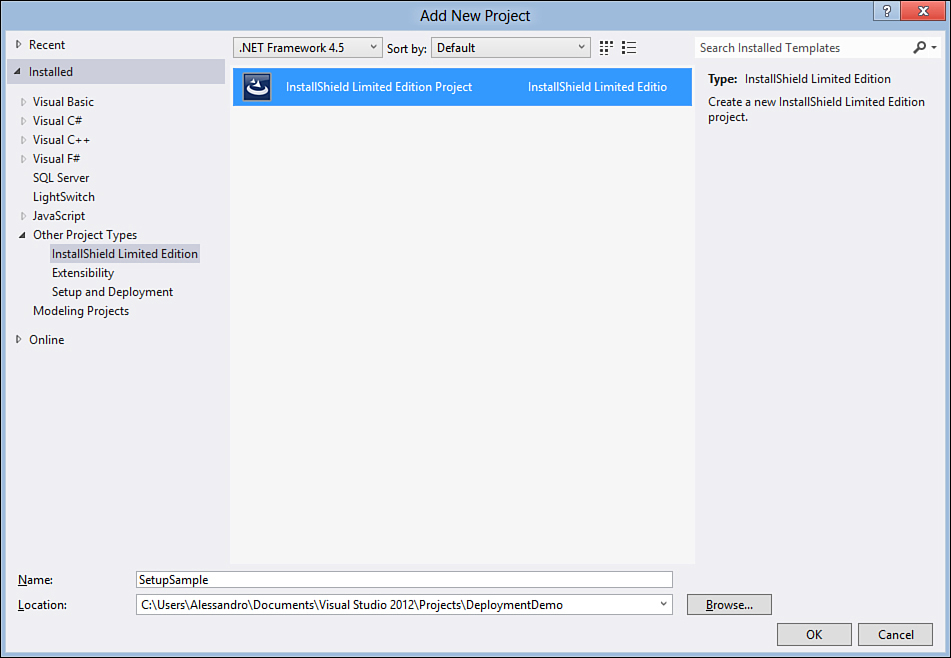
Figure 51.2. Adding a new setup project to the solution.
When you click OK, Visual Studio generates a new InstallShield project. Notice that during the creation of the very first project you will be prompted to enter the activation code you received via email. When the project is ready, you will see the InstallShield Project Assistant, which is where you start creating your setup package (see Figure 51.3).
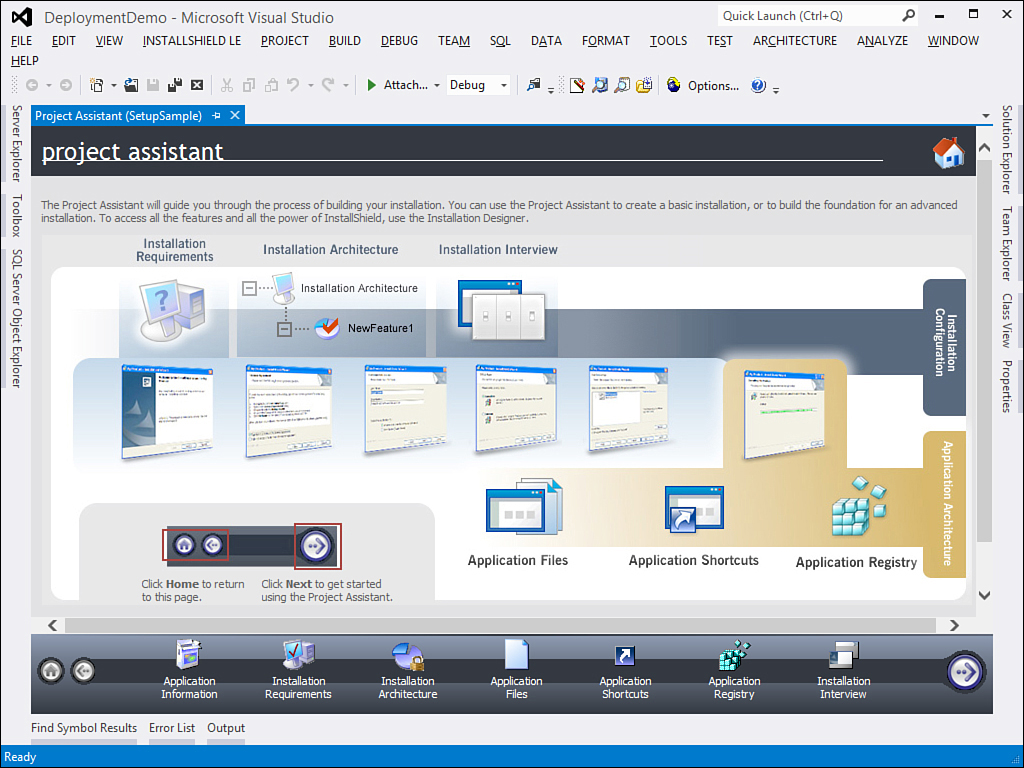
Figure 51.3. The InstallShield’s Project Assistant.
Availability of Certain Features
If you look at Solution Explorer, you will see that the InstallShield project offers a number of shortcuts and features. Not all of them are available in the Limited Edition for Visual Studio 2012. So we will explain how to build a setup project by using the Project Assistant instead of selecting features in Solution Explorer because this might lead to confusion.
At the bottom of the Project Assistant you can find a toolbar that provides a number of shortcuts you should follow from the left to the right, so you can start from supplying all the required information and finish with the package generation process. Now you will get an overview of all the available shortcuts to create a sample MSI package for the current project.
Application Information
The Application Information group allows specifying general information for the installation package such as the software’s producer name, application version, producer’s website. You can specify a custom icon for the installer by clicking the Browse button. Figure 51.4 shows an example.
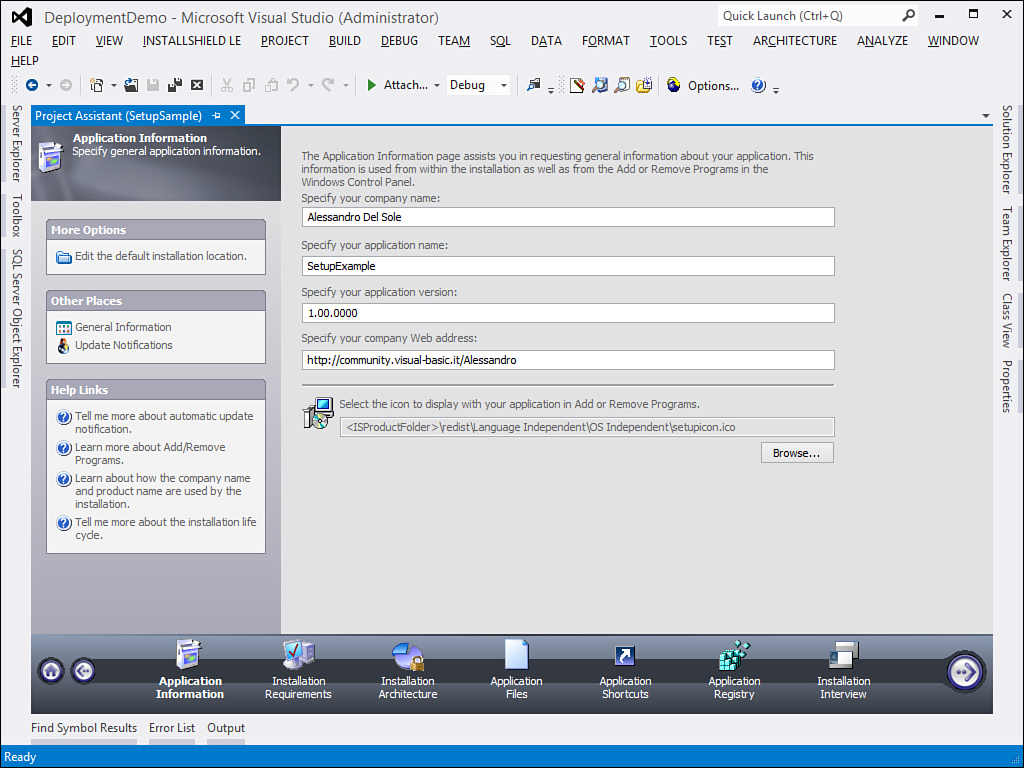
Figure 51.4. Specifying general application information for the package.
You can change the target directory for the installed application. The default is set based on the company name and application name under the form of C:Program FilesCompanyNameApplicationName. You can change the target directory by selecting the Edit the default installation location hyperlink on the left side of the Project Assistant. InstallShield assigns the target directory value to a variable called INSTALLDIR and is used by the Windows Installer engine to determine the target folder. After setting the Application Information, it is time to set prerequisites.
Installation Requirements
Installation Requirements include the specification of the Windows operating system that the application is going to target and those packages or runtime components that must be installed together with the application so it correctly works. As you can see from Figure 51.5, the Installation Requirement group is divided into two parts. The first part allows specifying the target operating systems, whereas the second part (at the bottom) allows specifying prerequisites like specific versions of the .NET Framework or other components (for example, Adobe Reader, SQL Server, and so on). The .NET Framework 4.5 is included by default and it is not available in the list.
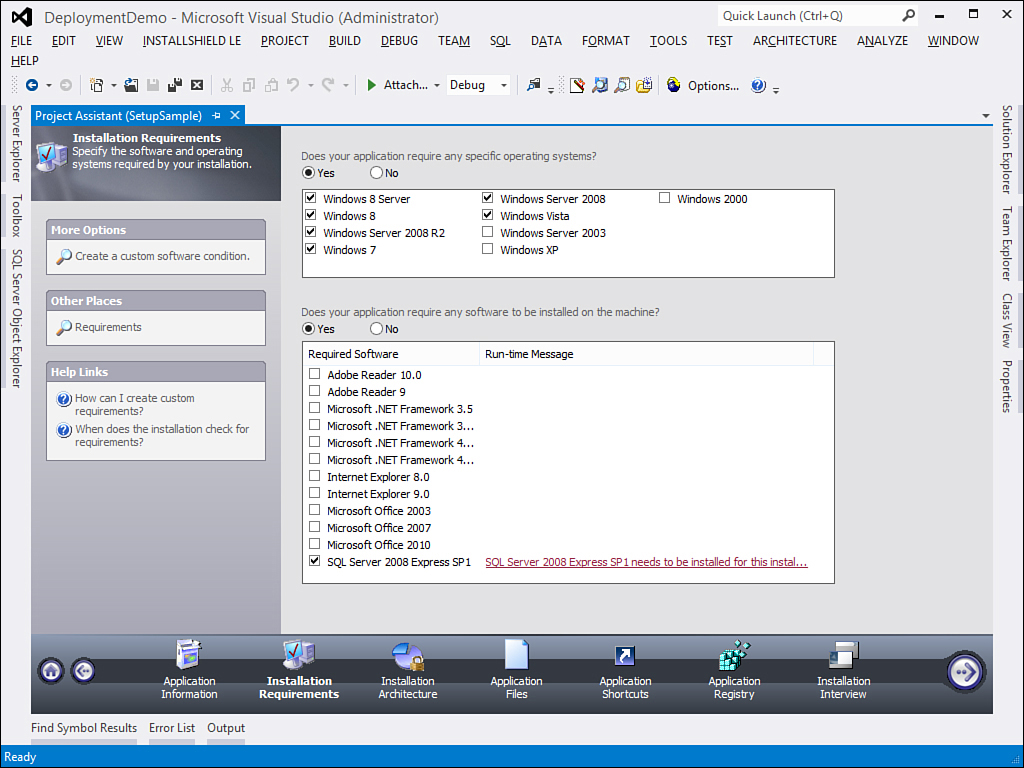
Figure 51.5. Configuring Installation Requirements.
Remember that the .NET Framework 4.5 is not supported on Windows 2000, Windows XP, and Windows Server 2003 so unselect these operating systems if you are deploying applications based on version 4.5 of .NET. Regarding runtime components and prerequisites, you can configure additional options for every single component. You can do this by clicking the Requirements shortcut on the left. This will open the Requirements designer where you can specify hardware requirements and customize installation messages. Figure 51.6 shows the Requirements designer and demonstrates an example about SQL Server 2008 R2. You can click the Edit the Message button to customize the text message that will show if a prerequisite is not found on the target machine.
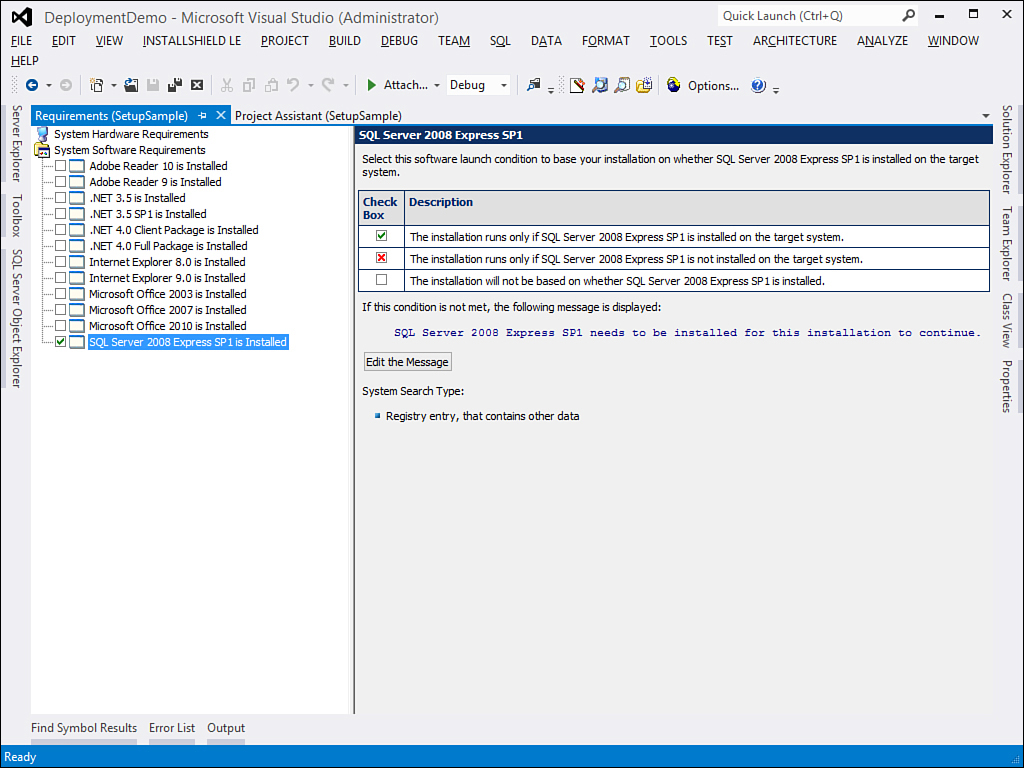
Figure 51.6. The Requirements designer.
When you click the Edit the Message button, the Text and Message designer opens. There you will be able to customize predefined values that are stored inside tables of the MSI package. You can finally create a custom software condition, by clicking the same-named shortcut on the left side of the Project Assistant. A custom software condition allows proceeding with the installation only if the specified item is found on the target machine. The installer can search for files, folders, registry keys, and INI file values. Clicking the Custom Software Condition shortcut will launch the System Search Wizard, an easy-to-use tool where you can specify what item will be searched in a convenient step-by-step procedure. This tool is not discussed in further detail because common scenarios are already predetermined in the default settings. We will move to the Application Files group to specify what files of the application will be deployed onto the target machine. You will see the Installation Architecture group first, but this is not available for InstallShield Limited Edition.
Application Files
You can manage files to be installed with your package in the Application Files group. The first thing you have to add is the primary output of the main project, DeploymentDemo in our case. To accomplish this you click Add Project Outputs and in the Visual Studio Output Selector dialog box select Primary Output, as demonstrated in Figure 51.7.
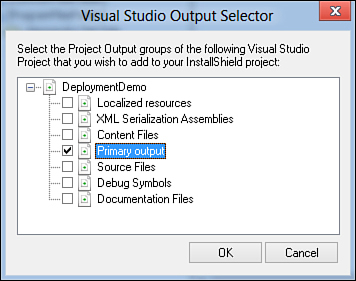
Figure 51.7. Adding the primary output to the installation package.
The primary output represents only the main .exe file, but InstallShield will check for dependencies at build time only in editions higher than the LE so you will have to add referenced assemblies manually with the Limited Edition. After you specify the primary output, this is added to the designer (as shown in Figure 51.8).
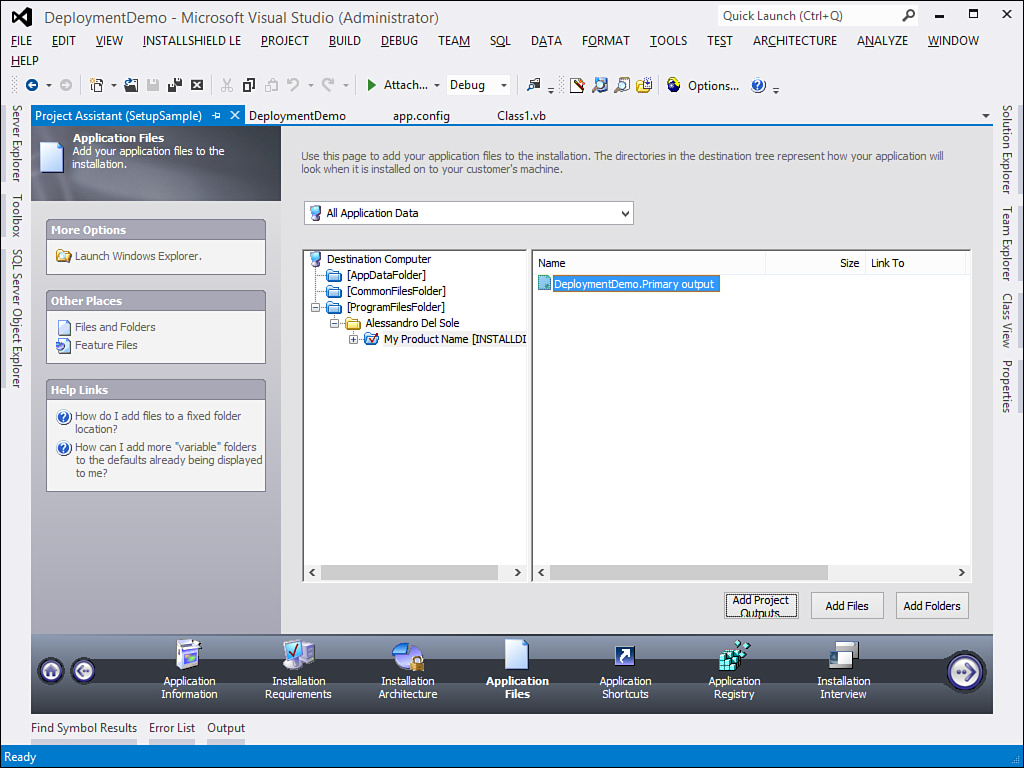
Figure 51.8. The Application Files group shows target folders and files.
You can then click the Add Files button, which can be used to include any other kind of required files into your package (including dependencies). You can use the Add Folder button to include an entire folder tree. It is worth mentioning that in case your solution contains multiple projects, you can choose the primary output for each project in the Visual Studio Output Selector dialog box. This is useful if you have several assemblies you want to deploy. Finally, you are not limited to the executable file but you can include other items like debug symbols, source code files, documentation, etc. Application files are added by default to the target folder under Program Files. If you select a different folder in the directory tree on the left, then selected files will be installed to the newly selected folder. You can add custom and special folders by right-clicking the root item of the directory tree (Destination Computer) and add a new folder. For instance, if you want to add an assembly that will be installed to the Global Assembly Cache you can follow these steps:
1. Right-click Destination Computer.
2. Select Show Predefined Folder, then [GlobalAssemblyCache].
3. Select the GAC folder in the directory tree and add assemblies to this folder.
This action is very useful to install files to specific locations, other than application files to the INSTALLDIR directory.
Dragging Files to the Package
If you click the Files and Folders shortcut on the left side of the Project Assistant, Visual Studio will open the Files and Folders designer that shows a view of files and directories on your computer and in the current solution you can easily drag and release onto the application files list.
Assuming you have added all the required application files, or at least the primary output, it is time to specify shortcuts the user will click to launch your application.
Application Shortcuts
Users launch applications via shortcuts. These are normally available on the Desktop or in the Start menu (except for Windows 8 where they are grouped in the applications list). With InstallShield LE you create shortcuts in the Application Shortcuts group. The first thing to do is to click the New button. When the Browse for a Destination File dialog box is ready, you have to browse the folders structure and locate the file that will be reachable via the new shortcut, such as the main .exe file. Figure 51.9 shows an example of how to create a shortcut for the DeploymentDemo sample application.
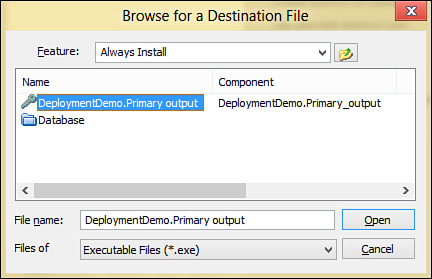
Figure 51.9. Creating a new shortcut.
After you click Open, a new shortcut called Built is available in the Project Assistant. Click Rename to replace the default name with a more meaningful one. You can decide to add a shortcut to the destination Desktop and Start menu (in Windows 8 this will add the shortcut to the applications list). Figure 51.10 shows how the Project Assistant appears at this point, with a renamed shortcut.
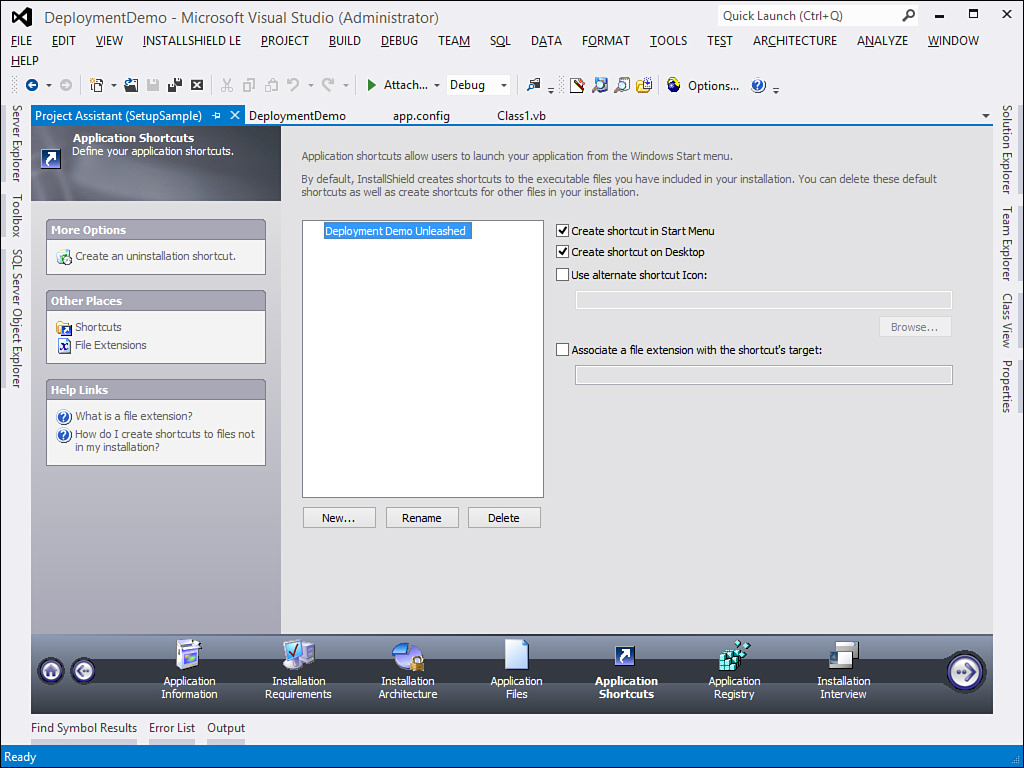
Figure 51.10. Specifying shortcut details.
Repeat the same operation to add multiple shortcuts in case you have different files you want users to be able to reach easily.
Shortcuts Hierarchy
You can click the Shortcuts hyperlink on the left to open the Shortcuts designer where you will be able to get a hierarchical view of shortcuts inside the desktop and the Start menu representations. This is useful to manage shortcuts in a graphical fashion.
You can create a file extension definition so files with the specified extension can be opened or manipulated with your application. Once you have your extension definition, this can be associated to shortcuts. To create an extension definition, follow these steps:
1. Click the File Extensions shortcut on the left.
2. When the designer appears, right-click File Extensions and select New Extension.
3. Specify the extension and then add settings in the properties pane on the right.
Follow the instructions to specify the Command that will be executed by your application when it gets associated to the file extension and in the File property specify your application’s primary output. If you do not specify any command, Open is assumed by default, which means files with the given extension will be always opened with your application (unless the user changes this setting manually). Figure 51.11 shows an example.

Figure 51.11. Creating an extension definition and specifying settings.
You can specify command line arguments (Arguments) and an icon for the extension (Icon). If you now go back to the Shortcuts group in the Project Assistant, you will see that the new extension has been associated to the selected shortcut. The next step is setting registry keys and values.
Application Registry
One of the biggest benefits in deploying applications with Windows Installer is that you can add keys and values to the Windows Registry on the target machine. You create keys, subkeys, and values by selecting the Application Registry in the Project Assistant and then right-click the desired root key. Finally, add the required key or value. Figure 51.12 shows how to accomplish this.
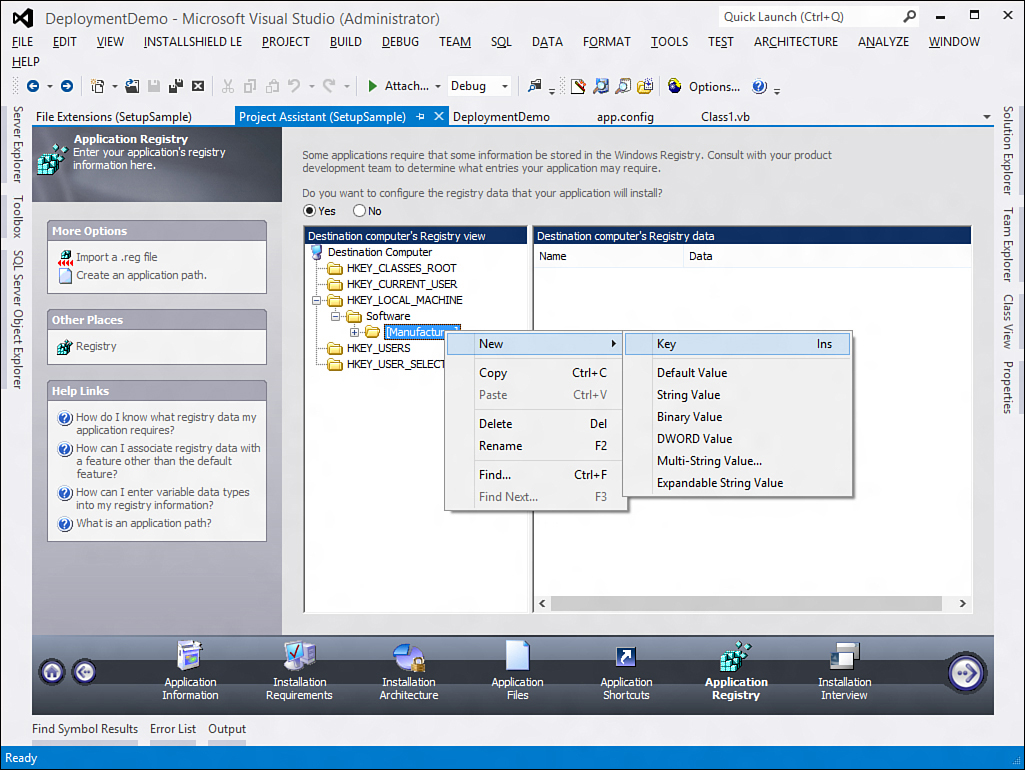
Figure 51.12. Adding keys and values to the target Windows registry.
Values are then visible on the right side of the editor. In this way, you have complete control over the Registry so your application can immediately store information onto the target system. The last part of the Project Assistant is all about the user interface of the installer.
Installation Interview
In the Installation Interview group, you can customize the way users interact with your installation package. Figure 51.13 shows an example.
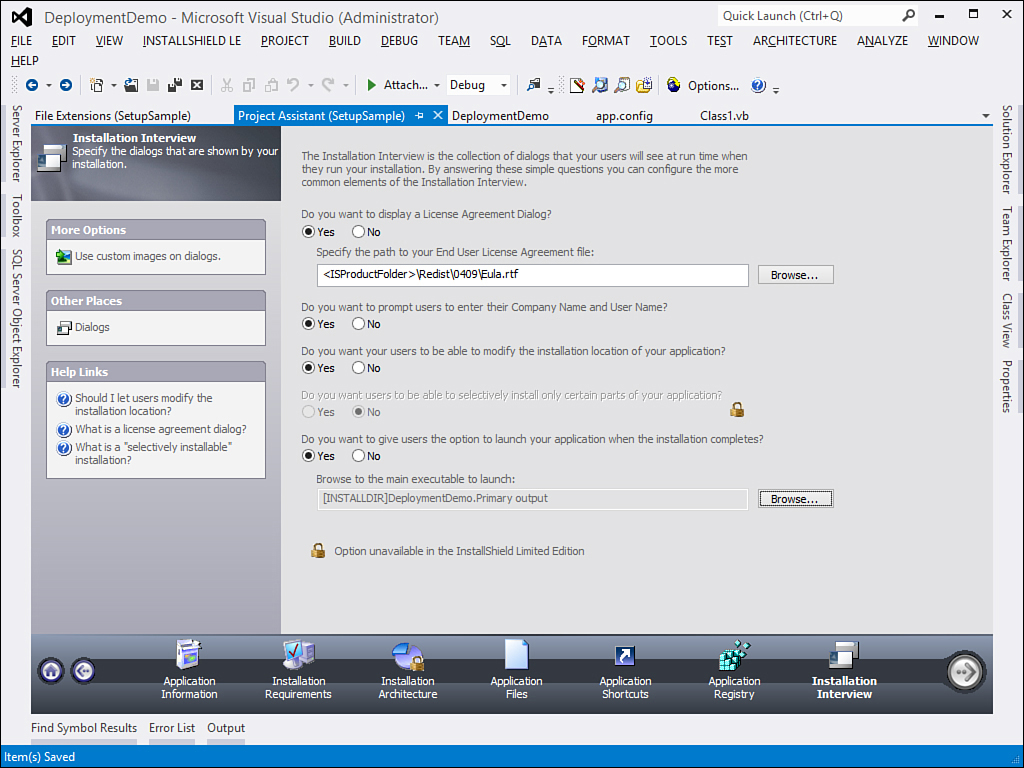
Figure 51.13. Customizing the user interface of the installation package.
You can specify an End User License Agreement under the form of a Rich Text Format (RTF) file. You can allow users to change the default installation folder, ask them to launch the application after the installation completes, and provide an opportunity of entering user and company name. Features adorned with a locker are not available in the Limited Edition. Because InstallShield provides default banners and bitmaps for MSI packages, you can replace these with custom ones that will be shown when the installer runs. To accomplish this, click the Use custom images on dialogs shortcut and supply the necessary bitmaps. In addition, you can specify a different number of dialogs for your package, each providing a different kind of information. You select dialogs for your package by clicking the Dialogs hyperlink. This will launch the Dialogs designer where you can select among the available dialogs and specify properties for each dialog box, as demonstrated in Figure 51.14.
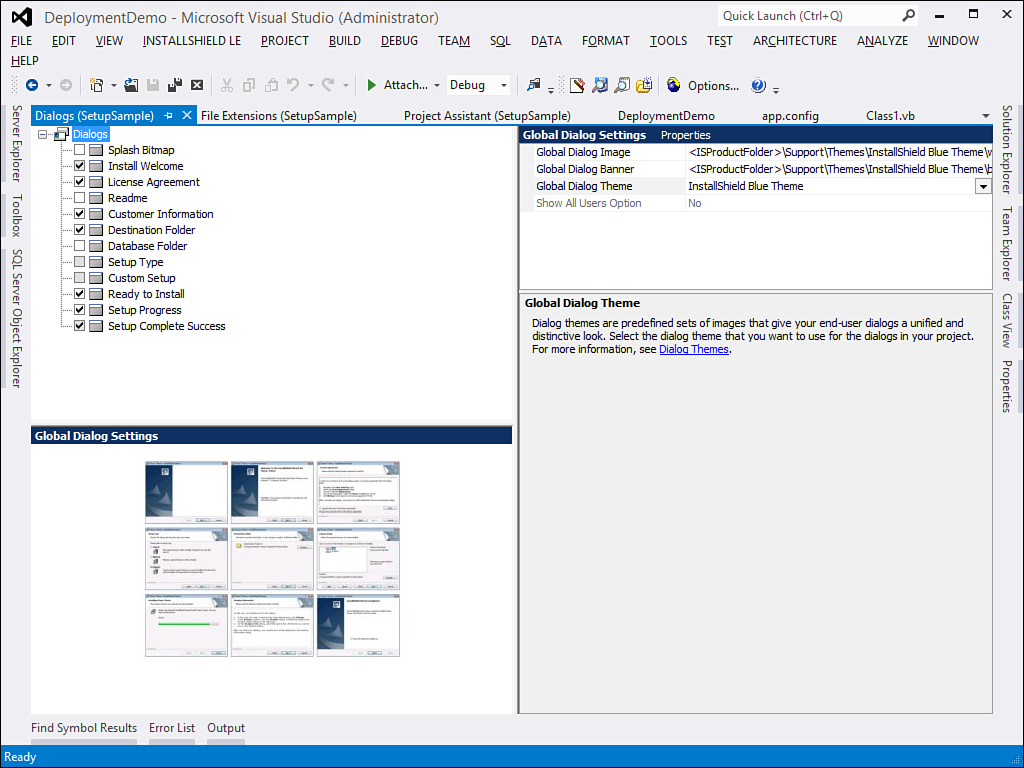
Figure 51.14. Specifying dialogs for the installation packages.
As you can see, you can select a theme and specify banner bitmaps directly from this designer.
Specifying Environment Variables
InstallShield LE allows creating Windows environment variables when the application is installed. To accomplish this, in Solution Explorer double-click the Environment Variables element to open the appropriate designer. When ready, right-click the Environment Variables root item and then select Add Environment Variable. Enter a name for the variable and then specify the value and other self-explanatory properties on the right. See Figure 51.15.
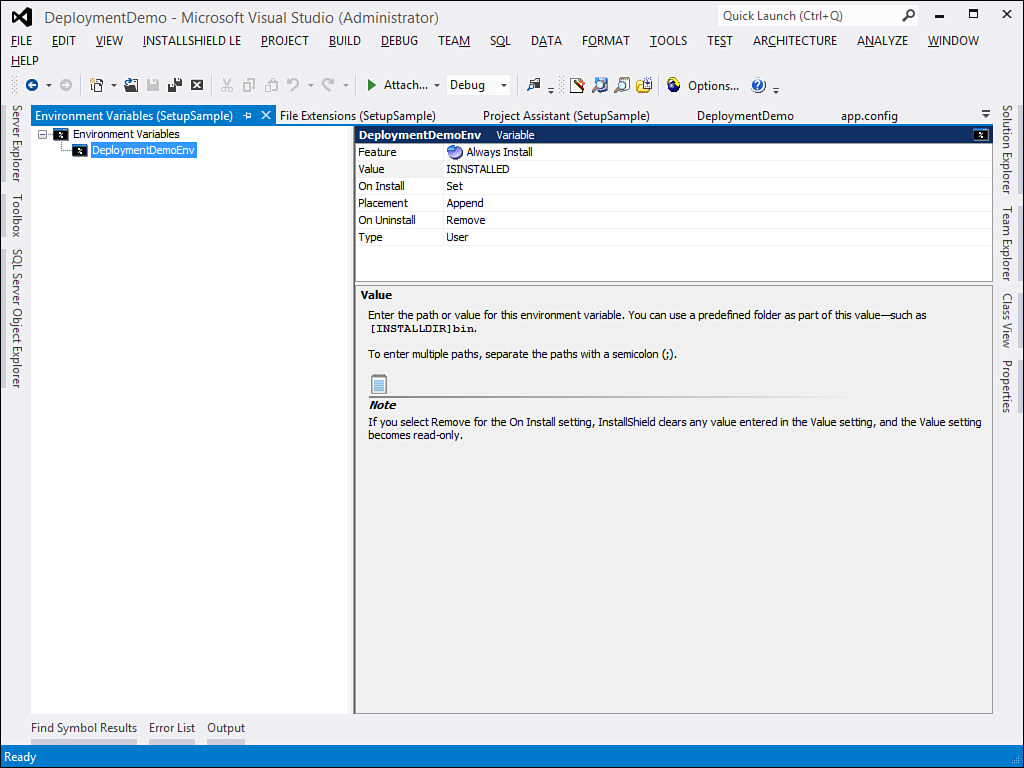
Figure 51.15. Adding environment variables.
Environment variables are typically used when applications need special kinds of interaction with the operating system. You will not need this editor if this is not your case.
Configuring the Setup Project
You can supply additional configuration settings for your Windows Installer package by selecting the General Information item in Solution Explorer. This will open the same-named designer and enable you to set a number of package’s properties. All the available properties affect layout, messages, and target folders when launching the installer. Figure 51.16 shows an example of how you can set properties.

Figure 51.16. Setting additional package properties.
Properties are self-explanatory, but you can click each of them to get a description at the bottom of the window.
Building and Deploying the Windows Installer Package
To create your Windows Installer distributable package, right-click the setup project name in Solution Explorer and select Build. As an alternative, you can choose the appropriate Build command from the Build menu. This generates a bootstrapper named Setup.exe and the Windows Installer package with an .msi extension, which in our case is named SetupExample.msi. The output will be available in the Express project subfolder that contains files you need to distribute to your customers for installing your application. They run the Setup.exe bootstrapper that correctly starts the Windows Installer package.
Customizing Releases
InstallShield can generate different kinds of distribution media, such as a single image, DVD-Rom, CD-Rom. To customize how the installation packages are generated, click the Releases item in Solution Explorer.
Summary
In this chapter, we covered how to create setup projects for Windows Installer in Visual Studio 2012 using InstallShield LE. First, you read about the reasons you should choose a technique. Then you saw how to generate a setup project with InstallShield Limited Edition. Next, the discussion focused on configuring and customizing your project with special integrated editors. Finally, you learned how to build and deploy your Windows Installer package.