
A common task faced by web designers is dealing with the constant workflow of editing web pages and reviewing their changes. With the large number of web browsers in the market, it can be tedious to keep them all in sync as changes are made. VS2015 seeks to address this with the advent of the Browser Link feature. The Browser Link feature allows you to select any number of browsers available on your development machine, and have them refreshed after making changes to your web pages. This feature makes it very easy to make changes to your website, and to preview them across your site's supported browsers in a streamlined way.
In this recipe, we will look at how to set up Browser Link, and how it can help you with your projects.
You can use Visual Studio Express 2015 for Web, Visual Studio 2015 Community Edition, or any of the premium editions for this recipe. You should also make available all of the web browsers you plan to use (Google Chrome, Mozilla Firefox, and so on) before we start. If you would like to just see how the feature works first, Internet Explorer will work fine.
We will start this recipe by enabling support for Browser Link, and then we will see it in action by performing the following steps:
- Open up a web-based project in Visual Studio. (The one created in this chapter's Getting started with a Bootstrap-based SPA recipe will work great.)
- Browser Link should be supported by default in a new project if you are running in the Debug (not Release) mode. If this is not set in your
Web.configfile, you will see the following error message on your Browser Link Dashboard window: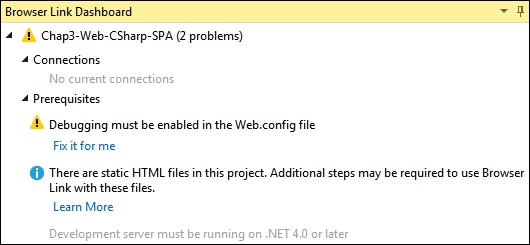
- VS2015 can enable debugging for you automatically, but you can also do this yourself by ensuring that the
compilationelement is set totrue, as shown in the following screenshot: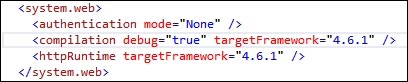
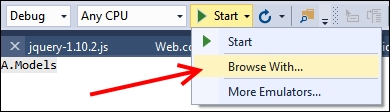
- As soon as you save the changes, Browser Link will be available for use, so let's see what it can do. Open an HTML or CSHTML page in your editor. Then to browse with Browser Link, you will have to open the web browsers in the following manner. Select Browse With… as shown in the following screenshot:
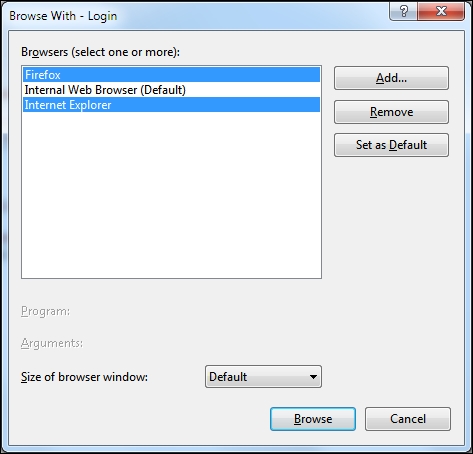
- Clicking on Browse With... will open the dialog box shown in the next image. Click on Firefox while holding down Ctrl. If Internet Explorer is not selected, Ctrl + click on its title as well. The following screenshot shows the desired selections:
- After making those selections, click on the Browse button. This will open up your web page in each browser selected.
- You can verify this connection by leaving the browsers open and switching back to Visual Studio. Then open the Browser Link Dashboard window (if it is not already open) using the menu shown here:

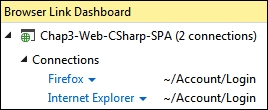
- Once the dashboard is open, it will show that two connections are, in fact, present:
- Returning to your main editor window, make a change, such as adding a few lines of text. You can instantly view the changes by reloading your website across all browsers with the hot key Ctrl + Alt + Enter, or by clicking on the Browse button under the Browser Link menu, as shown in Step 5.
Visual Studio is able to make this feature work by injecting a snippet of JavaScript into the web pages served by Visual Studio's internal web server. This code is added transparently behind the scenes, and does not affect your source in any way (it is not saved to the disk or entered into your source control system). The following screenshot shows the code that is added:

Browser Link is tied to running your site through Visual Studio in the Debug mode; it turns itself off when switching to the Release mode.
However, there may be situations where you want to absolutely guarantee that Browser Link is not running—perhaps you are tracking down a particularly nasty bug, and want to eliminate all outside factors. The following code fragments added to your project's Web.Config file under the appSettings tag can force Browser Link to always be ON (true) or always OFF (false), depending on your needs:
<system.web>
  <compilation debug="false" targetFramework="4.6.1" />
</system.web>
Separately, the following change to appSettings should be paired with the preceding change:
<appSettings>
  <add key="vs:enableBrowserLink" value="false"/>
</appSettings>
To ensure that Browser Link correctly displays the static HTML files, add the following to your Web.config file in the handlers section under system.webServer:
<add name="Browser Link for HTML" path="*.html" verb="*"
type="System.Web.StaticFileHandler, System.Web, Version=4.0.0.0, Culture=neutral, PublicKeyToken=b03f5f7f11d50a3a"
resourceType="File" preCondition="integratedMode" />
Note that you should only include this while developing, as it should not be enabled for production use due to performance considerations.