
Long-time users of TFS may recall an era where using it required that their development machine have constant contact with the TFS server, even for relatively benign operations. This was because the TFS server would track the files you had on your development machine, which meant that all check-in and check-out operations required communication with the server.
The consequence of this behavior is that it makes offline work very difficult. In areas of poor network connectivity (on a plane, café, and the like), it may even mean work is prevented. Since the use of source control is something to be encouraged, this behavior is very frustrating, especially when conflicts emerge during check-ins and "get latest" operations.
In an effort to mitigate this, TFS sets the read-only flag on all files that are under source control, which only frustrates developers more, since they can't easily edit files unless they use a tool that is aware of this behavior and can properly communicate with TFS.
While there can be valid reasons to the historical approach, it would be best if the tools fit your workflow rather than adjusting your behavior to fit your tools. Local workspaces provide that exact flexibility. TFS is still the sole source of truth for source control, and is the only place where check-ins can occur. However, the decision over which files have been changed now occurs on your development machine, not on TFS.
Another benefit is that Visual Studio no longer needs to ask TFS if it can open a file for editing or not. Also, you can use any program you want to edit files, because the read-only flag is no longer applied to files. This change also improves the offline editing scenario, and you no longer need to mess around with the "go offline" and "go online" operations.
In this recipe, we'll make some changes to the source code so that you can see how this refined approach to source control works.
As before, you will need to have access to TFS in order to follow this recipe. It would be best if you also had a sandbox team project—a project where you can try things and change data without worrying about it affecting your normal work.
Start VS2015, connect to your team project, and you're ready to go.
Perform the following steps:
- Create a new Visual Basic-based Class Library using the default name. Ensure that the Add to source control option is checked.
- You may be prompted to choose a source control system; if so, pick Team Foundation Version Control.
- If you choose a local path for your project that is not already mapped to a folder in source control, you will be prompted for a location in TFS where it should be stored. Select a folder in your source control tree in which to store the project, and click on OK as shown in the following screenshot:

- In Team Explorer, navigate to the Pending Changes tile. The files that will be added to source control are shown in the Included Changes section. Since this is a brand new project, all of the files are scheduled to be added, as shown in the following screenshot:
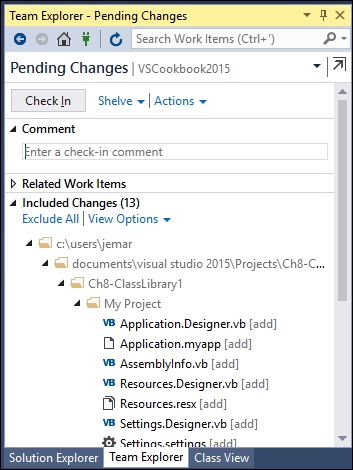
- Enter a check-in Comment to describe what you are doing, and then click on Check In to submit the changes to TFS. If you are asked to confirm your check-in, click on Yes.

- The files will be checked in and a confirmation of the changes will be displayed in Team Explorer. If you wish to look at the contents of the changeset, you can click on the changeset number displayed in the notification, as shown in the following screenshot (the changeset number will vary based on your particular TFS server history):

- In Solution Explorer, right-click on the class library project, and select Open Folder in File Explorer.
- Right-click on
Class1.vb, and open the file with Notepad or a favorite text editor that is not Visual Studio. - Add some comments to the body of the class, save your changes, and then close Notepad. The following screenshot shows an example of some brief modifications made to
Class1.vb: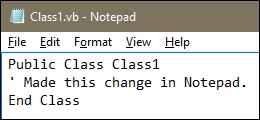
- Switch back to Visual Studio, and, if prompted to reload any files, select Yes to All.
- In Solution Explorer, you should now see that
Class1.vbhas been modified (it will have a checkmark next to it). Navigate to Team Explorer and within that, go to the Pending Changes tile. You should now see thatClass1.vbis listed as a pending change, as shown in the following screenshot:
- Before checking anything, switch back to File Explorer (formerly Windows Explorer in Windows 7), and make a copy of
Class1.vb. Edit the file in Notepad and change the class name toClass2. Alter the comments in the body of the class to differentiate it further from the original before saving it and closing Notepad. Rename the copy asClass2.vb. - Switch back to Visual Studio, and navigate to the Team Explorer | Pending Changes tile. The new file you just added won't be listed as an included change, but it has been detected as a change. Since it's not part of the solution, you will only see it by looking at the Excluded Changes section and clicking on the Detected link. Instead of including the file into source control directly, you'll want to first properly add it to the solution. To do so, navigate to Solution Explorer, and click on the Show All Files button (marked by 1 in the screenshot succeeding Step 14) on the toolbar.
- Right-click on
Class2.vb, and click on Include in Project (marked by 2), as shown in the following screenshot: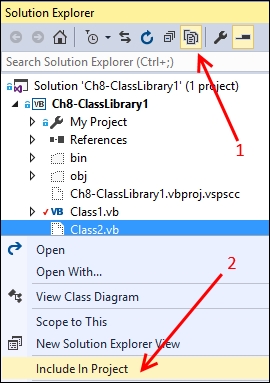
- Navigate to Team Explorer and the Pending Changes tile again, and confirm that
Class2.vbfile is now included as a pending change. Add a check-in Comment, and then click on Check In to reflect the changes, as shown in this screenshot:
- In the preceding steps, we renamed the file before we committed it. Let's look at what happens if you use Windows (File) Explorer to rename a file outside of Visual Studio. Rename
Class2.vbto a name of your choice (our example will useSecondClass.vb). - Switch back to Visual Studio, and navigate to the Pending Changes tile in Team Explorer. The rename isn't detected automatically, since it wasn't made in Visual Studio, however, you may notice that there are two changes in the Detected Changes section (one add and 1 delete).
- Click on the Detected link, and you will see that the rename is detected as a delete of the old filename and an add of the new filename. You can let Visual Studio know that this change is actually a rename by selecting both changes (Ctrl click on each item) in the add/delete pair, right-clicking on and choosing the Promote as Rename option. If prompted to rename all instances of
Class2, click on Yes. When this is done, just click on the Cancel button to close the Promote Candidate Changes window. The following is the screenshot of the Promote Candidate Changes window:
- Not only is the rename now listed in the Included Changes section, but the solution file has also been updated to reflect the change and is also included as a pending change. The Pending Changes tile should now look similar to the following screenshot:
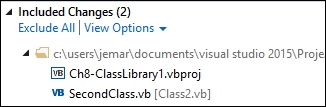
- Check-in your changes when you have finished.
When using a local workspace, Visual Studio creates a hidden local folder named $tf, and stores within it zipped copies of the workspace version of your source files. Visual Studio detects changes by comparing the contents of your local files and folders to the contents of the $tf folder, and adds any differences as pending changes.
Note
It might be an obvious warning, but don't delete the $tf folder or any of its contents, not even if you are short on disk space. Doing so will cause significant problems. If you want to examine this folder, a typical location would be C:UsersusernameSourceWorkspacesTFS_Repository_Name$tf. Change username and TFS_Repository_Name to reflect your specific situation.
You might have noticed that at no time during the recipe did you have to change the read-only flag on any of the files, nor did you have to check-out any files for edit. In fact, the only time Visual Studio communicated with TFS was during the check-in process. All other changes were managed and tracked locally.
This should alleviate a lot of pain for people who have been used to older versions of TFS and the way server tracked workspaces operated.
The detected changes list can grow quite large over time, and you may want to ignore certain folders or files (for example, the /obj and /bin folders). You can either create .tfignore files to specify the files and paths to ignore, or in Team Explorer, you can open the list of detected changes and exclude files either individually, by extension, or by folder path. Doing so will create or alter .tfignore files for you, and add them to the Pending Changes list so that they can be checked in and shared with all the other developers on the team.
Be aware that when using a local workspace, you will no longer have any real visibility on the server over who has checked out a file. The exception to this is locking files. If you lock a file, the server is notified and can report that you have locked it.
Unshelving a shelveset now merges any shelveset changes with your local edits. Any conflicts between the shelveset and your local version will cause a merge conflict, and you will need to resolve it in the normal manner.
When might a local workspace not be appropriate? For many users, it is a good choice. But sometimes, you may have a large number of files in your TFS project (100,000+), or your personal workflow might be such that you use two or more open instances of VS2015 with the same project. In those situations, you will not want to use a local workspace.
By default, the partnership of VS2015 and TFS/VSTS will be set such that you are using a local workplace as described in this recipe. But if you would like to change your workplace setting for your project, or verify that it is in fact configured as you intend, you can take the following quick steps to view the settings.
- Select Team Explorer. Then select the active workspace title and click on Manage Workspaces..., as shown in the following screenshot:

- In the resulting Manage Workspaces dialog, select the workspace you would like to view and/or change, and click on Edit.
- The Edit Workspace dialog will then appear. Select your folder from Working folders, and then click on Advanced to see full details. An excerpt of this dialog is shown in the following screenshot:
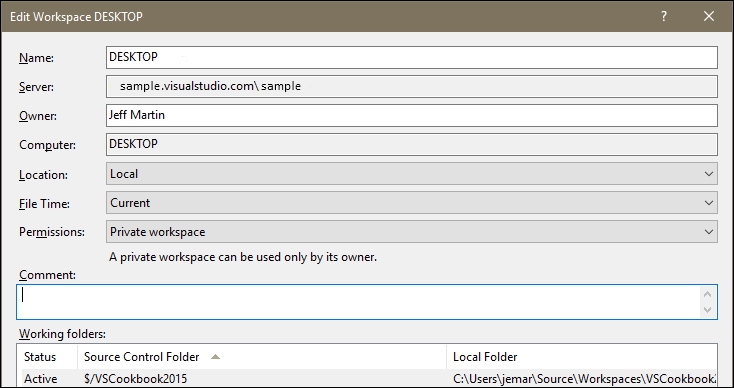
- From this dialog, Location can be changed to indicate whether the workspace should be Local or Server. Other options include setting the File Time and Permissions for the workspace.