
Windows Communication Foundation (WCF) remains a mature technology, so there is little difference in developing these applications and services with VS2015. Since WCF is a technology focused on network communications, the visible changes in Visual Studio are quite small. However, with .NET Framework 4.6.2, there have been many bug fixes and stability enhancements to ensure that it performs as expected.
Tip
WCF is Microsoft's framework designed for use in creating applications based on service-oriented architecture. Some of the features provided by WCF include interoperability, service metadata, data contracts, and security. For in-depth information on using WCF, refer to Microsoft's introduction at https://msdn.microsoft.com/en-us/library/ms731082(v=vs.110).aspx, and the general reference guide at http://msdn.microsoft.com/en-us/library/dd456779(v=vs.110).aspx.
In this recipe, you'll create a task-based WCF service so that you can see what has changed. A sample WPF application will call this sample WCF service.
Simply start a premium version of VS2015 (or Visual Studio Community), and you will be ready to go.
As you create these WCF applications, you will see how Visual Studio simplifies the process. Let's get started:
- Create a new project by navigating to Visual C# | WCF | WCF Service Application, and give it the default name.
- Add another project to the solution by navigating to Visual C# | Windows | WPF Application, also giving it the default name. Be sure to select Add to solution in the Solution field.
- Compile the solution and start the WCF service to make sure it starts correctly so that you have a working service for the next few steps. Stop the application once you are satisfied that it's working. Since you added the WCF project first, it should be the default project.
- Back in Visual Studio, right-click on the WPF application, and select Add Service Reference.
- Click on the Discover button. The Service1 web service should be discovered, as shown in the following screenshot:

- Click on the Advanced button in the bottom-left corner of the Add Service Reference dialog box. Ensure that in the options for service generation, Generate task-based operations is selected, and Allow generation of asynchronous operations is turned on, as shown in the following screenshot:
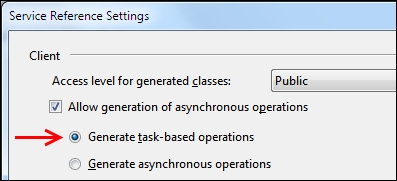
- Click on OK in this option's dialog box (Service Reference Settings), and then again in the Add Service Reference dialog box to generate the service proxy. (In some cases, Visual Studio may erroneously throw an error here, such as Unable to check out the current file. If you get bitten by this bug, simply restart Visual Studio, and try again. Note that this is less likely in VS2015.)
- Use Solution Explorer to open the
app.configfile for the WPF application, locate the<endpoint>configuration section, and hover the mouse over thenameattribute. A tooltip will appear to explain what this attribute is for, as shown in the following screenshot. Given the issues people have historically had with understanding the details in WCF configuration, this IntelliSense information is very welcome.
- Start adding a new endpoint configuration to the
<client />section by typing<endpoint binding=. IntelliSense will kick in to show you the values that can be placed inside the quotes. That makes editing WCF configurations much simpler than trying to remember what all the valid values are. Select thebasicHttpBindingvalue, as shown in the following screenshot: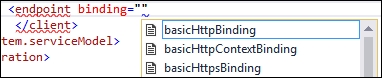
Note
The recipe asks you to add it here so you can see the new IntelliSense support for WCF configurations. A complete WCF tutorial is outside the scope of this book, but once you finish the recipe, try manually adding support for https using the
basicHttpsBindingclass. For now, we will comment out the second endpoint that we just added. - Returning to the WPF project, open the
MainWindow.xamlfile, and change the<Grid>element to a<StackPanel>element. Add a button and a textbox to the<StackPanel>element, as listed in the following code:<StackPanel> <Button x:Name="btnAsync" Click="btnAsync_Click_1"> click!</Button> <TextBlock x:Name="txtText">Not yet populated </TextBlock> </StackPanel>
- Navigate to the code-behind file,
MainWindow.xaml.cs, and add code for the button click event handler so that it calls out to the WCF service, as follows:async private void btnAsync_Click_1(object sender, RoutedEventArgs e){ using (var client = new ServiceReference1.Service1Client()) { var result = await client.GetDataAsync(3); txtText.Text = result; } } - In Solution Explorer, right-click on the solution, and select the Set as StartUp Project option.
- Choose Multiple startup projects, and set Action to Start for both projects. Click on OK to save the changes:

- Press F5 to start debugging, and when the WPF application appears, click on the click! button to make the
asynccall to the WCF service. The text below the button should update to say You entered: 3, proving that the call to the service worked.
As mentioned earlier, the Add Service Reference dialog box can generate task-based proxy classes that you can call from your code with an await keyword. This makes asynchronous calls to services much easier to write, though you can still call the blocking, synchronous methods if you need to. The generated code contains both the synchronous method call as well as the task-based call.
WCF's ServiceModel Metadata Utility Tool (svcutil.exe) can also be used to generate task-based proxies if you prefer to use the command-line tool instead of Visual Studio.