
Whether you work in a team or as an independent developer, the odds are good that you will have a lengthy list of requirements describing what you need to build. Scrum teams use product backlogs, traditional teams use functional specifications, and other teams will have their own variations of these. Even as an independent developer, you probably maintain, at minimum, a to-do list of features to add and bugs to fix. Using TFS, this information can be stored in the team project.
TFS provides several different ways you can classify your outstanding tasks, which are called work items, and include bug, feature, issue, task, and several more. As you may expect, these let you indicate the type of item being described. A minor bug (say incorrect font sizing) may be passed over in favor of a new feature to implement or a more serious bug (application keeps crashing).
You may recall that in the Creating a new TFS project recipe, you were able to select a Process template while creating a new team project (note that a Process template may also just be called Process.) The template choice indicates the type of work items that are provided.
In this recipe, we'll show you how to manage your work using VS2015 and TFS.
You will need to have access to a TFS project like the sample one created in the Creating a new TFS project recipe, or another that you have access to.
The recipe also requires that your team project be based on the Agile process template. If your project uses a different process template, the work item types may be different from those in the recipe, but the concepts remain the same.
Once you have identified the connection to TFS or VSTS that you will be using, start your copy of VS2015, and you're ready to go.
Perform the following steps:
- When you first connect to TFS, you will need to set up the connection if you have not already done so. From the Visual Studio menu, navigate to Team | Manage Connections…. Then click on Manage Connections within Team Explorer to connect to TFS. If your server is not already available in the drop-down menu (do note that the default can be blank), use the Servers... button in the connection dialog to add a new connection for the TFS. Then connect to the project collection and the specific team project you wish to use for this recipe.
- To ensure you are connected to TFS, navigate to the Home hub, and confirm that it is displaying the correct team project name, as shown in the following screenshot:

- This recipe needs some work for you to track, so start out by creating a new work item. Click on the Work Items entry in Team Explorer to navigate to the Work Items hub.
- Click on the New Work Item drop-down menu from the Work Items hub, and click on User Story from the list, as shown in the following screenshot:

- A new Work Item form will be displayed in the Visual Studio document area. Enter a title of your choice, and set the Assigned To user to yourself. You can set the value of any of the other fields as you wish, and when you are ready, click on the Save Work Item button in the form's toolbar, or press Ctrl + S to save the work item.
- Right-click on the background of the Product Backlog Item form (that is, right-click on the white space), and select the New Linked Work Item... option (Shift + Alt + L).
- In Work Item Type, select Task from the list, and enter a Title for the item before clicking on OK, as shown in the following screenshot:
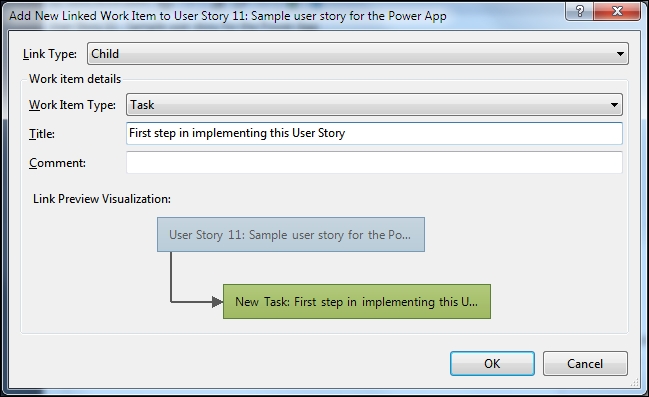
- Since this is a linked work item, several fields, including the Assigned To field, will automatically be set for you. So, just hit Ctrl + S to save the work item, or click on the Save Work Item button.
- In Team Explorer, double click on Unfinished Work under Queries | Shared Queries | Product Planning, which will now display the newly created work item, as shown in the following screenshot:

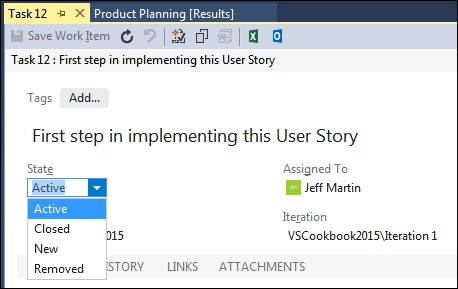
- To start work, click on Task that you created in Step 7. Then, change the state to Active, and click on Save Work Item, as shown in the following screenshot:
Tip
Something to remember about states under TFS
Depending on the configuration, states are typically changed in sequence. That means, a newly created item cannot always be changed directly to Closed. Saving a work item after each state change will usually allow you to advance the choices for available states.
- If you look at Shared Queries | Current Iteration | Active Tasks query, this task will now show as the result.
- Open up one of the solutions you have previously checked in to TFS. (If using the Team Project from the first recipe in this chapter, the solution was titled
Ch8-Console-BrandNew.) Solutions can be accessed from the Home hub under the Solutions heading. - Modify one of the files in the solution; for this example, a comment was added to
Ch8-Console-BrandNew.cpp. (For this recipe, the exact changes made aren't important, just that the file has been modified.) - Navigate to Pending Changes by clicking on the House icon on the Team Explorer tab and clicking on the Pending Changes tile. (Also available under View | Other Windows | Pending Changes.)
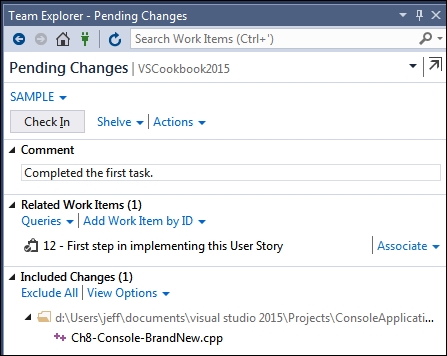
- To include this task with your commit, you can either drag it onto Team Explorer, or you add it by ID (both methods are highlighted in the following screenshot).

- Once a work item and changed source file(s) are associated, you will be able to enter a Comment and click on Check In, as shown in the following screenshot:
- Visual Studio may prompt you when you click on Check In, and if it does, just click on Yes, as shown in this screenshot:

- After making the check-in, Visual Studio will provide a message indicating the results, as shown in the next screenshot:
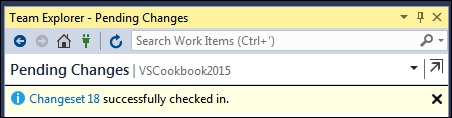
- The changeset text is a link, and if clicked, it will show you the details of what was just checked in.
The Team Explorer window provides an overview of the common tasks available for working with projects stored in TFS (regardless of if it is locally hosted, or part of VSTS). Pending Changes keeps track of outstanding modifications made since the last commit was made. Work Items keeps track of the work items available in TFS, with those marked In Progress appearing in the Work in Progress query.
You can check the details of a query by selecting the query, right-clicking on it, and selecting Edit Query. The task category doesn't have to be limited to just the Task work item type, but can also incorporate any custom work item types you include in the task category.
If you double-click on a work item in Team Explorer that isn't already open, it is opened, by default, in the preview pane in Visual Studio to prevent window clutter.
A couple more areas of Team Explorer are available for use to increase the effectiveness of the tool for your development work.
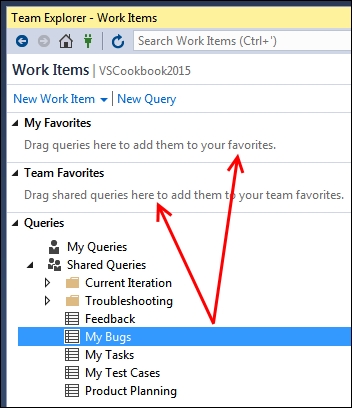
A key part to effectiveness in using Team Explorer is creating and using queries. Making a copy of an existing query and editing it to suit your needs is a quick way to customize the tool. Whether you use custom queries or the standard ones, drag your frequently used queries into My Favorites or Team Favorites, as shown in the following screenshot:
Team Explorer generally encourages you to only have one logical task in progress at a time. This can help you limit the amount of work in progress you have, and push you towards finishing a task completely before starting the next one. If you want to improve your personal productivity and work smarter, not harder, then this is a good practice to follow.
Unfortunately, if you plan to only work on one thing at a time, then what happens when you have to pause what you are doing and deal with an unexpected issue? If you have used previous versions of TFS, you may be familiar with the concept of shelving and unshelving code. Shelving takes a copy of the changes you have made, stores them on the server, and then optionally resets your local workspace. Unshelving is just the reverse of that. This lets you deal with the emergency, and then return to your previous work without commingling the two separate items. Shelving is available in all editions of VS2015.
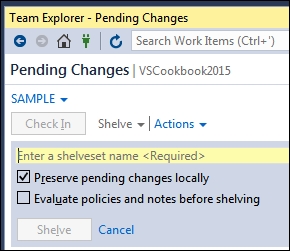
With Visual Studio Community or higher, you also have the added ability to suspend work. This automatically shelves your current changes, and the current state of your Visual Studio windows when you hit the button. It then resets your workspace, clears the work items that were in progress, and puts you back in a state ready to start another work item.
To access this, click on My Work, expand In Progress Work, and then click on the Suspend button, as shown in the following screenshot:

- MSDN documentation on choosing a TFS process: https://www.visualstudio.com/docs/work/guidance/choose-process
- The Using local workspaces for source control recipe
- The Performing code reviews recipe