
When Microsoft released Visual Studio 2010, they changed the approach to extensibility by introducing the VSIX format, and the number of extensions in the Visual Studio gallery is a testament to how successful this change has been.
Thanks to this accessible framework, you can make your own add-ins and extensions in Visual Studio to fill in any missing functionality that you want for your particular workflow. This recipe will show you how to configure your copy of VS2015 for extension development.
To create extensions, you will need to have the VS2015 SDK installed. In prior versions of Visual Studio, this was a standalone product, but it is now available from the main VS2015 installer. Even better, the Professional edition is no longer required, so you can create extensions using Visual Studio Community.
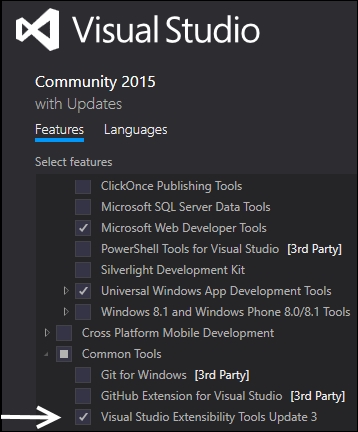
To verify that you have the SDK installed, and to install it if necessary, you will need to run the installer for your copy of VS2015. This can be found by going to the Control Panel for Add / Remove Programs. In Windows 10, you can find this in System Settings, under Apps & features. Once the installer is open, you will need to install the Visual Studio Extensibility Tools Update (the exact version, appropriate to your copy of Visual Studio) as shown in the following screenshot:
Once the SDK is installed, start VS2015, and you're ready to go.
- Start a new project using the Visual C# | Extensibility | VSIX Project template and the default name.
- Pressing F5 will start a new instance of Visual Studio in the debug mode (it may take a while to start), where you can use the Add-in manager (Tools | Add-in Manager… ) to enable your add-in and check its functionality. For this recipe, no changes are needed. The following screenshot shows our recipe's extension installed and enabled:
- Close the Experimental Instance, and return to your original instance of Visual Studio.
- From the Solution Explorer, open the
source.extension.vsixmanifestfile, and populate the Author field with your name. You can also use this file to provide a Description, Product Name, and set a custom icon for your extension. When preparing an actual extension, you will want to ensure that these are filled in to be helpful for your users. - Now we will see how to add an item to our extension, and make it do something. Right-click on your project in Solution Explorer, and select Add | New Item (Ctrl + Shift + A). Under Visual C# Items | Extensibility, select Editor Viewport Adornment.
- You can see the code for this adornment in the file
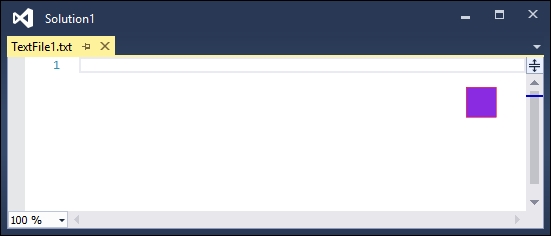
ViewportAdornment1.cs. This is now part of our extension package, so execute the project to see the results. - When Visual Studio has finished loading, it will automatically instantiate the extension making it active and available. From the Visual Studio menu, select File | New File | File, select General | Text File, and click Open. You should see a purple box in the top-right corner of the editor surface, as shown in the following screenshot; this proves that the extension is working as expected:
- Close the experimental instance of Visual Studio to return to your project.
The Experimental Instance of Visual Studio is launched using an experimental hive. The experimental hive is a separate set of Visual Studio settings you can use when testing extensions that won't affect your normal development settings. You may have noticed proof of this separation when it launches, as you are prompted to set your settings, just as you did the first time you launched VS2015 after installing it.
With VS2015, extensions are now the official way to extend Visual Studio, as add-ins have been deprecated. An extension implements a Managed Extensibility Framework (MEF) contract, and is not as restricted in the APIs it can access or in the way it is implemented.
There is a lot more flexibility in building extensions over add-ins, and this also applies to the update and distribution mechanism. Beyond the template we looked at in this recipe, there are many areas of Visual Studio that can be customized, including defining custom commands, tool windows, and so on. This provides you with the opportunity to reshape Visual Studio to fit your needs.
The Extension Manager complements the NuGet package system described in the Managing packages with NuGet recipe in Chapter 3, Web Development. The difference is that Extension Manager focuses on enhancements to Visual Studio, while NuGet is used to obtain libraries to be distributed with your application.