
Chapter at a glance
Learn
Learn about the new full screen interface of Internet Explorer, page 162
Pin
Pin websites to the Start screen, page 174
Browse
Browse the Web privately, page 176
Choose
Choose the Internet Explorer version you want as the default, page 181
IN THIS CHAPTER, YOU WILL LEARN HOW TO
Internet Explorer 11 in Windows 8.1 has two incarnations that can be used to browse the web: a minimalistic full-screen version, and the desktop version you know from earlier Windows operating systems. The new browser also brings several improvements versus previous versions, including faster page load times, side-by-side browsing of websites, enhanced pinned site notifications and apps settings, and other improvements.
Because the browsing experiences are very different, this chapter focuses mostly on the new full-screen version of the browser. In this chapter, you’ll review the new interface and learn how to use it to browse the web. Next, you’ll see how to create favorites and pin websites on the Start screen, how to browse the web without leaving any traces in your browser, and how to download files. You’ll understand one of the most important security features in Internet Explorer and Windows 8.1— the SmartScreen filter—and its role in securing your system. In addition, you’ll learn how to set either of the two Internet Explorer versions as the default.
Practice Files
You don’t need any practice files to complete the exercises in this chapter. For more information about practice file requirements, see the section “Using the practice files” in the Introduction of this book.
Internet Explorer 11 in Windows 8.1 incorporates two important changes from earlier versions found in Windows 7 or Windows Vista.
The first and most important change is that in Windows 8 and Windows 8.1 there are two versions of Internet Explorer. One is available directly from the Start screen, with which it shares the same full-screen interface. It is referred to as the Internet Explorer Windows 8.1 app. The other version is available on the desktop and uses the traditional desktop look to which you are accustomed from Internet Explorer 9 and previous versions of Windows. It is referred to as the desktop Internet Explorer.
They are the same app, and the same engine used for browsing the web. However, their looks are very different and so is the experience of browsing the web.
The Internet Explorer Windows 8.1 app runs in full-screen mode, providing you with all the screen space you need for viewing webpages and browsing the web. Its interface elements are minimalistic and optimized for touch. This mode of browsing the web doesn’t offer any support for add-ons or plug-ins except Adobe Flash Player, which is built in to the browser. According to benchmarks published by different sources, the Internet Explorer app offers slightly less performance than its desktop counterpart. However, the performance differences are very small (up to a maximum of five percent in some tests), and most people will not notice the difference when browsing the web. It is great if you are using tablets or computers with touch and you want a web-browsing experience without clutter, toolbars, and add-ons. Even though it is optimized for touch, you can use the Internet Explorer app just as easily with a mouse and keyboard. It might seem scary at first because it is new and different, but if you read the rest of this chapter, you should have no problem getting acquainted with it and using it comfortably.
The Internet Explorer desktop version uses an interface with which you are familiar, optimized for use on desktop computers or laptops, using a mouse and keyboard. The web-browsing performance it offers is slightly better than the Internet Explorer app. It also offers full support for add-ons and plug-ins (something that’s not available in Internet Explorer app).

The second important change you will find in Internet Explorer 11 is its noticeably better web-browsing performance. First, it has excellent support for open web standards such HTML5 or Cascading Style Sheet (CSS3), and the speed with which it loads websites has improved considerably. This means that, compared with earlier versions of Internet Explorer, you enjoy a much better browsing experience. Also, you achieve longer battery life on a laptop or tablet when browsing the web with the new Internet Explorer than with other browsers. This is because it includes power-saving features that balance the resources used while browsing the web and the amount of energy required for them. Last but not least, Internet Explorer 11 sends the Do Not Track signal to websites to help protect your privacy. Therefore, websites that provide support for this signal will not track your visits and cannot store detailed information about the pages you visited.
Internet Explorer 11 is integrated with Microsoft SkyDrive and it can synchronize your active tabs, favorites, home pages, history, and settings.
Tip
To learn how to set Windows to synchronize your settings, read Chapter 6.
It also introduces a download manager in the Windows 8.1 app, a feature which was not present in Internet Explorer 10. Last but not least, both versions of Internet Explorer now support the same touch navigation features, which makes the transition between versions smoother when used on touch devices.
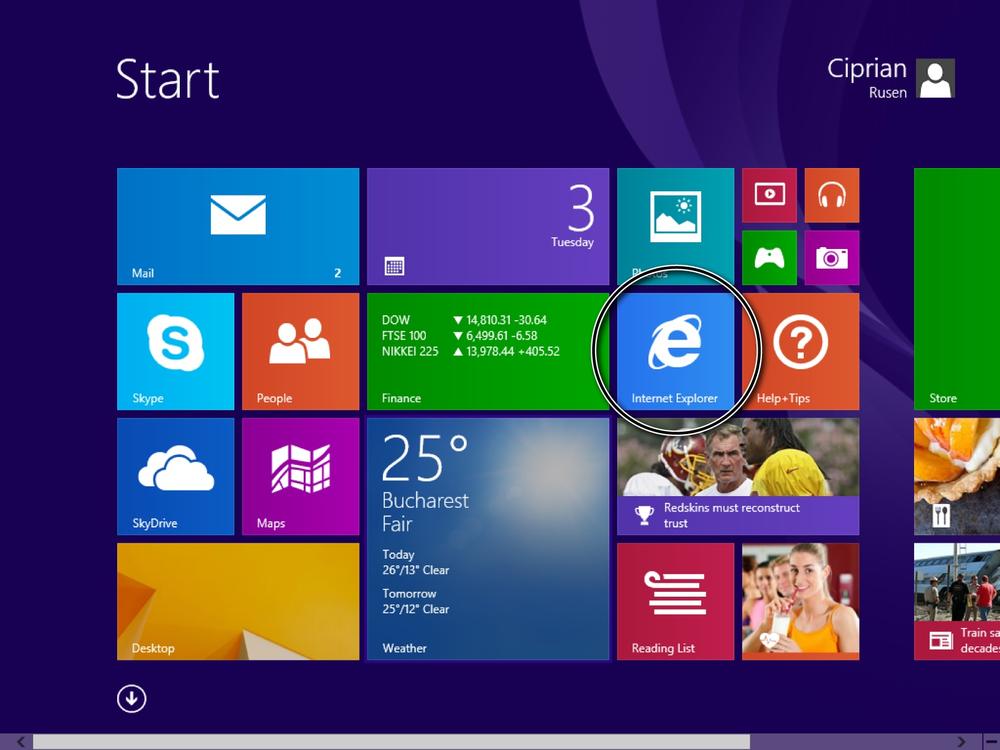
You can start Internet Explorer by using the default shortcuts Windows 8.1 provides. However, which of the two versions you start depends on where the shortcut is placed.
On the Start screen is a tile named Internet Explorer. If you want to start the Internet Explorer app, click this tile.
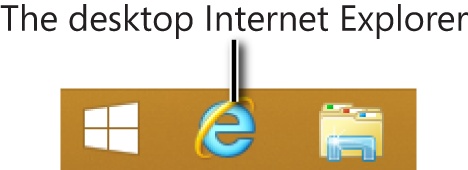
If you want to start the Internet Explorer desktop app, you must go to the desktop and then, on the lower-left side of the taskbar, click the Internet Explorer icon.
You can also start Internet Explorer by using the search function on the Start screen. Just type the word Internet, and its shortcut appears instantly. This shortcut starts the version of Internet Explorer that you set as the default. If you have made no configuration changes to Windows 8.1, it will start the Internet Explorer app.
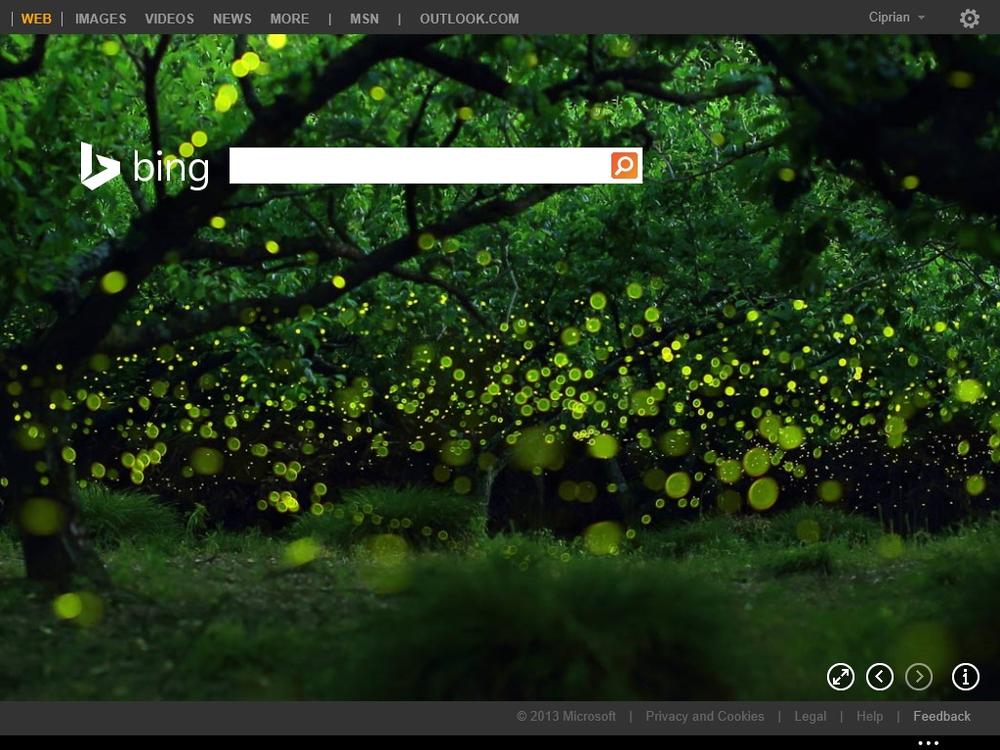
The new Internet Explorer app, even though simple in structure, can be confusing at first, especially to those who have not used mobile browsers such as the one found on smartphones powered by Windows Phone.
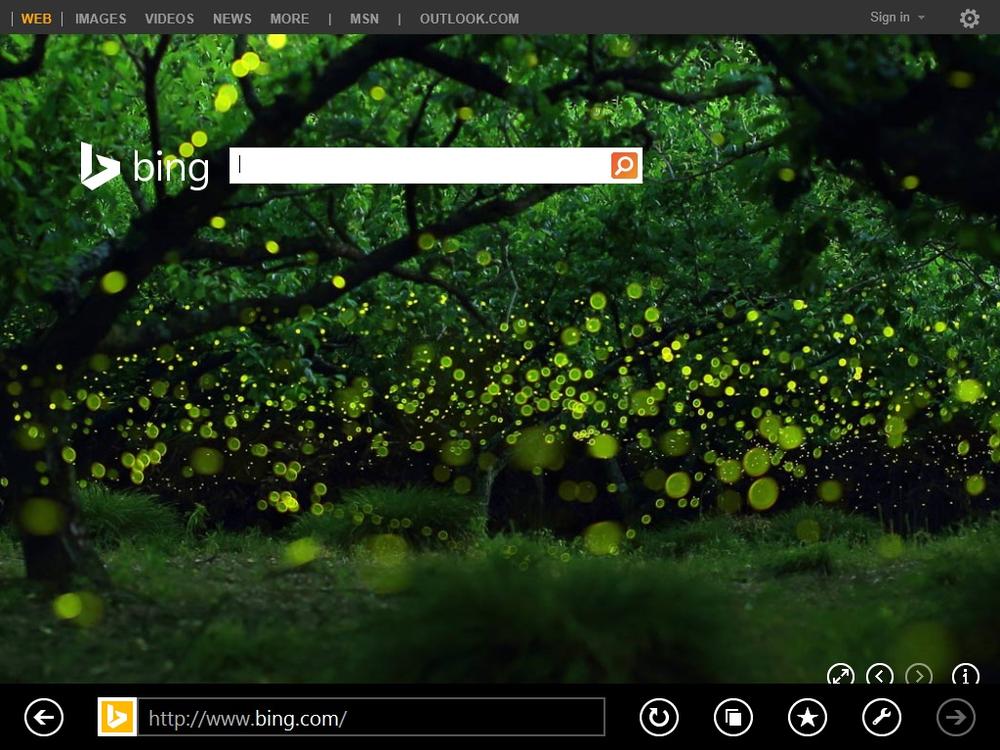
When you open it, you see the homepage that is set and a small toolbar at the bottom of the window with a few buttons and options. The toolbar is minimized as soon as you click where websites are loaded.
If you want to bring the toolbar back, swipe upward from the bottom edge of the window toward the middle. You can also right-click with a mouse.
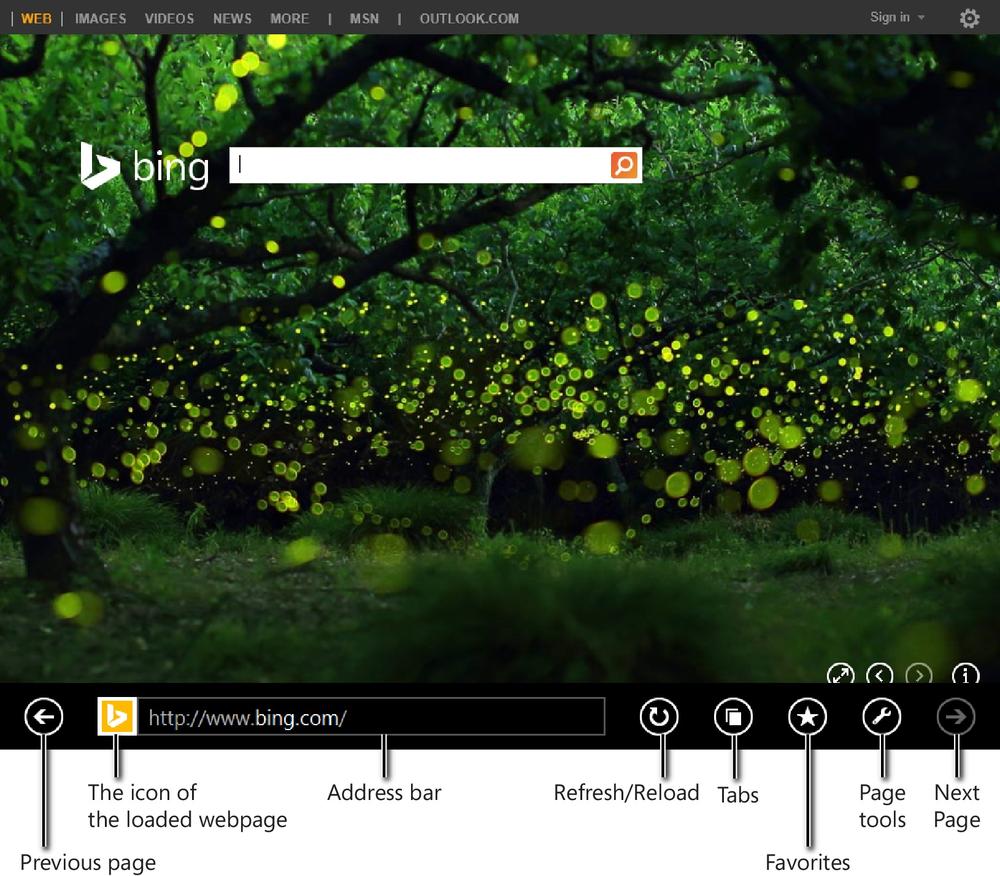
Let’s look at the buttons one by one, from left to right, and see what they do:
The Back button takes you to the previous page you visited. The button is active after you visit more than one webpage. The same effect can be achieved by flicking right if you are using a touch-enabled screen. A transparent version of this button appears if you move the mouse to the left side of the browsing window.
Next to the Back button is an icon that always changes. This is the icon that represents the website you are currently viewing. If no icon is detected for that website, the default Internet Explorer icon appears.
The Address bar is where you type the address of the website you want to visit. This bar can also be used as a search box. You can type a search term and press the Enter key or click the adjacent Go button. Internet Explorer displays the search results relevant to your search term by using the default search engine you have set. If you have not changed its default configuration, search results will be displayed by using Microsoft Bing.
Next to the Address bar is the Refresh button with which you can reload the webpage you are viewing so that you can see the updates that have been made to it, if any, since you arrived on the page.
The Tabs button displays a list of the tabs that are currently open.
The Favorites button opens the list of Internet Explorer favorites and options for adding the current website as a favorite, pinning it to the Start screen, or sharing it with others using the Share charm.
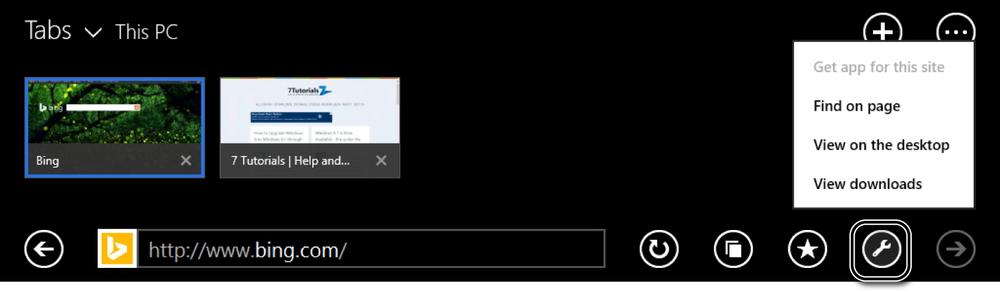
The Page Tools button gives access to a small contextual menu that can be used to search on the current webpage, view the same page on the Internet Explorer desktop app, view downloads or access the Windows Store app for the loaded website when one is available.
The Forward button takes you to the next page if you previously used the Back button. Click it and it will take you forward. The same effect can be achieved by flicking left if you are using a touch-enabled screen. A transparent version of this button appears if you move the mouse to the right side of the browsing window.
When using the Address bar, the Internet Explorer window changes to help you find what you want as quickly as possible. It displays the websites you visit frequently, the Go, Favorites, and Tabs buttons. The Favorites button can be used to quickly access your favorite websites, whereas with the Tabs button, you can quickly access all opened tabs.
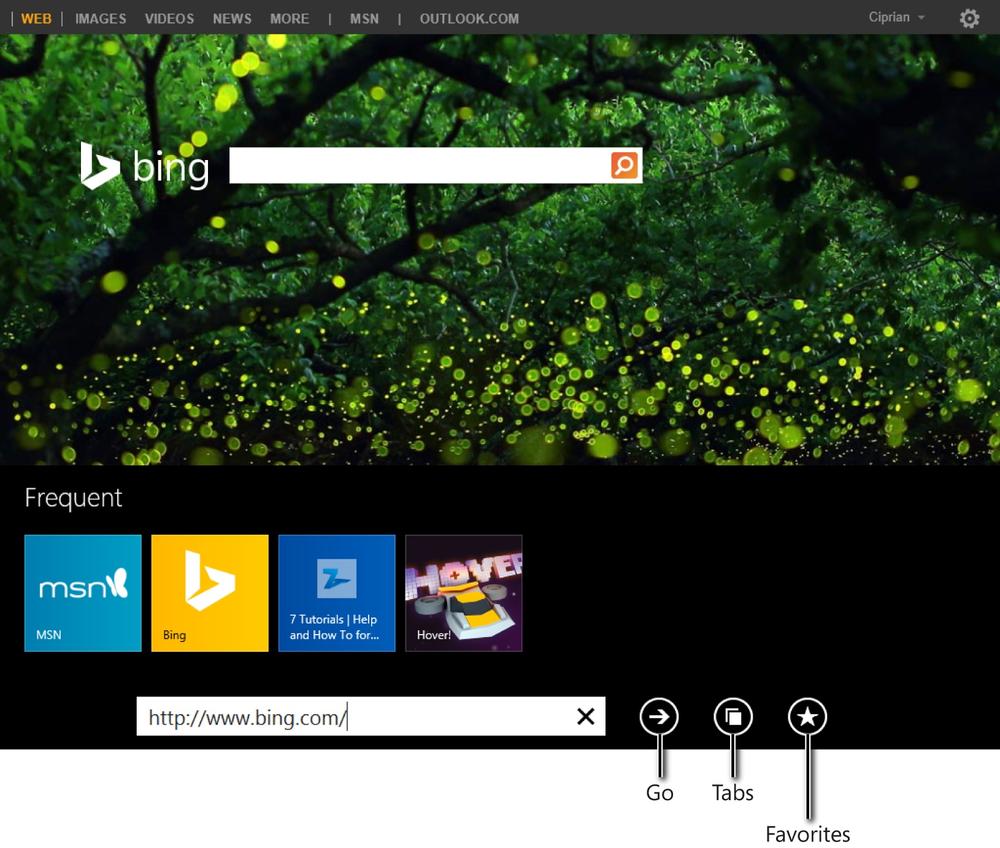
As you type (it doesn’t matter whether it is the address of a website, the name of a website, or a search term), Internet Explorer begins searching your most frequently visited websites, the websites you pinned to the Start screen, and your browsing history. It also displays search suggestions from Microsoft. If it finds entries that match what you have typed so far, it will display the appropriate results. Then, you can just click the result that matches where you want to go.
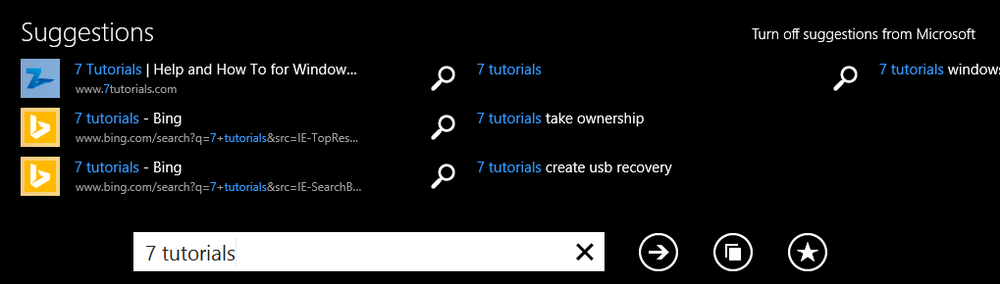
If you want to search the web for something that you have not yet visited, finish typing the search term and click the Go button adjacent to the Address bar or press Enter on your keyboard. This triggers a web search, using the search engine that you set as default.
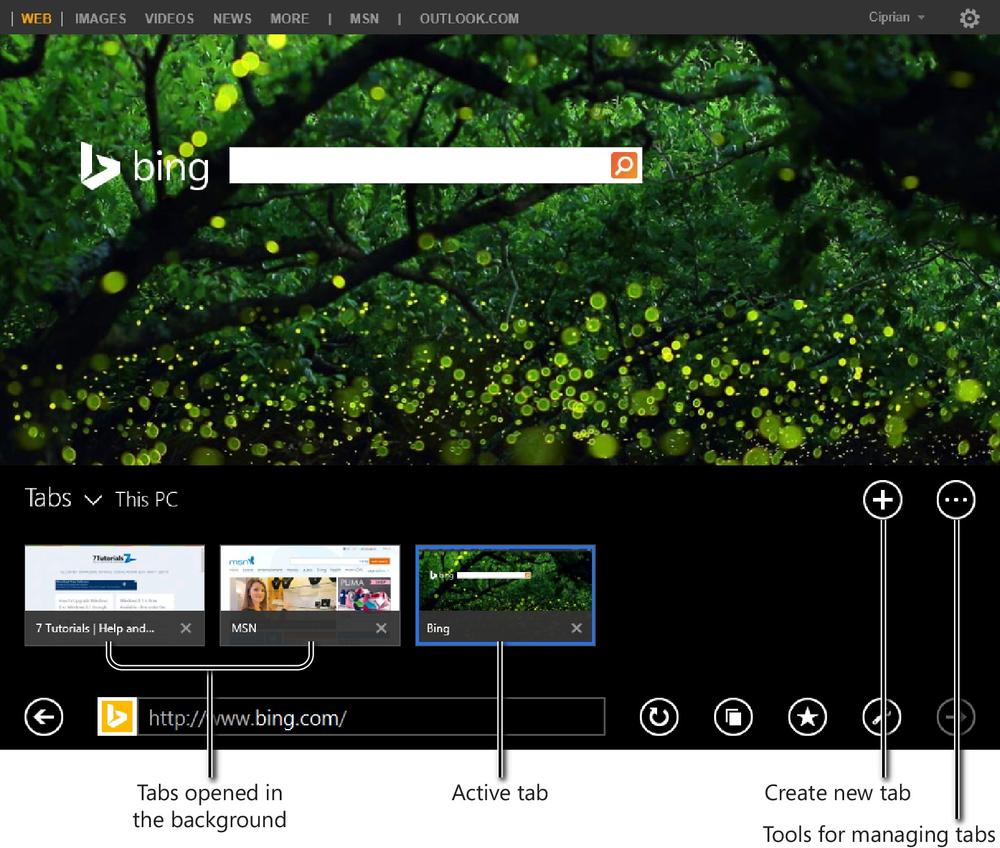
If you right-click somewhere in the middle of the Internet Explorer window, you will see the Tabs pane. It shows the tabs you opened and the websites loaded in each tab. The active tab displays a blue border, whereas the tabs open in the background have no visible border. Each tab has a Close button (the X in the lower-right corner) that dismisses that tab. To switch between tabs, click the one that you want to view. If you want to create a new tab, in the upper-right of the Tabs pane, click the + button.
Near the new tab button is the Tab Tools button (the ellipsis character). This button offers two options: start a new InPrivate tab, and reopen the recently closed tab.
When browsing the web, notice that the Page Tools button on the bottom toolbar can have a slightly different icon, depending on the websites you are visiting. On most websites, it shows a wrench icon. On some websites, however (Wikipedia, for example), it will also present a small plus sign below the wrench.
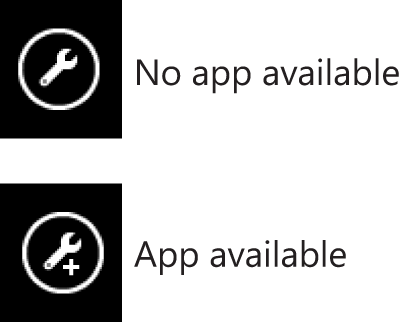
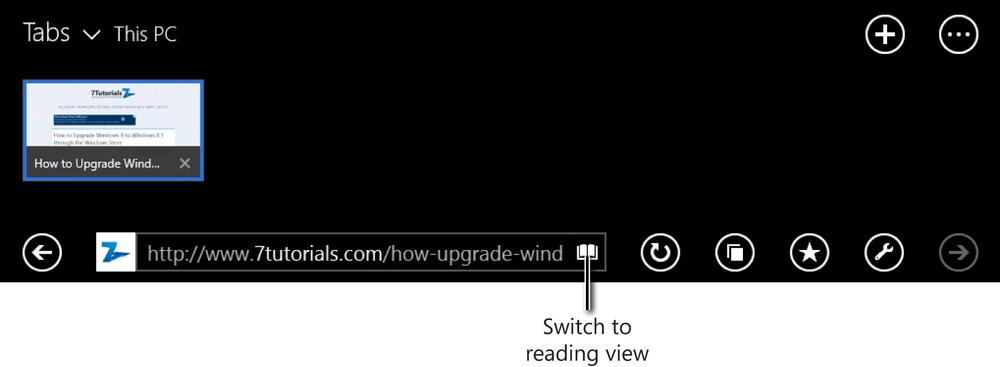
When this sign is displayed, it means the website you are visiting has a Windows 8.1 app available in the Windows Store. If you click or tap it, the Page Tools menu appears. This time, the menu will have an option named Get App For This Site. A click takes you to the Windows Store, from which you can install the app specific to that website. Another small but useful feature is the new Reading view. When you open an article on a website, in the address bar, a book icon appears adjacent to the URL. Click this icon to reload the current page in Reading view, which strips out all the advertisements and clutter on the page, displaying only the essential content. With this view, you can enjoy a better reading experience while browsing the web.
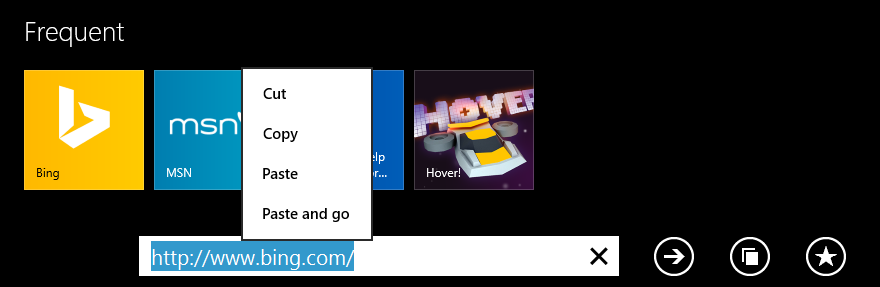
If you have copied a link to a webpage, you can paste it into the Address bar to view that page. You might appreciate the Paste And Go option, which automatically pastes the link and loads it into the browser. To access it, right-click the Address bar.
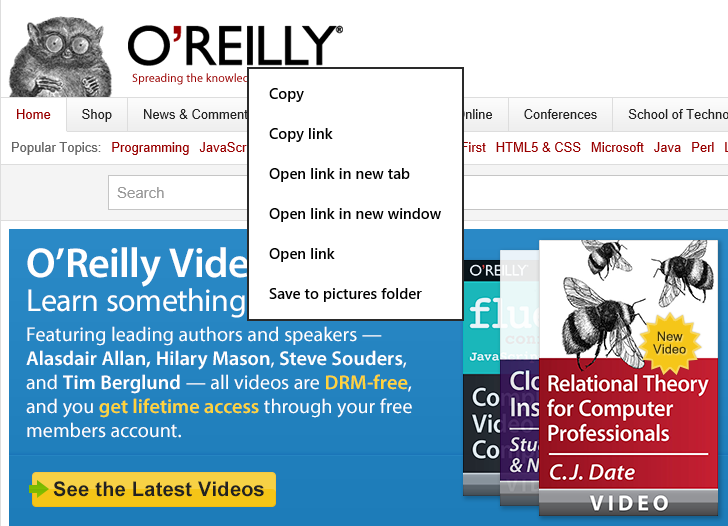
When you right-click a webpage, a shortcut menu appears, offering options with which you can copy content and links and open links in a new tab, a new window or the same tab, and save pictures directly to your picture folders.
To make navigation easier if you’re using the desktop, the Internet Explorer app gives you the ability to navigate backward and forward without having to bring up the toolbar on the bottom of the app window. Hovering the mouse on the left or right side of the window displays a transparent Back or Forward button, depending on where you placed the button. Clicking it takes you to the previous or next webpage you visited in the active tab.

The Internet Explorer app includes a new Flip Ahead feature so that you can navigate your favorite sites just as you would read a magazine. It replaces the need to click or tap links with a more natural forward-swipe gesture on touch-centric devices (and forward button with the mouse).
As you can see from this section, the new Internet Explorer app is not difficult to use. If you take some time to experiment, visit a few websites, and do searches on the web, you’ll become comfortable using it and start to enjoy this new way of browsing the web. That’s true whether you use a classic desktop computer or a computer with touch or a tablet.
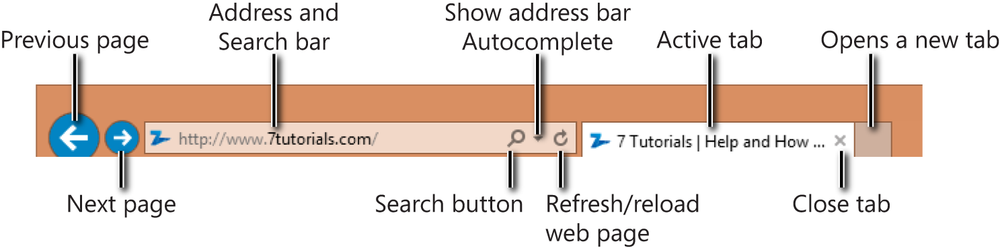
The Internet Explorer desktop app has a more complex interface than its Windows 8.1 full-screen counterpart. At the top of its window are several buttons and fields for managing the way you navigate the web. At the upper-right are three buttons that give you access to different configuration menus.
On the bottom and right side are scroll bars that you can use to move through the content of a webpage when the content is bigger than your Internet Explorer window.
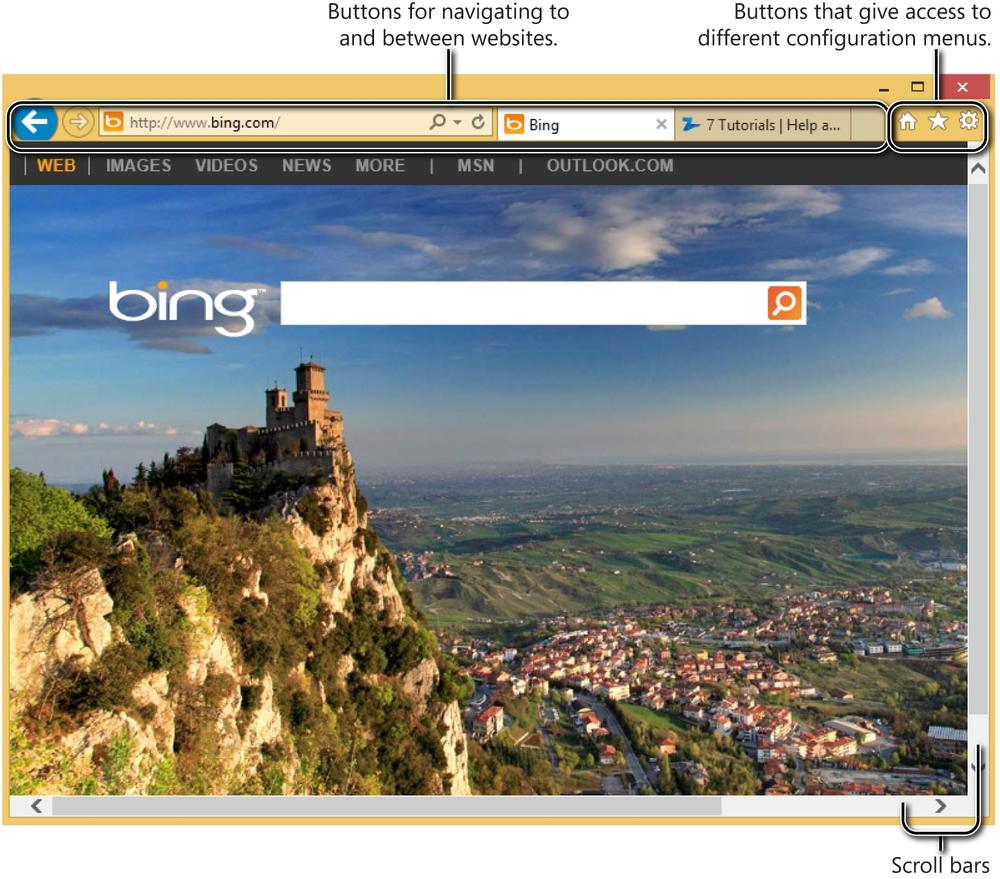
The middle of the window, taking up most of the space, is where websites are loaded and viewed.
Let’s see in more detail what each button does. Moving from left to right are the following buttons:
The Back and Forward buttons. These become active as soon as you browse to more than one page on the Internet. You can use them to navigate back and forth between the different pages you visited.
The Address bar. This is where you type the address of the website that you want to visit. You can also use this bar as a search box. You can type a search term and press Enter or click the Search button in the Address bar. Internet Explorer displays the search results relevant to your search term by using the default search engine that you set. If you have not changed its default configuration, search results will be displayed by using Bing.
Down arrow in the Address bar. This reveals Autocomplete suggestions, based on what you have typed in the Address bar.
The Refresh button. Use this to reload the current webpage so that you can see the updates that have been made to it, if any, since you opened the page.
Active tabs. Next to the Address bar are the tabs you have opened. The tab that is active always has a lighter color, whereas those in the background are a slightly darker tone. When you open a webpage, its name becomes the title of the tab. To change between tabs, just click them. If you want to close the active tab, click the Close button to the right of the name.
Square, unlabeled button. Use this button to open a new tab. Click it, type the address of the website that you want to visit in the Address bar, and then press Enter. The website is now loaded in its own tab.
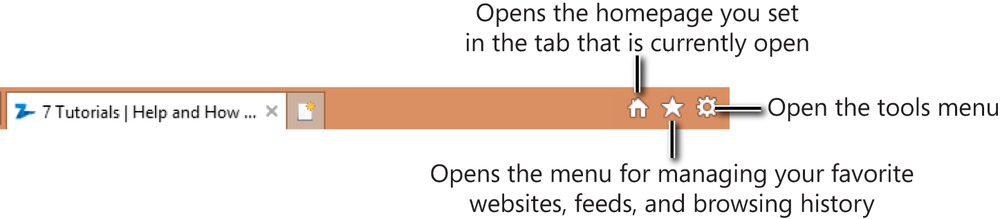
In the upper-right corner of the Internet Explorer window are three buttons. Let’s see what they do:
The first button (the one that looks like a small house) takes you to the homepage you have set for Internet Explorer on the desktop. By default, this is the MSN.com website, but it can be changed to something else.
The second button (the star) opens a menu for managing your favorite websites, the feeds to which you have subscribed, and the history of your browsing.
The third button (the gear icon) opens the Tools menu that you can use to configure many aspects of how Internet Explorer works.
If you are familiar with Internet Explorer 9, which was available in Windows 7 and Windows Vista, you’ll notice that not much has changed in terms of the interface. If you are comfortable using Internet Explorer 9, you will have no problems using the Internet Explorer 11 desktop app.
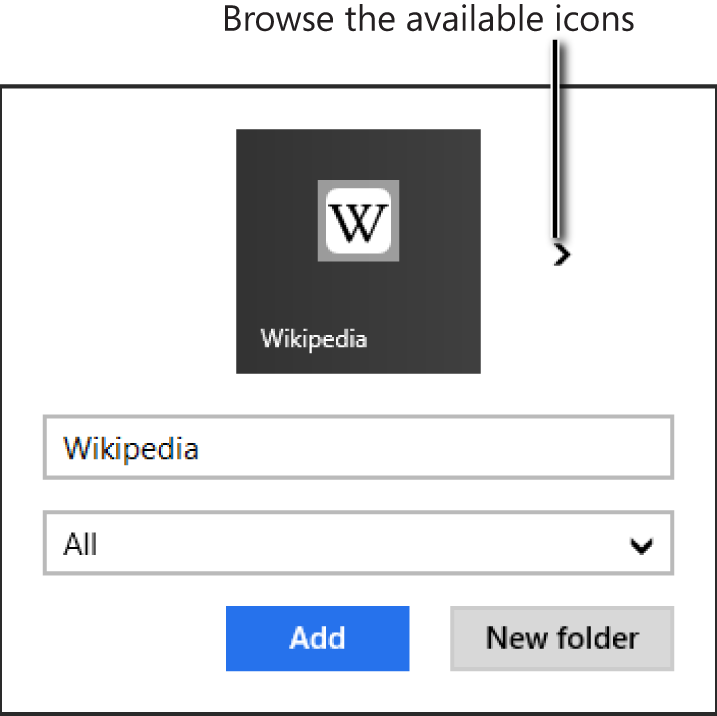
Unlike Internet Explorer 10, in Internet Explorer 11 you can add favorites from the full-screen app, as well. The process is quite simple. When adding a new favorite, you can set its name and change its location by adding a new folder or selecting a specific Favorites folder from the ones that already exist. Also, you can change its icon. To change the icon, click the Forward arrow near the website’s icon. As you might expect, when you pressed Forward, a Back button becomes available for navigating backward through the available icons. However, some websites do not provide multiple icons to choose from. If you want to add those to your favorites, the Forward and Back buttons will not be available.
In this exercise, you’ll learn how to add a website to your Favorites in Internet Explorer.
Set Up
Go to the Start screen and start Internet Explorer. Navigate to the Wikipedia website (www.wikipedia.org). If you don’t use Wikipedia, you can go to any other website you use frequently.
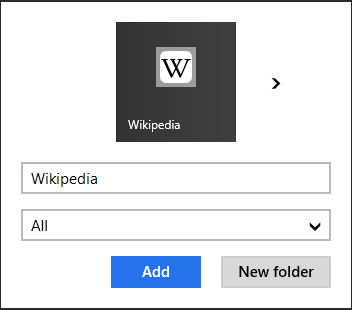
Wikipedia is now added to your list of Favorites in Internet Explorer, and you can easily access it from the Favorites menu.
Pinned websites appear as shortcuts on the Start screen. Each shortcut includes the icon of the website (if any) plus the name of the website. Websites that provide specific support for this feature can display custom icons, backgrounds, and the latest updates. When you click the shortcut, the website opens in Internet Explorer.

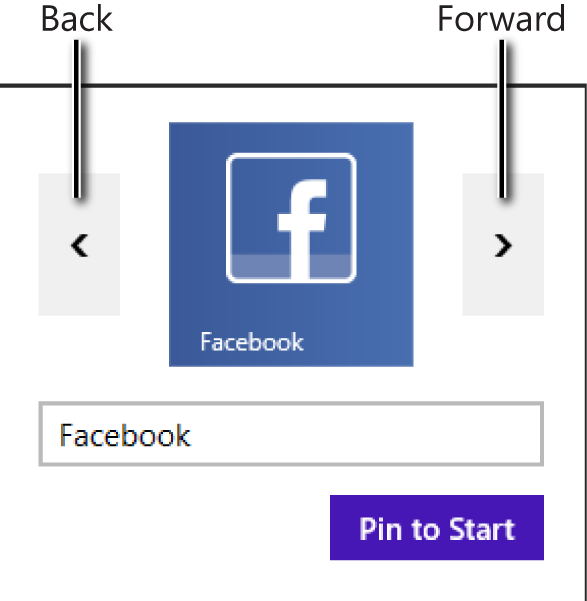
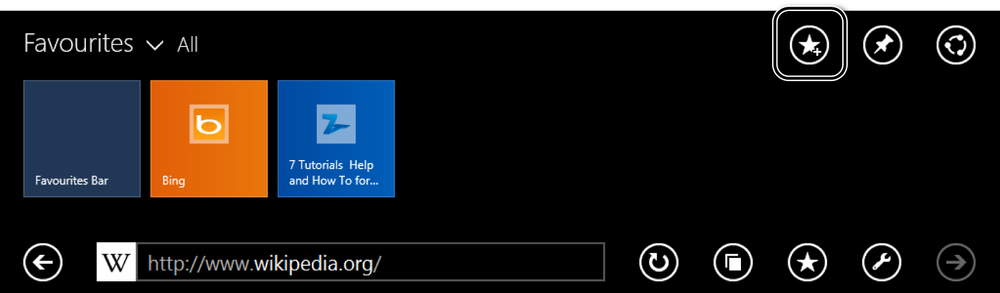
When pinning a website to the Start screen, you can select its icon from the list of available icons, by pressing the Back and Forward buttons. You can also type a custom name for the website.
In this exercise, you’ll learn how to pin a website to the Start screen.
Set Up
Go to the Start screen and start Internet Explorer. Navigate to the Facebook website (www.facebook.com). If you don’t use Facebook, you can go to any other website you use frequently.
Click the Favorites button near the Address bar. If the Address bar is minimized, first right-click to bring up the tabs and then click Favorites.
Click the Pin Site button.
Type the name that you want to use for the website and, if you want, select another icon, by browsing through the available icons.
When done, click Pin To Start.
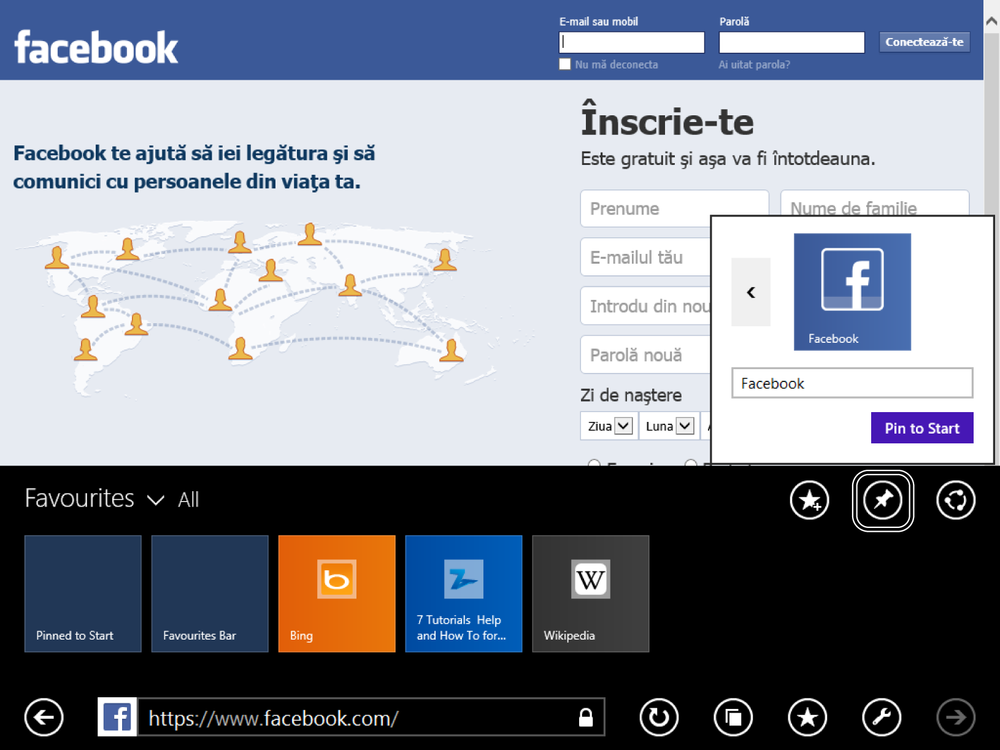
Facebook is now pinned to the Start screen, and you can use the shortcut that was created to quickly access it whenever you want.
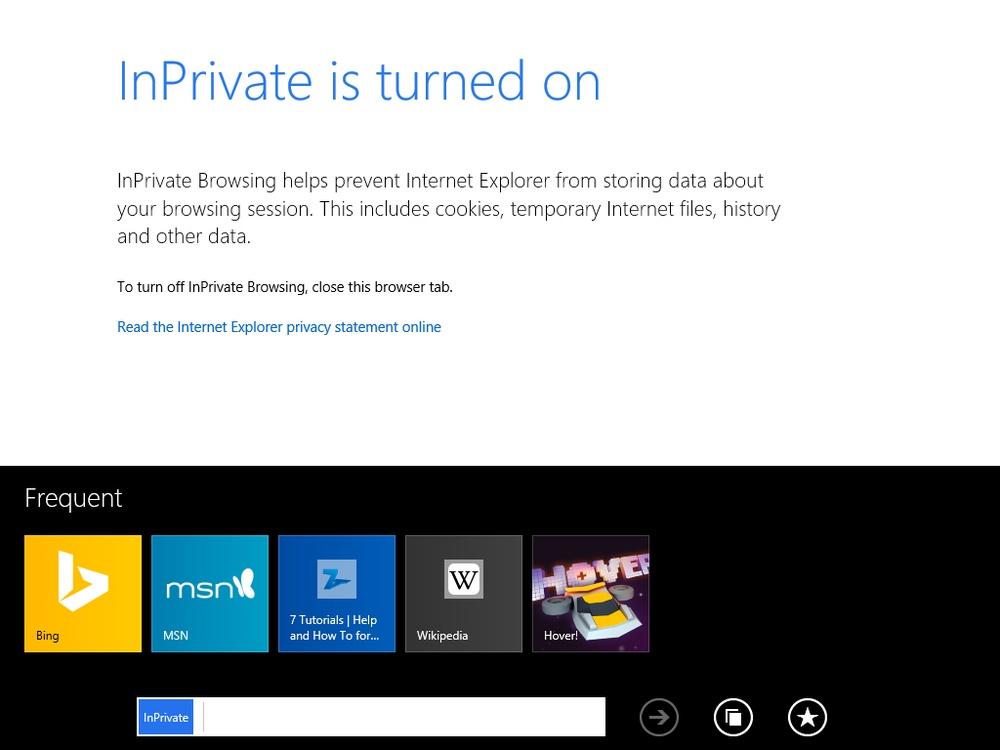
InPrivate mode is a way of browsing the web without leaving traces in the browser. When you open an InPrivate tab, all the websites you visit in that tab, the passwords you enter, the cookies that are created, and the temporary files that are downloaded are deleted as soon as you close the tab or you close Internet Explorer. An InPrivate tab is marked by the blue InPrivate icon. This icon does not appear on a normal tab.
This way of browsing is useful when you don’t want to be tracked or when you’re using someone else’s computer and you don’t want to leave traces of the sites you visited. This browsing mode is highly recommended when using public computers to browse the web.
In this exercise, you’ll learn how to visit a website by using the InPrivate mode.
Right-click somewhere in the middle of the Internet Explorer window to bring up the Tabs view.
Click the Tab Tools button (the ellipsis character).
Click New InPrivate tab so that a new tab is opened in the InPrivate mode.
Type the address of the website that you want to visit and then click the Go button.

The website is now loaded in InPrivate mode. As soon as you close this tab, any traces of your visit to this website are deleted.
The process for downloading files is similar to other browsers with which you are accustomed. You are first asked whether you want to run or open the file you are about to download (depending on its type) or save it on your computer.

When you click Save, the file is automatically downloaded to the Downloads folder. You are not asked whether you want to save the file to another location. The default Downloads folder can be changed only for the desktop version of Internet Explorer.
A progress bar appears. If you are downloading multiple files at the same time, the information is aggregated, and you are shown how many downloads are in progress and how much time remains until all of them are finished. You can close this notification or cancel the download altogether.

After a file is downloaded, you are given options relevant to its file type. You can run executable files, whereas you can open other files.

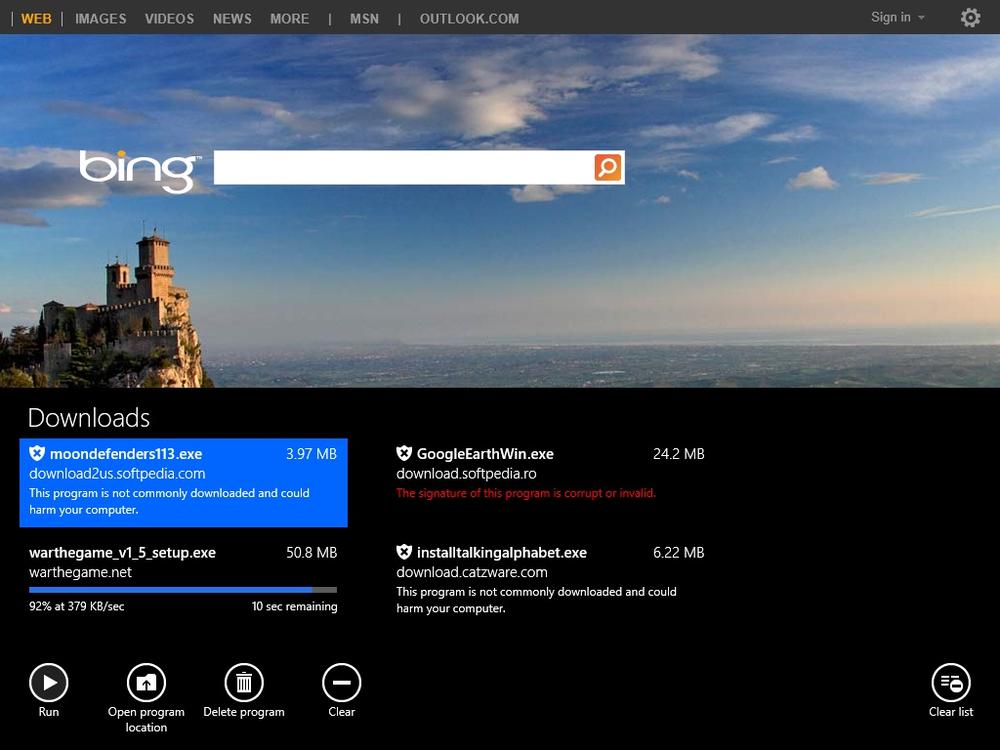
As mentioned earlier in this chapter, the Internet Explorer 11 app for Windows 8.1 now includes a manager for your downloads. In the Downloads window, you can view all the recent files that were downloaded, run or open them, open their location, delete them, or clear items individually or the entire list.
In this exercise, you will learn how to access the Downloads window in the Internet Explorer 11 app.
Sometimes when you try to download files, Internet Explorer doesn’t allow you to do so, issuing a warning that the file has been reported as unsafe and it was blocked by SmartScreen filter. The same can happen when you try to view certain websites to which your access is blocked, and you see a similar message.

SmartScreen filter is a security feature Microsoft introduced after Internet Explorer 8. It tracks what websites Internet Explorer users visit and, when a dangerous file or website has been detected, it blocks access to it to protect you. Files that are reported and confirmed as malware won’t download to your computer thanks to this security feature. Also, websites that are reported and confirmed as distributing malware or trying to steal personal information from visitors are automatically blocked. Therefore, don’t be upset if SmartScreen has prevented you from downloading a file or visiting a webpage; you just have avoided harm to yourself or to your system.
SmartScreen filter also looks at how commonly files are downloaded. If you are trying to download a file that is rarely downloaded by other Internet Explorer users, you are warned that the file “is not commonly downloaded and could harm your computer.”

If you know what that file is supposed to do and you trust the source from which you download it, you can go ahead and run it. If not, it is best either to delete it or to scan it for malware by using Windows Defender or any other security solution before trying to run it. This way, you make sure that you stay away from viruses and other forms of malware.
File Explorer uses the same technology, and you are warned before running files that are marked as infected by SmartScreen filter.
In Windows 8.1, you can set one of two versions of Internet Explorer as your default. Having both available and starting in different scenarios can be confusing. It is best to give both a try, decide which you like best, and set that one as your default.
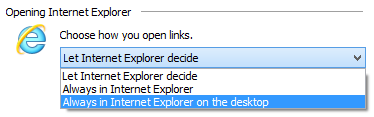
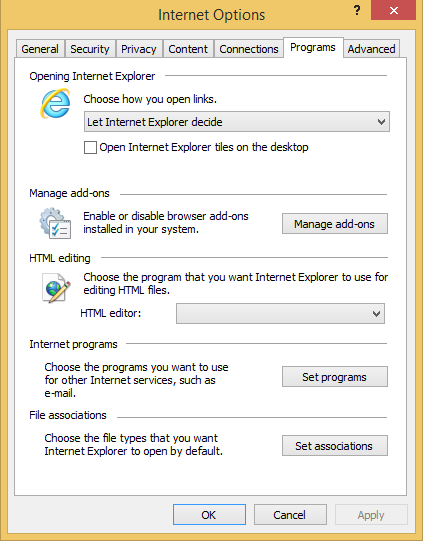
You set the default version in the Internet Options window, on the Programs tab. There, you are asked to choose how you open links. The default is to let Internet Explorer decide. If you choose Always In Internet Explorer, the Internet Explorer app will always be used to open links on your Start screen or in the apps you use.
However, the Internet Explorer shortcut on the desktop will continue to open the Internet Explorer desktop app. All the other shortcuts and links will open the Internet Explorer app.
Setting the Internet Explorer desktop app as your default involves a bit more configuration. In this exercise, you’ll learn the steps for setting up this option.
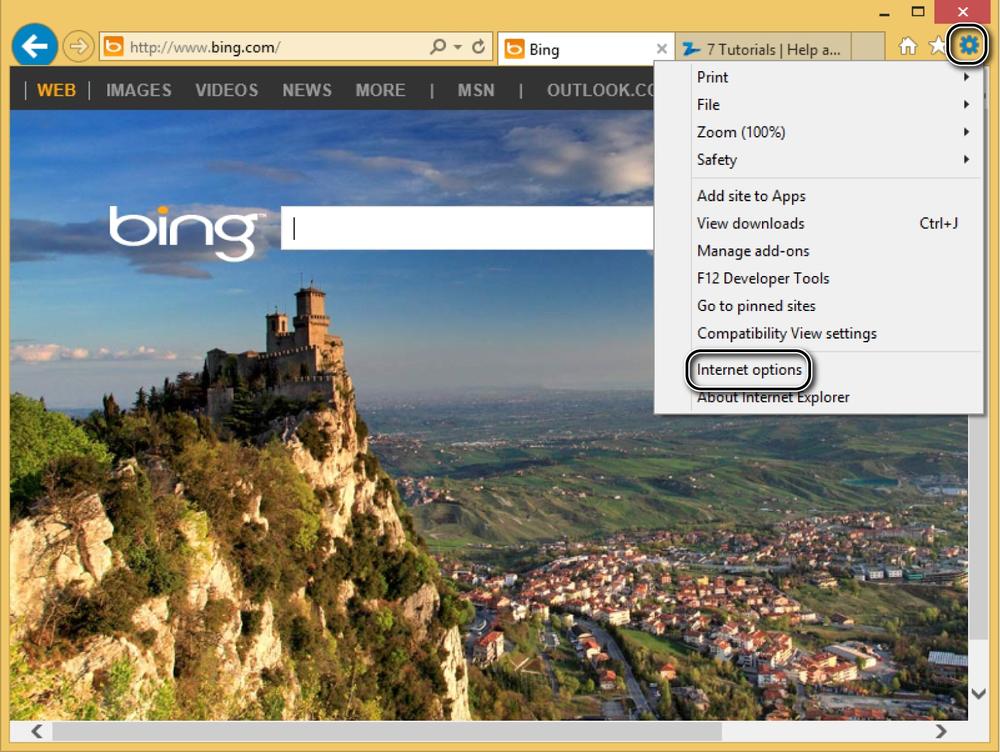
In the upper-right corner of the Internet Explorer window, click the Tools button.
In the Tools menu, click Internet Options to open the Internet Options window.
Click the Programs tab to find the options for configuring how Internet Explorer is opened.
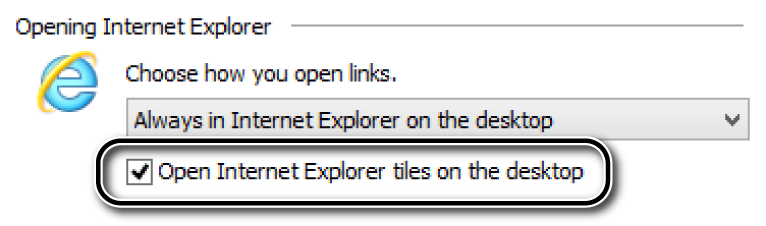
In the Opening Internet Explorer section, in the Choose how you open links list, select Always In Internet Explorer On The Desktop.
Beneath the list box, select the Open Internet Explorer Tiles On The Desktop check box.
Click OK.

Now, all the Internet Explorer shortcuts in Windows will open only the desktop Internet Explorer version. Also, when you click a link to a website in any app or on the Start screen, it will be opened by using the same version.
Internet Explorer 11 brings with it many changes and improvements to the browsing experience.
Pinning websites is a way of storing your favorite websites on the Start screen so that you can access them from there.
When browsing the web from a public computer, it is best to browse by using the InPrivate mode. This way, you leave no traces, and Internet Explorer does not store your personal data.
SmartScreen filter is a Microsoft technology that protects you from downloading and running infected files and from accessing malicious websites.
After you decide which Internet Explorer version you like best, it is good to set it as your default.