
Chapter at a glance
Find
Find the Advanced Sharing Settings window that contains all your network-sharing settings, page 381
Create
Create a homegroup to easily share libraries, folders, and devices, page 384

Use
Use the Sharing Wizard for quick file sharing, page 397
Share
Share all printers and devices with one setting, page 405
IN THIS CHAPTER, YOU WILL LEARN HOW TO
In Windows 8 and Windows 8.1, Microsoft continued its efforts to simplify the network sharing experience. Features such as HomeGroup have been further improved, and network sharing settings and wizards have been simplified so that they require fewer steps.
In this chapter, you’ll learn about the default network sharing settings and how they affect your network sharing experience. You’ll learn everything about the HomeGroup feature: how to create one, join other computers to it, find and change the current password, and leave an existing homegroup. Finally, you’ll learn about sharing your libraries, folders, and devices such as printers, including how to stop sharing them when necessary.
Practice Files
You do not need any practice files to complete the exercises in this chapter. For more information about practice file requirements, see the section “Using the practice files” in the Introduction of this book.
The Sharing Wizard in Windows is designed so that you can easily share anything you want with the other computers and devices on the network. By default, the wizard is turned on in Windows 8.1. However, if it is turned off on your computer, the exercises included as part of this chapter about sharing over the network won’t work, and you will see a completely different set of sharing options and buttons. Therefore, before we go any further, this section shows how to turn on the Sharing Wizard so that you can complete the previous exercises without problems and have the easiest network-sharing experience possible with Windows 8.1.
In this exercise, you’ll learn how to turn on the Sharing Wizard.
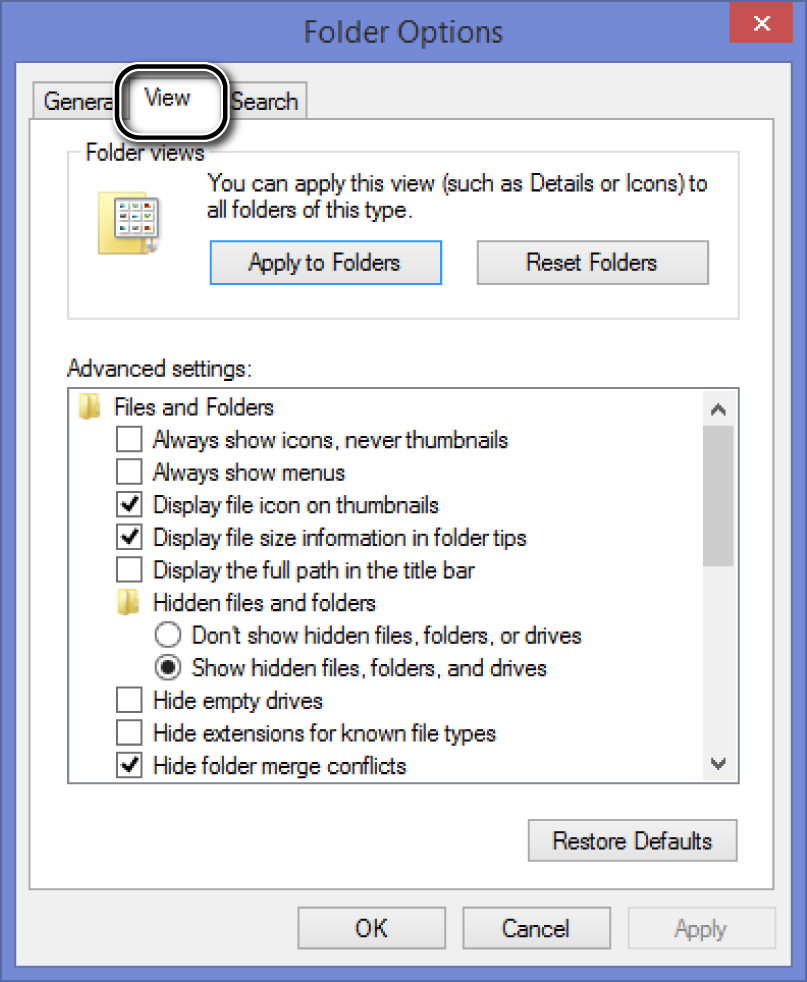
Click the View tab.
On the right side of the ribbon, click the Options button.
The Folder Options window box opens.
Click the View tab.
Scroll down the Advanced Settings list and select the Use Sharing Wizard (Recommended) check box.
Click OK.
You return to the File Explorer window.

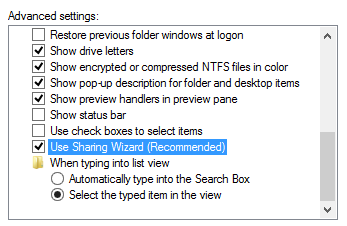
The Sharing Wizard is now turned on, and you can use it to complete the exercises detailed in this chapter.
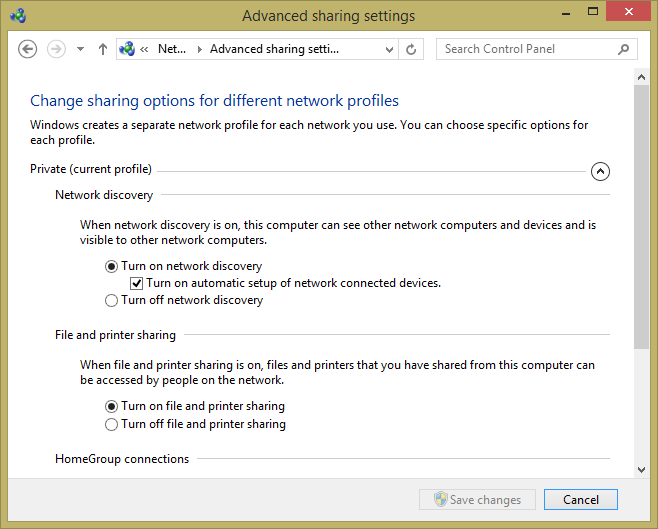
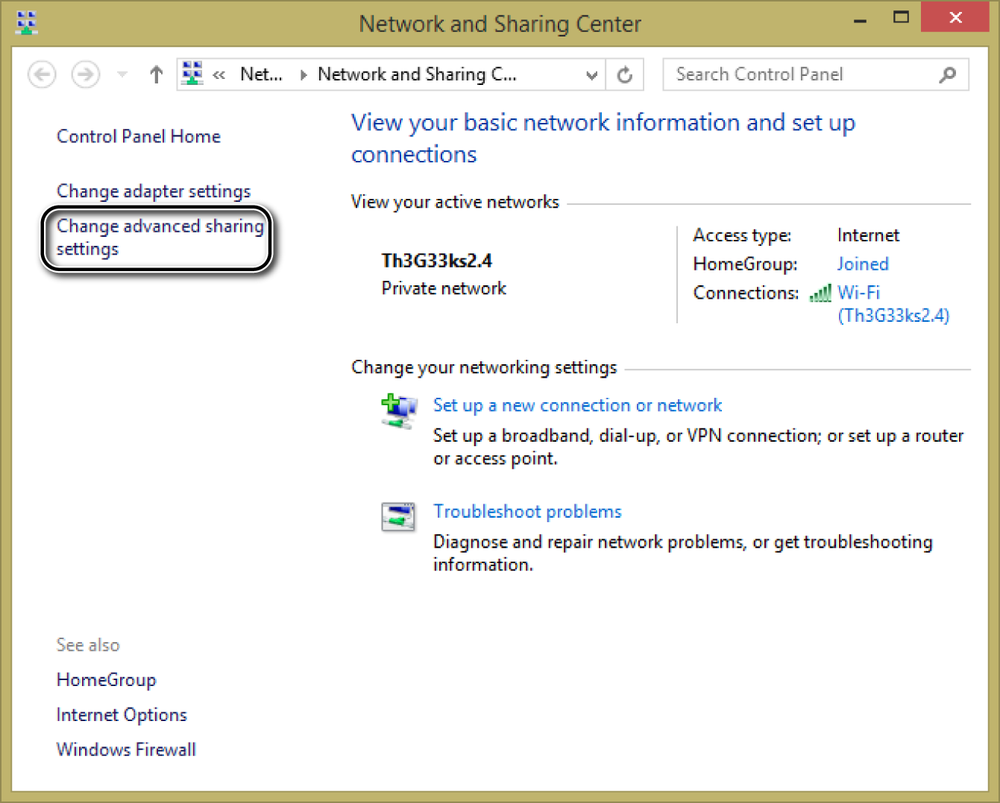
Windows 8.1 organizes most of your network sharing settings in the Advanced Sharing Settings window in the Network And Sharing Center, which is covered in detail in Chapter 11.
To access it, in the left column of the Network And Sharing Center, click the Change Advanced Sharing Settings link.
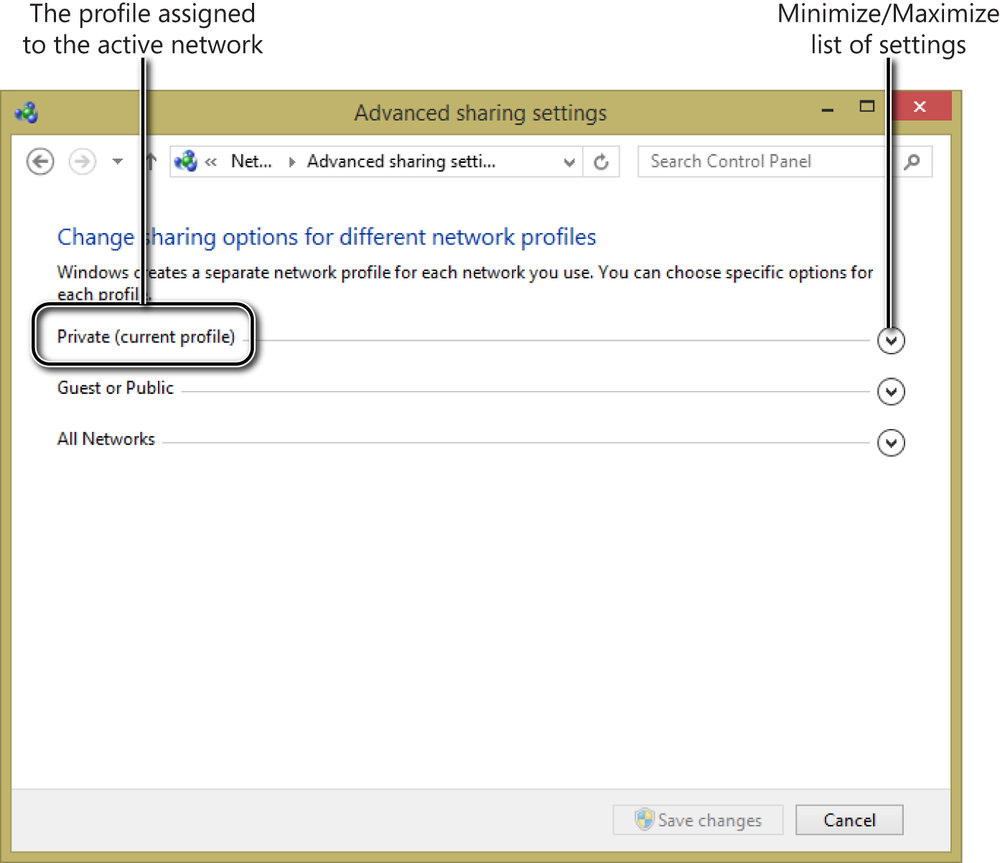
The network sharing settings are split by network profile. Each network profile has different settings, and a combination of settings is applied to all networks to which you connect.
The profile assigned to your current network connection is indicated by the Current Profile statement beside the name of one of the two profiles. If you want to access the settings for only one of the network locations, use the arrows to the right of each profile. Clicking the arrow once collapses the list of settings for that network location. Clicking it again expands the list.
Tip
To learn more about network profiles and assigning them to a network connection, see the section Changing the network profile of a network in Chapter 11.
The Private profile has the following default settings:
Network Discovery Is Turned On. When this setting is applied, Windows can search for other devices on the network to which it is connected, and it allows other computers and devices on the same network to find your Windows–based computer or device.
File And Printer Sharing Is Turned On. When this setting is applied, you can share content and printers with other computers and devices on your network.
Windows Is Allowed To Manage HomeGroup Connections. After you join or create a homegroup, Windows automatically manages HomeGroup connections. If you choose the other available option, you must manually type a user name and password when you connect to other computers.
The default settings for the Private profile are very effective and do not need changing unless you don’t want to or don’t need to use the available network sharing features on the network to which you are connected. If this is the case, it is best to switch the network profile to Guest Or Public instead of changing the default settings of the Private profile.
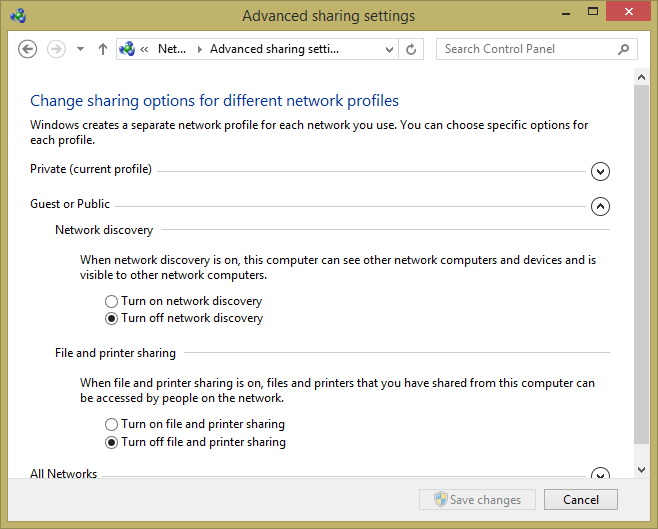
The Guest Or Public profile has the following default settings:
Network Discovery Is Turned Off. When this setting is applied, other computers and devices on the network can’t discover your Windows–based computer or device unless they utilize its direct network address.
File And Printer Sharing Is Turned Off. When this setting is applied, all network sharing features are disabled and can’t be used on this network. If your computer is accessed by others, they cannot view any files, folders, or devices being shared.
These default settings are great when connecting to networks that you don’t trust and with which you do not want to share any folders, libraries, or devices.
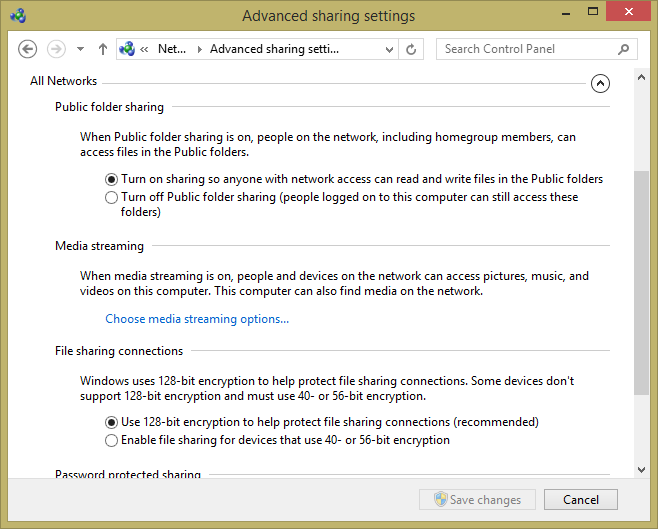
Last, a combination of settings is applied to all network connections. You can find and customize them in the All Networks section. The available settings are the following:
Public Folder Sharing. When this setting is turned on, the C:UsersPublic folder is shared with all the computers and devices on the network. This folder contains the following subfolders: Public Documents, Public Downloads, Public Music, Public Pictures, and Public Videos. Other folders are also contained here, but they are hidden to users. Users on the same computer or from other computers and devices can read the contents of the Public folder and write files inside it and its subfolders. When this setting is turned off, this folder is not shared with your network. Turning off Public folder sharing is recommended unless using this folder for sharing is useful to you. Depending on your personal preference, you might choose to share files and folders directly with others instead of copying them to the Public folder.
Media Streaming. With this setting, you can stream multimedia files (pictures, video, and music) by using Windows Media Player. When this setting is turned on, you can stream your media with the network and the Internet. When it’s turned off, no media streaming is possible by using Windows Media Player. You should only turn on this feature if you plan to use it. By default, it is turned off, unless you have used Windows Media Player at least once.
File Sharing Connections. This setting determines the type of encryption used for file sharing connections. By default, it’s set to 128-bit encryption. You can also set it to the less secure 40-bit or 56-bit encryption. However, it is best to leave this set at 128-bit encryption unless you have issues with older devices or computers that cannot properly access your shared files and folders.
Password Protected Sharing. With this setting, people can only access your shared files and folders if they have a user account and password set on your computer. If they don’t have these details, they cannot connect to your shared folders and devices unless the shared folders and devices are shared with everyone. Turning off this feature is useful only when connecting to trusted home or work networks with diverse operating systems that have trouble connecting to your Windows 8.1 shared folders and devices. However, this setting should be used only as a last resort.
If you make any changes to the default network sharing settings, don’t forget to click the Save Changes button so that they are applied. Also, keep in mind that making changes to these settings requires administrator permissions. User accounts with no administrator permissions cannot modify them in any way.
HomeGroup is a network feature first introduced in Windows 7 and further improved in Windows 8 and Windows 8.1. It aims to simplify the process of sharing content and devices on trusted small networks. In earlier versions of Windows, sharing content was a tedious and sometimes painful process.
By using the HomeGroup, you can access all shared files and devices in your network with very few clicks and without typing user names and passwords. The HomeGroup manages all security and authentication for you and ensures that computers and devices outside the homegroup cannot access what you are sharing. This feature is designed primarily for computers and devices connected to a small home or work network.
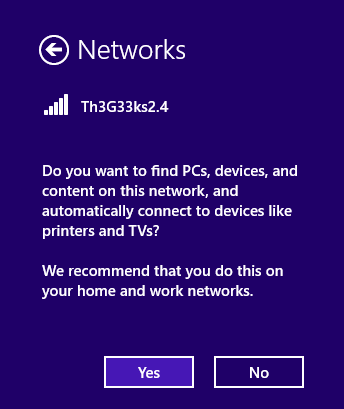
Each time you connect the computer to a new network, Windows 8.1 asks you to set network sharing. If you turn on sharing and connect to devices, you are in a trusted and private network of computers and devices. In this scenario, Windows 8.1 enables you to use the HomeGroup. If you do not turn on sharing, this feature will not be available.
Even though this feature is useful and easy to use, it has an important limitation: It is available only for computers and devices running Windows 7, Windows 8, and Windows 8.1. Only these operating systems can join a homegroup and take advantage of it without any special configuration.
After you have connected to your network and customized the network sharing settings, you can create the homegroup for your network computers to join and exchange libraries, files, folders, and devices. You can create the homegroup from either Control Panel or PC Settings; however, the creation process is slightly faster when you use PC Settings.
When you create a homegroup, Windows automatically generates a random and secure password that will be used by all computers and devices to join the homegroup and share items among them. You can’t set this password when you create the homegroup initially, but you can change it later on.
After the homegroup is created, you can select from a standard list of items to share with others. A limited list of libraries is available for sharing: Documents, Music, Pictures, and Videos. You can also share installed printers and devices (scanners, multifunctional printers, and so on) and allow devices such as TVs and game consoles to play the content you have shared with the homegroup. Sharing other libraries, folders, or devices can be set up after you create the homegroup.
Tip
To learn more about libraries in Windows 8.1, read Chapter 4.
In this exercise, you’ll learn how to create a homegroup.
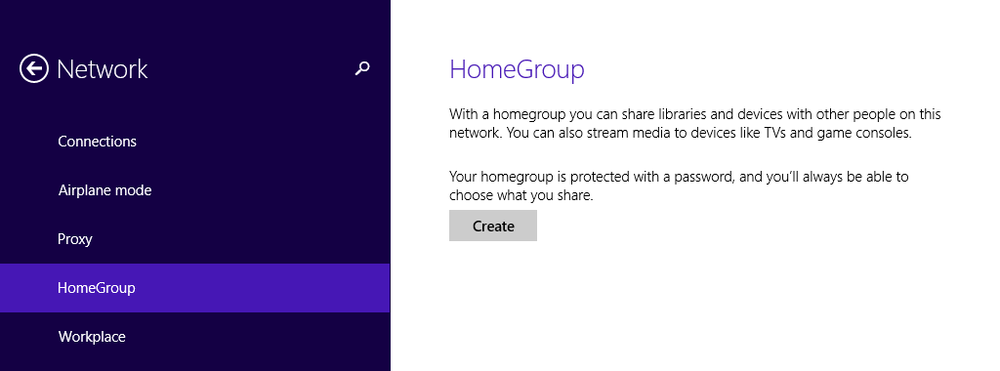
In PC Settings, at the bottom of the window, click Network.
In the Network pane, click HomeGroup.
Troubleshooting
If, when you click the HomeGroup link, you do not see a window similar to the one shown here, but something with the settings of an existing homegroup, the computer is already part of a homegroup. In this scenario, you either keep the computer as part of that homegroup or leave that homegroup and create a new one. To learn how to leave a homegroup, read the section Leaving a homegroup later in this chapter.
Click Create.
Windows takes a few seconds to create the homegroup.
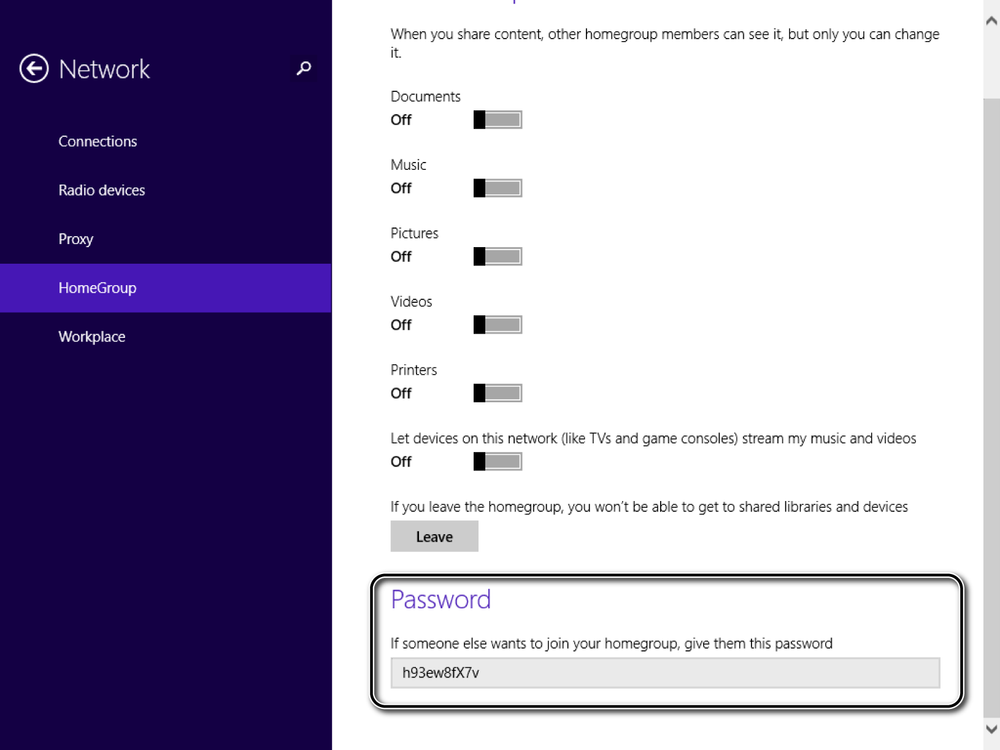
Set the permissions to On by changing the positions of the switches for the items you want shared with the homegroup.
Scroll down to the Password section to learn the password generated for your homegroup.
Write down the password.
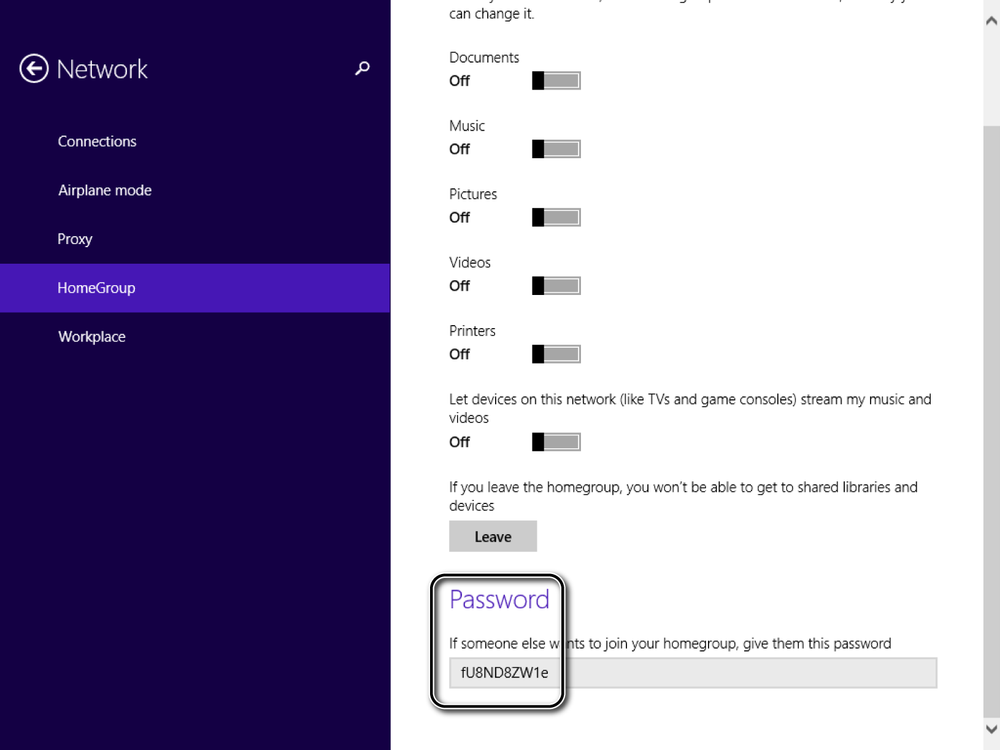
The homegroup is now created, and other computers and devices running Windows 7, Windows 8, or Windows 8.1 can join it by using the same password.
After the homegroup is created, other computers can join so that you can exchange files and folders and share devices. Any computer on the network can be part of a homegroup, but it can be in only one homegroup at a time.
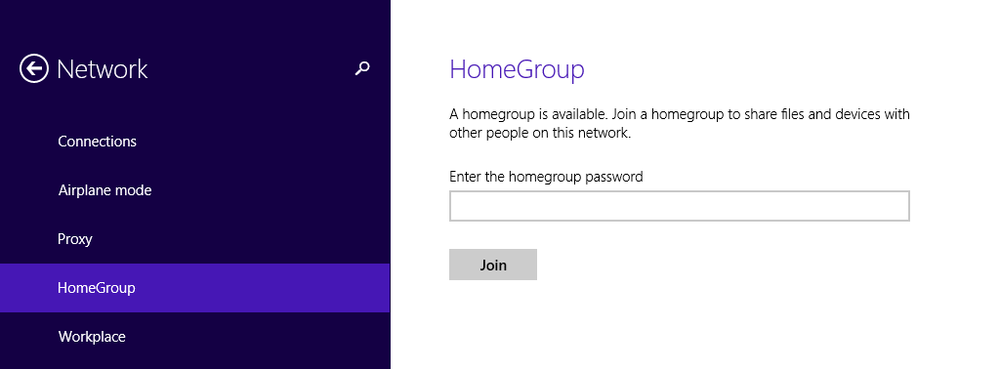
In PC Settings, go to Network and then HomeGroup. There, Windows 8.1 informs you whether it detects a homegroup created by another computer. When joining a homegroup, you are asked to type the password that was generated during its creation. If you remember the password from the previous section, use that one. If not, ask the person who created the homegroup for the password.
In this exercise, you’ll learn how to join a computer running Windows 8.1 to a previously created homegroup.
In PC Settings, at the bottom of the window, click Network.
In the Network pane, click HomeGroup.
In the Enter The HomeGroup Password box, type the homegroup password, and then click Join.
Windows takes a few seconds to join you to the homegroup.
Set the permissions to On by changing the positions of the switches for the items you want shared with the homegroup.
Clean Up
Close PC Settings. Repeat this procedure for all the computers and devices on your network that you want in the homegroup.
The computer is now part of the homegroup and has shared the items you selected.
If you want to add another computer or device to the homegroup and you forgot the password, you can find it easily on any of the computers that are part of the homegroup.
In this exercise, you’ll learn how to find the password for your homegroup so that you can share it with the people who need to know it.
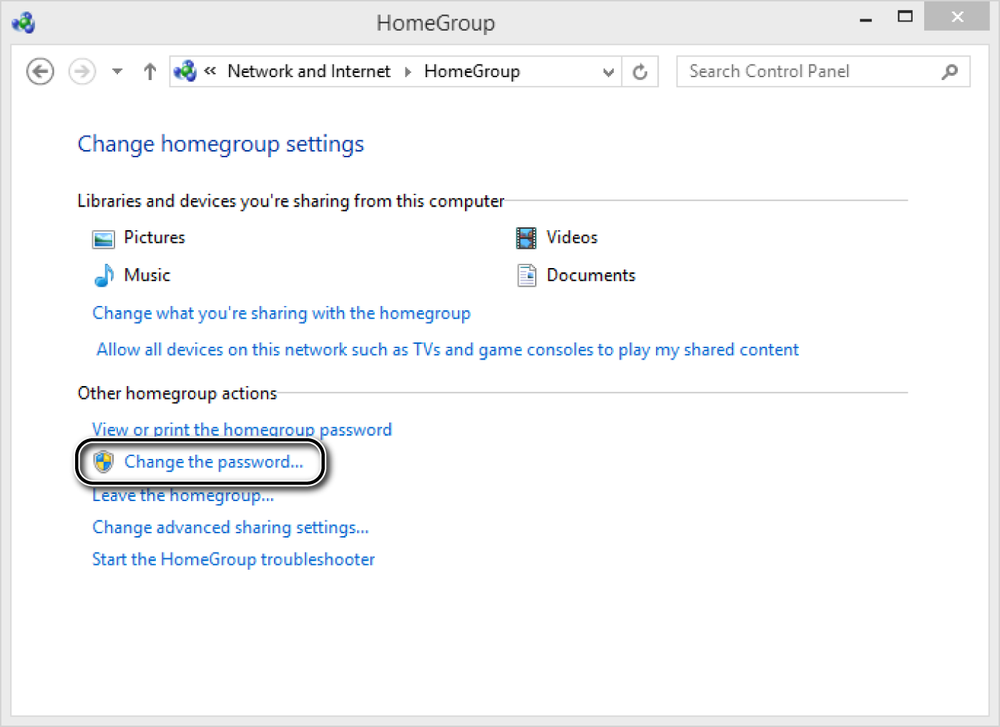
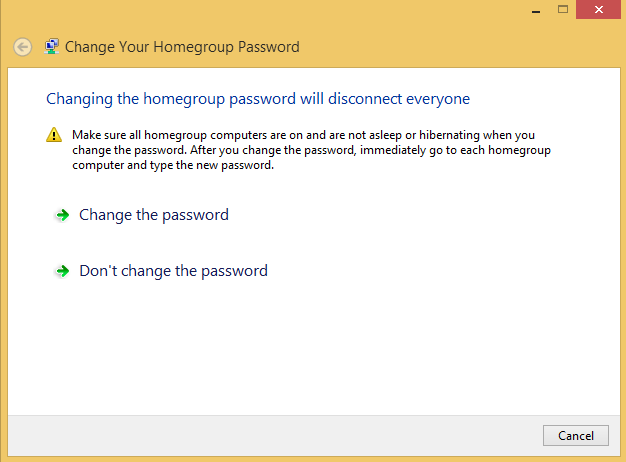
You can change the password of a homegroup from any computer that joined it, but only from Control Panel, not from PC Settings. If you change the password after other computers and devices have joined the homegroup, the password change will disconnect the other computers and devices. After the password is changed, all the other computers and devices must rejoin the homegroup by using the new password.
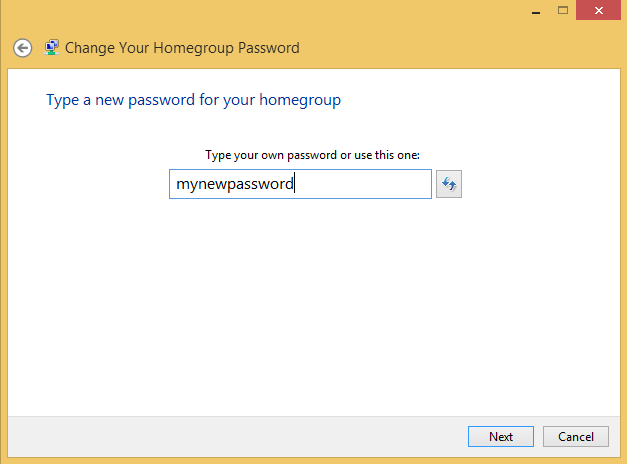
When changing the password, Windows generates a new random and secure password for you, but you can type a password of your own. The only condition is that the password must be at least eight characters long; otherwise, Windows won’t accept it as a valid password.
In this exercise, you’ll learn how to change the password of an existing homegroup to one of your own choosing.
In the Network And Sharing Center, click the HomeGroup link.
The HomeGroup window opens.
Click Change The Password.
You are asked to confirm that you want to change the password.
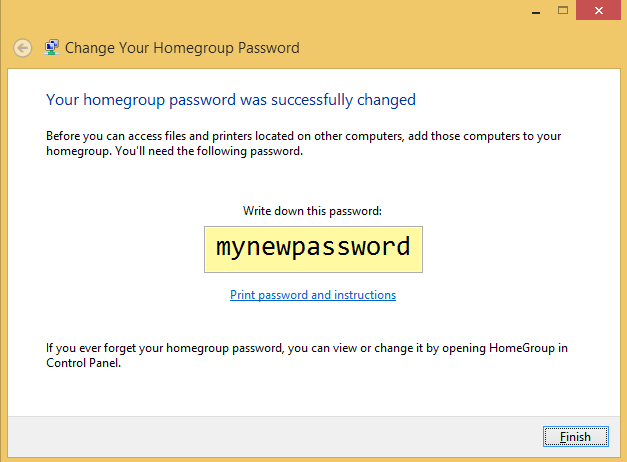
Click Change The Password.
Windows generates a new random password.
In the Type Your Own Password Or Use This One box, type a new password that is at least eight characters long.
Windows makes the necessary changes.
Click Finish.
Clean Up
Close the HomeGroup window. Rejoin all computers and devices that were disconnected due to the password change.
The password for the homegroup is now changed.
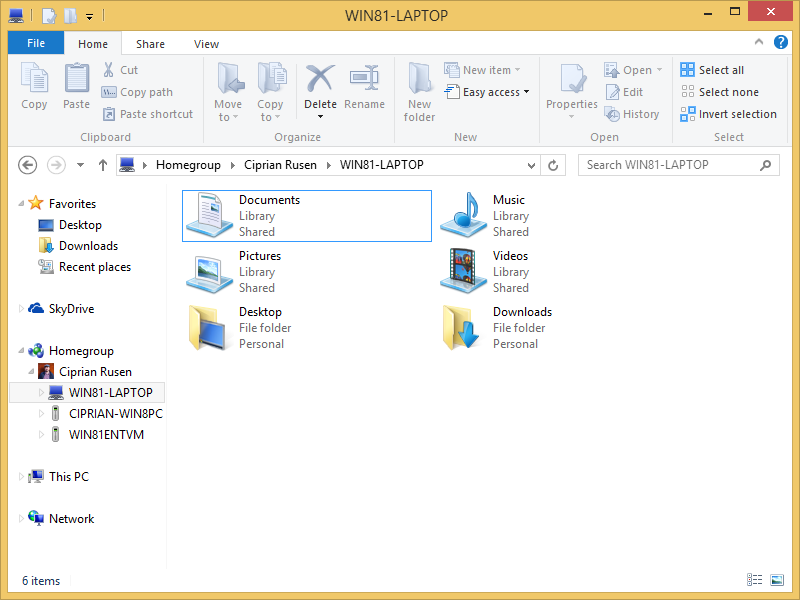
After the homegroup is created and all computers and devices are joined, accessing their shared content is simple. All it takes is a few clicks. You no longer need to type any user names and passwords to access what is being shared.
Open File Explorer and then, in the navigation pane on the left, click the HomeGroup section. You’ll see a list of user accounts and computers that are part of the homegroup and running at that moment. Double-click any of the shared folders and libraries to access their content.
Leaving a homegroup is as easy as joining one. If you leave a homegroup, you stop sharing files, folders, and devices with other members of the group, and you won’t be able to access what is shared as part of that homegroup. You can create another homegroup or join the existing one again at any time.
In this exercise, you’ll learn how to leave a homegroup to which your computer is joined.
In PC Settings, at the bottom of the window, click Network.
In the Network pane, click HomeGroup.
Scroll down until you find the Leave button and then click it.
Windows 8.1 takes a few seconds to leave the homegroup.

Your computer is no longer a part of the homegroup.
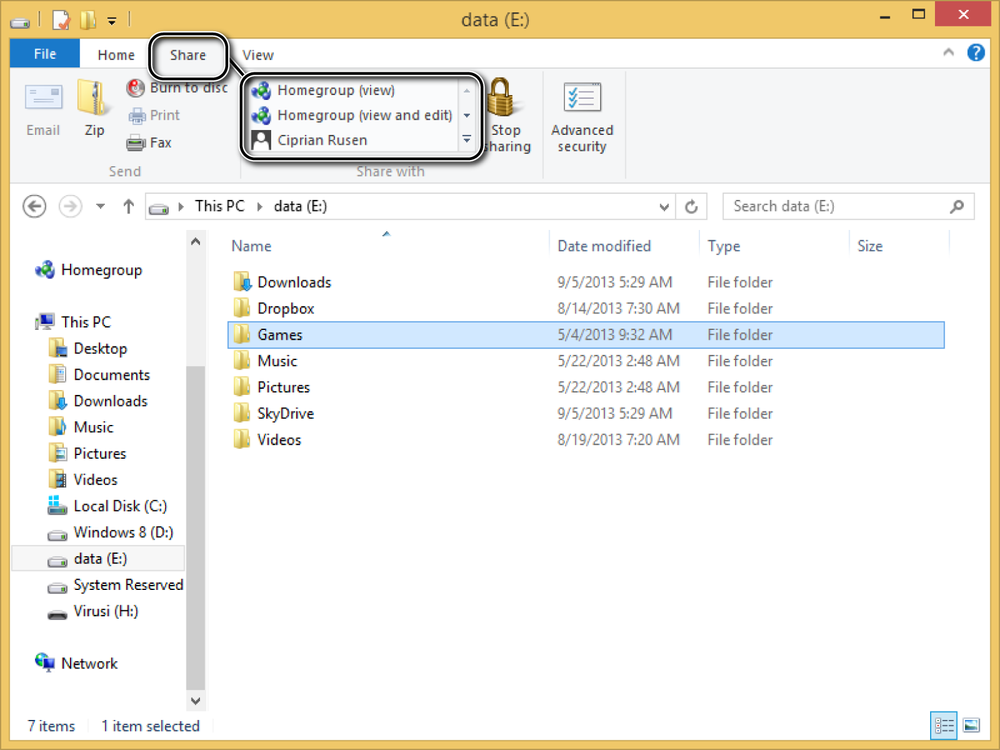
If you have set up a homegroup and you want to share something with other computers that have joined it, the Sharing Wizard makes the procedure simple. The sharing options are on the Share tab of File Explorer.
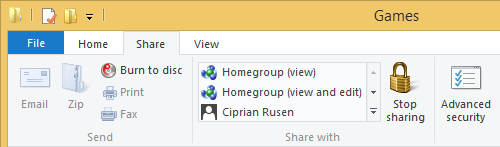
For any library or folder you select for sharing, you have the following options:
HomeGroup (View). This option shares the selected item with the homegroup and gives Read-Only permissions to all computers and devices in the homegroup. The item will be shared only when you are connected to the homegroup, and others will be able to view and read the shared item but not modify it or delete it.
HomeGroup (View And Edit). This shares the item with others in your homegroup and gives full permissions to modify it or delete it. The item will not be shared when you disconnect from the homegroup or connect to another network.
User Accounts Names. You will see other user accounts existing in Windows 8.1, in the list. If you select a user account name, you will share the item (with Read-Only permissions) with that user account.
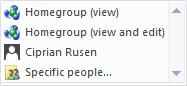
Specific People. With this option, you can share the selected item with whomever you want, including with computers that are not part of the homegroup or specific user accounts. This option is described in more detail in the next section of this chapter.
In this exercise, you’ll learn how to use the Sharing Wizard to share a folder with the homegroup.
Set Up
Open File Explorer and browse to the folder that you want to share. If the ribbon is collapsed, double-click it to expand it.
Select the folder without opening it.
Click the Share tab.
The list of sharing options opens.
In the Share with section, click HomeGroup (View).
Clean Up
Repeat the procedure for all the items you want to share. When you have finished, close File Explorer.
The selected folder is now shared with the homegroup.
If you have computers that are not running Windows 8.1, Windows 8, or Windows 7, you can use the Sharing Wizard to share libraries and folders with them without using the HomeGroup. However, the procedure takes slightly longer.
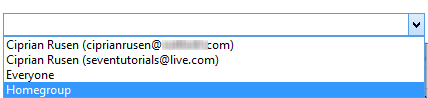
During the sharing procedure, a drop-down menu appears that shows all the user accounts defined on your computer, the homegroup you have joined, and a user account called Everyone. The homegroup user account represents all the computers and devices from your homegroup, whereas Everyone is a generic user account; this can be any user on the list. If you want to share something with computers that have different operating systems installed, it is best to share items by using the Everyone user account. The other operating systems will have an easier time accessing what you have shared.
By default, all the user accounts with which you choose to share are granted Read permissions to the shared item. If you want to change that, click the Permission Level assigned. A list appears showing the available permission levels.

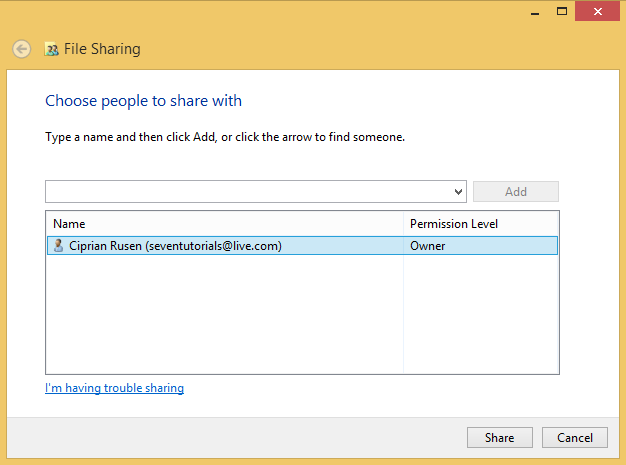
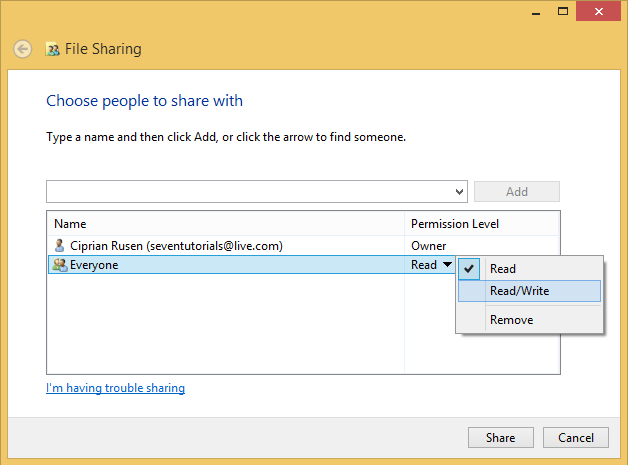
In this exercise, you’ll learn how to use the Sharing Wizard to share a folder with everyone and assign Read/Write permissions.
Set Up
Open File Explorer and browse to the folder that you want to share. If the ribbon is collapsed, double-click it to expand it.
Select the folder without opening it.
Click the Share tab.
Scroll down the Share With list of options.
Click Specific People.
The File Sharing Wizard opens.
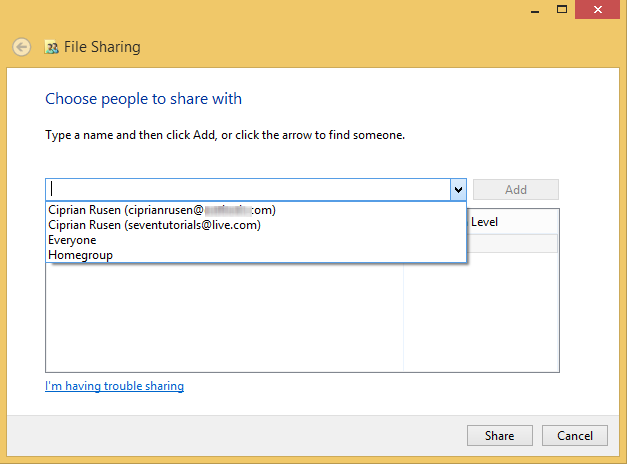
Click the drop-down list to see the user accounts with which you can share.
Select the user account named Everyone.
Click Add.
The user account is added to the existing accounts that appear below the drop-down list.
Click Permission Level for Everyone and select Read/Write.
Click Share.
You are informed that the selected folder has been shared.
Click Done.
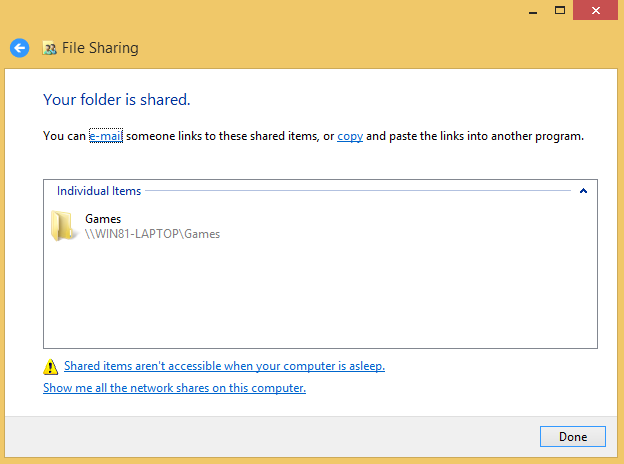
The selected folder is now shared with everyone on your network.
Stop sharing a library or folder
At some point in your networking experience, you might want to stop sharing a folder or library. The procedure for this is the same as for sharing it. The only difference is that you need to click the Stop Sharing button on the Share tab.
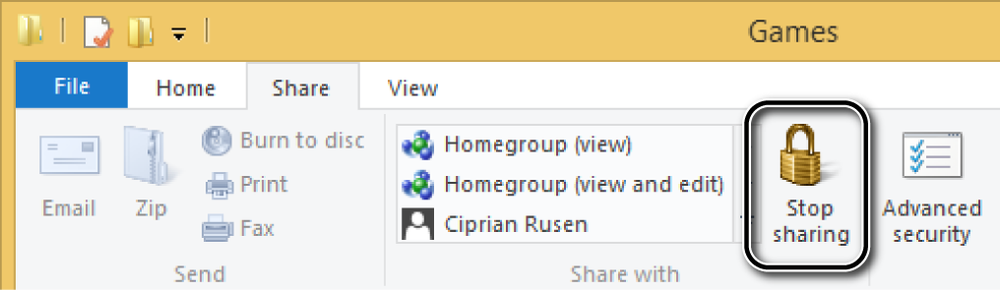
Without any other prompts or windows, the item you selected is no longer shared with the network to which you are connected.
Installed devices such as printers and scanners are accessible in the Devices And Printers window. From there, you can configure everything, including sharing devices with the other computers on your network.

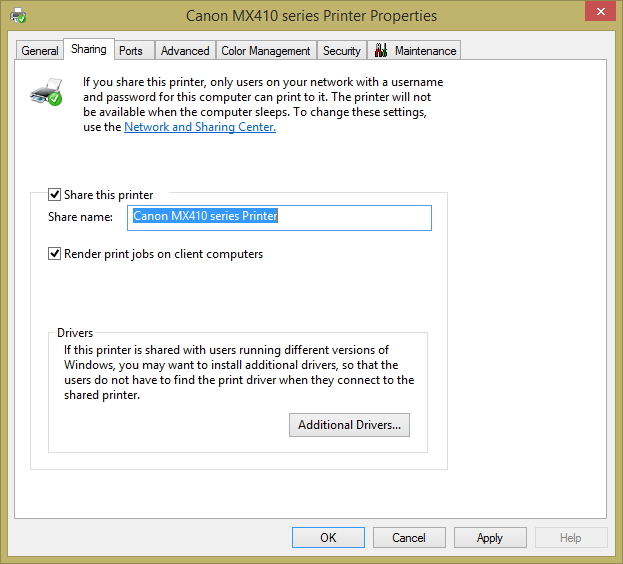
When sharing a printer, its default Share Name is its model name. If you want to change it, in the Properties dialog box for the printer, type a new name during the sharing procedure.
A shared printer on the network is shared with the entire network, including computers and devices that are outside the homegroup. If you want to share a printer with only the homegroup, check the instructions in the next section.
In this exercise, you’ll learn how to share a printer with your network. The exercise and illustrations were created using a Canon Pixma MX410 printer; however, the same steps apply to almost any model of printer and should not vary much from what you see here. Please keep in mind that the number of printers and devices you see mentioned in the screenshots of this exercise will vary depending on your setup.
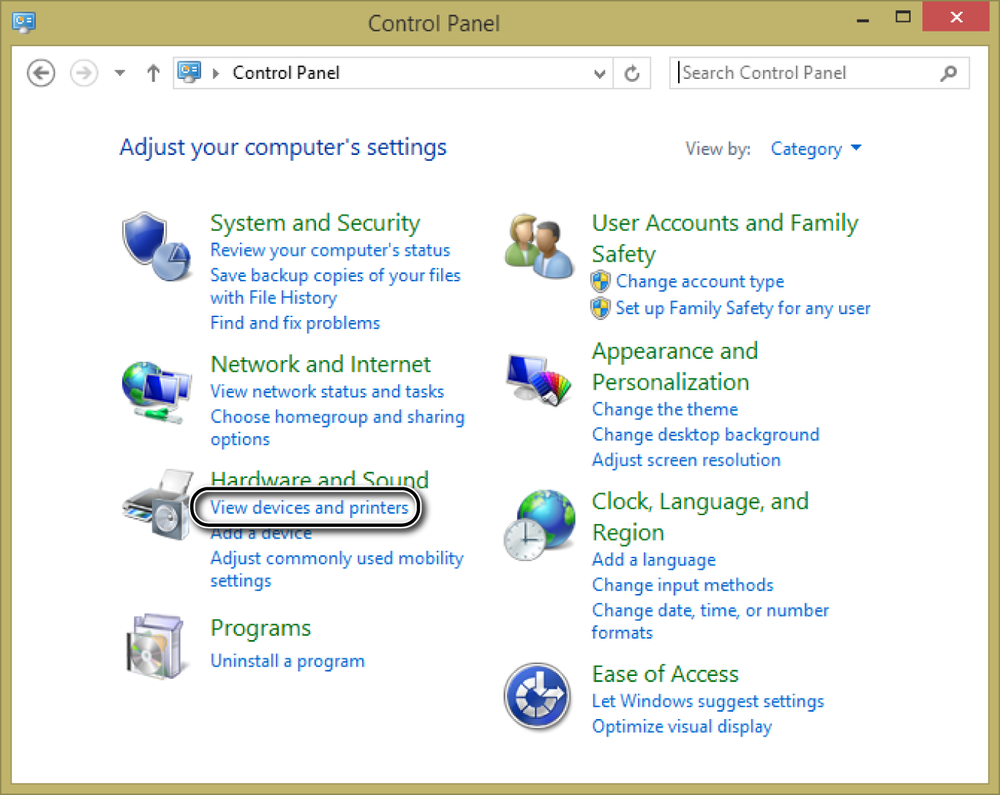
Open Control Panel.
In the Hardware And Sound section, click View Devices And Printers.
The Devices And Printers pane opens.
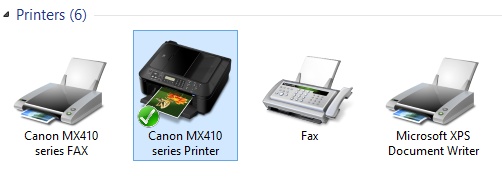
Scroll down to the Printers section to view the printers installed on your computer.
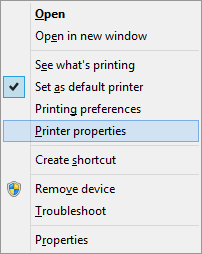
Right-click the printer that you want to share.
A shortcut menu opens.
Click Printer Properties.
The Printer Properties dialog box opens.
Click the Sharing tab.
Click OK.
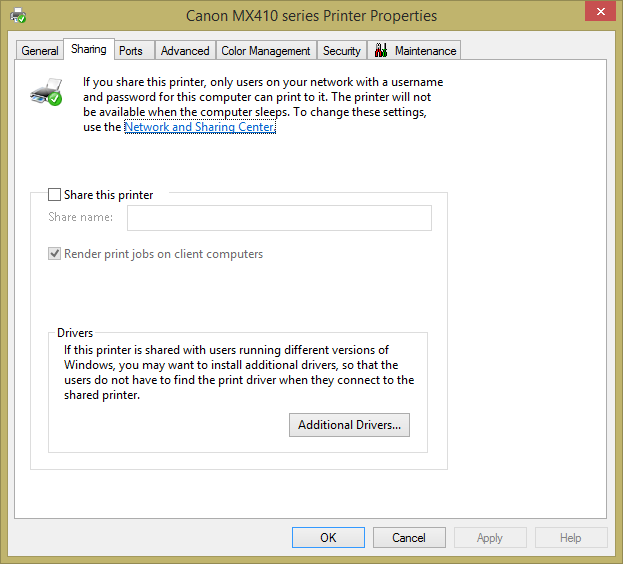

The printer is now shared with the other computers on your network.
Sharing a printer with your homegroup is very easy. However, the sharing procedure does not offer control over the specific devices being shared. With one setting, you can share with the homegroup all the printers and devices attached to your computer. If you want to share only one of the devices attached to your computer, it is best to follow the procedure detailed in the previous section.
In this exercise, you’ll learn how to share all your connected printers and devices with others on the homegroup.
In PC Settings, at the bottom of the window, click Network.
In the Network pane, click HomeGroup.
Look for the Printers switch.
Change the position of the switch from Off to On.
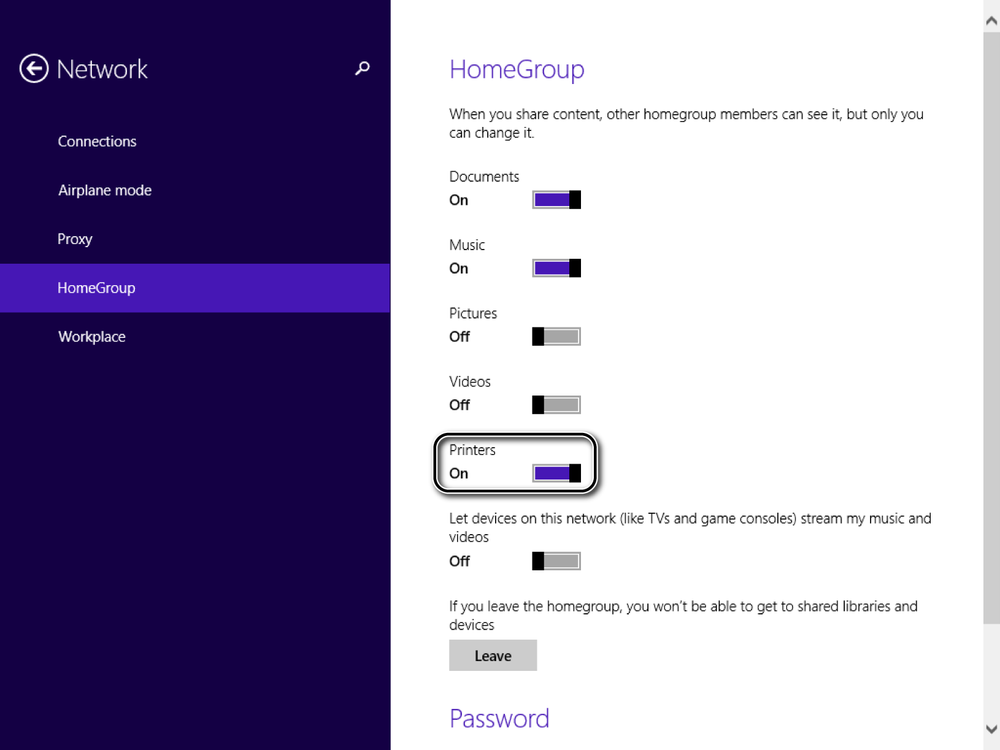
All your printers and devices are now shared with the homegroup.
The appropriate network sharing settings are applied automatically to the network to which you are connected, depending on whether you turned on sharing when first connecting to it.
The HomeGroup works only on computers running Windows 7, Windows 8, and Windows 8.1. It allows easy sharing of files, folders, libraries, and devices without having to type user names and passwords each time you want to access something that is shared over the network.
To join a homegroup, you need to type the homegroup password defined on the computer on which it was created.
A computer can join only one homegroup at a time. To join another homegroup, the computer must first leave the current one.
You can share your printer with both your homegroup and the computers that are not in your homegroup but are part of the network to which you are connected.
The Sharing Wizard makes it easy for you to share libraries and folders with your home network.