
Chapter at a glance
Burn
Burn a CD, page 270
Access
Access videos, page 272

Create
Create a playlist, page 275
Install
Install Media Center, page 280
IN THIS CHAPTER, YOU WILL LEARN HOW TO
Windows 8.1 offers many options for viewing and managing your media. This includes photos, videos, music, television, and more. You already learned quite a bit about accessing media from the various media apps on the Start screen, including the Photos, Music, and Video apps; these were covered in Chapter 3. In this chapter, we’ll look at two desktop apps with which you can view and manage media: Windows Media Player and Windows Media Center. Both open on the desktop in their own windows.
Tip
Windows Media Center does not ship with Windows 8.1; it’s an add-on. You’ll learn how to obtain Windows Media Center later in this chapter.
By using both Windows Media Player and Windows Media Center, you can access the media stored on your computer and on computers configured to share media on your home network, and browse, play, and view music, photos, and videos. You can create playlists of music and view photos in various ways. However, these two desktop apps are different in many ways.
Windows Media Player was created to give users a way to easily synchronize portable music devices, burn and rip music CDs, listen to music, and create music playlists. Windows Media Center offers many more options, including the ability to create slide shows of pictures, watch and record live TV, and browse and play media with a compatible remote control. Windows Media Player is just that—a player—whereas Windows Media Center is in essence an entertainment center. Usually, Windows Media Player requires less setup and is easier to use because you generally use it only to listen to and manage music. Windows Media Center requires more setup but offers more features and configuration options, including the ability to watch and record live TV provided you have the required hardware for doing so.
In this chapter, you’ll learn how to use Windows Media Player and how to obtain Windows Media Center and a little about the features it offers. Remember, however, that the Music, Photos, and Video apps are available on the Start screen, and those are much easier to use and more streamlined than Windows Media Player and Windows Media Center. You should try out all the apps along with Windows Media Player and then decide what you prefer to use (or need to use) for managing and playing specific types of media in varying circumstances.
Practice Files
You don’t need any practice files to complete the exercises in this chapter. For more information about practice file requirements, see the section “Using the practice files” in the Introduction of this book.
You open Windows Media Player just as you open any app or desktop app: You just start typing its name on the Start screen. You’ll see Windows Media Player in the results and can click the result once to open the app.

After Windows Media Player opens, if you’re prompted to choose a setup option, choose the Recommended Settings; you can always go back and customize them if desired. Depending on the options you choose, the types of media already on your Windows 8–based computer, music shared by other computers on your network, and other factors (such as other media apps you’ve installed and the type of media you’ve collected with them), you might see that some media (but perhaps not all of it) is already available. By default, Media Player populates itself automatically with compatible music from the Music library and will do the same with media from the Pictures library and Videos library. You’ll also see an entry in the Navigation pane if there’s a CD in the CD/DVD drive. The Navigation pane is shown here:
Tip
To pin Windows Media Player to the Start screen, on the Start screen, type Media, right-click Windows Media Player in the results, and then, on the menu that appears, click Pin To Start. You can also choose the option Pin To Taskbar.
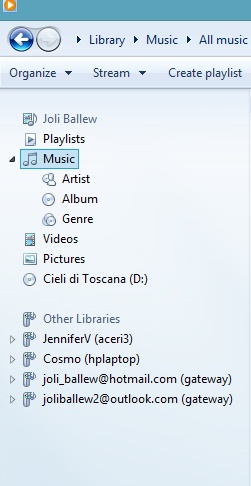
While using Windows Media Player, you might also notice entries under Other Libraries. If you do, media sharing is already set up on your network, and media stored in those libraries is available to you on your Windows 8–based computer. You must specifically state that you want to share media with other networked computers; it isn’t something that is enabled by default. To do that, open Windows Media Player at the desired networked computers and click the Stream list to configure sharing. You may see other options than the ones shown here.
Tip
If you store all your music, pictures, or videos somewhere other than in the default libraries, you’ll have to instruct Windows Media Player where to look for them. You can do that by using the Organize, Manage Libraries list.
When you look closely at Windows Media Player, you’ll see that several items run across the top of the interface. There are Back and Forward buttons, a Search window, and an icon to change the view. These probably look familiar to you if you’ve read other chapters in this book.
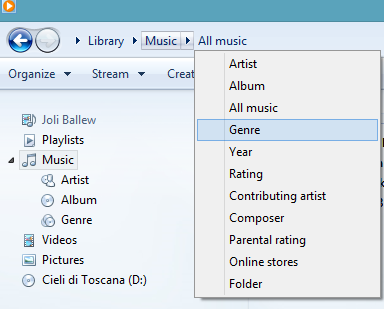
The titles you see (such as the name of your media library, the library that is currently selected, and how the data in that library is currently sorted) might differ from what you see here, though. You can click the arrow beside any title name to change the library you are in or the media you are browsing. What you see when you click a right-facing arrow depends on which arrow you click. To change from the current library (for example, Music) to another (for example, Recorded TV), you click the arrow just before Music. (Depending on the type of media you own, you might see an option for Other Media.)

Troubleshooting
If you do not see the library titles across the top of the Windows Media Player interface, you have something other than a default library selected in the Navigation pane. You might have a CD selected, for instance. To rectify this, select Music in the Navigation pane.
To narrow down what’s shown in any selected library, such as Music, click the arrow that appears directly after the name of the selected library. For example, you could show only music from a specific genre rather than all your music.
Beyond the lists for Organize, Stream, and Create Playlist detailed later in this chapter, there are tabs for Play, Burn, and Sync.
Play. Click this tab and drag songs to the resulting area, create a playlist of songs, and save it. You can play any song by clicking it once, and songs in a playlist will continue to play in order unless Shuffle is enabled.
Burn. Click this tab and use this area to drag songs and create a list of songs to burn to an audio CD that you can play in most CD players (such as the one in your car).
Sync. Click this tab and use this area to drag songs and sync them to a compatible portable music device.
You can use the commands that run across the interface under the previously discussed titles to perform tasks on the media in your library, configure preferences, share your media, change the Windows Media Player layout, and even customize the Navigation pane, among other actions.
Organize. Click the arrow for the Organize list to add folders to existing libraries (to expand your library), apply media information changes, sort the data currently visible, customize the Navigation pane by adding or removing elements, change the layout, and configure options.
Stream. Click the arrow for the Stream list to allow devices on your network to access the media stored on your Windows 8–based computer and play it. You can also let those devices control Windows Media Player, and you can make your media accessible via the Internet. You’ll learn more about this later in this chapter.
Create Playlist. Click the arrow for the Create Playlist list to create a playlist or an auto playlist. You’ll learn about this later in this chapter.
Rip CD. You’ll only see the Rip CD option if you have inserted a CD in the CD/DVD drive and if that CD has not already been copied (ripped) to your computer.
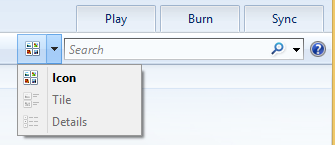
View Options. Click the Views list arrow to change how media is displayed on the screen. The choices include Icon, Tile, and Details.
Finally, Windows Media Player has several items in the Navigation pane.
Playlists. Offers access to the playlists you’ve created, copied, or synced. A playlist is a group of songs that you group together. You might have a workout playlist, a sleep playlist, and a dinner playlist, for example. Click any playlist to begin playing it.
Music. Offers access to music that is stored on your local computer. Click any song or album to access and play it.
Videos. Offers access to videos that are stored on your local computer. Click any video to play it.
Pictures. Offers access to pictures that are stored on your local computer. Click any picture to view it.
CD or DVD (the name appears) or Blank Disk. Only offers access if you have a CD or DVD in the CD/DVD drive.
Other Libraries. Offers access to media that’s been shared on your local network through other computers and compatible devices.

There are many ways to populate your Windows 8–based computer with music. You can buy music from the Xbox Music Store. You can copy the media from another computer, you can access the media from a shared drive on your home network, and you can copy music from a portable music player. You can also copy the music from CDs you currently own in a process known as ripping.
When you rip a CD, there are several settings you can configure prior to copying the songs; you’ll use these options to change the default settings if you need to. You might need to change settings when you rip a CD if you plan to copy the songs to an older MP3 player that doesn’t support the default Windows Media Audio format. You might also want to increase or decrease the Audio Quality settings. Lower quality takes up less storage space, but higher quality sounds better. You might also opt to eject the CD automatically after the rip has completed, which is a good option if you plan to sit down and rip your entire music collection. As you might have guessed, there are even more options from which to choose.
In this exercise, you’ll rip a CD, use the highest quality setting, and opt to eject the CD after the rip is complete.
Set Up
Open Windows Media Player. Get a music CD that you own. You do not need any practice files for this exercise.
Place the music CD in the CD/DVD drive.
In the Navigation pane, if the CD is not selected, select it.
Clear the check boxes for any songs that you do not want to copy.
Click Rip Settings located to the right of Rip CD. You might need to click a right-facing arrow to access this.
Click Audio Quality and then choose 192 Kbps (Best Quality).
Repeat step 4, but this time click Eject CD After Ripping.
Click Rip CD.
The ripping process starts.


You are likely to already be familiar with playlists: A list of songs on a CD or album is a playlist. The older mixed tapes with which you might be familiar were playlists, too. So it’s probably no surprise to you that you can create playlists that consist of your own music in Windows Media Player. You can create playlists for almost any occasion, including parties, workout routines, or even meditation sessions. After a playlist is created, you can synchronize it to other devices, burn it to a CD, and share it across your home network.
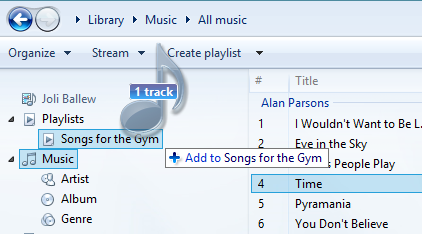
Creating a playlist is simple, if you haven’t created one yet. In the Navigation pane, click Playlists, and you will see the Click Here prompt to create your first one. After you’ve done that, you name the playlist, locate the songs to add to it, and drag them into it. You’ll use a similar dragging process to create a playlist to burn to a CD, detailed later in this section; read that section if you aren’t sure how to drag the files to the new playlist.
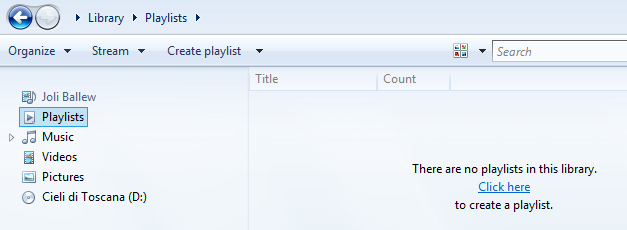
If you already have playlists, the option to Click Here to create one will not display. In that case, you can either add songs to an existing playlist or create a new one by clicking Create Playlist on the menu bar at the top of the window.
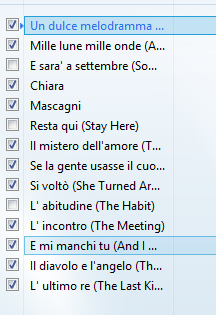
To add songs to an existing playlist or a new playlist you just created, locate the song to add, and then drag it on top of the playlist’s name. Note that songs you drag to playlists aren’t moved there; only the titles are added to the list. The music files remain in whatever folders they normally reside in on the hard disk.
Tip
If you aren’t sure how to drag songs to create a playlist, work through the upcoming exercise to burn songs to a CD. The process is similar.
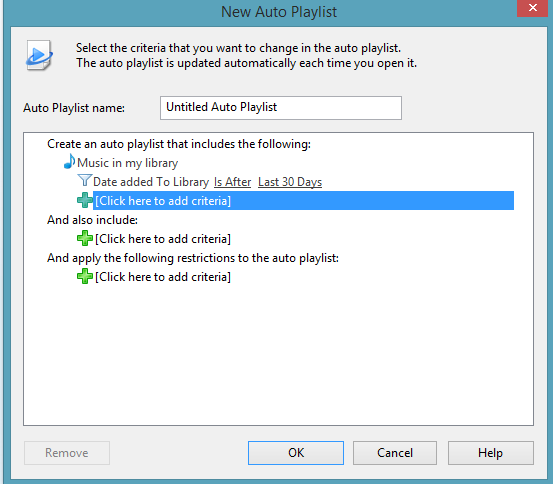
You can also create another kind of playlist—an auto playlist. When you create an auto playlist, you name it and then set criteria. Criteria can be almost anything; Windows Media Player will use the criteria you set to create a playlist automatically. For instance, you can create an auto playlist that contains only songs added to your library before or after a specific date or songs that you’ve played the most in the past year. After criteria are set, your playlist will be created and automatically managed. To start an auto playlist, on the menu bar, click Create Playlist, and then click Auto Playlist.
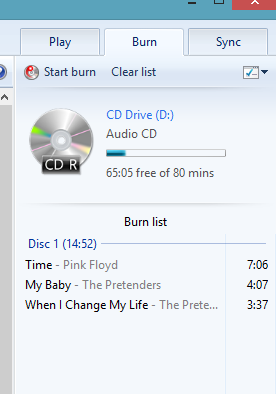
You can burn any playlist you create to a CD, provided it will fit and you have the required rights to copy the music. A typical CD holds about 80 minutes of music. If your playlist won’t fit on one CD, you’ll be prompted to span it over several (which is often the case with audio books and auto playlists). If you don’t already have a playlist created that you want to copy to a CD, you can create one on the go during the CD creation process.
In this exercise, you’ll burn a CD that contains music you like in the form of a playlist.
Set Up
You will need a computer that includes a CD-recordable drive, a blank CD, and music that you own available in Windows Media Player.
Open Windows Media Player.
Insert a blank, recordable CD into the CD/DVD drive.
Back in Windows Media Player, click the Burn tab.
Browse to the songs to add and then drag them to the Burn List.
Rearrange the order the songs in the list by dragging them up or down to a new position.
When the list is complete, click Start Burn.

Now that you understand the interface, how to navigate to various music tracks, and how to create playlists, spend some time playing the music you have on your computer. Playing music here is quite similar to playing music in the Music app you’ve already explored; you just select the song to play and use the controls to manage playback.
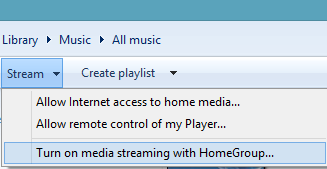
You can share the media you’ve acquired on your Windows 8–based computer with compatible computers and devices on your network. Devices can include tablets, media centers, smart phones, and Microsoft Xbox sets. For these other devices to gain access, however, you must enable streaming options in Windows Media Player. To do this, on the menu bar, click Stream.
There are varying options on the Stream menu, and what you see depends on how your computer and network are configured. You must click the desired option to access their features and settings.
Allow Internet Access To Home Media. Select this option to stream music, pictures, and videos from your home computer to a computer outside your home (such as one at a vacation home). You can configure this computer to send your media over the Internet. After you configure this option on your home computer, you must configure the same option on the outside computer so that it can receive the media.
Allow Remote Control Of My Player. Select this option to allow other computers and devices on your home network to push music, pictures, and videos to Windows Media Player and to remotely control Windows Media Player.
Automatically Allow Devices To Play My Media. Select the available option so that other computers and devices on your home network can access the media you store on this computer. This is most likely the first option you’ll want to choose.
More Streaming Options. Use this option to choose media-streaming options for specific computers and devices on your network. For example, you might allow access to your Xbox 360 but prevent access from your child’s computer.
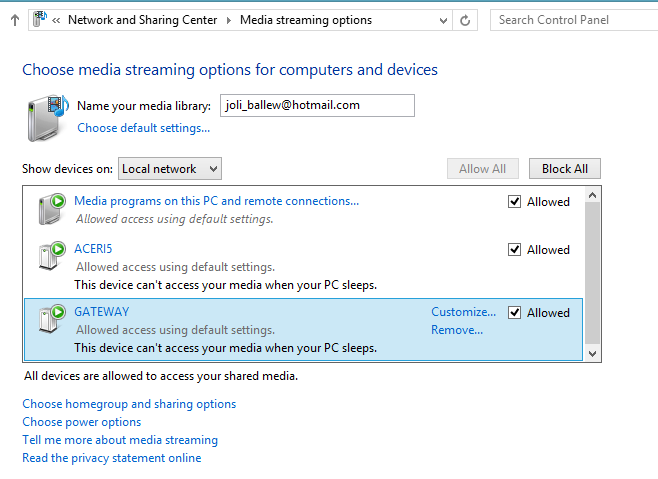
After it is configured, your media library will appear on allowed network devices.
So far, you’ve learned about Windows Media Player. As you learned in the introduction of this chapter, Windows Media Center is another media option that offers access to, management of, and the ability to play and watch any media that are available to you. It offers more features than Media Player, including the ability to record live TV, provided that your computer is equipped with the proper hardware. You can use Windows Media Center instead of your current Digital Video Recorder (DVR) if you decide you like it.
You have to get Windows Media Center yourself; it’s an available add-on feature and is not included with Windows 8.1 by default. There are two options for obtaining Windows Media Center. One is to add the Windows 8.1 Pro Pack, which is what you’ll do if you are running Windows 8.1; it costs $99. The other option is to add the Windows 8.1 Media Center Pack, which is what you’ll do if you are running Windows 8.1 Pro; it costs $9.99. Don’t worry, when you click I Want To Buy A Product Key Online in Step 2, you’ll be prompted as to which is suitable for your computer system.
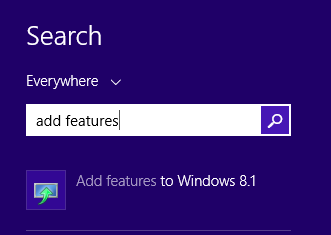
On the Start screen, type add features and then, from the results in Settings, click Add Features To Windows 8.1. (If prompted, click Yes to allow access.)
Click I Want To Buy A Product Key Online or I Already Have A Product Key, as applicable.
Work through the resulting process, which might involve purchasing the add-on and/or inputting a product key.
Accept the license terms and click Add Features.
Wait while the add-on installs.
When you start Windows Media Center, the setup process begins. You can choose Express or Custom. Because there are so many choices, it’s generally best to choose Custom. When you choose Custom, you’ll set up Windows Media Center by walking through each step of the configuration process.
During setup, you might be prompted to do the following:
Connect to the Internet.
Allow Media Center to download album cover art, music and movie information, and TV Program Guide listings automatically and periodically.
Optimize how Windows Media Center looks on your specific display.
Set up or configure speakers.
Set up or configure media libraries.
Configure advanced settings for your specific setup.
Configure your live TV signal.
You’ll see the main screen when Windows Media Center is ready.
You can navigate the Windows Media Center interface by using touch (if you have a compatible monitor), by using the arrow keys, by using a mouse, and even by using a compatible remote. At the main landing page, move up and down and left and right to see everything that’s offered. You’ll see various categories in which you can view and manage all of your media libraries.
With Windows Media Center you can do the following (with the required hardware):
Access all the pictures available to you, including shared pictures; add folders that contain media; and create slideshows, tag and rate pictures, and sort pictures in various ways.
Access and watch videos available to you, including shared videos. You can add additional video folders and sort videos in various ways, too.
Access your music library, sort music, create playlists, add other music folders, and view album art, among other things.
Automatically play music that you’ve configured as your favorites.
Listen to FM radio and configure presets. You must have the proper hardware configured for this to work.
Search for specific music.
Access movies in your Video library. You can sort movies by genre, year, parental ratings, and more.
Access the movie guide. If a TV tuner is configured and Live TV has been set up, you’ll see the movies that are currently playing.
Play a DVD by using the CD/DVD drive.
Access the TV guide and schedule recordings. One way to record TV is to right-click the show that you want to record. There are myriad settings to explore.
View TV programs you’ve recorded. You can sort by date recorded, title, and original air date, and you can access shared recordings.
Watch Live TV and access playback controls, record what’s on, and browse the guide. You can also pause Live TV. If you haven’t set up Live TV, the option will be named Live TV Setup.
View sports events, see scores, follow players, and more.
Access all Windows Media Center settings. If you want to change something about Windows Media Center, you do it here.
Synchronize Windows Media Center content to a compatible portable device.
Add a media extender so that you can view your media on other devices on your home network.
Windows Media Player is most often used for playing music, but you can also use it to view pictures, videos, and other compatible media.
You can rip and burn CDs by using Windows Media Player.
With Windows Media Player, you can share media across your home network and access media shared by other computers on the network.
Windows Media Center is most often used for watching and recording television, although you can also use it to view and listen to other media, including pictures, videos, and music.
Windows Media Center takes longer to set up, start, and find media than Windows Media Player does, but it offers more features than Windows Media Player.
With Windows Media Center, you can watch, pause, and record Live TV, and then play back those recordings.