
![]()
Introduction to the Windows Phone SDK
Welcome to this new and exciting journey toward Windows Phone 8 development! In this chapter, we will cover the essential information you will need to hit the ground running in mobile application development for the Windows Phone OS 8.0 platform. If you have developed Windows Phone 7 applications, don’t skip over this chapter just yet! We also have a recipe for upgrading your Windows Phone 7.x apps to Windows Phone 8.
For your first taste of Windows Phone 8 development, we will provide you with the following recipes:
- 1-1. Install the Development Tools
- 1-2. Create Your First Windows Phone 8 Application
- 1-3. Launch an App in the Windows Phone Emulator
- 1-4. Launch an App on a Windows Phone Device
- 1-5. Upgrade a Windows Phone 7.x app to Windows Phone 8
- 1-6. Become Acquainted With the Capabilities and Requirements in the Windows Phone Application Manifest
1-1. Install the Development Tools
Problem
Recently, you’ve been hearing the latest buzz around the newly released Windows Phone 8 devices. You want to capitalize on this by developing mobile apps for this platform while the market is hot. The problem is you don’t have a lot of time to spare to figure it out on your own. You want to know what you need to do to get your development environment up and running today.
Solution
Install the Windows Phone SDK 8.0.
How It Works
Just as a great artist needs a specific set of tools to create her masterpiece, a skillful mobile application developer needs the right tools to create quality applications. To develop Windows Phone 8 applications, you will need to download and install the necessary development tools from the Microsoft site. To obtain access to Windows Phone SDK downloads, documentation, developer forums, and more, go to http://dev.windowsphone.com. This web site is one which you will use often as you progress on your development journey, so you may want to bookmark it now.
On the main landing page, click the link “Get SDK,” which will take you to the download page. You will notice within the download page there are links to download previous and current versions of the Windows Phone SDK.
Before attempting to download and install the SDK, you should verify that your system meets the minimum requirements. You can check this by clicking the link “Get additional details and languages,” or for a quick summary refer to Table 1-1.
Table 1-1. Minimum Requirements for Windows Phone SDK 8.0 and Windows Phone Emulator
| Windows Phone SDK 8.0 | Windows Phone Emulator |
|---|---|
| Windows 8 or Windows 8 Pro operating system | Windows 8 Pro edition or higher |
| Windows 8 64-bit (x64) client versions | Same as SDK |
| 6.5 GB of available hard disk space | Same as SDK |
| 4 GB RAM | Same as SDK |
| 64-bit (x64) CPU | Same as SDK |
| -- | Requires processor that supports Second Level Address Translation (SLAT) |
As you can see in Table 1-1, the Windows Phone Emulator that is included in the SDK setup has slightly different requirements than the SDK. Most notably, Windows 8 Pro or higher must be installed on your system, as Hyper-V is required to run the Emulator. Additionally, your system must support Second Level Address Translation. If you are not sure whether your system supports Hyper-V or Second Level Address Translation, download and run the Coreinfo command-line utility from http://technet.microsoft.com/en-us/sysinternals/cc835722 (Figure 1-1). If Hypervisor and EPT both depict an asterisk (*), then your system will be able to run the Windows Phone Emulator.

Figure 1-1. Coreinfo command-line utility results
If the minimum requirements for the SDK are met, but the minimum requirements are not met for the Emulator, the SDK setup will still run and install the assemblies required for Windows Phone development; however, the Windows Phone Emulator will not be installed, and you will not be able to test your apps in the Emulator. In this case, you will need to test your app on a device, which we will discuss in Recipe 1-4. To install the latest SDK, you will need to perform the following steps:
- Click the “Download” button for the SDK 8.0. You will be prompted to save or run the installation, WPexpress_full.exe
- Launch the setup once it has finished downloading.
- The installation will check to ensure your system meets the minimum requirements for Windows Phone SDK 8.0. If it does not meet the minimum requirements, an error will display and you will not be able to proceed with the installation.
- Once the installation completes successfully, you may be required to restart your machine. Along with the required assemblies, and the Windows Phone emulator, the setup will install Visual Studio Express 2012 for Windows Phone on your system unless you have Visual Studio 2012 installed prior to running the SDK setup.
- If you already have Visual Studio 2012 installed (i.e., Professional, Premium or Ultimate edition), then an add-in for your Visual Studio IDE will be installed to enable Windows Phone development. It doesn’t matter which version of Visual Studio 2012 that you use, you will still have the same templates available for building Windows Phone applications.
![]() Note Windows Phone SDK 8.0 contains the necessary tools to develop apps for both Windows Phone 7.5 and Windows Phone 8 platforms. However, for the remainder of this book, we will focus on Windows Phone 8 application development.
Note Windows Phone SDK 8.0 contains the necessary tools to develop apps for both Windows Phone 7.5 and Windows Phone 8 platforms. However, for the remainder of this book, we will focus on Windows Phone 8 application development.
1-2. Create Your First Windows Phone 8 Application
Problem
Now that you have the right development tools at hand, you want to develop your first app but you are not sure where to begin.
How It Works
Launch Visual Studio 2012. Select File ![]() New Project . . . You will notice that a dialog displays with a list of built-in templates.
New Project . . . You will notice that a dialog displays with a list of built-in templates.
At first, the choice can be overwhelming or confusing. For now, we will keep it simple and select the “Windows Phone App” template under Templates ![]() Visual C#. Be sure to highlight this template as shown in Figure 1-2. The next step is to name this new application. Let’s call it “MyFirstWPApp”.
Visual C#. Be sure to highlight this template as shown in Figure 1-2. The next step is to name this new application. Let’s call it “MyFirstWPApp”.
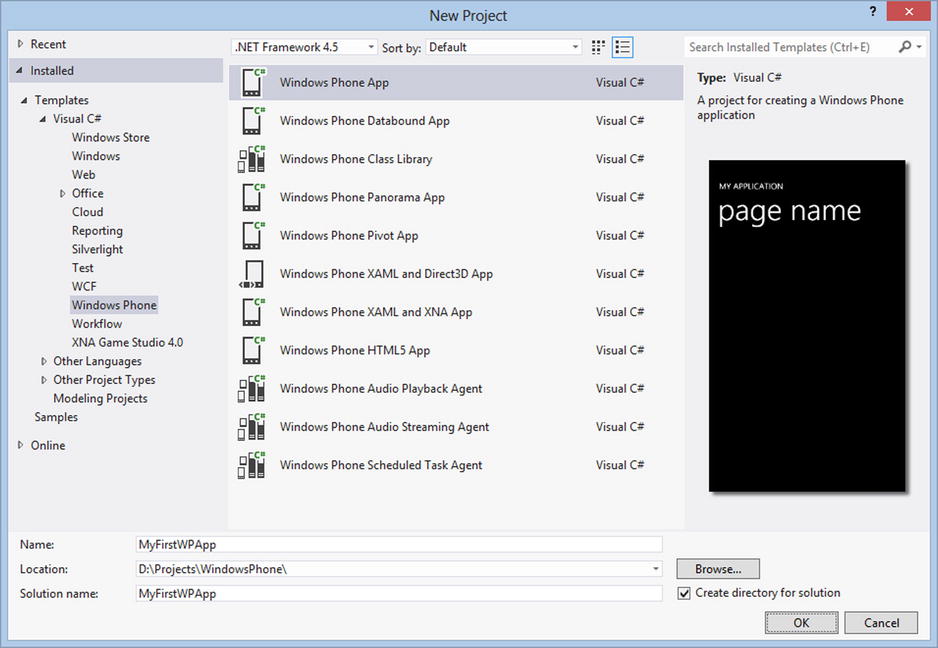
Figure 1-2. New Project dialog with Windows Phone templates displayed
Now, you have the choice to select the directory where you will store this project. The default directory provided in the Location field points to your user profile’s documents location, under a Visual Studio 2012 Projects subdirectory. I prefer to specify my own location that I reserve for Windows Phone projects, but the choice is up to you.
Also, notice the checkbox labeled “Create directory for solution”. Leaving this box checked will ensure that a subdirectory with the name of your project is created, and all project files will be saved within this subdirectory. If you uncheck this option, then your project files will be stored within the directory specified in the Location field. Again, the choice is up to you, but if you plan on creating multiple projects within the same directory, you want to ensure they are stored within subdirectories to avoid confusion and the possibility of files overwriting each other.
Once you have the name and directory specified, click the OK button.
A second dialog will display that will allow you to specify which Windows Phone OS version you want target (Figure 1-3). Click the dropdown arrow to view the different versions available.
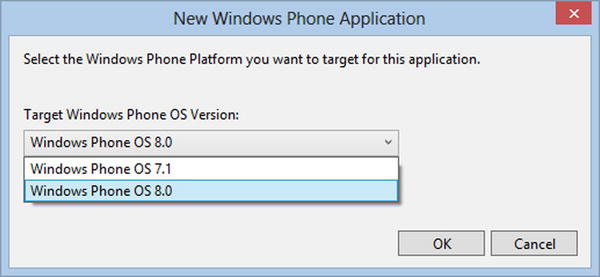
Figure 1-3. Select the Windows Phone Platform that your application will target
If you select Windows Phone OS 7.1, it means that this is the minimum OS version on which the application will run. You can create a Windows Phone OS 7.1 application and it will run on Windows Phone 7.x and Windows Phone 8 devices.
The focus of this book is intended to discuss Windows Phone 8 development, so we will create applications that target Windows Phone OS 8.0. Since this is the default selection, all you need to do in this dialog is click the OK button.
A progress bar will appear on screen, and it will take a few seconds or so for the development environment to create the default files and layout for your Windows Phone application.
Once the Visual Studio development environment loads, you will see a visual representation of the default phone page in the left pane. This is a good way to see what the page will look like on the device as you are designing your page. A sample of the Visual Studio IDE view on the initial load of a Windows Phone project is depicted in Figure 1-4.

Figure 1-4. View of Windows Phone project on first load in the Visual Studio 2012 development environment
Every Windows Phone page will have markup that must remain intact for the page to work. Let’s examine the markup of MainPage.xaml.
<phone:PhoneApplicationPage
    x:Class="MyFirstWPApp.MainPage"
    xmlns="http://schemas.microsoft.com/winfx/2006/xaml/presentation"
    xmlns:x="http://schemas.microsoft.com/winfx/2006/xaml"
    xmlns:phone="clr-namespace:Microsoft.Phone.Controls;assembly=Microsoft.Phone"
    xmlns:shell="clr-namespace:Microsoft.Phone.Shell;assembly=Microsoft.Phone"
    xmlns:d="http://schemas.microsoft.com/expression/blend/2008"
    xmlns:mc="http://schemas.openxmlformats.org/markup-compatibility/2006"
    mc:Ignorable="d"
    FontFamily="{StaticResource PhoneFontFamilyNormal}"
    FontSize="{StaticResource PhoneFontSizeNormal}"
    Foreground="{StaticResource PhoneForegroundBrush}"
    SupportedOrientations="Portrait" Orientation="Portrait"
    shell:SystemTray.IsVisible="True">
Any markup that you add to the page will be contained within the root element of the page, phone:PhoneApplicationPage. Note that the root element is prefixed with the namespace phone. If you look within the element attributes, you will notice the phone namespace is declared, which references the Microsoft.Phone.Controls namespace in the Microsoft.Phone assembly. This is the assembly that contains the definition of a PhoneApplicationPage.
Next, the class reference for the current page is defined, x:Class="MyFirstWPApp.MainPage". This is what is used to associate the proper code behind file which contains any additional code that needs to be executed.
FontFamily, FontSize, and Foreground specify the page defaults for font type, font size, and font color, respectively. These can be changed, but note that they will affect all text on the page that does not have a style defined for font family, size, and/or foreground color. Those page elements that do not have a style defined will inherit their immediate parent’s style, or page style, if a parent does not have a style defined.
SupportedOrientations element indicates which orientation the application supports. You can specify Portrait, Landscape, or PortraitOrLandscape. Portrait means that the application page will only display horizontally, even if the phone is rotated by the user. Landscape means the application page will only display vertically, meaning the user needs to rotate the phone to use the application. PortraitOrLandscape means the page will change with the physical rotation of the phone. This is the desired behavior by users, and if you can tailor your application with rotational support, then do so. In Windows Phone development, this is a simple as setting the SupportedOrientations property to PortraitorLandscape.
Orientation element is the default orientation that is displayed when the page is first loaded. For this you have multiple options: Landscape, LandscapeLeft, LandscapeRight, None, Portrait—this is the default option, PortraitDown and PortaitUp.
The final element, shell:SystemTrayIsVisible element, determines whether or not the Windows Phone system tray will be displayed while your application is loaded. The default value is set to True, which means it will continue to display even while your application is loaded. The System Tray on a Windows Phone, also known as the Status Bar, is the area at the top of the screen that displays the device’s signal strength, connection status, battery life indicator, and current time. The current time is always displayed, and the remaining indicators are displayed when the user taps on the system tray. For standard apps, it is best to ensure that the system tray remains available from within your application, unless there is a good reason to hide it (e.g., if you’re developing a game).
Notice that contained within the phone:PhoneApplicationPage element, there is a child element which is a Grid, named LayoutRoot. This Grid is automatically generated by the Windows Phone App template.
Within the LayoutRoot grid is a StackPanel, which by default is labeled TitlePanel, and a Grid, which by default is labeled ContentPanel.
The TitlePanel contains two textboxes to display the application name and the page name, respectively. The ContentPanel is an empty grid. This is the grid where you will add your page controls. These two panels are not set in stone, and you can essentially remove them and add other elements (i.e., Grid, StackPanel, Text Box, Label, etc.), as you see fit for your application’s purpose.
When designing your page, be aware that there can only be one direct child element, either a Grid, StackPanel, or Canvas, within the phone:PhoneApplicationPage element. It must be an element that can serve as a host to other controls. If you attempt to add more than one child element within the phone:PhoneApplicationPage element, outside of the main grid, you will receive an “Invalid Markup” error in the Visual Studio designer.
Now that you have the basics down, let’s continue on to developing your first Windows Phone 8 application!
This is a birds-eye view of what we are going to do within the main page:
- Change the application title
- Change the page name
- Add some controls
- Write some code to make it do something
To change the application title, scroll down the MainPage.xaml file, and change the Text property of the first Textbox from “MY APPLICATION” to “MY FIRST WP APP”.
To change the page name, change the Text property in the second textbox from “page name” to “welcome”.
<Grid x:Name="LayoutRoot" Background="Transparent">
        <Grid.RowDefinitions>
            <RowDefinition Height="Auto"/>
            <RowDefinition Height="*"/>
        </Grid.RowDefinitions>

        <StackPanel x:Name="TitlePanel" Grid.Row="0" Margin="12,17,0,28">
            <TextBlock Text="MY FIRST WP APP" Style="{StaticResource PhoneTextNormalStyle}" Margin="12,0"/>
            <TextBlock Text="welcome" Margin="9,-7,0,0" Style="{StaticResource PhoneTextTitle1Style}"/>
        </StackPanel>

        <Grid x:Name="ContentPanel" Grid.Row="1" Margin="12,0,12,0">
            ...
        </Grid>
    </Grid>
Now, we will add some control elements to the page to really spice things up. You can either drag a control from the Visual Studio toolbox to the page or manually enter the XAML markup for the control you want to add.
The easiest way to add controls to your page is to select a control from the Toolbox and, while holding the left mouse button down, drag it onto your page, then release the left mouse button. This action will create the XAML markup in your page automatically once you drop the control onto the page in the designer. At this point, you can modify your control by modifying the control properties in the XAML markup or by modifying the properties through the designer.
Add a textbox, a button, and two textblocks to the page by dragging those controls from the Toolbox to the page.
Once they are on the page we need to format them and ensure are in the ContentPanel grid. Notice how the main grid, named LayoutRoot, defined rows using the Grid.RowDefinitions elements. We will do the same for ContentPanel, so that we can ensure a nice clean layout, without needing to define spacing or margins to ensure the controls do not overlap.
Add the following markup to the ContentPanel grid:
<Grid x:Name="ContentPanel" Grid.Row="1" Margin="12,0,12,0">
   <Grid.RowDefinitions>
       <RowDefinition Height="Auto"/>
       <RowDefinition Height="Auto"/>
       <RowDefinition Height="Auto"/>
       <RowDefinition Height="Auto"/>
   </Grid.RowDefinitions>
</Grid>
Next, we will enhance the default controls markup to place them in separate rows so that in the UI they look like they are nicely stacked. To do this, we need to specify the row number each control will be contained within. This is achieved by setting the Grid.Row property within each control element.
In the steps that follow, we will provide a name for each control so that we can access it in code. Next, we will set the default text properties for the TextBox and TextBlock controls and change the text of the button by setting its Content property. Finally, we will add an event handler for the button’s Tap event. The final markup is depicted in Listing 1-1.
Listing 1-1. The ContentPanel grid within MainPage.xaml
<Grid x:Name="ContentPanel" Grid.Row="1" Margin="12,0,12,0">
            <Grid.RowDefinitions>
                <RowDefinition Height="Auto"/>
                <RowDefinition Height="Auto"/>
                <RowDefinition Height="Auto"/>
                <RowDefinition Height="Auto"/>
            </Grid.RowDefinitions>
            <TextBlock Name="nameLabel"
                       Grid.Row="0"
                       Text="what's your name?" />
            <TextBox Name="nameText"
                     Grid.Row="1" />
            <Button Name="greetMeButton"
                    Grid.Row="2"
                    Content="Greet Me"
                    Tap="greetMeButton_Tap_1" />
            <TextBlock Name="greetingText"
                       Grid.Row="3" />

        </Grid>
![]() Note The Tap event is equivalent to the Click event, which is the event that most .NET developers are accustomed to using. You can create a Click event handler, which will be triggered when the user taps the button via the touch screen on the device. However, for Windows Phone development, it is ideal to get used to handling the Tap event in lieu of the Click event, when available.
Note The Tap event is equivalent to the Click event, which is the event that most .NET developers are accustomed to using. You can create a Click event handler, which will be triggered when the user taps the button via the touch screen on the device. However, for Windows Phone development, it is ideal to get used to handling the Tap event in lieu of the Click event, when available.
Your MainPage.xaml page should now appear in the Visual Studio designer as shown in Figure 1-5.

Figure 1-5. Designer view of the application’s main page
At this point, we need to add code to the button’s Tap event handler so that it does something when the user taps it. To do this, we have to switch to the page’s code behind file. In the Visual Studio Solution Explorer, in the right pane, click the arrow next to MainPage.xaml. You will notice a second file below the MainPage.xaml file, with the same name, but with a file extension of .cs. This denotes that the code behind file is using the programming language C#. Double-click on this file in the Solution Explorer to launch it in the Visual Studio’s designer pane.
The first thing you will notice is that the code behind file does not provide the same page designer view that the XAML file does. This is because the XAML defines the way the UI appears, but the code behind the file contains the actions that will be performed. It is not necessary to add code to this file to compile and run your Windows Phone application, but then again, it wouldn’t be very useful to the user, would it?
Let’s add code to the button’s Tap event handler, so that when tapped, it will check the TextBox to determine if a name was entered. If so, then we will display a greeting in the greetingText TextBlock. Otherwise, we will display a message prompting for a valid name.
private void greetMeButton_Tap_1(object sender, System.Windows.Input.GestureEventArgs e)
{
     if (nameText.Text.Length == 0)
     {
         greetingText.Text = "Enter your name to receive a proper greeting";
     }
     else
     {
         greetingText.Text = String.Format("It's a pleasure to meet you, {0}", nameText.Text);
     }
}
Now, you can build your project, which will compile your code and generate the application’s XAP file. The XAP file is simply an archive containing all of the compiled code and related assemblies that are needed to successfully run your app. This is a valid Windows Phone application that you can now run in the Windows Phone emulator or deploy to a device.
Congratulations, you just created your first Windows Phone 8 app!
1-3. Launch an App in the Windows Phone Emulator
Problem
You want to test out the application you just created, but you don’t have a Windows Phone handy to run it on.
Solution
Run your app from the Visual Studio IDE, using the Windows Phone Emulator.
How It Works
If your machine met the requirements to run the Windows Phone Emulator, it would have been installed on your system during the SDK installation, which we completed in Recipe 1-1. If it was installed successfully, you should see the Emulator menu next to the “Start Debugging” button in your Visual Studio 2012 toolbar, as shown in Figure 1-6.
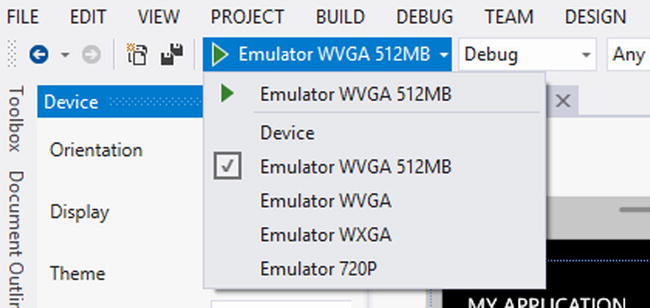
Figure 1-6. Windows Phone Emulator menu
Let’s use the application that we developed in Recipe 1-2 as the application we will test in this exercise.
To test your newly developed application in the Windows Phone 8 emulator, click on the green arrow button to the left of the emulator menu in the Visual Studio tool bar. Clicking the Debug button will force a build of the project, if it hasn’t been compiled yet with the latest code changes and will launch the Windows Phone emulator. Note that the first launch of the emulator will be slow and will take a minute or two to initialize.
Once the emulator has loaded, your application will launch and the main page of your application will display.
You can use your mouse to click on the textbox to set focus in this field, so that we can enter a value. Notice when you set focus to the textbox, that the emulator will display a digital keyboard. This is known as the Soft Input Panel and is the type of keyboard that a Windows Phone device will display when an entry field has focus. You can use your mouse to click on the letters you want to select to enter a value in the textbox. Alternatively, when debugging on a machine, users find it more convenient to use their physical keyboards for data entry in the emulator. To enable physical keyboard entry while running an app within the emulator, press the Page Down key. This will hide the Soft Input Panel and now you will be able to use your physical keyboard for text entry fields. To return back to the Soft Input Panel, simply press the Page Up key.
Now, enter a value in the text field, then click the Greet Me button. Notice that the emulator recognized the mouse click action as a Tap event, and executed the code we had added to the button’s Tap event handler, and your custom greeting displayed in the TextBlock below the button.
Clear the value in the textbox, and click the Greet Me button again. As expected, the greeting label prompts for a valid entry in the textbox.
That’s all there is to it! We’ve demonstrated launching your first Windows Phone app in the emulator and tested both cases to ensure we received the desired greeting message when a value was entered and when there was no value in the textbox.
1-4. Launch an App on a Windows Phone Device
Problem
You finally have your hands on a new Windows Phone and you want to take your newly developed app for a test run on the device.
Solution
Sign up for a developer account and then unlock your phone for testing.
How It Works
Before you can deploy a Windows Phone app to your device to test, you will need a Microsoft Live ID and a Windows Phone developer account. If you do not have a Microsoft Live ID, simply go to http://www.outlook.com and sign up for a free account. If you wish to associate your current e-mail address with a Microsoft Live ID, then go to http://go.microsoft.com/fwlink/p/?LinkID=238657 and enter your current email address on the sign-up page.
Once you have a Microsoft Live ID set up, you will need to register for a Windows Phone developer account. To register for a developer account, go to https://dev.windowsphone.com/en-us/join. The cost for a 1-year subscription is $99 at the time of this writing. Along with being able to test your apps on a real device, this account will also allow you to publish apps to the Windows Phone Store, as well as allow you to provide trial versions and in-app purchases within your apps, if you so choose.
Now that you have the required accounts set up and active, you can now continue with getting your device ready for testing. Connect your device to your computer with the USB cable that came with your Windows Phone. If this is the first time you have connected your phone to your computer, you will notice that it takes a few minutes to install some necessary files and you will see a dialog similar to the one shown in Figure 1-7.

Figure 1-7. Dialog displayed when connecting your Windows Phone to a computer for the first time
Once the install has completed, you are ready to proceed with unlocking your device for testing. The first thing you need to do is ensure your device is not at the lock screen. If it is, swipe from bottom up to unlock your device.
On your computer, hit the Windows key to switch to the All Apps view in Windows 8. Start typing the word “Developer” to filter your apps list view. You should see Windows Phone Developer Registration in the list. Click it to launch the Developer Phone Registration dialog as shown in Figure 1-8. Click the Register button within this dialog.

Figure 1-8. Developer Phone Registration tool is used to unlock a Windows Phone device for testing
At this point, you will be prompted to sign in using your Microsoft Live ID. This must be the same Microsoft Live ID under which you registered your developer account. Upon successful sign-in, you will notice the Status message changes in the Developer Phone Registration dialog to indicate that you have successfully unlocked your phone.
Now, you can go ahead and close the dialog, then load the Windows Phone project we created in Recipe 1-2 in the Visual Studio 2012 IDE. Be sure to keep your device connected to your computer. Once the project loads, expand the menu options for the Windows Phone Emulator, to change your debugging option from the Windows Phone Emulator to Device.
Hit the F5 key, or click the Start Debugging button to launch your app for testing. You will now see that the emulator does not launch at all. Instead, your app is deployed directly to your device. The difference you will notice when debugging an app on your device is that the performance counters that you are used to seeing along the right side of the emulator screen are also displayed on your device.
Hit Shift + F5, or click Debug ![]() Stop Debugging in the Visual Studio IDE. One thing you should be aware of is that even though you are no longer debugging your app, the app remains on your device. If you launch the app directly from your device, notice that the performance counters no longer display on the right side of your device’s screen, because you are not in Debug mode at this point.
Stop Debugging in the Visual Studio IDE. One thing you should be aware of is that even though you are no longer debugging your app, the app remains on your device. If you launch the app directly from your device, notice that the performance counters no longer display on the right side of your device’s screen, because you are not in Debug mode at this point.
To remove this test app from your device:
- Swipe from right to left on your device to reveal your installed apps list
- Locate the test app in the list or use the Search textbox to filter the list
- Tap and hold your test app’s name in the list until a context menu appears
- Tap the “uninstall” option from the context menu list
1-5. Upgrade a Windows Phone 7.x app to Windows Phone 8
Problem
You have already developed a Windows Phone 7.x app, and you want to upgrade it to Windows Phone 8.
Solution
Upgrade the application’s project within Visual Studio.
How It Works
Before we get into the details on upgrading your Windows Phone 7.x app, we need to take some steps to ensure that your live source code base is not lost. The first thing you will need to do is copy your Windows Phone 7.x app project to a new directory, separate from the original project.
Within Windows Explorer, my suggestion is to create a directory structure that separates your projects by version number. For example: D:ProjectsWindowsPhonev8_0.
Copy your Windows Phone 7.x project directory structure and contents to the new directory that we created for Windows Phone OS 8.0 projects. Now let’s load the copy of your Windows Phone 7.x project in Visual Studio 2012. Once it has loaded into the Visual Studio IDE, right-click on the project name in the Solution Explorer pane, and click Properties from the popup menu.
This will load the project’s properties page in the IDE as shown in Figure 1-9.
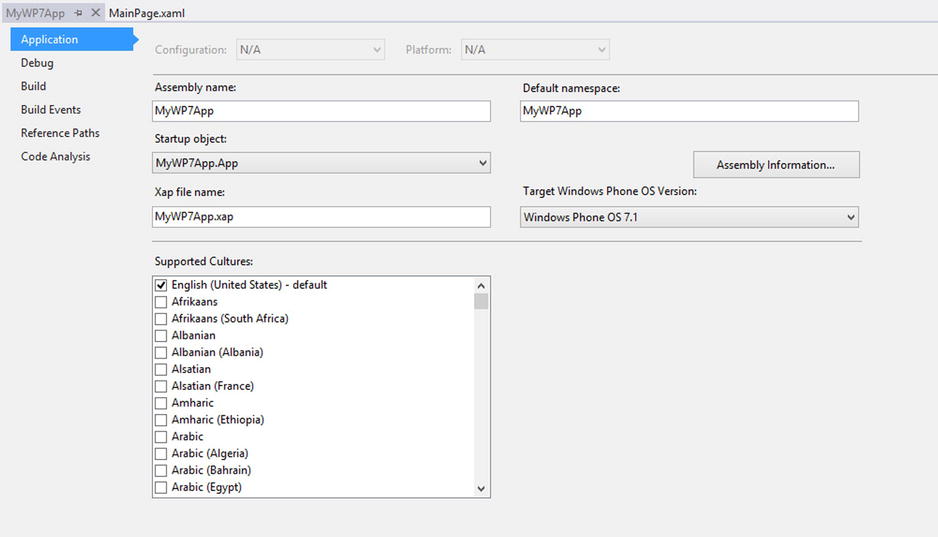
Figure 1-9. Windows Phone Project Properties Page in Visual Studio 2012
Notice that for Windows Phone project, there is a special dropdown labeled, “Target Windows Phone OS Version”. Expand this dropdown list, and select the option “Windows Phone OS 8.0”. This action will cause the confirmation message to display, as shown in Figure 1-10.

Figure 1-10. Confirmation dialog when upgrading to project to Windows Phone OS 8.0
Click “Yes” in this dialog to continue, since we have already performed our due diligence by making a backup copy ahead of time.
You are probably thinking to yourself, “Now what?”
Well, there are changes that have been made to your project quietly behind the scenes, even though it didn’t appear as though anything was really changed. For instance, expand the dropdown list for the Target Windows Phone OS Version once again. You should now see only the Windows Phone OS 8.0 option in the list. At this point, your upgraded app is a true Windows Phone 8.0 application. You cannot revert back to the previous version. As well, take a look at your Manifest Editor. You will notice some major changes here.
As shown in Figure 1-11, Windows Phone 7.x projects only allow you to include a single tile image of a specific size. The tile image dimensions are required to be 173px X 173px. There is no support for varying tile sizes for your Windows Phone apps prior to Windows Phone 8.

Figure 1-11. Windows Phone 7.1 project—Manifest Editor
In looking at the upgraded project’s Manifest Editor, you will notice that you are able to select one of three predefined tile templates, and you must provide tile images for small, medium, and large tiles (Figure 1-12). As well, you can specify which resolutions your app will support (i.e., WVGA, WXGA, and/or 720p). We will get into the details of these topics later in the book. For now, it is enough to know that they are there and need to be configured properly prior to submitting your upgraded app to the Windows Phone store.
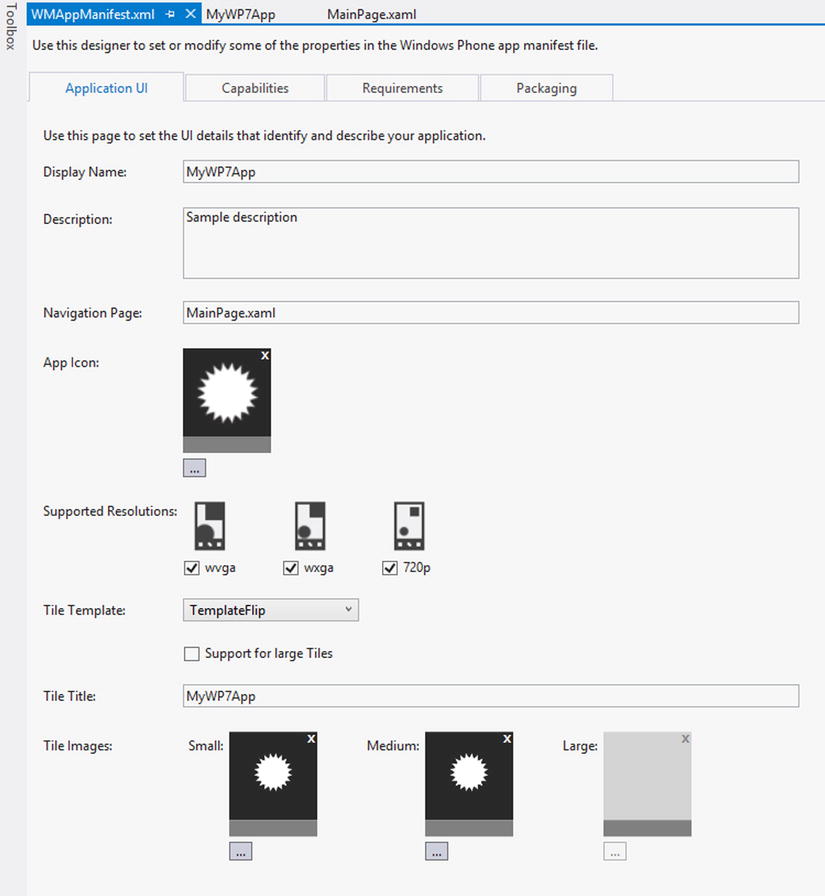
Figure 1-12. Windows Phone 8 project—Manifest Editor
The next thing you will notice is that the Capabilities list for Windows Phone 8 is far more extensive, including capabilities for the new features available in the new SDK, such as speech recognition, near field communications, and wallet. We will be discussing Capabilities in Recipe 1-6. For comparison purposes, Figure 1-13 depicts a screen capture of the Windows Phone OS 7.1 Capabilities list.
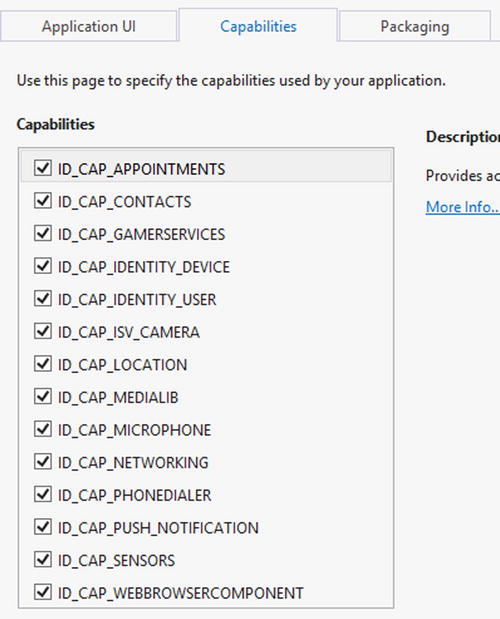
Figure 1-13. Windows Phone OS 7.1—Manifest Editor Capabilities tab
1-6. Become Acquainted With the Capabilities and Requirements in the Windows Phone Application Manifest
Problem
You want to understand the purpose of the Capabilities and Requirements lists when developing Windows Phone apps.
Solution
Checkmark the Capabilities and Requirements needed by your app within the Application Manifest.
How It Works
The Application Manifest file, WMAppManifest.xml, contains information that serves as the metadata for your Windows Phone application. It can be found within the Properties folder in your project, as shown in Figure 1-14.
Capabilities are used to inform the user which device features your application will be using when installed. For this reason, it is important to ensure you check the capabilities that your app leverages before submitting your app to the Windows Phone Store.
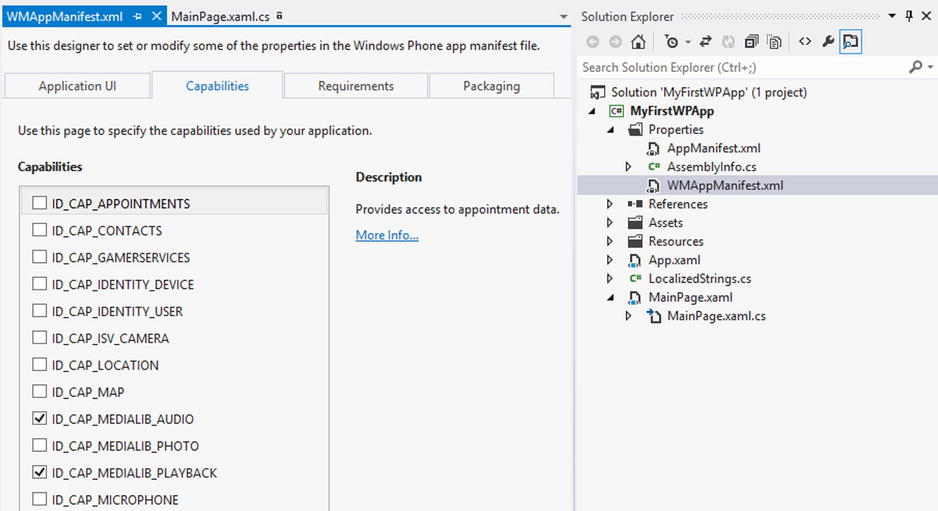
Figure 1-14. Capabilities list in the Windows Phone Application Manifest
Both Windows Phone OS 7.0 and 7.1 provided tools that you could use to verify the capabilities your application utilized. In addition to that, when submitting a 7.x app to the Windows Phone Store, your app capabilities were analyzed and the app manifest file would be corrected and regenerated if there were entries missing.
Unfortunately, this is not the case with apps developed on Windows Phone OS 8.0. The SDK does not contain a tool to detect the capabilities your Windows Phone 8 app requires. When you submit your Windows Phone 8 app to the Store, it does not analyze or correct your app manifest file. In turn, if you submit your app to the Store without including the proper capabilities in your app, your app may not function properly on a device.
When you create a Windows Phone project in Visual Studio, you will notice that some capabilities are checked by default. To view the Application Manifest, expand the Properties folder within your project in the Solution Explorer, and then double-click on the WMAppManifest.xml file to load it in the main Visual Studio pane.
When the Application Manifest is loaded, you will see the following tabs: Application UI, Capabilities, Requirements and Packaging. Click on the Capabilities tab to view the list of available capabilities. Table 1-2 lists the set of capabilities for Windows Phone OS 8.0, with a brief description on when you should include each capability.
In many cases, it is obvious which capabilities you will need. For example, if you want to search the device’s calendar data for appointments, you would ensure that the capability, ID_CAP_APPOINTMENTS, is checked.
In other cases, it may not be obvious which capabilities are needed. One good example is the Microsoft Ad SDK, which requires multiple capabilities. This is something we will touch on in Chapter 10, when discussing how to implement advertisements into your app. For now, it’s enough to know that you will need to come here to enable capabilities within your application.
Table 1-2. Windows Phone Capabilities
| Capability | Include this capability if.. |
|---|---|
| ID_CAP_APPOINTMENTS | Your app accesses appointments from the device’s calendar. |
| ID_CAP_CONTACTS | Your app access contact information from the device’s contact list. |
| ID_CAP_GAMERSERVICES | Your app integrates with XBOX Live services. |
| ID_CAP_IDENTITY_DEVICE | Your app accesses device-specific information, such as the device’s unique ID, phone number, etc. |
| ID_CAP_IDENTITY_USER | Your app accesses the user’s Microsoft Live ID account information. |
| ID_CAP_ISV_CAMERA | Your app leverages the device’s camera (rear-facing and/or front-facing). |
| ID_CAP_LOCATION | Your app requires the use of geographic location services. |
| ID_CAP_MAP | Your app incorporates mapping functionality. |
| ID_CAP_MEDIALIB_AUDIO | Your app loads audio from the media library, views the audio item properties, saves songs, and/or deletes songs. |
| ID_CAP_MEDIALIB_PHOTO | Your app loads photos from the media library, accesses photo properties, and/or saves photos to the device’s Camera Roll or Saved Pictures. |
| ID_CAP_MEDIALIB_PLAYBACK | Your app supports playback from IsolatedStorage, accesses media items that are playing, and/or adds media items to History, Favorites, and New collections. |
| ID_CAP_MICROPHONE | Your app uses the device’s microphone to record sounds. |
| ID_CAP_NETWORKING | Your app requires a data connection. |
| ID_CAP_PHONEDIALER | Your app allows the user to make phone calls. |
| ID_CAP_PROXIMITY | Your app includes Near-Field-Communications services. |
| ID_CAP_PUSH_NOTIFICATION | Your app receives data updates through push notification services. |
| ID_CAP_REMOVABLE_STORAGE | Your app saves to, or loads from, a media card. |
| ID_CAP_SENSORS | Your app leverages the device sensors, such as the accelerometer. |
| ID_CAP_WEBBROWSERCOMPONENT | Your app loads a web browser. |
| ID_CAP_SPEECH_RECOGNITION | Your app includes speech recognition or text-to-speech (TTS) services. |
| ID_CAP_VOIP | Your app allows the user to make Voice Over IP calls. |
| ID_CAP_WALLET | Your app leverages the Wallet feature for managing memberships, deals, and payment options. |
| ID_CAP_WALLET_PAYMENTINSTRUMENTS | Your app requires access to the Wallet payment options, such as debit or credit. |
| ID_CAP_WALLET_SECUREELEMENT | Your app requires access to the Wallet secure element for NFC transactions. |
Similarly, you will notice the Requirements tab allows you to specify the device hardware leveraged within your app (Figure 1-15). In this way, devices that do not meet the requirements will not be able to install your app. For example, if your app depends on Near Field Communications to function, then including the requirement ID_REQ_NFC will prevent devices that do not have an NFC chip from installing your app, since the app will not work properly on those devices anyway. Table 1-3 lists the hardware requirements available for Windows Phone 8.0, with a brief description on when to include each requirement.

Figure 1-15. Hardware Requirements list in the Windows Phone App Manifest
Table 1-3. Windows Phone Hardware Requirements
| Requirement | Include this requirement if.. |
|---|---|
| ID_REQ_NFC | Your app requires the use of the device’s NFC chip. |
| ID_REQ_FRONTCAMERA | Your app requires the use of the device’s front-facing camera. |
| ID_REQ_REARCAMERA | Your app requires the use of the device’s rear-facing camera. |
| ID_REQ_MAGNETOMETER | Your app requires the use of the device’s compass. |
| ID_REQ_GYROSCOPE | Your app requires the use of the device’s gyroscope. |