
![]()
Windows Phone SDK 8 provides new APIs to enable wireless communication using Bluetooth technology and Near Field Communications (NFC). Additionally, the SDK includes APIs that make it easy for developers to incorporate speech recognition and voice commands within the application. This chapter will cover the essentials of integrating these APIs within a Windows Phone application to enhance the user experience.
In this chapter, we will walk through the following recipes:
- 9-1. Send Data Between Devices Using Bluetooth
- 9-2. Send Data Between Devices Using NFC
- 9-3. Launch Your App Using Voice Commands
- 9-4. Incorporate Speech Recognition Within Your App
9-1. Send Data Between Devices Using Bluetooth
Problem
You want to create a chat application that will allow Windows Phone users to connect and send chat messages to each other when they are in close proximity.
Bluetooth is a wireless communication technology that devices use to communicate with each other within a 10-meter (or 32 – 33 foot) range. Numerous Bluetooth-enabled devices on the market today provide unlimited potential to mobile app developers to build engaging and innovative mobile apps that can interact with these devices. The Windows Phone 8 SDK makes it even easier through its Proximity API, which contains classes that enable wireless communication from a Windows Phone 8 application.
The PeerFinder class is part of the Windows.Networking.Proximity namespace in the Windows Phone SDK. It enables discovery of devices and applications that are within close range, using the FindAllPeers method. This method returns a read-only collection of PeerInformation objects. A PeerInformation object contains information about a peer application or device.
The PeerFinder class also provides a mechanism for a Windows Phone 8 application to create a socket connection with a peer application or external device, in the form of a StreamSocket, as shown in Listing 9-1. The StreamSocket class is part of the Windows.Networking.Sockets namespace. It supports network communication using a TCP stream socket, which enables app-to-app and app-to-device communication.
Listing 9-1. Use PeerFinder to Discover Peer Applications and to Establish a Connection with a Selected Peer
StreamSocket socket;
public async void FindPeers()
{
     IReadOnlyList < PeerInformation > peers = await PeerFinder.FindAllPeersAsync();
     if (peers.Count > 0)
     {
         //establish connection with the first peer in the list
         socket = await PeerFinder.ConnectAsync(peer[0]);

         //now that a connection has been established
         //stop advertising to conserve battery life
         PeerFinder.Stop();
     }
}
App-to-device communication allows an application to interact with an external device using a Bluetooth connection to exchange messages. To enable app-to-device communication, devices must be paired before they are able to transmit data in either direction. This means that the device must have Bluetooth turned on so that it is discoverable by the application to initiate device pairing.
During the pairing process, the connection is authenticated, and a Bluetooth connection is provided to the application in the form of a StreamSocket that allows the application to communicate with the required service on the device. To enable app-to-device communication from your Windows Phone application, you must include the ID_CAP_PROXIMITY and ID_CAP_NETWORKING capabilities in your application manifest. In this recipe, we will focus on app-to-app communication.
App-to-app communication allows two programs to interact using Bluetooth to exchange messages. Devices do not need to be paired when using app-to-app communication. Instead, the application searches for a device that is running an instance of itself. The application can wait for, and respond to, messages from another application.
An application can advertise itself as an application accepting connections by setting the DisplayName property on the PeerFinder class and then calling the PeerFinder.Start method, as shown in Listing 9-2.
Listing 9-2. Make the Application Discoverable Using PeerFinder
public void Advertise()
{
       //Set the DisplayName on the PeerFinder class to
       //the name of the app so that our peers can find it
       PeerFinder.DisplayName = appName;

       //Start advertising
       PeerFinder.Start();
}
The PeerFinder class exposes the ConnectionRequested event, which is raised when a communication request is received from another device. You must subscribe to this event within your application. When the event fires, the application can decide whether to accept the request and may display a confirmation to the user to indicate whether the connection was accepted. You can use the PeerInformation property of the event argument ConnectionRequestedEventArgs to determine who is attempting to connect to the application.
When the connection is accepted, use the ConnectAsync method on the PeerFinder class to create a StreamSocket to respond to messages from the incoming request (Listing 9-3). Also, you will want ensure that you call the PeerFinder.Stop method to stop advertising the application’s service within your application to prevent any further incoming requests and to conserve battery life.
Listing 9-3. Use the StreamSocket Instance to Connect to the Peer Application
public MySampleApp()
{
    //Register for incoming connection requests
    PeerFinder.ConnectionRequested + = PeerFinder_ConnectionRequested;
}

private void PeerFinder_ConnectionRequested(object sender, ConnectionRequestedEventArgs args)
{
    MessageBoxResult result = MessageBox.Show(
                string.Format("{0} is trying to connect. Would you like to accept?", args.PeerInformation.DisplayName),
                "My Bluetooth Chat App",
                MessageBoxButton.OKCancel);

    if (result == MessageBoxResult.OK)
    {
        socket.Connect(args.PeerInformation);
    }
}
To enable app-to-app communication within your Windows Phone application, you must include the ID_CAP_PROXIMITY capability in your application manifest.
Now that you know how to establish a Bluetooth connection, you’re probably thinking “That’s great, but how do I actually put it to use to send and receive messages?” Well, that’s a great question! Keep reading to find out more.
The DataReader class, which is part of the Windows.Storage.Stream namespace, is used to read incoming messages that are transmitted from an external device or peer application. The DataReader class is used to load and read data from an input stream, as shown in Listing 9-4. To use the DataReader class within your application, you will need to perform the following steps:
- Instantiate an instance of the DataReader class, passing in the StreamSocket’s InputStream.
- Call the DataReader’s LoadAsync to retrieve the message size.
- Call the LoadAsync method a second time to load the actual message input stream.
- Call the ReadString method to extract the message sent by the external device.
Listing 9-4. Reading an Incoming Message Using the DataReader Class
DataReader dataReader = new DataReader(socket.InputStream);

//Get the size of the message
await dataReader.LoadAsync(4);
uint messageLen = (uint)dataReader.ReadInt32();

//Get the actual message
await dataReader.LoadAsync(messageLen);
string actualMessage = dataReader.ReadString(messageLen);
The DataWriter class is also part of the Windows.Storage.Stream namespace and is used to send outgoing messages to an external device or peer application, as shown in Listing 9-5. To use the DataWriter class within your application, you will need to perform the following steps:
- Instantiate an instance of the DataWriter class, passing in the StreamSocket’s OutputStream.
- Set the message length in the OutputStream by calling the DataWriter’s WriteInt32 method.
- Call the StoreAsync method to transmit the data through the OutputStream.
- Call the WriteString method to write the actual message that you want to send to the connected device or peer application.
- Call the StoreAsync method a second time to send the message through the OutputStream.
Listing 9-5. Sending a Message Through an Established Connection Using the DataWriter Class
DataWriter dataWriter = new DataWriter(socket.OutputStream);

//Send the message length first
dataWriter.WriteInt32(message.Length);
await dataWriter.StoreAsync();

//Next, send the actual message
dataWriter.WriteString(message);
await dataWriter.StoreAsync();
Let’s see a full working sample of the concepts discussed in this recipe. Launch Visual Studio 2012, and open the project named MyBluetoothChatApp, located in the Chapter 9MyBluetoothChatApp directory. This is a full working sample of a chat application using Bluetooth communication. As you look at the project files and source code, notice that the sample application is structured a bit differently than the code listings provided in this recipe, making use of a view model and including error handling where appropriate.
This is the point where you are probably chomping at the bit to test it, and if you are impatient, you may have already tried to launch it in the emulator. Here’s where we break the bad news to you. You cannot test Bluetooth communication in the Windows Phone emulator.
Although you can see the Bluetooth settings page in the emulator, the setting itself is disabled. Attempting to run an app that requires a Bluetooth connection will fail miserably. The sample app that ships with this recipe checks whether Bluetooth is enabled and prompts the user to turn it on. In the emulator, the switch to turn on Bluetooth connections is disabled (Figure 9-1) because it is not supported.
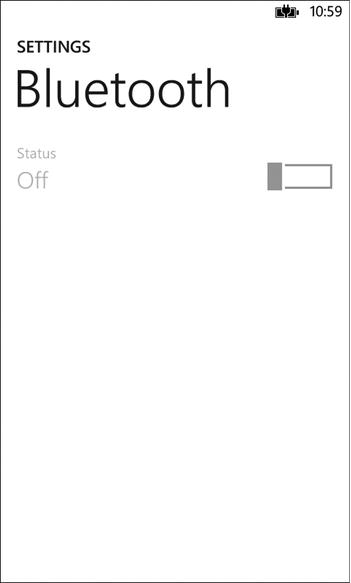
Figure 9-1. Bluetooth settings are disabled in the Windows Phone emulator
This is the point in time where you will need to phone a friend, a Windows Phone 8 friend, that is, in order to fully test Bluetooth communication within your Windows Phone application.
9-2. Send Data Between Devices Using NFC
Problem
You want to create an app that will allow Windows Phone users to send messages to another device by tapping the two devices together.
Solution
Use the TriggeredConnectionStateChanged event handler on the PeerFinder class to register for incoming requests.
Near Field Communication enables communication between electronic devices, over either a Bluetooth connection or a wireless network connection. Communication is often initiated by tapping the two devices together. Devices must be in very close proximity, no more than 3 to 5 centimeters (or 1 – 2 inches) of each other, to leverage Near Field Communication. The application must be running in the foreground to use NFC. Also, your application will need to include the ID_CAP_PROXIMITY and ID_CAP_NETWORKING capabilities in your application manifest in order to use NFC within your application.
As we discussed in Recipe 9-1, a StreamSocket is established when a connection between the two devices is successful. The socket is established on either a Wi-Fi connection using TCP/IP or a Bluetooth connection. The Proximity API determines which connection to establish based on the values of the PeerFinder.AllowBluetooth and PeerFinder.AllowInfrastructure properties. Both properties are set to True by default.
Note that communication between devices over a wireless network connection may be established only if both devices are on the same infrastructure network, with no IP conflicts and no firewalls blocking communication. Since Bluetooth offers a consistent user experience, it is recommended that you design your application to use Bluetooth communication if possible over a wireless network connection. You can set your application to exclusively use Bluetooth communications only by setting the PeerFinder.AllowInfrastructure property value to False in your application. It is also recommended that your application display a message to the user to confirm that Bluetooth is enabled on both devices before a tap attempt is initiated.
To provide a simple implementation of sharing data using a tap to connect devices through NFC, you will need to leverage the PeerFinder, StreamSocket, DataReader, and DataWriter classes. These classes were detailed in Recipe 9-1, so if you skipped that part, you may want to go back to read up on them.
On the PeerFinder class, you will need to subscribe to the TriggeredConnectionStateChanged event, rather than the ConnectionRequested event that was demonstrated in Recipe 9-1. However, you will want to subscribe to this event only if the current device supports NFC.
To determine whether the current device supports NFC, check the SupportedDiscoveryTypes property on the PeerFinder class.
if ((PeerFinder.SupportedDiscoveryTypes & PeerDiscoveryTypes.Triggered) == PeerDiscoveryTypes.Triggered)
{
    //Device supports NFC, so we can register for incoming connection requests
    PeerFinder.TriggeredConnectionStateChanged + =
       PeerFinder_TriggeredConnectionStateChanged;
}
When a tap between devices occurs, the PeerFinder_TriggeredConnectionStateChanged event is triggered. The order of states when a tap and subsequent successful connection between devices occur generally includes PeerFound, Connecting, Listening, and Completed. If the devices tap a second time, the Canceled state is initiated, and the connection is closed. You may want to handle the case in your application where an accidental secondary tap is triggered. You can choose to ignore the action or confirm with the user if they want to close the connection.
Listing 9-6 demonstrates an example of putting the TriggeredConnectionStateChanged event to use. When a connection is established, the application will send a random picture from the device’s media library to the connected device, using the DataWriter and StreamSocket classes. When the application is not sending data, it is listening for any incoming messages. When a picture is received, it is retrieved from the StreamSocket’s InputStream using the DataReader class to retrieve the picture’s byte array data. It is then converted to a BitmapImage and displayed in the view. The full code implementation of this can be found in the sample application shipped with this book, located in the Chapter 9TapToShare directory.
Listing 9-6. Monitor NFC Connection Requests from the PeerFinder’s TriggeredConnectionStateChanged Event
void PeerFinder_TriggeredConnectionStateChanged(object sender, TriggeredConnectionStateChangedEventArgs args)
{
    switch (args.State)
    {
        case TriggeredConnectState.Canceled:
            //This may have been triggered accidentally
            //so just ignore it. There is a way the user can
            //forcibly cancel the connection from the view
            break;
        case TriggeredConnectState.Completed:
            this.IsConnected = true;

            socket = args.Socket;
            StartRandomPictureShare();
            SetStatus(args.State.ToString());

            //Connection established, so we can stop advertising now
            PeerFinder.Stop();
            break;
        case TriggeredConnectState.Listening:
            this.IsConnected = true;

            socket = args.Socket;
            GetRandomPictureShare();
            SetStatus(args.State.ToString());

            //Connection established, so we can stop advertising now
            PeerFinder.Stop();
            break;
        default:
            //set the connected flag to false and display the state in the view
            SetStatus(args.State.ToString());
            this.IsConnected = false;

            //Connection is closed, so we can start advertising again
            PeerFinder.Start();
            break;

    }
}
To obtain information on a device that is within close proximity, you can leverage the ProximityDevice class. The ProximityDevice class, which is part of the Windows.Networking.Proximity namespace, enables you to publish messages to devices in close proximity, as well as subscribe to messages from those devices. Table 9-1 describes the methods available on the ProximityDevice class, including the various publish and subscribe methods. Publish and subscribe actions should be used only when sending or receiving small blocks of data. When you need to transmit larger amounts of data, use the PeerFinder and StreamSocket classes, as discussed in the “Tap to Connect” section, earlier in this recipe.
Table 9-1. ProximityDevice Methods
The ProximityDevice class also exposes two events: DeviceArrived and DeviceDeparted. The DeviceArrived event is triggered when a device enters in close range for Near Field Communication. The DeviceDeparted event is triggered when the device leaves the proximate range for Near Field Communication. As mentioned earlier, devices are close in proximity when they are within 3 to 5 centimeters of each other.
Launch Visual Studio 2012, and open the project named TapToShare, located in the Chapter 9TapToShare directory. This application demonstrates two simple NFC implementations:
- Establishing a connection between devices when the devices are tapped together. Once connected, the app sends a random picture from the user’s device to share with the connected device. Step through the PictureShare markup and code-behind, along with the PictureShareViewModel class, to see how it all ties together.
- A simple message exchange between two devices in close proximity, using the publish-subscribe actions available within the ProximityDevice class. Step through the MessageShare markup and code-behind, along with the MessageShareViewModel class.
If you are anxious to play around with NFC in your application but you don’t have multiple devices to test with, we have some good news to share! Proximity Tapper allows you to test your NFC application within the Windows Phone emulator.
Proximity Tapper is an open source project available on CodePlex at http://proximitytapper.codeplex.com. This tool allows you to test NFC apps in the Windows Phone emulator by enabling the tap to connect functionality between two separate running instances of the Windows Phone emulator on a single machine. When first launching the Proximity Tapper tool, you will receive a Windows Firewall prompt. You must select all of the check boxes in the prompt to allow the tool to communicate through the firewall; otherwise, the tool will silently fail.
The simplest way to launch your application in separate running instances of the Windows Phone emulator is to launch two separate instances of Visual Studio 2012 and load your project in each one. Set the emulator resolution in the first instance to any resolution and launch it in the emulator. In the second Visual Studio 2012 project instance, set the emulator to a different resolution, and then launch. If you have the Proximity Tapper running at this point, you will notice both emulator instances will appear in the Proximity Tapper window within ten seconds of launch, as illustrated in Figure 9-2.

Figure 9-2. Proximity Tapper tool displaying two running Windows Phone emulator instances in the Devices pane
If all is well with the emulator instances, then both lines will appear green in the Proximity Tapper window. At this point, you can select both instances in the window, holding down the Ctrl key as you click each row to ensure both remain highlighted. You can then click the Tap Selected Devices and Remain Connected button to initiate a tap action and establish a connection. Connection information is displayed in the text field within the Connections group in the left pane, below the Devices list. The right pane contains information about any attempted data transmission.
When testing the sample application in the emulators, note that for the publish-subscribe feature, you will need to set one application as a subscriber by clicking the subscribe button. Once the application is subscribing, enter a message in the second emulator window, and tap the publish button. You should see the message appear in both windows.
When testing the picture share feature in the emulators, you will need to use this tool to simulate the tap between the two devices. We found that the Proximity Tapper is a good tool, but oftentimes the connection would be refused or the one instance would be stuck in a “Connecting…” state without successfully establishing the connection. Ideally, you will want to test your application on multiple devices to ensure it is working as expected, prior to submitting the app to Windows Phone Store.
9-3. Launch Your App Using Voice Commands
Problem
You want to provide a way for users to launch your application and load a specific page simply by saying a phrase.
Windows Phone 8 devices provide built-in voice commands to allow you to launch any installed application on the device, simply by saying “open” or “start,” followed with the application name, when the Voice Command prompt is activated on the device (in other words, when the device displays the Listening screen).
The Windows Phone SDK includes a VoiceCommandService in the Windows.Phone.Speech.VoiceCommands namespace, which enables you to install command sets from a Voice Command Definition (VCD) file and get installed command sets. This will allow you to extend your app to allow users to not only launch your application using voice but also load a specific page based on the task the user may want to perform. This is known as deep linking into the application. You can configure your application so that a phrase opens a specific page in your app, performs a task, or initiates an action. For example, if your application is a simple to-do list, you can set up your application so that when a user says “Start my to-do list” followed with “Add new item,” it will launch your application and load the Add New Item page.
To use voice commands within your application, you must include the ID_CAP_SPEECH_RECOGNITION, ID_CAP_MICROPHONE, and ID_CAP_NETWORKING capabilities in the application manifest file.
You can add voice command functionality to your application in a few simple steps:
- Add a new Voice Command Definition (VCD) file to your project, and modify it to include the commands you want to handle. The Voice Command Definition file is an XML document that defines the list of voice commands recognizable by your application.
- Initialize the VCD file with the phone’s speech feature when your application launches by calling the VoiceCommandService.InstallCommandSetsFromFileAsync method, passing in the URI to your VCD file.
- Add code to determine whether the page was loaded through a voice command. If so, you will need to handle navigation and execute the desired commands accordingly.
Adding the Voice Command Definition File
You can add a new Voice Command Definition file in your project by clicking Add ![]() New Item . . . and selecting Voice Command Definition File in the Add New Item dialog, as shown in Figure 9-3.
New Item . . . and selecting Voice Command Definition File in the Add New Item dialog, as shown in Figure 9-3.
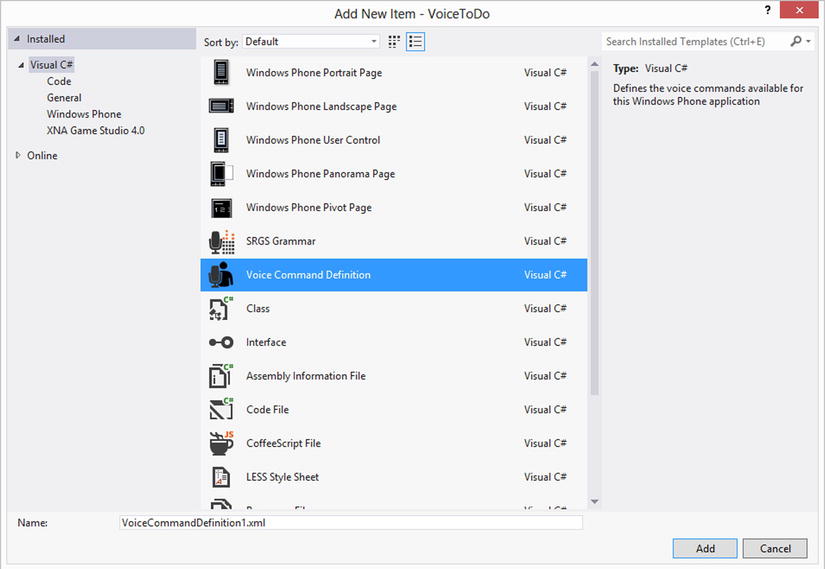
Figure 9-3. Voice Command Definition file template in the Add New Item dialog
When the file is added to your project, be sure to set the Build Action property to Content. Set the Copy To Output Directory property to Copy if newer. Take a moment to examine the default content that is generated in the VCD file (Listing 9-7). It provides some good examples of what the file layout and information should contain.
Listing 9-7. Voice Command Definition File Sample Content
<?xml version = "1.0" encoding = "utf-8"?>

<VoiceCommands xmlns = "http://schemas.microsoft.com/voicecommands/1.0">
  <CommandSet xml:lang = "en-US">
    <CommandPrefix > Contoso Rodeo</CommandPrefix>
    <Example > play a new game </Example>

    <Command Name = "PlayGame">
      <Example > play a new game </Example>
      <ListenFor > [and] play [a] new game </ListenFor>
      <ListenFor > [and] start [a] new game </ListenFor>
      <Feedback > Starting a new game... </Feedback>
      <Navigate />
    </Command>

    <Command Name = "PlayLevel">
      <Example > replay level two </Example>
      <ListenFor > replay level {number} </ListenFor>
      <Feedback > Going to level {number}... </Feedback>
      <Navigate />
    </Command>

    <Command Name = "PlayUnknownLevel">
      <Example > replay level two </Example>
      <ListenFor > [and] replay level {*} </ListenFor>
      <Feedback > Unknown level; going to level selection... </Feedback>
      <Navigate Target = "LevelSelect.xaml" />
    </Command>

    <PhraseList Label = "number">
      <Item > one </Item>
      <Item > two </Item>
      <Item > three </Item>
    </PhraseList>

  </CommandSet>
</VoiceCommands>
Let’s break this down in Table 9-2.
Table 9-2. Voice Command Definition File’s Elements
| Element | Required | Description |
|---|---|---|
| VoiceCommands | Yes | This is the root element of the VCD file. It must include the attribute xmlns = "http://schemas.microsoft.com/voicecommands/1.0". You may define only one VoiceCommand element per VCD file. |
| CommandSet | Yes | This defines a group of commands that are recognized by the application in a specific language. The xml:lang attribute must be included in the element, which indicates the language of the commands included in the group. If you want to modify the CommandSet programmatically, you must also include the Name attribute with a unique name value to identify the CommandSet. A file may have many CommandSets in order to support voice commands in different languages. However, you may not define multiple CommandSets for a single language. |
| CommandPrefix | No | When included, it must be the first child of the CommandSet element. Include this element to specify a user-friendly name for your application that will be spoken by the user when initiating a voice command for the application. You may define only one CommandPrefix per CommandSet. |
| Command | Yes | This defines a valid voice command that will be recognized by the application. Used in conjunction with its required child elements, it specifies an example for users to understand how to use the command and determines which phrase to listen for, which response to provide back to the user, and which page in your application to navigate to. You may define up to 100 Commands per CommandSet. |
| Example | Yes | This element must be the first child of the Command element. It provides an example of what the user must say to initiate the voice command. This phrase is listed on the “What can I say?” screen, the Listening screen, and the “Did you know?” screen. Only one Example may be defined per Command. |
| ListenFor | Yes | This element must follow the Example child element. The ListenFor element contains a word or phrase that will be recognized by your application when spoken by the user. You can use square brackets around any words that are optional within a phrase: <ListenFor > [and] play [a] new game </ListenFor>. You may also want to recognize any one of a set of phrases defined in a PhraseList by including the PhraseList name surrounded by curly braces: <ListenFor > replay level {number} </ListenFor>. You may also include wildcard searches to handle words that are not configured in the command file by including an asterisk surrounded by curly braces: <ListenFor > [and] replay level {*} </ListenFor>. Each Command must have at least one ListenFor element. You may define up to ten ListenFor elements per Command. |
| Feedback | Yes | This element contains the response text that will be displayed and read back to the user when the command is recognized. You may also refer to a PhraseList in the Feedback element, provided that the same PhraseList is used in any one of the configured ListenFor elements for the Command. You may specify only one Feedback element within a Command. |
| Navigate | Yes | This specifies the page that the application will navigate to when the voice command is spoken by the user. If the Navigate element is left empty, it will simply launch the application, loading its default main page. If a Target attribute is specified, its value should contain a valid URI pointing to a page in the application. In this way, the application will load and navigate directly to the page indicated. You may also include query string parameters in the Target URI value. You may specify only one Navigate element within a Command. |
| PhraseList | No | This defines list items, each of which may include a single word or phrase that may be used in a Command. You must specify a unique value for the PhraseList’s Label attribute, because it is this value that is specified in curly braces within a ListenFor or Feedback element. The Voice Command Definition file may contain multiple PhraseLists, provided the combined total of Item elements is not exceeded. |
| Item | No | Defines a single word or phrase that will be recognized by the application when spoken by the user. A single Voice Command Definition file may contain up to 2,000 Item elements combined, across all configured PhraseLists. |
The VoiceCommandService.InstallCommandSetsFromFileAsync method installs the CommandSet elements that are defined in the application’s Voice Command Definition file. The VoiceCommandService is part of the Windows.Phone.Speech.VoiceCommands namespace. To execute this command, simply pass in the URI of the application’s VCD file when calling the method, as shown in Listing 9-8. Although you can execute this command at any time from within the application, I prefer to handle it when the application first launches.
Listing 9-8. Initialize the Voice Command Definition File
using Windows.Phone.Speech.VoiceCommands;

private async void InitializeVoiceCommand()
{
    Uri vcdUri = new Uri("ms-appx:///MyVoiceCommands.xml");
    await VoiceCommandService.InstallCommandSetsFromFileAsync(vcdUri);
}

private void Application_Launching(object sender, LaunchingEventArgs e)
{
    InitializeVoiceCommand();
}
Handling Navigation and Command Execution
To handle navigation and command execution for voice commands within your application, override the OnNavigatedTo event in each page that is expected to be a target of a voice command action. Within the OnNavigatedTo event, check to see whether the NavigationContext.QueryString contains the voiceCommandName key. If so, the value of the voiceCommandName will be set to the Command that was initiated by the user. In this way, you can handle the action that was triggered accordingly. Listing 9-9 demonstrates an example of how this can be handled for simple voice commands.
Listing 9-9. Check Whether a Voice Command Initiated the Navigation Within the OnNavigatedTo Event
protected override void OnNavigatedTo(NavigationEventArgs e)
{
    if (NavigationContext.QueryString.ContainsKey("voiceCommandName"))
    {
        string voiceCommand = NavigationContext.QueryString["voiceCommandName"];

        switch (voiceCommand)
        {
            case "ViewTravel":
                //add code here to filter items by travel
                break;
            case "ViewRestaurant":
                //add code here to filter items by restaurant
                break;
            default:
                //add code here to filter items by the default view
                break;
        }
    }
}
The Code
Launch Visual Studio 2012, and open the project named VoiceBucketList, located in the Chapter 9VoiceBucketList directory. This application allows the user to view three bucket lists: Movie, Travel, and Restaurants. The user can also add new items to any of those three lists. We have decided to extend this application to allow the user to launch the application in a specific view by voice command. The user can also launch into the “Add Item page by voice” command.
The first thing we will look at is the application manifest file for this application. Notice that the three required capabilities (ID_CAP_SPEECH_RECOGNITION, ID_CAP_MICROPHONE, and ID_CAP_NETWORKING) have been included in this file, as depicted in Figure 9-4.
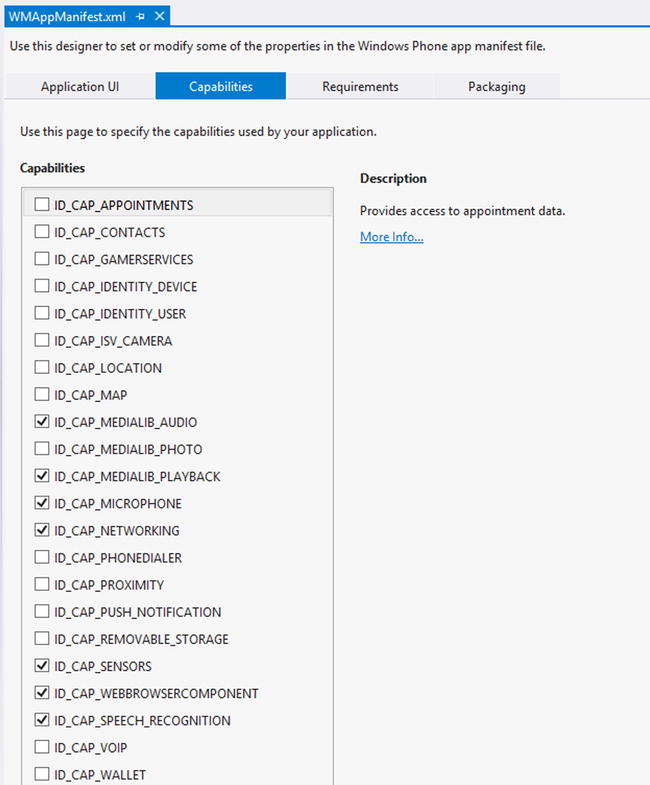
Figure 9-4. Include the appropriate capabilities to enable voice commands in your application
Next, take a moment to examine the Voice Command Definition file called MyVoiceCommands.xml (Listing 9-10). Within this command file, the recognizable commands by this application allow the user to view any one of the three valid bucket lists (i.e., movie, restaurants, and travel), as well as allowing the user to directly launch into the Add Item page for any of those lists.
Listing 9-10. VoiceBucketList’s VCD File
<VoiceCommands xmlns = "http://schemas.microsoft.com/voicecommands/1.0">
  <CommandSet xml:lang = "en-US">
    <CommandPrefix > Voice Bucket List</CommandPrefix>
    <Example > view my movie bucket list </Example>
    <Command Name = "ViewMovieList">
      <Example > view my movies </Example>
      <ListenFor > [and] view [my] movies </ListenFor>
      <ListenFor > [and] manage [my] movies </ListenFor>
      <Feedback > Loading your movie bucket list... </Feedback>
      <Navigate />
    </Command>
    <Command Name = "AddMovie">
      <Example > add a new movie </Example>
      <ListenFor>  [and] add [a] [new] movie </ListenFor>
      <Feedback > Loading the page so you can add a new movie to your bucket list... </Feedback>
      <Navigate Target = "AddBucketListItem.xaml" />
    </Command>
    <Command Name = "ViewTravelList">
      <Example > view my places to go </Example>
      <ListenFor > [and] view [my] places to go </ListenFor>
      <ListenFor > [and] manage [my] places to go </ListenFor>
      <Feedback > Loading your places to go bucket list... </Feedback>
      <Navigate />
    </Command>
    <Command Name = "AddTravel">
      <Example > add a new place to go </Example>
      <ListenFor>  [and] add [a] [new] place to go </ListenFor>
      <Feedback > So, you want to add a new place to your bucket list? Ok, let's do this... </Feedback>
      <Navigate Target = "AddBucketListItem.xaml" />
    </Command>
    <Command Name = "ViewRestaurantList">
      <Example > view my places to eat </Example>
      <ListenFor > [and] view [my] places to eat </ListenFor>
      <ListenFor > [and] manage [my] places to eat </ListenFor>
      <Feedback > Loading the places you want to go to try out some grub... </Feedback>
      <Navigate />
    </Command>
    <Command Name = "AddRestaurant">
      <Example > add a new place to eat </Example>
      <ListenFor>  [and] add [a] [new] place to eat </ListenFor>
      <Feedback > Time to add a new place to eat to the bucket list... </Feedback>
      <Navigate Target = "AddBucketListItem.xaml" />
    </Command>
  </CommandSet>
</VoiceCommands>
Now, open the App.xaml.cs code-behind file. In it, we have included the call to initialize the Voice Command Definition file when the application is launched. This is the same code that was displayed in Listing 9-6 earlier in this chapter.
Last but not least, let’s examine the navigation and command execution in the code-behind for both the MainPage and AddBucketListItem pages.
The MainPage simply displays a pivot list, where each pivot item represents each of the three bucket lists. When the user initiates an action to load the application to a specific list, we simply set the SelectedIndex of the pivot list to the desired view, as shown in Listing 9-11.
Listing 9-11. Handling Navigation and Command Execution in the MainPage of the Application
protected override void OnNavigatedTo(NavigationEventArgs e)
{
    if (NavigationContext.QueryString.ContainsKey("voiceCommandName"))
    {
        string voiceCommand = NavigationContext.QueryString["voiceCommandName"];

        switch (voiceCommand)
        {
            case "ViewTravelList":
                pivotList.SelectedIndex = 1;
                break;
            case "ViewRestaurantList":
                pivotList.SelectedIndex = 2;
                break;
            default:
                pivotList.SelectedIndex = 0;
                break;
        }
    }
}
The AddBucketListItem page simply creates a new bucket list item, setting its type based on the user’s voice command, as shown in Listing 9-12. The user then just needs to enter a name for the new item and then tap the save button to add the item to the corresponding list.
Listing 9-12. Handling Navigation and Command Execution in the AddBucketListItem Page
protected override void OnNavigatedTo(NavigationEventArgs e)
{
    if (NavigationContext.QueryString.ContainsKey("voiceCommandName"))
    {
        string voiceCommand = NavigationContext.QueryString["voiceCommandName"];

        switch (voiceCommand)
        {
            case "AddTravel":
                App.ViewModel.NewItem = new Models.BucketListItem { ItemType = BucketListItemType.Travel };
                App.ViewModel.PageTitle = BucketListItemType.Travel.ToString();
                break;
            case "AddRestaurant":
                App.ViewModel.NewItem = new Models.BucketListItem { ItemType = BucketListItemType.Restaurant };
                App.ViewModel.PageTitle = BucketListItemType.Restaurant.ToString();
                break;
            default:
                App.ViewModel.NewItem = new Models.BucketListItem { ItemType = BucketListItemType.Movie };
                App.ViewModel.PageTitle = BucketListItemType.Movie.ToString();
                break;
        }

    }
}

private void AddItem_Tap(object sender, System.Windows.Input.GestureEventArgs e)
{
    //force lost focus to occur on textbox so that the value gets updated in the binding
    var binding = itemToAdd.GetBindingExpression(TextBox.TextProperty);
    binding.UpdateSource();

    //let the viewmodel handle adding the item to the appropriate list based on item type
    App.ViewModel.AddNewItem();

    MessageBox.Show("The item has been added to the bucket list!");

    if (NavigationService.CanGoBack)
    {
        NavigationService.GoBack();
    }
    else
    {
        NavigationService.Navigate(new Uri("/MainPage.xaml", UriKind.RelativeOrAbsolute));
    }
}
You can run the application in the Windows Phone emulator to test it, provided you have a working microphone so that the emulator can hear your commands. Launch the application in the emulator but then hit the Back button once the application loads to return to the device’s Start screen.
Once you are at the Start screen, tap and hold the Start button. If this is the first time you are running the voice command feature in the emulator or on a device, the “What can I say” screen is displayed, as shown in Figure 9-5. Tap the accept button to allow access to speech recognition going forward.
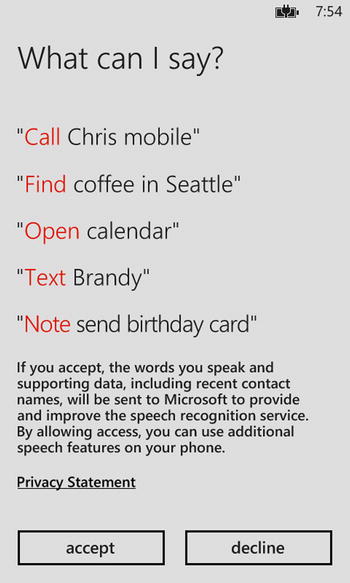
Figure 9-5. “What can I say?” screen
At this point, you’ll see the Listening screen, as illustrated in Figure 9-6.

Figure 9-6. At the Listening screen, speak a command to launch the desired application
With the Listening screen initiated, speak your desired command. You can say “Open [app name]” or “Start [app name]” to launch the application with the main page in view, as shown in Figure 9-7.
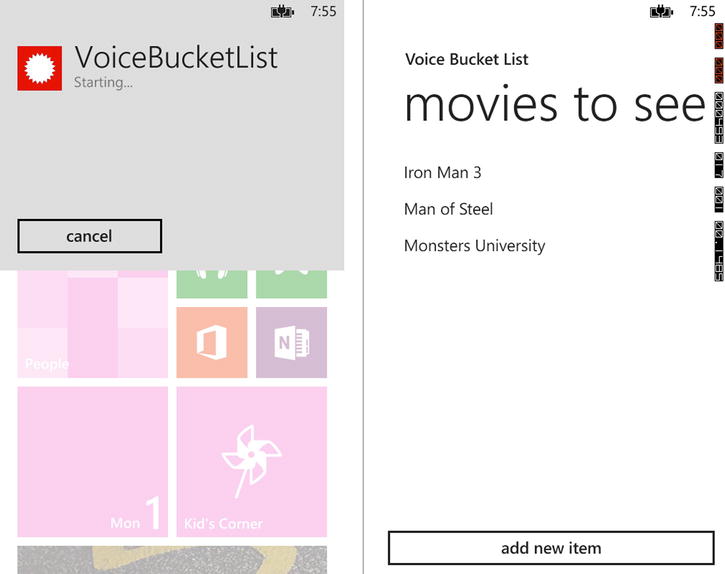
Figure 9-7. Launch Voice Bucket List using a simple start command
Go ahead and run a test with the following phrases to see what happens:
- Open Voice Bucket List.
- Open Voice Bucket List and add a new place to eat.
- Open Voice Bucket List and view places to go.
You may also use alternate commands to deep-link into the application or execute another command when the app is launched, as shown in Figure 9-8. In this case, we have launched the Voice Bucket List using a start command along with an action phrase from the CommandSet in the VCD file. Notice the Feedback phrase that is displayed and read back is from the Feedback element associated to the spoken command.
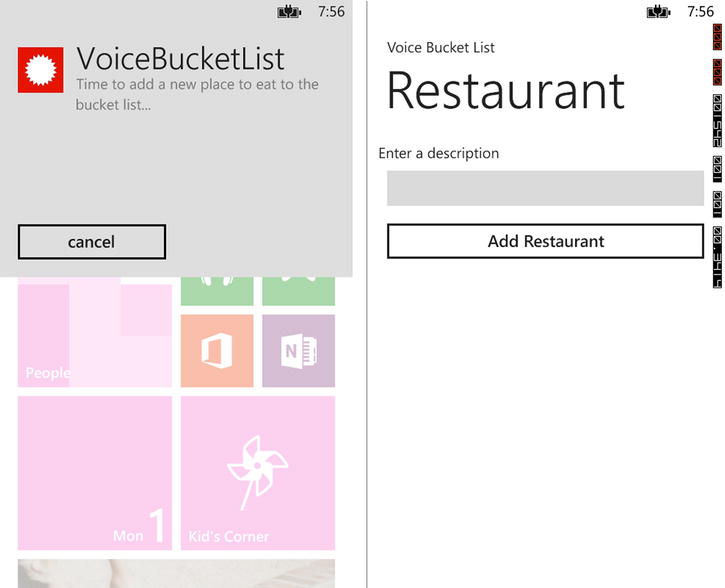
Figure 9-8. Launch Voice Bucket List using a start command along with an action phrase from the VCD file
As demonstrated in this recipe, it is quite easy to add voice commands to enhance your application for the user. By allowing the user to launch the application and drill down to specific pages using voice commands, you will make the experience more pleasurable for the user!
9-4. Incorporate Speech Recognition Within Your App
Problem
You want to enhance your Windows Phone 8 application by allowing users to give voice commands to complete tasks within the application.
Speech recognition is similar to the voice command feature in that it allows the user to initiate actions or commands through speech. However, speech recognition is used within the application after it is launched, while voice commands are used to launch an application. To incorporate speech recognition within your application, you must include the ID_CAP_SPEECH_RECOGNITION, ID_CAP_MICROPHONE, and ID_CAP_NETWORKING capabilities in the application manifest.
Speech recognition in Windows Phone 8 is driven by grammars. Within your application, you may include support for predefined dictation grammar, which is the simplest implementation when providing support for speech recognition within your application. You may also choose to include support for custom grammar by including a grammar file that is created using the industry-standard Speech Recognition Grammar Specification (SRGS).
To make your application speech-ready, you must incorporate one of the speech recognizer objects within your application. This allows your user to initiate a speech recognition operation within the application. The Windows.Phone.Speech.Recognition API contains two objects, each which contain its own method for initiating a speech recognition operation.
- SpeechRecognizerUI: Use the method RecognizeWithUIAsync to trigger a recognition operation, displaying the built-in Windows Phone 8 speech recognition-related screens during the recognition process.
When using predefined dictation or web search grammar, the user will be presented with the Listening screen, the Thinking screen, and either the “Heard you say” screen or an Error screen, all in that order. When using custom grammar, the user will be presented with the Listening screen, the Did You Say screen, and either the “Heard you say” screen or an Error screen.
The RecognizeWithUIAsync method returns a SpeechRecognitionUIStatus value to indicate the result of its speech recognition session. The potential values include Succeeded, Busy, Cancelled, Preempted, and PrivacyPolicyDeclined.
- SpeechRecognition: This object contains the method, RecognizeAsync, to trigger a recognition operation, without displaying the built-in Windows Phone 8 speech recognition-related screens.
To load predefined or custom grammar within your application, you must use one of the three available AddGrammar methods in the Windows.Phone.Speech.Recognition.SpeechGrammarSet class, as listed in Table 9-3.
Table 9-3. SpeechGrammarSet Methods for Loading Predefined or Custom Grammar into the Application
| Method | Description |
|---|---|
| AddGrammarFromList (string key, IEnumerable < string > phrases) | Creates a SpeechGrammar object from the string array of values that are passed into the method and adds it to the speech grammar set. |
| AddGrammarFromPredefinedType ( string key, SpeechPredefinedGrammar predefinedGrammarType) | Creates a SpeechGrammar object based on the predefined grammar type passed into the method and adds it to the speech grammar set. Possible values for the SpeechPredefinedGrammar parameter include Dictation or WebSearch. |
| AddGrammarFromUri (string key, Uri grammarUri) | Creates a SpeechGrammar object from the SGRS grammar file that is passed in through the Uri parameter and adds it to the speech grammar set. |
These methods are available through the Recognizer.Grammars collection, which is accessible from the SpeechRecognitionUI and SpeechRecognition objects. Here’s an example:
SpeechRecognizerUI speechRecognizerUI = new SpeechRecognizerUI();
speechRecognizerUI.Recognizer.Grammars.AddGrammarFromPredefinedType("myAppGrammar", SpeechPredefinedGrammar.Dictation);
You can also customize the listen prompt and example text that is displayed on the Listening screen by modifying the ListenText and ExampleText properties on the Settings class, which is accessible from both speech recognizer objects. Here’s an example:
speechRecognizerUI.Settings.ListenText = "What are you searching for?";
speechRecognizerUI.Settings.ExampleText = "coffee shop";
The Code
Launch Visual Studio 2012, and open the project named VoiceBucketListWithSpeech, located in the Chapter 9VoiceBucketListWithSpeech directory. This application is an extension of the application we developed in Recipe 9-3. If you skipped Recipe 9-3, now is the time to head back there to get ramped up on the application that we are working with now.
You will notice that this application has been enhanced to include speech recognition from within the application, when adding new items to the bucket list. All of our enhancements were performed in the AddBucketListItem page’s code-behind. Within the code-behind, you will notice that we instantiate a SpeechRecognizerUI object when the page is initialized (Listing 9-13). We also load a predefined dictation grammar set and ensure that the voice readout is enabled, and the confirmation message is displayed by setting the ReadoutEnabled and ShowConfirmation properties of the Settings class. If we want to turn voice readout off or bypass the confirmation dialog, simply set these properties to false.
Listing 9-13. Initializing the SpeechRecognizerUI Object in the AddBucketListItem Page
using Windows.Phone.Speech.Recognition;
...

SpeechRecognizerUI speechRecognizerUI;

public AddBucketListItem()
{
    InitializeComponent();
    DataContext = App.ViewModel;

    InitializeSpeechRecognizer();
}

private void InitializeSpeechRecognizer()
{
    speechRecognizerUI = new SpeechRecognizerUI();

    // Use the short message dictation grammar with the speech recognizer
    speechRecognizerUI.Recognizer.Grammars.AddGrammarFromPredefinedType("voiceBucketListKeywords", SpeechPredefinedGrammar.Dictation);

    speechRecognizerUI.Settings.ReadoutEnabled = true;
    speechRecognizerUI.Settings.ShowConfirmation = true;

}
Next, we decided to customize the Listen text and Example text that is displayed on the speech recognition screens, based on the type of item the user is currently adding to their bucket list, and then initiate the speech recognition UI, as shown in Listing 9-14.
Listing 9-14. Customize the Listen and Example Text Within the SpeechRecognizerUI.Settings Object
protected override void OnNavigatedTo(NavigationEventArgs e)
{
    if (NavigationContext.QueryString.ContainsKey("voiceCommandName"))
    {
        string voiceCommand = NavigationContext.QueryString["voiceCommandName"];

        switch (voiceCommand)
        {
            case "AddTravel":
                App.ViewModel.NewItem = new Models.BucketListItem { ItemType = BucketListItemType.Travel };
                App.ViewModel.PageTitle = BucketListItemType.Travel.ToString();

                speechRecognizerUI.Settings.ListenText = "Which place do you want to add?";
                speechRecognizerUI.Settings.ExampleText = "New York City";
                break;
            case "AddRestaurant":
                App.ViewModel.NewItem = new Models.BucketListItem { ItemType = BucketListItemType.Restaurant };
                App.ViewModel.PageTitle = BucketListItemType.Restaurant.ToString();

                speechRecognizerUI.Settings.ListenText = "Which restaurant do you want to add?";
                speechRecognizerUI.Settings.ExampleText = "McDonalds";
                break;
            default:
                App.ViewModel.NewItem = new Models.BucketListItem { ItemType = BucketListItemType.Movie };
                App.ViewModel.PageTitle = BucketListItemType.Movie.ToString();

                speechRecognizerUI.Settings.ListenText = "Which movie do you want to add?";
                speechRecognizerUI.Settings.ExampleText = "Spiderman";
                break;
        }

        PromptUserToSpeak();

    }
}

private async void PromptUserToSpeak()
{
    try
    {
        SpeechRecognitionUIResult recognitionResult =
            await speechRecognizerUI.RecognizeWithUIAsync();

        if (recognitionResult.ResultStatus == SpeechRecognitionUIStatus.Succeeded)
        {
            App.ViewModel.NewItem.Name = recognitionResult.RecognitionResult.Text;
        }
    }
    catch (Exception ex)
    {
        MessageBox.Show(ex.Message);
    }
}
When a successful result is received, the spoken word or phrase is set within the text box in the page. At this point, the user can tap the add button to add the item to the appropriate bucket list.
With just a few lines of code added, we have made the AddBucketListItem page speech-enabled. Let’s run this in the emulator to see what happens. Launch the application in the emulator and then hit the Back button to return to the Start screen. Initiate a deep-link to the application’s Add Bucket List Item screen by saying “Open VoiceBucketList and add a new movie.” The voice command response feedback will display, and the application will launch directly into the AddBucketListItem page. However, when the page loads, it will immediately initiate the speech recognition screen, prompting the user to say the name or description of the item they want to add, as depicted in Figure 9-9.
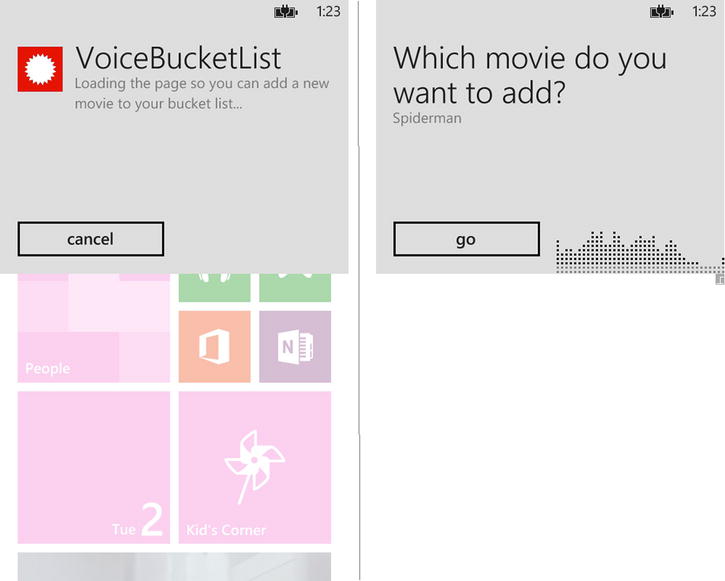
Figure 9-9. Use voice commands to launch the VoiceBucketList app and load the page to add a new bucket list item
When the user speaks a word or phrase, the speech recognition process then displays the Thinking screen while it processes the user’s speech. Once it locates a match within the predefined grammar collection, it will then display the “Heard you say” screen with the word or phrase displayed, as illustrated in Figure 9-10.

Figure 9-10. Once a command is heard, the Thinking screen displays, followed by the “Heard you say” screen
Next, the application sets the text box to the Text value of the RecognitionResult. At this point, the user needs only to tap the Add Movie button to add the new movie to a bucket list (Figure 9-11).
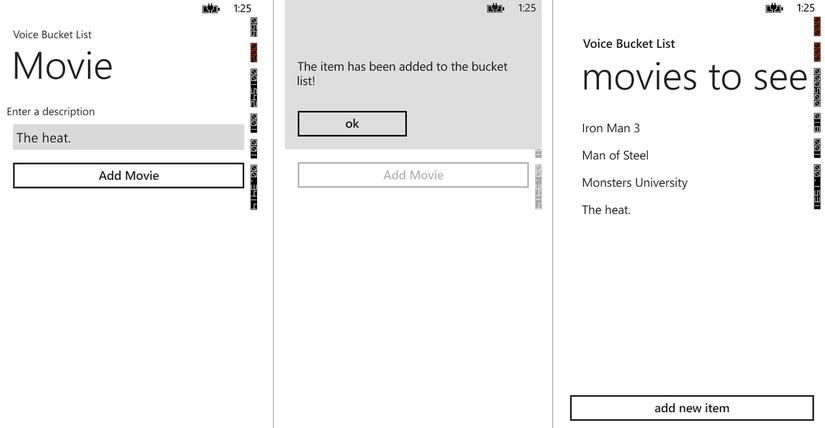
Figure 9-11. The resulting phrase is added to the text box in the AddBucketListItem page
As we demonstrated in this recipe, you can enhance the application experience for your users by incorporating speech recognition within the application in just a few lines of code. Speech recognition simplifies the tedious task of inputting information into a Windows Phone 8 application and will more than likely make the process more enjoyable for your user base.