
![]()
This chapter will walk you through the methods in which a developer can enhance their application’s photo experience by integrating with the built-in extension points provided in the Windows Phone 8 SDK. We will start off the chapter by covering how to access the user’s media library, as well as basic and advanced photo capture integration. We will then demonstrate how to extend your Camera app for media-sharing purposes. Finally, we will wrap up the chapter with a recipe that demonstrates how to incorporate background audio into a Windows Phone application.
In this chapter, we will go over the following recipes:
- 7-1. Access Photos from the User’s Media Library
- 7-2. Integrate Basic Photo Capture in Your App
- 7-3. Integrate Advanced Photo Capture in Your App
- 7-4. Register Your App as a Media-Sharing App
- 7-5. Play Background Audio from Your App
7-1. Access Photos from the User’s Media Library
Problem
You want to develop a photo gallery app that displays all the photos that are saved in albums on the user’s device.
How It Works
The MediaLibrary class is part of the Microsoft.Xna.Framework.Media namespace. It provides read-only access to photos and songs that are in the media library on the user’s device and that are made available through a set of enumerable collections. Table 7-1 lists these collections, along with additional properties that can be used to access information about the device’s media library.
Table 7-1. MediaLibrary Properties
| Property | Type | Details |
|---|---|---|
| Albums | AlbumCollection | Enumerable collection of all albums in the device’s media library. Each album contains a collection of songs, along with information about the album’s name, artist, genre, duration, and album art. |
| Artists | ArtistCollection | Enumerable collection of all artists in the device’s media library. Each artist contains a collection of albums and songs that are associated to a specific artist, along with the artist’s name. |
| Genres | GenreCollection | Enumerable collection of all genres in the device’s media library. Each genre contains a collection of albums and songs that are associated to a specific genre, along with the genre’s name. |
| MediaSource | MediaSource | The source from which the media is retrieved. On a Windows Phone, the media source is always the local device. |
| Pictures | PictureCollection | Enumerable collection of all pictures in the device’s media library. Each picture contains information about the picture’s name, width, height, and date. It also includes an Album property, which is of type PictureAlbum, and refers to the picture album that the picture exists within on the device. |
| Playlists | PlaylistCollection | Enumerable collection of all playlists in the device’s media library. Each playlist contains a collection of songs that are associated to the playlist, along with the playlist’s name. |
| RootPictureAlbum | PictureAlbum | The root picture album for all pictures in the device’s media library. The PictureAlbum property contains a collection of PictureAlbums, which return all child albums that are saved within the current album. It also contains a Pictures collection, which returns all pictures within the current album. |
| SavedPictures | PictureCollection | Similar to the Pictures collection. Enumerable collection of all saved pictures in the device’s media library. |
| Songs | SongsCollection | Enumerable collection of all songs in the device’s media library. Each song contains information about the song's name, artist, duration, genre, rating, track number, play count, and whether the song is DRM-protected. It also includes an Album property, which refers to the album that the song appears on. |
The MediaLibrary class provides the SavePicture and SavePictureToCameraRoll methods, which allow you to save pictures to the device’s Saved Pictures album or Camera Roll, respectively. We will demonstrate the use of the SavePicture method in Recipe 7-3. The MediaLibrary class also provides a GetPictureFromToken method, which allows you to retrieve a picture from the device based on a picture token. This method is useful when the app is exposed as a media-sharing app in the Photos Hub and must load a specific picture when launched, which we will show in Recipe 7-4.
Once we have access to any single picture on a device, we need to be able to load it and display it within the application. The Picture object exposes two methods that simplify this: GetThumbnail and GetImage. Both methods return a stream that contains the image data of the selected picture. As shown in Listing 7-1, the stream can be used to render a BitmapImage object, and then displayed within an Image control.
Listing 7-1. Create a BitmapImage from a Picture’s Image Data Stream
Microsoft.Xna.Framework.Media.MediaLibrary library =
    new Microsoft.Xna.Framework.Media.MediaLibrary();

//retrieve the first picture in the collection
Microsoft.Xna.Framework.Media.Picture firstPicture = library.Pictures.FirstOrDefault();

//retrieve the stream for the current picture's full-size image
System.IO.Stream pictureStream = firstPicture.GetImage();

//generate a BitmapImage from the current picture's image data stream
System.Windows.Media.Imaging.BitmapImage image =
    new System.Windows.Media.Imaging.BitmapImage();

image.SetSource(pictureStream);
Creating a Photo Gallery App
Now, let’s create a simple photo gallery app that uses the MediaLibrary class to load pictures that are on the user’s device. Launch Visual Studio 2012, and create a new Windows Phone project using the same steps provided in Chapter 1, Recipe 1-2. In this scenario, you will select the Windows Phone Databound Project template, in the New Project dialog. Let’s set the name of the new project to MyGalleryApp.
Since the application will be accessing photos on the device, we need to be sure to include the ID_CAP_MEDIALIB_PHOTO capability in the application manifest. If you are unsure how to include this capability, review Recipe 1-6.
Next, modify the MainViewModel class as follows:
- Include the using directive for the Microsoft.Xna.Framework.Media namespace.
- Delete the Sample properties that were added by default.
- Create the following properties:
- a. public ObservableCollection<PictureAlbum> PhotoAlbums - collection of albums on the device
- b. public PictureAlbum CurrentAlbum - the album that the user selected to drill down into
- c. public ObservableCollection<Picture> CurrentAlbumPictures - collection of pictures that are contained within the selected album
- d. public Picture CurrentPicture - the picture the user selected to view
- Modify the LoadData method in the MainViewModel class to set our PhotoAlbums observable collection to the RootPictureAlbum.Albums collection from the MediaLibrary class.
Refer to Listing 7-2 to view the code changes that are needed within the MainViewModel class.
Listing 7-2. MyGalleryApp Project’s Updated MainViewModel
using System;
using System.Linq;
using System.Collections.ObjectModel;
using System.ComponentModel;
using Microsoft.Xna.Framework.Media;

namespace MyGalleryApp.ViewModels
{
    public class MainViewModel : INotifyPropertyChanged
    {
        private ObservableCollection<PictureAlbum> photoAlbums;
        public ObservableCollection<PictureAlbum> PhotoAlbums
        {
            get
            {
                return photoAlbums;
            }
            set
            {
                photoAlbums = value;
                NotifyPropertyChanged("PhotoAlbums");
            }
        }

        private PictureAlbum currentAlbum;
        public PictureAlbum CurrentAlbum
        {
            get
            {
                return currentAlbum;
            }
            set
            {
                if (currentAlbum != value)
                {
                    currentAlbum = value;
                    NotifyPropertyChanged("CurrentAlbum");

                    //when the current album changes, update the CurrentAlbumPictures collection
                    //to reflect the pictures in the newly selected album
                    CurrentAlbumPictures = new ObservableCollection<Picture>(currentAlbum.Pictures.ToList());
                }
            }
        }

        private ObservableCollection<Picture> currentAlbumPictures;
        public ObservableCollection<Picture> CurrentAlbumPictures
        {
            get
            {
                return currentAlbumPictures;
            }
            set
            {
                currentAlbumPictures = value;
                NotifyPropertyChanged("CurrentAlbumPictures");
            }
        }

        private Picture currentPicture;
        public Picture CurrentPicture
        {
            get
            {
                return currentPicture;
            }
            set
            {
                currentPicture = value;
                NotifyPropertyChanged("CurrentPicture");
            }
        }

        public void LoadData()
        {
            using (MediaLibrary library = new MediaLibrary())
            {
                this.PhotoAlbums = new ObservableCollection<PictureAlbum>(library.RootPictureAlbum.Albums.ToList());
            }

            this.IsDataLoaded = true;
        }


        public bool IsDataLoaded
        {
            get;
            private set;
        }

        public event PropertyChangedEventHandler PropertyChanged;
        private void NotifyPropertyChanged(String propertyName)
        {
            PropertyChangedEventHandler handler = PropertyChanged;
            if (null != handler)
            {
                handler(this, new PropertyChangedEventArgs(propertyName));
            }
        }
    }
}
Leveraging Data Binding in the App
Next, we will modify the LongListSelector in the MainPage markup to bind to the PhotoAlbums collection in our view model. The LongListSelector’s DataTemplate will include a thumbnail image of the first picture in the album, the album’s name, and the total number of pictures in the album (Listing 7-3).
Listing 7-3. Main Page’s LongListSelector to Display List of Albums with the First Image in Each Album Displayed as the Thumbnail Image
<phone:LongListSelector
    Margin="10"
    Grid.Row="1"
    ItemsSource="{Binding PhotoAlbums}">
    <phone:LongListSelector.ItemTemplate>
        <DataTemplate>
            <StackPanel Orientation="Horizontal"
                        Margin="10"
                        Height="105"
                        Width="430">
                <Image Width="99"
                        Height="99"
                        Source="{Binding Pictures[0]}"/>
                <StackPanel Width="300">
                    <TextBlock Text="{Binding Name}"
                                TextWrapping="Wrap"
                                Margin="10,0"
                                Style="{StaticResource PhoneTextExtraLargeStyle}"
                                FontSize="{StaticResource PhoneFontSizeLarge}" />
                    <TextBlock Text="{Binding Pictures.Count, StringFormat='Pictures Count: {0}'}"
                                TextWrapping="Wrap" Margin="10,0"
                                Style="{StaticResource PhoneTextSubtleStyle}" />
                </StackPanel>
            </StackPanel>
        </DataTemplate>
    </phone:LongListSelector.ItemTemplate>
</phone:LongListSelector>
Take a minute to review the DataTemplate markup in Listing 7-3. We are binding the first picture in the collection to an Image control, along with the picture name and a count of all pictures in the collection for each album. However, there is still something not quite right in this markup. Did you spot it?
The binding for the Image control will not work the way it is shown. If you recall, the only way we can obtain an image from a Picture object is to call the GetThumbnail or GetImage method on the object. In this case, we will need to create a converter to handle this. For the sample project that ships with this recipe, I simply created a converter, called ThumbnailImageConverter, that leverages the concept we discussed earlier in the recipe to convert a Picture object’s thumbnail or full-size image data stream to a BitmapImage.
Using a Converter to Render a Picture Object as a BitmapImage
As shown in Listing 7-4, I’ve extended the converter by checking for a parameter value. This will provide us with the flexibility to choose which image we would like to convert from the Picture object, either the thumbnail or the full-size image, since we will be using this type of converter to handle both cases in this application. If a parameter of “thumbnail” is passed in, we will return the picture’s thumbnail image. Otherwise, we will return the picture’s full-size image.
Listing 7-4. ThumbnailImageConverter Class
using System;
using System.Windows.Data;
using System.Windows.Media.Imaging;
using Microsoft.Xna.Framework.Media;

namespace MyGalleryApp.Converters
{
    public class ThumbnailImageConverter : IValueConverter
    {
        public object Convert(object value, Type targetType, object parameter, System.Globalization.CultureInfo culture)
        {
            if (value is Picture)
            {
                Picture pic = value as Picture;
                BitmapImage image = new BitmapImage();

                if (parameter != null && parameter.ToString() == "thumbnail")
                {
                    image.SetSource(pic.GetThumbnail());
                }
                else
                {
                    image.SetSource(pic.GetImage());
                }

                return image;
            }
            return value;

        }

        public object ConvertBack(object value, Type targetType, object parameter, System.Globalization.CultureInfo culture)
        {
            throw new NotImplementedException();
        }
    }
}
We can now modify the MainPage markup to include the converter as a page resource.
    <phone:PhoneApplicationPage.Resources>
        <conv:ThumbnailImageConverter x:Key="thumbnailImageConverter" />
    </phone:PhoneApplicationPage.Resources>
Next, we will modify the Image element in the LongListSelector’s DataTemplate to leverage the converter in the Source property binding.
<Image Width="99" Height="99"
       Source="{Binding Pictures[0],
         Converter={StaticResource thumbnailImageConverter},
         ConverterParameter=thumbnail}"/>
Finally, add an event handler for the LongListSelector’s SelectionChanged event (Listing 7-5). We will use this event to set the CurrentAlbum property in the view model to the album that was selected by the user. Once the CurrentAlbum is set to the selected item, the application will then navigate to a new page, which will display the current album’s pictures in a grid layout.
Listing 7-5. The LongListSelector’s SelectionChanged Event in the MainPage Code-Behind
private void LongListSelector_SelectionChanged(object sender, SelectionChangedEventArgs e)
{
    if (e.AddedItems.Count > 0)
    {
        App.ViewModel.CurrentAlbum = e.AddedItems[0] as Microsoft.Xna.Framework.Media.PictureAlbum;
        NavigationService.Navigate(new Uri("/AlbumGalleryPage.xaml", UriKind.Relative));
    }
}
As we hinted at in the SelectionChanged event handler, we will need to create a new page called AlbumGalleryPage, which will be used to display the collection of pictures from the CurrentAlbum. Every time the CurrentAlbum property is set to a new value, the CurrentAlbumPictures collection is updated with the selected album’s pictures collection. So, the only thing we need to do is provide a page to display the pictures.
For this we will again leverage the LongListSelector control, setting its LayoutMode property to Grid and defining a GridCellSize of 140x140. The control’s ItemSource will be set to the CurrentAlbumPictures collection. The DataTemplate will include an Image control whose Source property is bound to each picture in the collection. In this case, the binding will be to the source object itself, so we will not include a property name in the binding. We do, however, need to include the ThumbnailImageConverter as we did in the MainPage markup. As a nice touch, we will be sure to include the album’s name in the title of the page, as shown in Listing 7-6.
Listing 7-6. AlbumGalleryPage Markup
<phone:PhoneApplicationPage.Resources>
    <conv:ThumbnailImageConverter x:Key="thumbnailImageConverter" />
</phone:PhoneApplicationPage.Resources>
<Grid x:Name="LayoutRoot" Background="Transparent">
    <Grid.RowDefinitions>
        <RowDefinition Height="Auto"/>
        <RowDefinition Height="*"/>
    </Grid.RowDefinitions>
    <StackPanel Grid.Row="0" Margin="12,0,0,28">
        <TextBlock Text="MY GALLERY APP" Style="{StaticResource PhoneTextNormalStyle}"/>
        <TextBlock Text="{Binding CurrentAlbum.Name}"
                    Margin="9,-7,0,0"
                    Style="{StaticResource PhoneTextTitle1Style}"/>
    </StackPanel>
    <Grid x:Name="ContentPanel" Grid.Row="1" Margin="12,0,12,0">
        <phone:LongListSelector LayoutMode="Grid"
                                GridCellSize="140,140"
                                ItemsSource="{Binding CurrentAlbumPictures}"
                                SelectionChanged="LongListSelector_SelectionChanged">
            <phone:LongListSelector.ItemTemplate>
                <DataTemplate>
                    <Image Width="120"
                            Height="120"
                            Margin="10,5"
                            Source="{Binding
                            Converter={StaticResource thumbnailImageConverter},
                            ConverterParameter=thumbnail}"/>
                </DataTemplate>
            </phone:LongListSelector.ItemTemplate>
        </phone:LongListSelector>
    </Grid>
</Grid>
As depicted in Listing 7-7, we will modify the AlbumGalleryPage code-behind by setting the DataContext to our view model instance in the page’s constructor. We will also wire up the SelectionChanged event in a similar manner that was done for the MainPage, except we will set the CurrentPicture property in the view model to the selected item. As well, we will navigate to a new page that will display the full-size image of the selected picture.
Listing 7-7. AlbumGalleryPage Code-Behind
public AlbumGalleryPage()
{
    InitializeComponent();
    DataContext = App.ViewModel;
}

private void LongListSelector_SelectionChanged(object sender, SelectionChangedEventArgs e)
{
    if (e.AddedItems.Count > 0)
    {
        App.ViewModel.CurrentPicture = e.AddedItems[0] as Microsoft.Xna.Framework.Media.Picture;
        NavigationService.Navigate(new Uri("/ViewPicturePage.xaml", UriKind.Relative));
    }
}
As you have probably guessed, we will be adding a new page, called ViewPicturePage, to the project. This page will contain an image control that is bound to the CurrentPicture object, which will also make use of the ThumbnailImageConverter. In this case, we will not be passing a ConverterParameter value, since we want the full-size image returned.
<Image Width="480"
       Height="600"
       Grid.Row="1"
       Source="{Binding CurrentPicture,
          Converter={StaticResource thumbnailImageConverter}}" />
The ViewPicturePage’s code-behind will only need to set the DataContext to our current view model instance. Once that is done, we can test the application. Go ahead and launch the application in the emulator. What do you notice? If you said, “There are no albums in my list,” then you would be correct! On the initial launch of the emulator, your albums list will be empty, as shown in Figure 7-1.

Figure 7-1. First launch of MyGalleryApp in the emulator
Testing in the Emulator
To populate an album in the emulator with sample photos, you will need to launch the Photos Hub manually, by clicking Photos on the main screen or in the application list on the emulator. This information is discussed in the Windows Phone Emulator article on the MSDN site, under the section “Features that changed in the Windows Phone 8 emulator,” located at http://msdn.microsoft.com/en-us/library/windowsphone/develop/ff402563(v=vs.105).aspx#BKMK_changedfeatures.
This means you will need to exit from your application by hitting the back button in the emulator. Next, tap the Photos tile on the main screen to launch the Photos Hub. Once the Photos Hub screen loads, hit the back button. Now you can go to the apps list in the emulator and relaunch MyGalleryApp. Notice that there is sample data on the main screen of the application now. Tap the Sample Pictures album to drill down into the album and view its collection of pictures (Figure 7-2). Then tap any picture on the album pictures grid to view the full-size image of the selected picture.
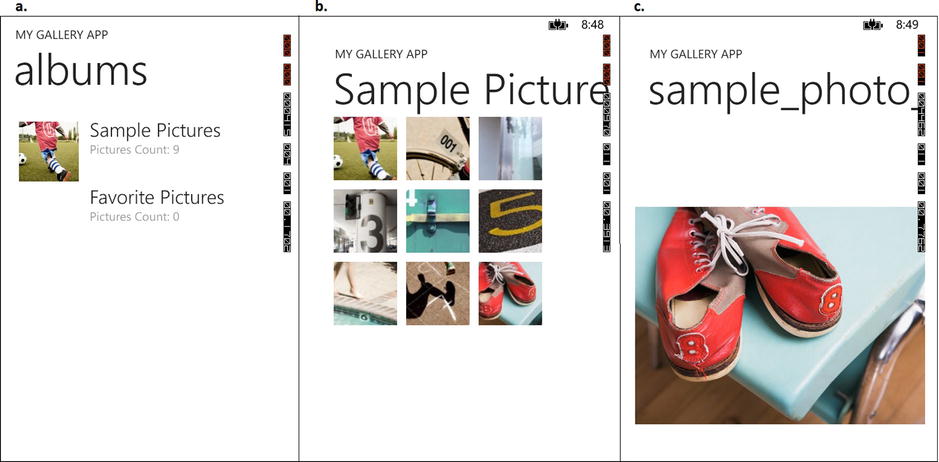
Figure 7-2. The three views in MyGalleryApp: a) albums view, b) album pictures view, and c) picture view
As we demonstrated in this recipe, it is easy to access photos on a device by creating a new instance of the MediaLibrary class, leveraging one of the available picture collections, and calling the GetImage or GetThumbnail method on the Picture object. Although we tested it only in the emulator, ideally you will want to test this application on a device that has many pictures in order to test performance.
7-2. Integrate Basic Photo Capture in Your App
Problem
You want to create an app that allows the user to take photos without having to leave the app.
Solution
Leverage the CameraCaptureTask from within the application to launch the device’s native Camera application.
How It Works
The Windows Phone APIs include a CamaraCaptureTask, in the Microsoft.Phone.Tasks namespace, which you can use to incorporate photo capture from within your app. The CameraCaptureTask contains a single method, Show, which launches the device’s Camera application. It also contains a single event, Completed, which is triggered when the photo capture has completed. The Completed event receives a PhotoResult object indicating whether the capture was successfully completed. The PhotoResult.TaskResult property is an enumerated value with the following options: OK, Cancel, None. If the photo capture completed as expected, the TaskResult will be set to the OK enumerated value, and the image data stream will be returned in the PhotoResult.ChosenPhoto property. If an error occurred on capture, the PhotoResult.Error object will return the exception that occurred.
Once a photo stream is returned in the Completed event of the CameraCaptureTask, it is already saved to the device’s Camera Roll. Additionally, you can save it to isolated storage, save it to the device’s Saved Pictures album, or even stream it to a web service, depending on the purpose of your application. However, because the CameraCaptureTask automatically saves the photo to the Camera Roll when the user accepts the photo, it would be courteous to give the user an indication beforehand that this is the behavior of your application. The user may have the Camera Roll set up to automatically sync to their SkyDrive account, and they may not want any photos they take through your application to be synchronized to that account. In the same respect, if you want to stream photos captured on the user’s device to an alternate web service that hosts photos, make this abundantly clear to the user as well, keeping in line with Microsoft’s requirement to obtain user consent before taking action on any of the user’s personal content.
Another thing to note is that when the Camera application is launched using the CameraCaptureTask, your application may be deactivated. To ensure that your application will successfully receive the result of the camera capture, it is necessary to declare a class-level property for the CameraCaptureTask in the page’s code-behind. And, within the page’s constructor, create a new instance of the CameraCaptureTask and register its Completed event handler.
In this recipe, we will create a simple camera application that will allow the user to take a photo that will automatically be saved to the Camera Roll upon acceptance of the capture. Launch Visual Studio 2012 and create a new Windows Phone application. Since the application’s sole purpose is to take pictures, we should ensure that the user has a rear-facing camera at a minimum. Go to the application manifest’s Requirements tab and include the ID_REQ_REARCAMERA requirement. This ensures that the user’s device must have a rear-facing camera at an absolute minimum in order to install this application. In this way, we will not need to conduct a check in code for this feature. If you are unsure how to include this requirement, go back to Chapter 1 and review Recipe 1-6.
The Code
In the MainPage markup, add a TextBlock control and an Image control to the ContentPanel grid, as shown in Listing 7-8. Also, include an application bar containing a single button that will be used to launch the Camera application.
Listing 7-8. MyCameraApp’s MainPage Markup
<Grid x:Name="LayoutRoot" Background="Transparent">
    <Grid.RowDefinitions>
        <RowDefinition Height="Auto"/>
        <RowDefinition Height="*"/>
    </Grid.RowDefinitions>
    <TextBlock Text="MY CAMERA APP"
                    Style="{StaticResource PhoneTextNormalStyle}"
                    Grid.Row="0" Margin="12,17,0,28"/>

    <Grid x:Name="ContentPanel" Grid.Row="1">
        <Grid.RowDefinitions>
            <RowDefinition Height="Auto"/>
            <RowDefinition Height="*"/>
        </Grid.RowDefinitions>
        <TextBlock x:Name="statusMessage"
                    TextWrapping="Wrap"
                    Margin="10"
                    MaxWidth="450"
                    Text="Tap the camera button below to take a picture" />
        <Image Name="myPicture"
                Grid.Row="1" />
    </Grid>
</Grid>
<phone:PhoneApplicationPage.ApplicationBar>
    <shell:ApplicationBar>
        <shell:ApplicationBarIconButton
            IconUri="/Assets/feature.camera.png"
            Text="take a pic"
            Click="ApplicationBarIconButton_Click" />
    </shell:ApplicationBar>
</phone:PhoneApplicationPage.ApplicationBar>
In the MainPage code-behind, add a using directive for the Microsoft.Phone.Tasks namespace. Next, instantiate the CameraCaptureTask and attach an event handler to the CameraCaptureTask’s Completed event. In the ApplicationIconBarButton’s Click event, call the Show method of the CameraCaptureTask’s instance. In the Completed event handler, convert the image data stream returned in the PhotoResult’s ChosenPhoto property to a BitmapImage that will then be set as the Image control’s Source property, provided the capture completed successfully. The resulting code is shown in Listing 7-9.
Listing 7-9. MainPage Code-Behind Instantiating the CameraCaptureTask and Launching It When the Application Bar Button Is Tapped
using Microsoft.Phone;
using Microsoft.Phone.Controls;
using Microsoft.Phone.Tasks;

namespace MyCameraApp
{
    public partial class MainPage : PhoneApplicationPage
    {
        CameraCaptureTask camera;

        public MainPage()
        {
            InitializeComponent();
            camera = new CameraCaptureTask();
            camera.Completed += camera_Completed;
        }

        private void camera_Completed(object sender, PhotoResult e)
        {
            if (e.TaskResult == TaskResult.OK && e.Error == null)
            {
                System.Windows.Media.Imaging.BitmapImage image =
                    new System.Windows.Media.Imaging.BitmapImage();

                image.SetSource(e.ChosenPhoto);

                myPicture.Source = image;

                statusMessage.Text = "Photo captured using the CameraCaptureTask. Photo has been saved to the Camera Roll.";
            }
        }

        private void ApplicationBarIconButton_Click(object sender, System.EventArgs e)
        {
            camera.Show();
        }

    }
}
Testing in the Emulator
That is all the code we need! Now we can launch the application in the emulator to take it for a test run. When the application is first launched, the user is prompted to tap the camera button in the application bar to take a picture (Figure 7-3).
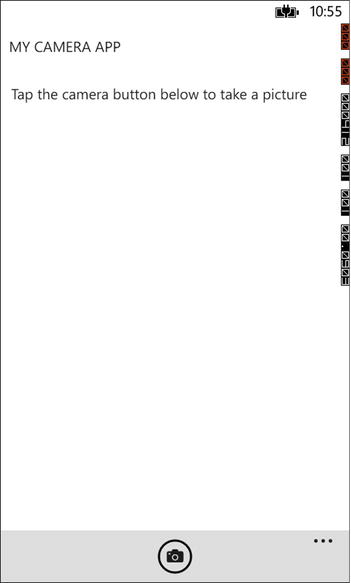
Figure 7-3. MyCameraApp main screen on launch
When the camera button is tapped, the native Camera application is launched in the emulator. When testing camera functionality in the emulator, the viewfinder will display a moving block along the edge of the viewfinder that changes colors intermittently. When the screen is tapped, the Camera application will capture the display in the viewfinder. The resulting photo will be the screen with a colored block at the location that the capture completed. You have the option to accept the photo capture or retake the photo, because this is the behavior of the native Camera application. Upon accepting a photo capture, you will automatically be returned to MyCameraApp’s main page, and the Completed event is triggered. The image in Figure 7-4 will be displayed in the main page.
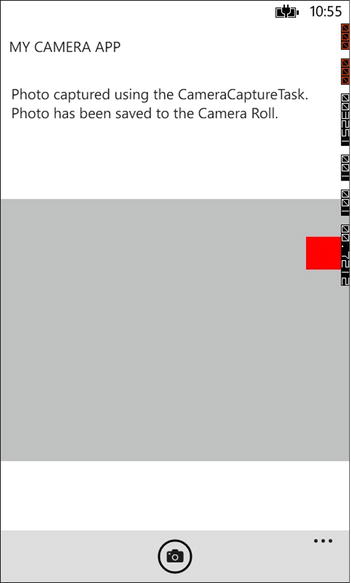
Figure 7-4. Photo captured in emulator
Remember that upon acceptance of the photo capture, the photo is saved to the device’s Camera Roll. You can confirm this by launching the Photos Hub in the emulator and drilling down into the Camera Roll. You will notice that the photo that was captured through MyCameraApp is now in the Camera Roll as well.
7-3. Integrate Advanced Photo Capture in Your App
Problem
You want to create an app that allows the user to take photos without leaving the app.
Solution
Leverage the PhotoCamera class, in the Microsoft.Devices namespace, to launch the device’s built-in camera capture feature.
How It Works
The Microsoft.Devices.PhotoCamera class allows you to include a camera that runs right within your Windows Phone application. It includes properties that allow you to have control of the camera’s flash mode, resolution, and image capture. It also provides events for camera focus, image capture, image availability, and thumbnail availability, as shown in Figure 7-5.
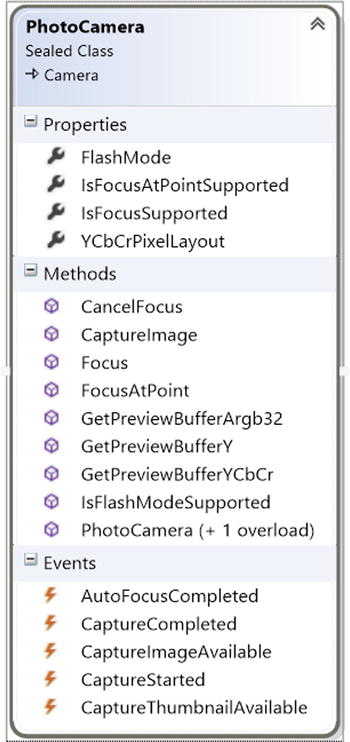
Figure 7-5. PhotoCamera members
To provide a true camera experience, we will also need to handle the events triggered when the device’s hardware shutter button is pressed. The CameraButtons class, in the Microsoft.Devices namespace provides events for this purpose, as shown in Figure 7-6.
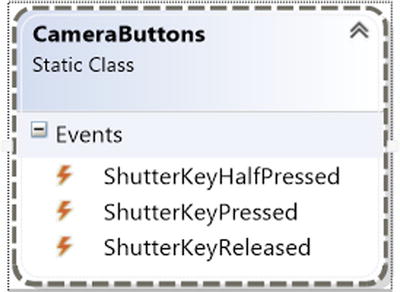
Figure 7-6. CameraButtons events
Now we can put the information we learned about PhotoCamera and CameraButtons to use. In this recipe, we will create a camera that runs within the application and allows for camera capture through both the tap of the screen and the device’s shutter button. Once the capture is successful and an image is available, we will save the picture to the device’s Saved Pictures album within the media library. We will also force navigation to another page to load the saved picture from the media library.
The Code
Launch Visual Studio 2012, and create a new Windows Phone App project named MyAdvancedCameraApp. Since we are providing an integrated camera capture experience, the first thing we need to do is add the ID_CAP_ISV_CAMERA capability in the application manifest file. We also plan on loading the saved photo from the MediaLibrary class, so we will need to include the ID_CAP_MEDIALIB_PHOTO capability as well. Last but not least, we will need to include the ID_REQ_REAR_CAMERA requirement in the manifest to specify that, at a minimum, the user’s device must have a rear-facing camera.
In the MainPage markup, add a Canvas, named viewfinderCanvas, and a TextBlock, named cameraState, that will serve as our camera status message.
<Grid x:Name="LayoutRoot" Background="Transparent">
    <Grid.RowDefinitions>
        <RowDefinition Height="Auto"/>
        <RowDefinition Height="Auto" />
    </Grid.RowDefinitions>
    <Canvas x:Name="viewfinderCanvas"
                Width="480"
                Height="700"
                HorizontalAlignment="Left" >
        <Canvas.Background>
            <VideoBrush x:Name="viewfinderBrush" />
        </Canvas.Background>
    </Canvas>
    <TextBlock Name="cameraState" Grid.Row="1"
                Width="450"
                Margin="10"
                TextWrapping="Wrap"/>
</Grid>
In the MainPage code-behind, we will add code to ensure that we create a new instance of the PhotoCamera class and set the Canvas’ Source to this instance. We will also register events to trap when the device’s shutter button is pressed/released and register events to handle focus and image capture availability. We will also allow the user to tap the screen to initiate a photo capture.
As an added bonus, we will also save the captured image to the media library’s Saved Pictures album and provide a full-size view of the captured image. The resulting code is displayed in Listing 7-10.
Listing 7-10. Instantiating a PhotoCamera Object and Registering Camera-Related Events in the MainPage Code-Behind
using System;
using System.Windows.Navigation;
using Microsoft.Devices;
using Microsoft.Phone.Controls;

namespace MyAdvancedCameraApp
{
    public partial class MainPage : PhoneApplicationPage
    {
        PhotoCamera myCamera;

        public MainPage()
        {
            InitializeComponent();
        }

        protected override void OnNavigatedTo(NavigationEventArgs e)
        {
            if (PhotoCamera.IsCameraTypeSupported(CameraType.Primary))
            {
                CameraButtons.ShutterKeyHalfPressed += CameraButtons_ShutterKeyHalfPressed;
                CameraButtons.ShutterKeyPressed += CameraButtons_ShutterKeyPressed;
                CameraButtons.ShutterKeyReleased += CameraButtons_ShutterKeyReleased;

                myCamera = new PhotoCamera(CameraType.Primary);
                myCamera.AutoFocusCompleted += myCamera_AutoFocusCompleted;
                myCamera.CaptureImageAvailable += myCamera_CaptureImageAvailable;

                this.Tap += MainPage_Tap;
                viewfinderBrush.SetSource(myCamera);

                cameraState.Text = "Tap the screen to focus and take a picture or press the hardware camera button to take a picture";

            }
            else
            {
                cameraState.Text = "Camera not supported";
            }
        }

        void MainPage_Tap(object sender, System.Windows.Input.GestureEventArgs e)
        {
            if (myCamera != null)
            {
                myCamera.Focus();
                SetCameraStateMessage("Camera focus initiated through screen tap");
            }
        }

        protected override void OnNavigatingFrom(NavigatingCancelEventArgs e)
        {
            CameraButtons.ShutterKeyHalfPressed -= CameraButtons_ShutterKeyHalfPressed;
            CameraButtons.ShutterKeyPressed -= CameraButtons_ShutterKeyPressed;
            CameraButtons.ShutterKeyReleased -= CameraButtons_ShutterKeyReleased;

            myCamera.AutoFocusCompleted -= myCamera_AutoFocusCompleted;
            myCamera.CaptureImageAvailable -= myCamera_CaptureImageAvailable;

            myCamera.Dispose();
        }

        private void myCamera_CaptureImageAvailable(object sender, ContentReadyEventArgs e)
        {
            string imageName = string.Format("MyAdvCam{0}.jpg", DateTime.Now.Ticks.ToString());

            using (Microsoft.Xna.Framework.Media.MediaLibrary library = new Microsoft.Xna.Framework.Media.MediaLibrary())
            {
                //save picture to device's Saved Pictures album
                library.SavePicture(imageName, e.ImageStream);
            };

            this.Dispatcher.BeginInvoke(() =>
                {
                    NavigationService.Navigate(new Uri("/PhotoDetailsPage.xaml?pic=" + imageName, UriKind.Relative));
                });
        }

        private void myCamera_AutoFocusCompleted(object sender, CameraOperationCompletedEventArgs e)
        {
            if (myCamera != null)
            {
                myCamera.CaptureImage();
                SetCameraStateMessage("Auto focus completed, camera capture initiated");
            }
        }

        private void CameraButtons_ShutterKeyReleased(object sender, EventArgs e)
        {
            if (myCamera != null)
            {
                myCamera.CancelFocus();
                SetCameraStateMessage("Camera focus cancelled");
            }
        }

        private void CameraButtons_ShutterKeyPressed(object sender, EventArgs e)
        {
            if (myCamera != null)
            {
                myCamera.CaptureImage();
                SetCameraStateMessage("Camera capture initiated");
            }
        }

        private void CameraButtons_ShutterKeyHalfPressed(object sender, EventArgs e)
        {
            if (myCamera != null)
            {
                myCamera.Focus();
                SetCameraStateMessage("Camera focus initiated");
            }
        }

        private void SetCameraStateMessage(string message)
        {
            this.Dispatcher.BeginInvoke(() =>
            {
                cameraState.Text = message;
            });
        }
    }
}
As shown in the code for the PhotoCamera’s CaptureImageAvailable event, we will need to add a new page, named PhoneDetailsPage, to the project. Add an Image control, named myImage, and a TextBlock, named imageDetails, to the page.
<Image Name="myImage"
       Width="400"
       Height="500"
       Stretch="Fill"/>
<TextBlock Name="imageDetails"
           Width="450"
           Margin="10"
           Grid.Row="1"
           TextWrapping="Wrap" />
As shown in Listing 7-11, in the PhoneDetailsPage code-behind, we will simply override the OnNavigatedTo event. This will determine whether a picture name is being passed in so that it can be loaded from the Media Library.
Listing 7-11. Overriding the OnNavigatedTo Event in the PhoneDetailsPage Code-Behind
protected override void OnNavigatedTo(NavigationEventArgs e)
{
    if (NavigationContext.QueryString.ContainsKey("pic"))
    {
        string imageName = NavigationContext.QueryString["pic"];

        using (MediaLibrary myLibrary = new MediaLibrary())
        {
            Picture myPic = myLibrary.SavedPictures.Where(p => p.Name == imageName).FirstOrDefault();
            if (myPic != null)
            {
                BitmapImage bmp = new BitmapImage();
                bmp.SetSource(myPic.GetImage());
                myImage.Source = bmp;

                imageDetails.Text = string.Format("Image saved as {0} in album {1}", imageName, myPic.Album.Name);
            }
        }
    }
}
If the NavigationContext’s QueryString property contains the picture name, we will use the query string value to load the picture from the device’s media library by name, render it as a BitmapImage, and display it in the Image control within the page.
Testing in the Emulator
We are now ready to run the application in the emulator to test our custom camera. When the application launches, our PhotoCamera object will be instantiated and attached to our viewfinderCamera canvas. Notice that we do not have to leave the application for the camera to work. It is currently functioning within our app. The viewfinderCamera canvas will display the rotating image in the emulator for our testing purposes, as shown in Figure 7-7. Tap the screen to initiate the photo capture.

Figure 7-7. MyAdvancedCameraApp displays our in-app camera viewfinder on launch
Upon a successful photo capture, the PhotoCamera’s CaptureImageAvailable event is triggered, which returns the captured image, as shown in Figure 7-8. It is then saved to the Saved Pictures album on the device, and navigation to the PhotoDetailsPage occurs, passing the picture’s saved name through the query string. The PhotoDetailsPage checks the query string for a picture name. If a name has been passed in, it retrieves the specified picture from the media library and displays it in the page.
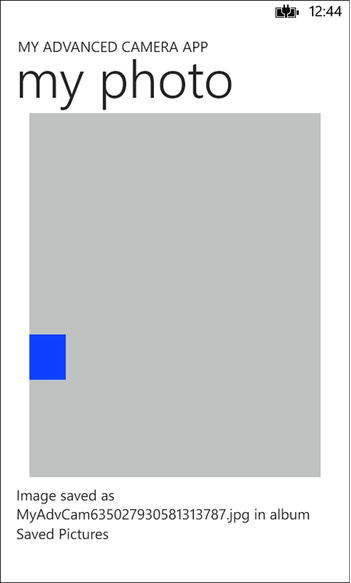
Figure 7-8. PhotoDetailsPage loads and displays the saved image that was captured by the app
Incorporating an in-app camera requires a little more legwork than using the CameraCaptureTask, but it provides more control over the actions that are taken on the captured image within your application. It provides the added benefit that the application is not navigated away from to take a picture.
Another benefit of developing an in-application camera experience is that you will be able to extend your application as a Lens application. As this topic is beyond the scope of this book, you can learn more about Lens applications by reviewing the MSDN article “Lenses for Windows Phone 8” at http://msdn.microsoft.com/en-us/library/windowsphone/develop/jj206990(v=vs.105).aspx.
7-4. Register Your App as a Media-Sharing App
Problem
You want to allow the user to load a photo by launching and displaying it in your app using the share option in Photos Hub.
Solution
Include the Photos_Extra_Share extension in the application manifest to register it as a media-sharing application, and leverage the MediaLibrary class in code to load the photo.
How It Works
When developing a Windows Phone application, you have the option to extend your application, using one or more extension points, as listed in Table 7-2.
Table 7-2. Photos Extension Points
| Extension | Extension Name | End Result |
|---|---|---|
| Photos Hub | Photos_Extra_Hub | The application is listed under the apps list in the Photos Hub. |
| Share Picker | Photos_Extra_Share | The application is available for selection in the share picker list, when the user selects the share menu item when viewing a photo in the Photos Hub. QueryString will contain Action=ShareContent and FileId={picture token}. |
| Rich Media App | Photos_Rich_Media_Edit | The application is available as an open menu option in the application bar when viewing a photo in the Photos Hub. QueryString will contain Action=RichMediaEdit and token={picture token}. |
| Photo Edit Picker | Photos_Extra_Image_Editor | The application is available for selection in the edit picker list, when the user selects the edit menu item when viewing a photo in the Photos Hub. QueryString will contain Action=EditPhotoContent and FileId={picture token}. |
| Photo Apps Picker | Photos_Extra_Viewer | The application is available for selection. |
Launch Visual Studio 2012 and open the MyCameraApp we developed in Recipe 7-2. We will extend this application as a photo-sharing app. To register this application as a media-sharing application, we will need to add the Photos_Extra_Share element to the application manifest.
<Extensions>
     <Extension ExtensionName="Photos_Extra_Share" ConsumerID="{5B04B775-356B-4AA0-AAF8-6491FFEA5632}" TaskID="_default" />
</Extensions>
Next, we will need to override the OnNavigatedTo event in the MainPage code-behind. Within this event, we will check the NavigationContext.QueryString to determine whether the navigation was a result of the share menu item selection in the Photos Hub. As discussed in Table 7-2, we will check the query string for the Action key, with a value of ShareContent. We will then retrieve the picture token value from the FileId key in the query string. This token will be used to load the picture using the MediaLibrary’s GetPictureFromToken method. Listing 7-12 shows the resulting code. If you are unfamiliar with the MediaLibrary or its related members, review Recipe 7-1.
Listing 7-12. Override the OnNavigatedTo Event in the MainPage Code-Behind to Check Whether the Current Navigation Is a Result of the Share Option Through Photos Hub
protected override void OnNavigatedTo(System.Windows.Navigation.NavigationEventArgs e)
{
    if (NavigationContext.QueryString.ContainsKey("Action") &&
        NavigationContext.QueryString["Action"] == "ShareContent")
    {
        using (MediaLibrary library = new MediaLibrary())
        {
            string token = NavigationContext.QueryString["FileId"];
            Picture sharedPicture = library.GetPictureFromToken(token);

            System.Windows.Media.Imaging.BitmapImage image =
            new System.Windows.Media.Imaging.BitmapImage();

            image.SetSource(sharedPicture.GetImage());

            myPicture.Source = image;

            statusMessage.Text = "Photo was loaded through the share menu option from Photos Hub.";
        }
    }
}
Once the Picture is loaded from the MediaLibrary, we will generate the BitmapImage from the Picture’s image data stream and set the resulting BitmapImage to the Source of the MainPage’s Image control.
At this point, we are ready to test the application in the emulator. When our newly extended application launches in the emulator, tap the back button to exit from the application. Tap the Photos tile to launch the Photos Hub, drill down into the Sample Albums, and select a picture to view. When a picture is displayed, click the ellipsis button in the application bar to display the application bar menu options. Tap the Share . . . menu item. This action will display a list of all applications that are registered as media-sharing applications. Select MyCameraApp.
Notice that MyCameraApp will load and the selected photo is displayed in the Image control right when the application is launched in this way. The TextBlock status message also indicates that the photo was loaded through the Share . . . menu item.
7-5. Enable Your Application to Play Background Audio
Problem
You want to create an application that allows the user to play music even when the app is not running in the foreground.
How It Works
The Windows Phone APIs include two types of background agents, within the Microsoft.Phone.BackgroundAudio namespace, that can be used to play audio when an application is not running in the foreground.
- AudioPlayerAgent: Use this agent to play audio files that are on the device even when the application is no longer running in the foreground. The AudioPlayerAgent class derives from the BackgroundAgent class and provides three methods that can be overridden.
- OnPlayStateChanged: This method is invoked when the play state changes, except for the error state. Play state changes include actions such as buffering, playing, track ready, track ended, and shutdown, to name a few.
- OnUserAction: This method is invoked when the user triggers an action on the application’s audio playlist using controls provided through the foreground application or the Universal Volume Control.
- OnError: This method is invoked when an error occurs with the audio playback.
When overriding methods in the audio player agent, you must call the NotifyComplete or Abort method within 30 seconds.
- AudioStreamingAgent: Use this agent to stream audio within the application, through the use of a MediaStreamSource. When using this approach, you will need to create a class derived from MediaStreamSource to handle the streaming and decoding of audio. The AudioStreamingAgent also derives from the BackgroundAgent class and provides two methods.
- OnBeginStreaming: This method is invoked when a new track requires audio streaming.
- OnCancel: This method is invoked when the streaming is cancelled. When overriding this method in your background agent, be sure to call base.OnCancel to ensure all resources are released properly.
![]() Note When playing files within a background audio agent, you may access audio only from a URI or audio files that are saved in isolated storage. Songs in the device’s media library cannot be accessed from the background audio agent.
Note When playing files within a background audio agent, you may access audio only from a URI or audio files that are saved in isolated storage. Songs in the device’s media library cannot be accessed from the background audio agent.
When designing an application that supports playing audio in the background, you must design a foreground application that provides the user with the ability to trigger the audio playback. You will also need to create a background audio agent that performs the audio playback. The background audio agent includes methods that are invoked when the play state of a song has changed (in other words, started, stopped, paused, skipped, and so on). These actions may be driven through the application or through the Universal Volume Control on the device. The Universal Volume Control is the band that contains the set of playback when an audio file is playing. The Universal Volume Control is displayed at the top of the device’s lock screen when audio is playing, as illustrated in Figure 7-9. It also appears at the top of the device screen when the user presses the volume control switch.

Figure 7-9. Windows Phone Universal Volume Control
Although it appears that the audio playback is executed from the background agent, there is an additional layer within the operating system, the Zune Media Queue, through which all media on the device is played. The background audio agent sends commands to the Zune Media Queue, which in turn performs the desired action on the audio file.
Within the foreground application, you can obtain a reference to the application’s background audio agent through the BackgroundAudioPlayer.Instance property. The BackgroundAudioPlayer.Instance communicates with the Zune Media Queue to manipulate the playback of the audio files.
For a more in-depth look at the background audio architecture and details on the differences between an AudioPlayerAgent and AudioStreamingAgent, refer to the MSDN article “Background audio overview” at http://msdn.microsoft.com/en-us/library/windowsphone/develop/hh394039(v=vs.105).aspx.
Now that we have a basic understanding of what a background audio agent is and how it works, let’s put it into action!
The Code
Launch Visual Studio 2012 and open the solution named MyBackgroundMusicApp, located within the Chapter 7MyBackgroundMusicAppStart directory. Notice that this project contains a few audio files that will be saved to isolated storage on application launch, if the files do not already exist in isolated storage. This will then make the audio files accessible from the background audio agent. In the App.xaml.cs file, we have already provided a method, CopyToIsolatedStorage, where we have handled this action. This method is called from the app constructor so that it is executed only on application launch.
Open the application manifest and ensure that the ID_CAP_MEDIALIB_AUDIO capability is included. Next, open the MainPage code-behind and include a using directive to the Microsoft.Phone.BackgroundAudio namespace. In the MainPage initializer, attach an event handler to the BackgroundAudioPlayer.Instance.PlayStateChanged event.
Within the PlayStateChanged event handler, add any code to handle UI state based on the current state of the audio player, as depicted in Listing 7-13.
Listing 7-13. Handling UI State in the BackgroundAudioPlayer’s PlayStateChanged Event
void Instance_PlayStateChanged(object sender, EventArgs e)
{
    BitmapImage image = new BitmapImage();

    switch (BackgroundAudioPlayer.Instance.PlayerState)
    {
        case PlayState.Playing:
            //set the button image to a pause button
            //while a track is playing
            SetButtonImage(playTrack, "pause");
            break;
        case PlayState.Paused:
        case PlayState.Stopped:
            //set the button image to a play button
            //when there is no track playing
            SetButtonImage(playTrack, "play");
            break;
    }

    if (null != BackgroundAudioPlayer.Instance.Track)
    {
        App.ViewModel.CurrentTrackTitle = BackgroundAudioPlayer.Instance.Track.Title;
    }
}
Next, add the code necessary to the button Tap events for the buttons in the MainPage. For example, as shown in Listing 7-14, the previousTrack button should call the SkipPrevious method of the BackgroundAudioPlayer.Instance.
Listing 7-14. Main Page Button Events Will Trigger Audio Manipulation Through the BackgroundAudioPlayer to Reflect the User’s Chosen Action
private void previousTrack_Tap(object sender, System.Windows.Input.GestureEventArgs e)
{
    BackgroundAudioPlayer.Instance.SkipPrevious();
}

private void playTrack_Tap(object sender, System.Windows.Input.GestureEventArgs e)
{
    if (PlayState.Playing == BackgroundAudioPlayer.Instance.PlayerState)
    {
        BackgroundAudioPlayer.Instance.Pause();
    }
    else
    {
        BackgroundAudioPlayer.Instance.Play();
    }
}

private void nextTrack_Tap(object sender, System.Windows.Input.GestureEventArgs e)
{
    BackgroundAudioPlayer.Instance.SkipNext();
}
Finally, in the OnNavigatedTo method, check the BackgroundAudioPlayer’s current state and update the buttons in the UI accordingly, as shown in Listing 7-15. This is more for the benefit of when an application is relaunched after an audio playback is initiated. If the audio is then managed through the Universal Volume Control (either paused or stopped), the application needs to ensure its UI reflects the current state of the audio playback.
Listing 7-15. Ensure That the Application’s MainPage UI Is Updated When Launched to Reflect the Current State of the Audio Playback
protected override void OnNavigatedTo(NavigationEventArgs e)
{
    if (!App.ViewModel.IsDataLoaded)
    {
        App.ViewModel.LoadData();
    }

    if (PlayState.Playing == BackgroundAudioPlayer.Instance.PlayerState)
    {
        SetButtonImage(playTrack, "pause");
        App.ViewModel.CurrentTrackTitle = BackgroundAudioPlayer.Instance.Track.Title;

    }
    else
    {
        SetButtonImage(playTrack, "play");
    }
}
Next, we will need to create our background audio agent that will handle the audio playback through the Zune Media Queue. Add a new project to the solution. In the Add New Project dialog, select the Windows Phone Audio Player Agent, as depicted in Figure 7-10. Name the project MyAudioPlayerAgent.

Figure 7-10. New Project dialog with the Windows Phone Audio Playback Agent highlighted
In the main application, add a reference to MyAudioPlaybackAgent.
Open the AudioPlayer class in the background audio agent project. Add the following using directives at the top of the AudioPlayer class:
using System.Collections.Generic;
using System.IO.IsolatedStorage;
using System.Linq;
Note that code has already been generated for the three available methods in the class. All we need to do is load our music files from isolated storage and track the current audio track so that when the user wants to skip forward or backward, we will be able to set the next track to the proper audio file. Refer to Listing 7-16 for the code needed to accomplish this action.
Listing 7-16. Load the Audio Files from Isolated Storage Within the Background Agent
static List<AudioTrack> tracks = new List<AudioTrack>();
static int songIndex = 0;

/// <remarks>
/// AudioPlayer instances can share the same process.
/// Static fields can be used to share state between AudioPlayer instances
/// or to communicate with the Audio Streaming agent.
/// </remarks>
static AudioPlayer()
{
    // Subscribe to the managed exception handler
    Deployment.Current.Dispatcher.BeginInvoke(delegate
    {
        Application.Current.UnhandledException += UnhandledException;
    });

    LoadAudioTracks();
}

private static void LoadAudioTracks()
{
    Microsoft.Devices.MediaHistoryItem item = new Microsoft.Devices.MediaHistoryItem();

    using (IsolatedStorageFile storage = IsolatedStorageFile.GetUserStoreForApplication())
    {
        string[] musicFiles = storage.GetFileNames().Where(f => f.EndsWith(".mp3")).ToArray();
        foreach (string musicFile in musicFiles)
        {
            AudioTrack track = new AudioTrack(new Uri(musicFile, UriKind.Relative),
                                            musicFile.Replace(".mp3", "").Replace("_", " "),
                                            "Unknown",
                                            "Unknown",
                                            null);

            tracks.Add(track);
        }
    }
}

private AudioTrack GetNextTrack()
{
    songIndex++;

    if (songIndex > tracks.Count-1)
        songIndex = 0;

    return tracks[songIndex];
}

private AudioTrack GetPreviousTrack()
{
    songIndex--;
    if (songIndex < 0)
        songIndex = tracks.Count-1;

    return tracks[songIndex];
}
Testing in the Emulator
Now we can test the application in the emulator. On the initial launch, the song list will display, and there is a visual indication that audio is not currently playing. When the play button is tapped, the button image changes to a pause button, and a text message displays the current song that is playing (Figure 7-11).
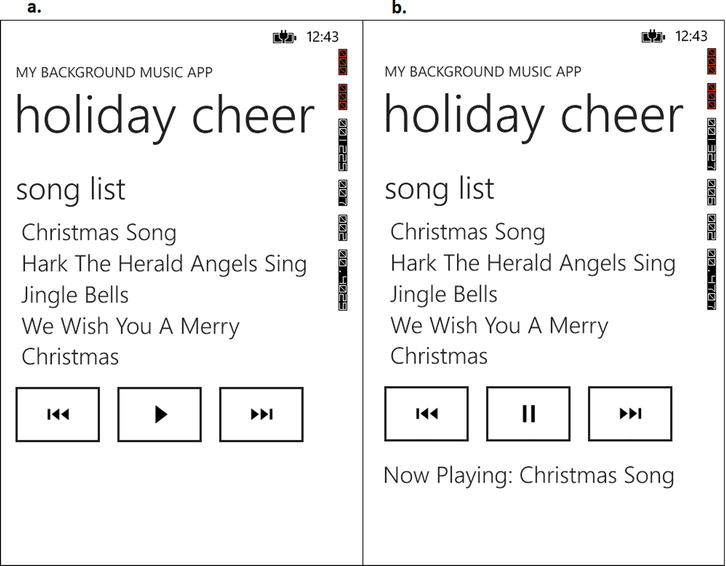
Figure 7-11. Main application on a) initial launch and b) when an audio playback is triggered
Press the back button in the emulator to exit from the application. The audio should continue playing at this point. Test the application on a device to access the Universal Volume Control (UVC) in order to manage the audio playback through the UVC. Launch the application after using the UVC to skip forward to the next track or to stop the playback altogether. The current state of the audio playback should be displayed in the application’s UI.