
![]()
Publishing Your App
Now that you are equipped with the skills to build mobile apps for Windows Phone, you are ready to become a full-fledged mobile app publisher! In this chapter, we will discuss how you can monetize your applications, provide trial versions of paid applications, and walk through the steps necessary to officially submit your application for publication to the Windows Phone Store!
In this chapter, we will walk through the following recipes:
- 14-1. Monetize your application using in-app advertisements
- 14-2. Provide a trial version of your Windows Phone 8 app
- 14-3. Submit your mobile app to the Windows Phone store
14-1. Monetize Your Application Using In-App Advertisements
Problem
You plan to publish a free app to the Windows Phone Store but would like to still find a way to make money from your app.
Solution
Create a Microsoft pubCenter account, and leverage the Microsoft Advertising SDK in your application.
Microsoft’s pubCenter enables Windows Phone developers to monetize their applications by equipping them with the controls to quickly and easily incorporate ads within their applications. When users click on these ads, the developer earns money from the advertiser through Microsoft’s Mobile Ad Exchange. The Mobile Ad Exchange enables multiple advertisers to buy ads within your apps, by bidding on impressions generated by your users, which maximizes the revenue opportunity for you, the developer. When you create a pubCenter account, you must register each application in which you plan to provide advertisements, along with each ad unit you plan to include in the application. Each ad unit allows you to define the guidelines for the types of ads that will appear in your application. In this way, ads that are relevant to the target audience of your application will appear in your application, thereby increasing the potential of click-through rates by your users.
To enable delivery of these ads within your applications, Microsoft has conveniently packaged the controls you will need within yet another SDK! The Microsoft Advertising SDK for Windows Phone is installed along with the Windows Phone 8 SDK (that’s right, it’s an SDK within an SDK) and includes controls which display the ads that are served up through the Microsoft pubCenter. The ads that are delivered to your application are based on the ad unit configuration settings that you defined in pubCenter. Is that clear as mud? Don’t worry! You will realize how this all ties together as we progress through this recipe.
The ad controls included in the SDK support the display of either text or image-based advertisements and support actions such as Click to Web, Click to Call, and Click to Marketplace. Since the Microsoft Advertising SDK is tightly coupled with your Microsoft pubCenter account, one benefit you receive as the Windows App publisher, is having access to real-time reporting on ad performance within your application. Another benefit is that you will be able to tweak your ad unit configuration and keyword selection to maximize your revenue earning potential. So, let’s get started!
Create a Microsoft pubCenter Account
To create your pubCenter account, login to your Windows Phone Developer Center account and go to the Account Summary page. Under the Ad Network heading, you will see a link to create your pubCenter account. Click the link to get started.
Alternatively, you may go to http://pubcenter.microsoft.com and sign up by clicking the Sign up now button. However, you will need to be sure to go back to your Dev Center account and input your pubCenter Account number there to ensure that you properly tie the two accounts together. From the pubCenter site, click the Sign up now button as shown in Figure 14-1.
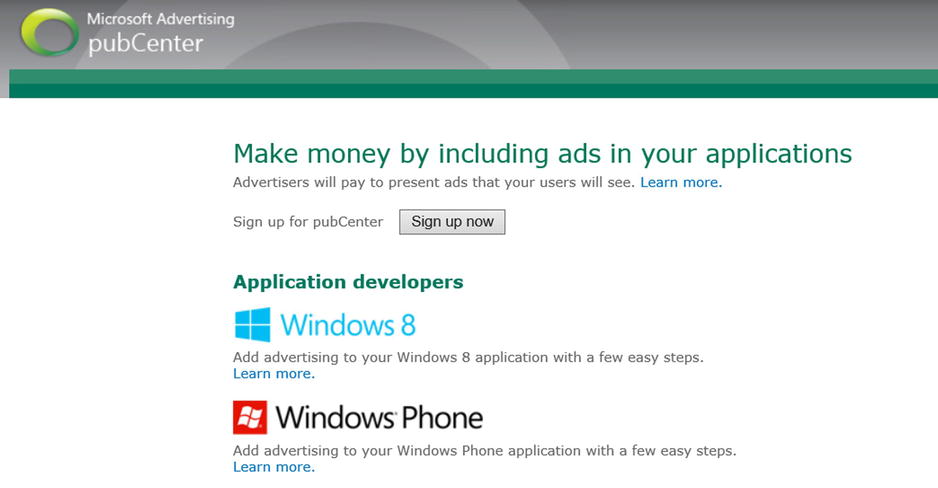
Figure 14-1. Microsoft pubCenter main page
You will then be prompted for your Windows Live ID login credentials (Figure 14-2). If you do not have a Windows Live ID account, you may create one by clicking the link, “Sign up for a new Windows Live ID now.”

Figure 14-2. Sign in using your Live ID
Upon entering your Live ID credentials on the pubCenter sign up page, click the Sign In button.
At this point, you will have the opportunity to enter information about your business. If you signed up directly on the pubcenter.com site, outside of the Developer Center Dashboard, take note of your pubCenter account ID. Login to your Windows Phone Developer Center Account, go to the Account summary page, and enter in your pubCenter account ID to associate the two accounts.
Once you have a pubCenter account associated with your Windows Phone Developer Center account, you can create ad units for your application within your Windows Phone Developer Center Dashboard when you initiate a new application submission. Prior to the pubCenter account integration within the Windows Phone Developer Center, you were able to register your application and create the related ad units through pubCenter, incorporate the ads in your application, and then submit your application to the Windows Phone store. This, in my opinion, seemed to follow a natural order.
Now, you will notice that you will need to “start” your application submission process before you are ready to submit your application simply to generate your ad unit Ids that you will need to include in your application. This requires you to pause the submission process, go back to your app, and incorporate the related application Id and ad unit Ids that were generated for your in-app advertisements. At that point, you can revisit your application submission to complete the process by uploading your new XAP file and related images.
To create ad units for your application, click the Submit App link in your dashboard. On the Submit app page, click the App info link (Figure 14-3).

Figure 14-3. Submit app page
On the App info page, enter a name for your application and select a category. The name entered here is simply the name associated to your application in your Dev Center Dashboard, so don’t get hung up on trying to select the perfect app name just yet. The application name the customer sees is the one defined in your application project. We will discuss the app submission process in detail in Recipe 14-3. However, the category you select is important, as well as the related subcategory (when applicable), as this will determine the type of advertisements that are delivered to your application and displayed in the AdControl. Once you save the app info and return to the Submit app page, you will be able to select the Add in-app advertising link. Click this link to navigate to the in-app advertising page, as shown in Figure 14-4.

Figure 14-4. Create ad units for your application during your app submission process
The first thing that you will define is an alias for your application. To simplify things, you will likely use your application’s name or the name you defined as the app alias for your Dev Center account (back in the App info page).
Next, you will want to generate one or more ad units for your application. Note that you may define multiple ad units, of different sizes, for a single application. The dropdown list provides the following ad sizes:
- 300 X 50
- 480 X 80
- 480 X 640
- 480 X 800
- 480 X 853
Microsoft guidelines recommend using an ad size of 480 X 80 for mobile applications. The larger sizes are meant for non-Windows Phone applications. The smaller ad size of 300 X 50 is provided for backward compatibility. However, the smaller ad size should still be rendered in an AdControl with a size of 480 X 80.
To generate an ad unit, enter a name in the Ad unit name text box, select a size from the Size dropdown list, and then click the Generate ad unit ID link. Once your first ad unit Id is generated, notice that your pubCenter Application ID will change from “None” to a GUID. This GUID is unique to your application and will remain the same across all ad units that you generate for this application. Your application Id and ad unit Ids are unique to your application and should not be shared.
Use the Microsoft AdControl
The Microsoft AdControl is contained within the Microsoft.Advertising.Mobile.UI namespace. You must include the following capabilities in your Application Manifest when incorporating in-app ads using the Microsoft AdControl: ID_CAP_PHONEDIALER, ID_CAP_IDENTITY_USER, and ID_CAP_MEDIALIB_PHOTO.
To include an AdControl on your page, simply drag-and-drop the AdControl from your toolbox to your page. Alternatively, you can manually enter the necessary XAML markup, which requires including the following namespace declaration within the PhoneApplicationPage element, xmlns:UI="clr-namespace:Microsoft.Advertising.Mobile.UI;assembly=Microsoft.Advertising.Mobile.UI", as well as the AdControl markup:
<UI:AdControl
     x:Name="myAdControl"
     IsAutoRefreshEnabled="True"
     Width="480"
     Height="80"
     ApplicationId="INSERT YOUR APPLICATION ID HERE"
     AdUnitId="INSERT YOUR AD UNIT ID HERE"
     ErrorOccurred="AdControl_ErrorOccurred" />
Within the markup, you must explicitly set the Width and Height of your AdControl to the recommended size of 480 X 80. You must also enter the ApplicationId and AdUnitId values in the markup. Attempting to bind these properties to a ViewModel property will crash. It doesn’t seem to take binding very well. Also note that you will need to handle the ErrorOccurred event, because the AdControl is notorious for crashing unexpectedly. Handling the ErrorOccurred event will give you the opportunity to recreate the instance of the AdControl programmatically and possibly recover gracefully, as shown in Listing 14-1.
Listing 14-1. Reinstantiate the AdControl Within the ErrorOccurred Event
private string applicationId = "INSERT YOUR APPLICATION ID HERE";
private string adUnitId = "INSERT YOUR AD UNIT ID HERE";
private void AdControl_ErrorOccurred(object sender, Microsoft.Advertising.AdErrorEventArgs e)
{
        myAdControl = new AdControl(applicationId, adUnitId, true);
}
Handling the ErrorOccurred event alone will not necessarily rectify scenarios where ads are not displaying as expected in your application. There may be instances where the AdControl will not render at all due to a lack of ad availability. This may be a result of low ad inventory in the Mobile Ad Exchange for your application’s selected category and/or related subcategory. The availability of ads is dependent on advertisers’ actively participating in the marketplace. As well, the categories configured for your ad units may not have ads available, which may require you to modify the application’s defined category, or associated subcategory, within your Dev Center Account to allow your application to receive ads from a broader market.
When incorporating the AdControl in your application, note that you must test the application on a device in order to view the ads in your application. Applications running within the emulator will not receive live ads. Alternatively, for testing within the emulator, you may use the Application Id of test_client and one of the following ad unit Ids: TextAd, Image480_80, or Image300_50.
![]() Note The AdControl can be used in standard Windows Phone 7.x and Windows Phone 8 applications. When developing XNA games, you must use the DrawableAd and AdGameComponent classes to incorporate in-app advertisements.
Note The AdControl can be used in standard Windows Phone 7.x and Windows Phone 8 applications. When developing XNA games, you must use the DrawableAd and AdGameComponent classes to incorporate in-app advertisements.
When designing your application with in-app advertisements, it is good practice to adhere to the recommended usage guidelines, as follows:
- Ensure your AdControl is configured at the the recommended size of 480 X 80, and ad units are generated at this size only.
- Place the AdControl at the top or bottom of the page
- When a page contains a ScrollViewer control, place the AdControl outside of the ScrollViewer so that the ad always remains in view.
- When a page contains a Pivot control, place the AdControl outside of the Pivot control so that the ad always remains in view or place a separate AdControl within each pivot item to display different ads.
- When a page contains a Panorama control, place the ad outside of the Panorama control so that the ad always remains in view, or place a separate AdControl within each panorama page to display different ads.
- Ensure that if your application uses alternate foreground and background colors, instead of the standard system colors, that the AdControl’s border and text content are readable when the device theme is set to either light or dark theme.
Let’s take a look at how this all comes together. Launch Visual Studio 2012 and open the sample project in the Chapter 14MyWindowsPhoneApp directory. Double-click the MyAdPage.xaml file to view the XAML markup. You will notice that AdControl markup is similar to the markup that was depicted earlier in this section, with the only modification being that we have specified the use of the test application Id and ad unit Id, so that we can view the ad in the emulator. Open the code behind for this page, to see that the only code on this page is that which handles the AdControl’s ErrorOccurred event. The majority of the work involved when including ads within your app are primarily in the application and ad unit configuration in your Windows Phone Developer Center account.
Launch the application in the emulator to see how in-app advertisements will look within the application. As shown in Figure 14-5, the first page simply contains 3 buttons: Single Page, Pivot Page, and Panorama Page. The Single Page displays the ads at the top of the page.
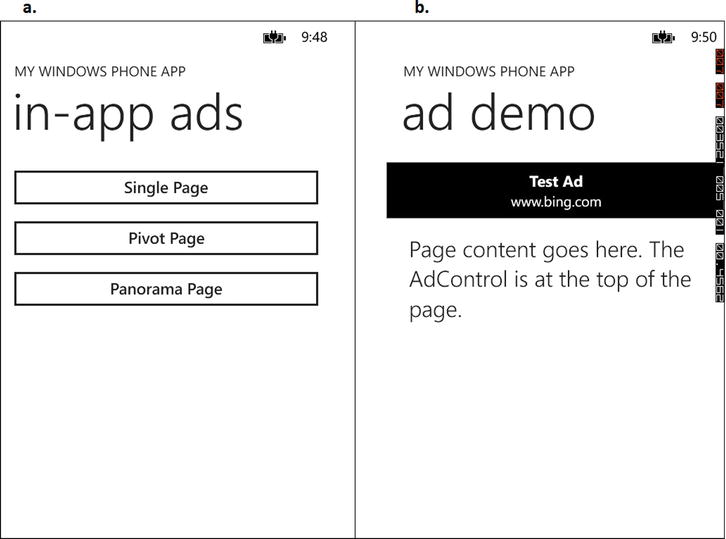
Figure 14-5. Example usage of in-app ads: a) Main page, and b) Single page with ads placed at the top of the page
Tap each one of these buttons to view how the AdControl placement works within each page. Figure 14-6 depicts the ad placement within a panorama page.

Figure 14-6. Panorama control with a separate AdControl placed in each panorama page
As you can see, it is very easy to incorporate in-app advertisements within your Windows Phone application. Through your Windows Phone Developer Center account and pubCenter account integration, along with the Microsoft Advertising SDK, you can include in-app advertisments in your existing app in no time and with minimal code.
14-2. Provide a Trial Version of Your App
Problem
You plan to publish a paid app to the Windows Phone store. You would like to provide a trial version to entice users to try the app with limited features to encourage downloads and potentially increase app sales.
Solution
Use the Microsoft.Phone.Marketplace.LicenseInformation class to limit features when your app is running as a trial version.
The Windows Phone SDK makes it easy for developers to provide trial versions of their apps without the need to create two separate applications. The Microsoft.Phone.Marketplace namespace contains the LicenseInformation class that allows you to provide a limited feature set in your existing application simply by calling the method, IsTrial. This method returns a boolean value to indicate if the application is currently running as a trial version. You can make use of this method’s return value to limit the available features when your app is running as a trial version. It is best to give some thought to which features will be excluded within the trial version. In this way, you can include code within your application to hide or disable these features when the app is running in trial mode.
![]() Note When developing games using the XNA Framework, you will need to use the GamerServices.Guide class instead, as it comes with built-in trial and purchase simulation features. For more information, refer to the MSDN article, Simulating Trial Mode for Marketplace Content, at http://msdn.microsoft.com/en-us/library/dd282459.aspx.
Note When developing games using the XNA Framework, you will need to use the GamerServices.Guide class instead, as it comes with built-in trial and purchase simulation features. For more information, refer to the MSDN article, Simulating Trial Mode for Marketplace Content, at http://msdn.microsoft.com/en-us/library/dd282459.aspx.
When providing a trial version of your application, you should also allow the user to purchase the full version right from within your application. This can be accomplished by incorporating a button that launches the application product page in the Windows Phone Store, through a call to the MarketplaceDetailTask.Show method.
Finally, when it is time to submit your application to the Windows Phone Store, you will need to indicate that your app will offer free trials by including a checkmark in the box, “Offer free trials of this app,” during the application submission process in the Windows Phone Developer Center (Figure 14-7).

Figure 14-7. Indicate that your app offers free trials during the submission process
This ensures that when your app is published, Microsoft will make both a trial and full license available for your application. As well, a Try button will be displayed within your application’s product page in the Store. When the user purchases the application, the trial license is simply replaced with a full license.
Trial licenses do not expire, so it is not a good idea to provide a time-based trial offering of your application. It is best to include limited functionality that provides just enough functionality to allow your user to test out the application but leaves them wanting for more. This will hopefully entice your users to eventually purchase the full version.
Now that we have discussed what you need to do to create a trial version of an application, let’s walk through the process and see how it all comes together!
Launch Visual Studio 2012, and open the TrafficView application located in the Chapter 14TrafficViewWithTrialStart directory. In the App.xaml.cs file, include the following using directive: using Microsoft.Phone.Marketplace;
Next, we need to add a new static property that will contain a new instance of the LicenseInformation object, along with a new static boolean property that we will use to store the return value of the LicenseInformation.IsTrial method call. We will also create a method called CheckLicense, which will be called from the Application_Launching and Application_Activated events, as shown in Listing 14-2.
Listing 14-2. Cache the Check for Trial Version License in the App Code Behind
private static LicenseInformation licenseInfo = new LicenseInformation();
private static bool isTrial = true;
public static bool IsTrial
{
    get
    {
        return isTrial;
    }
    set
    {
        isTrial = value;
    }
}

private void CheckLicense()
{
#if DEBUG
    IsTrial = true;
#else
    IsTrial = licenseInformation.IsTrial();
#endif
}

private void Application_Launching(object sender, LaunchingEventArgs e)
{
    CheckLicense();
}

private void Application_Activated(object sender, ActivatedEventArgs e)
{
    CheckLicense();
}
Note that we also included a special check using #if DEBUG...#else...#endif to set the IsTrial property to True when running in Debug mode. Since there is no license information available when running within the emulator, this is how we will simulate a trial mode experience for testing purposes.
Next, open the MainPage.xaml file and add a button to the bottom of the page, which will allow the user to buy the full version of the application, and include an event handler for the Tap event. This button will only display only when the application is running as a trial version:
<Button Name="trialButton"
        Content="buy the full version"
        Tap="trialButton_Tap"/>
In the MainPage code behind, override the OnNavigatedTo event, and set the Visibility of the button to display only when the IsTrial static property within the App class is set to True. As well, include a call to the view model’s LoadTrafficList event, so that we can be sure to refresh the list with a limited number of traffic views.
Also, we will need to instantiate a new MarketplaceDetailTask object and store it in a class level variable in the MainPage code behind. Within the trialButton_Tap event, we simply need to call the Show method on the instance of the MarketplaceDetailTask object. The resulting code is shown in Listing 14-3.
Listing 14-3. Managing the UI Based on Whether the App is Running in Trial Mode
protected override void OnNavigatedTo(System.Windows.Navigation.NavigationEventArgs e)
{
   trialButton.Visibility = (App.IsTrial) ? System.Windows.Visibility.Visible : System.Windows.Visibility.Collapsed;
   App.ViewModel.LoadTrafficList();
}
MarketplaceDetailTask task = new MarketplaceDetailTask();
private void trialButton_Tap(object sender, System.Windows.Input.GestureEventArgs e)
{
    task.Show();
}
Finally, within the TrafficViewModel class, we need to modify the LoadTrafficList method to ensure that only two of the four traffic views are loaded in the dropdown list when running in trial mode, as shown in Listing 14-4.
Listing 14-4. Limit Traffic View Options When Running in Trial Mode
public void LoadTrafficList()
{
    TrafficItems = new ObservableCollection<TrafficItemViewModel>();
    TrafficItems.Add(new TrafficItemViewModel { Description = "E.C. Row near Lauzon Pkwy", ImageName = "loc27.jpg" });
    TrafficItems.Add(new TrafficItemViewModel { Description = "Howard near Hwy 3", ImageName = "loc10.jpg" });

    if (App.IsTrial == false)
    {
        //only include the additional views when it's a full version application
        TrafficItems.Add(new TrafficItemViewModel { Description = "Hwy 401 near Hwy 3", ImageName = "loc89.jpg" });
        TrafficItems.Add(new TrafficItemViewModel { Description = "St. Clair College near Hwy 3", ImageName = "loc08.jpg" });
    }

    LoadLastAppState();
}
With that in place, we can now run our application in the emulator to see what the user experience will be like when the application is installed as a trial. Notice that the “buy full version” button appears at the bottom, and our dropdown list of traffic views only lists 2 possible views, as illustrated in Figure 14-8.
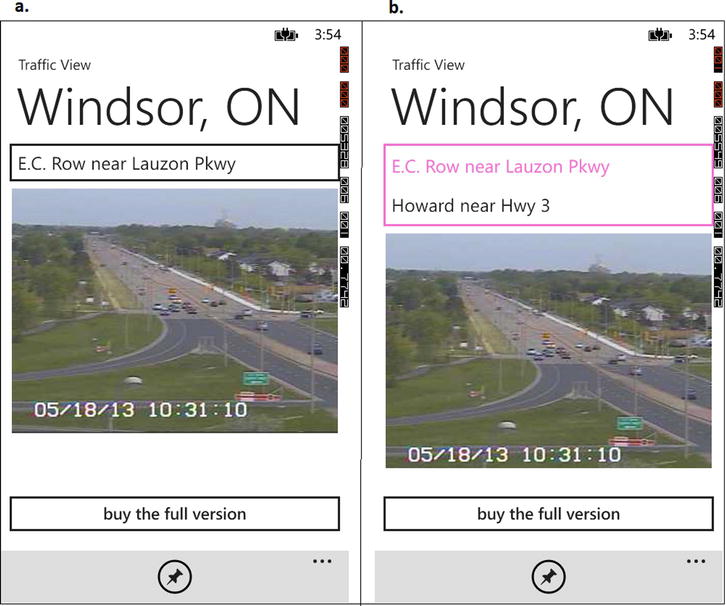
Figure 14-8. TrafficView application as a trial version: a) initial view, b) with limited traffic view selections
Tap the buy button to simulate the experience the user will have when attempting to purchase the full featured version of the application. As depicted in Figure 14-9, you can see a shadow of a product page in the emulator, but an error is displayed indicating that there was a problem with the request. If the error code listed is 805a0194, then this indicates a “successful” execution of the MarketplaceDetailTask.Show method in the emulator.

Figure 14-9. Error code 805a0194 indicates a successful call in the emulator for the MarketplaceDetailTask.Show method
When the application is actually running as a trial application that was downloaded from the Windows Phone Store onto an actual device, the buy action will launch the application’s product page, allowing the user to buy the full version of the application.
That is all it takes to include a trial version of your application! In my opinion, I think it’s a pretty sweet deal that Microsoft handles the license management for Windows Phone publishers, which in turn simplifies life tremendously for the average developer turned publisher. You only need to create a single app and include simple boolean checks to turn on/off features to provide a trial mode of your application. If this doesn’t knock your socks off, then I don’t know what else will!
14-3. Submit Your App to the Windows Phone Store
Problem
You have fully functional mobile app that is ready to be published to the Windows Phone Store.
Solution
Prepare your application for submission, then login to your Windows Phone Developer Center account and submit your app to the Windows Phone Store.
How It Works
Submitting your application to the Windows Phone Store can seem like a daunting task. There is a list of things you will need to ensure are completed before you can even begin the app submission process. First and foremost, Microsoft defines a slew of certification requirements that must be met for your application to pass testing and to be published to the Windows Phone Store. The list is quite extensive, and many of the requirements may not apply to your application specifically. It is important that you take the time to review the app certification requirements for Windows Phone at http://msdn.microsoft.com/en-us/library/windowsphone/develop/hh184843(v=vs.105).aspx.
This article contains subarticles, which contain quite a lot of information, and is not for the faint of heart. But for those developers who are serious about publishing Windows Phone applications, this is something you will want to use as a reference when submitting your applications. It is a good idea to bookmark this link and refer to it whenever you are ready to submit a new application to the Windows Phone Store.
Some of the common checks you should perform include, but are not limited to, the following:
- Test your application in both dark and light themes within the emulator to verify all text displays as expected.
- Create a custom app icon and tile images and associate them with your application from within the Application Manifest.
- Verify that your application’s XAP file is no larger than 1 GB in size.
- Build your application using the Release configuration in Visual Studio
- Verify the Application Manifest information is configured properly.
- Provide at least one screenshot for each of the resolutions your application will support.
Application Manifest Configuration
Verify the settings within your Application Manifest are configured properly across all sections: Application UI, Capabilities, Requirements, and Packaging.
- Application UI tab: This tab is where you will define your application’s display name, description, app icon, and tile images.
- Capabilities tab: The appropriate capabilities must be included in your manifest to ensure that your application runs properly.
- Requirements tab: You may also specify minimum hardware requirements to ensure that users can only install your application if their device is able to execute the features within it (e.g., a camera application should require that a device has a rear-facing camera, at a minimum).
- Packaging tab: This tab is where you will specify your author name, publisher name, version number, default language, and supported languages. Note that your Windows Phone 8 app will fail certification if the Default Language is not set.
Capturing Screenshots for Application Submission
You will need to ensure that you have taken at least one screenshot of your application in each of the supported resolutions, which will be uploaded during the application submission process.
To capture the necessary screenshots for the app submission process, build your application in Visual Studio 2012 using the Release configuration, select the emulator for the desired resolution that you wish to simulate, then select “Deploy [app name]” from the Build menu to install your application within the emulator. Once it is successfully deployed, you should launch your application in the emulator through the application list in the emulator.
Next, click the ![]()
![]() button in the sidebar that appears to the right of the emulator. This will cause the Additional Tools screen to display, as shown in Figure 14-10.
button in the sidebar that appears to the right of the emulator. This will cause the Additional Tools screen to display, as shown in Figure 14-10.
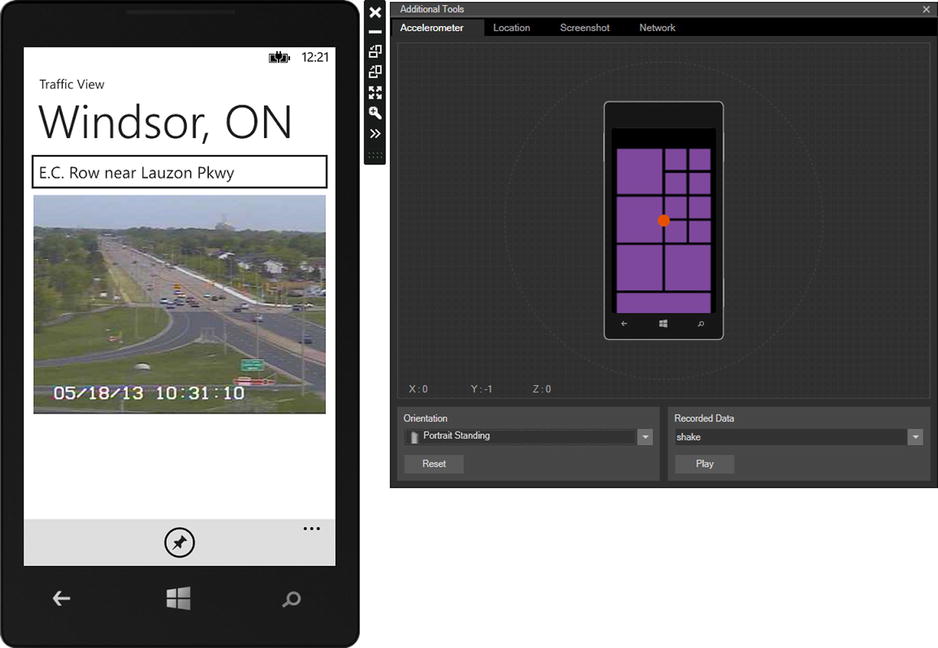
Figure 14-10. Use the Additional Tools within the emulator to capture screenshots of the application
Click on the Screenshot tab. You will notice that the tab page contains two buttons: Capture and Save. As well, notice that the resolution of the screen is displayed in the bottom left corner of the page. Click the Capture button. An image of your screenshot will appear in the Screenshot page (Figure 14-11).
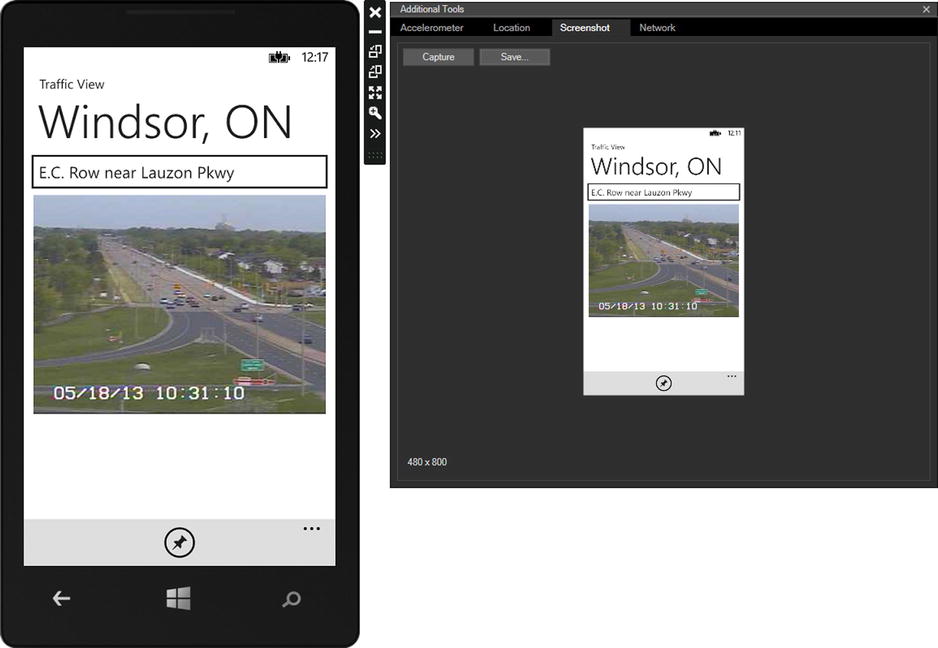
Figure 14-11. Screenshot captured within the emulator
Click Save... to launch the Windows Save As dialog box. Select the directory location where you wish to keep your screenshots contained within, and provide a unique name for the image. When generating screenshots for multiple resolutions, I prefer to create subdirectories for each of the resolutions that I will be supporting, and store the respective screenshots in the proper directories. This simplifies the application submission process when it comes time to upload the necessary screenshots for each resolution.
Submitting Your Application to the Windows Phone Store
Once you have confirmed that the Application Manifest is configured properly, build a Release version of your application in Visual Studio. This will be the XAP file that you will submit to the Store.
Windows Phone Developer Center Dashboard
Navigate to http://dev.windowsphone.com and login using your Developer Center Account credentials. Upon login, your Dashboard will appear within the browser window. To the left of the Dashboard, you will notice navigation links, including one labeled Submit App as depicted in Figure 14-12. Click this link to start the application submission process.
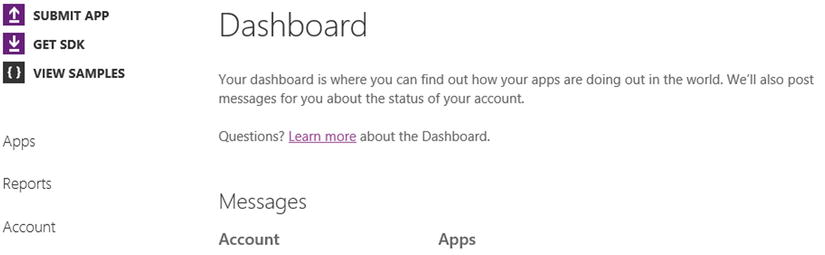
Figure 14-12. Initiate the application submission process from the Dashboard
App Submission Page
On the Submit app page, you will be provided with links to enter your application information, and submit your application’s XAP file. These two actions are required. Refer to Figure 14-3, in Recipe 14-1, for a screenshot of this page.
In addition to that, you may include in-app advertisements, limit market availability, set custom pricing per region, and generate tokens for map services, if used within the application. These actions are optional and not required to complete the app submission process.
Click the App info link to navigate to the App info page as shown in Figure 14-13. Within the App info page, enter a name for your application and select a category. As we touched upon in Recipe 14-1, the name entered here is simply the name associated to your application in your Dev Center Dashboard. The application name the customer sees is the Display Name defined in your Application Manifest file, within the Application UI tab.
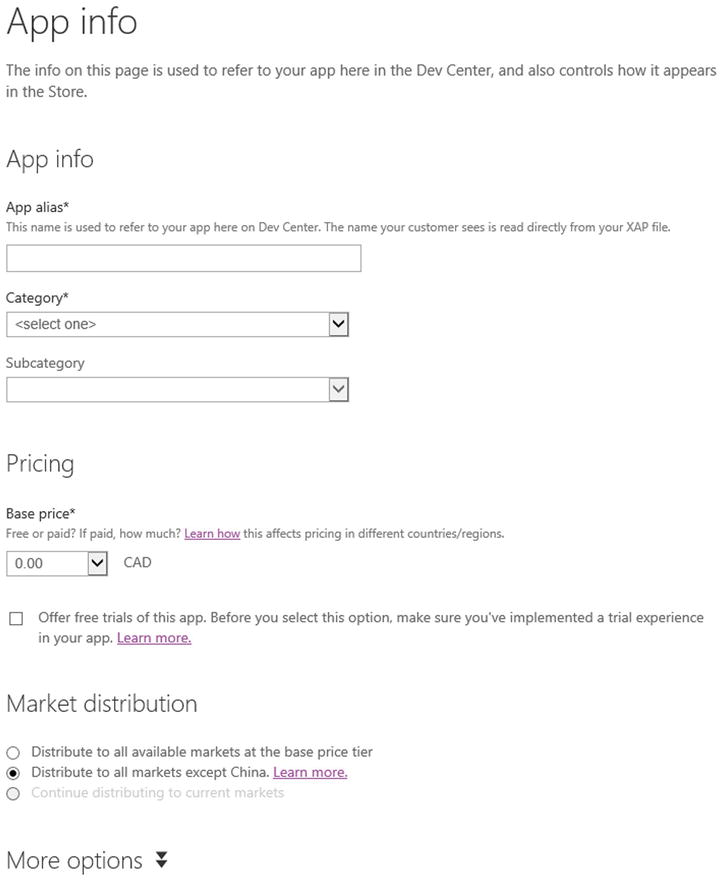
Figure 14-13. Step 1 of the app submission process
The category you select here determines the category grouping that your application will appear within in the Windows Phone Store. If a subcategory is available for the selected category, its dropdown list will become enabled. You may optionally select a subcategory.
At this point, you will want to give careful consideration to pricing. If you choose to provide a free app, you do not need to modify this value. You can leave it at the default value of 0.00. If you choose to charge your users to install your application, you will need to set a price here. If you have incorporated in-app advertisements, do NOT charge users to download your app. That is an unspoken rule of sorts. There’s no easier way to turn off users from your app than to include advertisements within a product that they paid for.
When you are charging users to install your app, as we discussed in Recipe 14-2, it is a good idea to offer a trial version. Remember that you will need to checkmark the “Offer free trials” checkbox if you have set up your application to leverage the LicenseInformation.IsTrial check within your application to limit features for trial mode.
If you expand the More options list (Figure 14-14), you will note that there are options to submit your app to the Public Store or only provide it as a Beta release. When submitting an application as a Beta release, you are able to specify which users are able to receive your app for free to test your application.
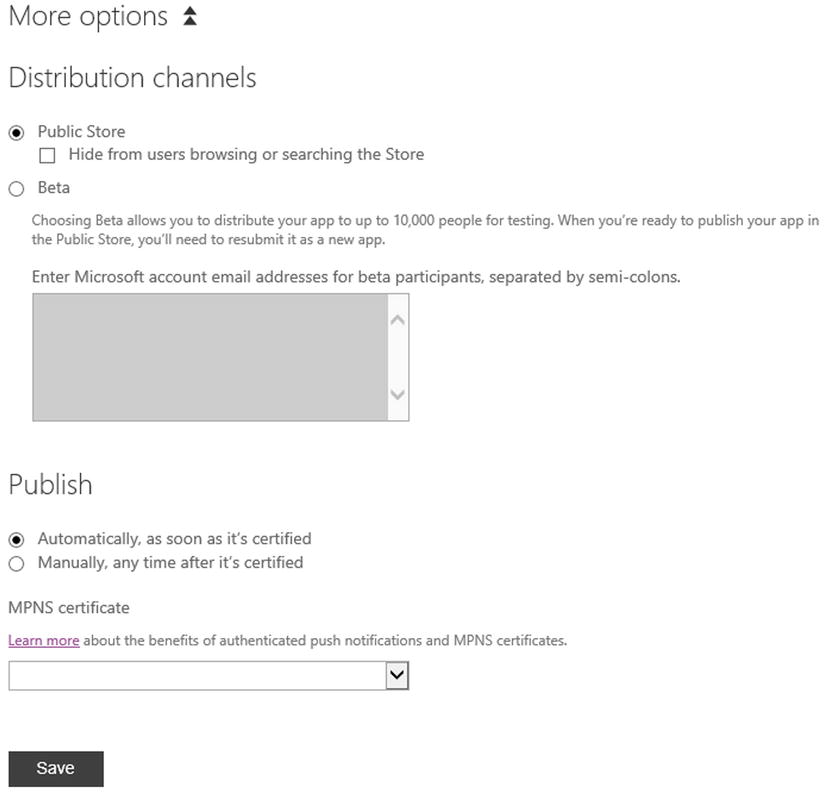
Figure 14-14. App info page - More options section
You must include at least one Microsoft email address account that is associated to a user’s Windows Phone device. In this way, the user will receive an e-mail with a download link from which they can download and install your Beta release onto the device. The maximum limit of Beta testers that you may set up for a single application is 10,000 users.
As well, you may choose to have your app published automatically, once it has passed testing. Note, that it generally takes between 24 and 48 hours for an application to appear in the Windows Phone Store once it has been certified. You will receive an e-mail once testing has completed, with a status to indicate if your app has passed or failed the testing phase. If there is a problem with your application that was uncovered in testing, the cause of the failure will be included in your application status e-mail. If this happens, be sure to review it carefully, review the certification and submission requirements, and address any issues that were listed. Once you have corrected the issues, you may resubmit your application to the Store.
Finally, if your app is configured to receive Push Notifications from an authenticated web service, you will need to upload the web service’s TLS cetificate to your Windows Phone Developer Center account. This can be found by clicking the Certificates link, which is available from your Account page. When you are submitting an application, any previously uploaded TLS certificates will appear in the MPNS certificate dropdown list within the App info page. Select the appropriate TLS certificate, if it is required by your application. When you are satisfied with the information entered on the App info page, hit the Save button to return to the main app submission page to continue on to the next step.
Upload Your XAP File
Upon saving the application information, you will be able to upload your XAP file, set up the Store listing, configure relevant keywords, and upload screenshots of the application. Click on the Upload and describe your XAP link. The first thing you must do within the Upload page is to do just that, and upload the Release version of your application’s XAP file. Click the Add new link to launch a File Explorer that you will use to browse and select the XAP file to upload (Figure 14-15).
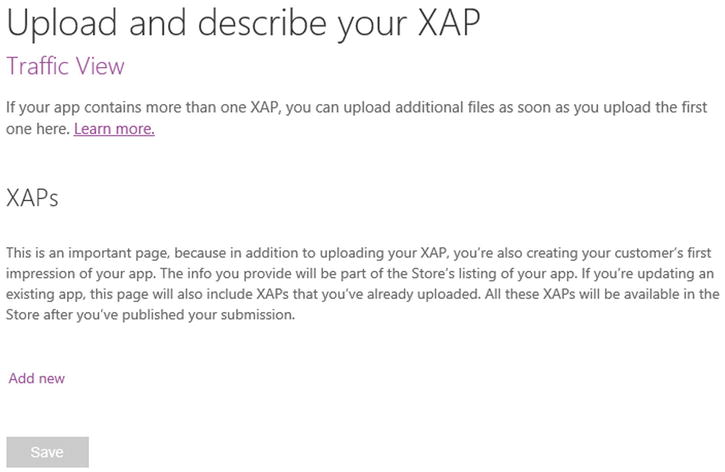
Figure 14-15. Step 2 of the app submission process - Upload and describe your XAP
Once you have selected the file, click Open in the File Explorer dialog to initiate the upload process. A progress indicator will display as the XAP file is uploaded. Once the upload has completed successfully, the Upload page will refresh and will then display information about the uploaded XAP file, as shown in Figure 14-16.
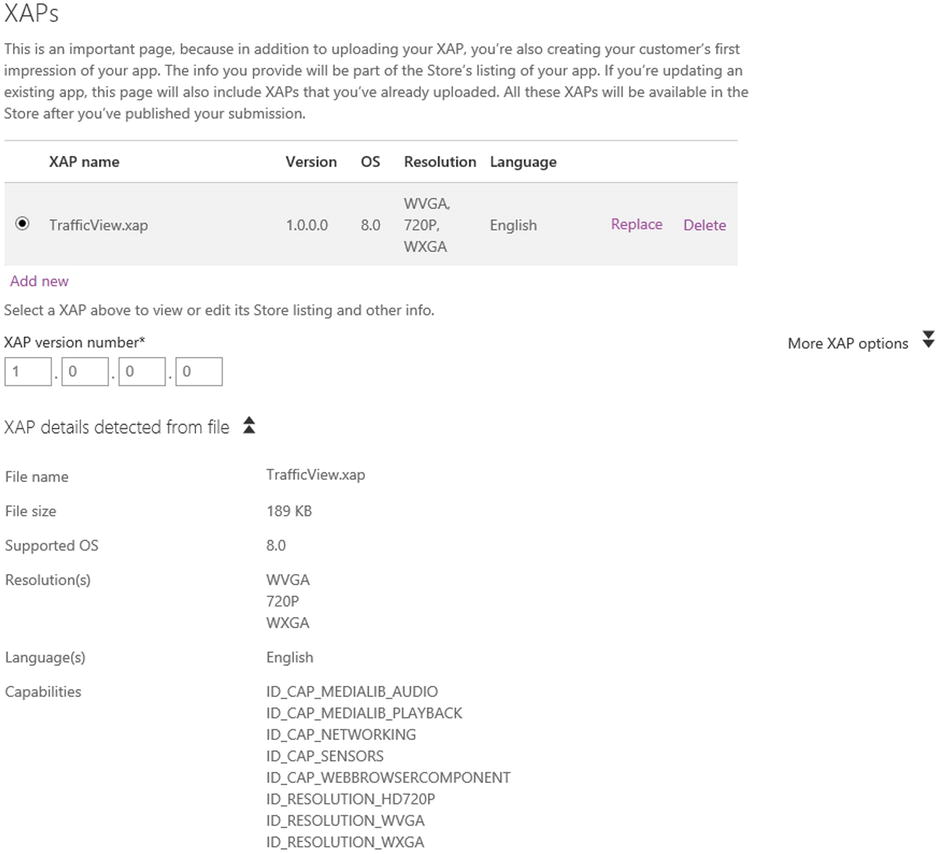
Figure 14-16. Additional info displayed once XAP is uploaded
As you can see, the capabilities that you configured within your Application Manifest now appear in this page, along with the supported resolutions, XAP file size, and version number. This information will be displayed in your application’s product page listing in the Store, once it is published. The only thing that you can manually change in this section is the application version number.
Once you have confirmed the information about your XAP file is accurate, scroll down to the XAP’s Store listing info section, as depicted in Figure 14-17. This is the where you will provide a description about your application, which will appear in the application’s product page when published to the Windows Phone Store. You may also specify keywords which makes it easier for users to find your app when they are searching the Windows Phone Store using any of the keywords that you provide here. As well, you should include a URL that points to a legal disclaimer and privacy policy that you have hosted on your own website, along with a support e-mail address for your application. Notice that you can enter this information in multiple languages. The languages provided here correspond to the supported languages that you selected in the Packaging tab within your Application Manifest.
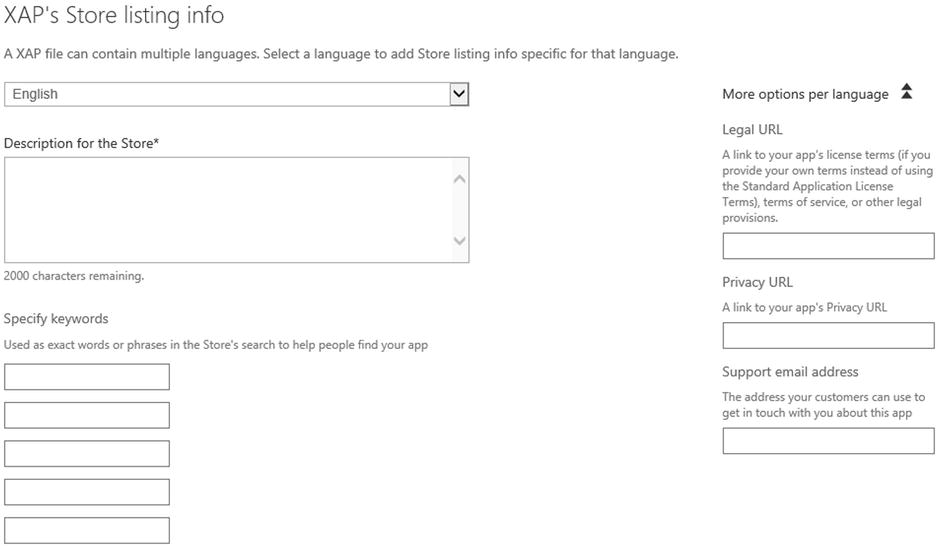
Figure 14-17. Enter a description, keywords, legal URL, privacy URL, and support e-mail address for each language your application will support
The next thing that you will discover, as you scroll down the page further, is that this is the page where you will upload your application’s app tile icon, background image, and at least one screenshot for each supported resolution (Figure 14-18). You may click the Upload All link to browse and select all of the images at once. Alternatively, you may upload each image separately by clicking on each image placeholder.

Figure 14-18. Upload an app tile icon, background image, and screenshots for each resolution your application will support
Once you are satisfied with the information provided in the Upload page, hit Save to commit these changes, and return to the main application submission page. At this point, you have fulfilled the basic submission requirements and you can proceed to submit your app to the Windows Phone Store.
However, there are 3 optional links that allow you to further configure your application: Add in-app advertising, Market selection and custom pricing, and Map services.
In-app advertising should have been configured and incorporated into your application prior to uploading the XAP file. We discussed this topic in Recipe 14-2.
Market Selection and Pricing
If you wish to make your application available only to specific markets and/or if you wish to define custom pricing per region, drill down into the Market selection and custom pricing link. This will load the Define market pricing page as shown in Figure 14-19. In this page, you can uncheck any markets that you do not want to your application being distributed within. For example, if you are developing an application that is specific to a region, such as a Transit application for a single city, then make that application available only in the country in which that transit application applies to. It doesn’t make sense to make the application availabe for download by users across the world. Unfortunately, this page does not have an “Uncheck all” option, and the list of markets is quite extensive. So in the case where the application is very limited to a smaller market, this could be a painstaking task to go through.
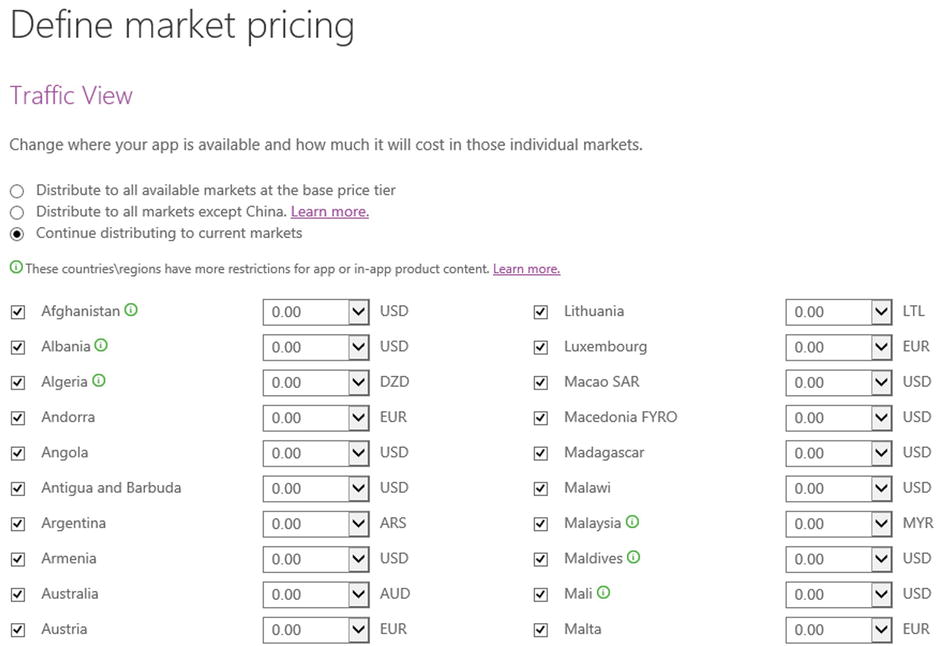
Figure 14-19. Optionally, you can limit the markets that your app is available within or set custom pricing for each market
Also, make sure to familiarize yourself with the restrictions that some countries may have. If your application should not be distributed to those markets due to the type of content it includes, make sure to exercise due diligence and remove those markets from your app distribution list. Those countries that contain a small icon to the right of the name include special restrictions. Review the restrictions and other content policies on MSDN at the following URL: http://msdn.microsoft.com/library/windowsphone/develop/hh184842(v=vs.105).aspx. As well, you can define custom pricing for each region within this page, if you so desire.
Map Services
Finally, if your application uses Map services, you will need to generate a map service Application ID and token, as shown in Figure 14-20. Similar to in-app advertisements, this should have been done prior to uploading the application’s XAP file, as this information must be incorporated within the application code. Refer to the recipes provided within Chapter 8 for more information on location and map services.
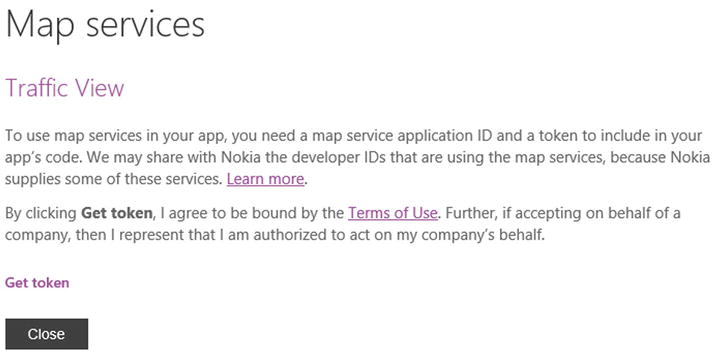
Figure 14-20. Generate a map service application ID and token to include in your application if it leverages map services
Completing the Submission Process
At this point, you may choose to proceed with the application submission process or leave your submission information as an in-progress submission. In-progress submissions will appear in your Dashboard with a state of Not submitted, as depicted in Figure 14-21.

Figure 14-21. View in-progress submissions from your Dashboard
From your Dashboard, you can click on the Alias to go to the application information page in your Dashboard. Within this page, you can view more details about your application. When your application is submitted, you can view stats about daily and overall downloads, crash rates, user reviews, current pricing, application details, and in-app products, if relevant.
If your application submission has been initiated, but not completed, you will see a Current submission box at the top of the details page as shown in Figure 14-22.
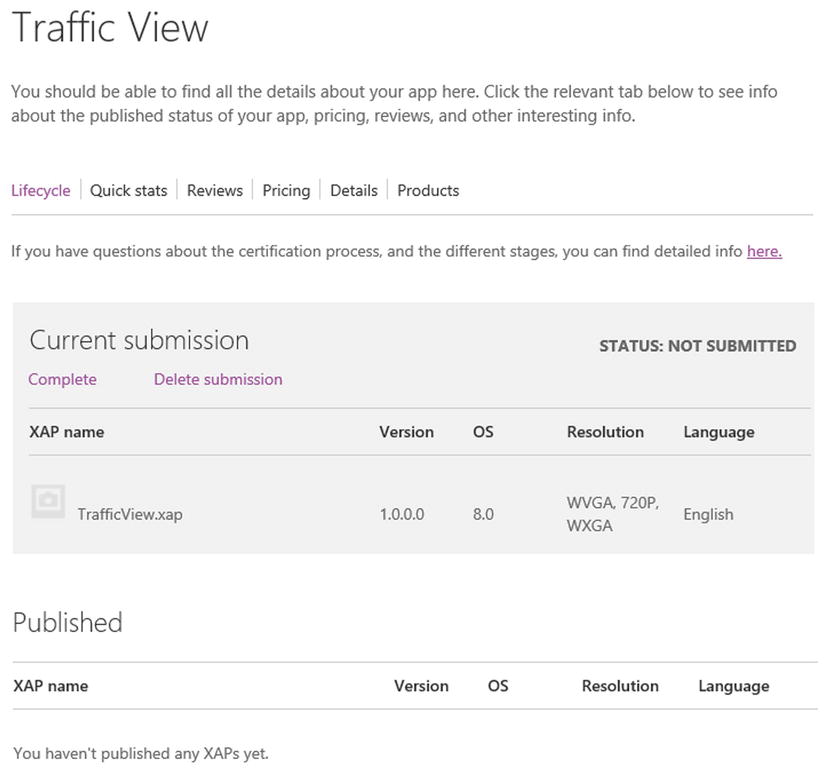
Figure 14-22. Application details page displaying an in-progress submission
Click on the Complete Submission link in this page to load the Submit app page. At this point, you can modify any information you included in the app submission, or you can choose to submit your application. When you are satisfied with the application submission information, click the Review and Submit button on the Submit app page.
Congratulations! You have successfully published a Windows Phone 8 application! The testing and certification stage could take a week or two before you receive any indication on the state of your application. While your application is going through this process, take the time to relax and enjoy your accomplishments thus far. Or, you can start designing another Windows Phone app!