
![]()
The Microsoft Live SDK is a set of APIs that allow developers to integrate a user’s Windows Live account and related services within a Windows Phone application. This chapter will walk through the necessary steps to download and install the SDK, as well as how to incorporate the Live Connect APIs to authenticate a user, retrieve a user’s list of Hotmail contacts and calendar information, and access files in a user’s SkyDrive1 account.
In this chapter, we will go over the following recipes:
- 13-1. Install the Live SDK
- 13-2. Register Your Windows Phone App with the Live Connect Developer Center
- 13-3. Authenticate a User Within Your Windows Phone App
- 13-4. Manage the User’s Outlook Calendar Information
- 13-5. Download Files from SkyDrive
13-1. Install the Live SDK
Solution
Download and install the Live SDK v5.4.
How It Works
The Microsoft Live SDK v5.4 comes packaged with a set of controls and APIs that provide you with the ability to incorporate the Microsoft Live user experience within your Windows Phone 8 app. Along with basic user authentication, you can upload or retrieve files from SkyDrive, manage a user’s Hotmail contacts list or calendar, integrate in-app chat, and more.
To download and install the Live SDK, go to www.microsoft.com/en-us/download/details.aspx?id=39304, and click the Download button. Select the check box next to the file named LiveSDK.msi, and then click the Next button.
The minimum requirements for this installation are pretty simple. It must be installed on a system that is running on Windows 7, Windows 8, Windows 8.1 Preview, Windows Server 2008, or Windows Server 2012. The Live SDK may be leveraged in Windows Phone 7.1, Windows Phone 8, Windows 8, and Windows 8.1 Preview application development, and it requires .NET 4.5.
Since we already have our machines configured for Windows Phone 8 application development, it is safe to say that we have met the minimum requirements for the Live SDK, and we should proceed with the installation once the MSI file has been downloaded.
The main screen of the Live SDK Setup application provides the SDK license agreement, as shown in Figure 13-1. Read and accept the terms of the license agreement; then click Install.

Figure 13-1. Live SDK installation
Once the installation completes successfully, launch Visual Studio 2012, and create a new Windows Phone app. There will not be a noticeable visual indication that the Live Connect controls and APIs were installed. The libraries are available on your machine, which you will be able to reference from your project. To add these libraries in your Windows Phone project, right click on the project name in Visual Studio, and select Add Reference... from the context menu to launch the Reference Manager dialog.
You will now see that the Microsoft.Live and Microsoft.Live.Controls are available for inclusion in your project, as depicted in Figure 13-2. This is something we will discuss in more detail in Recipe 13-3. For now, we just wanted to quickly demonstrate that the Live SDK was in fact installed properly, even though it is not something that is immediately apparent when you are creating or updating a Windows Phone project.

Figure 13-2. Add a reference to the Microsoft Live libraries in your Windows Phone app
13-2. Register Your Windows Phone App with the Live Connect Developer Center
Problem
You’ve installed the Live SDK, and you want to develop an app that leverages the Live Connect APIs.
Solution
Register the app online at the Live Connect Developer Center.
How It Works
If you want to include features and functionality that is available through the Live Connect APIs within a Windows Phone app, you will need to obtain a unique client ID from the Live Connect Developer Center. This means you must log in to the Live Connect Developer Center and register your app. Once your application is properly registered, it is assigned a client ID. You must register each Windows Phone app that will be using the Live Connect APIs separately in your Live Connect Developer Center account.
Perform the following steps to register your Windows Phone app with the Live Connect Developer Center:
- Go to the Live Connect Developer Center web site at http://msdn.microsoft.com/en-us/live/.
- Sign in using your Microsoft Live ID.
- Click the “My apps navigation” link.
- On the “My applications” page, click the “Create application” link, as shown in Figure 13-3.
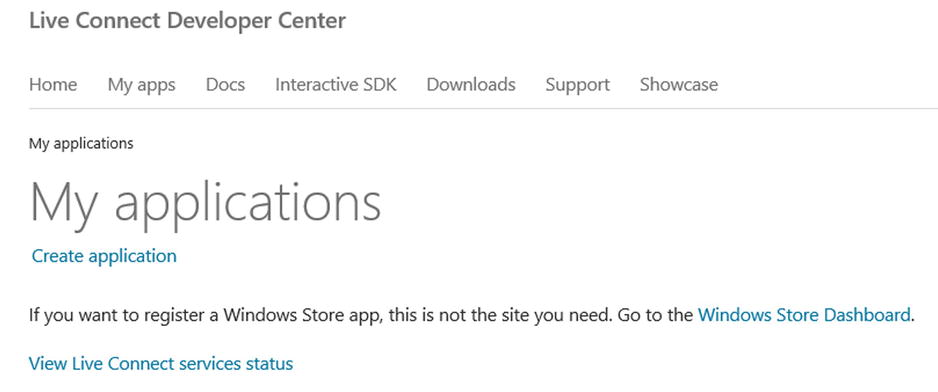
Figure 13-3. Register an application by clicking the “Create application” link on your Live Connect Developer Center “My applications” page
- The next step will prompt you to enter your application name and select the application’s primary language, as shown in Figure 13-4. You must also read and accept the terms of use.
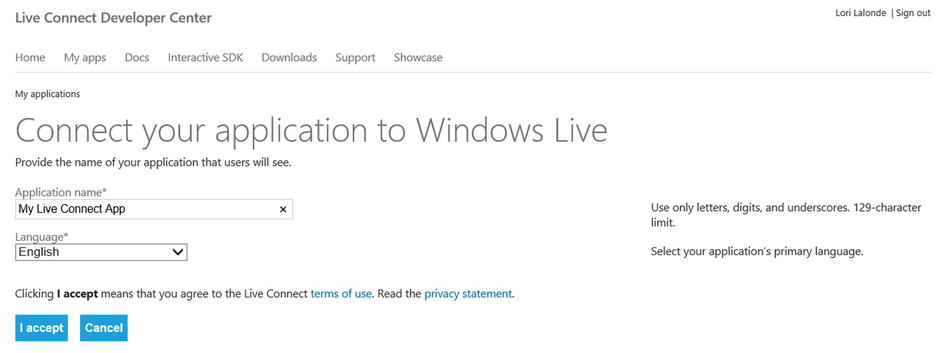
Figure 13-4. Provide an application name and set your application’s primary language
Upon acceptance of the terms of use, your application is assigned a client ID and client secret. At this point, you will notice a message indicating that the application requires further configuration, as shown in Figure 13-5.
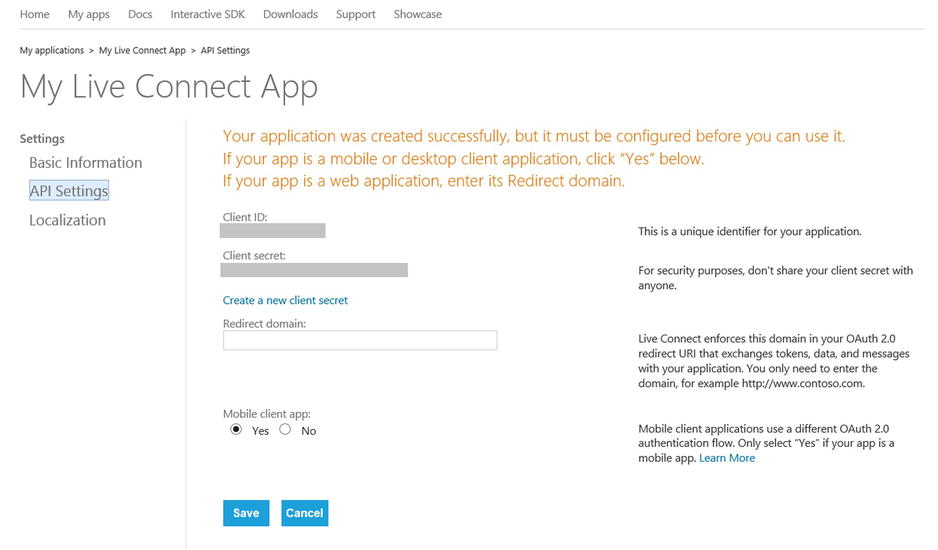
Figure 13-5. Upon creating application, message displays indicating that further configuration is required
Note that I have grayed out the client ID and client secret intentionally. This is a private key that you will use to enable use of the Live Connect features within your application. It is not to be shared.
On this page, select the Yes radio button to indicate that the app we just registered is a mobile client app. This distinction is necessary because the OAuth 2.0 authentication flow used in a mobile client application is different from the flow used in a web application. If you are unfamiliar with OAuth 2.0, visit the OAuth 2.0 site at http://oauth.net/2/ and review the specifications.
Save your changes on this screen. At this point, we can now create the intended Windows Phone application using the client ID provided.
If you return to the “My applications” page in your Live Connect Developer Center dashboard, you will notice that not only can you view the list of applications that are registered, but you can also track daily and monthly users (Figure 13-6). If you are the type of developer who cares about tracking analytics for your application, this feature is provided with your Live Connect Developer Center account. Bookmark this site and ensure that you visit it regularly to monitor your application’s usage.
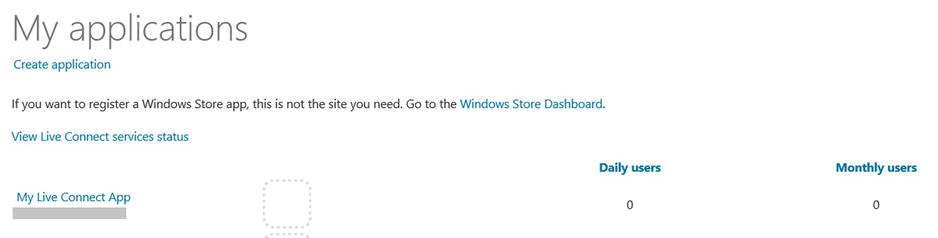
Figure 13-6. The “My applications” dashboard displays a snapshot of daily and monthly users for each registered application
You can drill down into your application registration page to view or modify settings. You can also view detailed analytics in chart form or delete your application from the Live Connect Developer Center.
13-3. Authenticate a User Within Your Windows Phone App
Problem
You want to incorporate a quick and easy way to authenticate a user from your Windows Phone app.
Solution
Leverage the Identity API, available as part of the Live Connect APIs, to provide a simple way to incorporate user authentication and single sign-in within the application.
How It Works
The LiveConnectClient class exposes a set of methods that execute the REST API calls to manage a user’s Microsoft account. The Identity API is a subset of the Live Connect APIs, which allows us to include basic authentication within a Windows Phone app.
As we discussed in Recipe 13-2, a client ID must be registered with the Live Connect Developer Center in order to leverage the Live Connect APIs. Additionally, we must obtain consent from the user to access any of the Microsoft Live account features within the application. This is accomplished by defining the type of access that is required when attempting to create a new LiveConnect session. Essentially, we must define the scope of the request.
The Live Connect APIs provide two scope types: core and extended. Core scopes provide sign-in capabilities as well as access to the user’s profile and basic contact information. The core scopes are as follows:
- wl.basic: Provides read-only access to the user’s profile information and contacts list.
- wl.offline_access: Allows the app to access or update the user’s info whether or not the user is signed in to their Live account.
- wl.signin: Enables the user to sign in within the app using Live ID credentials. The sign-in process will prompt for credentials on the application’s first sign-in attempt. After that, the sign-in will occur automatically.
Extended scopes provide access to additional information and functionality, such as accessing calendars, photos, and SkyDrive contents, to name a few. We will be utilizing a handful of the available scopes as we progress through the remaining recipes in this chapter. To view a full list of extended scopes and the type of access each scope provides, read the MSDN article on scopes and permissions at http://msdn.microsoft.com/en-us/library/live/hh243646.aspx.
In this recipe, we will create a simple app that allows a user to sign in using Live ID credentials, and we will build on this app to include additional functionality in the following recipes in this chapter. If you have not registered your app with the Live Connect Developer Center yet, go back to Recipe 13-2 and walk through the steps to register your app and obtain a client ID for your application.
Launch Visual Studio 2012, and open the project located within the Chapter 13MyLiveConnectAppStart directory. Add a reference to the Microsoft.Live and Microsoft.Live.Controls libraries, which we briefly touched upon at the end of Recipe 13-1 and depicted in Figure 13-2.
Open the MainPage XAML file, and add a namespace declaration for the Microsoft.Live.Controls library within the phone:ApplicationPage element:
xmlns:live="clr-namespace:Microsoft.Live.Controls;assembly=Microsoft.Live.Controls"
The only control available to add to the MainPage from the Microsoft.Live.Controls library is the SignInButton, which will be used to initiate the sign-in process of the user’s Microsoft account. Within the MainPage markup, replace the comment <!-- Add the Live Signin button here --> with a SignInButton as follows:
<live:SignInButton
        Name="signInButton"
        Grid.Row="1"
        ClientId="{Binding ClientId, Mode=OneTime}"
        Scopes="wl.signin wl.basic wl.birthday"
        Branding="MicrosoftAccount"
        TextType="SignIn"
        SessionChanged="signInButton_SessionChanged"/>
The SignInButton allows us to specify the scopes we want to use right within the button’s markup. To specify multiple scopes, enter them in the Scopes property, making sure to separate each scope with a single space. For this example, we will request the user to enable sign-in, as well as enable access to the user’s birthday, basic profile information, and contacts information from within the application.
The Branding property allows us to select which logo to display on the SignInButton. There are four available logos: Messenger, MicrosoftAccount, Outlook, and SkyDrive. TextType allows us to select which text to display: Connect, Custom, Login, and Signin. If Custom is selected, then we will need to provide text for two additional properties, SigninText and SignoutText, on the SignInButton. You can choose whichever branding and text type you prefer. They are simply cosmetic changes and do not affect the behavior of the SignInButton.
Additionally, we will need to include an event handler for the button’s SessionChanged event. This will be the event that will be raised when the session is instantiated. Within the ContentPanel grid, add a few TextBlock controls to display the user’s name, birthday, and current sign-in state. Add a HyperlinkButton so that we can provide a link to the user’s online profile page.
In the MainPage code-behind, we will first need to add the following using directives:
using Microsoft.Live;
using Microsoft.Live.Controls;
Next, we will need to include code within the SessionChanged event handler to check whether a Live Connect session was successfully connected (Listing 13-1). If the session is connected, this means the user entered valid Live ID credentials during the authentication process and the user consented to enable access to the information requested within the application.
Listing 13-1. Check to Determine Whether We Are Successfully Connected in the SessionChanged Event of the SignInButton
private LiveConnectClient client;
private async void signInButton_SessionChanged(object sender, LiveConnectSessionChangedEventArgs e)
{
    try
    {
        if (e.Status == LiveConnectSessionStatus.Connected)
        {
            client = new LiveConnectClient(e.Session);
            LiveOperationResult operationResult = await client.GetAsync("me");
            App.ViewModel.LoadUserInfo((dynamic)operationResult.Result);
        }
        else
        {
            App.ViewModel.ResetUserInfo();
        }
    }
    catch (LiveConnectException exception)
    {
        App.ViewModel.ResetUserInfo();
        MessageBox.Show("An error occurred signing in: " + exception.Message);
    }
}
Notice that we did not have to write any code to handle user login or to manage the authentication flow. This is all handled for us within the SignInButton. We simply need to track the current state of the Live Connect session. As well, we can easily obtain the Session, Status, and Error information from the LiveConnectSessionChangedEventArgs parameter that is passed into the SessionChanged event.
We simply check the Status to determine whether the session was successfully connected and make the appropriate calls to the Live Connect APIs to obtain the information we need within the application.
The LiveConnectClient encapsulates the web service calls to the available REST APIs to manage a user’s Live account. The LiveConnectClient class includes async methods (Figure 13-7) for each of the HTTP verbs that are used with REST-based services: GET, POST, PUT, MOVE, DELETE, and COPY.
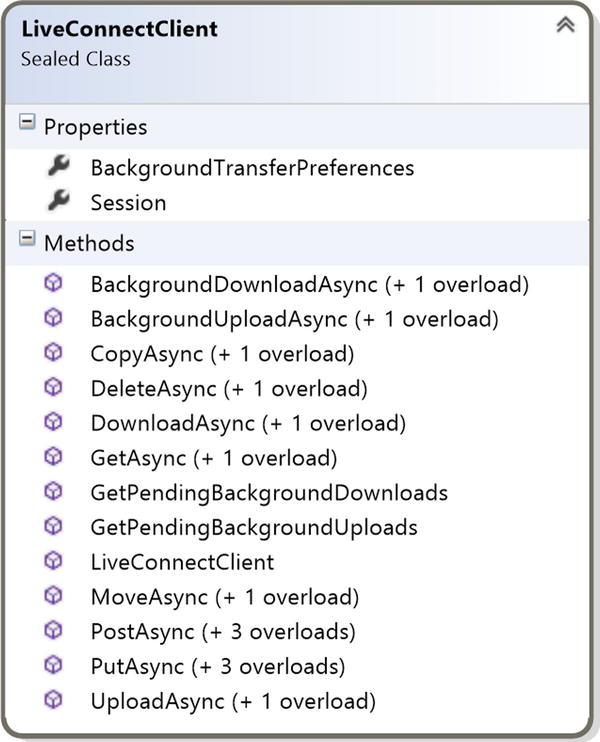
Figure 13-7. LiveConnectClient class diagram
As shown in Listing 13-1, to obtain the user’s profile information, we instantiated the LiveConnectClient using the current Session object: client = new LiveConnectClient(e.Session).
To retrieve the user’s profile information, we called the GetAsync method on the LiveConnectClient instance. The GetAsync method expects a string parameter that points to the REST API’s object path. In this case, we want the user’s profile information, so we will pass in "me". This is a valid object path that maps to the user’s profile. Review the online REST reference article to view the full list of available object paths at http://msdn.microsoft.com/en-us/library/live/hh243648.aspx#objectdata.
The GetAsync method returns a dynamic object in the Result property of the LiveOperationResult object. The dynamic object contains all combined fields that are returned based on the object path passed into the GetAsync method, along with the scopes defined for application access during sign-in. In this case, the dynamic object is a User object. To view the list of fields returned in the User object, review the Live Connect REST API article online at http://msdn.microsoft.com/en-us/library/live/hh243648.aspx#user.
Finally, to serve as good developer citizens, we added exception handling to trap for the exception LiveConnectException. If an error occurred while attempting to communicate with the Microsoft Live services, then we can gracefully handle it and display a friendly message to the user.
This is a good place to mention that the SignInButton serves a dual purpose. Along with signing a user in, the button is also used to sign a user out of the Microsoft account. Tapping the button when the session is connected will trigger a sign-out process that is handled behind the scenes. Just like the sign-in process, the SessionChanged event will be triggered once the sign-out process has completed. Therefore, we need to ensure that we clear any user-specific information from the page when the user chooses to sign out.
Before we test the application, we need to drill down into the MainViewModel class and make one more change. Load the MainViewModel and take a moment to review the properties and methods that are contained within this class.
Notice that the ClientId property is not filled in with a valid ID:
public string ClientId
{
     get
     {
         return "TO DO: REGISTER YOUR APP FOR A CLIENT_ID ONLINE";
     }
}
You will need to modify this property to return the client ID that was generated in your Live Connect Developer Center account for this application.
Take a moment to review the LoadUserInfo method and the ResetUserInfo method. Both methods are called from the MainPage code-behind. The LoadUserInfo method accepts the LiveOperationResult.Result value that was returned when we requested the user’s profile information through the LiveConnectClient’s GetAsync method. It simply sets the properties within the view model, which in turn will display the user information in the view through the power of data binding.
At this point, we are ready to test the user sign-in process within our app!
Testing in the Emulator
Run the application in the emulator so that we can see what happens when the SignInButton is tapped and to observe the authentication flow that takes place. On initial launch, you will see the “Sign in” button and the status that indicates we are not signed in, as shown in Figure 13-8.
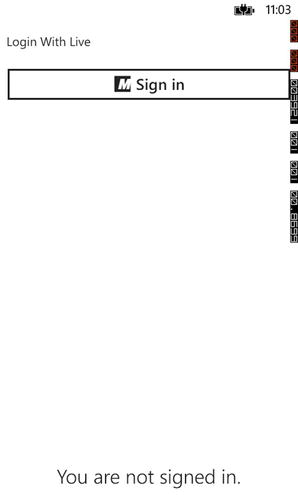
Figure 13-8. Live “Sign” in button, branded with the Microsoft Live account logo
Tap the “Sign in” button to initiate user authentication. Notice that the sign-in page displayed prompts for your Microsoft Live ID credentials (Figure 13-9). Enter your credentials and then tap “Sign in.”
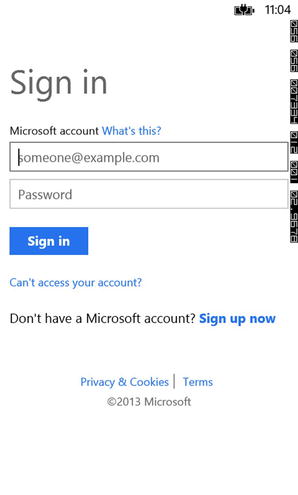
Figure 13-9. The Live sign-in process prompts for credentials
Upon successful verification of your credentials, the user consent page is displayed, as depicted in Figure 13-10. The permissions list that is displayed on this page reflect the scopes that we included in the SignInButton’s Scopes property. Tap the Yes button to give the application permission to your basic profile information, birthday, and contacts information.

Figure 13-10. User consent is required for access to the user’s Live account info
Once user consent is obtained, the SessionChanged event will be triggered. At this point, our code will execute, which will conduct an async call to obtain the user’s profile information and display it in the MainPage, as shown in Figure 13-11.
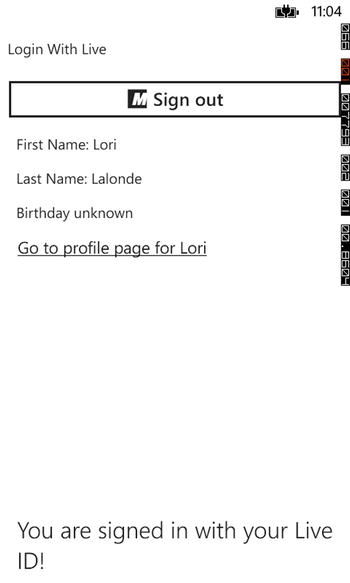
Figure 13-11. Once the user is signed in, the requested Live account information is available within the application
As you can see, we were able to include user authentication within our Windows Phone application simply by adding the SignInButton from the Microsoft.Live.Controls library, setting the ClientId to a valid ID that was generated specifically for your application, and defining the scope of the desired access within the application. That is how easy it is to include a sign-in process within your Windows Phone application!
To view the completed application, open the solution MyLiveConnectApp in the Chapter 13MyLiveConnectAppFinished directory.
13-4. Manage the User’s Outlook Calendar Information
Problem
You want to develop an app that allows a user to manage their Outlook calendar events within the application.
Solution
Leverage the Hotmail API, available as part of the Live Connect APIs, to access the user’s calendar information.
How It Works
Similar to the concept that was discussed in Recipe 13-3, the Hotmail APIs packaged within the Live Connect APIs provide access to the user’s online calendar. The LiveConnectClient will be used to retrieve the user’s calendar information. We will simply need to pass in the object path me/calendars in the LiveConnectClient’s async methods to accomplish this goal. We can either GET or POST data to the user’s Outlook calendar.
In addition to that, we will need to include one or more of the following extended scopes to ensure we obtain user consent so that our application can access the user’s Outlook calendars:
- wl.calendars: Provides read-only access to the user’s calendars and events
- wl.calendars_update : Provides read-write access to a user’s calendars and events. This scope also provides the ability to create new calendars and delete calendars.
- wl.events_create: Allows the application to create events within the user’s default calendar.
![]() Note Microsoft recently rebranded its popular Hotmail calendar to Outlook. However, the term Hotmail is still used in the Live Connect API documentation when referring to the Microsoft online calendar and contacts. In this chapter, we will refer to it as Outlook to conform to the recent rebranding. If you are searching the Live SDK documentation, keep in mind it may still be labeled as Hotmail.
Note Microsoft recently rebranded its popular Hotmail calendar to Outlook. However, the term Hotmail is still used in the Live Connect API documentation when referring to the Microsoft online calendar and contacts. In this chapter, we will refer to it as Outlook to conform to the recent rebranding. If you are searching the Live SDK documentation, keep in mind it may still be labeled as Hotmail.
When retrieving calendar data through the LiveConnectClient’s GetAsync method, the result that is returned is a Calendar object. To view the list of fields available in the Calendar object, review the Live Connect REST API article online at http://msdn.microsoft.com/en-us/library/live/hh243648.aspx#calendar.
Launch Visual Studio 2012 and open the project in the Chapter 13 MyLiveConnectAppWithCalendar directory. Notice that it is similar to the MyLiveConnect app discussed in Recipe 13-3 but has some additional tweaks. The most significant change was that we moved the user profile information to a separate page.
In addition, within the MainPage markup, notice that the wl.calendar scope has been added to allow the application to access the user’s calendar data. The wl.calendars_update scope has been included as well so that we can update the user’s calendar information from within the application.
Furthermore, HubTiles from the Windows Phone Toolkit are used in the MainPage, which will serve as our navigation menu. Notice in the MainPage code-behind, when a HubTile is tapped, it will navigate to the page that we specified in the HubTile’s Tag property.
        private void HubTile_Tap(object sender, System.Windows.Input.GestureEventArgs e)
        {
            if (App.ViewModel.IsConnected)
            {
                HubTile selectedTile = (HubTile)sender;
                Uri pageUri = new Uri(string.Format("/{0}.xaml", selectedTile.Tag.ToString()), UriKind.Relative);
                NavigationService.Navigate(pageUri);
            }
            else
            {
                MessageBox.Show("You must sign in first.");
            }
}
The Calendar HubTile will load the Calendars page, listing the user’s Outlook calendars, as shown in Listing 13-2.
Listing 13-2. Retrieve the User’s List of Outlook Calendars When the Calendars Page Loads
private async void Calendars_Loaded(object sender, RoutedEventArgs e)
{
    try
    {
        if (App.ViewModel.IsConnected)
        {
            LiveOperationResult operationResult = await App.ViewModel.LiveClient.GetAsync("me/calendars");
            dynamic eventsResult = ((dynamic)operationResult.Result).data;
            App.ViewModel.LoadCalendars(eventsResult);
        }
    }
    catch (LiveConnectException ex)
    {
        MessageBox.Show("Error occurred loading calendars: " + ex.Message);
    }
}
With the calendar information at hand, we can drill down to view events that are contained within a calendar by calling the LiveConnectClient’s GetAsync method and passing in the object path of [calendarId]/events, where calendarId is the unique ID for the selected calendar.
In the Calendars page code-behind, notice that the SelectionChanged event for the LongListSelector control passes the selected calendar ID to the Events page on navigation.
        private void LongListSelector_SelectionChanged(object sender, System.Windows.Controls.SelectionChangedEventArgs e)
        {
            LiveConnectCalendar selectedCalendar = calendarList.SelectedItem as LiveConnectCalendar;
            NavigationService.Navigate(new Uri("/Events.xaml?id=" + selectedCalendar.Id, UriKind.RelativeOrAbsolute));
        }
Within the Events code-behind file, we simply retrieve the ID value from the NavigationContext’s QueryString and use that in our object path when requesting the events list for the selected calendar, as shown in Listing 13-3. The result returned will be a list of Event objects. To view the list of fields available in the Event object, review the Live Connect REST API article online at http://msdn.microsoft.com/en-us/library/live/hh243648.aspx#event.
Listing 13-3. On Navigation to the Events Page, Retrieve a Specific Calendar’s List of Events
protected override void OnNavigatedTo(System.Windows.Navigation.NavigationEventArgs e)
{
    LoadEvents();
}

private async void LoadEvents()
{
    try
    {
        if (NavigationContext.QueryString.ContainsKey("id") && App.ViewModel.IsConnected)
        {
            string calendarId = NavigationContext.QueryString["id"];
            LiveOperationResult operationResult = await App.ViewModel.LiveClient.GetAsync(string.Format("{0}/events", calendarId));
            dynamic eventsResult = ((dynamic)operationResult.Result).data;
            App.ViewModel.LoadEvents(eventsResult);
        }
    }
    catch (LiveConnectException ex)
    {
        MessageBox.Show("Error occurred loading events: " + ex.Message);
    }
}
Also, since we included the wl.calendars_update scope, we can also create new calendars, update information on existing calendars, and delete calendars, provided the user has the either owner, co-owner, or read-write permissions on the calendar. Within the Calendars page, we have included a single button that creates a new calendar with some sample information when it is first selected. We were able to add a new calendar to the user’s calendars list by calling the PostAsync method, passing in the object path of me/calendars, and passing in a new Calendar object. Listing 13-4 shows the call that is made to create the calendar.
Listing 13-4. Add a New Calendar to the User’s Calendars List
Dictionary<string, object> newCalendar = new Dictionary<string, object>();
                    newCalendar.Add("name", "My New Calendar");
                    newCalendar.Add("description", "Sample to demonstrate adding and deleting calendars");
                    LiveOperationResult operationResult = await App.ViewModel.LiveClient.PostAsync("me/calendars", newCalendar);
Once the calendar has been created, the calendars list is updated, and the button changes to a delete button, which will simply the delete the calendar we just added the next time the button is tapped. To delete a calendar, we simply call the LiveConnectClient’s DeleteAsync method, passing in only the unique calendar ID.
LiveOperationResult operationResult = await App.ViewModel.LiveClient.DeleteAsync(calendarId);
Testing in the Emulator
As we mentioned in Recipe 13-3, modify the ClientId property in the MainViewModel to the application ID you generated in your Microsoft Live account so that you can properly test this in the emulator. Once that is in place, launch the application in the emulator. When the application launches, sign in. Once connected, navigate to the calendars page. It will display a list of the calendars you currently have configured in your Outlook account (Figure 13-12).

Figure 13-12. Calendars list from the user’s online Outlook account
Next, click the Add Calendar button to create a new calendar. If the calendar has been created successfully, the list will refresh with the new calendar added to the list, as shown in Figure 13-13.
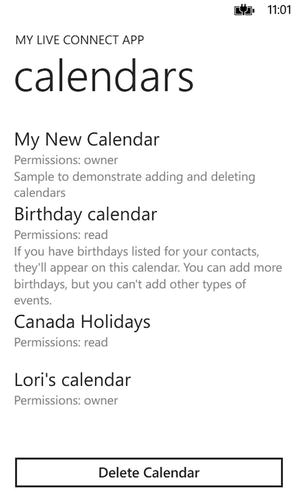
Figure 13-13. New calendar added to the user’s Outlook calendars
To prove that this calendar was not just created locally, launch Internet Explorer, go to http://outlook.com, and sign in. Navigate to your Calendars view, and click the Settings button. This action will display a menu containing a list of calendars configured as part of your Outlook account. Notice that the new calendar appears in the list, as depicted in Figure 13-14.
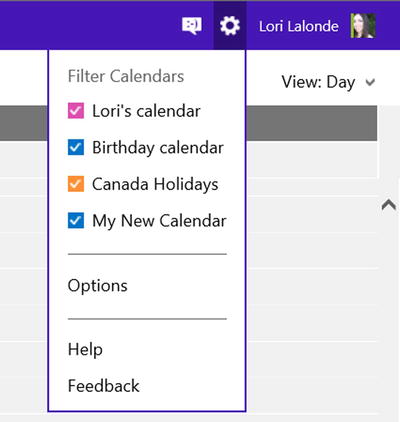
Figure 13-14. The newly created calendar is accessible when logging into Outlook.com
If you want to add or delete events from a calendar, the same concepts that we went over with GetAsync, PostAsync, and DeleteAsync apply, as we discussed in the calendars demonstration, except the object path that must be specified in the GetAsync and PostAsync calls will need to indicate me/events and the wl.events_create scope must be included in the sign-in process.
![]() Note A bonus project is packaged with this chapter in the directory Chapter 13MyLiveConnectAppWithContacts, which demonstrates the same concepts discussed in this recipe but against the Outlook Contacts list.
Note A bonus project is packaged with this chapter in the directory Chapter 13MyLiveConnectAppWithContacts, which demonstrates the same concepts discussed in this recipe but against the Outlook Contacts list.
13-5. Download Files from the User’s SkyDrive
Problem
You want to develop an app that allows the user to access and manage the user’s SkyDrive files.
Solution
Leverage the SkyDrive API, available as part of the Live Connect APIs, to access the user’s SkyDrive account and download files.
Following the pattern of Recipes 13-3 and 13-4, the LiveConnectClient will be used to retrieve the user’s SkyDrive contents. Before attempting to access the SkyDrive through the APIs available, we will need to include the extended scope, wl.skydrive, to obtain permission from the user to get a read-only list of SkyDrive contents, as well as download files from the user’s SkyDrive account.
To retrieve the list of contents in the SkyDrive root folder or child folders, we will once again leverage the LiveConnectClient’s GetAsync method call, passing in the relevant object path. To view a list of valid object paths for SkyDrive access, refer to the SkyDrive API article online at http://msdn.microsoft.com/en-us/library/live/jj680723.aspx.
To download a file from SkyDrive, we will leverage the DownloadAsync method call, passing in the unique ID of the file we want to download. This method writes the file content to a stream, at which point you can do what you want. Some common options include saving the file to isolated storage and loading the file content into the app.
For this recipe, our application will use the object path me/skydrive/files to load the top-level files and folders available in the SkyDrive account when the SkyDrive Contents page is first loaded. The page will display the list of folders and files in a list. Selecting a folder will drill down to display the folder contents. Selecting a file will prompt the user to download the file.
Launch Visual Studio 2012 and open the project within the Chapter13 MyLiveConnectAppWithSkyDrive directory.
Note that we added the wl.skydrive scope to the SignInButton Scopes property in the MainPage markup. As well, there is a new HubTile, which allows us to navigate to the SkyDrive Contents page. On initial load of this page, we retrieve the list of items at the top level in the user’s SkyDrive account, as shown in Listing 13-5.
Listing 13-5. SkyDriveContents Page Retrieves Top-Level SkyDrive Items During Load
private async void SkyDriveContents_Loaded(object sender, RoutedEventArgs e)
{
    try
    {
        if (App.ViewModel.LiveClient != null)
        {
            LiveOperationResult operationResult = await App.ViewModel.LiveClient.GetAsync("me/skydrive/files");
            dynamic skyDriveResult = ((dynamic)operationResult.Result).data;
            App.ViewModel.LoadSkyDriveContents(skyDriveResult);
        }
    }
    catch (LiveConnectException ex)
    {
        MessageBox.Show("Error occurred loading files from SkyDrive: " + ex.Message);
    }
}
Within the SelectionChanged event for the LongListSelector control, if the selected item is a folder, another call is made to the GetAsync method call, passing in the object path [folder_id]/files, in order to load the folder’s contents (Listing 13-6).
Listing 13-6. SkyDriveContents Page Retrieves the Selected Folder Contents or Downloads the Selected File
private async void LongListSelector_SelectionChanged(object sender, SelectionChangedEventArgs e)
{
    LiveConnectSkyDriveItem selectedItem = this.skyDriveList.SelectedItem as LiveConnectSkyDriveItem;
    if (!selectedItem.IsFolder)
    {
        MessageBoxResult result = MessageBox.Show("Would you like to download this file?", "", MessageBoxButton.OKCancel);
        if (result == MessageBoxResult.OK)
        {
            LiveConnectClient client = App.ViewModel.LiveClient;
            LiveDownloadOperationResult operationResult = await App.ViewModel.LiveClient.DownloadAsync(selectedItem.Id);

            MessageBox.Show("Download completed. Now saving to IsolatedStorage...");

            ...
        }
    }
    else
    {
        LiveOperationResult operationResult = await App.ViewModel.LiveClient.GetAsync(string.Format("{0}/files", selectedItem.Id));
            dynamic filesResult = ((dynamic)operationResult.Result).data;
            App.ViewModel.LoadSkyDriveContents(filesResult);
     }

}
If the selected item is a file, the application will prompt the user to download the file. If the user agrees to download the file, the LiveConnectClient’s DownloadAsync method is called, passing in the file’s unique ID. Once the download completes, the file content will be returned in the LiveDownloadOperationResult object’s Stream property. Within the sample application in this chapter, the application conducts a save of the file stream to isolated storage. If you are not familiar with isolated storage or how to save files to isolated storage on a Windows Phone device, you may want to revisit Chapter 11’s Recipe 11-1, which discusses this topic in detail.
The SkyDrive APIs provide extensive functionality for accessing photos, videos, files, and folders in a user’s SkyDrive account. In this recipe, we demonstrated a simple file download; however, you could also add the ability to upload files, move files and folders, copy files, and delete files and folders, among many other actions. Visit the SkyDrive API page at http://msdn.microsoft.com/en-us/library/live/hh826521.aspx to learn more about how to manage a user’s SkyDrive account from within a Windows Phone application.
Testing in the Emulator
As we mentioned in Recipe 13-3, modify the ClientId property in the MainViewModel to the application ID you generated in your Microsoft Live account so that you can properly test this in the emulator. Once that is in place, launch the application in the emulator. When the application launches, sign in.
Once connected, navigate to the SkyDrive page. It will display a list of folders you created in your SkyDrive, along with any files you have uploaded. For my account, I have two folders at the top level: Blog and CTTDNUG (Figure 13-15).
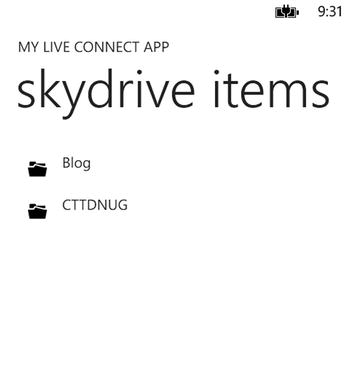
Figure 13-15. SkyDrive folders list from the user’s online Outlook account
Click a folder to view its contents. I have chosen to drill down into the CTTDNUG folder, where I store slide decks for my user group, as shown in Figure 13-16.
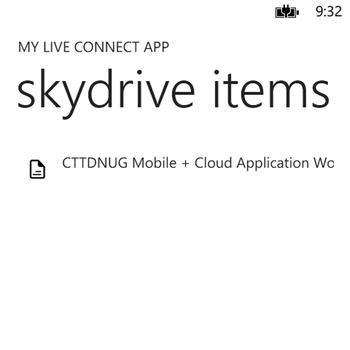
Figure 13-16. SkyDrive files
In this case, I have one slide deck from a “Mobile and Cloud” workshop we hosted for our user group members. If you have a file in your list, click it to initiate the file download. You will be prompted to confirm the file download (Figure 13-17). This was a prompt we included in the code when a user selected a file in the LongListSelector control. Refer to Listing 13-6 to see where this was added.

Figure 13-17. Prompt the user to confirm the file selected for download
Click the “ok” button to proceed with the file download. You will see a few more messages indicating that the file was downloaded and then saved successfully. If you so desire, you can enhance this application by launching the file in the appropriate application after it is saved to the device.
1 By the time you read this, SkyDrive may be called something completely different due to a trademark infringement case that was filed by a British company against Microsoft over the use of the word sky. The latest reports indicate that Microsoft settled the case and will rebrand SkyDrive. (www.pcworld.com/article/2045634/microsoft-to-rename-skydrive-after-losing-trademark-suit.html/). For now, we will continue to use SkyDrive to refer to Microsoft’s cloud storage product until a new name has been announced.