
![]()
Background Agents and Local Notifications
Background agents are useful for performing tasks in the background when an application is not running. These tasks can include performing data synchronization, retrieving data from an online source such as an RSS feed or RESTful web service, and displaying notifications to relay information to the user. It is also possible to create local notifications from within the application that will display when the application is not running in the foreground.
Why would a developer want to display notifications when the application is not running? Notifications are a great way to draw a user back into your Windows Phone app! This chapter will cover how to create the different types of background agents available on Windows Phone, as well as how to create different types of local notifications that developers can incorporate into their own applications.
In this chapter, we will beef up your Windows Phone knowledge with the following recipes:
- 5-1. Update the App Tile Using a Background Agent
- 5-2. Engage the User with a Toast (Notification)
- 5-3. Schedule Tile Updates Without a Background Agent
- 5-4. Download Video Using a Background Transfer Service
- 5-5. Schedule Reminders Within Your App
5-1. Update the App Tile Using a Background Agent
Problem
You developed an app to display a list of inspirational quotes. You want to update the app tile so that when pinned to the user’s start screen, it displays a different quote at timed intervals.
Solution
Create a Scheduled Task Agent project that registers a periodic task that will update the displayed quote on the application’s wide tile.
How It Works
The Windows Phone APIs include a ScheduledTaskAgent class that you will use when creating a background agent that runs on a schedule. The ScheduledTaskAgent class derives from the BackgroundAgent class and contains a method, OnInvoke, which is called when the agent is executed. This is the method you will need to override and provide custom code within to execute the desired actions.
A Scheduled Task Agent can include code for the following tasks:
- PeriodicTask: This is used when executing an action that takes little time to process, such as raising a notification, and it runs once approximately every 30 minutes. Note that this time can vary by 10 minutes, and it must complete execution in 25 seconds or less.
- ResourceIntensiveTask: This is used when performing tasks that require a long processing time, such as conducting data synchronization with a cloud-based data store. This task will run for 10 minutes and will execute only when all of the following requirements are met:
- The device screen is locked.
- The device’s battery power is greater than 90 percent.
- The device is connected to an external power source.
- The device has a network connection through Wi-Fi or a PC connection.
- The device is not in the midst of an active phone call.
![]() Note Because of the number of requirements needed for a resource-intensive agent to run, it is not guaranteed that it will execute on a user’s device.
Note Because of the number of requirements needed for a resource-intensive agent to run, it is not guaranteed that it will execute on a user’s device.
A Windows Phone app can reference only one Scheduled Task Agent project; however, you can register both the periodic and resource-intensive tasks for an application. If your app registers both types of tasks for your background agent, the tasks will run on different schedules and are limited to 11MB of memory usage at any time. If either agent type experiences two unhandled exceptions, it will be removed from the schedule automatically.
Both periodic and resource-intensive tasks have a limited lifetime and are set to expire two weeks from the time they are first registered by the application. So, it is good practice to reregister your agent before the expiration time is met to ensure the agent is not removed from the schedule. There are some cases where an automatic renewal may occur. Most notably, if the app tile is pinned to the phone start screen or is selected to display notifications on the lock screen and the agent makes a call to the Update method on the ShellTile class, which in turn will update the application’s tile or lock screen status, then its expiration time will be extended by two weeks.
When designing your app and its associated agent, keep in mind that there are large set of API calls that you simply cannot make from your background agent. Many of these included APIs access components that run in the foreground, such as accessing the camera, the clipboard, and the web browser, to name few. To view the complete list of unsupported API calls from within a scheduled agent, review the article “Unsupported APIs for background agents for Windows Phone” on the MSDN web site at http://msdn.microsoft.com/en-us/library/windowsphone/develop/hh202962(v=vs.105).aspx.
If you’ve taken a quick peek at that article, you will notice that the list also includes the background audio player as an unsupported API for scheduled agents. You are probably thinking to yourself, “Why wouldn’t a background audio player be supported in a background agent? Isn’t that the purpose?”
Although that seems like a valid point, this action is not appropriate within a Scheduled Task Agent. The purpose of this agent is to execute an action at timed intervals. Playing audio in the background just doesn’t fit in here, since the playback is initiated by the user rather than launched as a timed-based action. There is a separate type of agent you will create so that your app can play audio even while your app is not running in the foreground; however, that is beyond the scope of this chapter. We will discuss this topic in Chapter 7.
Now that we have discussed what you can’t do within a Scheduled Task Agent, let’s go over what you are able to do!
- HttpWebRequest: You can make web requests using the HttpWebRequest class, which will come in handy if your app needs to use web services to manage data, such as uploading or downloading data.
- Mutex: If your background agent needs to access files in isolated storage that are also used by the foreground app, then you will need to use a Mutex class to synchronize access to those files. This holds true for any other resources that are shared between the app and the background agent.
- GeoCoordinateWatcherAPI: You can use a background agent to retrieve the device’s geographic coordinates using the GeoCoordinateWatcher API. Note that the location is a cached value, which is updated every 15 minutes, so the user’s location may not always be 100 percent accurate. Keep this in mind when designing agents that depend on tracking the user’s location.
- ShellTile and ShellToast: As was hinted at during the introduction to this chapter, you can use a background agent to update your app tiles or raise a toast notification.
Since this recipe alludes to updating tiles from the agent, let’s walk through a simple example on how this can be accomplished.
Open the solution named InspireMe, located within the Chapter 5InspireMeStart directory. This application simply displays a list of quotes when launched. It also provides the user with the ability to pin and unpin a live tile to the device’s start screen. For now, when the tile is pinned to the start screen, the wide tile content is set to a random quote. Once this quote is set, it does not change.
![]() Note The pin/unpin application bar icons featured in the InspireMe app are not included as part of the icon set delivered with the Windows Phone SDK. These icons were downloaded from http://modernuiicons.com, which are offered as open source and are also available on GitHub.
Note The pin/unpin application bar icons featured in the InspireMe app are not included as part of the icon set delivered with the Windows Phone SDK. These icons were downloaded from http://modernuiicons.com, which are offered as open source and are also available on GitHub.
We will enhance the application so that the application’s wide tile content will update periodically with a random quote from the list when the tile is pinned to the start screen. We will need to create a Scheduled Task Agent project and make use of the PeriodicTask to accomplish this goal.
Building a Scheduled Task Agent
Add a new project to the solution. In the Add New Project dialog, select Windows Phone Scheduled Task Agent, as depicted in Figure 5-1. Name the project InspireMe.Agent.

Figure 5-1. Add New Project dialog with Windows Phone Scheduled Task Agent template highlighted
When the Scheduled Task Agent project loads, you will notice a single class is included in the file called ScheduledAgent, which derives from the ScheduledTaskAgent class. Open this file and take a look at the generated code that is provided by default. The method that we will be adding code within is the OnInvoke method. However, this will require some modifications to the InspireMe Windows Phone project, which we will get to shortly.
The first thing we will need to do is add a reference within our Scheduled Task Agent to the InspireMe.DataProvider project. The reason we have the Quotes list separated into a data provider class library is so we can access the Quotes list data from both the main app and the background agent. It is extremely important to note that this simplistic approach is being used because we are not modifying the list of quotes at any time.
If the application allowed the user to either add or remove quotes within the foreground app, it would be best to store the Quotes XML file within isolated storage, using the IsolatedStorageFile class. In addition to that, when accessing files from isolated storage from either the foreground app or the background agent, you must use a mutex to secure exclusive access to the file on only one thread. In this way, if one thread acquires a mutex, the second thread is suspended until the first thread releases the mutex. The benefit to this approach is to prevent data corruption in the event the Quotes XML file is being modified by the foreground app at a time when the background agent is also trying to access it. Isolated storage is out of the scope of this chapter, so we will keep our recipe focused on using a background agent with a static collection. We will be discussing IsolatedStorage in more detail in Chapter 11.
Within the InspireMe project, be sure to add a reference to the newly created InspireMe.Agent project. As well, we should ensure that an ExtendedTask element has been added to the application manifest for the background agent, within the Tasks collection. Open the file in Code View, and be sure that the ExtendedTask element is added to the Tasks collection, as shown in Listing 5-1.
Listing 5-1. ExtendedTask Element for the InspireMe.Agent
<Tasks>
   <DefaultTask Name="_default" NavigationPage="MainPage.xaml" />
   <ExtendedTask Name="InspireMeTask">
     <BackgroundServiceAgent Specifier="ScheduledTaskAgent" Name="InspireMeTask" Source="InspireMe.Agent" Type="InspireMe.Agent.ScheduledAgent" />
   </ExtendedTask>
</Tasks>
It is now time to add the code in the foreground app to register our background agent. We will need to use a couple of classes from the Microsoft.Phone.Scheduler namespace to accomplish this action: PeriodicTask and ScheduledActionService.
In the MainPage code-behind file, add a using directive to include the Microsoft.Phone.Scheduler namespace. Next, add a new private method called RegisterAgent. In this method, we will do the following:
- Create a PeriodicTask object, setting a name and description for the agent.
- Check to determine whether the PeriodicTask has already been registered with the ScheduledActionService by calling the Find method on the ScheduledActionService class and passing in the task name.
- If the scheduled action is already registered, we will remove it by calling the Remove method on the ScheduledActionService class, passing in the task name.
- We will then register the PeriodicTask with the operating system by calling the Add method on the ScheduledActionService class and passing in the PeriodicTask object.
If you are wondering why we are going through the effort to remove the task only to add it back into the schedule, recall the point in the beginning of this section when we talked about how background agents have an expiration date set to two weeks from the date when it was first registered. The action of removing this task and then adding it back in ensures that we push out the expiration date when the user runs the application. You are probably thinking “We update the application’s tile. Doesn’t that automatically renew the agent?”
It does, but only in the case when the user has pinned the app’s tile to the device’s start screen. This isn’t a guarantee, so the only way we can be sure to extend the life of our agent is to force a new registration of it whenever the user launches the application.
Finally, we will need to call the RegisterAgent method when the MainPage is loaded. For completeness, we should include exception handling. For this demonstration, we will simply display errors in a MessageBox, as depicted in Listing 5-2. Ideally, if you are publishing your app, you will want to fine-tune your error handling to log errors, notify the user, or provide the user the option to e-mail the exception details to your support e-mail address.
Listing 5-2. RegisterAgent Method in the MainPage Code-Behind
private void MainPage_Loaded(object sender, RoutedEventArgs e)
{
    RegisterAgent();
}

private void RegisterAgent()
{
    string taskName = "InspireMeTask";
    try
    {

        if (ScheduledActionService.Find(taskName) != null)
        {
            //if the agent exists, remove and then add it to ensure
            //the agent's schedule is updated to avoid expiration
            ScheduledActionService.Remove(taskName);
        }

        PeriodicTask periodicTask = new PeriodicTask(taskName);
        periodicTask.Description = "InspireMe task updates the tile with a new quote";
        ScheduledActionService.Add(periodicTask);
    }
    catch (InvalidOperationException exception)
    {
        MessageBox.Show(exception.Message);
    }
    catch (SchedulerServiceException schedulerException)
    {
        MessageBox.Show(schedulerException.Message);
    }
}
At this point, you can run the app in the emulator, but for testing purposes, it’s not efficient to wait for 30 minutes to see whether your agent runs as expected. For this reason, there is a method available on the ScheduledActionService class, called LaunchForTest, which you can use when debugging your scheduled agent. This is to be used only when in debug mode and should be removed before publishing the app. The LaunchForTest method accepts a task name and a TimeSpan value. The TimeSpan value indicates the amount of time that should pass between task executions. For testing purposes, a 30-second delay time works well; however, you can set it to any value you think suits your testing purposes best. Include the code shown in Listing 5-3, after the scheduled task is registered through the ScheduledActionService, in the RegisterAgent method in the MainPage code-behind.
Listing 5-3. Use the LaunchForTest Method When Debugging Scheduled Agents
//only use LaunchForTest when debugging
                //be sure to remove this code section before publishing your app
#if DEBUG
                ScheduledActionService.LaunchForTest(taskName, TimeSpan.FromSeconds(30));
#endif
Note that if we wanted to also register a resource-intensive agent, all we would need to do is create a ResourceIntensiveTask object and register the scheduled action with the operating system, in the same manner we created and registered the PeriodicTask.
ResourceIntensiveTask resourceIntensiveTask =
            new ResourceIntensiveTask("InspireMe RI Agent");
resourceIntensiveTask.Description = "Resource intensive agent for InspireMe";
ScheduledActionService.Add(resourceIntensiveTask);
Since we are simply updating a tile, a resource-intensive agent doesn’t make sense in this recipe. Just note that its implementation is similar to the periodic agent.
With everything in place in the foreground app, we need to revisit the Scheduled Task Agent project and include the necessary code to actually update the application’s tile with a random quote.
Within the ScheduledAgent class, add the using directive for the InspireMe.DataProvider namespace. Now it’s time to add code to the OnInvoke method. Notice how there is already a call to the NotifyComplete method. It is important to leave this code intact, because this is what notifies the operating system that the agent has completed the execution of the task’s actions on the current run.
Before the call to the NotifyComplete method, we will include a check to determine whether the current task that is being executed is in fact a PeriodicTask, and we will code the desired actions for the task. The scheduled task that is being invoked could be different in the scenario where the foreground app uses both a PeriodicTask and a ResourceIntensiveTask. In this instance, it’s not necessary to include this check here because we registered only one scheduled task, but it is something worth mentioning while we’re here.
Next, we will want to instantiate a new instance of the QuoteDataProvider class, which will load the quotes from the XML file into the QuoteList collection, making the quotes available within our agent. We will then use the Random class to generate a random number, which will represent the ID of the quote we will then add to the back of the app’s wide tile. We will pull the random quote from the collection using the magic of LINQ! This means we must add the using directive for the System.Linq namespace in this class.
Once we obtain the random quote from the collection, we will update the app’s tile by creating a new FlipTileData object and setting the WideBackContent property to the new quote. For good measure, we will also update the BackTitle property to display the date and time the tile was last updated. Our code should now look similar to Listing 5-4.
Listing 5-4. Include the Desired Code in the OnInvoke Method in the ScheduledTaskAgent Class
protected override void OnInvoke(ScheduledTask task)
{
    if (task is PeriodicTask)
    {
        QuoteDataProvider quoteProvider = new QuoteDataProvider();

        if (quoteProvider.QuoteList.Count() > 0)
        {
            FlipTileData newTileData = new FlipTileData()
            {
                //load a random quote from the quote data provider
                WideBackContent = quoteProvider.GetRandomQuote(),
                BackTitle = string.Format("Last Updated: {0}", DateTime.Now.ToString("MMM dd, yyyy h:mm tt"))
            };

            ShellTile appTile = ShellTile.ActiveTiles.FirstOrDefault(x => x.NavigationUri.ToString().Contains(mainPageUri));
            if (appTile != null)
            {
                appTile.Update(newTileData);
            }
        }
    }

    NotifyComplete();
}
We have all the code in place that is required to load quotes into a list in the main application and display random quotes on the backside of the app’s wide tile. One thing that is important to note here is that if you are developing an application for which you plan to support wide tiles, you will need to explicitly enable this setting in the application manifest, as shown in Figure 5-2. By default, the “Support for large tiles” option in the manifest is turned off.

Figure 5-2. Enable support for large tiles in your app
Another thing that is worthwhile to mention here is that although the Windows Phone project generates default tiles for you to use for each of the possible tile templates, it is good practice to get in the habit of creating your own tile images that are representative of the app’s purpose. Syncfusion provides a free tool for developers, called MetroStudio, which you can use to create your custom tile images. You can download this tool from www.syncfusion.com/downloads/metrostudio. This was the tool used to create the InspireMe tiles.
Testing the Agent in the Emulator
Now it is time to take the application for a test run. Launch the app in the emulator and notice the Quotes list displayed in the app’s main page. Tap the Pin application bar icon. If the tile was pinned successfully, you will automatically be taken to the start screen to view the newly pinned tile.
By default, the medium size tile is pinned to the start screen. Tap and hold the InspireMe tile to change sizes. The first size change will switch to the small tile size. The next size change will expand to the large, wide tile size, as shown in Figure 5-3.

Figure 5-3. InspireMe wide tile pinned to start screen
With the app launched and the tile pinned to the start screen, wait for the tile to flip to the backside, as illustrated in Figure 5-4. Notice the random quote that is displayed, along with the last updated date and time. Continue to monitor the start screen to watch the tile as it flips from back to front, and the quotes continue to change on a regular interval.
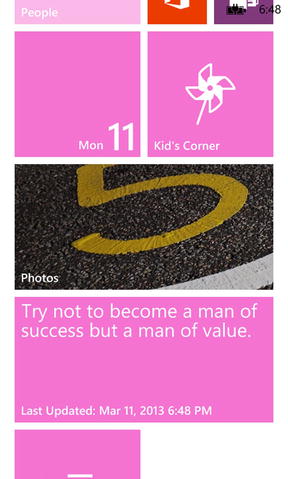
Figure 5-4. InspireMe wide tile: back content
Congratulations on creating your first scheduled agent for Windows Phone 8! We have packaged the complete solution, which includes the scheduled agent for this recipe, within the Chapter 5InspireMeFinished folder.
There was a lot of content to digest in this recipe, so take some time to sit back, relax, and enjoy this accomplishment. Although it is simple to create a scheduled agent for your app, there is a lot of thought and consideration that must be given to the design of the app, such as the purpose of the background agent, which background agents you will include, and the limitations of each agent.
5-2. Engage the User with a Toast (Notification)
Problem
You want to develop an app that will provide the user with a notification if there are any weather alerts in the area when the app is not running.
Solution
Create a Scheduled Task Agent project that registers a periodic task that will read from a weather feed and display a toast notification when one or more active weather alerts are discovered.
How It Works
In Recipe 5-1, we discussed in depth what a Scheduled Task Agent is, along with the two types of tasks you can register in an agent. The same concepts apply within this recipe. The only difference is that rather than performing a tile update, we will be creating a toast notification using the ShellToast class.
A toast notification displays in a colored band at the top of the screen for approximately 10 seconds. Its purpose is to notify users of an app-related event and can be used to provide deep linking into your app. This means that when the user taps the notification, it will launch your app and load a specific page, which can be a page other than the main screen. If a deep link is not configured for the toast notification, the app will still launch and load the main page by default. Note that the user may not always tap the notification, so do not rely on this behavior. The user can flick the toast to the right, which dismisses the notification. As well, the user may not see the notification in the short time it is displayed on the device screen. Keep this in mind when designing your app. You may want to queue any notifications that were missed and display them in an alternate way in your app if it makes sense to do so, such as a messaging app that distinguishes between old and new messages.
A toast notification can be triggered locally or through push notifications by a cloud-based service. For the purpose of this recipe, we will be focusing on raising local toast notifications through a background agent.
When creating a toast notification, you are able to configure the notification’s title, the message (or content), and a navigation URI to specify the page to load when the user taps the notification. Because of the limited space at the top of the screen for toast notifications, note the following character limitations:
- Title property: Approximately 40 characters, if Content is not set
- Content property: Approximately 47 characters, if Title is not set
- Title and Content combined: Approximately 41 characters
It is important to note the values you set for these properties will be truncated if the values extend beyond the limitations; therefore, it is best to keep your notifications concise. You will notice that the toast also displays a small version of your app icon, which is defined by the icon that is associated with your app and cannot be changed.
If your app is running at a time when a toast notification is to be triggered for your app, the notification will not display. To display any new toast notifications, you must ensure your app is not running in the foreground. This is important to keep in mind when we are testing later.
Now that you are familiar with the concepts of a toast notification for Windows Phone, let’s develop an agent so we can put it into action. Launch Visual Studio 2012, and open the WeatherAlerts solution in the Chapter 5WeatherAlerts folder. Add a new Windows Phone Scheduled Task Agent project to this solution called WeatherAlerts.Agent.
Similar to Recipe 5-1, we will need to add a reference to the application’s related data provider, which, in this case, is the WeatherAlerts.DataProvider project. As we discussed earlier, this approach is taken to enable code reuse between the main Windows Phone application and the scheduled agent. Before we make any modifications, open the AlertsDataProvider class to determine the method call that needs to be included in the background agent.
Notice that there is a public method called LoadData, which uses the OpenReadAsync method on the System.Net.WebClient class to retrieve the data from a URL that points to a weather site’s XML feed. This is the method that we will need to call from within the agent’s OnInvoke method.
Also notice that the OpenReadCompleted event, which receives the result of the data feed, raises another event, AlertsDownloaded. In this way, we can register this event handler within the Scheduled Task Agent so that the agent receives a notification from the data provider when the data has been downloaded from the XML data feed.
Creating the Toast Notification
Within the AlertsDownloaded event, we will create our toast notification by creating an instance of the ShellToast class and setting the Title, Content, and NavigationUri properties. To ensure the notification is displayed, we need to call the ShellToast.Show method. From here, we can also remove the event handler registration. Finally, we will move the NotifyComplete method call from the OnInvoke method to the AlertsDownloaded event. Refer to Listing 5-5 for the code that was added to the ScheduledAgent class.
Listing 5-5. Scheduled Task Agent for the WeatherAlerts App
AlertsDataProvider dataProvider = new AlertsDataProvider();
protected override void OnInvoke(ScheduledTask task)
{
    if (task is PeriodicTask)
    {
        dataProvider.LoadData();
    }
}

private void dataProvider_AlertsDownloaded(object sender, System.EventArgs e)
{
    if (dataProvider.WeatherAlerts.Count() > 0)
    {
        ShellToast toast = new ShellToast();
        toast.Title = "Weather Alert";
        toast.Content = dataProvider.WeatherAlerts.Count().ToString() + " active alert(s)";
        toast.NavigationUri = new System.Uri("/MainPage.xaml", System.UriKind.RelativeOrAbsolute);
        toast.Show();
    }

    dataProvider.AlertsDownloaded -= new AlertsDataProvider.EventHandler(dataProvider_AlertsDownloaded);

    NotifyComplete();
}
Next, we will need to return to the WeatherAlerts application and add a reference to the InspireMe.Agent project. We will also need to modify the MainPage code-behind file to register the agent when the page loads. Refer to Listing 5-2 in Recipe 5-1 to view an example of how to implement this in your MainPage code-behind.
Last but not least, we need to include the ExtendedTask definition in the application manifest. Refer to Listing 5-1 within Recipe 5-1 as the example to follow. Once that is in place, we can launch our app in the emulator to test it. Note that if there no active weather alerts from the feed provided at the time you run this app, you can alternatively replace it with a weather feed that suits your testing needs or just provide some fake data to force a toast notification to occur. You can make this change within the AlertsDataProvider class in the WeatherAlerts.DataProvider project.
Testing Toast Notifications in the Emulator
In launching the app in the emulator, the first thing you want to do is back out of the app and return to the start screen. At this point, it’s just a matter of waiting for the agent to run for the first time. If there are alerts that are active, you should see the toast notification depicted in Figure 5-5.

Figure 5-5. Toast notification displaying a count of active weather alerts
When the toast notification displays onscreen, click it with your mouse to launch the WeatherAlerts app and view the full details of any active alerts, as shown in Figure 5-6.
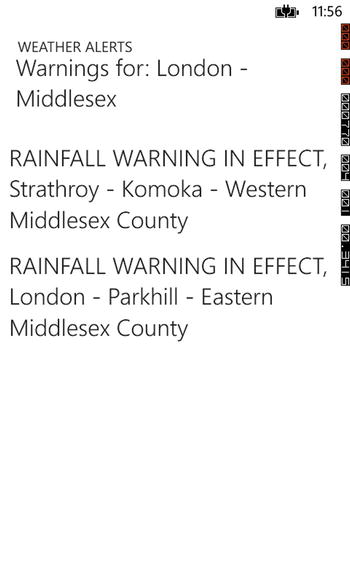
Figure 5-6. WeatherAlerts main page with alert details
That is all it takes to create local toast notifications in your app!
To view the source code for the complete solution, load the WeatherAlerts solution located within the Chapter 5WeatherAlertsFinished folder.
5-3. Schedule Tile Updates Without a Background Agent
Problem
You are creating a traffic app, and you want to update the app tile’s image with the most recent image of current traffic conditions at regular intervals. This feature should work even when the app is not running.
Solution
Schedule your tile image updates from within your app using the ShellTileSchedule class.
How It Works
The ShellTileSchedule class, from the Microsoft.Phone.Shell namespace, provides a mechanism to allow you to schedule updates of an app tile’s background image from within the application itself, without the need to create a Scheduled Task Agent. The schedule will remain active even when your app is not running. As well, you can choose to update the app tile on a recurring schedule or on a one-time basis. If you choose a recurring schedule, you can optionally configure the schedule to run a specific number of times or indefinitely. Refer to Table 5-1 for a list of these properties and information on how they are used.
Table 5-1. ShellTileSchedule Properties
| Property | Type | Details |
|---|---|---|
| Interval | UpdateInterval (enumerated value) | Use this property when creating a recurring schedule. Set its value to the options defined in the UpdateInterval enumeration. Possible values are EveryHour, EveryDay, EveryWeek, and EveryMonth. |
| MaxUpdateCount | Integer | Use this property when creating a recurring schedule and to limit the number of times that the schedule will run. This schedule will run indefinitely if a value is not set for this property or if the value is less than 1. |
| Recurrence | UpdateRecurrence (enumerated value) | Use this property to indicate whether the schedule will be executed only once or on a recurring basis. Set its value to the options defined in the UpdateRecurrence enumeration. Possible values are Onetime and Interval. |
| RemoteImageUri | Uri | Use this property to set the background of the tile to the image located at the specified URI. |
| StartTime | DateTime | Use this property to set the start time of the schedule. |
In looking at the ShellTileSchedule properties in Table 5-1, you can see that the background image is the only tile property you will be able to update, using the RemoteImageUri property. If you need to update additional tile content, you will need to create a Scheduled Task Agent, as described in Recipe 5-1, or implement push notifications.
Once you have a ShellTileSchedule object instantiated and configured, you can activate it by calling its Start method. To deactivate the schedule and stop the tile background image from updating, simply call the Stop method. Let’s walk through an example to see how this works.
At this point, you may be wondering where it is that we can include code to update the RemoteUriImage property on each schedule run. Well, there is no way to do this with a ShellTileSchedule object. If you need more control over your tile updates, you will need to create a Scheduled Task Agent. Now, your next thought may be, “Well, what’s the point of this when I can set the property only one time? How do I use this to update the tile to a new image?”
Ideally, the image will be one in which the URI will remain the same but the image is updated on a recurring basis on the web server that it is hosted on. This is useful for apps that want to display the most recent state of an image that changes often, such as weather maps or traffic images.
Now that we know what a ShellTileSchedule is and how to use it, let’s put it into practice for our sample traffic app. Launch Visual Studio 2012, and open the TrafficView solution located in the Chapter 5TrafficViewStart folder.
The TrafficView app leverages a few of the images from the current traffic views listed within the Traveller’s Portal on the Ontario Ministry of Transportation web site. These images are updated on the site every three to five minutes. Although we are able to run the schedule on only an hourly basis as the most frequent interval, we are guaranteed that the selected image will always reflect a new view when the schedule runs.
Run the application in the emulator to get a feel for how it currently works and to note the missing implementation, which we’ll be adding during this recipe walk-through.
When launched in the emulator, the main page of the TrafficView app will be displayed, as shown in Figure 5-7. Notice that it contains a selection list, an image depicting the current list selection, and a Pin button in the application bar. The purpose of the application is to select a view from the list and ultimately pin a tile that represents the selected view to the device start screen. The tile will be attached to a ShellTileSchedule object which will update the tile’s image on each schedule run. Once a tile has been pinned to the start screen, the app should allow the tile to be unpinned.

Figure 5-7. Initial launch of TrafficView
Currently, tapping the pin button in the application bar will simply raise a message to indicate that we still have work to do within this app to achieve the desired behavior. The TrafficViewModel class will be where the bulk of the code changes will need to be made.
Within the TrafficViewModel class, we will need to ensure the following actions are handled:
- Pin tile
- Create a new shell tile that will represent the selected view, using the FlipTileData object.
- Add, or update, the shell tile within the ShellTile.ActiveTiles collection. This is the action that will pin the tile to the start screen.
- Create the ShellTileSchedule object to update the tile every hour.
- Save the current app state to the application settings in isolated storage.
- Unpin tile
- Stop the ShellTileSchedule for the pinned tile.
- Remove the tile from the ShellTile.ActiveTiles collection, which in turn will remove the tile from the start screen.
- Save the current app state to the application settings in isolated storage.
Refer to Listing 5-6 to view the code required to pin a tile to the start screen, which will initiate a ShellTileSchedule. Note that the StartShellTileSchedule method sets the properties listed in Table 5-1 so that the tile will display the image at the specified URI of the selected item and update every hour. A call to the Start method is then made to trigger the schedule start.
Listing 5-6. TrafficViewModel Methods to Pin Tile and Create ShellTileSchedule
private const string mainPageUri = "/MainPage.xaml?state=pinned";
private ShellTileSchedule ugTileSchedule;

//current traffic view selected in the list on the Main Page
private TrafficItemViewModel currentTrafficView;
public TrafficItemViewModel CurrentTrafficView
{
    ...
}

//the traffic view that is pinned to the start screen
//returns null if a tile is not pinned
private TrafficItemViewModel pinnedTile;
public TrafficItemViewModel PinnedTile
{
    ...
}

public void PinTile()
{
    //update the pinned tile to the selected item
    //on the Main Page
    this.PinnedTile = this.CurrentTrafficView;

    FlipTileData tileData = new FlipTileData();
    tileData.Title = "";
    tileData.BackTitle = "Windsor Traffic View";

    //set the back tile content to indicate which traffic view is represented on the front tile
    tileData.BackContent = this.PinnedTile.Description;

    //if a traffic view tile has not yet been pinned to the start screen, create a new one
    //otherwise, update the existing tile with the new traffic view selection
    ShellTile scheduledTile = ShellTile.ActiveTiles.FirstOrDefault(x => x.NavigationUri.ToString().Contains(mainPageUri));
    if (scheduledTile == null)
    {
        ShellTile.Create(new Uri(mainPageUri, UriKind.Relative), tileData, false);
        scheduledTile = ShellTile.ActiveTiles.FirstOrDefault(x => x.NavigationUri.ToString().Contains(mainPageUri));
    }
    else
    {
        scheduledTile.Update(tileData);
    }

    //with the tile pinned to start, start the shell tile schedule
    StartShellTileSchedule(scheduledTile);

    //SaveAppState is a private method in the ViewModel
    //that saves the current view selection and pinned
    //tile info to IsolatedStorage.ApplicationSettings
    SaveAppState();

}

private void StartShellTileSchedule(ShellTile scheduledTile)
{
    ugTileSchedule = new ShellTileSchedule(scheduledTile);

    //set the schedule to update every hour, indefinitely,
    //or until the user chooses to stop the schedule
    ugTileSchedule.Recurrence = UpdateRecurrence.Interval;
    ugTileSchedule.Interval = UpdateInterval.EveryHour;
    ugTileSchedule.StartTime = DateTime.Now;
    ugTileSchedule.RemoteImageUri = App.ViewModel.CurrentTrafficView.ImageUri;

    //start the schedule
    ugTileSchedule.Start();
}
Furthermore, we need to add code to the ApplicationBarPin_Click event within the MainPage so that when the pin button is tapped, the PinTile method in the TrafficViewModel class is called to trigger the expected behavior.
private void ApplicationBarPin_Click(object sender, EventArgs e)
{
    App.ViewModel.PinTile();
    UpdateAppBar();
}
The UpdateAppBar method within the MainPage code-behind simply handles swapping out the pin/unpin application bar buttons accordingly.
The next thing that needs to be handled is the action of stopping an existing ShellTileSchedule and removing a pinned tile from the start screen, as shown in Listing 5-7.
Listing 5-7. TrafficViewModel Methods to Delete ShellTileSchedule and Unpin Tile
public void UnpinTile()
{
    if (this.PinnedTile != null)
    {
        //get the shell tile from the ActiveTiles collection
        ShellTile appTile = ShellTile.ActiveTiles
                .FirstOrDefault(x => x.NavigationUri.ToString().Contains(mainPageUri));

        //stop the shell tile schedule, and then unpin the tile
        StopShellTileSchedule(appTile);

        //remove the pinned tile from the start screen
        appTile.Delete();
    }

    //clear the pinned tile from the view model
    this.PinnedTile = null;

    //save app settings to reflect the change
    SaveAppState();
}

private void StopShellTileSchedule(ShellTile scheduledTile)
{
    if (scheduledTile != null)
    {
        //to stop a running schedule, we must attach to an existing schedule
        //to do that, we will need to recreate the schedule and start it,
        //if the schedule was started during a previous run of the application
        if (ugTileSchedule == null)
        {
            StartShellTileSchedule(scheduledTile);
        }

        ugTileSchedule.Stop();
    }
}
Additionally, we need to add code to the ApplicationBarUnpin_Click event within the MainPage so that when the unpin button is tapped, the UnpinTile method in the TrafficViewModel class is called to carry out the desired actions.
private void ApplicationBarPin_Click(object sender, EventArgs e)
{
    App.ViewModel.UnpinTile();
    UpdateAppBar();
}
The completed solution provided with this chapter source code, in the Chapter 5TrafficViewFinished folder, also contains methods to handle saving and loading app state from the IsolatedStorageSettings.ApplicationSettings collection.
Launch the project to view the fully functioning TrafficView application in action. On load, select a view from the list, and tap the pin button in the application bar. If the tile is pinned to the start screen successfully, you will be taken to the start screen automatically to view the pinned tile. The traffic view you selected should be reflected in the app tile, as shown in Figure 5-8.

Figure 5-8. TrafficView tile pinned to the start screen, whose image will update every hour by the ShellTileSchedule
Click the back button in the emulator to return to the application. Notice that the unpin button now appears, and a message is displayed at the bottom of the screen indicating that the current traffic view is pinned to the start screen. The selection list is also disabled and will become enabled only when the current image view’s tile is unpinned from the start screen, as shown in Figure 5-9.

Figure 5-9. TrafficView main page depicting current pinned tile state
This recipe demonstrated an approach to update the image on an application tile without using a background agent. However, as we have seen, it is extremely limited in comparison to using a Scheduled Task Agent, in that it allows you to update the tile’s image only by pointing to a predefined URI. It is expected that the image you specify in the URI is one that is updated on the web server in which it is hosted. The ShellTileSchedule object simply refreshes the image during each scheduled run.
It is also important to keep in mind that, just as with Scheduled Task Agents, should the ShellTileSchedule cause an exception or failure a number of times, its schedule will be canceled. When using this approach, you may want to consider forcing the start of the schedule each time the application is run, if it makes sense to do so in the context of your application.
5-4. Download Video Using a Background Transfer Service
Problem
You want to develop an app that allows you to download your favorite videos from the Channel9 MSDN site.
Solution
Use the Background Transfer Service to download the video using an HTTP file transfer request.
How It Works
The background transfer APIs, available in the Microsoft.Phone.BackgroundTransfer namespace, allows an application to queue up multiple HTTP or HTTPS file transfer requests that will continue to be performed when the app is no longer running in the foreground. Both file download and upload are supported.
The BackgroundTransferRequest class will be used to define a file transfer request. It also includes the TransferStatusChanged and TransferProgressChanged events, which you can register in your application to monitor the status of existing file transfers and current transfer progress state, respectively.
The BackgroundTransferService class allows you to add these transfer requests to a queue so that the requests will be executed in the background. The file transfers will continue to execute even when the application is not running in the foreground.
There are a few things to keep in mind when working with background transfers for Windows Phone.
- Background transfers must include a local file path.
- All download requests must specify a download location within the /shared/transfers root directory in isolated storage. Once the file has been downloaded, you can move it to another location in isolated storage, if you so choose.
- Maximum size of file transfers are as follows:
- 20MB when downloading files over a cellular connection
- 100MB when downloading files over a Wi-Fi connection when the device is not plugged into a power source
- 5MB when uploading a file
- Up to five transfer requests are allowed for a single application.
- Up to 500 transfer request are allowed across all applications.
- Only two transfer requests may run concurrently at any given time across all applications.
![]() Note When a background transfer request has completed, it is not automatically removed from the background transfer service. You must call the service’s Remove method, passing in the completed request object, to clear the request from the service queue so that it can accept new transfer requests.
Note When a background transfer request has completed, it is not automatically removed from the background transfer service. You must call the service’s Remove method, passing in the completed request object, to clear the request from the service queue so that it can accept new transfer requests.
Designing the Background Transfer Service
To understand how background transfer requests work, we will create an application that will allow the user to queue up a list of videos for download. Launch Visual Studio 2012, and create a new Windows Phone Databound App project, named DownloadMe. Since we have chosen a databound app template, we have the basic shell of our ViewModels already created for us, along with some basic data binding already wired up for us in the MainPage. We will be making quite a few modifications, but this is a good starting point.
The purpose of this app is to allow the user to do the following:
- Select videos to download from a static media list of our choosing
- Ensure the download completes even if the user exits the app
- Track the video download progress
- Enable the user to play the video once it is downloaded
The MainPage will be modified slightly to display more information about the media items available for download. As well, we will include a download button and a check box next to each media item to allow the user to selectively download one or more items. Furthermore, when the download completes, we want the user to be able to view any of the video files that downloaded.
In the LongListSelector control, we will modify the DataTemplate to include the check box for each item in the list and some additional TextBlock controls. The TextBlock controls will be used to display the download location of the file and a progress message only while the item is being downloaded. We will also display a button to allow the user to play the file once it has been downloaded. The markup for the LongListSelector should now be similar to the markup in Listing 5-8.
Listing 5-8. LongListSelector Markup Modifications in the MainPage.xaml File
    <phone:LongListSelector.ItemTemplate>
        <DataTemplate>
            <Grid>
                <Grid.ColumnDefinitions>
                    <ColumnDefinition Width="Auto" />
                    <ColumnDefinition Width="*" />
                </Grid.ColumnDefinitions>
                <Grid.RowDefinitions>
                    <RowDefinition />
                    <RowDefinition />
                    <RowDefinition />
                </Grid.RowDefinitions>
               <CheckBox IsChecked="{Binding ItemSelected, Mode=TwoWay}"
                         Grid.RowSpan="2" />
                <Button Content="Play"
                        Height="80"
                        Grid.RowSpan="2" />
               <TextBlock Grid.Column="1" Grid.Row="0"
                          Text="{Binding Title}" TextWrapping="Wrap"
                          Style="{StaticResource PhoneTextLargeStyle}"/>
              <TextBlock Grid.Column="1" Grid.Row="1"
                         Text="{Binding Speaker}" TextWrapping="Wrap"
                         Style="{StaticResource PhoneTextSubtleStyle}"/>
                <TextBlock Grid.Column="1" Grid.Row="2"
                         Text="{Binding LocalUri}" TextWrapping="Wrap"
                         Style="{StaticResource PhoneTextSubtleStyle}"/>
                <TextBlock Grid.Column="1" Grid.Row="2"
                         Text="{Binding DownloadProgress}" TextWrapping="Wrap"
                         Style="{StaticResource PhoneTextSubtleStyle}"/>
            </Grid>
        </DataTemplate>
    </phone:LongListSelector.ItemTemplate>
</phone:LongListSelector>
You may have noticed that we have both the check box and button elements in the same grid row and column location. We plan on showing the check box only when a file has not been selected for download yet. Once the file has been downloaded, we will hide this element and display the button instead. To control the visibility of these elements, we need to use a Converter class.
Add a new class to the project, and name it VisibilityConverter. Modify the class to implement the IValueConverter interface. The Converter value that will be passed in will be the ItemDownloaded property for a single media item. If true, the button should be visible, and the check box will be hidden.
public object Convert(object value, Type targetType, object parameter, CultureInfo culture)
{
    bool visibility = (bool)value;
    if (parameter.Equals("checkbox"))
    {
        visibility = !visibility;
    }

    return visibility ? Visibility.Visible : Visibility.Collapsed;
}
We will need to add the newly created converter as a resource in the MainPage markup.
        xmlns:local="clr-namespace:DownloadMe"
    ....
        <Grid.Resources>
            <local:VisibilityConverter x:Key="buttonVisibilityConverter" />        </Grid.Resources>
With that in place, we can now modify our elements to use the new converter to determine which element is displayed based on whether the media item was downloaded. As well, we will include the DownloadUrl and LocalUri values of the item in the Tag properties of the Checkbox and Button, respectively. We will be using these values later to determine the download location of each selected item and to indicate which file to launch when the play button is tapped. On that note, we should also wire up the Tap event handler for the button, because we will be coding for it shortly.
<CheckBox IsChecked="{Binding ItemSelected, Mode=TwoWay}"
          Tag="{Binding DownloadUrl}" Grid.RowSpan="2"
          Visibility="{Binding ItemDownloaded, Converter={StaticResource buttonVisibilityConverter}, ConverterParameter=checkbox}"/>
<Button Content="Play"
        Height="80"
        Tap="PlayButton_Tap_1"
        Tag="{Binding LocalUri}"
        Grid.RowSpan="2"
        Visibility="{Binding ItemDownloaded, Converter={StaticResource buttonVisibilityConverter}, ConverterParameter=button}"/>
Finally, we will add a button in the ContentPanel to appear below the LongListSelector, which will be used to launch the download of any selected media items.
<Button Content="download selected videos" Grid.Row="1" Tap="Button_Tap_1" />
Now, we can move along to the MainViewModel class. In the LoadData method, we will include a set list of Channel9 videos to download.
public void LoadData()
{
    this.Items.Add(new ItemViewModel()
        {
            ID = "1",
            Title = "Building Windows Phone Apps",
            Speaker = "Lori Lalonde",
            DownloadUrl = "http://media.ch9.ms/ch9/a2ec/8673d554-4992-48d4-80e7-b9acdda4a2ec/DEVC3.wmv"
        });

    //add a few more items here
        ...

    this.IsDataLoaded = true;
}
The complete list of items that is used for this recipe is available in the MainViewModel class within the project that is packaged with this book, in the Chapter 5DownloadMe folder.
Handling Background Transfer Requests
The next method that needs to be added to the MainViewModel class is important, because this will be the method that creates the background transfer requests based on the media items that are selected by the user. We will create a method called DownloadSelectedItems. The method will iterate through the list of selected media items to create a background transfer request for each item and add the request to the Background Transfer Service. We will also register the TransferProgressChanged and TransferStatusChanged events on each request so that we can display the download progress in the UI and so we can monitor the status of each download request.
There is an additional method called ReinitTransferRequests that should be called when the application is reactivated or relaunched after download requests for one or more media files have been started. The purpose of this method is to rewire both transfer events on each active request so that the download progress and status are received by the application when it is relaunched. Refer to Listing 5-9 to see the resulting code.
Listing 5-9. Register Each Download Request and Monitor Its Download Progress and Status
public void DownloadSelectedItems()
{
    List<ItemViewModel> selectedItems = this.Items.Where(i => i.ItemSelected).ToList();

    _downloadsInProgress = selectedItems.Count;

    //register a background request for each media item separately
    foreach (ItemViewModel item in selectedItems)
    {
        Uri videoUri = new Uri(item.DownloadUrl, UriKind.Absolute);
        Uri downloadLocationUri = new Uri("shared/transfers/" + videoUri.Segments.Last(), UriKind.RelativeOrAbsolute);

        //add the request for the selected item to the service if it has not already been added
        if (BackgroundTransferService.Requests.Where(r => r.RequestUri == videoUri).FirstOrDefault() == null)
        {
            BackgroundTransferRequest request = new BackgroundTransferRequest(videoUri, downloadLocationUri);
            request.TransferPreferences = TransferPreferences.AllowCellularAndBattery;

            //register the background request with the operating system
            BackgroundTransferService.Add(request);

            item.LocalUri = "";
            item.DownloadProgress = "downloading video...";

            //register events for each request to monitor download progress and status
            request.TransferProgressChanged += new EventHandler<BackgroundTransferEventArgs>(request_TransferProgressChanged);
            request.TransferStatusChanged += new EventHandler<BackgroundTransferEventArgs>(request_TransferStatusChanged);
        }
    }

    SaveToIsolatedStorage();
}

void request_TransferProgressChanged(object sender, BackgroundTransferEventArgs e)
{
    //calculate the progress percentage so that we can display it in the UI
    double progress = (e.Request.BytesReceived * 100) / e.Request.TotalBytesToReceive;

    //get the current item from the collection that is being downloaded by this request
    //this can be determined by matching the item's DownloadUrl to the RequestUri
    ItemViewModel currentItem = this.Items.Where(i => i.DownloadUrl == e.Request.RequestUri.AbsoluteUri).FirstOrDefault();
    if (currentItem != null)
    {
        //update the DownloadProgress property so that it is reflected in the control that it is bound to in the UI
        currentItem.DownloadProgress = string.Format("download progress: {0}%", progress.ToString());
    }
}

void request_TransferStatusChanged(object sender, BackgroundTransferEventArgs e)
{
    BackgroundTransferRequest currentRequest = e.Request;
    if (currentRequest.TransferStatus == TransferStatus.Completed)
    {
        TransferCompleted(currentRequest);
    }
}

private void TransferCompleted(BackgroundTransferRequest currentRequest)
{
    //get the current item from the collection that is being downloaded by this request
    //this can be determined by matching the item's DownloadUrl to the RequestUri
    ItemViewModel currentItem = this.Items.Where(i => i.DownloadUrl == currentRequest.RequestUri.AbsoluteUri).FirstOrDefault();

    if (currentItem != null)
    {
        if (currentRequest.TransferError != null)
        {
            //update the DownloadProgress to indicate the download failed and include
            //the error message received in the TransferError object on the request
            currentItem.DownloadProgress = "download failed: " + currentRequest.TransferError.Message;
        }
        else
        {
            currentItem.DownloadProgress = "";
            currentItem.ItemDownloaded = true;

            //format the download location Uri to use forward slashes such that when
            //the user attempts to play the media files in the UI, the file system location is recognized
            string[] downloadUri = currentRequest.DownloadLocation.OriginalString.Split(new char[] { '' }, StringSplitOptions.RemoveEmptyEntries);
            currentItem.LocalUri = string.Join("/", downloadUri);
            currentItem.ItemSelected = false;
        }
    }

    //unregister the events from the request
    currentRequest.TransferProgressChanged -= request_TransferProgressChanged;
    currentRequest.TransferStatusChanged -= request_TransferStatusChanged;

    //remove the request from the BackgroundTransferService
    BackgroundTransferService.Remove(currentRequest);
    _downloadsInProgress -= 1;

    //if all downloads have completed, updated the current state of the Items collection in IsolatedStorage
    if (_downloadsInProgress == 0)
    {
        SaveToIsolatedStorage();
    }
}

public void SaveToIsolatedStorage()
{
    if (IsolatedStorageSettings.ApplicationSettings.Contains("Items"))
    {
        IsolatedStorageSettings.ApplicationSettings.Remove("Items");
    }

    IsolatedStorageSettings.ApplicationSettings.Add("Items", this.Items);
    IsolatedStorageSettings.ApplicationSettings.Save();
}

public void ReinitTransferRequests()
{
    foreach (BackgroundTransferRequest request in BackgroundTransferService.Requests)
    {
        if (request.TransferStatus == TransferStatus.Completed)
        {
            //if a queued up request has completed when the app was not running
            //be sure to reflect the completed state for the item in the collection
            TransferCompleted(request);
        }
        else
        {
            //if we have active requests in the BackgroundTransferService, rewire the events
            request.TransferProgressChanged += new EventHandler<BackgroundTransferEventArgs>(request_TransferProgressChanged);
            request.TransferStatusChanged += new EventHandler<BackgroundTransferEventArgs>(request_TransferStatusChanged);
        }

    }
}
Last but not least, we need to include the code for the button Tap events for both the download and play buttons. As you can see in Listing 5-10, the code required in the MainPage is minimal.
Listing 5-10. Button Event Handlers to Handle Download and Playback of Media Items
private void Button_Tap_1(object sender, System.Windows.Input.GestureEventArgs e)
{
    App.ViewModel.DownloadSelectedItems();
}

private void PlayButton_Tap_1(object sender, System.Windows.Input.GestureEventArgs e)
{
    Button btn = (Button)sender;

    //the file location is stored in the Tag of list item's play button
    if (btn.Tag != null && btn.Tag.ToString() != "")
    {
        string fileLocation = btn.Tag.ToString();
        //use IsolatedStorageFile to check the file location to be sure the file exists
        //before attempting to launch the video
        IsolatedStorageFile isoFile = IsolatedStorageFile.GetUserStoreForApplication();
        if (isoFile.FileExists(fileLocation))
        {
            Uri videoUri = new Uri(fileLocation, UriKind.RelativeOrAbsolute);

            try
            {
                MediaPlayerLauncher mediaPlayerLauncher = new MediaPlayerLauncher()
                {
                    Media = videoUri,
                    Location = MediaLocationType.Data,
                    Orientation =  MediaPlayerOrientation.Landscape,
                    Controls = MediaPlaybackControls.All
                };

                mediaPlayerLauncher.Show();
            }
            catch (Exception ex)
            {
                MessageBox.Show(ex.Message);
            }
         }
      }
   }
Finally, modify the LoadData method in the MainViewModel to include a check for any saved data in IsolatedStorage. If the Items collection is found in the ApplicationSettings collection, then load the saved collection. Otherwise, create a new collection using our set media item list.
if (IsolatedStorageSettings.ApplicationSettings.Contains("Items"))
{
    this.Items = IsolatedStorageSettings.ApplicationSettings["Items"] as ObservableCollection<ItemViewModel>;

    ReinitTransferRequests();
}
else
{
    //first time launching the app, so add the default list of media items to the Items collection
         ...
}
Testing the Background Transfer Service
Launch the application in the emulator to test. When the application loads, select one or more media items for download and tap the download button. Notice that the download progress message updates as each item is downloaded. Exit from the app before the download completes. Wait a few seconds, relaunch the application, and notice how the current state is reflected in the UI. Also note that the download progress continues to update. This occurs because we rewired the events on the existing requests when the application was reloaded.
Once a media item has successfully been downloaded, select the play button for the downloaded item to launch the video within the Media Player on the device.
5-5. Schedule Reminders Within Your App
Problem
You want to develop an app that allows a user to track their upcoming bill payments, which will raise a reminder one day before the next bill is due.
Solution
Use the ScheduledActionService within your app with a scheduled notification that will serve as a reminder of the upcoming bill.
How It Works
Alarms and reminders for Windows Phone are the two types of scheduled notification you can use to create local notifications that will display at a specified time. Scheduled notifications are displayed in a pop-up dialog at the top of the device screen and provide options for the user to dismiss the notification or have the notification launch again at a later time. This is the same dialog that you will see when setting reminders for appointments that are added to the device’s calendar or setting an alarm through the Alarms app. A single application may register up to 50 alarms or reminders at any given time.
Alarms and reminders both inherit from the ScheduledAction class, so they contain many of the same properties, with the following exceptions:
- Alarms can specify a URI that points to the location of a sound file that will be played when the notification is launched. Reminders do not have this option. If an invalid URI is specified, an exception will be thrown.
- Reminders can include a navigation URI that will provide deep linking to a page in your app so that when the reminder is tapped on an area outside of the snooze and dismiss action buttons, the application will launch and load the specified page. Alarms do not have that option.
To demonstrate the concept of how a scheduled notification is used within an application, we will create a new Windows Phone Databound app in Visual Studio 2012, named RemindMe. We will design the application so that the MainPage displays a list of bills using the LongListSelector control. When a single bill is selected in the list, the details page of the bill will be displayed.
Within the Details page, add controls to the page that will allow the user to enter the bill amount and due date. Also, we will need to add a check box to allow the user to turn on/off reminders for each bill. When a reminder is activated for a bill, we will do the following:
- Set a title and display message for the reminder by setting the Title and Content properties, respectively.
- Configure the date/time on which the reminder’s schedule will begin by setting the BeginTime property.
- Configure the reminder to launch one day before the bill’s due date by setting the ExpirationTime property to that date/time value.
- Configure the reminder’s NavigationURI property to the Details page, including the bill’s ID in the query string of the URI. This will ensure the details page is loaded with the relevant bill’s details.
- Add the reminder to the ScheduledActionService.
- Furthermore, when the user chooses to turn off the reminder for a bill, we will remove the existing reminder from the ScheduledActionService.
- If you recall the project we developed in Recipe 5-1, we used the ScheduledActionService to register periodic tasks in the background agent for an application. The ScheduledActionService can also be used locally within an application to register scheduled notifications.
- The code that contains the work to create our reminder, add the reminder to the service, and remove it from the service will be handled in the application’s MainViewModel class and is depicted in Listing 5-11.
Listing 5-11. SetNotification in the MainViewModel Class, Which Handles the Creation, Scheduling, and Unscheduling of the Reminder
public void SetNotification(ItemViewModel item)
{
    bool removeFromSchedule = (item.DueDate.Subtract(DateTime.Now).Days < 0);
    string reminderName = item.Description + " reminder";
    string notificationMessage = string.Format("Amount due: ${0}. Due by: {1}", item.AmountDue, item.DueDate.ToShortDateString());

    if (item.ShowReminder && !removeFromSchedule)
    {
        Reminder reminder = new Reminder(reminderName);
        reminder.Title = reminderName;
        reminder.BeginTime = DateTime.Now;
        reminder.ExpirationTime = item.DueDate;
        reminder.RecurrenceType = RecurrenceInterval.Daily;
        reminder.Content = notificationMessage;
        reminder.NavigationUri = new Uri(string.Format("/DetailsPage.xaml?selectedItem={0}", item.ID), UriKind.Relative);
        try
        {
            if (ScheduledActionService.Find(reminderName) != null)
            {
                ScheduledActionService.Remove(reminderName);
            }

            ScheduledActionService.Add(reminder);
        }
        catch (InvalidOperationException ex)
        {
            MessageBox.Show(reminderName + " Error: " + ex.Message);
        }
    }
    else
    {
        item.ShowReminder = false;
        ScheduledActionService.Remove(reminderName);
    }
}
In the Details page, we will include a Save button in the application bar. When the button is tapped, the SetNotifications method will be called, which will handle the management of the reminder scheduled action. In this way, when a reminder is set for an item, the scheduled notification will be created and added to the ScheduledActionService. Alternatively, if the reminder is unchecked on the item, the scheduled notification will be removed from the ScheduledActionService.
private void ApplicationBarIconButton_Click_1(object sender, EventArgs e)
{
    ApplicationBarIconButton btn = sender as ApplicationBarIconButton;
    App.ViewModel.SetNotification((ItemViewModel)DataContext);
    NavigationService.GoBack();
}
At this point, we can run the application for testing in the emulator. The sample project for this recipe will display a static list of bills with default data displayed. Selecting a bill in the list will load the Details page, as shown in Figure 5-10.
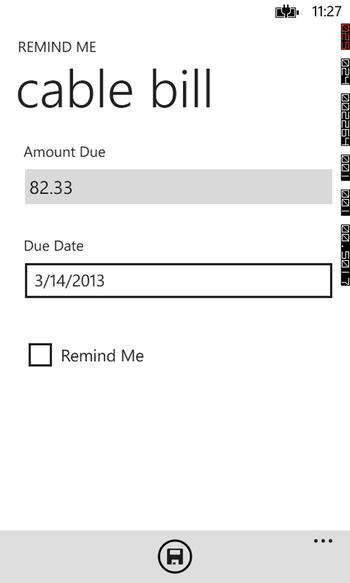
Figure 5-10. Details page
Tap the Remind Me check box to schedule a reminder for this bill, set the due date to one day ahead, and tap the Save button. Tap the Back button in the emulator to return to the device start screen. Wait a brief period until the reminder displays, as shown in Figure 5-11.

Figure 5-11. Reminder notification displayed as expected for the selected bill
As demonstrated in this recipe, managing scheduled notifications for your application is quite easy when leveraging the built-in Alarm and Reminders object and using the ScheduledActionService class to add, or remove, these notifications.