
![]()
Without the ability to store and retrieve data, many Windows Phone applications would serve a limited purpose. Most real-world apps need to store and retrieve data to increase their usefulness and add appeal to the intended user. The Windows Phone 8 SDK provides APIs that allow developers to create files and folders, access the phone’s external storage, store data in a local database, and encrypt sensitive data that is stored on the device.
In this chapter, we will go over the following recipes:
- 11-1. Read from and Write to a Local Text File
- 11-2. Read Data from an SD Card
- 11-3. Store and Retrieve Data from a Local Database
- 11-4. Encrypt Data Using the Data Protection API
- 11-5. Store Application Settings in Isolated Storage
11-1. Read from and Write Data to a Local File
Solution
Utilize the StorageFolder and StorageFile classes to perform file and folder management.
How It Works
The StorageFolder and StorageFile classes, which belong to the Windows.Phone.Storage namespace, provide methods for file and folder management within a Windows Phone application. The StorageFile class represents a local file and contains information about the file and its content. It also contains methods that provide for further file manipulation.
The StorageFolder class can be used to read from and write to a local file. This class also contains methods to obtain the list of files or subfolders within a local folder, as well as to create, rename, or delete folders. Table 11-1 describes the methods available in the StorageFolder class related to file and folder management. This is not the complete list of methods that are exposed in this class. Rather, we have listed the methods that are relevant for the purpose of this topic.
Table 11-1. Folder and File Management Methods in the StorageFolder Class
| Method | Description |
|---|---|
| CreateFileAsync(string desiredName, CreationCollisionOptions options) | Creates or updates a file in the local storage folder. CreationCollisionOptions is an enumerated value that specifies what to do if a file with the desired name already exists. Options include FailIfExists, GenerateUniqueName, OpenIfExists, and ReplaceExisting. Returns a StorageFile object if successful. |
| CreateFolderAsync(string desiredName, CreationCollisionOptions options) | Creates or updates a subfolder in the local storage folder, using the name that is passed into the method. The action that takes place depends on the CreationCollisionOptions value, in the same way that is described for CreateFileAsync. Returns a StorageFolder object if successful. |
| DeleteAsync(StorageDeleteOption option) | Deletes the local storage folder or filegroup. StorageDeleteOption indicates whether the folder/filegroup is a permanent delete. Options include Default and PermanentDelete. This parameter is optional. No value is returned when the method completes. |
| GetFileAsync(string name) | Gets a single file from the local storage folder that matches the name passed into the method. Returns a StorageFile object if a file exists in the local folder with the name indicated. |
| GetFilesAsync | Gets a collection of files from the local storage folder. Returns a read-only collection of StorageFile objects if the local folder contains files. |
| GetFolderAsync(string name) | Gets a single subfolder from the local storage folder that matches the name passed into the method. Returns a StorageFolder object if a subfolder exists in the local folder with the name indicated. |
| GetFoldersAsync | Gets a collection of subfolders from the local storage folder. Returns a read-only collection of StorageFolder objects if the local folder contains subfolders. |
| GetItemAsync | Gets a single file or folder that matches the name passed into the method. Returns an IStorageItem object if a file or subfolder exists with the name indicated. Use the IsOfTypeOf method to determine whether the item is a StorageFile or StorageFolder. |
| GetItemsAsync | Gets a collection of storage items from the local storage folder. Returns a read-only list of IStorageItem objects if the local folder contains files or subfolders. Use the IsOfTypeOf method on each item in the collection to determine whether the item is a StorageFile or StorageFolder. |
| IsOfType(StorageItemTypes type) | Determines whether the current object is a valid storage item object. StorageItemTypes is an enumerated value that determines the object type to match the current storage item against. Options include File, Folder, and None. Returns a boolean value indicating whether the current item matches the storage item type enumerated value. |
| OpenStreamForReadAsync(string relativePath) | Retrieves a Stream object that can be used to read data from a file. The desired file name must be specified in the relativePath parameter. |
| OpenStreamForWriteAsync(string relativePath, CreationCollisionOptions option) | Retrieves a Stream object that can be used to write data to a file. The desired file name must be specified in the relativePath parameter. The action that takes place depends on the CreationCollisionOptions value, in the same way that is described for CreateFileAsync. |
| RenameAsync(string desiredName, NameCollisionOption option) | Renames the current local storage folder with the name passed into the method. Optionally, specify a NameCollisionOption to indicate the action to take if a folder with the desired name already exists. NameCollisionOption is an enumerated value with the following options: FailIfExists, GenerateUniqueName, and ReplaceExisting. |
To be able to perform any type of file or folder management, we first need to obtain a handle to a local storage folder. This can be accomplished by accessing the LocalFolder property for the current application data store instance.
StorageFolder folder = ApplicationData.Current.LocalFolder;
With a handle to the root folder of the current app’s data store, we can now perform various file and folder management tasks using the methods that are exposed on the StorageFolder object. Since we are interested in reading from a file, we will need to call the OpenStreamForReadAsync method to obtain a stream of the file data. We will then use the StreamReader class, from the System.IO namespace, to read the file contents, as shown in Listing 11-1.
Listing 11-1. Read Data from a Specified File Using OpenStreamReadForAsync in Conjunction with StreamReader
public async Task<bool> LoadFile(string fileName)
{
    this.FileName = fileName;

    //Get the local folder for the current application
    StorageFolder local = Windows.Storage.ApplicationData.Current.LocalFolder;

    if (local != null)
    {
        try
        {
            //Load the specified file
            Stream file = await local.OpenStreamForReadAsync(this.FileName);

            //Read the entire file into the FileText property
            using (StreamReader streamReader = new StreamReader(file))
            {
                FileText = streamReader.ReadToEnd();
            }

            file.Close();
        }
        catch (FileNotFoundException ex)
        {
            //file doesn't exist
            return false;
        }
    }

    return true;
}
Similarly, to write data to a text file, we can use the CreateFileAsync method on the StorageFolder object. However, a simple call to this method will not write the data to the file. It will simply create an empty file. We will need to call the OpenStreamForWriteAsync method to obtain a stream that we can use to write the contents to the file. Refer to Listing 11-2 for an example of how this is accomplished.
Listing 11-2. Create a File and Write Data to It Using CreateFileAsync and the Stream Class
public async Task<bool> SaveFile()
{
    try
    {
        //Convert the file text to a byte array
        byte[] fileBytes = Encoding.UTF8.GetBytes(FileText.ToCharArray());

        //Get the local folder for the current application
        StorageFolder local = ApplicationData.Current.LocalFolder;

        if (local != null)
        {
            //Create a new file, or update file if one already exists with the same name
            StorageFile file = await local.CreateFileAsync(this.FileName, CreationCollisionOption.ReplaceExisting);

            //Write the file contents
            Stream fileStream = await file.OpenStreamForWriteAsync();
            fileStream.Write(fileBytes, 0, fileBytes.Length);
            fileStream.Flush();
            fileStream.Close();
        }
    }
    catch (Exception ex)
    {
        return false;
    }

    return true;
}
The asynchronous methods within the StorageFolder and StorageFile classes are “awaitable.” As such, it is necessary to execute these calls using the async and await keywords. If you are not familiar with how to implement asynchronous calls using the async and await keywords in C#, refer to the article “Asynchronous Programming with Async and Await” on the MSDN site at http://msdn.microsoft.com/en-ca/library/vstudio/hh191443.aspx.
To view this recipe’s code in its entirety, open the project named FileManagement within the directory Chapter 11FileManagement. The file management code can be found in the FileViewModel class. The app contains an additional bonus feature, which lists the files that currently exist in the app’s local folder. This list was obtained by calling the GetFilesAsync method on the StorageFolder object, as shown in Listing 11-3.
Listing 11-3. Obtain the List of Files That Exist in the Local Storage Folder
public ObservableCollection<StorageFile> Files { get; set; }

public async Task GetFiles()
{
     StorageFolder folder = ApplicationData.Current.LocalFolder;
     IReadOnlyCollection<StorageFile> files = await folder.GetFilesAsync();
     Files = new ObservableCollection<StorageFile>(files);
}
Run the app in the emulator to see the file and folder management methods put into action. When the application first loads, you will notice a single button, called “create new file,” as shown in Figure 11-1.

Figure 11-1. FileManagement app main screen
Tap the button to create a new text file that will be stored in a folder within the application’s local data store. Enter the desired text, specify a file name, and tap the Save button in the application bar. Do this a few times, and notice that the files display within a list on the main screen, as illustrated in Figure 11-2.
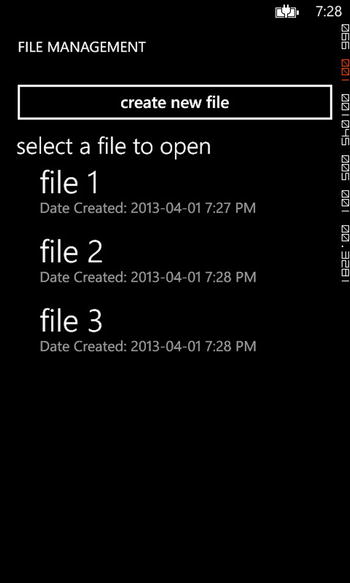
Figure 11-2. The files list is obtained through the GetFilesAsync method call
Tap a file name in the list to view or update the file’s text, as shown in Figure 11-3.
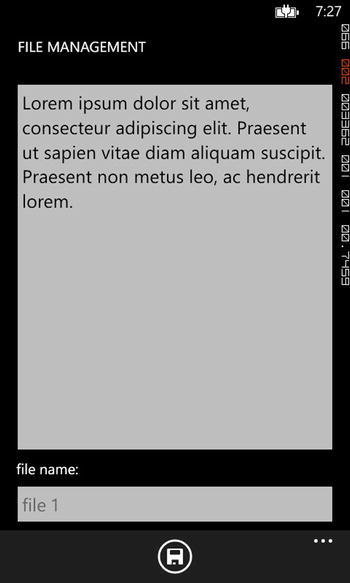
Figure 11-3. View or update the content of an existing file
When the save is initiated, the app will execute the same method call that was used when creating a new file. The current file will be overwritten through a call to the CreateFileAsync method, which will overwrite the file, since we passed in the ReplaceExistingFile creation collision option to the method. This will result in an overwrite of the existing file in the event that a file with the same name already exists.
As we demonstrated in this recipe, file access is simplified for developers thanks to the Windows.Phone.Storage API, which allows us to incorporate powerful file and folder management capabilities within a Windows Phone app using only a few lines of code.
11-2. Read Data from an SD Card
Problem
You want to develop an app that will allow the user to read data from an external media card.
Solution
Leverage the set of ExternalStorage classes, available within the Microsoft.Phone.Storage APIs.
How It Works
The Microsoft.Phone.Storage namespace includes the following set of classes that can be used to access and read from external storage:
- ExternalStorage: A static class that is used to obtain a handle to an external media card, if one is available on the device. It contains only a single method, GetExternalStorageDevicesAsync, which returns an ExternalStorageDevice object.
- ExternalStorageDevice: Exposes a property, RootFolder, which provides a handle to the root folder on the SD media card, which is an ExternalStorageFolder object.
- External StorageFolder: Used to obtain the list of files or subfolders within a folder on the media card. Table 11-2 lists the methods available in the ExternalStorageFolder class related to file and folder retrieval.
- External StorageFile: Used to open a stream to read the contents of the current file through the method OpenForReadAsync.
Table 11-2. File and Folder Retrieval Methods in the ExternalStorageFolder Class
| Method | Description |
|---|---|
| GetFilesAsync | Gets a collection of files from the external storage folder. Returns a read-only collection of ExternalStorageFile objects if the folder contains files. |
| GetFolderAsync(string name) | Gets a single subfolder from the external storage folder that matches the name passed into the method. Returns an ExternalStorageFolder object if a subfolder exists with the name indicated. |
| GetFoldersAsync | Gets a collection of subfolders from the external storage folder. Returns a read-only collection of ExternalStorageFolder objects if the folder contains subfolders. |
Note that there are not methods to create or update files on an external media card. The APIs currently allow only read-only access to files.
To read a file from an SD card, the app must incorporate the following modifications in the app manifest file:
- Include the ID_CAP_REMOVABLE_STORAGE capability.
- Register for a file association to declare what file types the app can handle. Listing 11-4 shows an example of how to do this. This must be done in Code View of the app manifest file.
Listing 11-4. File Associations Must Be Included in the App Manifest File
<Extensions>
  <FileTypeAssociation TaskID="_default" Name="txt" NavUriFragment="fileToken=%s">
    <SupportedFileTypes>
      <FileType ContentType="application/txt">.txt</FileType>
    </SupportedFileTypes>
  </FileTypeAssociation>
</Extensions>
Not all Windows Phone devices have microSD expansion slots. Therefore, before attempting to retrieve folder content or read from a file on an SD card, we will need to check to ensure external storage is available on the current device by calling the GetExternalStorageDeviceAsync method on the ExternalStorage class.
IEnumerable<ExternalStorageFile> files;
ExternalStorageDevice sdCard = (await ExternalStorage.GetExternalStorageDevicesAsync()).FirstOrDefault();
if (sdCard != null)
{
     files = await sdCard.RootFolder.GetFilesAsync();
}
else
{
        //An SD card was not detected
}
If an external storage device was returned, we can obtain a handle to the root folder using the RootFolder property on the ExternalStorageDevice object. Next, we can retrieve a list of files in the root folder by calling the GetFilesAsync method on the RootFolder.
To read data from an existing file, we will need to call the OpenForReadAsync method on the ExternalStorageFile class to obtain a stream of the file data. We will then make use of the System.IO.StreamReader class to read the file contents, as shown in Listing 11-5.
Listing 11-5. MainViewModel
ExternalStorageDevice sdCard = (await ExternalStorage.GetExternalStorageDevicesAsync()).FirstOrDefault();
if (sdCard != null)
{
    IEnumerable<ExternalStorageFile> files = await sdCard.RootFolder.GetFilesAsync();
    ExternalStorageFile file = files.Where(f=> f.Name.EndsWith(".txt")).FirstOrDefault();
    System.IO.Stream fileStream = await SelectedFile.OpenForReadAsync();

    //Read the entire file into the FileText property
    using (StreamReader streamReader = new StreamReader(fileStream))
    {
       FileText = streamReader.ReadToEnd();
    }

     fileStream.Close();
}
![]() Note Testing external storage file access within the Windows Phone emulator is not available. A Windows Phone device with a microSD expansion slot is required to test code that accesses media on an external storage card.
Note Testing external storage file access within the Windows Phone emulator is not available. A Windows Phone device with a microSD expansion slot is required to test code that accesses media on an external storage card.
With only a few lines of code and a couple of configuration settings in the app manifest, we have easily incorporated reading files from external storage within a Windows Phone app.
To view the code related to this recipe, open the project named ExternalFileManagement within the directory Chapter 11ExternalFileManagement. The file management code can be found in the MainViewModel class. Similar to Recipe 11-1, the main page of the application will list the files that currently exist in the root folder of the device’s SD card. When a file on the main screen is tapped, the LoadSelectedFile method on the view model will execute, which will load the file contents. Note that although you can run this app in the emulator, you will simply receive the error message that an SD card could not be found. The Windows Phone emulator does not provide support for testing external storage access. To fully test the functionality of this application, you will need to test it on a Windows Phone device that has a microSD expansion card and an SD card with relevant files to test against.
11-3. Store and Retrieve Data from a Local Database
Problem
You are in the midst of developing an app that allows the user to enter a list of books they have read. In addition to that, the user can add one or more personal notes/remarks on each book. You are looking for an efficient way to store relational data for this purpose.
How It Works
There are four namespaces that contain classes that provide a mechanism to define a database schema, create/delete a local database, and perform standard CRUD operations (in other words, create, retrieve, update, and delete) against the data in the database from a Windows Phone application: System.Data.Linq, System.Data.Linq.Mapping, Microsoft.Phone.Data.Linq, and Microsoft.Phone.Data.Linq.Mapping.
It is important to become familiar with data contexts, entities, and the LINQ to SQL runtime when working with a local database for Windows Phone.
- Data context: An object that is the main entry point for accessing a database using LINQ to SQL. It defines the connection string to the local data file. In this class, you will expose public properties of type Table<T> to provide a handle to each table in the database that you want to access in your application. The following are noteworthy methods that are available on a data context object:
- CreateDatabase: Creates a database in the application’s isolated storage
- DatabaseExists: Conducts a check to determine whether the database already exists in isolated storage
- SubmitChanges: Commits any changes that occurred on the database-related objects
- Entity: An object that represents a table in the database. To designate a class as an entity, the Table attribute must be included before the class declaration. Within the entity, one or more properties may be defined to represent columns in the table. In this case, each property that is to be included in the table must include the Column attribute before the property declaration. Additionally, it is possible to define foreign key to primary key relationships within an entity using the Association attribute on an EntitySet or EntityRef property in the parent and child entities, respectively. The following are data insertion and deletion methods that are available on Table objects:
- InsertOnSubmit and InsertAllOnSubmit: These add the entity object or collection of objects to the data context in a pending insert state.
- DeleteOnSubmit and DeleteAllOnSubmit: These add the entity object or collection of objects to the data context in a pending insert state.
To update data in an existing entity object, simply modify the data for the entity object that is exposed through the data context. The change will be picked up by the current data context and will be committed to the database when SubmitChanges is called on the data context.
- LINQ to SQL runtime: Provides object-relational mapping capabilities that map the objects defined in code to their respective representations in the database (in other words, table, column, index, and associations). It also provides the mechanism to perform basic database operations to select, insert, update, or delete data within the application.
Table 11-3 describes the database mapping attributes that are most often used when defining a database schema. These attributes are in the System.Data.Linq.Mapping namespace.
Table 11-3. Mapping Attributes
| Name | Attribute Properties | Description |
|---|---|---|
| TableAttribute | Name: String value defining the name of the table in the database. | Associates the class with a table in the database. |
| ColumnAttribute | IsPrimaryKey: Boolean value indicating whether the column is a primary key. IsDbGenerated: Boolean value indicating whether the column values are automatically generated by the database on insert. DbType: String value that defines the data type. CanBeNull: Boolean value indicating whether the column allows null values. AutoSync: Enumerated value indicating when to retrieve the value when an insert or update is performed. Options are Always, Never, OnInsert, and OnUpdate. | Associates the class member with a column in its table. |
| IndexAttribute | Columns: String value that lists the columns that make up the index. IsUnique: Boolean value indicating whether the index is unique. Name: String value defining the name of the index. | Table-level attribute that designates indexes on the table and can include one or more columns. |
| AssociationAttribute | Name: String value defining the name of the association. Storage: String value that indicates the name of the private property that will hold the value of the column. ThisKey: String value that indicates the key in the current table that will be used in the relationship association OtherKey: String value that indicates the key in the associated table that will be used in the relationship association | Defines an association between two tables, such as a foreign key to primary key association. An EntitySet property is designated as an association in both the parent and child table definitions. |
Listing 11-6 shows an example of the usage of the mapping attributes, which is part of the recipe’s sample application, MyBookList. The Book entity is used to define a table that will store basic details of a book, such as author and title. It also defines a one-to-many relationship with a child table called BookNotes, which allows one or more notes to be associated to a single book.
Listing 11-6. Book Entity with an Association to a BookNotes Table
[Table(Name = "Book")]
public class Book : INotifyPropertyChanged, INotifyPropertyChanging
{
        #region Constructor
        public Book()
        {
            _notes = new EntitySet<BookNote>(
                    note =>
                    {
                        NotifyPropertyChanging("BookNotes");
                        note.Book = this;
                    },
                    note =>
                    {
                        NotifyPropertyChanging("BookNotes");
                        note.Book = null;
                    }
                );
        }
        #endregion

        #region Columns
        private int _bookId;
        [Column(IsPrimaryKey = true,IsDbGenerated = true, DbType = "INT NOT NULL Identity", CanBeNull = false, AutoSync = AutoSync.OnInsert)]
        public int BookId
        {
            get { return _bookId; }
            set
            {
                if (_bookId != value)
                {
                    NotifyPropertyChanging("BookId");
                    _bookId = value;
                    NotifyPropertyChanged("BookId");
                }
            }

        }

        private string _title;
        [Column(DbType = "nvarchar(255)", CanBeNull = false)]
        public string Title
        {
            ...
        }

        private string _author;
        [Column(DbType = "nvarchar(255)", CanBeNull = false)]
        public string Author
        {
            ...
        }
        #endregion
        #region Book Notes Association (Child Table)
        private EntitySet<BookNote> _notes;
        [Association(Name = "FK_Book_Notes", Storage = "_notes", ThisKey = "BookId", OtherKey = "BookId")]
        public EntitySet<BookNote> Notes
        {
            get
            {
                return _notes;
            }
            set
            {
                _notes.Assign(value);
            }
        }

        #endregion

        #region INotifyPropertyChanged, INotifyPropertyChanging Members
        ...
        #endregion
    }
}
The BookNote entity is used to define a table that will store notes for a book. Just as the Book entity defines the child association, the BookNote entity must define its parent association, as shown in Listing 11-7.
Listing 11-7. Parent Table Association to the Book Table Within the BookNote Entity
#region Parent Table Association
private EntityRef<Book> _book;
[Association(Name = "FK_Book_Notes", Storage = "_book", ThisKey = "BookId", OtherKey = "BookId", IsForeignKey = true)]
public Book Book
{
    get
    {
        return _book.Entity;
    }
    set
    {
        NotifyPropertyChanging("Book");
        _book.Entity = value;

        if (value != null)
        {
            _bookId = value.BookId;
        }

        NotifyPropertyChanged("Book");

    }
}
#endregion
Once the entities are defined, we can proceed to create the DataContext that will provide the entry point to accessing data within the local database. The data context will expose properties that will contain table data and will initialize each table property by calling the GetTable<TEntity> method on the DataContext for each entity, as depicted in Listing 11-8.
Listing 11-8. Book DataContext
public class BookDataContext : DataContext
{
    public const string ConnectionString = "isostore:/Books.sdf";

    public BookDataContext(string connectionString)
        : base(connectionString)
    {
        this.Books = this.GetTable<Book>();
        this.BookNotes = this.GetTable<BookNote>();
    }

    public Table<Book> Books { get; set; }
    public Table<BookNote> BookNotes { get; set; }
}
With the entities and data context in place, we can continue to develop the remainder of the application, ensuring that the data context is initialized. As well, we will need to handle the initial database creation and retrieve and store data through the application. In the MyBookList project that is included with this chapter, the MainViewModel handles the data context instance initialization, as well as the initial database creation. As shown in Listing 11-9, a check is conducted to determine whether a database exists with the current database file name, which is defined through the connection string. If the target database does not exist in the application’s isolated storage, the CreateDatabase method is called on the DataContext, which will then create the database based on the defined tables, columns, indexes, and primary key/foreign key relationship associations. SubmitChanges is then called to commit the changes to the database.
Listing 11-9. MainViewModel Initializes the Data Context and Creates a Local Database If One Does Not Exist
private BookDataContext CurrentDataContext;
public ObservableCollection<Book> Books { get; private set; }
public bool IsDataLoaded { get; private set; }

public MainViewModel()
{
    this.Books = new ObservableCollection<Book>();
    CurrentDataContext = new BookDataContext(BookDataContext.ConnectionString);

    if (!CurrentDataContext.DatabaseExists())
    {
        CurrentDataContext.CreateDatabase();
        CurrentDataContext.SubmitChanges();
    }
}
To view the sample application code that demonstrates the concepts in this recipe, open the project in the Chapter 11MyBookList directory. Let’s perform a test run on this application to see it in action. Hit F5 to launch the app in the Windows Phone emulator.
The main screen will not contain any data to start since the database has been newly created on the initial run of the application. Tap the add button in the application bar to add a new book to the database in the details page, as illustrated in Figure 11-4. Enter a title and author and then hit the save button.

Figure 11-4. Book details are stored in the database
Once the save is successful, the add button on this page will become enabled to allow one or more notes to be added for a book. Go ahead and add a few notes for the book and then return to the main screen. Notice that the book is now displayed in the list, as shown in Figure 11-5. It also displays the book ID, which was generated by the database. If you recall, the BookId member in the Book entity was explicitly defined to act in this way.

Figure 11-5. List of books retrieved from the database using LINQ to SQL
And just like that, we have developed an app that provides for relational data storage within a Windows Phone app!
Keep in mind that although a Windows Phone local database seems to mirror the behavior of a standard client-server database, it differs from a typical database in the following ways:
- A Windows Phone local database does not run as a background service. Instead, it runs within the Windows Phone app’s process.
- A Windows Phone local database resides in the local folder of the Windows Phone app; therefore, it can be accessed only by its corresponding app. It cannot be accessed by any other app on the device.
- LINQ to SQL must be used for data access. Transact-SQL is not directly supported.
11-4. Encrypt Data Using the Data Protection API
Problem
You are developing an app that will store sensitive data within a file that will be saved to isolated storage. You want to ensure the file data is encrypted as an additional security measure.
How It Works
The Windows Phone Data Protection API provides a mechanism to encrypt and decrypt sensitive data using a unique decryption key that is created when the app is run for the first time. Cryptographic key generation is built into the API and removes the need for a developer to explicitly define a key for this purpose.
The Data Protection API includes the ProtectedData class (part of the System.Security.Cryptography namespace), which contains two methods.
- Protect: Encrypts the data that is passed into the method. The data must be passed in as a byte array. The encrypted data is returned as a byte array.
- Unprotect: Decrypts the data that is passed into the method. The data must be passed in as a byte array. The decrypted data is returned as a byte array.
For this recipe, we have created a sample application that allows the user to enter emergency contact information and save it to a file in isolated storage. Prior to writing the data to the file, the application leverages the Data Protection API to encrypt the information. To view the code for this application, open the project MyEmergencyInfo in the directory Chapter 11MyEmergencyInfo. Listings 11-10 and 11-11 demonstrate the use of the Protect method and Unprotect method, respectively.
Listing 11-10. Use the Protect Method on the ProtectedData Class to Encrypt Sensitive Data Prior to Saving
//EmergencyInfoData is a string property in the ViewModel
byte[] emergencyInfoByteArray = Encoding.UTF8.GetBytes(EmergencyInfoData.ToString());
byte[] encryptedEmergencyInfoByteArray = ProtectedData.Protect(emergencyInfoByteArray, null);

// Create a file in the application's isolated storage.
IsolatedStorageFile file = IsolatedStorageFile.GetUserStoreForApplication();
IsolatedStorageFileStream writestream = new IsolatedStorageFileStream(filePath, FileMode.Create, FileAccess.Write, file);

Stream writer = new StreamWriter(writestream).BaseStream;
writer.Write(encryptedEmergencyInfoByteArray, 0, encryptedEmergencyInfoByteArray.Length);
writer.Close();
writestream.Close();
Listing 11-11. Use the Unprotect Method to Decrypt Data
IsolatedStorageFile file = IsolatedStorageFile.GetUserStoreForApplication();
IsolatedStorageFileStream readstream = new IsolatedStorageFileStream(filePath, FileMode.Open, FileAccess.Read, file);

if (readstream != null)
{
     Stream reader = new StreamReader(readstream).BaseStream;
     byte[] encryptedEmergencyInfoByteArray = new byte[reader.Length];

      reader.Read(encryptedEmergencyInfoByteArray, 0, encryptedEmergencyInfoByteArray.Length);
      reader.Close();
      readstream.Close();

      byte[] emergencyInfoByteArray = ProtectedData.Unprotect(encryptedEmergencyInfoByteArray, null);

      string emergencyInfoData = Encoding.UTF8.GetString(emergencyInfoByteArray, 0, emergencyInfoByteArray.Length);
      EmergencyInfoData = new EmergencyInfo(emergencyInfoData);
}
The decryption key that is generated for an application is used behind the scenes each time a call is made to either of these two methods. Note that the decryption key will remain the same even when updates to the app are installed.
![]() Note The Data Protection API for encryption/decryption is best used on small amounts of data. To encrypt data in a local database, simply set the Password parameter within the connection string of the database, rather than using this approach.
Note The Data Protection API for encryption/decryption is best used on small amounts of data. To encrypt data in a local database, simply set the Password parameter within the connection string of the database, rather than using this approach.
Open the sample application, MyEmergencyInfo, within Visual Studio. Launch the app in the Windows Phone emulator. The application allows the user to enter emergency contact details as well as allergy and medication information. Enter values for each field and then hit the save button. A confirmation message will appear if the data was encrypted and saved to a local file without error, as shown in Figure 11-6.
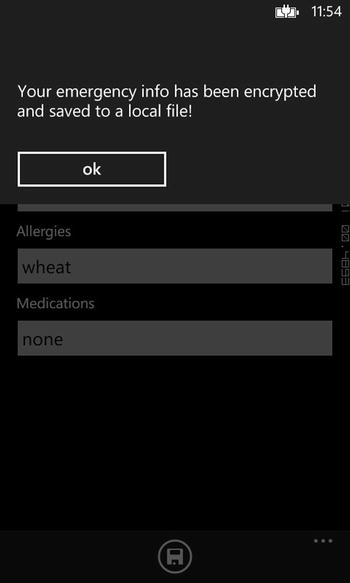
Figure 11-6. Confirmation message displayed after data is encrypted and saved
As demonstrated in this recipe, the Data Protection API provides a simple and straightforward approach to data encryption within a Windows Phone application.
11-5. Store Application Settings
Problem
You want to include application-specific settings in your Windows Phone application that the users can change from within the app.
Solution
Store the values of each setting within isolated storage and provide a UI that will allow the user to change these settings from within the application.
How It Works
The IsolatedStorageSettings class, within the System.IO.IsolatedStorage namespace, can be used to store key-value pairs in the application’s isolated storage. The ApplicationSettings property retrieves the current instance of the IsolatedStorageSettings dictionary for the application, or it creates a new one if one does not yet exist.
Table 11-4 lists the methods available on the IsolatedStorageSettings object, which simplifies management of the key-value pairs within its settings collection.
Table 11-4. IsolatedStorageSettings Methods
| Method | Description | Example |
|---|---|---|
| Add(key, value) | Adds an entry to the IsolatedStorageSettings collection. | IsolatedStorageSettings.ApplicationSettings.Add(“MyKey”, 1) |
| Clear() | Removes all items from the IsolatedStorageSettings collection. | IsolatedStorageSettings.ApplicationSettings.Clear() |
| Contains(key) | Conducts a check to determine whether an element exists in the collection for the specified key. Returns true if an element is found. | bool itemExists = IsolatedStorageSettings.ApplicationSettings.Contains(“MyKey”); |
| Remove(key) | Removes the item associated to the specified key from the dictionary. | IsolatedStorageSettings.ApplicationSettings.Remove("MyKey"); |
| Save() | Saves the changes made within the collection to isolated storage. | IsolatedStorageSettings.ApplicationSettings.Save() |
To allow for application-level settings management through the app, we will need to create a page that will serve as the Settings page. When the user navigates to the page, any existing settings should be loaded from the IsolatedStorage.ApplicationSettings collection. If no settings exist, then it would be ideal to display default values for each setting. A class should be created to handle defining the application-level settings that will be available for configuration, along with defining default values for each setting. In this way, we can simply bind the settings to the controls on the Settings page.
Furthermore, you can choose to update the settings automatically when a property changes, or you can expose a method that will save changes, only if the user chooses to do so (i.e., through the action of tapping a Save button).
The sample application provided with this recipe demonstrates the first approach, which forces a save to occur each time a change occurs on a setting. To view the code related to this recipe, open the project named MyAppSettings within the directory Chapter 11MyAppSettings.
Be sure to handle those pages in your application that depend on application-level settings. The setting values that are saved in isolated storage need to be retrieved and applied to the areas of the application where it makes sense. For example, if your application allows the user to change the font size within the app, then you will need to apply the new font size value across all fields that display text within your app.
Open the sample application MyAppSettings in Visual Studio and launch the application in the emulator. The main page displays the default setting values on the first run, since there are no saved values for these settings. Tap the settings button in the application bar to navigate to the Settings page. As shown in Figure 11-7, the Settings page simply contains a username and a check box to turn sounds on/off. We don’t really have a sound file included in this app, but we will display the value of this setting on the main page.
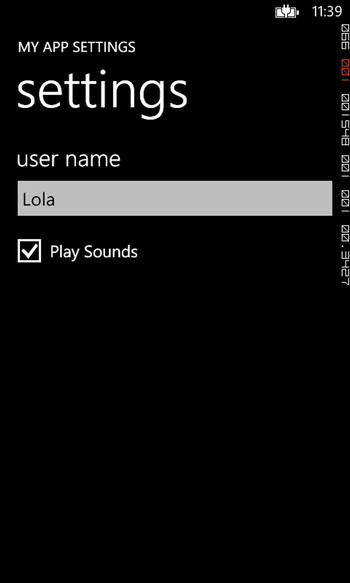
Figure 11-7. Settings page
Notice that we have not included a save button on the Settings page. The reason is that we’ve chosen to automatically save any changes that occur on either of the setting fields, which will automatically be triggered through the magic of data binding. Refer to Listing 11-12 for an example of how this was implemented in the sample application.
Listing 11-12. Settings Page Markup
<StackPanel x:Name="ContentPanel" Grid.Row="1" Margin="12,0,12,0">
    <TextBlock
        Margin="10 0"
        Text="user name"
        Style="{StaticResource PhoneTextLargeStyle}" />
    <TextBox Text="{Binding UserName, Mode=TwoWay}" />
    <CheckBox
        Content="Play Sounds"
        IsChecked="{Binding PlaySounds, Mode=TwoWay}" />
</StackPanel>
In this way, the Settings page code-behind is pretty barren. The only code that needed to be included was to set the data context of the page to the main view model, as shown in Listing 11-13.
Listing 11-13. MainViewModel Used to Expose Settings Properties to Enable Data Binding
public class MainViewModel : INotifyPropertyChanged
{

    private MyAppSettings.Models.Settings _settings = new MyAppSettings.Models.Settings();

    public string UserName
    {
        get
        {
            return _settings.UserNameSetting;
        }
        set
        {
            _settings.UserNameSetting = value;
            NotifyPropertyChanged("UserName");
        }
    }

    public bool PlaySounds
    {
        get
        {
            return _settings.PlaySoundSetting;
        }
        set
        {
            _settings.PlaySoundSetting = value;
            NotifyPropertyChanged("PlaySounds");
        }
    }

    public event PropertyChangedEventHandler PropertyChanged;
    private void NotifyPropertyChanged(String propertyName)
    {
        PropertyChangedEventHandler handler = PropertyChanged;
        if (null != handler)
        {
            handler(this, new PropertyChangedEventArgs(propertyName));
        }
    }
}
Enter any value in the username field, and return to the main page. Notice that the “Hello” message has changed to include the new username that was entered in the Settings page, as shown in Figure 11-8. Exit the application in the emulator without shutting down the emulator. Now, relaunch the app within the emulator. The last values that were saved for the username and play sounds settings are reflected in the main page.

Figure 11-8. The main page displays the current value of each setting