
![]()
Windows Phone 8 ships with a new Maps control that is available in the Microsoft.Phone.Maps.Controls namespace. The Bing Maps control was browser-based and rendered in design mode. The new Map control is partially implemented in unmanaged code and therefore does not render in the Visual Studio designer. The new Map control is the same control used in the built-in applications, and it takes advantage of the new map platform that is included with the Windows Phone 8 OS. A nice design-time experience is certainly a plus, but the trade-offs in this case are well worth the price of admission. Some features enabled by the new control include offline map sharing, more responsive gestures, and vector-based high-frame-rate rendering.
Maps that are downloaded in any application are immediately available to any other application via shared map caching, which saves on bandwidth use. That’s a big plus for those on a limited cellular data plan.
The recipes included in this chapter are as follows:
- 8-1. Using the Maps Task Launchers
- 8-2. Mapping the Current Location
- 8-3. Understanding Map Control Basics
- 8-4. Creating Map Overlays
- 8-5. Creating Routes and Directions
8-1. Using the Maps Task Launchers
Problem
You don’t know where you are, where you are going, or how to get there.
How It Works
Sure, you could launch one of the online mapping services or the built-in Maps application and navigate your way to the search and . . . well, you get the idea.
I’ll admit that the problem statement is a little contrived, but sometimes it’s tough to come up with a decent real-world scenario for such narrow topics. Of course, one of the overarching principles of Windows Phone 8 design is simplicity. Everything is focused around the experience of the user. Your application should allow users to accomplish their goals as quickly as possible. Generally speaking, it should do one thing, do it very well, and stay out of the way.
With those principles in mind, we’ll create a small application that allows the user to enter the name of a place and locate it on a map, find themselves on the map, and see how to get there from here. Table 8-1 describes the tasks we’ll be using.
Table 8-1. Maps-Related Launcher Tasks
| Task | Description |
|---|---|
| MapsTask | This task searches around a specific location for items that match the search text. If no location is provided, the phone’s current location is used as the center of the search area. It has the same internal implementation as the Windows Phone 7.x BingMapsTask. |
| MapsDirectionsTask | When given a destination as coordinates or as text, this task displays a map route and list of directions. If a starting point is not provided, directions begin with the phone’s current location. It has the same internal implementation as the Windows Phone 7.x BingMapsDirectionsTask. |
| MapDownloaderTask | This task launches a user interface that provides a narrowing set of choices that allow the user to download maps for offline use. |
| MapUpdaterTask | This task examines the currently downloaded maps and retrieves any updates that might be available. |
Let’s get started. Create a new Windows Phone application in Visual Studio. The first thing you need to do is add the required capabilities to your project. Double-click the WPAppManifest.xaml file to open the editor. Select the Capabilities tab and then check the ID_CAP_MAPS and ID_CAP_LOCATION capabilities.
Next, let’s set up a page that will let us launch each of these tasks. This sample uses the Windows Phone Toolkit, so you’ll need to add a reference in your project using NuGet. Listing 8-1 provides the XAML for a simple UI.
Listing 8-1. XAML for the Maps-Related Tasks
<Grid x:Name="ContentPanel" Grid.Row="1" Margin="12,0,12,0">
    <Grid.RowDefinitions>
        <RowDefinition Height="Auto"/>
        <RowDefinition Height="Auto"/>
        <RowDefinition Height="Auto"/>
        <RowDefinition Height="Auto"/>
        <RowDefinition Height="Auto"/>
        <RowDefinition />
    </Grid.RowDefinitions>
    <Grid.ColumnDefinitions>
        <ColumnDefinition />
        <ColumnDefinition />
    </Grid.ColumnDefinitions>

    <toolkit:PhoneTextBox
        Grid.Column="0"
        Grid.ColumnSpan="2"
        Grid.Row="2"
        Hint="enter a location"
        x:Name="locationToFind"/>
    <Button
        Click="WhereIsIt"
        Grid.Column="0"
        Grid.Row="1">
        <TextBlock
            Style="{StaticResource PhoneTextNormalStyle}"
            Text="where is it"/>
    </Button>
    <Button
        Click="HowToGetThere"
        Grid.Column="1"
        Grid.Row="1">
        <TextBlock
            Grid.Row="1"
            Style="{StaticResource PhoneTextNormalStyle}"
            Text="how to get there"/>
    </Button>
    <Button
        Click="WhereAmI"
        Grid.Column="0"
        Grid.ColumnSpan="2"
        Grid.Row="0">
        <TextBlock
            Grid.Row="1"
            Style="{StaticResource PhoneTextNormalStyle}"
            Text="where am I"/>
    </Button>
    <Button
        Click="DownloadMaps"
        Grid.Column="0"
        Grid.Row="3">
        <TextBlock
            Grid.Row="1"
            Style="{StaticResource PhoneTextNormalStyle}"
            Text="download maps"/>
    </Button>
    <Button
        Click="UpdateMaps"
        Grid.Column="1"
        Grid.Row="3">
        <TextBlock
            Grid.Row="1"
            Style="{StaticResource PhoneTextNormalStyle}"
            Text="update maps"/>
    </Button>
</Grid>
The MapsTask has only three properties that you can set. You must set either the Center or SearchTerm (or both); otherwise, an InvalidOperationException will be thrown. Setting the ZoomLevel is optional. Table 8-2 describes the properties of the MapsTask.
Table 8-2. Properties of the MapsTask Class
| Name | Description |
|---|---|
| Center | The location that will be used as the center point for the map. If this property is left empty, then the phone’s current location is used as the center point of the search. |
| SearchTerm | The search term that is used to find and tag locations on the map. The search is centered on the Center coordinates or the phone’s current location if no Center is specified. |
| ZoomLevel | The initial zoom level of the map. The property is of type Double and must be greater than zero with a range between 1 and 21. |
Using the MapsTask is simple. Most commonly you will want to find something that is close by, so in Listing 8-2 we will just set the SearchTerm and ZoomLevel and then call the Show method.
Listing 8-2. Finding a Location Using the MapsTask
private void WhereIsIt(object sender, RoutedEventArgs e)
{
    if (string.IsNullOrEmpty(locationToFind.Text))
    {
        MessageBox.Show("Please enter a location.");
    }
    else
    {
        MapsTask mapTask = new MapsTask();
        mapTask.ZoomLevel = 15;
        mapTask.SearchTerm = locationToFind.Text;
        mapTask.Show();
    }
}
Probably the most common use case for directions is the desire to be somewhere else. We’ve all had that feeling I’m sure. The MapsDirectionsTask makes it simple to plan your escape. The MapsDirectionsTask has only two properties, Start and End, both of which are of type LabeledMapLocation. See Table 8-3 for the specifics of the LabeledMapLocation class.
Table 8-3. Properties of the LabeledMapLocation Class
| Name | Description |
|---|---|
| Label | This is the text label that identifies the associated geographic location and will be applied to the pushpin on the map. If a Location is not provided, then this value is used as a search term. |
| Location | The geographic coordinate that is associated with the labeled map location. The Label text is used as a search term if this property is not set. |
The End property will be set to the phone’s current location if it is not set to a valid LabeledMapLocation. The same applies to the Start property. The problem of both the Start and End properties being set to an invalid location is addressed by the task throwing an InvalidOperationException given that you are, in essence, asking it to route you from where you are currently located to your current location.1
MapDownloaderTask and MapUpdaterTask
The last two tasks are very simple to use and have no properties to set. They rely completely on the built-in functionality. Listing 8-3 and Listing 8-4 show their use, while Figures 8-1 and 8-2 show the respective results.
Listing 8-3. Using the MapDownloaderTask
private void DownloadMaps(object sender, RoutedEventArgs e)
{
    MapDownloaderTask mapDownloaderTask = new MapDownloaderTask();
    mapDownloaderTask.Show();

}
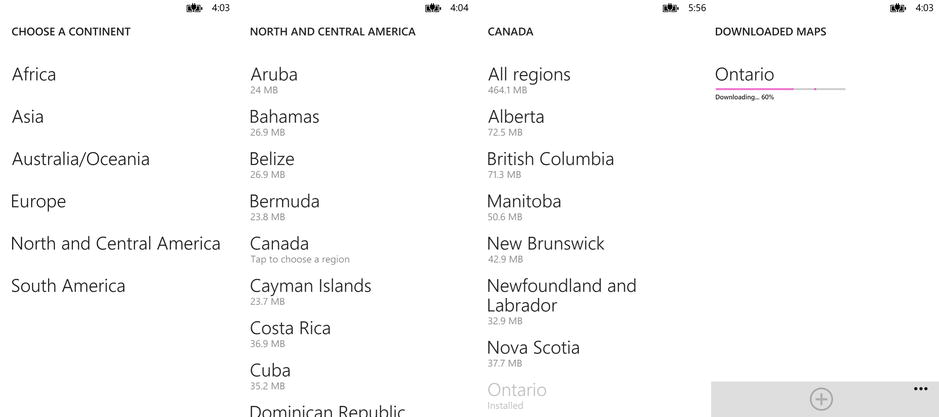
Figure 8-1. The four possible map download screens
Listing 8-4. Using the MapUpdaterTask
private void UpdateMaps(object sender, RoutedEventArgs e)
        {
            MapUpdaterTask mapUpdaterTask = new MapUpdaterTask();
            mapUpdaterTask.Show();
        }
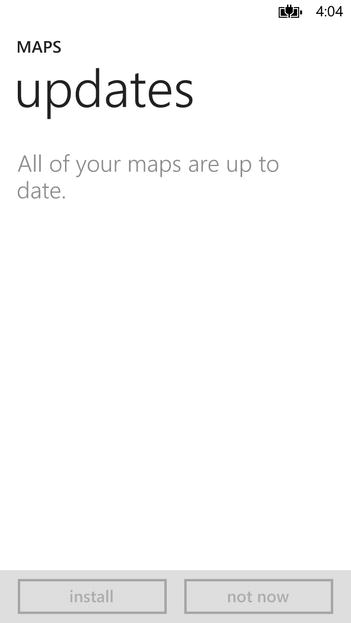
Figure 8-2. The MapUpdaterTask screen
8-2. Mapping the Current Location
Solution
Use the GetGeopositionAsync method of the Geolocator class in the Windows.Devices.Geolocation namespace to get the phone’s current Geoposition.
How It Works
Create a new project using the Windows Phone 8 App project template in Visual Studio. Two of the ingredients for this recipe are the capabilities2 ID_CAP_MAPS and ID_CAP_LOCATION. Double-click the WMAppManifest.xml file so that it opens in the editor, and make sure these capabilities are selected. The GetGeopositionAsync method will throw an UnauthorizedAccessException if Location is disabled on the device or if you don’t request the required capabilities.
Those of you who have read Recipe 8-1 will remember that it requires either the SearchTerm or Center property (or both) to be set to a valid value. Knowing this, we can simply set the Center to the phone’s current location and leave out the SearchTerm.
Now that we have a project, let’s add a button to the MainPage.xaml file. Replace the ContentPanel Grid with the XAML in Listing 8-5.
Listing 8-5. XAML for the “Where Am I” User Interface
<Grid x:Name="ContentPanel" Grid.Row="1" Margin="12,0,12,0">
    <Grid.RowDefinitions>
        <RowDefinition Height="Auto"/>
    </Grid.RowDefinitions>
    <Button
        Click="WhereAmI"
        Grid.Column="0"
        Grid.ColumnSpan="2"
        Grid.Row="0">
        <TextBlock
            Grid.Row="1"
            Style="{StaticResource PhoneTextNormalStyle}"
            Text="where am I"/>
    </Button>
</Grid>
![]() Note The sample source code for this recipe is in the Chapter08WhereAmI project included in the Chapter 8 download.
Note The sample source code for this recipe is in the Chapter08WhereAmI project included in the Chapter 8 download.
The GetGeopositionAsync method of the Geolocator returns a Geoposition. The Coordinate property of GeoPosition gives us the Latitude and Longitude that we then use to create a GeoCoordinate. We then pass that to the MapsTask as the Center property value and leave the SearchTerm property empty. The GetGeopositionAsync method is awaitable, so first we’ll create a private async method that returns a GeoCoordinate. Listing 8-6 has the code.
Listing 8-6. Awaitable Private Method for Retrieving the Phone’s Current GeoCoordinate
private async Task<GeoCoordinate> GetCurrentCoordinate()
{
    Geolocator locator = new Geolocator();
    locator.DesiredAccuracy = PositionAccuracy.High;

    Geoposition position = await locator.GetGeopositionAsync();

    GeoCoordinate coordinate =
        new GeoCoordinate(position.Coordinate.Latitude, position.Coordinate.Longitude);
    return coordinate;
}
All that’s left now is to add the code for the Click event of the Button. Make sure you add the async keyword to the method declaration since we’ll be using await in our code. Listing 8-7 has the details, and Figure 8-3 shows the results.
Listing 8-7. Code-Behind to Launch the MapsTask and Display the Phone’s Current Location
private async void WhereAmI(object sender, RoutedEventArgs e)
{
    try
    {
        GeoCoordinate coordinate = await GetCurrentCoordinate();

        MapsTask mapTask = new MapsTask();
        mapTask.ZoomLevel = 15;
        mapTask.Center = coordinate;
        mapTask.Show();
    }
    catch (UnauthorizedAccessException ex)
    {
        // this means that location is disabled on the device.
        MessageBox.Show("Location is disabled.");
    }
}
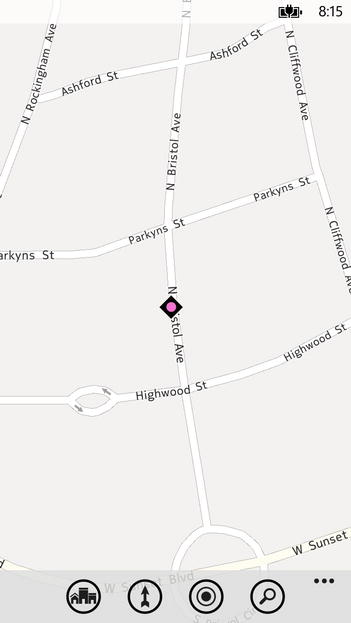
Figure 8-3. Where am I? Right here, of course . . . or am I?
8-3. Understanding Map Control Basics
Problem
You’re creating an application that requires some mapping capability. You don’t want to use the Maps-related tasks because they take the user out of your application and you would rather control the experience.
Solution
Use the Map control that can be found in the Microsoft.Phone.Maps.Controls namespace to allow the user to interact with the map.
The beginning of this chapter introduced the new Map control that ships with Windows Phone 8, but it’s a significant enough improvement that it bears repeating here. It can be found in the Microsoft.Phone.Maps.Controls namespace. The Bing Map control was browser-based and rendered in design mode. The new Map control is partially implemented in unmanaged code and therefore does not render in the Visual Studio Designer.
Some features enabled by the new control include offline map sharing, more responsive gestures, and vector-based high-frame-rate rendering. In addition, maps that are downloaded in any application are immediately available to any other application via shared map caching, which saves on bandwidth use. That’s a big plus for those on a limited cellular data plan. Let’s get cooking.
Start Visual Studio and create a new project using the Windows Phone App project template. Once the designer finishes loading the MainPage, open the ToolBox, and drag a Map control onto the design surface. The first thing you will notice is that the map does not render but rather just shows a placeholder image; however, if you run the application without doing anything else, you will see a zoomed-out image of North America and South America. Figure 8-4 shows the design-time and run-time views of the Map control.
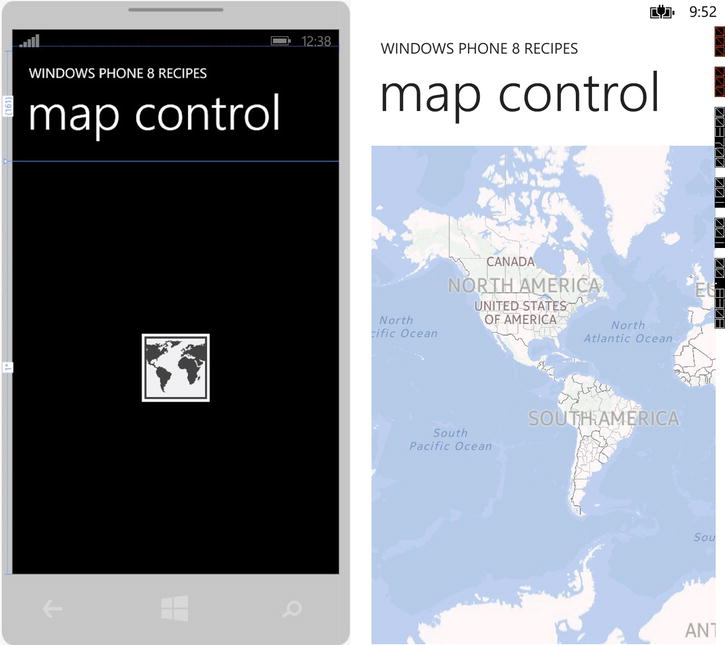
Figure 8-4. The Windows Phone 8 Map control design-time and run-time views
The Map control inherits from System.Windows.Controls.Control and as such inherits properties from UIElement, FrameworkElement, and Control. Table 8-4 describes the Map control–specific properties.
Table 8-4. Map Control–Specific Properties
| Name | Description |
|---|---|
| CartographicMode | Gets or sets the MapCartographicMode of the Map control |
| Center | Gets or sets the center of the Map control |
| ColorMode | Gets or sets the MapColorMode of the Map control |
| Heading | Gets or sets the heading of the Map control |
| LandmarksEnabled | Gets or sets a value that indicates whether 3D landmarks are enabled on the Map control |
| Layers | Gets or sets a collection of MapLayer objects on the Map control |
| MapElements | Gets or sets the map elements on the Map control |
| PedestrianFeaturesEnabled | Gets or sets a value that indicates whether pedestrian features such as public stairs are enabled on the Map control |
| Pitch | Gets or sets the pitch of the Map control |
| TileSources | Gets or sets the TileSource collection of the Map control |
| TransformCenter | Gets or sets a value to which the center of the Map control is transformed |
| UniqueId | Gets the ID of the Map control |
| WatermarkMode | Gets or sets the watermark of the Map control |
| ZoomLevel | Gets or sets the zoom level of the map control |
Let’s set up a user interface with some controls that will allow us to change the properties of the map. We’ll add a couple of Slider controls for the Pitch, ZoomLevel, and Heading. Listing 8-8 has the XAML you’ll need.
To use the Map control, you’ll need to declare the namespace at the top of your XAML or simply drag the Map control out of the ToolBox and drop it on the design surface.
xmlns:mapControls="clr-namespace:Microsoft.Phone.Maps.Controls;assembly=Microsoft.Phone.Maps"
Listing 8-8. XAML for the Map Control User Interface
<Grid x:Name="ContentPanel" Grid.Row="1" Margin="12,0,12,0">
    <Grid.RowDefinitions>
        <RowDefinition />
        <RowDefinition Height="Auto"/>
    </Grid.RowDefinitions>
    <mapControls:Map
        x:Name="theMap" />
    <Grid
        Grid.Row="1"
        Visibility="Visible"
        x:Name="settingsPanel">
        <Grid.RowDefinitions>
            <RowDefinition/>
            <RowDefinition/>
            <RowDefinition/>
        </Grid.RowDefinitions>
        <Grid.ColumnDefinitions>
            <ColumnDefinition/>
            <ColumnDefinition/>
        </Grid.ColumnDefinitions>
        <Slider
            Grid.Column="0"
            Grid.Row="0"
            Maximum="19"
            Minimum="1"
            ValueChanged="ZoomSliderValueChanged"
            X:Name="zoomSlider" />
        <Slider
            Grid.Column="1"
            Maximum="75"
            Minimum="0"
            ValueChanged="PitchSliderValueChanged"/>
        <Slider
            Grid.Row="1"
            Grid.ColumnSpan="2"
            Maximum="360"
            Minimum="0"
            ValueChanged="HeadingSliderValueChanged"/>
    </Grid>
</Grid>
![]() Note The sample project for this recipe is called BasicMapControl and is available with the Chapter 8 download.
Note The sample project for this recipe is called BasicMapControl and is available with the Chapter 8 download.
We’ll also add an ApplicationIconBarButton to show and hide the setting controls and another to refresh the current location. Listing 8-9 shows the XAML for the ApplicationBar.
Listing 8-9. XAML for the ApplicationIconBarButtons
<phone:PhoneApplicationPage.ApplicationBar>
    <shell:ApplicationBar>
        <shell:ApplicationBarIconButton
            Click="ShowSettings"
            IconUri="/Assets/feature.settings.png"
            Text="settings"/>
        <shell:ApplicationBarIconButton
            Click="UpdateLocation"
            IconUri="/Assets/refresh.png"
            Text="settings"
            x:Name="locationButton"/>
    </shell:ApplicationBar>
</phone:PhoneApplicationPage.ApplicationBar>
Listing 8-6 in Recipe 8-2 demonstrated how to get the phone’s Geoposition and extract the coordinate information from it. Here is a reminder of that code:
private async Task<GeoCoordinate> GetCurrentCoordinate()
{
    Geolocator locator = new Geolocator();
    locator.DesiredAccuracy = PositionAccuracy.High;

    Geoposition position = await locator.GetGeopositionAsync();

    GeoCoordinate coordinate =
        new GeoCoordinate(position.Coordinate.Latitude, position.Coordinate.Longitude);
    return coordinate;
}
Add this method to MainPage.xaml.cs so that it’s available. Next we’ll add the event handlers for the Slider controls that will set the ZoomLevel, Pitch, and Heading properties of the Map control. Add the code in Listing 8-10 to the code-behind.
Listing 8-10. Event Handlers for the Slider Controls
private void ZoomSliderValueChanged(object sender,
    RoutedPropertyChangedEventArgs<double> e)
{
    if (theMap != null)
    {
        theMap.ZoomLevel = e.NewValue;
    }
}

private void PitchSliderValueChanged(object sender,
    RoutedPropertyChangedEventArgs<double> e)
{
    if (theMap != null)
    {
        theMap.Pitch = e.NewValue;
    }
}

private void HeadingSliderValueChanged(object sender,
    RoutedPropertyChangedEventArgs<double> e)
{
    if (theMap != null)
    {
        theMap.Heading = e.NewValue;
    }
}
The final code we need is for the app bar icon buttons and some code in the override of the OnNavigatedTo method to initialize our current location. Add the code in Listing 8-11 to your code-behind.
Listing 8-11. ApplicationIconBarButton Code and OnNavigateTo Override
private void ShowSettings(object sender, EventArgs e)
{
    settingsPanel.Visibility =
        settingsPanel.Visibility == Visibility.Visible ? Visibility.Collapsed :
                                                         Visibility.Visible;
}

private async void UpdateLocation(object sender, EventArgs e)
{
    try
    {
        ((ApplicationBarIconButton)sender).IsEnabled = false;
        GeoCoordinate coordinate = await GetCoordinate();
        theMap.Center = coordinate;
    }
    catch (Exception) // I meant to do that.
    {
        MessageBoxResult result = MessageBox.Show("Location services is not enabled.  Would you like to go to the settings page to enable it?", "Error", MessageBoxButton.OKCancel);
        if (result == MessageBoxResult.OK)
        {
            Launcher.LaunchUriAsync(new Uri("ms-settings-location:"));
        }
    }
    finally
    {
        ((ApplicationBarIconButton)sender).IsEnabled = true;
    }
}

protected async override void OnNavigatedTo(NavigationEventArgs e)
{
    try
    {
        theMap.Center = await GetCoordinate();
        zoomSlider.Value = 15;            }
    catch (Exception)
    {
        MessageBoxResult result = MessageBox.Show("Location services is not enabled.  Would you like to go to the settings page to enable it?", "Error", MessageBoxButton.OKCancel);
        if (result == MessageBoxResult.OK)
        {
            Launcher.LaunchUriAsync(new Uri("ms-settings-location:"));
        }
    }
}
Notice the addition of the async keyword in the method override declaration and the event handler for UpdateLocation. This is needed because we are going to be using await in our handler. Go ahead and build and run the project. If you are running in the emulator, you should be centered on the Microsoft campus in Redmond, Washington. If you are using your device, the map should be centered on your current location. There won’t be a marker to show the location exactly. When using the Map control, you are in charge of everything. Recipe 8-4 will cover adding overlays to the map for things such as location marking.
![]() Note The observant reader will have noticed that Listing 8-11 catches the base System.Exception. This is not a Good Thing.3 Unfortunately, this is what gets thrown when the Location service is disabled on the device, so we’re left with no choice.
Note The observant reader will have noticed that Listing 8-11 catches the base System.Exception. This is not a Good Thing.3 Unfortunately, this is what gets thrown when the Location service is disabled on the device, so we’re left with no choice.
You will also note the use of the Windows.System.Launcher.LaunchUriAsync method to send the user to the Location settings page so that they can enable the Location service. LaunchUriAsync is a simple way to launch the built-in application rather than using one of the classes in Microsoft.Phone.Tasks, and there are some applications that are accessible only by using this technique. Table 8-5 describes a few of the others that are available.
Table 8-5. Uri Schemes for Launching Built-in Applications
| URI Scheme | Description |
|---|---|
| http:[URL] | Launches the web browser and navigates to the specified URL. |
| mailto:[email address] | Launches the e-mail app and creates a new message with the specified e-mail address on the To line. Note that the e-mail is not sent until the user taps send. |
| ms-settings-accounts: | Launches the account Settings app. |
| ms-settings-airplanemode: | Launches theflight mode Settings app. |
| ms-settings-bluetooth: | Launches the Bluetooth Settings app. |
| ms-settings-cellular: | Launches the Cellular Settings app. |
| ms-settings-emailandaccounts: | Launches the e-mail and accounts settings app. |
| ms-settings-location: | Launches the location Settings app. |
| ms-settings-lock: | Launches the lock screen Settings app. |
| ms-settings-wifi: | Launches the WiFi Settings app. |
We don’t have the space to cover all of the properties, so we’ll look at two of the more interesting ones: CartographicMode and ColorMode. They are controlled by their respective enumerations, and changing modes is as easy as setting the property. Listing 8-12 contains the XAML and code-behind.
Listing 8-12. XAML for the MapCartographicMode and MapColorMode with Code-Behind
<Button
    Click="ToggleColorMode"
    Content="Dark"
    Grid.Row="2"/>
<Button
    Click="CycleMapCartographicMode"
    Content="Mode"
    Grid.Column="1"
    Grid.Row="2"/>

// code-behind for the color mode
private void ToggleColorMode(object sender, RoutedEventArgs e)
{
    ((Button)(sender)).Content = theMap.ColorMode.ToString();
    theMap.ColorMode = theMap.ColorMode == MapColorMode.Dark ? MapColorMode.Light :
                                                               MapColorMode.Dark;
}

// code-behind for the cartographic mode
private void CycleMapCartographicMode(object sender, RoutedEventArgs e)
{
    switch (theMap.CartographicMode)
    {
        case MapCartographicMode.Aerial:
            theMap.CartographicMode = MapCartographicMode.Hybrid;
            break;
        case MapCartographicMode.Hybrid:
            theMap.CartographicMode = MapCartographicMode.Road;
            break;
        case MapCartographicMode.Road:
            theMap.CartographicMode = MapCartographicMode.Terrain;
            break;
        case MapCartographicMode.Terrain:
            theMap.CartographicMode = MapCartographicMode.Aerial;
            break;
    }
}
As you experiment with the two settings, you will notice that the MapColorMode affects only what you see when the MapCartographicMode is set to MapCartographicMode.Road. Figure 8-5 shows the Light and Dark modes, and Figure 8-6 shows the four cartographic modes: Road, Terrain, Aerial, and Hybrid.

Figure 8-5. The two MapColorMode settings: Light and Dark
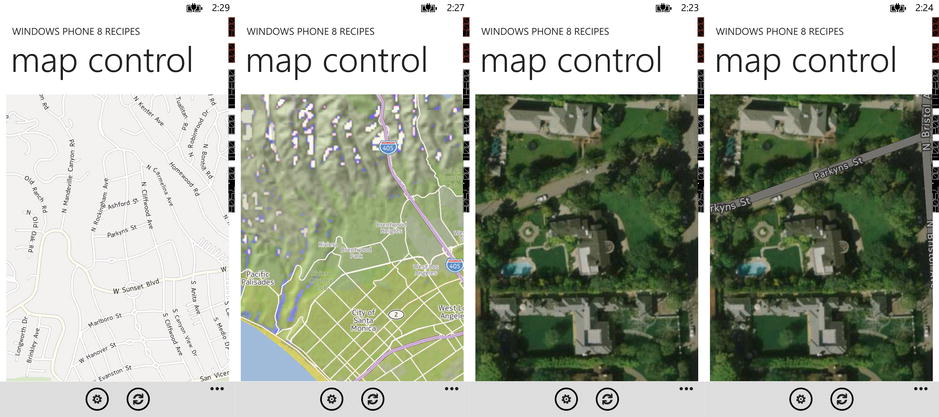
Figure 8-6. The four cartographic modes of the Map control: Road, Terrain, Aerial, and Hybrid
Problem
You have an application that allows the user to mark a location on the map by tapping it. You also want to display a marker showing the device’s current location.
Solution
Use the MapLayer and MapOverlay classes in the Microsoft.Phone.Maps.Controls namespace. The Windows Phone Toolkit, first shown in Recipe 2-6, also includes several map-related controls to help make it easier to add overlay items to a Map control.
Recipe 2-6 contains instructions on how to obtain and work with the Windows Phone Toolkit, so if you haven’t read that one yet, you might want to give it a quick read now and then come back here. I’ll wait.
How It Works
Two main classes are used in the overlaying of visuals on the Map control: MapLayer and MapOverlay. MapLayer inherits from ObservableCollection<MapOverlay> and serves as a container for related MapOverlay objects. The MapOverlay class inherits from DependencyObject and serves as a custom content control that positions its Content using geographic coordinates. The PositionOrigin property is a System.Windows.Point that will be used as the center point when positioning the item.
Think of a layer as a group of related items that you want to display as a whole on top of the map. Figure 8-7 shows an example of multiple layers. The first layer could be a list of your favorite places to enjoy an afternoon out, and the top layer could be an overlay of current weather conditions in those areas. Using the MapLayer and MapOverlay classes you can build up a rich display of useful information.
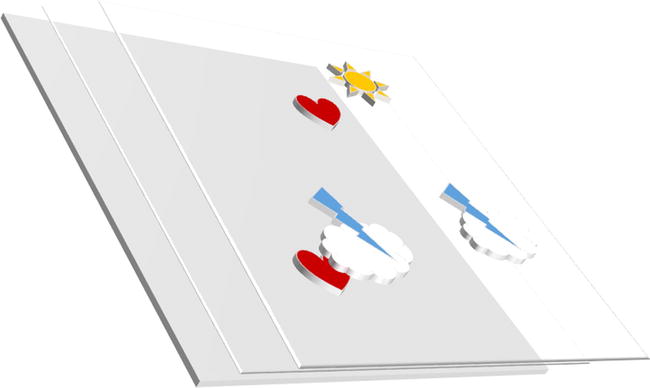
Figure 8-7. An example of layering on the Map control
The Windows Phone Toolkit comes with a static class called MapExtensions that uses AttachedProperties to extend the functionality of the Map control. You can examine the source code that comes with the Windows Phone Toolkit to see how it works. The MapExtensions class basically takes each child item, wraps it in a MapOverlayItem, wraps that in a MapOverlay and then puts that into a MapLayer, and finally adds the item to the map. It’s an exercise in convolution to be sure, but it works.
To mark the current location of the phone, we’ll use the UserLocationMarker control that comes with the Toolkit. Create a new project using the Windows Phone App template and then use NuGet to add a reference to the Toolkit. As always, don’t forget to add the ID_CAP_MAP and ID_CAP_LOCATION to the capabilities required by your application. Add the following namespace declaration to the top of the MainPage XAML and then replace the ContentPanel Grid with the XAML in Listing 8-13:
xmlns:toolKit="clr-namespace:Microsoft.Phone.Maps.Toolkit;assembly=Microsoft.Phone.Controls.Toolkit"
Listing 8-13. XAML for the ContentPanel Grid
<Grid x:Name="ContentPanel" Grid.Row="1" Margin="12,0,12,0">
    <mapControls:Map x:Name="theMap">
        <toolKit:MapExtensions.Children>
            <toolKit:UserLocationMarker
                Visibility="Collapsed"
                x:Name="UserLocationMarker"/>
        </toolKit:MapExtensions.Children>
    </mapControls:Map>
</Grid>
Next we’ll add some code that you’ve probably already seen in the previous recipe that gets the current location of the device. We’ll also add code to override OnNavigatedTo and set the location of the UserLocationMarker. Listing 8-14 has everything you need.
Listing 8-14. Code to Get and Set the Current Location
private async Task<GeoCoordinate> GetCoordinate()
{

    Geolocator locator = new Geolocator();
    GeoCoordinate coordinate;
    locator.DesiredAccuracy = PositionAccuracy.High;

    Geoposition position = await locator.GetGeopositionAsync();

    coordinate = new GeoCoordinate(position.Coordinate.Latitude,
        position.Coordinate.Longitude);
    return coordinate;
}

protected async override void OnNavigatedTo(NavigationEventArgs e)
{
    try
    {
        GeoCoordinate coordinate = await GetCoordinate();
        theMap.Center = coordinate;
        theMap.ZoomLevel = 15;

        this.UserLocationMarker =
                      (UserLocationMarker)this.FindName("UserLocationMarker");
        this.UserLocationMarker.GeoCoordinate = coordinate;
        this.UserLocationMarker.Visibility = System.Windows.Visibility.Visible;

    }
    catch (Exception)
    {
        MessageBoxResult result = MessageBox.Show("Location services is not enabled.  Would you like to go to the settings page to enable it?", "Error", MessageBoxButton.OKCancel);
        if (result == MessageBoxResult.OK)
        {
            Launcher.LaunchUriAsync(new Uri("ms-settings-location:"));
        }
    }
}
You should now be able to run the application and see a marker at the current location of your phone or the current location of the emulator if you are using one. Figure 8-8 shows the results.
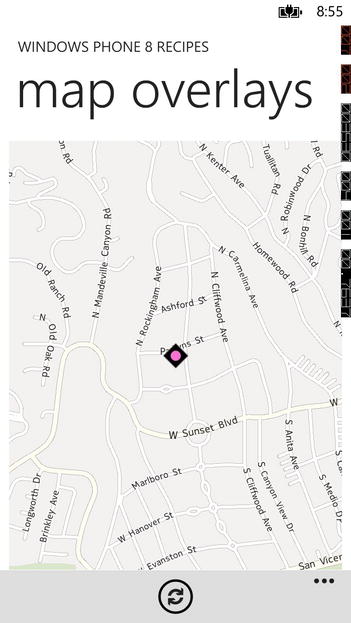
Figure 8-8. The UserLocationMarker displayed on the map
For the sake of simplicity, let’s imagine that you want to be able to mark some favorite places on the Map by tapping them. The process for doing this is straightforward. You can add pretty much anything you want as an overlay, but it’s advisable to keep it simple.
We’ll add our code in an event handler for the Tap event of the Map. The code in Listing 8-15 is well-commented to describe each step of the process. Add this code to the code-behind of the MainPage and then wire up the handler in XAML. In addition to the code in the listing, also add a private class-level variable to hold a MapLayer. Figure 8-9 shows the results of tapping on the Map.
private MapLayer layer;
Listing 8-15. Code to Add an Overlay to the Map at the Location Tapped by the User
private void TheMapTap(object sender, System.Windows.Input.GestureEventArgs e)
{
    // create an image using the favs icon
    // that comes with the SDK and add it to
    // a new MapOverlay
    Image image = new Image();
    image.Source = new BitmapImage(new Uri("Assets/footprint.png",
                             UriKind.RelativeOrAbsolute));

    MapOverlay overlay = new MapOverlay();
    overlay.Content = image;

    // get the position that the user tapped
    Point point = e.GetPosition(theMap);

    // the favs icon is 76 x 76 and we want to
    // center it on the point the user tapped
    // so we'll shift the point
    point.X -= 38;
    point.Y -= 38;

    // convert the ViewPort point into an actual GeoCoordinate value
    GeoCoordinate coordinate = theMap.ConvertViewportPointToGeoCoordinate(point);
    overlay.GeoCoordinate = coordinate;

    // the one and only layer that we
    // add all of the overlays to
    if (layer == null)
    {
        layer = new MapLayer();
        theMap.Layers.Add(layer);
    }
    layer.Add(overlay);
}
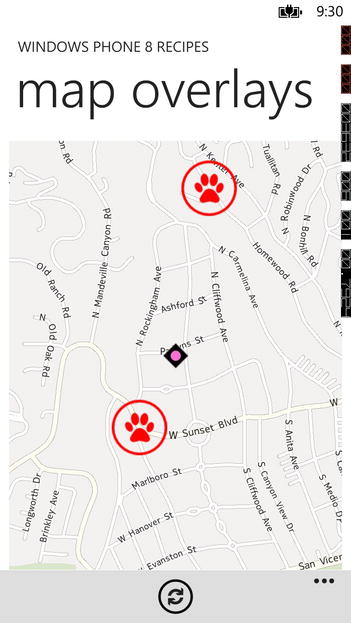
Figure 8-9. Footprints on my map. Who didn’t wipe their feet?
8-5. Creating Routes and Directions
Solution
Use the GeocodeQuery and RouteQuery available in the Microsoft.Phone.Maps.Services namespace.
The MapsDirectionsTask that we explored in Recipe 8-1 provides a fairly simple interface for getting directions, but sometimes you need more flexibility and power. It is a very nice implementation, and you get to reap the benefit of the investments made by Microsoft and Nokia. The built-in Maps application is really nice.
Having said that, there are certainly times when you need more fine-grained control of the information and overall experience. The MapsDirectionsTask, for example, supports only a single destination, and you may want to be able to display directions through several waypoints. The services available to you in the Microsoft.Phone.Maps.Services namespace provide you with these abilities and more.
Before we get started with the code, I want to make sure that we’re all on the same page when it comes to what a GeocodeQuery is. I have to admit, I made some assumptions in the beginning, and it caused me some pain, so I want to be sure you don’t suffer the same fate. This type of searching is about as far as you can get from a simple keyword search that you would do when Googling/Binging. A search for coffee may or may not go well.4 A search for coffee using the MapsDirectionsTask from my current location will take me to Coffee County about 100 km outside of Nashville, Tennessee, in the United States. That is just over 1,228 km from where I am right now here in southwestern Ontario in Canada.
Geocoding
Geocoding is the process of discovering the geographic coordinates of a location, commonly expressed as latitude and longitude, based on other geographic data such as street addresses and postal/ZIP codes. This information is premapped in what is generically referred to as a Geographic Information System (GIS). These systems aren’t always about street addresses; in fact, the first operational GIS was developed in the early 1960s by Dr. Roger Tomlinson in Ottawa, Canada, for the Canadian Land Inventory. It mapped things such as soils, recreation, wildlife, forestry, and land use. In the late 1980s CGIS was slowly being rendered obsolete by the emergence of commercial GISs. In the early 1990s, a team of volunteers was successful in extracting all of the CGIS information from tapes, and it’s been made available for free on GeoGratis at http://geogratis.cgdi.gc.ca.
The best way to ensure good results with the GeocodeQuery is to give it as much information about the location you are seeking as possible. An exact and detailed address including a postal code will provide the best results. The other thing to note is that the search needs to be centered on a specific location. The results of the query will change depending on the location because it returns matches based on how close they are to that location. Notice also that I said “matches.” The GeocodeQuery, at least in my experience, will return up to ten possible matches. There is also a MaxResultCount property that you can use to limit the number of results further if you so choose. The first result in the list may or may not be the one you are looking for if a possible match is found that is geographically closer to the GeoCoordinate you set as the center of the search.
Route
A route is the lists of waypoints, legs, and maneuvers that describe how to navigate between two or more locations. A route in Windows Phone 8 is represented by the Microsoft.Phone.Maps.Services.Route class. A Route is returned as the Result of a RouteQuery. A MapRoute instance is constructed by passing a Route to the constructor, and that is added to a Map control for display.
Most commonly we want to be somewhere else. We want to start “here” and go “there.” Other times you may have more than one point along the way that you want to visit. Your starting point is included as a waypoint when configuring the RouteQuery, and the route is constructed based on the order in which the waypoints are added. It’s up to you to determine the most efficient order in which to visit all of the waypoints given specific start and end points. There are advanced routing programs available that, given a start point, an end point, and a list of points in between, will calculate the optimal route through all waypoints. That is not the case with the RouteQuery.
A waypoint is represented by a System.Device.Location.GeoCoordinate. The RouteQuery.Waypoints property takes an IEnumerable<GeoCoordinate>.
A leg consists of a list of maneuvers that are taken between one waypoint and the next. The number of legs is equal to the number of waypoints minus one. A trip from your home to the bank, the grocery store, and home again would have three legs because there are four waypoints. One of them, your home, is counted at the start and end points even though they are the same geographic location.
- Home
 Bank
Bank - Bank Grocery store
- Grocery store Home
A leg is represented in code by the Microsoft.Phone.Maps.Services.RouteLeg class.
Maneuvers are the actions that make up each leg of a route and are represented by the RouteManeuver class in the Microsoft.Phone.Maps.Services namespace. A maneuver contains the list of actions to be taken by a traveler for each leg of the route to get to the next waypoint. Table 8-6 describes the various properties of the RouteManeuver.
Table 8-6. Properties of the RouteManeuver Class
| Name | Description |
|---|---|
| InstructionKind | A value from the RouteManeuverInstructionKind enumeration that identifies the basic type of the maneuver, such as TurnLeft, TurnLightLeft, TurnHardLeft, FreewayEnterLeft, and so on |
| InstructionText | Describes the action to take based on the InstructionKind followed by the target of the action, such as “Turn Left onto Main Street” or “Keep right onto Hwy 401” |
| LengthInMeters | The distance in meters to the start of the next maneuver |
| StartGeoCoordinate | The GeoCoordinate of the starting point of the maneuver |
Bringing It All Together
Now that we know what all the moving parts are and how they relate to each other, let’s take a look at how to tie them all together into something useful. The first step is to find your current location and set that as the first item in our list of waypoints. This will be the start of our route. We’ll do this in the override of OnNavigatedTo in our MainPage.xaml.cs file, as shown in Listing 8-16.
Listing 8-16. Code to Determine and Set the Current Location of the Device
protected async override void OnNavigatedTo(NavigationEventArgs e)
{
    try
    {
        currentLocation = await GetCurrentLocation();
        App.ViewModel.WayPoints.Clear();
        App.ViewModel.WayPoints.Add(new LocationItem
        {
            Address = "My Location",
            Coordinate = currentLocation
        });

    }
    catch (Exception)
    {
        MessageBoxResult result = MessageBox.Show("Location services is not enabled.  Would you like to go to the settings page to enable it?", "Error", MessageBoxButton.OKCancel);
        if (result == MessageBoxResult.OK)
        {
            Launcher.LaunchUriAsync(new Uri("ms-settings-location:"));
        }
    }
}

private async Task<GeoCoordinate> GetCurrentLocation()
{
    Geolocator locator = new Geolocator();
    GeoCoordinate coordinate;
    locator.DesiredAccuracy = PositionAccuracy.High;

    Geoposition position = await locator.GetGeopositionAsync();

    coordinate = new GeoCoordinate(position.Coordinate.Latitude,
        position.Coordinate.Longitude);

    return coordinate;
}
The next step, now that we have our starting point, is to look up the GeoCoordinate of each of the destinations we want to add to our route. We do that by using the GeocodeQuery. Setting up and executing the GeocodeQuery is simple, as shown in Listing 8-17; dealing with the results, not so much.
Listing 8-17. Configuring and Executing a GeocodeQuery
codeQuery = new GeocodeQuery();
codeQuery.SearchTerm = App.ViewModel.SearchText;
codeQuery.GeoCoordinate = currentLocation;
codeQuery.QueryCompleted += GeocodeQueryQueryCompleted;
codeQuery.QueryAsync();
As discussed earlier, the more specific the information is that you pass in for the SearchTerm, the more accurate your results are going to be. Including a postal or ZIP code will almost guarantee a match. The GeocodeQuery uses an event-based asynchronous programming model and doesn’t provide an awaitable version of the QueryAsync method. This is a shame since it makes our code more complicated. Listing 8-18 contains the code for our QueryCompleted handler.
Listing 8-18. QueryCompleted Event Handler for Our GeocodeQuery
void GeocodeQueryQueryCompleted(object sender,
    QueryCompletedEventArgs<IList<MapLocation>> e)
{
    App.ViewModel.LocationItems.Clear();
    if (e.Error != null || e.Result.Count == 0)
    {
        string errorText = string.Empty;
        if (e.Error != null)
        {
            GeocodeQueryHresult hresult = (GeocodeQueryHresult)e.Error.HResult;
            errorText = hresult.GetGeocodeQueryHresultDescription();

        }
        else
        {
            errorText = "Location not found";
        }

        App.ViewModel.LocationItems.Add(new LocationItem { Address = errorText });
    }
    else
    {
        App.ViewModel.LocationItems.Clear();
        foreach (var result in e.Result)
        {
            MapAddress address = result.Information.Address;
            string addressText = string.Format("{0} {1}, {2}",
                address.HouseNumber, address.Street, address.City);
            LocationItem item = new LocationItem
            {
                Address = addressText,
                Coordinate = result.GeoCoordinate
            };
            App.ViewModel.LocationItems.Add(item);
            App.ViewModel.SearchControlsEnabled = true;
        }
    }
    App.ViewModel.SearchControlsEnabled = true;
}
The first thing to do in our handler is to check the Error property of the returned event arguments, and if it’s not null, something has gone wrong. Another thing that complicates our code is the fact that the Error is returned as an Exception—not as a specific exception cast to the base type, mind you, but just a plain old exception. You know, it’s the one that you are never supposed to throw or catch. Adding injury to the insult is the fact that the only useful information that gets returned to you is an HResult. In other words, “Something bad happened. Please decode this cryptic value to find out what.” Table 8-7 lists the possible HResult codes and their meaning. I suppose it’s better than nothing but only just.
Table 8-7. HResult Codes for the GeocodeQuery Results
| HResult | Symbolic Code |
|---|---|
| 0x80041B58 | EErrorBadLocation |
| 0x80041B57 | EErrorIndexFailure |
| 0x80041B56 | EErrorCancelled |
Assuming that nothing has gone wrong and our search returned some results, we can now add each result to a list of items and allow the user to pick the one that corresponds to the destination that they are searching for. The Result property of the argument is of type MapLocation. The MapLocation class has a property of type LocationInformation, and from that we can access the Address property that is of type MapAddress.
I created my own LocationItem class that exposes a string used to display the address of the result and a property of type GeoCoordinate since that is all we need for our RouteQuery later. I simply create a new instance and add it a list of locations from which the user can pick the correct match.
MapAddress address = result.Information.Address;
string addressText = string.Format("{0} {1}, {2}",
address.HouseNumber, address.Street, address.City);
LocationItem item = new LocationItem
{
    Address = addressText,
    Coordinate = result.GeoCoordinate
};
App.ViewModel.LocationItems.Add(item);
The item selected by the user is then added to a list of waypoints that will be used in the RouteQuery. The RouteQuery, like the GeocodeQuery, is very simple to use. Listing 8-19 has the details.
Listing 8-19. Setting Up and Executing a RouteQuery
RouteQuery routeQuery = new RouteQuery();
coordinates = (from point in App.ViewModel.WayPoints
               select point.Coordinate).ToList();

routeQuery.Waypoints = coordinates;
routeQuery.QueryCompleted += RouteQueryQueryCompleted;
routeQuery.QueryAsync();
The QueryCompleted handler for the RouteQuery follows the same pattern as the GeocodeQuery right down to the use of the Exception and HResult. On the upside, there are quite a few result codes, and each has a fairly descriptive meaning. Table 8-8 lists the codes and their meaning. The sample code for this recipe contains a couple of enumerations I created to wrap up these HResult codes. I also created a couple of extension methods that allow you to get the description text for a particular code.
Table 8-8. HResult Codes for the RouteQuery
| HResult | Symbolic Code | Description |
|---|---|---|
| 0x80042328 | EErrorGraphDisconnected | No route found. |
| 0x80042327 | EErrorGraphDisconnectedCheckOptions | No route found; some option (for example, disabled highways) may be prohibiting it. |
| 0x80042326 | EErrorNoStartPoint | Start point not found. |
| 0x80042325 | EErrorNoEndPoint | End point not found. |
| 0x80042324 | EErrorNoEndPointCheckOptions | End point unreachable; some option (for example disabled highways) may be prohibiting it. |
| 0x80042323 | EErrorCannotDoPedestrian | Pedestrian mode was set but cannot do pedestrian route (too long route). |
| 0x80042322 | EErrorRouteUsesDisabledRoads | Route was calculated but it uses roads, which were disabled by options. Note: this error is given also when start direction is violated. |
| 0x80042321 | EErrorRouteCorrupted | Corrupted route. |
| 0x80042320 | EErrorRouteNotReady | Route not ready. |
| 0x8004231F | EErrorRouteNotReadyFailedLocally | Route not ready failed locally. |
| 0x8004231E | EErrorRoutingCancelled | Routing was cancelled. |
We’ll use the LongListSelecor to display the results and use its grouping capability to display the maneuver list for each leg of the journey in a separate group. The features of the LongListSelector are covered in depth in Recipe 2-5 in Chapter 2. We’ll make use of the ObservableLongListGroup class from that chapter to display our results.
The Result property of the QueryCompletedEventArgs is of type Route. The Legs property of Route contains one RouteLeg for each of the waypoints we provided to our query, and each RouteLeg contains the collection of RouteManeuver objects that direct us to that waypoint. The RouteLeg doesn’t contain the address information, but since the Legs are in the same order as our list of waypoints, we can index into that list to retrieve the address for display in our group header. Listing 8-20 shows the code to create the ObservableLongListGroup items, and Listing 8-21 shows the XAML used to create the necessary templates and LongListSelector to display the directions.
Listing 8-20. Generating the ObservableLongListGroup Items
Route route = e.Result;
for (int j = 0; j < route.Legs.Count; j++)
{

    string wayPoint = App.ViewModel.WayPoints[j].Address;
    List<string> manuvers = (from man in route.Legs[j].Maneuvers
                             select man.InstructionText).ToList();

    App.ViewModel.Maneuvers.Add(
    new ObservableLongListGroup<string>(manuvers, wayPoint));
}
Listing 8-21. XAML for the LongListSelector and Related Templates
<phone:JumpListItemBackgroundConverter x:Key="BackgroundConverter"/>
<phone:JumpListItemForegroundConverter x:Key="ForegroundConverter"/>

<DataTemplate x:Name="ManeuverHeaderTemplate">
    <Border
        BorderThickness="1"
        Background="{Binding Converter={StaticResource BackgroundConverter}}">
        <TextBlock
            Foreground="{Binding Converter={StaticResource ForegroundConverter}}"
            Text="{Binding Key}"
            Style="{StaticResource LongListSelectorGroupHeaderStyle}"/>
    </Border>
</DataTemplate>

<DataTemplate x:Name="MaueverItemTemplate">
    <TextBlock
        Style="{StaticResource PhoneTextNormalStyle}"
        Text="{Binding}"/>
</DataTemplate>

    <phone:LongListSelector
        Grid.Row="3"
        IsGroupingEnabled="True"
        ItemTemplate="{StaticResource MaueverItemTemplate}"
        ItemsSource="{Binding Path=Maneuvers}"
        GroupHeaderTemplate="{StaticResource ManeuverHeaderTemplate}">
    </phone:LongListSelector>
Figure 8-10 shows the results of our efforts.
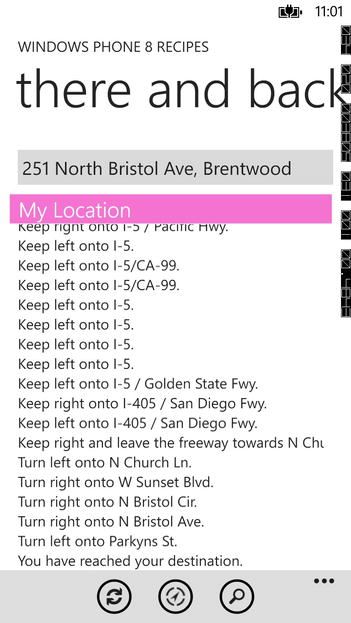
Figure 8-10. The list of maneuvers with a group header showing the starting point
1 If I wrote that method, I’d just send them out in a western direction and route them around the globe back to their starting point. That’s probably why I don't write mapping software.
2 Eight chapters in and I’m just now using the word ingredients . . .?
3 “I invented ‘It’s a good thing’ before you were even born.” —Martha Stewart
4 It’s not entirely my fault. The sample for the MapsTask on MSDN sets the SearchTerm to coffee.