Chapter 4. Using HomePage
HomePage is a Web-site tool that lets you create Web pages with files stored on your iDisk. Using any of the templates that come with HomePage, you can whip up a Web site in minutes—without having to know a lick of HTML.
Your .Mac Web pages are great for sharing pictures, movies, or files with friends and family. They’re not so great, however, for running a business. For a business site, you’ll probably want features that .Mac doesn’t offer, such as forums, shopping carts, and customized domains. If that’s the case, you’ll need to host your site through a company that specializes in Web hosting. And remember—since your iDisk is where you post your Web pages (and accompanying media), your site is limited by the amount of space on your iDisk.
Most users, however, will find that HomePage makes up for its lack of business features through ease of use and a slew of professional-looking templates. You can use HomePage to create your Web pages—which is perfect if you don’t know HTML or just don’t have the time to create a custom site—or you can create your site in any other Web authoring tool and host the pages on your .Mac account. I’ll cover both options in this chapter.
Creating a Web Page
Can you really create a Web page in a matter of minutes? You betcha. Although the templates and reasons for creating a Web page may vary, the process remains largely the same, no matter what type of page you create. And that’s the great thing about your .Mac account—it provides a bunch of templates and does all the dirty work for you; all you need to do is provide the pictures or movies you want to show off, and write some text describing what you’re publishing.
It goes something like this: When publishing a page using .Mac and HomePage, you log in to the HomePage section of the .Mac Web site; select a template to use as a starting point for your page; connect pictures, movies, or files on your iDisk to the template; write some text for your page; and publish it.
Don’t worry—I’ll go over these steps in detail. Publishing a Web page with HomePage isn’t a long process—with a little practice, you can put a photo album on the Web in 10 minutes or less.
I’ll describe how to upload files such as pictures and movies for your Web pages, which templates are available, and how to create Web pages using the HomePage tool.
Uploading Files
Although I covered how to copy files to your iDisk in Chapter 3, it’s central enough to using HomePage that we’ll cover the basics again here. For complete information on iDisk, including connecting to iDisk and uploading files, see Chapter 3, “Using iDisk.”
The reason iDisk is so important when publishing a Web page using .Mac is that HomePage looks to iDisk for the pictures, movies, and other files that it displays on each Web page. If a file is not on your iDisk, you can’t publish it on the Web with HomePage.
To upload a file to your iDisk
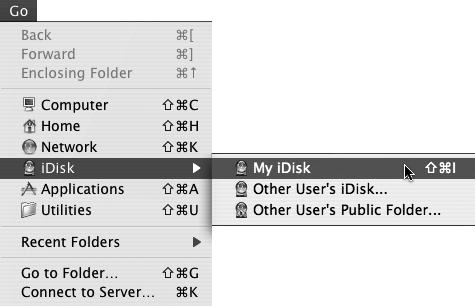
- From the Go menu, choose iDisk > My iDisk (Command-Shift-I) (Figure 4.1). The Connect To iDisk dialog opens, asking for your .Mac member name and password (unless you’ve already entered that information in System Preferences, in which case your iDisk mounts automatically on your Desktop).
Figure 4.1. From the Go menu, choose iDisk > My iDisk to connect to your iDisk.
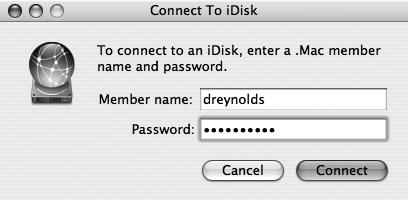
- Enter your .Mac member name and password, and click Connect (Figure 4.2).
Figure 4.2. Enter your .Mac member name and password in the Connect To iDisk dialog, and then click Connect to connect to your iDisk.
Your iDisk mounts on your Desktop, and you can use it like any other volume (Figure 4.3). The connection to your iDisk is maintained until you disconnect it or shut down your computer.
Figure 4.3. Once mounted, your iDisk works like any other network volume.

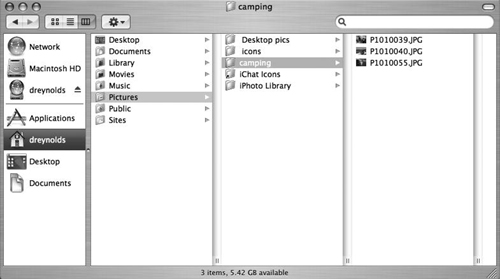
- Open a new Finder window, navigate to the files you want to copy to your iDisk, and select them (Figure 4.4).
Figure 4.4. Before you copy files to the iDisk, you need to navigate to them.
- Drag the selected files to the appropriate folder on your iDisk (Figure 4.5).
The selected items are successfully copied to your iDisk.
Figure 4.5. To copy files to your iDisk, drag them to the folder to which you want to copy them.
 Tip
Tip
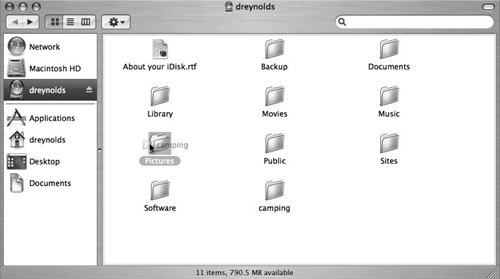
• Remember—image files must be placed inside the Pictures folder on your iDisk (or a subfolder of Pictures) in order for HomePage to find them. Same goes for movie files.
About Templates
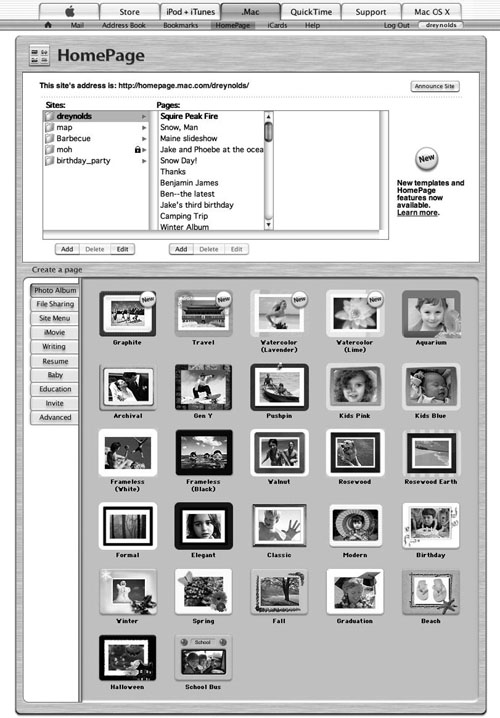
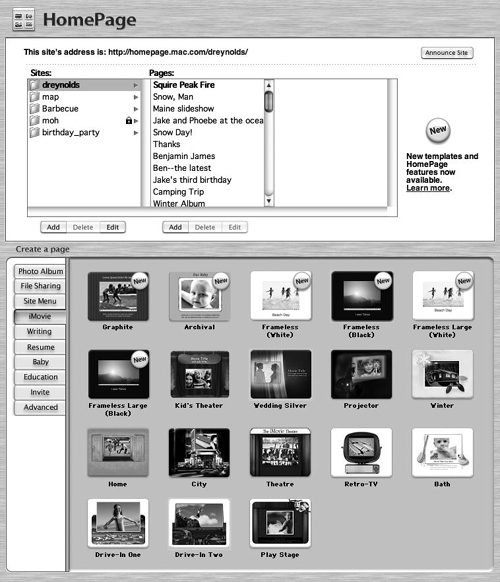
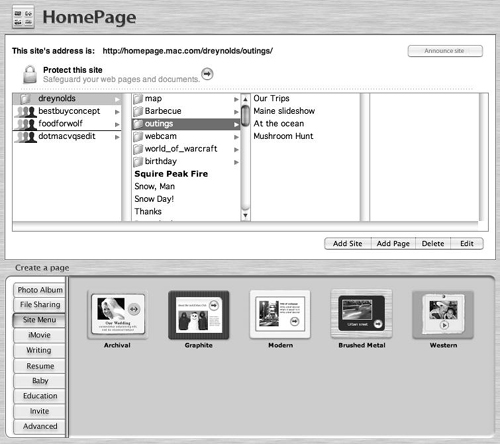
HomePage comes with hundreds of templates you can use to build your Web pages. These templates are essentially prebuilt Web pages into which you plug your pictures, movies, and text. Although you can build Web pages from scratch and publish them on a .Mac site, .Mac templates spare you all that work and free you from having to know any HTML. You supply the content and HomePage provides the rest: Its main interface lists the kinds of pages you can create, displays thumbnail images of the various templates, and provides a map of the sites and pages published on your .Mac account (Figure 4.6).
Figure 4.6. When you first load the HomePage section of the .Mac members’ Web site, you’re presented with its main interface. The top portion lists all of your sites and pages within those sites in column view. The bottom portion shows the templates you can use to quickly create new pages.

HomePage templates are divided into the following ten categories (the categories and templates on .Mac sometimes change, so this may not be a complete—or accurate—list):
• Photo Album. This option provides more than two dozen templates for sharing pictures you’ve uploaded to the Pictures folder on your iDisk (Figure 4.7).
Figure 4.7. The extensive Photo Album template set is a quick way to get your digital albums online.

• File Sharing. These templates help you to create a page that lets visitors download files from your Movies, Pictures, Public, Sites, and Music folders (Figure 4.8).
Figure 4.8. The File Sharing template set makes it easy to create a page allowing others to download files from your .Mac Web site (including your Public folder).

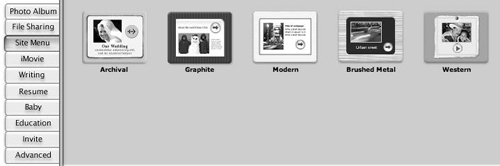
• Site Menu. Sort of the uber-template, the Site Menu template lets you create a menu page that can be used to navigate the rest of your .Mac site (Figure 4.9).
Figure 4.9. The Site Menu template set allows you to pull together an index page that points to several other Web pages—either within your .Mac Web site or on external sites.
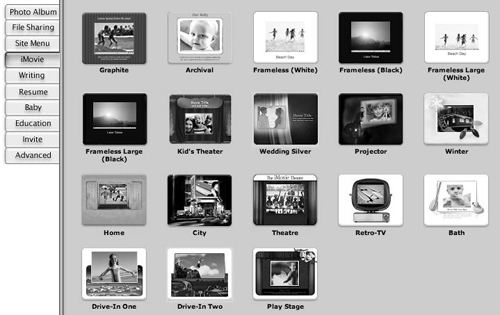
• iMovie. More than a dozen templates in this category let you showcase movies you upload to your iDisk Movies folder (Figure 4.10).
Figure 4.10. The iMovie template set lets you easily put your movies online.
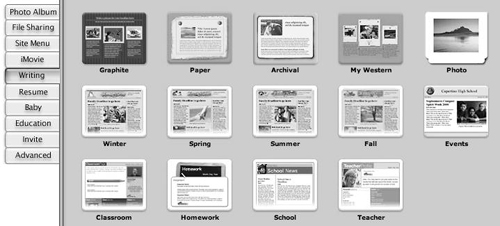
• Writing. Well, we’ve already seen templates for sharing pictures, movies, and files, so why not some for text? Choose from more than a dozen templates for creating text-based Web pages. Some of these pages feature images from your iDisk Pictures folder, but no files are needed to add text; all you have to do is type your prose into some HomePage text fields (Figure 4.11).
Figure 4.11. The Writing template set provides some attractive starting points for text-based pages, such as newsletters.
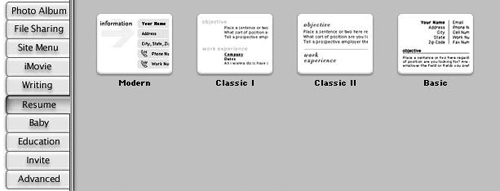
• Resume. Looking for a job? Might be worth filling out these templates to tempt potential employers. You essentially fill in the blanks; you won’t need to upload files to your iDisk (Figure 4.12).
Figure 4.12. The Resume template set makes it easy for you to post your résumé online for others to read.
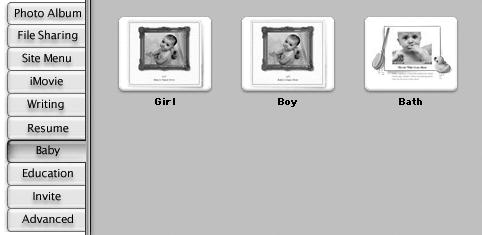
• Baby. As of this writing, HomePage offers three templates for creating baby announcements: Girl, Boy, and Bath (Figure 4.13).
Figure 4.13. The Baby template set helps you get the word out about that new addition.
• Education. Tailored to schools and educators, these templates include designs pertaining to school events, sports teams, school news, homework, and more (Figure 4.14).
Figure 4.14. The Education template set gives those involved in education (such as teachers and coaches) specialized pages.

• Invite. Throwing a party? Choose from templates that include Birthday, Football, and Picnic themes (Figure 4.15).
Figure 4.15. The Invite template set is an easy way to put up an electronic invitation to a party, sporting event, or other gathering.

• Advanced. This option lets you publish files you’ve created using an HTML editor or other external Web authoring tool (Figure 4.16). Not technically a template (you can’t plug content into it—you build the page yourself from the ground up), it’s included in the template list for simplicity’s sake.
Figure 4.16. One lonely item in the Advanced section allows you to integrate any HTML page into your .Mac site.

Creating a Photo Album
The most popular type of .Mac Web page has got to be the photo album. E-mailing digital photos to friends and family members can feel like a chore, especially once you realize how easy it is to post your pictures to the Web using one of HomePage’s Photo Album templates. Each Photo Album template displays a set of photos you publish as thumbnail images that, when clicked, expand to reveal full-size images. HomePage generates the thumbnails automatically, so you don’t have to worry about resizing your images. Published Photo Album pages also give visitors the option of viewing all their images in a slide show, at full size. Photo Album pages are perfect for sharing digital photos of special events and are practically mandatory for new parents.
To create a .Mac photo album
- Upload the photos you want to use in your photo album to your iDisk’s Pictures folder (Figure 4.17). Place the photos you want to appear together in the album inside their own folder within the Pictures folder. If you plan on making more than one album page, place the files for each page in a separate folder—for example, birthday1, birthday2, and so on.
Figure 4.17. The first step in creating a photo album is to upload the pictures you want to put in that album to your iDisk’s Pictures folder.

- Using a Web browser, go to www.mac.com and log in to your .Mac account (Figure 4.18).
Figure 4.18. Type your .Mac member name and password into the fields on the .Mac login page, and click the Login button to log in to the .Mac members’ section.

The main .Mac members’ page loads.
- Click the HomePage link at the top (Figure 4.19).
Figure 4.19. Click the HomePage link at the top of the page or the link in the left sidebar to load the HomePage tool.

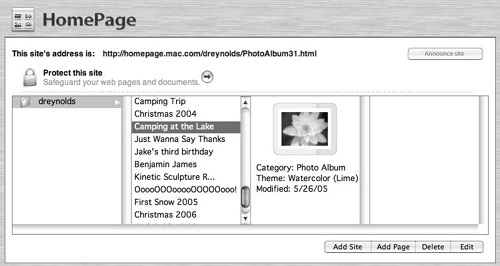
The main HomePage page loads (Figure 4.20). By default, it opens to the Photo Album page.
Figure 4.20. The main HomePage page defaults automatically to the Photo Album page.
- If the Photo Album tab is not already selected, click it to select it (Figure 4.21). The Photo Album templates are displayed.
Figure 4.21. If it’s not selected for some reason, click the Photo Album tab to load the Photo Album templates, and then click the thumbnail of the template you want to use.
- Select the template you want to use to display your photos from the ones on the Photo Album page.
The “Choose a folder” page loads, displaying the contents of your iDisk’s Pictures folder (Figure 4.22). Take the name of this page literally. Photos must be saved to a folder within your Pictures folder on your iDisk to be uploaded as a group.
Figure 4.22. To choose photos for your photo album, click the folder that contains the photos you want to use in the “Choose a folder” window. Once done, click Choose.

- Click the folder that houses the pictures you want to use in the photo album, and then click Choose.
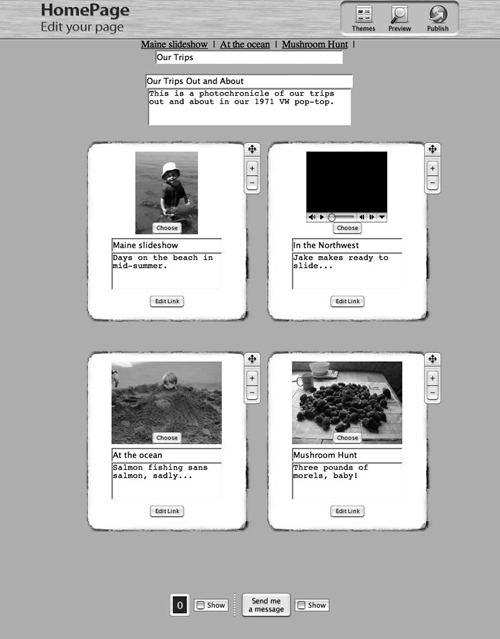
The “Edit your page” page loads (Figure 4.23).
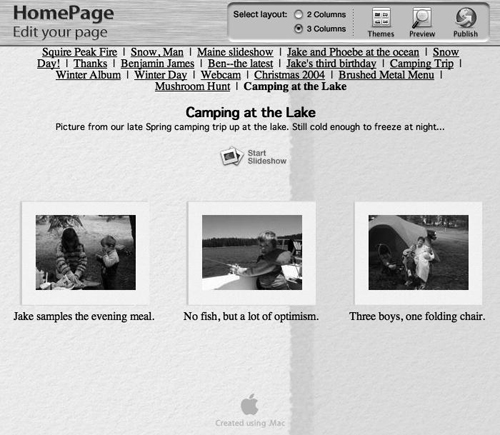
Figure 4.23. In the “Edit your page” page, fill in the fields in the chosen photo album template to complete the page. Here, you’ll have to fill in a page title, a page description, and brief descriptions for each picture.

- Fill in the following fields:
• In the field at the top of the page, type a name for your Web page. This will appear in the index at the top of your main .Mac homepage.
• In the page title field, type a title for the page itself.
• In the text box below the title field, type a few sentences explaining what your page is about.
• In the text box below each picture, type a label or caption.
- If you want your album to contain a “hit counter” that tracks visits to the page, check the Show box to the right of the number 0 at the bottom of the page.
- If you want to include a “Send me a message” button (which viewers can click to send you an e-mail message), check the Show box to the right of the “Send me a message” button.
- In the “Select layout” section in the upper right corner of the page, do one of the following:
• Click the 2 Columns radio button to display your photos in a set of two columns on the page (Figure 4.24).
Figure 4.24. Click the 2 Columns radio button to choose the two-column layout for your photo album.

• Click the 3 Columns radio button to display your photos in a set of three columns on the page (Figure 4.25).
Figure 4.25. Click the 3 Columns radio button to choose the three-column layout for your photo album.

The page refreshes to display your new layout.
- If you want to see what your page will look like before publishing it, click the Preview button at the top of the page (Figure 4.26).
Figure 4.26. To preview your page, click the Preview button.
The page refreshes, displaying a preview of your page.
- If you did not choose to preview your page, do one of the following:
• If you’re satisfied with how things look, click the Publish button at the top of the page.
• If you want to make changes to your page, click Edit to go back and make changes before publishing your page (the edit button only appears when you’re previewing a page).
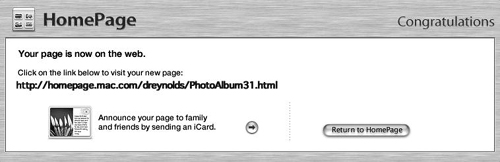
After you’ve clicked the Publish button, you’re presented with the site’s URL, and the opportunity to send an iCard to friends and family announcing the site (Figure 4.27).
Figure 4.27. The final step in publishing your site is the Congratulations page, which gives you the URL for your new page as well as the opportunity to send an iCard announcing the page.
Tips
• To prevent a photo from showing up on your Web page, uncheck its Show box.
• To arrange the pictures in a different order than the one shown, simply drag them to their new locations.
Creating a Movie Page
Thanks to broadband Internet access (for some of us lucky souls, at least), we can easily view movies online. (And if you don’t have broadband Internet access, you probably shouldn’t be uploading video to .Mac.) Thanks to your .Mac account, you can upload your own movies for others to view. Creating a movie page follows the same basic process as creating a photo album.
To create a movie page
- Upload the movie you want to share to your iDisk’s Movies folder.
- Go to www.mac.com using a Web browser, and log in to your .Mac account (Figure 4.28).
Figure 4.28. Enter your .Mac member name and password in the appropriate fields on the login page.

The main .Mac members’ page loads.
- Click the HomePage link.
The main HomePage page loads.
- On the lower left side of the page, click the iMovie tab.
The iMovie templates load (Figure 4.29).
Figure 4.29. The iMovie templates page lets you choose from a number of templates for your uploaded iMovie, including seasonal templates as well as event-based templates.
- Click the template you want to use (my fave is Retro-TV).
The “Edit your page” page loads (Figure 4.30).
Figure 4.30. On the “Edit your page” page, you set up the specifics of your new iMovie page.
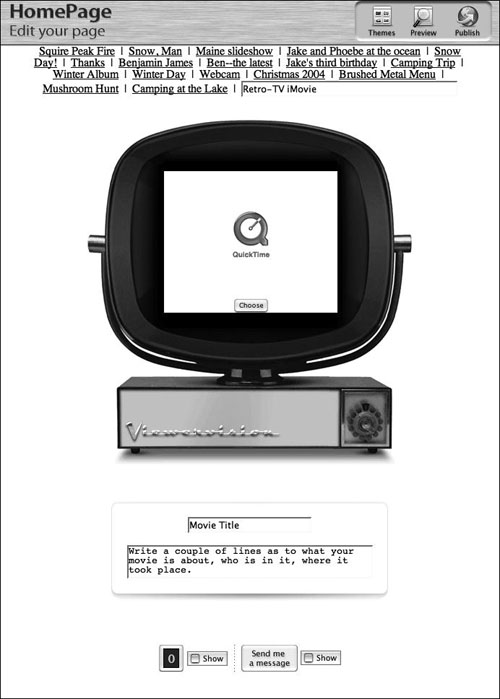
- Fill in the following fields (Figure 4.31):
• In the field at the top of the page, type a name for your Web page, which will serve as the page’s link and appear in the index at the top of your main .Mac homepage.
• Type a name for your movie.
• Type a brief description of what your movie is about.
Figure 4.31. To complete the iMovie page, give it a name and a brief description of the page.

- If you want a hit counter, check the Show box to the right of the number 0 at the bottom of the page (Figure 4.32).
Figure 4.32. To have a hit counter included on your Web page, check the Show box to the right of the number 0 at the bottom of the page.

- If you want to include a “Send me a message” button, check the Show box to the right of the “Send me a message” button, as shown in Figure 4.32.
- Just below the QuickTime logo, click the Choose button as shown in Figure 4.32.
The “Choose a file” page opens (Figure 4.33).
Figure 4.33. Select the movie you want to use on your iMovie page, and then click Choose.
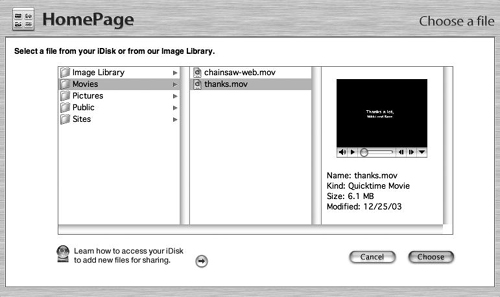
- Click a movie to select it, and then click Choose.
You’re returned to the “Edit your page” page.
- At the top of the page, click Preview.
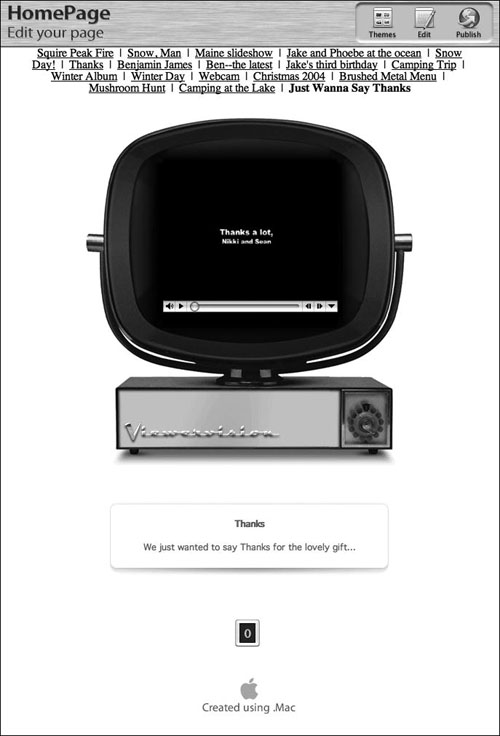
The page displaying your movie loads (Figure 4.34).
Figure 4.34. After you’ve selected the movie you want to include on your new page and clicked Preview, the page reloads, appearing as others will see it.
- If you need to make changes, click the Edit button at the top of the page (Figure 4.35).
Figure 4.35. Click the Edit button to make changes to your movie page, or click Publish to post it.

or
If you’re satisfied with how it looks, click Publish.
A Congratulations page loads, containing the movie page’s URL and giving you the opportunity to send an iCard announcing the new page (Figure 4.36).
Figure 4.36. When you’ve published your iMovie page, the page’s URL is shown, and you’re given the opportunity to send an iCard announcing it.

Tips
• Although the tab says iMovie, don’t worry—you can create your video using a different video-editing package and still use it here, as long as QuickTime understands it. For example, the AVI movies that many still cameras take work just fine.
• You can also select a movie from your Pictures, Public, or Sites folder.
Creating a File-Download Page
If you want to provide an easy way for people to download files from your iDisk’s Public folder, you’re in luck: HomePage includes a few file-download templates.
To create a file-download page
- Upload the files you want to share to your iDisk’s Public folder.
- Using a Web browser, go to www.mac.com and log in to your .Mac account.
The main .Mac members’ page loads.
- Click the HomePage link.
The main HomePage page loads.
- On the lower left side of the page, click the File Sharing tab.
The File Sharing templates load (Figure 4.37). There are two types of templates here: My Downloads templates and iDisk Public Folder templates. The My Downloads templates allow you to offer downloads of specific files, anywhere on your iDisk; the iDisk Public Folder templates list the files in your iDisk’s Public folder.
Figure 4.37. To begin creating a file-download page, click the File Sharing template that you want to use.

- Click the File Sharing template that you want to use.
The “Edit your page” page loads for the selected template. What you do next depends on whether you chose a My Downloads template or an iDisk Public Folder template.
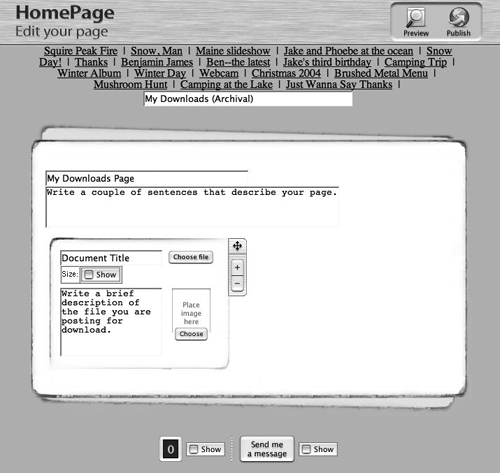
- If you chose a My Downloads template, do the following (Figure 4.38):
• In the field at the top of the page, type a name for your Web page, which will serve as the page’s link and appear at the top of your central .Mac homepage.
• Type a few sentences that describe your page. This text will appear below the page’s title at the top of your Web page.
• In the document title field, type a title for the first file that you’re making available as a download.
• If you want the file’s size to be displayed on the page, check the Show box to the right of the word Size.
• In the description text box, write a brief description of the file.
• To choose an image for the downloadable file’s thumbnail from your iDisk, click the Choose button.
• Click the “Choose file” button and navigate to the file you’ll be offering for download from your iDisk’s Movies, Pictures, Public, Sites, or Music folder.
• To add files to a My Downloads page, click the plus (+) button to the right of the file-description area and repeat these steps for the new file. If you have multiple file-description areas on a download page, you can rearrange them by dragging them around by the crossed vertical-and-horizontal-arrow handles in their upper-right corners.
Figure 4.38. If you’ve chosen a My Downloads template, enter a page title and a brief description, choose an image, and choose a file to be downloaded.
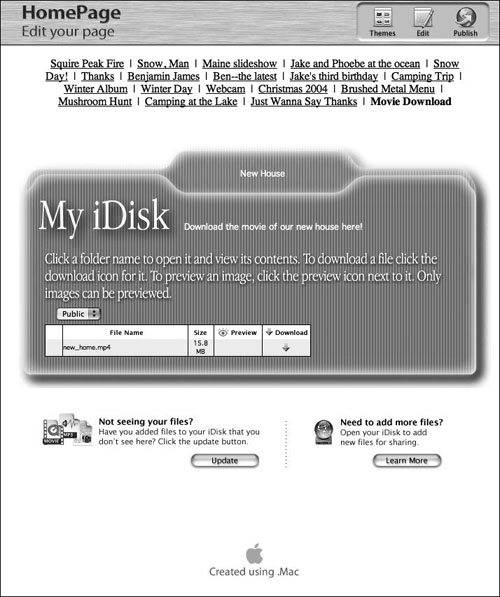
- If you chose an iDisk Public Folder template, do the following (Figure 4.39):
• In the first field at the top of the page, type a name for your Web page, which will serve as the page’s link and appear at the top of your central .Mac homepage.
• In the description field, type a description of the contents of your folder.
Figure 4.39. If you’ve chosen an iDisk Public Folder template, enter a page title and a brief description for your page.

- If you want a hit counter, check the Show box to the right of the number 0 at the bottom of the page.
- If you want to include a “Send me a message” button (which viewers can use to send you an e-mail message), check the Show box to the right of the “Send me a message” button.
- To see what the page will look like before you publish it, click Preview.
A preview of the page loads (Figure 4.40).
Figure 4.40. After you click the Preview button, the page loads as others would see it—giving you the opportunity to make any needed last-minute changes.
- If you need to make changes, click Edit. If you’re satisfied with how it looks, click Publish.
A Congratulations page loads, displaying the download page’s URL and giving you the opportunity to send an iCard announcing the new page (Figure 4.41).
Figure 4.41. When you’ve published your File Sharing page, you’re given the page’s URL and the opportunity to send an iCard announcing it.

Tips
• If files that you know are in your Public folder aren’t appearing in your Public Folder Web-page list, click the Refresh button to see if you can make them appear.
• To make sure that everyone—regardless of operating system—can work with your files, use care when naming your files. If you stick to uppercase letters, lowercase letters, numbers, hyphens, and underscore characters only (this means no spaces), you ought to be fine. And don’t delete filename extensions (such as .jpg or .doc).
• My Downloads templates let you specify files from any folder on your iDisk, so they don’t require you to place download files in the Public folder.
• To remove a file from a My Downloads page, click the minus (–) button to the right of its description area.
Editing Pages
Spelling being what it is, sometimes, you may need to make changes to a .Mac Web page or perhaps delete a page you no longer need. You can change anything about your Web pages—template colors, layout options, captions, you name it—quickly and easily.
To edit an existing page
- Log in to your .Mac account using a Web browser, and click the HomePage link. The main HomePage page loads.
- At the top of the page, select the page you want to edit, and click the Edit button (Figure 4.42).
Figure 4.42. To edit a page, select it in the proper column and then click the Edit button below the Pages column.
The “Edit your page” page loads, displaying your page in its editable form.
Say It with an iCard
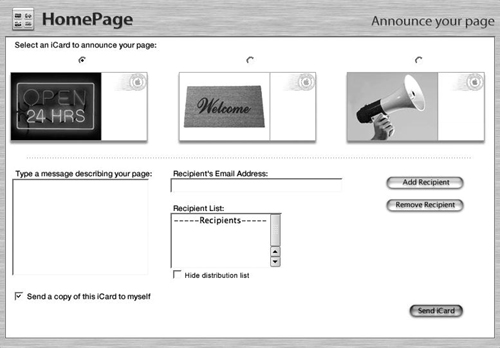
After you create a new .Mac Web page, the first thing you’ll want to do is tell people about it. Thanks to iCards, that’s a breeze. When you finish creating a new site, a page opens asking if you want to send an iCard announcement. Click the arrow button at the bottom of the page, and you’re taken to a special iCard template page, where crafting a quick card with your URL is as easy as filling in the blanks (Figure 4.43).
Figure 4.43. To send an iCard announcing your new page, simply choose a template, type a message, and add e-mail addresses to which you’ll be sending it. When finished, click Send iCard.
To delete an existing page
- Log in to your .Mac account using a Web browser, and click the HomePage link.
The main HomePage page loads.
- At the top of the page, select the page you want to delete, and click the Delete button (Figure 4.44).
Figure 4.44. To delete a page, select it in the proper column and then click the Delete button.
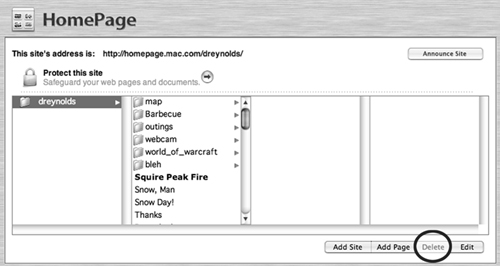
A warning appears, noting that deleting a page is permanent and asking if you want to continue.
- Click Yes.
Your Web page is deleted.
Creating a Site
When you’ve created a series of Web pages that you’d like to tie together into a logical group, you may be best served by creating a site. This groups a set of pages together for easier access. Your .Mac account not only makes it easy to create a Web page, but it also lets you manage multiple Web sites with the same set of tools.
To create a site
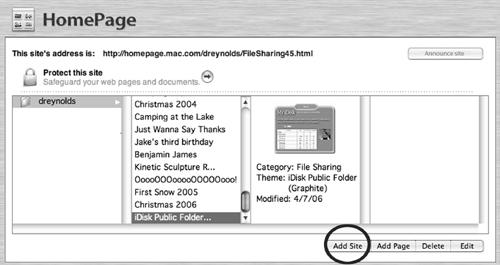
- Log in to your .Mac account using a Web browser, and click the HomePage link. The main HomePage page loads.
- On the right side of the page below the columns, click the Add Site button (Figure 4.45).
Figure 4.45. To add a new site, click the Add Site button.
The “Create a site” page loads.
- In the Site Name field, type the name for your site.
- If you want to password-protect your site, check the Password: On box.
- If you’ve checked the Password: On box, type your password in the Password field (Figure 4.46).
Figure 4.46. Give the site a name on the “Create a site” page. Check the Password: On box, and type in a password to protect the site.
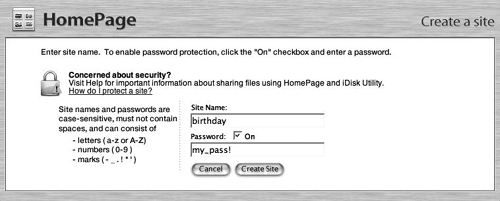
- Click the Create Site button.
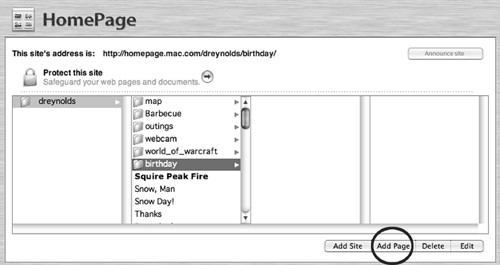
The main HomePage page loads, with a note at the top indicating the URL of the newly created site. A folder (with the site’s name to the right) appears in the second column (Figure 4.47).
Figure 4.47. Your new site appears as a folder in the second column from the left. Above, a URL for the page is displayed. Of course, no pages are on the site yet—you’ll have to add those.

Tips
• You can’t use spaces in your site names.
• .Mac site names are case-sensitive.
• Don’t use your .Mac password for a site’s password. If you do, the people to whom you give the site’s address and password will also have the keys to your .Mac account.
To add a page to a site
- Log in to your .Mac account using a Web browser, and click the HomePage link. The main HomePage page loads.
- In the second column, click the folder of the site to which you want to add a new page (see Figure 4.47).
- Click the Add Page button (Figure 4.48). The “Select a theme” page opens. From here, you can create any type of page you like, as described earlier in this chapter.
Figure 4.48. To add a new page to a site, first click the site’s folder in the second column from the left, and then click the Add Page button.
Tip
• You can move a page from one site to another by dragging the page you want to move to the new site folder in the main HomePage interface.
Getting to Your New Web Site
Once you’ve created a Web site, others can see it at the following address:
http://homepage.mac.com/membername/
Of course, be sure to replace membername with your .Mac member name. This will take folks to your main .Mac homepage. To specify a different site published to your .Mac account, use this URL:
http://homepage.mac.com/membername/sitename/
In the URL above, replace membername with your .Mac member name and sitename with the site name that you specify. This takes people to the specified site in sitename.
You can always find a site’s URL by logging in to HomePage and selecting the site (on the left). The URL will appear at the top of the page in blue (see Figure 4.49).
Figure 4.49. The first step in creating a site menu is to select the site in the second column from the left and then click the Site Menu tab to load the Site Menu template set.
Creating a Site Menu
Now that you’ve created all these great Web pages, it’s time to organize them with a site menu—and for that, we’ll need the Site Menu template. A site menu provides visitors with a high-level overview of the pages in a site that you’ve created using your .Mac account. The site menu should be one of the last things you do when creating a site—it ties all those pages into a coherent whole.
To create a site menu
- Log in to your .Mac account using a Web browser, and click the HomePage link. The main HomePage page loads.
- In the second column from the left, at the top of the page, select the site for which you want to create a site menu, and then click the Site Menu tab (Figure 4.49).
The Site Menu templates load.
- Click a Site Menu template.
The “Edit your page” page loads for that selected template. This page shows all of the site’s individual Web pages.
- Fill in all of the text fields, writing a title and description for the page, and a title and description for each item (Figure 4.50).
Figure 4.50. To create a site menu, fill in a title for the page, and a title and description for each item on the page.
- To choose a picture to represent each page accessible from the site menu, click the Choose button within each image and select a picture in the “Choose a file” page (Figure 4.51).
Figure 4.51. Click the picture you want to use as the representative graphic for the site menu item, and then click Choose to set the image.

You can use appropriate photos from your own Pictures folder or make a selection from the HomePage Image Library—a collection of artwork you can plunder for your own purposes. This selection of high-class clip art is organized by category, so it’s easy to find something you might like. To do so, simply navigate to the Image Library rather than the Pictures folder (Figure 4.52).
Figure 4.52. If you don’t have a photo of your own to match a Site Menu entry, you can probably find one that works in the HomePage Image Library.

- To remove a page from the site menu you are creating, click the minus (–) button next to each page you want removed from the site menu (Figure 4.53).
Figure 4.53. To remove an item from a site-menu page, click the minus (–) button in its upper right corner.

The page reloads sans the items you clicked.
- To add a new page (or external link) to the site menu you are creating, click the plus (+) button next to the item that comes before the place where you want to add a new item (Figure 4.54).
Figure 4.54. To add a new item linking to another page (or to an e-mail address), click the plus (+) button in the upper right corner of the item you want to have appear before the new item.

The page reloads with a new item. See the sidebar “Adding Links to Your Site Menu” for details on how to do this.
- To reposition any item on the site-menu page, drag the crossed-arrows icon on its right side to move it (Figure 4.55).
Figure 4.55. Repositioning items on a site-menu page is as easy as dragging the upper right corner of the item until the item is where you want it to be—place it between two items to have the moved item appear between them.

- To preview your site menu before publishing it, click the Preview button.
- If you’re satisfied, click the Publish button.
Your site-menu page is published, and the Congratulations page loads with the URL to your new page.
- If you want the site menu to be the first page visitors see when they visit the site, drag its page icon to the topmost spot in the site’s page list on the HomePage page. Its name will appear in boldface, indicating that it’s the default page for the site.
Adding Links to Your Site Menu
Remember that plus (+) button next to each item on the Site Menu template (see Figure 4.55)? That button lets you link to the following items from your site menu:
• Another page from your .Mac account
• An external Web page
• An e-mail address
To create a section that links to any of these items from your site menu, click the plus button next to the Web page to which you want to add the link. Don’t worry, you won’t remove the existing page—the section for adding the link appears after it. Customize this one as you would any other section within a site-menu page by typing a title and description and choosing a graphic element (Figure 4.56).
Figure 4.56. A new item on a site-menu page is mostly blank—it’s up to you to select a graphic and type in a page title and description.

To create the new link, click the Edit Link button. The “Edit your links” page opens. Select from the My Pages, Other Pages, and Email tabs (Figure 4.57). Here’s what each one does:
• My Pages. This pane lets you link only to pages that you’ve created through your .Mac account. In the My Pages pane, select a page to link to it from the site menu, and click Apply.
• Other Pages. This pane lets you link to pages other than the ones you’ve created yourself through your .Mac account. In the Other Pages pane, type into the field the URL of the page you want to link to from the site menu, and click Apply.
• Email. This pane lets you link an item on your Web page to an e-mail address. In the Email pane, type into the field the e-mail address that you’d like to link to, and click Apply.
Figure 4.57. By clicking the Edit Link button on an item in a site menu, you can link to another .Mac element, a Web page outside of .Mac, or an e-mail address.
Editing Sites
Web sites are not set in stone. After you’ve created your site, you’re likely to want to go back occasionally and change it. Although you’ll make most of your changes to individual pages, which we’ve already covered in this chapter, you can make a few sitewide changes, should the need arise. You can change the name of the site, change the password, or delete the site altogether.
To edit a site
- Log in to your .Mac account using a Web browser, and click the HomePage button. The main HomePage page loads.
- In the second column from the left, select the site that you want to edit (Figure 4.58).
Figure 4.58. To edit a site, click its name in the second column from the left, and then click the Edit button.

- Click the Edit button.
The “Edit your site” page loads.
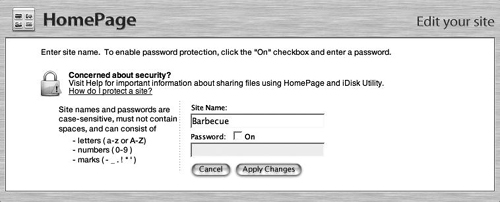
- Do one or all of the following (Figure 4.59):
• In the Site Name field, type in a new name for your site.
• If you’d like to set a password for the site, check the Password: On box, if it isn’t already checked, and type a password in the field below it.
• If you’d like to remove password protection from your site, uncheck the Password: On box.
• If you’d like to change the password for your site, type in a new password.
Figure 4.59. When the “Edit your site” page loads, you can change the site’s name and either assign or remove a password.
- Click Apply Changes.
Your new site settings are applied automatically.
To delete a site
- Log in to your .Mac account using a Web browser, and click the HomePage button. The main HomePage page loads.
- In the second column from the left select the site that you want to delete.
- Click the Delete button.
The “Delete your site” page loads, asking if you’re sure you want to delete the site.
- Click Yes.
Your site is deleted.
Tip
• To reorder the pages within a site, drag them up or down in the list on the main HomePage page. The top page in the list for a given site is the one that loads first when the site is visited—it becomes the index for that site.
Advanced Web Publishing
Although your .Mac account isn’t a full-service professional-level Web hosting account, it is capable of doing more than publishing photo albums and file-download pages. In fact, as long as your Web pages don’t rely on fancy services such as CGIs, PHP scripts, or databases, then the sky is the limit (or, at least your proficiency with an HTML authoring application is the limit).
Custom .Mac Web pages can be set up to look and feel just about any way you like, and you can host movies and pictures, publish blogs—anything you can do with HTML and static files that you upload to your iDisk.
So, if Apple’s templates just aren’t doing it for you, it’s OK to code your own. A great crash course in HTML Web design is Elizabeth Castro’s Creating a Web Page with HTML: Visual QuickProject Guide (Peachpit Press, 2004). She also wrote the best-selling HTML for the World Wide Web with XHTML and CSS: Visual QuickStart Guide, 6th Edition (Peachpit Press, 2006).
In this section of this book, you’ll learn how to integrate a custom-coded Web page into your .Mac account’s main page.
Integrating a Custom Site
If you’re here, you’ve taken the time to learn HTML or a graphical Web-page editor, and you’ve created a fabulous site that blows away the already-great templates provided by Apple. Now, it’s time to take the plunge and put your site up for everyone else to browse.
With .Mac, there are two ways to do this: You can integrate custom-built pages into an existing site created in HomePage, or you can publish one or more pages as a site that stands on its own, separate from the HomePage organizing scheme. The standalone option is described in the “Publishing a Custom Site Sans HomePage” sidebar; we’ll look at the HomePage-integration option here.
The benefit of publishing a custom page this way is that the page appears in the list of links in your .Mac site menu (and optionally includes a page-visit counter and contact link). The drawback is that you sacrifice some ability to organize page content exactly as you might like, and the page is surrounded by the .Mac interface, which may not be an ideal complement to your design.
To integrate a custom site
- Gather the HTML files that you’ll publish on your .Mac site, along with any supporting files (such as images, Flash animations, or movies), and put them in a folder.
- Connect to your iDisk, and upload the contents of your site’s folder (not the folder itself) to your iDisk’s Sites folder. If you upload the whole folder, you can still connect to the site, but you won’t be able to use the External HTML template to integrate it into your site (Figure 4.60).
Figure 4.60. Drag a custom HTML file to your iDisk’s Sites folder to upload that file in preparation for integration into your .Mac site.

- Log in to your .Mac account using a Web browser, and click the HomePage link.
The main HomePage page loads.
- At the bottom of the list of tabs, click the Advanced tab (Figure 4.61).
Figure 4.61. The Advanced template tab lists just one item—External HTML. This lets you connect any HTML file you create to your .Mac site.

The Advanced templates page loads, showing one template: External HTML.
- Click the External HTML template button.
The “Choose your web page” page loads. The HTML file that you uploaded in step 2 should show up in the Sites folder.
- Select the HTML file and click Choose (Figure 4.62).
Figure 4.62. When you load External HTML, you are asked to locate the HTML document you uploaded. Click it, and then click Choose.

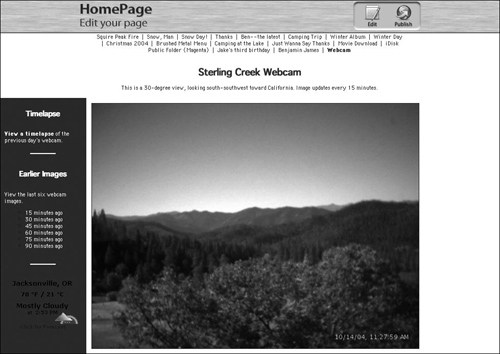
The page loads in HomePage on the “Edit your page” page, showing you a preview of how it will look when published.
- In the title field, type a title for your uploaded page (Figure 4.63).
Figure 4.63. After you’ve loaded the HTML file, the “Edit your page” page loads, allowing you to type a new name for your custom HTML page.
- If you want a counter or a Send Me a Message link, check the boxes next to these items at the bottom of the page.
- Click Preview.
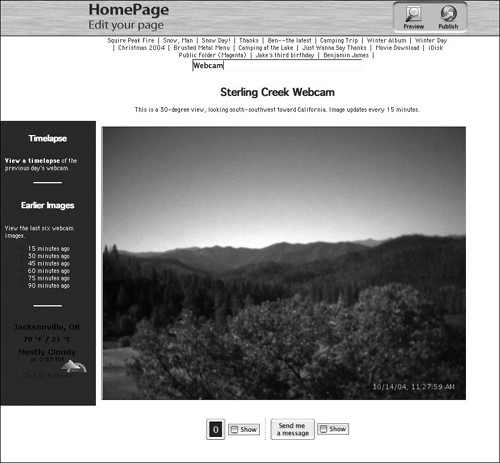
Apreview of the page loads (Figure 4.64).
Figure 4.64. After you click the Preview button, the custom page loads as others would see it.
- If you need to make changes, click Edit. If you’re satisfied with how it looks, click Publish.
A Congratulations page loads with the custom page’s URL and gives you the opportunity to send an iCard announcing the new page (Figure 4.65).
Figure 4.65. After you publish the custom HTML page, its URL is displayed in a Congratulations page, and you’re given the opportunity to send an iCard announcing it.

Once the custom Web site is uploaded, you can connect to it without doing anything else. Simply point your browser to http://homepage.mac.com/membername/filename, where membername is your .Mac member name, and filename is the name of the page you’ve just uploaded.
Tips
• As long as your links all point to the proper places, you can host a whole Web site, with as many pages, graphics, and supporting files as your iDisk capacity will allow.
• To publish a custom HTML page to a site other than the default site, first create the site using HomePage, and then upload the HTML file (and supporting files) to the proper site folder, located in the Sites folder of your iDisk.
Publishing a Custom Site Sans HomePage
If you’re a stickler for keeping things organized, there’s another way to host your custom site through your .Mac account that doesn’t involve HomePage.
Rather than uploading the bare Web page and any supporting files for your custom site, upload the folder that contains those pages. There is one major benefit to doing it this way—you can keep your content organized by folder (staying out of the way of the HomePage application). Here’s how you go about it.
- Upload your entire custom site’s folder to the Sites folder on your iDisk.
- Log in to your .Mac account, and click the HomePage link.
- Rather than clicking the Advanced tab, select the site where you want to include the new custom page, and click the Site Menu tab (Figure 4.66). On the new site-menu page that results, click the plus (+) button next to where you’d like a link to your custom site to appear. See the sidebar “Adding Links to Your Site Menu,” earlier in this chapter, for complete instructions.
Figure 4.66. To create a new site menu, first select the site where you’d like the menu page to appear in the second column from the left, and then click the Site Menu tab below.

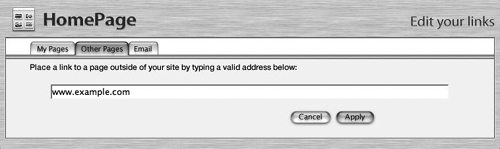
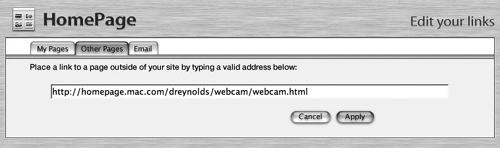
- On the “Edit your links” page, click the Other Pages tab, and type in the URL for the index file inside your newly uploaded site folder (such as http://homepage.mac.com/dreynolds/webcam/webcam.html) (Figure 4.67).
Figure 4.67. Create a link to the newly integrated site by entering its URL in the Other Pages field, and then click Apply.
- Click Apply.
- Click Preview to see how the site will look before it goes live. If you like what you see, click Publish.
You can edit an existing site-menu page in the same way to include the new site.
Also, here’s one tip worth remembering: If you’re using this technique, consider naming the index page inside the folder index.html. Why? Most Web servers, including the .Mac Web server, are set to automatically serve up the page named index.html if one isn’t specified. So, that means that
http://homepage.mac.com/dreynolds/webcam/index.html
and
http://homepage.mac.com/dreynolds/webcam/
work the same. And, hey, you’re doing your visitors a favor—a shorter URL means less typing for anyone who wants to visit your site.