
Chapter 8. Using .Mac Sync
Your .Mac account doesn’t just provide a great ad-free e-mail address, online storage, and the ability to whip up Web pages in a flash. It also serves as a repository for your personal information—your Safari bookmarks, Address Book contacts, iCal calendars, Mail accounts and rules, and Mac OS X keychains (which hold encrypted passwords for various accounts).
There are two great things about this: The first is that storing this information on your .Mac account lets you transfer it easily to any other Macintosh computer. Copying the items to another Mac is as easy as logging in to your .Mac account from that computer and clicking a button. The second great thing about storing personal information on .Mac is that you can access most of this information (such as your contacts and Safari bookmarks) from just about any computer with a Web browser and an Internet connection. With a little cleverness, you can even copy your information to a cell phone, iPod, or Palm PDA.
Five software tools allow you to do this. You’ll need your .Mac account, iSync, Address Book, Safari, and iCal. All of these come with the latest version of Mac OS X, and they can be downloaded from Apple for older versions of Mac OS X. A sixth important tool—.Mac Sync—is built right into Mac OS X v10.4 Tiger.
In this chapter, I’ll show you how to set up Mac OS X 10.4’s .Mac Sync, how to use it to synchronize information between two (or more) Macs using your .Mac account, and how to use iSync to integrate other devices in your synchronization routine.
Setting Up .Mac Sync
With the advent of Mac OS X v10.4, Apple integrated something called .Mac Sync into the operating system. This simply means that Mac OS X knows how to talk to your .Mac account directly and how to share your important information with it. To enable your Mac to do that, you first have to set up the .Mac System Preferences to work appropriately. Note that your computer will need to be connected to the Internet in order for Sync setup to work correctly.
To set up .Mac Sync
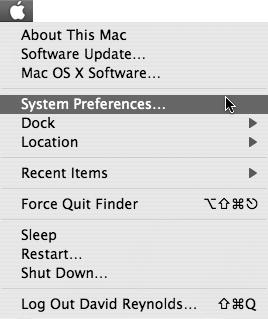
- From the Apple menu, choose System Preferences (Figure 8.1).
Figure 8.1. Choose System Preferences from the Apple menu to open the application.
System Preferences launches, and the main System Preferences window opens.
- Click the .Mac icon in the Internet & Network section (Figure 8.2).
Figure 8.2. Click the .Mac icon to load the .Mac preferences.

The .Mac pane opens, with the Account tab selected by default (Figure 8.3).
Figure 8.3. The .Mac pane opens, by default, to the Account tab.

- If you haven’t done so previously, enter your .Mac member name and password in the appropriate fields.
- Click the Sync tab.
The .Mac Sync preferences load (Figure 8.4).
Figure 8.4. Clicking the Sync tab opens the .Mac Sync preferences, where you can control what is synchronized, and when.

- At the top of the pane, check the Synchronize with .Mac box. This turns .Mac synchronization on.
- From the Synchronize with .Mac pop-up menu, choose whether you want synchronizations to take place manually (only when you tell the computer to sync your account) or automatically. If automatically, you should also choose how frequently you want updates to occur (hourly, daily, or weekly) (Figure 8.5).
Figure 8.5. From the pop-up menu, you can choose whether synchronizations happen automatically (hourly, daily, or weekly) or manually.

- Check the boxes next to the items you want synchronized. Your choices are Bookmarks, Calendars, Contacts, Keychains, Mail Accounts, and Mail Rules, Signatures, and Smart Mailboxes (for a rundown on each of these, see the sidebar “What .Mac Sync Synchronizes”).
- If you want to have the Sync icon appear in the menu bar, check the “Show status in menu bar” box at the bottom of the window.
- From the System Preferences application menu, choose Quit System Preferences (Command-Q) to quit the application and save your .Mac Sync changes (Figure 8.6).
Figure 8.6. From the System Preferences applications menu, choose Quit System Preferences to quit the application and save your changes.

 Tip
Tip
• Whether you choose automatic or manual syncing, you can perform a manual synchronization anytime by clicking the Sync Now button at the bottom of the .Mac Sync preferences pane.
Performing Your First Sync
The first time you synchronize your computer to your .Mac account is different from other synchronizations. Before your first sync, you must make some choices about how things will proceed during the synchronization. Mainly, you have to decide whether information will be merged or replaced.
In a merge synchronization, the information stored on your computer is combined with any information stored on your .Mac account (such as information copied from another computer or from an earlier synchronization of the computer you’re currently using). In a replacement synchronization, all the information on one side of the transfer (your computer or the .Mac account) is erased and replaced by a copy of the information stored on the other side. If you choose to do a replacement synchronization, you must therefore specify which set of information will be kept and copied, and which will be discarded.
To perform your first sync
- In the .Mac Sync System Preferences pane, set up a sync and click Sync Now (Figure 8.7).
Figure 8.7. Clicking the Sync Now button causes a synchronization to happen immediately.

An alert dialog opens, asking what you would like to do for this first sync (Figure 8.8).
Figure 8.8. The first time you perform a synchronization, an alert pops up asking you how you want to handle the data transfer.
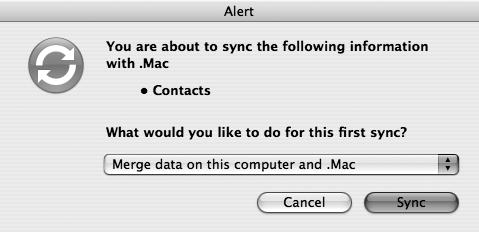
- From the pop-up menu, choose one of the following (Figure 8.9):
• “Merge data on this computer and .Mac.” This choice, selected by default, does its best to consolidate the information on your Mac with that in your .Mac account, leaving the sum total of all information on both sides of the transfer.
• “Replace data on .Mac.” This choice replaces the information in your .Mac account with the information on your Mac. Choose this when you want the information on your computer be the starting point for all synchronizations—or if there is no information in your .Mac account in the first place. Remember: Choosing this option will erase all of the synchronized information in your .Mac account for the category listed in the dialog.
• “Replace data on this computer.” This choice replaces the information on your Mac with the information in your .Mac account. Choose this when you want to use the information in your .Mac account as the starting point for all synchronizations. This is especially useful when you want to set up a new computer with your .Mac data without having to reenter contact information, Safari bookmarks, or Mail accounts.
Figure 8.9. From the pop-up menu, choose whether you’d like to merge data or replace it in one place or another.

- Click Sync.
Your Mac begins synchronizing its information with your .Mac account. If you’re merging information and there is conflicting data, the Conflict Resolver dialog opens, and you’re given the choice of reviewing information now or later (Figure 8.10). The dialog also tells you how many data points conflict, so that you have some idea what you may be getting into if you choose Review Now.
Figure 8.10. If you’re synchronizing conflicting information when merging data—such as two contacts with the same name but different addresses—the Conflict Resolver dialog appears.
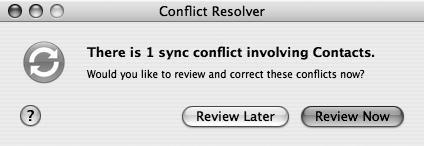
- Click Review Now.
The Conflict Resolver dialog expands to show the “Select the correct information” section, where the two pieces of conflicting information appear side by side (Figure 8.11).
Figure 8.11. When you have to choose between two conflicting bits of data, the choice is presented clearly in the Conflict Resolver dialog. Simply click the side with the correct information.
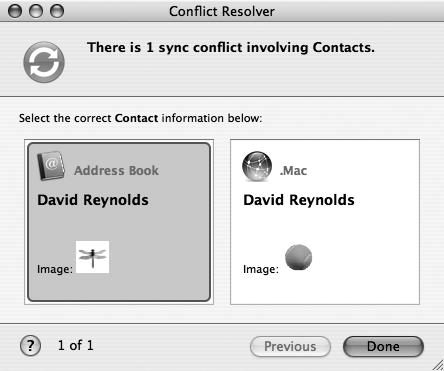
- Click the side with the correct information to resolve the conflict.
If there is more than one conflict, the next one loads in the dialog. Choose the correct information for each by clicking the proper side. When you’ve gone through all of the conflicts, the “Save conflict choices” dialog appears, noting that the changes will be applied the next time you perform a synchronization (Figure 8.12).
Figure 8.12. After you’ve made your selection in each conflict, the “Save conflict choices” dialog opens, asking you to synchronize your information again. Click the Sync Now button to perform another sync.

- Click Sync Now.
Your Mac synchronizes its information with your .Mac account, resolving the conflicts as you directed.
Tips
• If you want to investigate the Conflict Resolver, you can induce a conflict by synchronizing your data, making two separate edits to one of your contacts; and then resynchronizing.
• If you have more than one conflict to resolve, a checkbox appears allowing you to apply the same rule to all conflicts—specifying that the local versions of all contacts should be used instead of those on the server, for instance, or vice-versa. You can also review each conflict separately and decide which to use on a case-by-case basis.
• When you perform a .Mac synchronization for the first time, you may be shown the “first sync” alert dialog a few times—asking you to specify different rules for handling Address Book contacts, Mail accounts, iCal calendars, and so on.
• If you see the Conflict Resolver dialog open, don’t panic—it often means minor adjustments. Conflicting information can be as major as entirely different phone numbers and addresses for a given contact, or it can be as simple as having different user images associated with an account.
Manual Synchronization
If you’ve set up your .Mac Sync preferences to Automatic, Every Hour, Every Day, or Every Week, your computer will automatically synchronize your data on the schedule you’ve set. If you’ve set it to Manually, however, you’ll have to be the one to initiate a sync.
To perform a manual sync
- From the Apple menu, choose System Preferences.
The System Preferences application launches, and the main System Preferences window opens.
- Click the .Mac icon.
The .Mac pane opens, with the Account tab selected.
- Click the Sync tab.
The .Mac Sync preferences load.
- In the lower right corner of the .Mac Sync preferences, click the Sync Now button (Figure 8.13).
Figure 8.13. Clicking the Sync Now button causes a synchronization to happen immediately.

Your Mac synchronizes your information with your .Mac account.
Tip
• If you’ve checked the “Show status in menu bar” box, you can choose Sync Now from the Sync menu to initiate a sync (Figure 8.14).
Figure 8.14. If you elected to have Sync in the menu bar, you can perform a synchronization at any time by selecting Sync Now from that menu.

Unregistering a Mac
When you perform a synchronization to your .Mac account, any Mac you use to initiate a sync is automatically registered with your .Mac account. If you sell your Mac or otherwise don’t want a computer associated with your .Mac account (for example, if you sync a temporary user account set up on a friend’s computer), you can unregister the computer from your .Mac account so that it’s no longer eligible for synchronization.
To unregister a mac
- From the Apple menu, choose System Preferences.
The System Preferences application launches, and the main System Preferences window opens.
- Click the .Mac icon.
The .Mac pane opens, with the Account tab selected.
- Click the Advanced tab.
The .Mac Advanced preferences load, showing all computers registered for synchronization with your .Mac account (Figure 8.15).
Figure 8.15. The Advanced pane lets you control which computers are authorized to synchronize with your .Mac account, as well as reset synchronization data.

- From the Registered Computer list, select the computer that you want to unregister, and click the Unregister button.
A dialog slides down, asking if you’re sure that you want to unregister the selected computer (Figure 8.16).
Figure 8.16. Before you’re allowed to unregister a computer, a dialog slides down to ask if you’re sure—and to warn you of the consequences (which are minor). Click Unregister.

- Click Unregister.
After a short wait, the selected computer is unregistered and no longer appears in the list (Figure 8.17).
Figure 8.17. After you unregister a computer, it no longer appears in the Registered Computer list.

- From the System Preferences application menu, choose Quit System Preferences (Command-Q) to quit the application and save your .Mac Sync changes.
System Preferences quits.
Tip
• Unregistering doesn’t require logging in to your .Mac account from the computer you want to unregister. You can do it from any Macintosh. If the Mac you’re using isn’t registered to your .Mac account, you’ll have to register it temporarily, and then just select it along with the Mac you originally wanted to unregister, and unregister them both.
Resetting Sync Data
Anytime your computer is connected to the Internet, you can reset your .Mac Sync data—a process that’s essentially the same as using the replacement synchronization option presented the first time you sync a computer with .Mac. Resetting your data either replaces all the data on your computer with information stored on your .Mac account, or vice versa. It’s a useful option if you accidentally delete some critical information on your Macintosh, botch an import into your Address Book, or just decide you want to undo changes made on .Mac during your last sync.
To reset your sync data
- From the Apple menu, choose System Preferences.
The System Preferences application launches, and the main System Preferences window opens.
- Click the .Mac icon.
The .Mac pane opens, with the Account tab selected.
- Click the Advanced tab.
The .Mac Advanced preferences load, showing all computers registered to be synchronized with your .Mac account.
- Click the Reset Sync Data button (Figure 8.18).
Figure 8.18. The Reset Sync Data button allows you to “take back” the last synchronization you’ve done, by replacing the synchronized data with a copy.

A dialog slides down, asking for specifics on which information to reset and what to use as the replacement source, indicated by two arrows (Figure 8.19).
Figure 8.19. When you click the Reset Sync Data button, a dialog slides down, presenting you with some options on what data to replace and where.

- From the Replace pop-up menu at the top of the dialog, choose one of the following to reset (Figure 8.20):
• All Sync Info. This replaces all information.
• Bookmarks. This replaces just your Safari bookmarks.
• Calendars. This replaces just your calendar information.
• Contacts. This replaces just your contact information.
• Keychains. This replaces just your keychain information.
• Mail Accounts. This replaces just your Mail account information.
• Mail Rules, Signatures, and Smart Mailboxes. This replaces just the Mail rules, signatures, and any Smart Mailboxes (mailboxes created using a Spotlight search) you’ve created.
Figure 8.20. The Replace pop-up menu allows you to choose which data you want to replace—including replacing all data.

- Click one of the arrow buttons to choose whether information is to be replaced on the computer or on the .Mac account.
Clicking the left arrow replaces information on the computer with information from the .Mac account. Clicking the right arrow replaces information on the .Mac account with information from the computer.
- Click Replace.
The information is replaced as specified during the next synchronization.
Syncing a Phone, PDA, or iPod
Mac OS X v10.4 comes with a utility program called iSync, which lets you synchronize some of your information to handheld devices—such as cell phones, iPods, and PDAs—in addition to your .Mac account.
To use iSync with a handheld device
- Connect your phone, PDA, or iPod to your Mac via its USB cable; or, if your phone or PDA supports it, use a Bluetooth wireless connection. (You may need to consult your device’s manual for guidance on this.)
- In the Applications folder, double-click iSync to launch it.
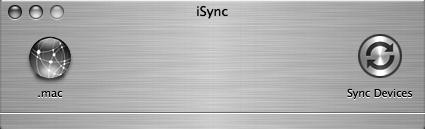
The iSync window opens (Figure 8.21). By default, it has one lonely little icon representing devices it can sync with—the icon for your .Mac account. (The account isn’t really a “device,” of course, but iSync treats it as one.)
Figure 8.21. The iSync window starts out with just one icon—the one labeled .mac.

- From the Devices menu, choose Add Device (Command-N) (Figure 8.22).
Figure 8.22. To add a device to iSync, choose Devices > Add Device or press Command-N.

The Add Device window opens, and iSync scans for any eligible connected devices. When it finds your phone, iPod, or PDA, it notifies you in the Add Device window (Figure 8.23).
Figure 8.23. When an eligible device is found, the Add Device window expands to provide details. In this case, iSync has discovered a V60 cell phone connected by USB.

- Double-click the found device to add it to iSync.
iSync adds the device and displays its preferences (Figure 8.24). The preferences in this window vary according to the specific type and model of device you’ve connected.
Figure 8.24. After a device has been added, its preferences are displayed. These preferences differ, based on the kind and model of device detected.
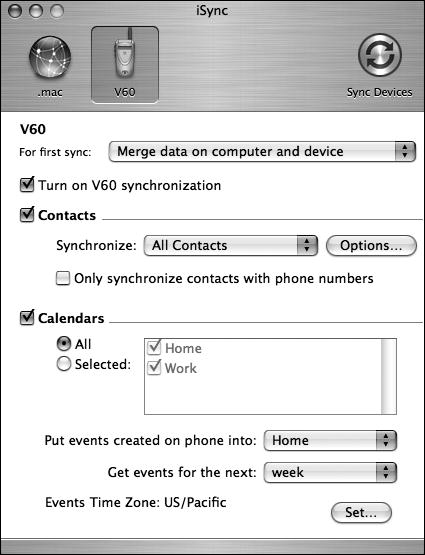
- From the “For first sync” pop-up menu, choose one of the following:
• “Merge data on computer and device” to preserve data on both the phone and your Mac, merging it and reporting any conflicting data to you
• “Erase data on device then sync” to erase the phone data and replace its data with information from your Mac
- Check the “Turn on device name synchronization” box.
This ensures that data on the device will be synchronized.
- Check the boxes next to the information you want synchronized. This varies depending on the device, but it can include contact information, calendar events, and to-do items.
- In the upper right corner of the iSync window, click the Sync Devices button. iSync synchronizes information between your phone, your Mac, and your .Mac account (Figure 8.25).
Figure 8.25. iSync presents a progress bar when information is being synchronized between your computer, a device, and your .Mac account.

Tips
• Not all cell phones work with iSync. To check your phone’s compatibility, visit Apple’s “iSync Compatible Devices” page (www.apple.com/macosx/features/isync/devices.html). Note that you may need to purchase a data cable separately.
• If you’re using a Bluetooth phone, be sure it has been set up using the Bluetooth preferences pane in System Preferences before you set up iSync to work with it. (If you don’t see a Bluetooth icon in the main System Preferences window, your Mac doesn’t have a Bluetooth module installed.)
• The .Mac icon in iSync 2.0 doesn’t do much—it presents a dialog noting that you have to change your .Mac Sync preferences in the .Mac pane of System Preferences. That dialog has a button called Open .Mac Preferences, which, if clicked, opens the .Mac pane of System Preferences.
• iSync synchronizes data stored on your phone with the records in the Address Book and iCal applications installed on the Macintosh you’re synchronizing with—not with the data stored on your .Mac account. It’s a good idea to do a .Mac sync, to make sure that Address Book and iCal are fully up-to-date, before you sync a phone or other device using iSync.
Removing a Device from iSync
iSync allows you to remove a device you previously added, so that it’s no longer synchronized—say, you give your iPod to your kid or you upgrade your cell phone and need to remove the old one.
To remove a device from iSync
- In the Applications folder, double-click iSync to launch it.
The iSync window opens (Figure 8.26).
Figure 8.26. When iSync is launched after a device is added, the device’s icon appears in the main iSync window.

- Click the icon of the device you want to remove.
The window expands to show the device’s preferences (Figure 8.27).
Figure 8.27. Before a device can be removed from iSync, you must select its icon, which expands the window to reveal the iSync preferences for the device.

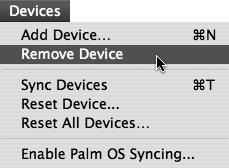
- From the Devices menu, choose Remove Device (Figure 8.28).
Figure 8.28. To remove a device, choose Remove Device from the Devices menu.
A dialog opens asking if you want to remove the device from iSync (Figure 8.29).
Figure 8.29. Before you’re allowed to remove a device from iSync, you’re asked to confirm the action. Click OK.
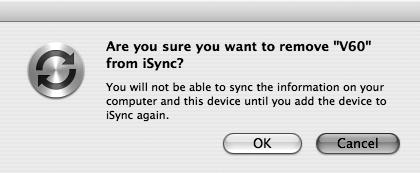
- Click OK.
The device is removed from iSync (Figure 8.30).
Figure 8.30. After the device is removed, the iSync window returns to its previous size—minus the removed device’s icon.
Setting .Mac iSync Preferences
iSync has a number of preferences you can tweak to control how your computer, your .Mac account, and any devices that you’ve set up share information (Figure 8.31). To access the iSync Preferences, choose Preferences from the iSync menu.
Figure 8.31. iSync’s preferences allow you some control over how iSync behaves.
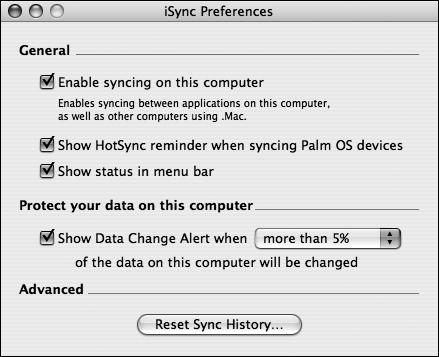
Here’s what each preference does:
• “Enable syncing on this computer.” With this check box you turn synchronization on and off for this computer, as well as for your .Mac account.
• “Show HotSync reminder when syncing Palm OS devices.” If you’re using a Palm OS–based device, with this check box you tell iSync to show the HotSync reminder when you use iSync with it.
• “Show status in menu bar.” This check box allows you to have the Sync menu appear in the menu bar.
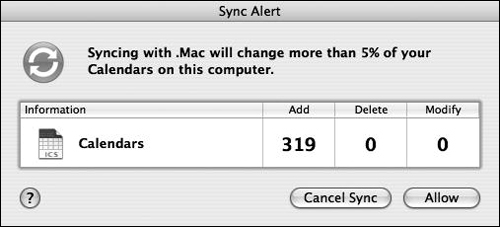
• “Show Data Change Alert when.” This pop-up menu lets you set how much of your personal information can be changed before an alert pops up. By default, an alert appears if more than 5 percent of the data on your computer changes during a synchronization (Figure 8.32).
Figure 8.32. If more than a certain amount of information will be changed by a synchronization, an alert dialog provides some details on what’s happening—including what’s being changed; how many items are being added, deleted, or modified; and whether the synchronization should be allowed or canceled.
• Reset Sync History. You click this button to reset the Mac’s synchronization history, which effectively wipes the slate clean. After you reset your sync history, the computer behaves as if it were the first time a synchronization had taken place. See the section “Performing Your First Sync” for more on what happens during a first synchronization.