Chapter 9. Using Address Book
In Chapter 8, “Using .Mac Sync,” we covered how to turn on .Mac Sync to synchronize your Safari bookmarks, iCal calendars, Address Book contacts, Mac OS X keychains, and Mail accounts to your .Mac account. Once you’ve done that, you’re ready to start tapping into one of .Mac’s most powerful features: the ability to access all of that luscious contact information from anywhere in the world using a Web browser and an Internet connection.
After you’ve performed a synchronization, you can look up contact information in your .Mac Address Book from any computer, and you can also use those contacts to quickly address e-mail messages from within .Mac’s Webmail interface.
In this chapter, I’ll show you how to set Address Book preferences, add and remove contacts from Address Book, and browse and search through the contact information stored in your .Mac Address Book using a Web browser. I’ll also explain how to edit contacts and share the contact information stored in your Mac OS X 10.4 Tiger Address Book with others.
An important note: In this chapter, we’re talking about two separate things that are both named Address Book. Your Mac OS X Address Book is an application that lets you store and organize contact information; your .Mac Address Book is an area of your .Mac account that stores contact information. Through Mac OS X synchronization, you can keep the information in your Mac OS X Address Book and .Mac Address Book identical.
Setting .Mac Address Book Preferences
Your .Mac Address Book allows you to set some preferences that govern how it behaves. By changing these preferences, you can select the number of contacts displayed per page, change how addresses are sorted, choose the defaults for the kind of data you enter, and turn on (or off) Address Book Synchronization.
To set .Mac Address Book preferences
- At www.mac.com, log in to your .Mac account.
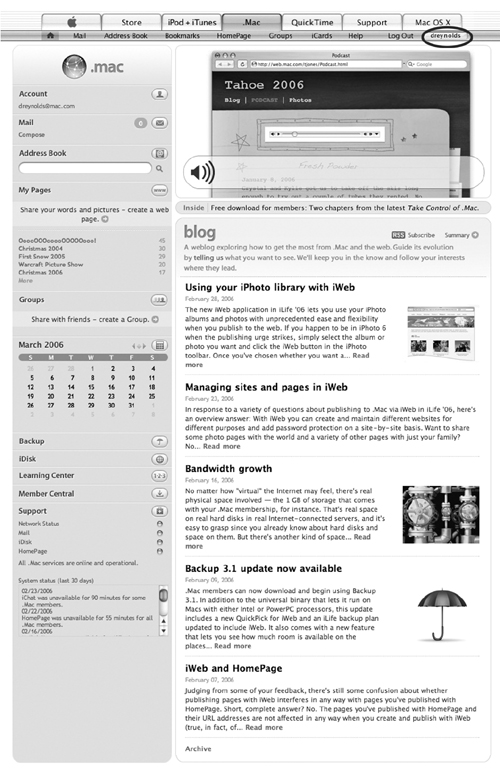
The main .Mac welcome page opens, with you logged in (Figure 9.1).
Figure 9.1. After you’ve logged in to your .Mac account, your .Mac member name appears in the upper right corner of the page.
- Click the Address Book link at the top of the page or in the column on the left.
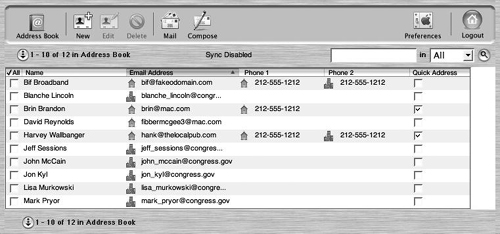
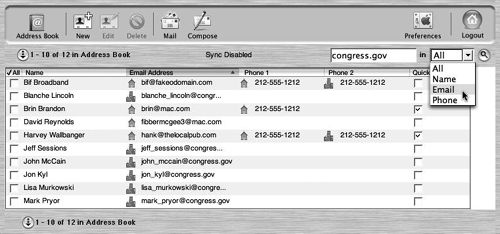
The main .Mac Address Book page opens, listing your contacts and their e-mail addresses and phone numbers (Figure 9.2).
Figure 9.2. When you open your .Mac Address Book, the contacts are listed in groups of ten, and a toolbar appears at the top of the page. Click the Preferences button to open the Preferences page.

- Click the Preferences button at the top of the .Mac Address Book page.
The .Mac Address Book Preferences page opens (Figure 9.3). On this page, you can see how many contacts are in your .Mac Address Book, and you can set how it behaves.
Figure 9.3. The .Mac Address Book Preferences page lets you set how your .Mac Address Book behaves.

- On the .Mac Address Book preferences page, do the following:
• Select the number of contacts to be displayed per page from the Contacts Per Page pop-up menu.
• Select whether addresses are sorted by last name or first name from the Display Order pop-up menu.
• Choose whether Home or Work is set as the default e-mail address in the Default Email pop-up menu.
• Choose whether Home, Work, Mobile, or Fax is set as the default phone number in the Default Phone #1 pop-up menu.
• Choose whether Home, Work, Mobile, or Fax is set as the default phone number in the Default Phone #2 pop-up menu.
• Choose whether Email, Last Name, or First Name is set as the default sort order in the Default Sort Order popup menu.
• Check the Turn on .Mac Address Book Synchronization box to turn on Address Book synchronization (as covered in Chapter 8).
- Click Save.
Your preferences are saved, and the main Address Book page opens.
 Tip
Tip
• You can go right to your .Mac Address Book by pointing your Web browser to http://addressbook.mac.com (there’s no www). If this is the first time you’ve accessed your Address Book via .Mac and you’ve already performed a sync, you may be told that you’ll have to perform an additional sync—this time from your .Mac account to your computer.
Adding Contacts to Address Book
.Mac does a fabulous job of pulling updated information from your local Address Book application that comes with Mac OS X through .Mac Sync (as described in Chapter 8). It’s not the only way to add contact information to your .Mac account, though. You can also add contacts using your Web browser.
To add a contact using a Web browser
- Log in to your .Mac Address Book.
The main .Mac Address Book page opens (Figure 9.4).
Figure 9.4. The .Mac Web Address Book also lists contacts in groups of ten, and it provides a toolbar with some common commands.
- In the toolbar at the top of the page, click the New button.
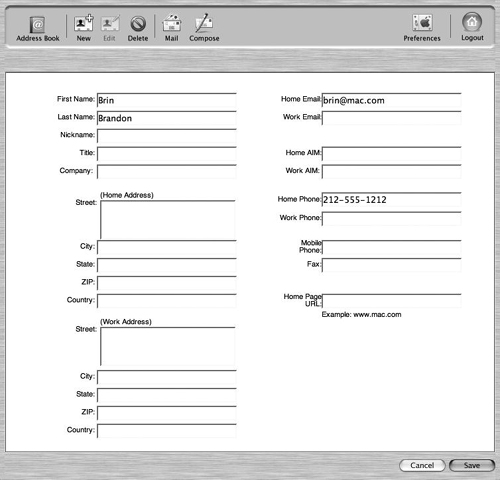
The new-contact page opens (Figure 9.5).
Figure 9.5. When you click the New button in the toolbar, the new-contact page opens. On it, you can enter as much contact information as you like.
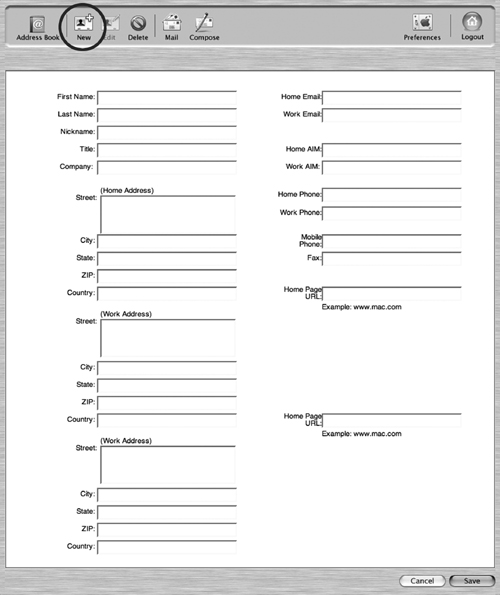
- In the fields on the new-contact page, enter as much of the following information as you like:
• Personal information, such as first name, last name, title, and company
• Physical addresses for work and home
• E-mail addresses for work and home
• AIM account information for work and home
• Telephone numbers for work, home, mobile phone, and fax
• URL for the contact’s homepage
- Click Save (Figure 9.6).
Figure 9.6. After you’ve entered the contact information, click Save.

You are returned to the main .Mac Address Book page. The new contact shows in the contact list (Figure 9.7). The next time you sync your computer(s) with your .Mac account, the new contact information will also be copied to your computer’s Mac OS X Address Book application. If you add a contact and immediately synchronize, however, you may not see the changes right away. Wait a few minutes and try synchronizing again.
Figure 9.7. The new contact appears in your .Mac Address Book.

Viewing Contact Information
When you log in to your .Mac Address Book at www.mac.com, a page opens displaying a list of your contacts. If you don’t have a lot of contacts, you might just want to browse through the list until you find the person you need to reach. When your contacts start getting more numerous, however, performing a search for the person you need to get in touch with will save you time.
To browse contact information
- Log in to your .Mac Address Book.
The main .Mac Address Book page opens, listing your contacts and their e-mail addresses and phone numbers.
- In the lower left corner of the page, click the downward-pointing arrow to bring up the next set of ten addresses (Figure 9.8).
Figure 9.8. To see the next set of ten contacts, click the downward-pointing arrow.

The next set of ten addresses appears.
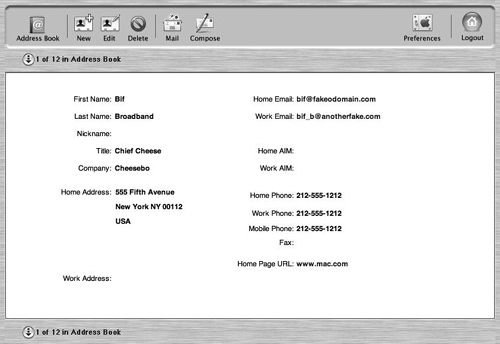
- Click a name, e-mail address, or phone number to bring up the detailed information for that contact.
The contact’s detailed-information page opens (Figure 9.9).
Figure 9.9. The detailed-information page for a given contact contains only as much information as you’ve entered, but it can include name; work and home addresses; work and home e-mail addresses; work, home, mobile, and fax numbers; Web-site URLs, and more.
Tip
• You can also browse backward through your addresses, ten at a time, by clicking the upward-pointing arrow at the bottom of the Address Book window. (This assumes you’re not viewing the first page of addresses, from which it’s impossible to go backward.)
To Search Contact Information
- Log in to your .Mac Address Book.
The main .Mac Address Book page opens.
- In the upper right corner of the Address Book page, type your search term. It can be a name, an e-mail address, or a phone number.
- From the “in” pop-up menu, choose the criterion you want to use to restrict your search (if you want to use any). The default choice is All; you can restrict your search to names, e-mail addresses, or phone numbers (Figure 9.10).
Figure 9.10. If you want to restrict your search to just names, e-mail addresses, or phone numbers, you can do so by selecting the appropriate filter from the “in” pop-up menu.
- Click the magnifying glass button to conduct the search.
The search results page appears, showing you all the matches (Figure 9.11).
Figure 9.11. Once the search is complete, its results are displayed in a list.

Editing Contact Information
At times, you may need to change a contact’s information—say you’ve misspelled an e-mail address, you need to use it for a series of messages, and you don’t feel much like correcting it every time.
To edit contact information
- Log in to your .Mac Address Book.
The main .Mac Address Book page opens.
- Check the box to the left of the contact you want to edit (Figure 9.12). You can edit only one contact at a time.
Figure 9.12. Check the box to the left of the address you want to edit.

- At the top of the page, click the Edit button.
The contact-editing page opens (Figure 9.13).
Figure 9.13. On the contact-editing page, you can make any changes you like to the selected contact’s information.
- Make any necessary changes to the contact’s information, and click Save.
Your changes are saved, and the main .Mac Address Book page opens.
To delete a contact
- Log in to your .Mac Address Book.
The main .Mac Address Book page opens.
- Check the boxes to the left of all the contacts you want to delete (Figure 9.14). You can delete more than one contact at a time.
Figure 9.14. Check the boxes next to the contacts you want to delete.

- Click the Delete button.
A page appears, asking if you’re sure you want to delete the selected contacts (Figure 9.15).
Figure 9.15. Before any contacts are deleted, you are asked if you want to go through with the deletion. Click Yes to continue.
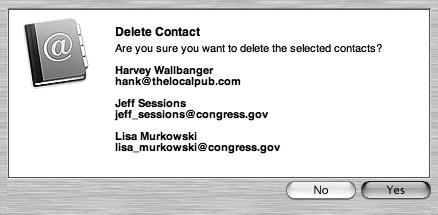
- If you’re sure you want to delete the contacts, click Yes.
The selected contacts are deleted, and the main Address Book page opens.
Sharing Address Book Information
Mac OS X 10.4 has an updated version of Address Book with one great new feature: Address Book sharing. With this feature, you can share your Address Book contacts with anyone listed in your Address Book application who has a .Mac account, and you can choose whether those people can edit your contacts or just read them. Likewise, if another .Mac member has included you (using your .Mac e-mail address) in his or her list of authorized Address Book sharers, you can subscribe to that person’s information using Address Book.
To share your Address Book information
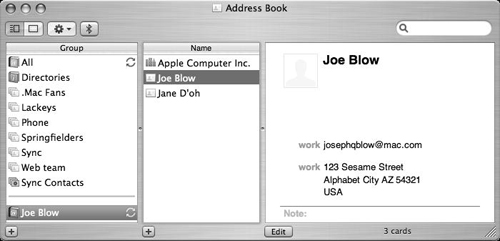
- In the Applications folder, double-click the Address Book icon to open the application.
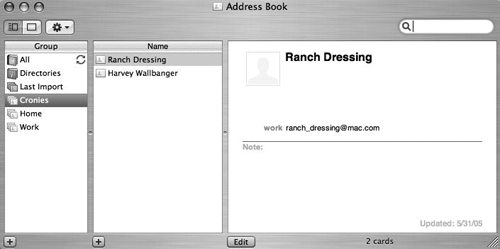
The main Address Book window opens (Figure 9.16).
Figure 9.16. The first step to sharing an Address Book is to open the Address Book application.
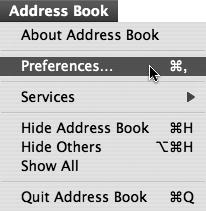
- From the Address Book menu, choose Preferences (Figure 9.17).
Figure 9.17. From the Address Book menu, choose Preferences to open the Address Book Preferences.
The Address Book Preferences window opens to the General pane by default (Figure 9.18).
Figure 9.18. The Address Book Preferences window is where you make changes to how the local version of Address Book behaves; it’s also where you set up Address Book sharing.

- At the top of the window, click the Sharing button.
The Sharing pane opens (Figure 9.19).
Figure 9.19. You’ll use the Sharing preferences pane to control who can access your Address Book information.

- Check the “Share your Address Book” box. Address Book sets up sharing behind the scenes over the course of a few seconds.
- In the lower left corner of the Sharing pane, click the plus (+) button.
A dialog listing Address Book contacts slides down (Figure 9.20).
Figure 9.20. When you click the plus (+) button in the Sharing pane, a dialog listing the available Address Book contacts slides down. Select a .Mac member with whom you want to share your Address Book information, and click OK.

- Select the .Mac member or members with whom you want to share your Address Book information, and click OK.
The dialog slides back up, and the selected contact can access your Address Book information (Figure 9.21).
Figure 9.21. Once you’ve added a .Mac member to the sharing list, that person’s name appears in the Sharing pane.

- If you want to allow the .Mac member to edit your Address Book information, check the Allow Editing box to the right of the name (Figure 9.22).
Figure 9.22. Checking the Allow Editing box to the right of a .Mac member’s name enables that member to edit your contact information.
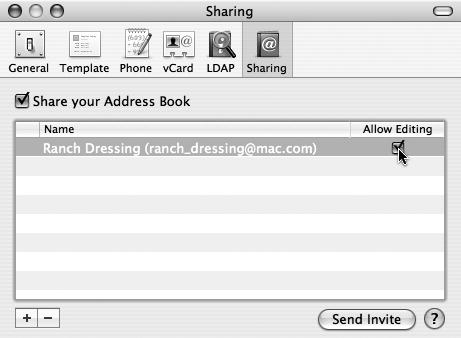
- If you want to send an e-mail invitation to the .Mac member with whom you’re sharing your Address Book information, click the Send Invite button in the lower right corner of the Sharing preferences pane.
A new e-mail with an invitation and a link to subscribe to your Address Book is generated in your default e-mail program (Figure 9.23). Send it when you’re ready.
Figure 9.23. When you click Send Invite, an e-mail message is automatically generated in your default e-mail program. This message is addressed to the person who is authorized to share your Address Book information.

- Click the red close button in the upper left corner of the Sharing preferences pane to close the window and save your changes.
Tips
• Before you can share your Address Book with another .Mac member, that person’s contact information (more specifically, his or her @mac.com e-mail address) must be entered in your Address Book application.
• To remove someone from your authorized list of those who can share your Address Book information, click the minus (–) button in the lower left corner of the Sharing preferences pane.
To subscribe to another .Mac member’s Address Book
- In the Applications folder, double-click the Address Book icon to open the application.
The main Address Book window opens.
- From the File menu, choose Subscribe to Address Book (Figure 9.24).
Figure 9.24. Choose Subscribe to Address Book from Address Book’s File menu to begin the subscription process.

A dialog slides down, asking for the account information of the .Mac member to whose Address Book information you want to subscribe.
- Type the @mac.com e-mail address for the .Mac member in the “Subscribe to this .Mac member’s Address Book” field (Figure 9.25).
Figure 9.25. Address Book asks for the e-mail address of the .Mac member to whose Address Book information you want to subscribe. Type in the e-mail address and click OK.
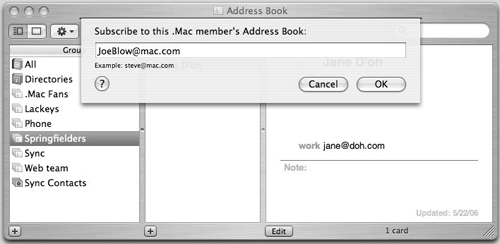
- Click OK.
The .Mac member’s Address Book appears in the lower left corner of the main Address Book window—in the Group column (Figure 9.26). Click the .Mac member’s name to open the Address Book.
Figure 9.26. Once you’ve subscribed to a .Mac member’s Address Book, it appears in the left column of the main Address Book window.
Tips
• You can use drag and drop to copy contacts from a shared Address Book into your personal Address Book: In Address Book, click the name of the shared Address Book in the Group column, highlight the name(s) you want to copy, and drag them onto All (or any other name in your personal Group list). If you have edit privileges for a shared Address Book, you can reverse the process to add your contacts to a shared Address Book.
• If you use .Mac Sync with your Address Book contacts, entries in shared Address Books will not be copied to your .Mac Address Book, unless you manually copy them to your personal Address Book as described in the previous tip.
• If you receive an e-mail invitation to share another .Mac member’s Address Book, click the “Click here to automatically subscribe now” link in the message. Your Address Book application will appear, displaying a prompt confirming the subscription (Figure 9.27). Click OK to share that Address Book.
Figure 9.27. If you receive an e-mail invitation to share another .Mac member’s Address Book, clicking the embedded “Click here to automatically subscribe now” link will open your Address Book application and display this prompt, asking you to confirm the subscription. Click OK to subscribe.

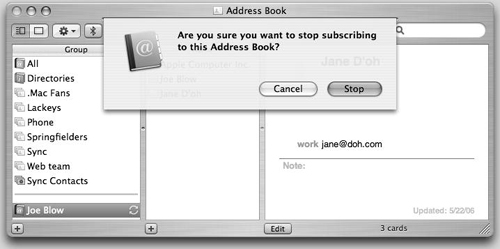
• To unsubscribe from another member’s .Mac Address Book information, select the Address Book from which you want to unsubscribe in the main Address Book window, press Delete, and then click Stop when prompted to confirm that you want to cancel the subscription (Figure 9.28).
Figure 9.28. After highlighting the name of a shared Address Book and pressing the Delete key, you must click Stop at this prompt to end your subscription.