Chapter 11. Using iCal
iCal, Apple’s free calendaring software, is included with Mac OS X 10.4 Tiger and offers some unique features to .Mac members. Anyone running Mac OS X can use iCal to keep track of calendar events, set alarms for events, and create and manage to-do lists, but .Mac members can also publish their calendars using their .Mac accounts so that anyone with a Web browser can view them. In addition, other Mac OS X users can subscribe to iCal calendars you publish on .Mac, so that the published calendars appear inside their copies of iCal, next to all their other calendars—and can even be automatically updated when changes occur.
In this chapter, I’ll show you how to publish your calendars, view your calendars using a Web browser, subscribe to other calendars, and remove calendars.
Publishing Calendars
iCal paired with a .Mac account is a powerful combination. With it, you can publish your calendars on your .Mac account so that others can see your schedule and the events you have planned. As a side benefit, you can also view your calendars from anywhere that you have access to a Web browser.
To publish a calendar
- In the Applications folder, double-click the iCal icon to open the application.
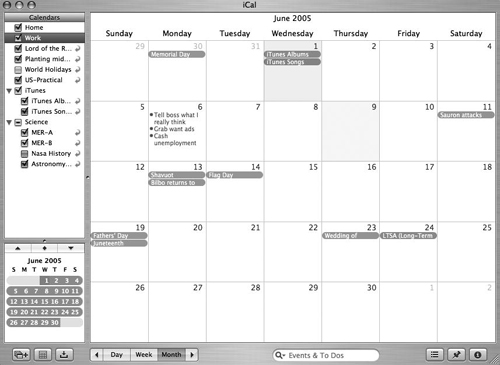
The main iCal window opens (Figure 11.1).
Figure 11.1. iCal’s main interface is pretty simple: familiar visual calendar with all scheduled events on the right, and individual calendars listed on the left. Select a calendar in the list to prepare to publish it.
- From the Calendars section on the left, select the calendar you want to publish.
- From the Calendar menu, choose Publish (Figure 11.2).
Figure 11.2. When you choose Publish from the Calendar menu, the calendar-publishing dialog opens; it allows you to name the calendar, specify where it will be published, and indicate what calendar elements will be published.

A dialog slides down that lets you control what information is published, as well as where it’s published.
- In the dialog, do the following (Figure 11.3):
• In the “Publish calendar as” field, type a name for your calendar. Refrain from using non-alphanumeric characters (such as spaces), or you’ll have to use the HTML-code equivalents of those characters. For example, a calendar titled My Calendar becomes My%20 Calendar when listed in a URL. This is simply because URLs can’t contain spaces, so the space in the calendar name is encoded as %20. Bottom line: Avoid non-alphanumeric characters when naming calendars you want to publish.
• From the “Publish on” pop-up menu, choose .Mac, if it’s not already selected.
• If you want your published calendar to reflect changes you make to it in iCal, check the “Publish changes automatically” box.
• To publish the titles and notes for the calendar’s events, check the “Publish titles and notes” box.
• To publish alarms associated with the selected calendar, check the “Publish alarms” box.
• To publish To Do items associated with the calendar, check the “Publish To Do items” box.
Figure 11.3. Once you’ve customized how your calendar will be published, click Publish.

- Click Publish.
The calendar is uploaded to your .Mac account, and the Calendar Published dialog opens (Figure 11.4). This dialog provides the URL for subscribing to the calendar, as well as the URL for viewing the calendar using a Web browser.
Figure 11.4. After you’ve published a calendar, the Calendar Published dialog appears, giving you several options on what to do next. You can visit the calendar’s page, send an e-mail announcing the page, or simply dismiss the dialog by clicking OK.

- Click the Visit Page button to open the calendar in your Web browser (Figure 11.5).
Figure 11.5. If you click the Visit Page button after publishing a calendar, the calendar opens in your Web browser.

or
Click the Send Mail button to generate an e-mail message announcing the calendar in your default e-mail client (Figure 11.6).
Figure 11.6. If you click the Send Mail button after publishing a calendar, an e-mail message is automatically generated in your e-mail client, complete with the details concerning your new calendar.

or
Click OK to dismiss the dialog.
 Tips
Tips
• If you have private calendars that you want to keep secure, don’t publish them on your .Mac account where anyone with a Web browser who knows the URLs can view them.
• You can also publish calendars to private servers with iCal. Choose Calendar > Publish. In the dialog that slides down, choose “a Private Server” from the “Publish on” pop-up menu. This is useful if you want to keep your calendars private, such as with an intranet. Remember—.Mac calendars are neither private nor secure.
To unpublish a calendar
- In the Applications folder, double-click the iCal icon to open the application.
The main iCal window opens; in the Calendars section on the left, published calendars have a small icon to the right of their names indicating that they have been published (Figure 11.7).
Figure 11.7. Calendars that you’ve published show a small icon to the right of their names that looks like a wave emanating from a point.

- In the Calendars section, select the calendar you want to unpublish.
- From the Calendar menu, choose Unpublish (Figure 11.8).
Figure 11.8. To unpublish a calendar, select the calendar and then choose Unpublish from the Calendar menu.

A dialog appears, asking you to confirm that you want to unpublish the calendar (Figure 11.9).
Figure 11.9. Before you can unpublish a calendar, iCal first asks if you’re sure you want to do that. Click Unpublish.

- Click Unpublish.
The calendar is no longer published on your .Mac account, and the published icon disappears (Figure 11.10).
Figure 11.10. After you’ve unpublished a calendar, the published icon no longer appears to the right of its name in the Calendars column.

Subscribing to Calendars
You can use iCal to subscribe to a calendar that someone else (or you, if you like) has published to a .Mac account. This imports the calendar into your copy of iCal, so that you can view that calendar without opening a Web browser. You can customize the update frequency for the subscription and remove alarms and To Do items.
To subscribe to a calendar
- In the Applications folder, double-click the iCal icon to open the application.
The main iCal window opens.
- From the Calendar menu, choose Subscribe (Command-Option-S) (Figure 11.11).
Figure 11.11. To subscribe to an iCal calendar, choose Subscribe from the Calendar menu.

The “Subscribe to” dialog slides down.
- In the “Subscribe to” field, type the URL of the calendar you’re subscribing to (Figure 11.12).
Figure 11.12. To subscribe to an iCal calendar, enter its URL in the “Subscribe to” field. The URL should begin with webcal://.
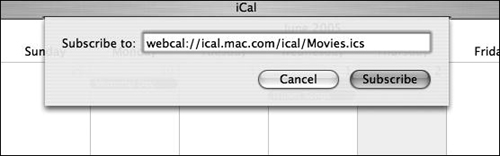
The URL should begin with webcal://.
- Click Subscribe.
The calendar is downloaded, and the “Subscribing to” dialog appears, asking you to customize the subscription.
- In the “Subscribing to” dialog, do the following (Figure 11.13):
• In the Title field, type a title for the calendar (one is supplied for you).
• If you want to have your calendar automatically updated, check the Refresh box.
• From the Refresh pop-up menu, choose a frequency for the updates. Your choices are “every 15 minutes,” “every hour,” “every day,” and “every week.”
• To remove all alarms from the calendar, check the “Remove alarms” box.
• To remove To Do items from the calendar, check the “Remove To Do items” box.
Figure 11.13. In the “Subscribing to” dialog, you can give the calendar a name, set how often it’s checked for new information, and set whether alarms and To Do items are also subscribed to.

- Click OK.
The calendar is added to the bottom of iCal’s Calendars column on the left side of the window (Figure 11.14).
Figure 11.14. Once you’ve subscribed to a calendar, it appears in the Calendars section of your iCal page.

Tips
• To find out the URL of a calendar, you can do the following: combine webcal://ical.mac.com/ with the .Mac member name, a slash, the calendar’s published name, and finally .ics. So, the URL for a .Mac member named bigbill who has published a calendar named Parties would look like webcal://ical.mac.com/bigbill/Parties.ics. Or, you could just ask bigbill, who would be happy to give you his Parties calendar URL.
• You can find more calendars to subscribe to at www.apple.com/macosx/features/ical/library and www.icalshare.com.
To unsubscribe from a calendar
- In the Applications folder, double-click the iCal icon to open the application.
The main iCal window opens.
- From the Calendars section of the window on the left, select the calendar you want to unsubscribe from.
- Press the Delete key.
A dialog opens, asking if you’re sure you want to remove the calendar (Figure 11.15).
Figure 11.15. Before you can unsubscribe from a calendar—that is, delete it from your list—iCal asks if you’re sure this is something you want to do. Click Delete to proceed.

- Click Delete.
You are unsubscribed from the calendar, and it is removed from your iCal calendar (Figure 11.16).
Figure 11.16. After you’ve removed a calendar to which you’ve subscribed, it no longer shows up in the Calendars section.

Viewing Calendars Online
When you publish a calendar from iCal on your .Mac account, you can view it using a Web browser. A corollary to this is that you can view any published iCal calendar using a Web browser, provided you know the name of the calendar and the member name of the person who published it.
To view an iCal calendar online
- Open your Web browser.
- In the address field, enter http://ical.mac.com/
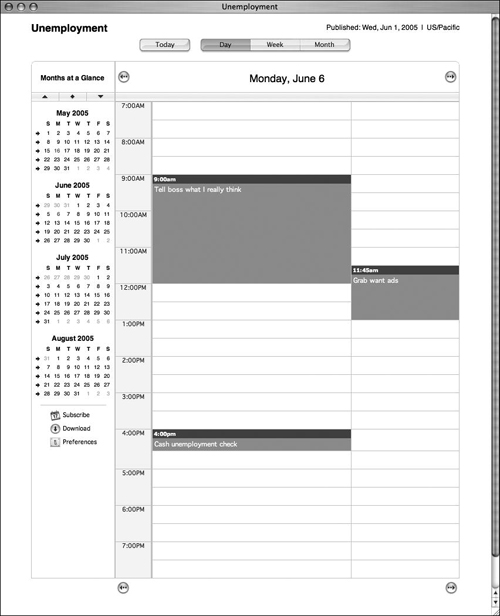
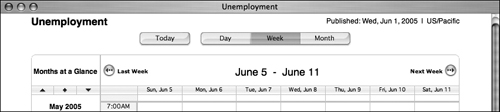
membername/calendarnameand press Return—replacing membername with the .Mac member name of the person who published the iCal calendar, and calendarname with the name of the calendar you want to view.The calendar opens in your Web browser, showing the Week view by default (Figure 11.17).
Figure 11.17. When you open a calendar in your Web browser, the Week view is selected by default.

- To view the calendar one day at a time, click the Day button.
The calendar switches to Day view (Figure 11.18).
Figure 11.18. Click the Day button to change the calendar to the Day view. A calendar’s Day view lets you see how things are supposed to play out each day, minute by minute.
- To view the calendar one month at a time, click the Month button.
The calendar switches to Month view (Figure 11.19).
Figure 11.19. A calendar’s Month view displays an entire month at a time, with a summary of the month’s scheduled events at the bottom.

- To view today’s calendar, click the Today button.
The calendar for the day you’re working in opens.
- To view the calendar one week at a time, click the Week button.
The calendar switches to Week view (Figure 11.20).
Figure 11.20. The Week view (a calendar’s default view) shows the week at a glance, and provides a time frame for each event—a nice cross between the Day and Month views.

Set Online Calendar Preferences
You can set a calendar’s viewing preferences by clicking the Preferences button in the lower left column of the calendar’s Web page (Figure 11.21). When this page opens (Figure 11.22), you can alter the following settings:
• Choose a language. From the “Choose a language” pop-up menu, choose which of 15 languages the calendar is displayed in.
• Choose whether the event list is displayed. From the “Event list” pop-up menu, choose On or Off to set whether the event list appears at the bottom of the calendar in Month view.
• Choose a default calendar view. From the “Default calendar” pop-up menu, select Daily, Weekly, or Monthly to set which view is the default.
• Choose the day on which the week starts. From the “Start week on” popup menu, choose a day of the week on which you want calendars to start. By default, this is set to Sunday, but no one’s stopping you from setting it to Thursday if you like.
• Choose how the time is displayed. From the “Time display” pop-up menu, choose whether calendars are displayed using a 12-hour or 24-hour clock.
Figure 11.21. Click the Preferences button to load the preferences for that Web calendar.
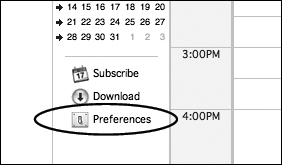
Figure 11.22. On the calendar preferences page, you can change some settings that govern how the calendar behaves—such as the language it’s displayed in, whether the event list is shown, and what the default calendar view looks like.

Once you’ve made your selections, click the Apply button in the lower right corner to save your changes.
To subscribe to a calendar online
- Open your Web browser.
- In the address field, enter http://ical.mac.com/
membername/calendarname, and press Return—replacing membername with the .Mac member name of the person publishing the iCal calendar, and replacing calendarname with the name of the calendar you want to view.The calendar opens in your Web browser.
- In the left column, click the Subscribe button (Figure 11.23).
Figure 11.23. Click the Subscribe button to launch iCal and subscribe to the calendar you’re viewing in your Web browser.

iCal opens and presents you with the “Subscribe to” dialog, with the URL filled in automatically (Figure 11.24).
Figure 11.24. After you click Subscribe, the “Subscribe to” dialog slides down, with the URL for the calendar you were just viewing filled in. To subscribe, click the Subscribe button.

- Click Subscribe.
The subscribed calendar appears in iCal.
To download a calendar
- Open a calendar in a Web browser.
- In the lower left column, click the Download button (Figure 11.25).
Figure 11.25. To download a file of the calendar (in a format that can be read by some other calendaring programs, such as Microsoft Entourage), click the Download button.

A calendar file downloads to the folder where files are normally downloaded. You can import this calendar file into calendaring programs that don’t support subscriptions, such as Microsoft Entourage.
Tips
• To import a calendar file into another program, typically you can either drop the calendar file on the program’s icon, or import the file through the program’s import function.
• To view more information about a calendar event, click it in the browser window.
A window pops up with details about the event (Figure 11.26).
Figure 11.26. When you click a calendar event, a window pops up with more information about that event, showing its title, start date, and end date.

• You can browse through a calendar by clicking the Last and Next buttons at the top and bottom of the calendar’s browser window (Figure 11.27).
Figure 11.27. To browse through a calendar, click the Last and Next buttons at the top and bottom of the calendar’s browser window.
• To view an individual day, click it in the Months at a Glance sidebar. The day will load in the browser window.