Chapter 7. Using .Mac Groups
Some would say that the Internet is all about connecting with other people (that is, those who aren’t busy saying the Internet is for comparison-shopping insurance). That’s been true since the first e-mail messages started flitting around the ether (before spam ruined all that). These days, coordinating and connecting with a group takes more than e-mail alone—it takes custom Web pages, message boards, and more.
That’s where .Mac groups come in. With them, you can create a group Web page, set up a message board, maintain a group calendar, and have a group e-mail address—all using your .Mac account. This is great for coordinating book clubs, sports teams, family activities, and even people who like to play the same video games as you do.
In this chapter, you’ll learn how to set up a group, send messages using the group e-mail address, invite others to join your group, use the group iDisk space, post messages to your group message board, manage your group calendar, and delete a group once it’s outlived its usefulness (or you really need to free up some iDisk space).
 Tip
Tip
• To get the skinny on .Mac groups from the proverbial horse’s mouth, visit www.mac.com/1/Groups_faq.html.
Setting Up a Group
The first step in using your .Mac account to host a group site is to create it (go figure), which means you’ll need to supply the following:
• A name for your group
• A group e-mail address (you get to make this up, but it’ll end in @groups.apple.com)
• A group description
• Your group’s time zone
You’ll also need to pick a color scheme for your group and choose whether group members can refer others to your group—that is, invite new recruits to sign up.
Tip
• To create a group on your .Mac account, you must have at least 30 MB of iDisk space available. You also need a full .Mac membership (not a trial version).
To create a group
- In your Web browser, navigate to www.mac.com.
The main .Mac page loads (Figure 7.1).
Figure 7.1. The main .Mac page is what the world sees when it visits www.mac.com.

- Click the Groups link in the navigation bar.
The .Mac login page loads (Figure 7.2).
Figure 7.2. Enter your member name and password, and then click Login to log in to your .Mac account.
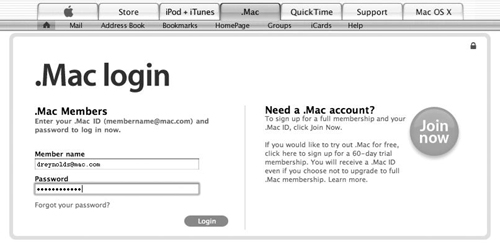
- Type your .Mac member name and password, then click Login.
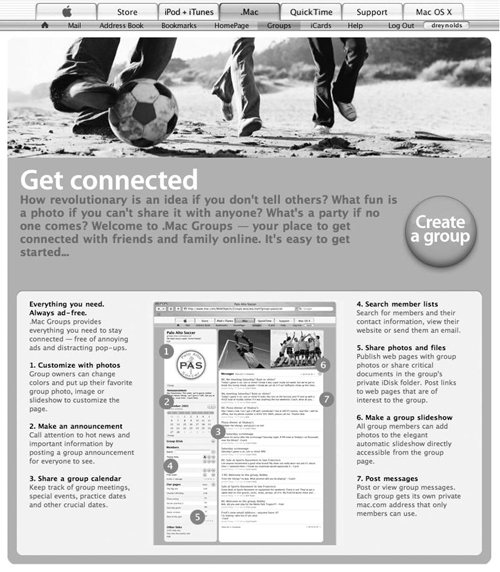
The main .Mac groups page loads (Figure 7.3).
Figure 7.3. If you’ve logged in by clicking the Groups link and you don’t have any groups, you are presented with the main .Mac groups page that describes what groups are all about.
- Click the “Create a group” button. The “Set up your group” page loads (Figure 7.4).
Figure 7.4. On the group setup page, you can give your group a name, assign it an e-mail address, create a description, choose a color scheme, select a time zone, and decide whether or not to allow referrals. Once you’ve filled in all of the personal details, click the Submit button.
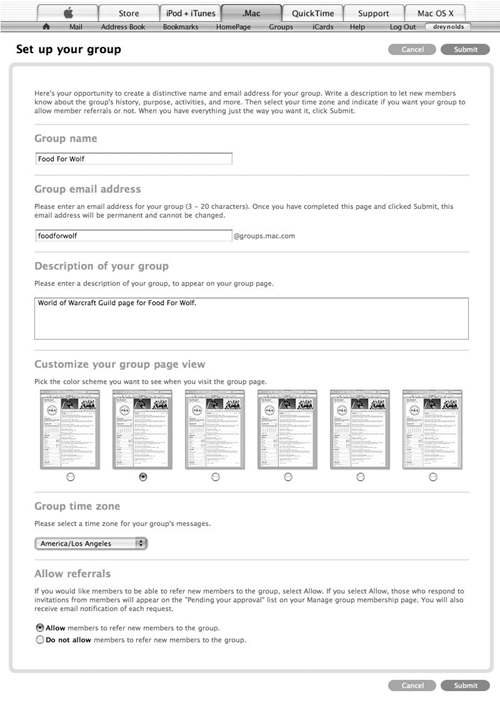
- Do the following:
• In the “Group name” field, type your group’s name.
• In the “Group email address” field, type the e-mail address you’d like to use. Remember—this can be done only once and can’t be changed, so use care.
• In the “Description of your group” field, type a description for your group.
• In the “Customize your group page view” area, choose one of the six color schemes.
• From the “Group time zone” popup menu, select a time zone for your group’s messages. This will be used to time-stamp group postings.
• In the “Allow referrals” section, click the “Allow” or “Do not allow” radio button to select whether group members can invite other people to join the group. (If you allow referrals, you, as group owner, can still approve or deny any new members.)
Click the Submit button; your group list page loads, showing your new group (Figure 7.5).
Figure 7.5. When you create a group (and before you assign an image), you’ll see the generic “Get connected” graphic on your main group list page, to the left of your group’s description.

- Click the right arrow on the right side of the page, or click the URL for the group’s main page, which appears under the group’s title.
The group page loads the way others will see it (Figure 7.6). It’s a little plain, but we can change that.
Figure 7.6. After you’ve created a group, its page looks a little plain. Don’t worry—you can spice it up with photos and messages.

To customize your group page
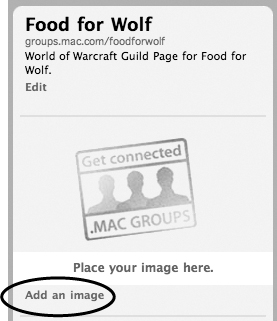
- In the left column just below the generic .Mac Groups image, click the “Add an image” link (Figure 7.7).
Figure 7.7. Click the “Add an image” link to add a picture to your page.
The column expands down to show controls for adding an image (Figure 7.8).
Figure 7.8. After you click the “Add an image” link, you’ll see controls for uploading an image to your group.

- Click the Choose File button.
A file-selection dialog slides down (Figure 7.9).
Figure 7.9. In the file-selection dialog, choose the graphic you want to upload to your group page.
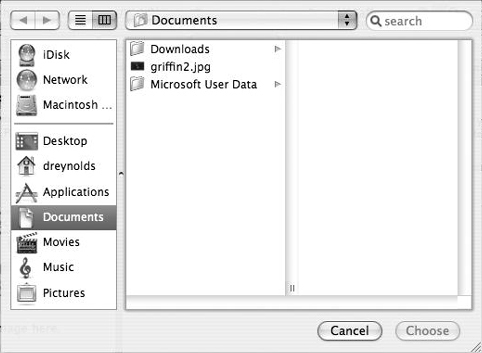
- In the file-selection dialog, navigate to the GIF or JPEG image you want to use, select it, and then click Choose.
The filename appears to the right of the Choose File button (Figure 7.10).
Figure 7.10. After you’ve uploaded an image to your group, its name appears to the right of the Choose File button. Click Select to continue.
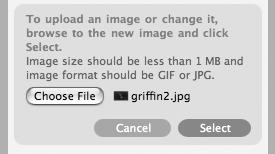
- Click the Select button.
The page reloads, showing the image you uploaded (Figure 7.11).
Figure 7.11. After you upload an image to your group, it appears in the upper left corner of the page.
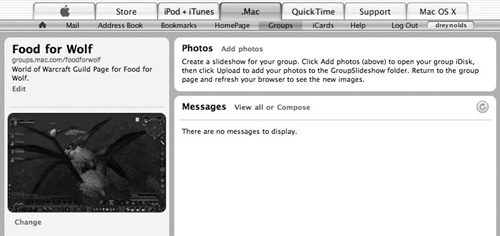
- In the Photos section of the page, click the “Add photos” link (Figure 7.12).
Figure 7.12. Click the “Add photos” link in the Photos section to upload photos to your group.

Your group iDisk page loads in a new window, and a login dialog slides down (Figure 7.13).
Figure 7.13. Before you can access your group iDisk, you have to enter your .Mac member name and password, and then click Log In to continue.
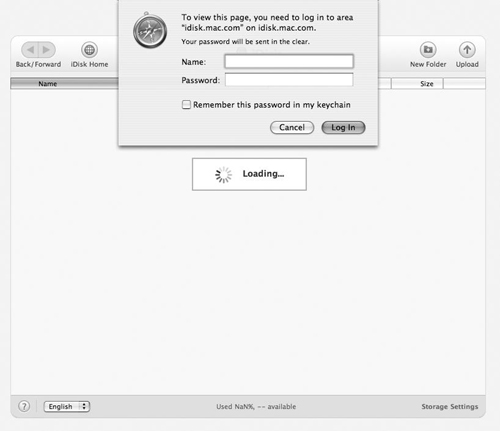
- Type your member name and password in the respective fields and click Log In.
The GroupSlideshow folder in the group iDisk page finishes loading (Figure 7.14).
Figure 7.14. Your group’s slide-show folder on the group iDisk page loads, showing any files there. Since we’re creating our slide show, we don’t have any—yet.

- In the upper right corner, click the Upload button.
A “Select a file to upload” dialog opens (Figure 7.15).
Figure 7.15. Use the “Select a file to upload” feature to upload images for your group slide show.

- Click the Choose File button.
A file-selection dialog slides down (Figure 7.16).
Figure 7.16. Choose the image that you want to upload for your slide show.

- In the file-selection dialog, navigate to the first picture that you’ll be uploading to the slide show, and then click Choose.
The file’s name appears to the right of the Choose File button (Figure 7.17).
Figure 7.17. After you’ve uploaded an image to your group’s iDisk, its name appears to the right of the Choose File button.

- Click the Upload button.
The picture is uploaded to the group iDisk in the GroupSlideshow folder. The page reloads showing the image (Figure 7.18).
Figure 7.18. Now that you’ve uploaded a file to your group’s slide-show portion of the iDisk, it’s listed in the iDisk window.

- Repeat steps 7–10 for each image file (up to a total of 99) that you want to upload for your slide show.
The files are listed in the window (Figure 7.19).
Figure 7.19. Five images have been uploaded to your group’s slide-show folder and are listed here.

- Close the iDisk window.
You are returned to your main group window (Figure 7.20).
Figure 7.20. After you’ve uploaded images for your slide show, you are returned to your main group page. However, your slide show doesn’t display yet.

- Refresh the browser window.
Your slide show is now displayed in the upper right portion of the window (Figure 7.21).
Figure 7.21. Once you refresh your page, the images you uploaded are displayed.
You’ve now created a group and customized the main portions of the interface.
Tips
• Once you’ve created (or joined) a group, clicking the Groups item in the .Mac navigation bar will take you to a page that lists your groups and gives you the option to set up a new group.
• You can bypass your .Mac page and log in to a group page directly by aiming a Web browser at the URL http://groups.mac.com/groupname, replacing groupname with the short name of your group. You can get this URL on your groups list page. When you create a group, you give it a name, often with more than one word. But that doesn’t work so well for e-mail addresses and URLs. So, when you create a group name (such as My fabulous group), it gets shortened to myfabulousgroup for purposes of URLs and e-mail addresses. That’s your short group name.
Managing Group Members
Army recruiting slogans aside, a group of one, such as the one you just created, isn’t really a group. The solution? Use the group membership tools to invite others to join your group. And if you need to remove a few members from your group (say they move away and no longer play city league softball), the membership tools can do that, too.
To invite others to your group
- Log in to your .Mac account following steps 1–3 of “To create a group.”
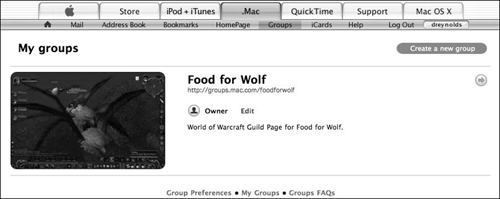
Your “My groups” page loads (Figure 7.22).
Figure 7.22. When you log in to your .Mac account and click the Groups navigation element, all of your active groups are listed.
- On the right side of the group, click the right-pointing arrow.
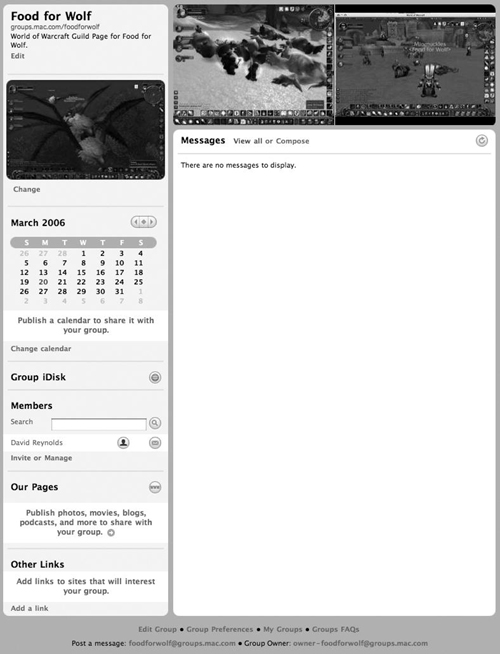
The group’s page loads (Figure 7.23).
Figure 7.23. The group page shows everything you’ve set up so far for your group.
- In the lower left portion of the page in the Members section, click the Invite link.
The “Invite new members” page loads (Figure 7.24).
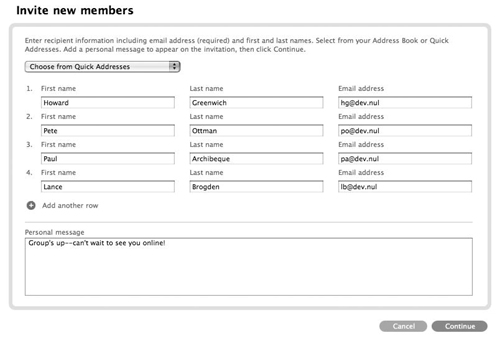
Figure 7.24. The “Invite new members” page allows you to fill in the blanks pertaining to those you want to invite.

- Do the following (Figure 7.25):
• For each person you want to add, type the person’s first name, last name, and e-mail address in the appropriate fields.
• If you need to invite more than four people, click the plus (+) button next to “Add another row” below the last row of names and e-mail addresses.
• Type a personal invitation in the “Personal message” text box.
• Click the Continue button.
Figure 7.25. After you’ve filled in the details for the people you want to invite, you’re ready to issue your invitations by clicking Continue.
A preview of your invitation appears (Figure 7.26).
Figure 7.26. Before you send out your invitation, you’re given the opportunity to review it and make changes.

- If you want to edit the invitation, click the Back button.
The “New member invitation” page reloads (see Figure 7.27).
Figure 7.27. Check the “Send me a copy” box to have a copy of the invitation sent to your .Mac e-mail address.

- If you want to have a copy of the invitation sent to you, check the “Send me a copy” box (Figure 7.27).
- If the invitation looks OK, click the Send button.
A page loads telling you that the invitation has been sent (Figure 7.28).
Figure 7.28. Once you’ve sent an invitation, you’re given a confirmation that it’s on its way.

- Click the “Back to group” button to return to the main group page.
Tips
• If you see a blue Invite link at the bottom of your group’s member list, the group owner has authorized you to refer others to the group. Click the link to issue an e-mail invitation, but remember that the group owner must approve all new members.
• To send an invitation to a contact in your Quick Addresses list, pick a name from the Choose from Quick Addresses popup menu at the top of the page. The address will be automatically added to the next empty row. (For more on using Quick Addresses, see Chapter 2, “Sending Mail.”)
• Although the owner of a group must have a paid .Mac membership, other group members do not. Each group member must have a .Mac ID, however. A .Mac ID is assigned to anyone age 13 or older (even users of Windows PCs) who signs up for a free .Mac trial subscription at www.mac.com. Even after their 60-day trials expire, members can still use their .Mac IDs to log in to group pages. If you invite someone without a .Mac ID to join a group, the invitation e-mail will guide him or her to an ID sign-up page.
• Invitations to join groups expire after 30 days. Anyone who waits that long before accepting will be prompted to send you an e-mail requesting a new invitation.
Accepting an Invitation
If someone has invited you to join a .Mac group, it’s easy to accept that invitation. Your invite will arrive in the form of an e-mail with a personal message and a “Join group now” button (Figure 7.29).
Figure 7.29. If you’re invited to a .Mac group, simply click the “Join group now” link in the invitation e-mail to accept.

To join the group, click the “Join group now” button. You can use your existing .Mac member ID to accept the invitation. If you don’t have one, you’ll be taken to a page where you can sign up for one.
To manage members
Once you’ve created a group and people have joined it, you may need to add a few more, or say good-bye to some. That’s where managing members comes in handy.
- In a Web browser, go to the URL of your group (such as http://groups.mac.com/groupname, replacing groupname with your group’s short name).
You’ll be presented with the login page (see Figure 7.2).
- Enter your member name and password, and click Login.
Your group’s home page is loaded (Figure 7.30).
Figure 7.30. The first step to managing members of your group is to load your main group page.

- In the Members section of the sidebar on the left, click the Manage link.
The group’s membership page loads, showing members, invitations, and any pending approvals (Figure 7.31).
Figure 7.31. The “Manage group membership” page lets you search for members, e-mail or remove members, invite new members, approve pending invitations, and view any invitations that you’ve sent.

- On this page, do one of the following:
• To invite a new member, click the Invite button in the upper right corner, and then follow the onscreen instructions for inviting someone (see Steps 4-8 of “To invite others to your group”).
• To cancel a pending invitation, check the box to the left of the invitation to cancel, and click Cancel Invitation.
• To approve a pending invitation (referred from someone else), check the box to the left of the invitation to approve and click Approve Invitation (which only appears if there are any pending invitations to approve).
- When finished, click the “Back to group” button (Figure 7.32). The group’s page loads.
Figure 7.32. Click “Back to group” to return to your group page after managing the members of the group.

Tip
• To find a group member’s profile, enter the member’s name in the search field, and click the magnifying glass icon to search.
Editing an Existing Group
After you create a group, you may want to make a few changes to it. Fortunately, you can quickly edit your group’s settings with a few clicks.
To edit an existing group
- Log in to your .Mac account following steps 1–3 of “To create a group.”
The list of groups you’ve created and that you belong to is listed.
- Click the Groups link in the navigation bar.
Your groups page loads, listing any groups that you have already set up (Figure 7.33).
Figure 7.33. Any groups that you have already created are listed on your main Groups page.

- Just below the group title, click the Edit link.
The Edit Group page loads (Figure 7.34).
Figure 7.34. On the Edit Group page, you can make changes to your group’s setup.
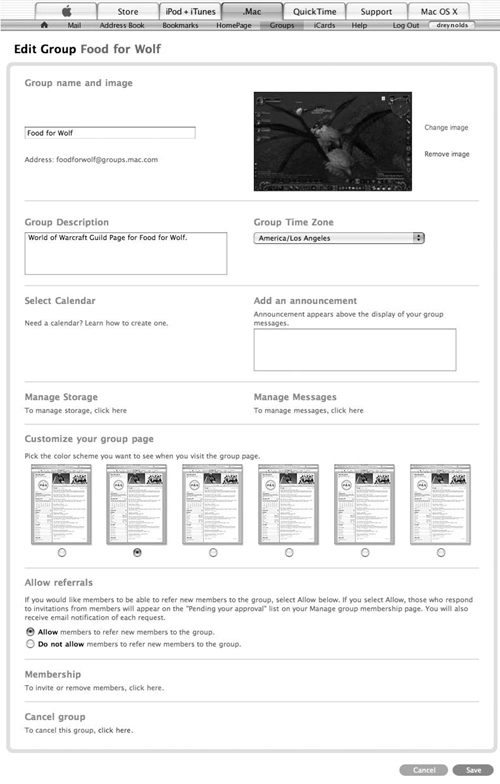
- Make any changes you want to elements of your group, including the name, description, time zone, or color scheme, and then click Save.
You are returned to the group list, and your changes have been saved.
Tip
• You can adjust how much of your iDisk space is reserved for your group by visiting the Storage Settings page for your .Mac account.
To post a message to your group
- In a Web browser, go to the URL of your group (such as http://groups.mac.com/ groupname, replacing groupname with your group’s short name).
You’ll be presented with the login page (see Figure 7.2).
- Enter your member name and password, and click Login.
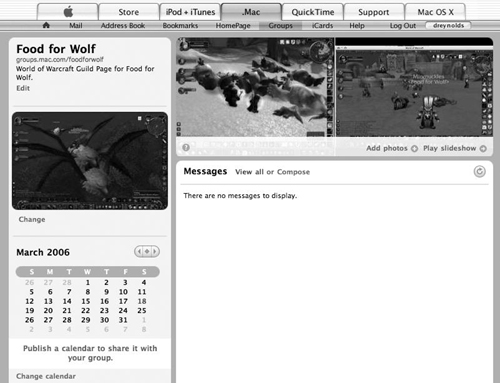
Your group’s home page is loaded (Figure 7.35).
Figure 7.35. Your group homepage shows no messages, yet—you (or another member) need to add them.

- Click the Compose link in the Messages section.
The “Compose a message” page loads (Figure 7.36).
Figure 7.36. The “Compose a message” page lets you create and post a message to your site—and send it to your group members.
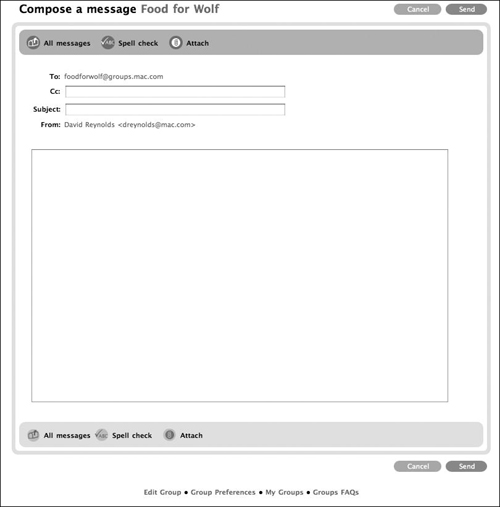
- In the fields, do the following:
• In the Cc field, type any additional email addresses you want the message to go to.
• In the main text area, type your message.
• Click the “Spell check” button to check your message for spelling errors.
- To attach a file, do the following:
• Click the Attach button.
• On the next page, click the Choose File button.
• Navigate to the file you want to attach in the file-selection dialog that opens, and click Choose.
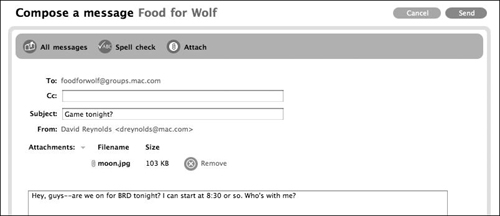
• Click the “Attach and done” button. Your file appears in the Attachments section (Figure 7.37).
Figure 7.37. After you’ve uploaded a file to your message, its name appears in the Attachments section of the composition window.
- Click Send.
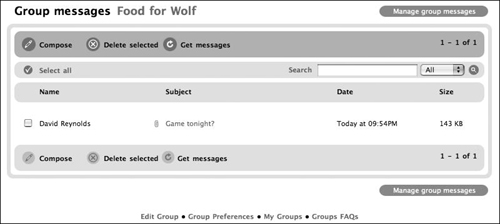
Your message is sent, and a page appears, notifying you of that (Figure 7.38).
Figure 7.38. The group messages page reloads, and it displays a line of text at the top, reading, “Your message was sent.”

- Click “Get messages” to reload your message list.
Your new message appears in the list (Figure 7.39). It also appears on the main group page.
Figure 7.39. After you refresh your messages via the “Get messages” button, your new message appears in the list.
Tips
• To send a message to your group e-mail address, address it to the e-mail address you set up when you created the group. The message will be e-mailed to all members.
• To delete a message, click the message’s title, and then click the Delete button. The message will be removed.
• To reply to a message, click the message’s title, and when the next page loads, check the box next to the message you want to reply to, click the Reply button, type your reply, and click Send. Off you go ...
Publishing a Group Calendar
You can use iCal to post calendar events to your group’s page by publishing a calendar to your .Mac account. Here’s how.
Create a calendar for your group, and publish it to your .Mac account. (For complete information on using iCal with your .Mac account, see Chapter 11, “Using iCal.”)
Load the Edit page for your group, and in the Select Calendar section choose the calendar you want to use from the pop-up menu (Figure 7.40); click Save.
Figure 7.40. Choose the iCal calendar you want associated with your group from the Select Calendar pop-up menu.

When you visit the homepage, your calendar events will show up on the group calendar. Adate with an event will be blue, and if you click it, the calendar’s day will load in a new window (Figure 7.41). Simple, huh? Users can even subscribe to the group calendar with iCal from this page.
Figure 7.41. When you click a day on the group calendar, a new page loads, listing all of the events for that day for your group.

To access the group iDisk
- In a Web browser, go to the URL of your group (such as http://groups.mac.com/ groupname, replacing groupname with your group’s short name).
You’ll be presented with the login page (see Figure 7.2).
- Enter your member name and password, and click Login.
Your group’s home page is loaded (see Figure 7.30).
- On the left side of the page, click the globe button to the right of the Group iDisk label.
Anew browser window opens with a login dialog (Figure 7.42).
Figure 7.42. To access your group’s iDisk, you’ll need to enter your .Mac member name and password, and then click Log In.

- Enter your member name and password, and click Log In.
Your group’s iDisk page is loaded (Figure 7.43).
Figure 7.43. Your group iDisk page is an ideal place to share movies, pictures, or other files.

You can use the group’s iDisk as you would your normal iDisk. See “Connecting to Your iDisk with a Browser” in Chapter 3, “Using iDisk,” for complete details.
To add a link to the page
- In a Web browser, go to the URL of your group (such as http://groups.mac.com/ groupname, replacing groupname with your group’s short name).
You’ll be presented with the login page (see Figure 7.2).
- Enter your member name and password, and click Login.
Your group’s home page is loaded (see Figure 7.30).
- In the lower left corner of the page, click the “Add a link” link.
The link expands into an area that allows you to enter a link name and URL (Figure 7.44).
Figure 7.44. The Other Links controls let you enter a new link by typing a name and URL, and then clicking Add.

- In the Link Name field, enter a name for the link, and in the Link URL field, enter the site’s URL; then click Add (Figure 7.45).
Figure 7.45. After entering a name and URL for the link to be added, click the Add button.

The link shows up in the Other Links section, and the “Add a link” link changes to one that reads “Edit” (Figure 7.46).
Figure 7.46. After you add a link, it appears in the Other Links section of your Group homepage, and an Edit link replaces “Add a link.”

Tip
• The Edit link is used just like “Add a link” for placing additional links on your Group homepage, but it also gives you the option of removing any custom link by checking a box next to its name and clicking Delete (Figure 7.47).
Figure 7.47. To remove a custom link from the Other Links section of your Group homepage, click the Edit link, check the box next to the name of the link to be removed, and click Delete.

Calling It Quits
The day may come, after you’ve set up and nurtured a lively .Mac group, when you feel it’s time to turn management duties over to another member of the community. Or you may choose to shut down a group once its reason to exist (planning an event, for example) has gone. In either case, .Mac Group Preferences is the key to a smooth transition.
To transfer group ownership
- Log in to your .Mac account following steps 1–3 of “To create a group.”
The list of groups you’ve created and that you belong to is listed.
- Click the Groups link in the navigation bar.
Your “My groups” page loads, listing all groups that you own or have joined (see Figure 7.33).
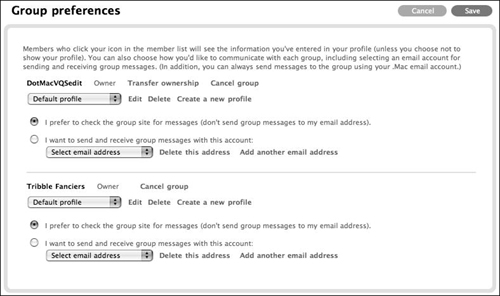
- Click the Group Preferences link at the bottom of the page.
The “Group preferences” page loads (Figure 7.48).
Figure 7.48. To delete a group or transfer ownership to another group member, use the “Group preferences” page.
- Click the “Transfer ownership” link to the right of the name of the group you want to transfer.
Alist of all group members with full .Mac membership accounts appears.
- Click the radio button to the left of your successor’s name, and then click the Send button.
Tip
• If the “Group preferences” page doesn’t show a “Transfer ownership” link next to the name of a group you own, that means no other member of that group has a paid .Mac subscription. Only paying subscribers can own groups, so you’ll have to get someone to pony up before you can hand over the reins.
To delete a group
- Follow steps 1–3 of “To transfer group ownership” to display your “Group preferences” page (see Figure 7.48).
- Click the “Cancel group” link to the right of the name of the group you want to delete.
The cancellation-confirmation page loads, warning you that the group will be canceled, messages to it will bounce, and pages published to it will be lost (Figure 7.49).
Figure 7.49. Before you delete a page, you are warned that clicking the Yes button will remove the group, delete its files, and cause all of its messages to bounce.

- Click Yes.
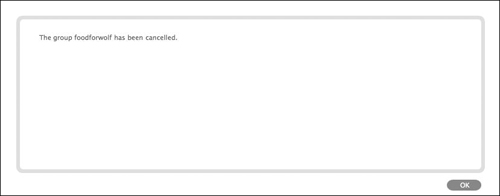
The group is deleted (Figure 7.50).
Figure 7.50. Once you’ve clicked Yes, a page loads, telling you that the group has been deleted.