Chapter 10. Using .Mac Bookmarks
If you use Safari as your Web browser, you can take advantage of one of .Mac’s nifty information-synchronization features: the ability to share a common set of browser bookmarks among several different Macs, and have those bookmarks available online from just about any Web browser.
This synchronization of bookmarks is a real time- and frustration-saver if you have more than one Mac, as anyone who’s ever tried to keep bookmarks organized between two or more machines knows.
It’s also a real boon for anyone who travels without the benefit of taking along his or her main computer (or any computer). With .Mac bookmark synchronization, your bookmarks are never any farther away than a Web browser and an Internet connection.
The only drawback with .Mac Bookmarks is that you have to use Safari in order to take advantage of them—too bad for the Firefox, Camino, Opera, Microsoft Internet Explorer, Netscape Navigator, Mozilla, and OmniWeb users among us.
In this chapter, I’ll show you how to access your Safari bookmarks using a Web browser, add a bookmark, and remove bookmarks and folders. I’ll also show you how to set your preferences so that your bookmarks behave the way you want them to.
Accessing Your .Mac Bookmarks
Once you have .Mac synchronization set up properly—as explained in Chapter 8, “Using .Mac Sync”—and you’ve synchronized your bookmarks, calendars, contacts, keychains, and mail information between your Macintosh and your .Mac account, the bookmarks from Safari on your synchronized computer will be available through your .Mac account, waiting for you to use them.
To access your .Mac Bookmarks
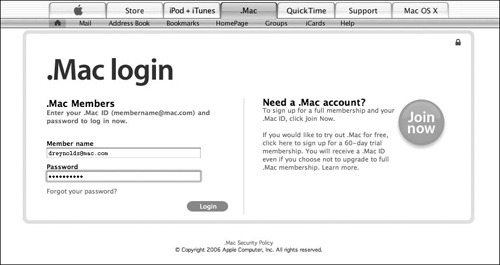
- At www.mac.com, log in to your .Mac account (Figure 10.1).
Figure 10.1. Enter your .Mac member name and password in the respective fields, and then click Login to log in to .Mac.
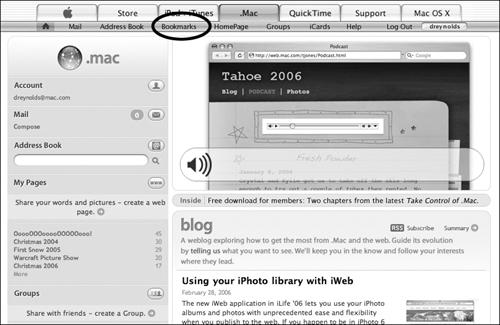
The main .Mac welcome page opens, with you logged in (Figure 10.2).
Figure 10.2. This is the main .Mac welcome page, which shows me as being logged in.

- At the top of the page, click the Bookmarks link (Figure 10.3).
Figure 10.3. Click the Bookmarks link at the top of the page.
The Welcome to .Mac Bookmarks page opens (Figure 10.4). The first time you visit the .Mac Bookmarks page, you may be notified that your bookmarks will be synchronized. This is OK.
Figure 10.4. The Welcome to .Mac Bookmarks page gives you basic information on how to use .Mac bookmarks, as well as how to synchronize them.

- At the bottom of the page, click the Open Bookmarks button.
Your .Mac Bookmarks window opens, listing the Safari bookmarks synchronized with your computer (Figure 10.5). The original browser window reloads the main .Mac members’ page.
Figure 10.5. The .Mac Bookmarks window loads as a separate browser window that can be conveniently pulled to the side of your main browser window.

- To use these bookmarks, click one of them.
A new browser window opens and loads the Web site of the clicked bookmark (Figure 10.6).
Figure 10.6. When you click a bookmark in the .Mac Bookmarks window, a new full-size browser window opens and loads the Web site of the clicked bookmark.
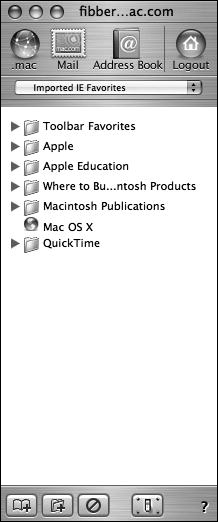
- To open a collection (one of the items indicated by a folder icon), click its icon in the .Mac Bookmarks window (Figure 10.7). Don’t let the term collection throw you—it’s really just a top-level folder to help organize your bookmarks.
Figure 10.7. Click the icon of a collection (one of the items with the folder icon) to open it and load its contents.

The collection’s contents are loaded in the window (Figure 10.8). These can include folders and bookmarks.
Figure 10.8. Bookmark collections can contain folders or bookmarks, or a mix of the two.
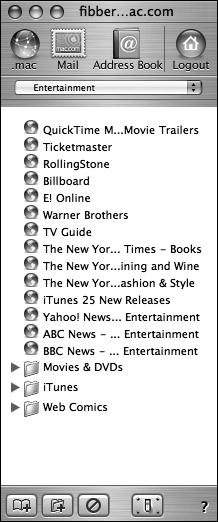
- To open a folder, click it.
The disclosure triangle to the left of the folder icon rotates to point down, and the folder’s contents are listed in the window (Figure 10.9).
Figure 10.9. When you click the icon for a folder, its contents are listed below, and the disclosure triangle to the left of the folder’s name points down.

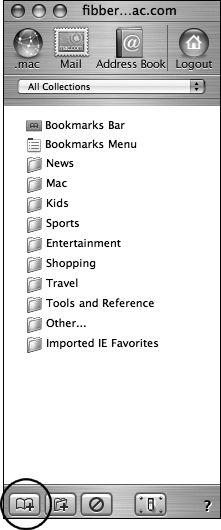
- To view another .Mac Bookmarks collection, choose its name from the pop-up menu below the toolbar (Figure 10.10).
Figure 10.10. To load a different .Mac Bookmarks collection, choose its name from the pop-up menu at the top of the .Mac Bookmarks window.

The selected collection loads.
 Tips
Tips
• You can also load your .Mac Bookmarks by going to http://bookmarks.mac.com using a Web browser.
• You can quickly access other areas of your .Mac account by clicking the .Mac, Mail, and Address Book buttons at the top of your .Mac Bookmarks window.
• To open the Help page for .Mac Bookmarks, click the question mark button in the lower right corner of the window.
Adding a Bookmark
If you’re browsing the Web on someone else’s computer, and you run across a site that you really want to bookmark, you can use your .Mac account and whichever Web browser you happen to be using to add that bookmark to your .Mac Bookmarks.
Of course, if you’re working on your own computer, it makes more sense to add the bookmark to Safari and it will appear in your .Mac Bookmarks the next time you synchronize your Mac with your .Mac account.
To add a bookmark to your .Mac Bookmarks
- Open your .Mac Bookmarks window. Your .Mac Bookmarks window opens as shown in Figure 10.5.
- In the lower left corner of the window, click the Add Bookmark button (Figure 10.11). The Add Bookmark button looks like an open book with a plus (+) sign on it.
Figure 10.11. The Add Bookmark button, at the bottom of the window, is a quick way to add a bookmark to your .Mac Bookmarks.
The bottom portion of the window expands to show the Add Bookmark fields (Figure 10.12).
Figure 10.12. When you click the Add Bookmark button, fields appear where you can add a bookmark name, URL, and location for your new bookmark.

- In the Add Bookmark fields, do the following (Figure 10.13):
• Click In the Bookmark Name field, type in a short descriptive name for the new bookmark.
• In the Bookmark URL field, type in the URL for the Web page you want to bookmark.
• From the Add Bookmark To pop-up menu, select the collection to which you want to add the bookmark.
Figure 10.13. After you’ve filled in the relevant field for your new bookmark, click the Add button to create it.

- Click the Add button.
The .Mac Bookmarks page reloads, complete with the new bookmark; you may have to open a collection to see your new addition, depending on where you saved it (Figure 10.14). The next time you synchronize, your new bookmark will be added to Safari in the collection you specified.
Figure 10.14. Your newly added bookmark appears in the collection you specified, ready for your use.

Tip
• When using the .Mac Bookmarks window’s Add Bookmark function in Safari (and some other browsers), you can copy the URL of the page in the main browser window by clicking in that window’s address field and dragging the highlighted URL to the Bookmark URL field in the .Mac Bookmarks window.
Adding a Bookmark Folder
Although you can’t use the .Mac Web site for full bookmark management—that is, you can’t use it to rename, move, or copy bookmarks or folders—you can use it for rudimentary organization by creating folders for bookmarks.
To add a .Mac Bookmarks folder
- Open your .Mac Bookmarks window.
- At the bottom of the window, click the Add Folder button (Figure 10.15). It looks like a file folder with a plus (+) sign on it.
Figure 10.15. The Add Folder button, at the bottom of the window, lets you quickly add a folder for new bookmarks.

The bottom portion of the window expands to show the Add Folder options (Figure 10.16).
Figure 10.16. When you click the Add Folder button, a field and a pop-up menu appear, allowing you to enter a name and choose a location for your new folder.

- In the Add Folder options, do the following(Figure 10.17):
• In the Folder Name field, type in a short descriptive name for the new folder.
• From the Add Folder To pop-up menu, choose the collection (or folder within a collection) to which you want to add the folder.
Figure 10.17. The Add Folder button, at the bottom of the window, lets you quickly add a folder for new bookmarks.

- Click Add.
The .Mac Bookmarks window reloads, complete with the new folder; you may have to open a collection or folders within a collection to see your new creation, depending on where you created it (Figure 10.18).
Figure 10.18. Your new folder appears in the appropriate collection, ready for your use.
Tips
• To add a bookmark to a newly created bookmark folder, click the Add Bookmark button and choose the new folder from the Add Bookmark To popup menu.
• You can further organize your .Mac Bookmarks by first making the changes in Safari and then synchronizing your bookmarks with your .Mac account.
Removing Bookmarks and Folders
.Mac allows you to remove bookmarks as well as add them—a blessing for those who need to do a little pruning in an overly large collection. You can use this feature to delete either an individual bookmark or a whole folder.
To delete a .Mac Bookmarks folder or bookmark
- Open your .Mac Bookmarks window.
- Navigate to the location that contains the bookmark or folder you want to delete.
- Click the Delete button at the bottom of the window (Figure 10.19). The Delete button looks like a circle with a line through it.
Figure 10.19. The Delete button at the bottom of the window lets you delete a bookmark or folder.

Delete buttons—circles with embedded white Xs—appear next to each item in the window (Figure 10.20).
Figure 10.20. When you click the Delete button, small circles with white embedded Xs appear to the left of all visible items. These are individual Delete buttons.

- Click the Delete button next to the item you want to delete.
The bottom portion of the window expands to ask if you are sure you want to delete the item (Figure 10.21).
Figure 10.21. When you click an item’s Delete button, a message appears at the bottom of the window asking if you’re sure you want to delete the item. Click Delete.

- Click Delete.
The .Mac Bookmarks window reloads with the deleted item removed (Figure 10.22). The next time you synchronize your bookmarks with your .Mac account, the deleted item will be removed from your Safari bookmarks.
Figure 10.22. After you confirm that you do indeed want to delete the selected item, the .Mac Bookmarks window reloads with the item removed.
Tip
• You can delete only one bookmark or folder at a time, so if you want to do some serious spring cleaning, you may have to repeat this process several times. You might consider making the changes in Safari instead, and then synchronizing your bookmarks.
Setting Bookmark Preferences
As with most other aspects of your .Mac account, you can customize how .Mac handles bookmark display and synchronization by setting your .Mac Bookmarks preferences (Figure 10.23).
Figure 10.23. The .Mac Bookmarks preferences window lets you customize your .Mac Bookmarks experience by choosing how links open, what collection opens by default, the default language, and whether bookmarks are synchronized.

To open the .Mac Bookmarks preferences window, log in to your .Mac account and open the .Mac Bookmarks window; then click the Preferences button in the lower right corner (it’s the one that looks like a light switch). This loads the .Mac Bookmarks preferences window, the settings of which you can change as follows:
• Always open pages in a new browser window. If it’s not already selected, click this radio button to cause pages opened from your .Mac Bookmarks to open in a new browser window instead of your current browser window. This is the default setting.
• Always open pages in the same browser window. Click this radio button to cause pages opened from your .Mac Bookmarks to open in your current browser window.
• Default folder to open. By default, the All Collections folder is opened when you open your .Mac Bookmarks window (this simply sets your view to the top level of your bookmarks). You can, however, specify a different folder to open by default, by choosing it from the “Default folder to open” pop-up menu.
• Language. Your .Mac Bookmarks can be displayed in either English or Japanese—you choose which one from the Language pop-up menu.
• Turn on .Mac Bookmarks Synchronization. This option lets you determine whether your .Mac Bookmarks are synchronized. When you check this box, changes you make to your .Mac Bookmarks are reflected on computers subscribed to this .Mac account.
After you’ve made your changes to your .Mac Bookmarks preferences, click Save to apply them.