Chapter 2. Sending Mail
One of the biggest benefits of having a .Mac account is that you get an e-mail address that moves with you, even if you switch ISPs—no more sending out those “my e-mail address has changed” messages, asking everyone to update their address books (which no one does). Plus, if you’re like me, you get the cachet of an e-mail address that associates your messages with a computer you love.
Your .Mac e-mail account uses your .Mac login name with @mac.com as your e-mail address. You can use your .Mac e-mail account with just about any e-mail client program out there—provided it can use POP3 or IMAP, and that covers almost any you care to name. In this chapter, I’ll show you how to set up your e-mail client to work with your .Mac e-mail account. You’ll also learn how to use .Mac Mail on the Web, which allows you to work with your e-mail using just about any Web browser.
Setting Up Apple Mail
Apple has integrated .Mac e-mail into its own e-mail client, Mail. Since Apple owns both Mail and .Mac, you can expect them to work very well together. (Don’t be fooled, though—.Mac plays well with other e-mail clients, too.)
There are three scenarios for setting up Mail to use your .Mac e-mail account:
• You haven’t opened Mail but have entered your .Mac subscription information in System Preferences.
• You haven’t opened Mail and haven’t entered your .Mac subscription information in System Preferences.
• You have already opened Mail (whether or not you’ve entered your .Mac subscription information in System Preferences).
 Tip
Tip
• Your .Mac e-mail account isn’t the only wrench in the toolbox. .Mac also lets you send classy and custom e-mail greeting cards (called iCards), and it enables you to connect to other .Mac and AOL Instant Messenger users via iChat.
If you haven’t opened mail but have entered your .Mac subscription information
This is typically the case if you’ve just installed a fresh copy of Mac OS X and entered your .Mac information in the setup assistant but you haven’t yet fired up Mail. Typically, folks who already have a .Mac account fall into this category.
If you’re using Mac OS X v10.4 Tiger and you’ve entered your .Mac information in System Preferences, Mac OS X automatically creates an account for you in Mail. All you have to do is open the Mail application.
To set up mail with your .Mac e-mail address (Mac OS X 10.3 or earlier)
- In the Applications folder, double-click the Mail icon to open Mail.
The Mail application opens, and you’re asked if you want to import mailboxes from another client (Figure 2.1).
Figure 2.1. When you first launch Mail, it asks if you want to import mailboxes from another e-mail client, which is great if you’ve been using a different client and want to take the leap to Mail. Click Yes to import mailboxes; click No to skip this step and move on.

- Click No.
Mail then notes that this version is greatly enhanced and asks if you’d like to take a tour (Figure 2.2).
Figure 2.2. Next, Mail asks if you’d like to see what’s new in this version. Click Yes to take a tour; click No to skip this step and move on.

- Click No.
Mac OS X automatically configures Mail to work with your .Mac e-mail address. You are ready to use Mail to send and receive mail with your .Mac account.
If you haven’t opened mail and haven’t entered your .Mac subscription information
This usually happens if you set up your Mac before you had a .Mac subscription (and thus didn’t enter anything in the setup assistant) and you haven’t been using Mail as your e-mail client. We’ll show you how to do this using Mac OS X v10.3 Jaguar as well as with Mac OS X v10.4.
To set up mail to work with Your .Mac e-mail address (Mac OS X v10.4)
- In the Applications folder, double-click the Mail icon to open Mail.
The Mail setup assistant opens (Figure 2.3).
Figure 2.3. This is the first pane in the Mac OS X 10.4 Mail setup assistant. Click Continue to move to the next step.
- Click Continue.
The General Information pane opens (Figure 2.4).
Figure 2.4. The General Information pane asks you to choose your account type, provide an account description and your full name, and provide your e-mail user name and password. Click Continue to move to the next step after you’ve filled in all the fields.

- From the Account Type pop-up menu, choose .Mac.
- In the Account Description field, give the account a description.
- In the Full Name field, type your name.
- In the User Name field, type your .Mac member name.
- In the Password field, type your .Mac password.
- Click Continue.
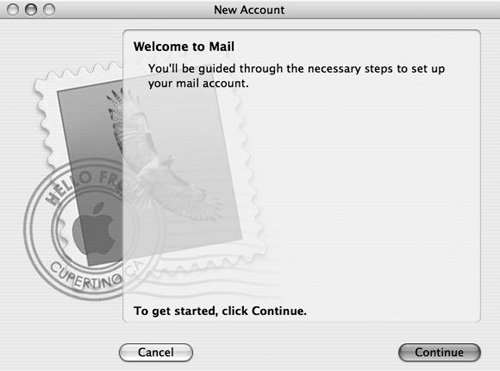
Mail checks your connection information to make sure you can connect (Figure 2.5). After this check is complete, a summary pane opens (Figure 2.6).
Figure 2.5. After you’ve clicked Continue, Mail checks the information you’ve entered to ensure that all of the connections are good.

Figure 2.6. Mail presents you with a summary of your new Mail account settings.
- Click Continue.
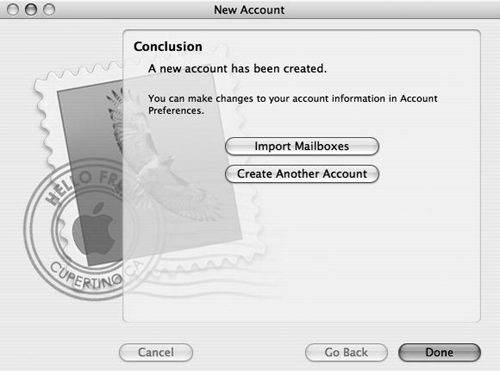
The Conclusion pane opens, offering you the choice of importing mailboxes or creating another account (Figure 2.7).
Figure 2.7. Finally, when your account is created, you can choose to import mail, create another account, or click the Done button and go on about your business.
- Click Done to finish.
You’re ready to use Mac OS X v10.4 Mail to send and receive e-mail with your .Mac e-mail address.
To set up Mail to work with your .Mac e-mail address (Mac OS X v10.3 or earlier)
- In the Applications folder, double-click the Mail icon to open Mail.
The Mail application opens, and you’re asked to set up an account (Figure 2.8).
Figure 2.8. Creating a new Mail account in Mac OS X v10.3 is fairly simple, and Mail gives you a blank slate from which to start.

- In the Full Name field, type your name.
- In the Email Address field, type your .Mac e-mail address, which is your .Mac member name plus @mac.com.
- In the Incoming Mail Server field, type
mail.mac.com. - From the Account Type pop-up menu, choose POP or IMAP (see the sidebar “POP vs. IMAP”).
- In the User Name field, type your .Mac login.
- In the Password field, type your .Mac password.
- In the Outgoing Mail Server (SMTP) field, type
smtp.mac.com. - Click OK (Figure 2.9). You’re asked if you want to import mail from another client (Figure 2.10).
Figure 2.9. After you’ve filled in the pertinent information, you can click OK to create your account.

Figure 2.10. Again, Mail asks if you care to bring e-mail messages over from another e-mail program. You’d click Yes to import mail messages, but for now click No to skip this step.

- Click No.
You’re asked if you want to find out about the new features in Mail (Figure 2.11).
Figure 2.11. Again, Mail asks if you’d like to see what’s new in this version. Click Yes to take a tour; click No to skip this step and move on.

- You can click Yes another time for a pleasant tour, but for now click No. You’re ready to use Mail to send and receive e-mail with your .Mac e-mail address.
If you’ve already opened Mail
If you’ve opened Mail but haven’t entered your .Mac information, you need to manually configure your account. This simply means that you need to provide more information when setting up your account.
To set up Mail to work with your .Mac e-mail address (Mac OS X 10.4)
- In the Applications folder, double-click the Mail icon to open Mail.
The Mail application opens.
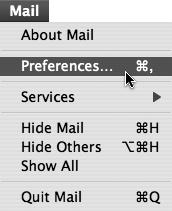
- From the Mail menu, choose Preferences (Figure 2.12).
Figure 2.12. To access Mail’s preferences, choose Preferences from the Mail menu or press Command-, (comma).
Mail’s Preferences window opens with the Account Information tab selected and the Accounts pane opens. (Figure 2.13).
Figure 2.13. Using Mail’s Accounts preferences, you can create and manage e-mail accounts in Mail. Here, no e-mail accounts exist yet.

- In the lower left corner of the window, click the plus (+) button.
Mail’s setup assistant opens to the General Information pane, as shown in Figure 2.4.
- From the Account Type pop-up menu, choose .Mac.
- In the Account Description field, give the account a description.
- In the Full Name field, type your name.
- In the User Name field, type your .Mac member name.
- In the Password field, type your .Mac password.
- Click Continue.
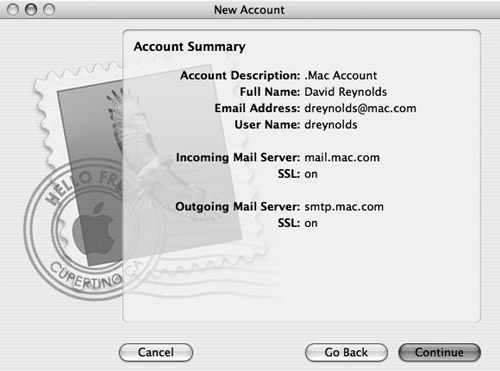
Mail checks your connection information to make sure you can connect. After this check is complete, the Account Summary sheet slides down over the window (Figure 2.14).
Figure 2.14. Once you’ve entered your .Mac account information, the Account Summary sheet shows you how the account has been set up.

- Click Continue.
The Conclusion sheet opens, offering you the chance to create another account (Figure 2.15).
Figure 2.15. After your account has been created, Mail gives you the option of creating another account or simply clicking Done on the lower-right portion of the page and moving on with your life.

- Click Done.
You’re ready to use Mac OS X v10.4 Mail to send and receive e-mail with your .Mac e-mail address.
To set up Mail to work with your .Mac e-mail address (Mac OS X v10.3)
- In the Applications folder, double-click the Mail icon to open Mail.
The Mail application opens.
- From the Mail menu, choose Preferences, as shown in Figure 2.12.
Mail’s Preferences window opens.
- If it’s not already selected, click the Accounts button.
The Accounts pane opens (Figure 2.16).
Figure 2.16. Mail’s Accounts preferences let you create and manage e-mail accounts in Mail. Here, no e-mail accounts exist yet.

- In the lower left corner of the window, click the plus (+) button.
Anew Mail account is created, and the Account Information tab is automatically selected (Figure 2.17).
Figure 2.17. After you click the plus (+) button, the name of a new account appears in the column on the left, and the fields on the right are ready to fill in.

- From the Account Type pop-up menu, choose .Mac (Figure 2.18).
Figure 2.18. Mail supports these four types of e-mail accounts: .Mac, POP, IMAP, and Exchange. For our purposes, select .Mac (and note that .Mac e-mail will also work with POP and IMAP).

- In the Description field, type a short description of your account (such as your name or your business name—typically a few words).
- In the Full Name field, type your name.
- In the User Name field, type your .Mac member name.
- In the Password field, type your .Mac password.
Mail fills in the Email Address, Incoming Mail Server, and Outgoing Mail Server fields for you.
- Click the red close button in the upper left corner to close the window (Figure 2.19).
Figure 2.19. Once you’ve finished entering the account information, close this window; Mail will now be able to send and receive e-mail using your .Mac account. This is how the window looks when everything is filled in. Note that what used to read New Account on the left has now changed to the account name you typed in the Description field.

You’re ready to use Mail to send and receive e-mail with your .Mac e-mail address. The account is added to any other e-mail accounts you’ve already set up in Mail.
Using Webmail
Using an e-mail client (such as Apple’s Mail or Microsoft’s Entourage) isn’t the only way to access your .Mac e-mail account. Your .Mac account also gives you Webmail, so you can send and receive e-mail, organize your e-mail, and even use the addresses stored in Mac OS X’s Address Book from anywhere you have a Web browser and access to the Internet.
To open .Mac Webmail
- Open your Web browser and go to http://Webmail.mac.com.
The .Mac login page opens.
- In the Member name field, type your .Mac member name.
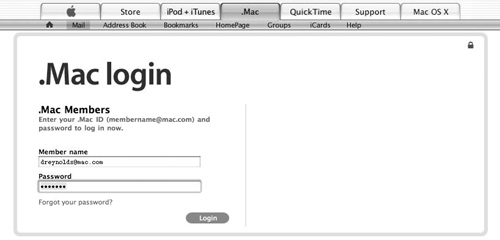
- In the Password field, type your .Mac password (Figure 2.20).
Figure 2.20. You’ll be seeing a lot of this page. This is the .Mac login page, and you’ll use it to enter your .Mac member name and password to access the members’ area of the .Mac Web site.
- Click Login.
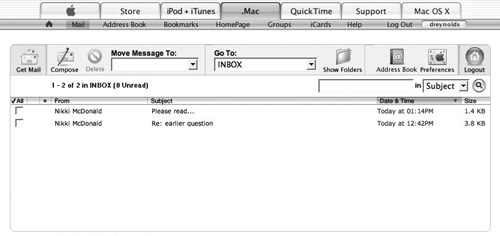
The Web browser loads your .Mac e-mail Inbox page (Figure 2.21). This Web page looks and behaves a lot like an e-mail client, and if you’ve ever used Web-based mail for other e-mail accounts, you’ll probably feel right at home. The Inbox page features a toolbar across the top, a message count and search field, a list of messages, and a message count at the bottom—everything you need to work with your e-mail.
Figure 2.21. The .Mac Webmail Inbox page looks and behaves a lot like an application-based e-mail program does. Icons across the top act like buttons in a program, causing actions to happen. E-mail messages are listed below the buttons.
Tips
• .Mac Webmail displays the contents of your e-mail inbox by default. To view your other e-mail folders, select them from the “Go To:” popup in the Webmail toolbar, or list all folders by choosing Show All Folders from the popup. (Note that some folders exist only when there are messages stored inside them; you won’t have a Sent Mail folder until you’ve sent a message, for instance.)
• To sort listed messages, click the column header above what you want to sort by (such as date, message size, or subject).
• You can also visit www.mac.com, log in to your .Mac account, and then click the Mail button. This also will take you to the Web interface for your .Mac e-mail account.
• If you’re using IMAP with your .Mac account, you can manage your mail by logging in to your .Mac account through a Web browser. From there, you can move and delete mail, for example, and create and delete folders. These changes will show up in your IMAP e-mail client the next time you synchronize your mail.
To read a message
• Click the subject line of the message you want to read (Figure 2.22).
Figure 2.22. Click the subject line of a message to open and read it. Because this is a Web page and not an e-mail program, the message will not be highlighted when it is clicked—but your pointer will change to indicate that it is over something you can click.
or
• Click the name of the person who sent the message.
The message loads in your browser’s Mail window.
Tip
• When reading a message, you can move to the previous message or next message by using your arrow keys, or you can move back to the list of messages by clicking the Mail button.
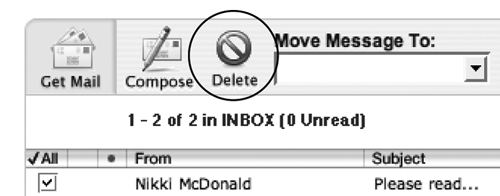
To delete a message
- Click the subject line or the name of the person who sent the message you want to delete.
The message loads in your Mail window.
- Click the Delete button (Figure 2.23). The message is moved to the Deleted Messages folder, and the next message is displayed.
Figure 2.23. Click the Delete button to delete the message you’re reading.
Tip
• You can also delete one or more messages directly from the .Mac e-mail Inbox page, by clicking the checkboxes to the left of the name(s) of the senders(s) whose message(s) you want to delete, then checking the circle-with-a-slash Delete button in Webmail toolbar.
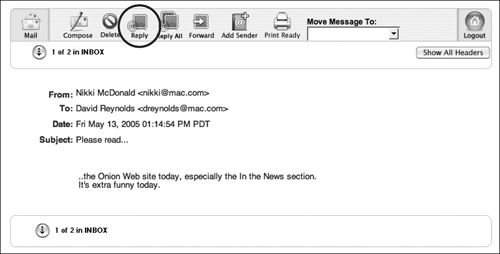
To reply to a message
- Click the subject line of the message to which you want to reply.
The message loads in the Inbox window.
- Click the Reply button (Figure 2.24).
Figure 2.24. Click the Reply button to move to .Mac’s reply-composition page, where you can pen a reply to a message you’ve received.
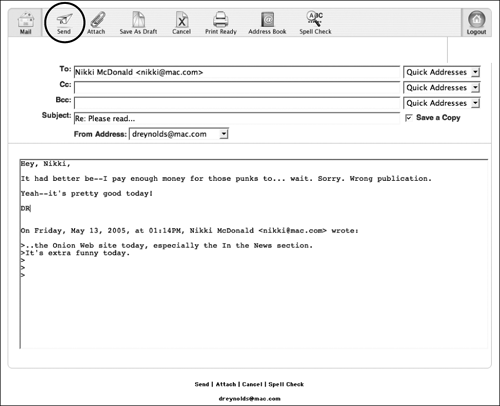
This takes you to the message-composition page, where you can write your reply in the text box (Figure 2.25).
Figure 2.25. When you compose a reply to a message, you’ll see a few key things—the recipient’s e-mail address, the subject line, and your reply text.

- Type your reply, and then click the Send button (Figure 2.26).
Figure 2.26. Click the Send button to send your message.
Your reply is sent to the person who sent you the original message.
Tips
• To reply to all other recipients of an email message as well as the sender, click the Reply All button. You can change or add any e-mail addresses—just be sure to separate multiple addresses with a comma and a space: [email protected], [email protected].
• To reply to a message you’ve already read, (or to one you haven’t read but you know requires a reply), you can skip opening it first: Click the checkbox to the left of the sender’s name in the Inbox message list, then click Reply or Reply All at the bottom of the Inbox page. A message-composition page will open, with the content of the original message quoted in the body of the new message.
• You can add a message’s sender to your Address Book by first clicking the message in the Web version of .Mac mail and then clicking the Add Sender button in the toolbar. The sender of the message is added to your .Mac Address Book, and if you use iSync or .Mac Sync, that address will be copied to your other devices as well.
To forward a message
- Click the subject line of the message you want to forward.
The message loads in your Mail window.
- Click the Forward button (Figure 2.27).
Figure 2.27. Click the Forward button to move to .Mac’s forward-composition page, where you can write a note at the top of a forwarded e-mail.

The message-forwarding page opens (Figure 2.28).
Figure 2.28. When you write the introduction to a forwarded message, the original message’s text appears below, including some basic e-mail headers (From, To, and so on).

- In the To field, enter the e-mail address of the person to whom you want to forward the message.
- Click the Send button.
The message is forwarded.
Tip
• To forward a message without opening it first, click the checkbox to the left of the sender’s name in the Inbox message list, click Forward at the bottom of the Inbox page, and continue with step 3 above.
To compose and send a message
- Log in to your .Mac Webmail account. Your Web browser displays the .Mac e-mail Inbox window.
- Click the Compose button (Figure 2.29).
Figure 2.29. To write an e-mail message from scratch, click the Compose button.

The message-composition page opens (Figure 2.30).
Figure 2.30. Blank page—not very inspiring. Here, you enter your recipients’ e-mail addresses, a subject, and the text of your message.

- Enter at least one e-mail address in the To field and as many as you like in the Cc (copy) field.
- In the Subject field, enter a subject for your message.
- In the From Address pop-up menu, choose the e-mail address from which you want to send the message (if your .Mac account has more than one address associated with it).
- In the text box, type the message.
- In the toolbar at the top of the page, click Send.
The e-mail message is sent, and you’re returned to the main Mail window.
Tips
• You can check to make sure your e-mail message isn’t riddled with misspellings by clicking the Spell Check button before you send. Any misspelled words will be underlined in red, and the number of misspelled words will be shown. Click the Edit link at the bottom to return to the message-composition screen and change the misspelled words.
• If you want to save a message as a draft while you’re working on it, click the Save As Draft button on the message-composition page. The message will be saved in your Drafts folder.
• It’s possible to send blind copies of messages using .Mac Webmail. To learn how, see “To add the Bcc field to mail headers” in the “Setting .Mac Mail Preferences” section of this chapter.
To attach a file to a message
- Log in to your .Mac Webmail account.
- Compose a new message to which you want to attach a file.
The message opens.
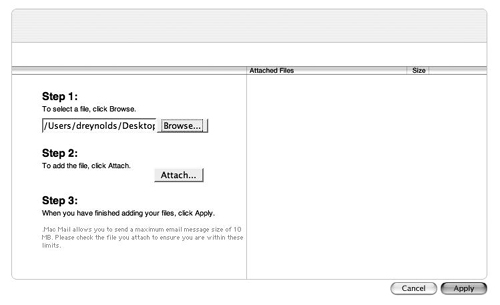
- In the .Mac Webmail toolbar, click the Attach button (Figure 2.31).
Figure 2.31. To attach a file to an outgoing e-mail message, click the Attach button in the toolbar above the composition area.

The file-attachment page opens (Figure 2.32).
Figure 2.32. Attaching a file using the file-attachment page is an easy three-step process.

- Click the Choose File button.
The File Upload sheet slides down (Figure 2.33).
Figure 2.33. Click the Choose File button to open the File Upload window, from which you can choose a file to attach to an e-mail message.

- Navigate to the file that you want to attach to your message, and click Choose. The name of the file that you chose appears in the field next to the Browse button (Figure 2.34).
Figure 2.34. Once you’ve selected a file to be attached, its name shows up in the field to the left of the Browse button.
- Click the Attach button.
The file is uploaded to the .Mac e-mail servers, and its name appears in the Attached Files column on the right (Figure 2.35).
Figure 2.35. Once you’ve attached a file, it appears in the Attached Files column. You can attach more than one file this way.

- Click Apply.
You’re returned to the message-composition page, and the name of the file you uploaded appears above the message text area (Figure 2.36).
Figure 2.36. An attached file appears to the right of the Attachments label, with a nifty paper-clip icon next to it.

- Click the Send button.
The message and the attached file are sent, and you’re returned to the main Mail window.
Tip
• To remove an attached file, click the Remove button to the right of the filename in the message-attachment page as shown in Figure 2.35, or click the disclosure triangle to the right of the Attachments label on the message-composition page as shown in Figure 2.36. Here you can delete attachments and see other information about the files you’ve uploaded.
Using .Mac’s online Address Book
One of the best reasons to have a .Mac account is that .Mac is so well integrated with Mac OS X that it makes tedious tasks less, well, tedious. A good example of this is how .Mac Mail uses e-mail addresses stored in your Address Book. After you’ve set up synchronization and synced your Address Book to your .Mac account (see Chapter 9, “Using Address Book,” for instructions on how to do this), you can easily access all of your e-mail addresses from any Internetenabled computer, anywhere, anytime. And if you use .Mac’s Quick Address feature, entering e-mail addresses can be accomplished with a simple click.
To use an address from Address Book
- Log in to your .Mac Webmail account.
- In the .Mac Webmail toolbar, click the Compose button.
The message-composition page opens.
- In the .Mac Webmail toolbar, click the Address Book button (Figure 2.37).
Figure 2.37. Looking for an e-mail address? You can access your Address Book while using .Mac’s Webmail by clicking the Address Book button.

A page showing the addresses in your online Address Book opens (Figure 2.38).
Figure 2.38. The addresses in your .Mac Address Book are ready for you to use in your e-mail messages.

- From the pop-up menu next to each address, choose the addresses you want to use by selecting To, Cc, or Bcc (Figure 2.39).
Figure 2.39. To include an address in an e-mail message, select To, Cc, or Bcc in the pop-up menu to the right of the address you want to use.
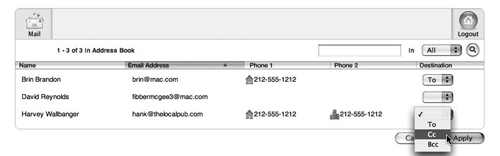
- Click the Apply button.
The addresses you selected appear in the appropriate address fields (Figure 2.40).
Figure 2.40. The addresses you specified on the Address Book page appear in the appropriate e-mail address fields.

To add an address to the Quick Addresses menu
- Log in to your .Mac Webmail account. Your Web browser displays your Webmail Inbox page.
- In the Webmail toolbar, click the Address Book button.
A page listing addresses in your online Address Book opens. Depending on the number of contacts in your Address Book, you may see only a partial list. If necessary, click the down-arrow button at lower left to view the next page of your list.
- Check the boxes in the Quick Address column to the right of the addresses that you want to add to the Quick Addresses menu (Figure 2.41).
Figure 2.41. To add an address to the Quick Addresses menu, check the box to the right of the address in your online Address Book.

Cancel and Save buttons appear in the lower-right portion of the page.
- Click Save.
The addresses are added to the Quick Addresses menu, available for use when composing an e-mail message.
To use an address from the Quick Addresses Menu
- Log in to your .Mac Webmail account.
- In the .Mac Webmail toolbar, click the Compose button.
The message-composition page opens.
- To the right of the To, Cc, and Bcc fields, click the Quick Addresses menu to select the address you’d like to add to that field (Figure 2.42).
Figure 2.42. Addresses you’ve selected appear in the Quick Addresses menu, ready and waiting.
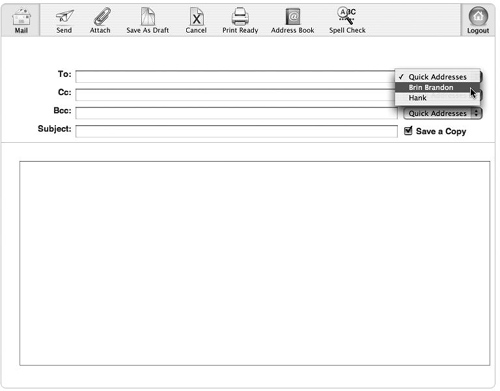
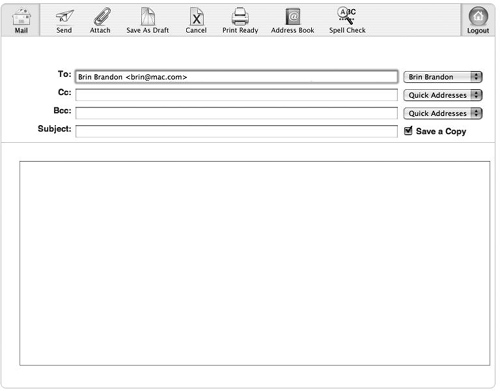
The address is automatically added to the field (Figure 2.43). Repeat as desired to add additional names to each field.
Figure 2.43. Once you’ve chosen an e-mail address from the Quick Addresses menu, it appears in the To, Cc, or Bcc field to its left.
Working with folders
You can use .Mac Webmail to organize and sort your mail in folders. When you log in to your .Mac e-mail account through a Web browser, you’re presented with your Inbox, which is your main folder. Every account also comes with a few additional folders that may show up—Drafts, Sent Messages, and Deleted Messages—and you can create more folders if you like. The Drafts folder appears only after you’ve saved an e-mail as a draft, and the Sent Messages and Deleted Messages folders appear only if you have the Save Sent Message To and Move Deleted Messages To boxes checked in .Mac Mail preferences.
To view all mail folders
- Log in to your .Mac Webmail account. Your Web browser displays the Webmail Inbox page.
- From the Go To pop-up menu, choose Show All Folders (Figure 2.44).
Figure 2.44. From the Go To menu, choose Show All Folders to be taken to a list of your .Mac e-mail folders.

or
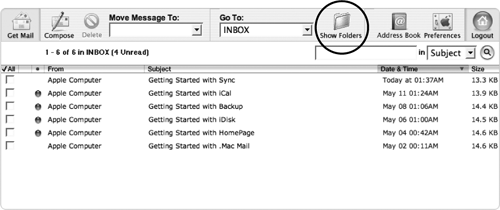
In the .Mac Webmail toolbar, click the Show Folders button (Figure 2.45).
Figure 2.45. You can also click the Show Folders button to see a list of all your .Mac e-mail folders.
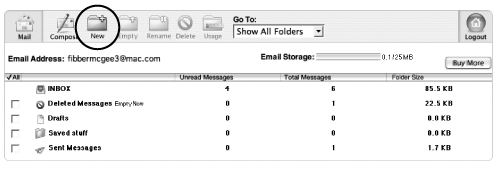
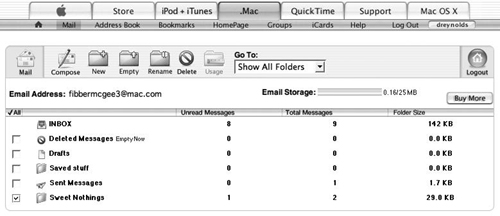
A page opens displaying all of your current e-mail folders, along with each folder’s name, the number of unread messages in it, the total number of messages in it, and the size of each folder (Figure 2.46).
Figure 2.46. The Show All Folders view displays all of the folders associated with your .Mac e-mail account.

To create a folder
- Log in to your .Mac Webmail account. Your Web browser loads the .Mac e-mail window.
- In the .Mac Webmail toolbar, click the Show Folders button as shown in Figure 2.45.
A page opens displaying all of your current e-mail folders.
- In the toolbar at the top of the page, click the New button (Figure 2.47).
Figure 2.47. Clicking the New button creates a new folder in which you can store your e-mail.
Anew folder appears at the top of your current list of e-mail folders.
- In the folder-name field, type the name for your new folder (Figure 2.48).
Figure 2.48. You can name your folder something useful or memorable—type the name in the field next to the folder icon and click Save.
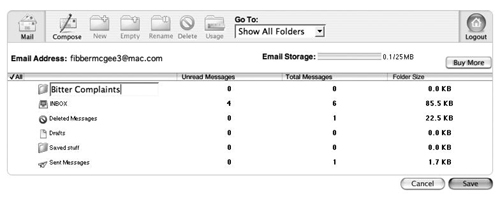
- Click Save.
Your new folder is added to your existing folder set and appears in your Webmail account, as well as in your e-mail client (provided you’re set up to use your .Mac account as an IMAP account).
To rename a folder
- Log in to your .Mac Webmail account. Your Web browser loads the .Mac Inbox window.
- In the .Mac Webmail toolbar, click the Show Folders button.
A page opens displaying all of your current e-mail folders.
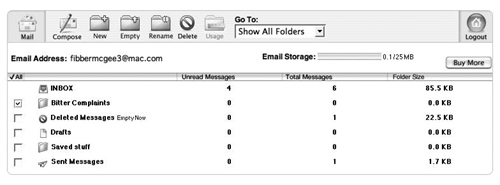
- Check the boxes next to the folders you want to rename (Figure 2.49).
Figure 2.49. To flag a folder for renaming, check the box to the left of its name.

- In the .Mac Webmail toolbar, click the Rename button (Figure 2.50).
Figure 2.50. To rename checked folders, click the Rename button.
The names of all the checked folders are now editable.
- Type a new name for each checked folder (Figure 2.51).
Figure 2.51. Rename your folder.

- Click Save.
Your folders should display their new names.
Tips
• You can rename any folder except your Inbox folder.
• You can rename your Drafts and Deleted Messages folders, but resist the urge to do so. If you rename your Drafts folder, you could run into an error the next time you try to save a message. Renaming Deleted Messages seems to work without causing any problems, but it’s better to be safe than sorry.
To delete a folder
- Log in to your .Mac Webmail account. Your Web browser loads the .Mac Inbox window.
- In the .Mac Webmail toolbar, click the Show Folders button.
A page opens displaying all of your current e-mail folders.
- Check the boxes next to the folders you want to delete (Figure 2.52).
Figure 2.52. To flag a folder for deleting, check the box to the left of its name.
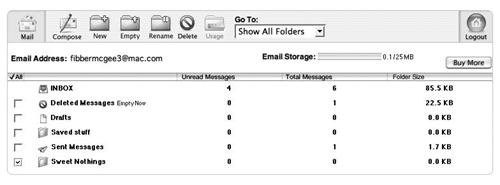
- In the toolbar at the top of the page, click the Delete button (Figure 2.53).
Figure 2.53. Clicking the Delete button deletes all flagged folders.

A page opens asking if you’re sure you want to delete the selected folder or folders. If you’ve selected multiple items, you’re only warned once (Figure 2.54).
Figure 2.54. Before you’re allowed to delete a folder, you’re asked if you want to follow through. Click Delete to continue.

- Click Delete.
The folder is deleted.
Tips
• To select all the check boxes, click the All column header.
• If you delete the Drafts, Sent Messages, or Deleted Messages folder, Webmail will recreate them automatically the next time you save a draft message, send a message, or delete one.
Deleting all messages in a folder
Sometimes you want to delete all of the messages in a folder but keep the folder itself. Doing so is easy. Here’s how.
To delete all messages in a folder
- Log in to your .Mac Webmail account. Your Web browser loads the .Mac Inbox window.
- In the .Mac Webmail toolbar, click the Show Folders button, as shown in Figure 2.45.
A page opens displaying all of your current e-mail folders.
- Check the box next to the folder you want to empty (Figure 2.55).
Figure 2.55. To empty a folder, check the box to the left of the folder you want to empty
- In the toolbar at the top of the page, click Empty (Figure 2.56).
Figure 2.56. Click the Empty button in the toolbar to delete all of the messages in the folder.

The messages are removed from that folder.
Tip
• When you click the Empty button, you are not asked if you’d like to proceed, so be sure this is really something you want to do before clicking the button.
Moving messages
The key to keeping an organized e-mail account is to trash the messages you no longer need and file the messages you want to hold on to for a while. Moving messages between folders is easy.
To move an e-mail message
- Log in to your .Mac Webmail account. Your Web browser loads the .Mac Inbox window.
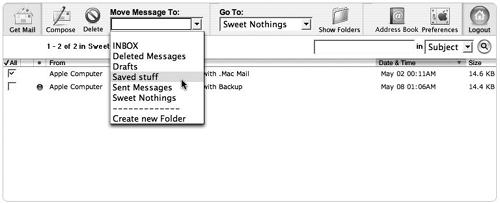
- From the Go To pop-up menu, choose the folder that contains the message you want to move (Figure 2.57).
Figure 2.57. From the Go To menu, choose the folder that contains the messages you want to move (or search for); the folder opens on the page.

The folder opens, displaying all of its messages in a list.
- Check the boxes next to the messages you want to move.
- From the Move Message To pop-up menu, choose a destination folder for your selected messages (Figure 2.58). The selected messages are moved to the new folder.
Figure 2.58. From the Move Message To menu, choose a destination folder for your messages.
Using search
If you’re using your .Mac e-mail account as an IMAP account, you may be storing a lot of messages. Wading through them to find that one special message from the Bulwer-Lytton Fiction Contest, well, it may be daunting when you have 373 messages in your Filed Messages folder, and you can’t quite remember the date when the message was sent. That’s why your .Mac Web e-mail has a builtin search function.
To find a message using search
- Log in to your .Mac Webmail account. Your Web browser loads the .Mac Inbox window.
- From the Go To menu, choose the folder that contains the message you’re looking for (see Figure 2.57).
The folder opens, displaying all of its messages in a list.
- In the search field in the upper right corner of the page, type the term you want to search for (Figure 2.59).
Figure 2.59. Type your search term in the search field.

- From the pop-up menu next to the search field, choose Subject, From, To, or CC (Figure 2.60).
Figure 2.60. To choose what’s searched, select Subject, From, To, or CC from the menu.
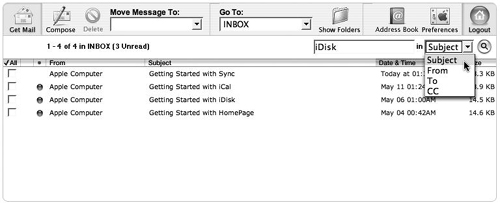
This setting determines whether the program will search message subjects, From addresses, To addresses, or CC addresses.
- Click the magnifying glass button to the right of the pop-up menu (Figure 2.61).
Figure 2.61. Click the magnifying glass button to perform the search.

All messages matching the search term load in a new page (Figure 2.62).
Figure 2.62. After you perform a search, the results are shown in a list.

Tip
• Search weeds through only one folder at a time. If you have a number of e-mail folders set up, you may have to search each likely folder to find the elusive message.
Setting .Mac Mail Preferences
Now that you know how to read and manage your e-mail using .Mac’s Webmail, it’s time to set your .Mac e-mail preferences using a Web browser. By doing so, you ensure that your email account behaves the way you want it to. (Wouldn’t it be nice if you could do this in other areas of your life . . .)
Your .Mac e-mail preferences are divided into three realms: Viewing, Composing, and Accounts. To access these preferences, log in to your .Mac e-mail account using a Web browser and click the Preferences button. The Viewing and Composing preferences affect only how your .Mac account works when you access it using a Web browser—your Accounts preferences affect how it behaves across the board.
Setting Viewing preferences
The Viewing preferences let you set the time zone, the number of messages displayed in a folder at one time, and whether all e-mail headers are displayed.
To set the time zone
- Log in to your .Mac Webmail account. Your Web browser loads the .Mac e-mail window.
- At the top of the window, click the Preferences button (Figure 2.63).
Figure 2.63. The .Mac Mail preferences let you control how you see mail, how you write messages, and how your account behaves.

The .Mac e-mail preferences load with the Accounts tab selected as the default (Figure 2.64). Don’t worry, we’ll discuss those options later in the chapter.
Figure 2.64. Click the Viewing tab at the top of the page to access your Viewing preferences.
- Click the Viewing tab at the top of the page.
The Viewing preferences load (Figure 2.65).
Figure 2.65. The .Mac Webmail Viewing preferences let you set your time zone, the number of messages that appear on a given page, and whether all e-mail headers are displayed.
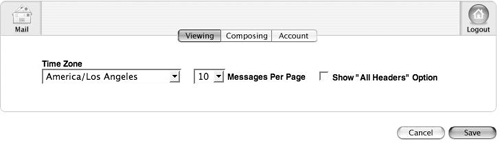
- From the Time Zone pop-up menu, choose a location in the time zone you’re working in.
- Click Save.
A message indicating that the change has been saved appears.
To set the number of viewable messages per page
- Log in to your .Mac Webmail account and open Viewing preferences.
The Viewing preferences load.
- From the Messages Per Page pop-up menu, choose the number of messages you’d like to see on a given page.
- Click Save.
Mail shows only the number of messages per page that you’ve selected.
Tips
• Ten or 15 messages per page is usually a manageable number for viewing, unless you go through a lot of e-mail in a day—in which case it might be worth listing more. The more messages you list, the longer the scroll.
• If you want to show all the e-mail headers when you read a message, check the Show “All Headers” Option box on the right side of this page and click Save. Headers let you see where an e-mail has come from, helping you to determine if it’s genuine.
Setting Composing preferences
The Composing preferences control what happens when you compose and send an e-mail—everything from whether your original message is included in your reply to how your spelling checker behaves.
To exclude original messages from replies
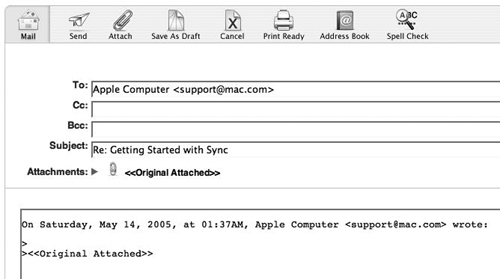
By default, whenever you use Webmail to Reply (or Reply All) to a message, the contents of the original message appear in the body of the reply message or as an attachment (if the original e-mail contains complex HTML) (Figure 2.66). If you don’t like this, you aren’t forever condemned to erase repeated content. Here’s how to turn off that behavior:
Figure 2.66. When you reply to an HTML e-mail message using a Web browser, the original message is included as an attached file, rather than as text within the message-composition text box.
- Log in to your .Mac Webmail preferences. The .Mac e-mail preferences load.
- Click the Composing tab.
The Composing preferences load (Figure 2.67).
Figure 2.67. The .Mac Webmail Composing preferences let you set what’s included in a reply, whether the Bcc header is shown, whether spelling is checked before you send a message, whether a photo or signature is included with a sent message, where sent and deleted messages go, and from whom the message appears to come.
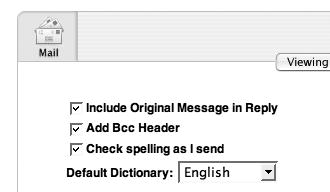
- In the upper left corner of the page, uncheck the Include Original Message in Reply box (Figure 2.68).
Figure 2.68. Uncheck the top box to prevent inclusion of original message text in your e-mail replies.

- Click Save.
To add the Bcc field to mail headers
The blind-carbon-copy (Bcc) address field lets you send copies of a message to someone without letting other recipients know that person is receiving a copy.
- On the Composing tab of your .Mac e-mail preferences, check the Add Bcc Header box (Figure 2.69).
Figure 2.69. Check the Add Bcc Header box to have the Bcc header included in e-mail messages you write.

- Click Save.
The Bcc header appears in all .Mac Webmail messages (Figure 2.70).
Figure 2.70. The Bcc header appears in Webmail messages if the proper preference is set, allowing blind-carbon-copy recipients to be added to a message.
Tip
• Besides its many uses in the realm of office politics, the Bcc field is handy for forwarding the latest e-mail joke or cartoon to your friends: If you address the message to yourself in the To field and put all other addresses in the Bcc field, you’ll spare your friends from seeing all the other recipients’ addresses when they open the message.
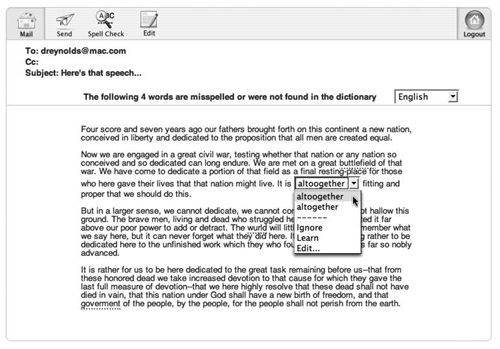
To have spelling checked before sending
- On the Composing tab of your .Mac e-mail preferences, check the “Check spelling as I send” box (Figure 2.71).
Figure 2.71. Check the last box to have your message’s spelling checked when you send it.
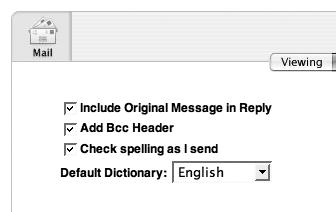
- From the Default Dictionary pop-up menu, choose a language (Figure 2.72).
Figure 2.72. From this menu, you can choose the language in which you’d like your e-mail’s spelling checked.

- Click Save.
Mail checks spelling before you send your message, using the language you’ve selected for your default dictionary (Figure 2.73).
Figure 2.73. .Mac’s built-in spelling checker shows you words that it suspects are misspelled and provides alternatives.
To create an automatic signature
A mail signature is a block of text that appears at the bottom of every e-mail message you compose. It typically contains the sender’s name, address, and other contact information. Some folks also include a favorite quote, a link to their Homepage, or what have you. Here’s how to make your own:
- On the Composing tab of your .Mac email preferences, check the Signature box (Figure 2.74).
Figure 2.74. Check the Signature box to have a text signature placed at the bottom of each message you send through .Mac’s Webmail.
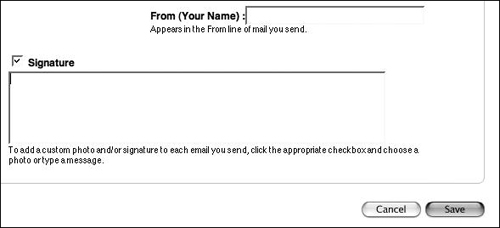
- In the text box below the Signature check box, type the text you’d like to use as your signature (Figure 2.75).
Figure 2.75. Enter the signature you’d like to have appear on e-mails that you send.

- Click Save.
Your new signature appears at the bottom of each .Mac Webmail message you send (Figure 2.76).
Figure 2.76. When composing a message using the signature option, the signature appears in the message-composition area automatically.
Tip
• If you’re using your .Mac e-mail account for business purposes, include your name, address, phone number, and Website address in your signature to help customers contact you easily. And even though addressees can easily click Reply to respond to your message, include your e-mail address as well, in case a recipient prints your message and wants to reply later.
To add an image to your Webmail reply
This task adds an image to messages that you send through .Mac Webmail—it’s not for sending an image as an attachment.
- On the Composing tab of your .Mac Mail preferences, check the Photo box (Figure 2.77).
Figure 2.77. Check the Photo box to have a photo included with each message you send through .Mac’s Webmail.

- Click Choose.
A page opens where you can choose an image (Figure 2.78).
Figure 2.78. On this page, you can choose an image using the Browse button.

- Click the Browse button.
The File Upload sheet slides down (Figure 2.79).
Figure 2.79. In the File Upload window, you can find and select an image to upload.

- Navigate to the image you want to use in your message and click Open.
The File Upload window closes, returning you to your preferences page.
- Back on the image-selection page, the name of the image you selected appears in the Step 1 field (Figure 2.80). Click the Upload button.
Figure 2.80. Click the Upload button to upload the selected item to the .Mac servers.

The image is uploaded to your .Mac account.
- Click the Apply button.
The preferences page opens with the Composing tab selected.
- Click Save.
When you send a .Mac Webmail message, the image you selected automatically appears in the upper right corner of your message (Figure 2.81).
Figure 2.81. Your image appears in the upper right corner of all .Mac e-mails sent using Webmail.

Other Composing Preferences
Additional settings options found in the upper-right portion of the Composing preferences page allow you to do any of the following (see Figure 2.68):
• Check the Save Sent Messages To box to have messages that you send saved. Choose the folder in which you want to have these messages saved from the pop-up menu.
• Check the Move Deleted Messages To box to have messages that you delete moved to the folder you select in the pop-up menu.
• To set the name that appears in the From line of the messages you send, type a new one in the field titled From (Your Name).
Tips
• To remove a custom image or icon, click the Remove button on the Composing preferences page, and click Save.
• If you’re using your .Mac e-mail for business, you can use the photo feature to add a company logo to your Webmail messages.
Setting Accounts Preferences
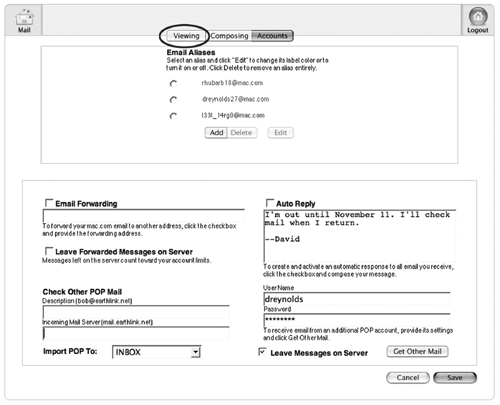
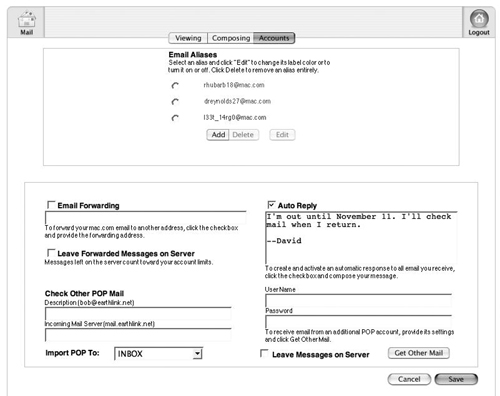
Although you must log in to your .Mac account on the Web to access the Accounts preferences, they affect how your .Mac account works both online and on your Desktop. The Accounts preferences enable you to create e-mail aliases, edit existing aliases—which essentially means that you can make them inactive or change the color of the messages that come in to the aliases—forward your mail, set up an auto reply, and set .Mac to check other e-mail accounts you might have.
Aliases, if you’ve never used them before, are e-mail addresses that don’t have accounts associated with them. Mail sent to an alias is redirected to another address—one with an associated account. If your account was [email protected], for example, you could create an alias called [email protected], and all email to [email protected] would be automatically delivered to [email protected] . Why do this? You can give out aliased e-mail addresses without fear—if an alias is abused (with, say, a forklift full of spam), simply delete it and create a new alias. Your original e-mail address remains uncompromised.
Using Accounts preferences, you can also set up your .Mac e-mail account so that all messages that come to it are forwarded to another e-mail account. This is useful if, for example, you won’t be checking your .Mac email account, and you want someone else to be able to read the messages while you’re away. Simply forward the messages to that person’s e-mail address, and every message sent to your .Mac account will be redirected to that person’s account.
To create an E-mail alias
- Log in to your .Mac Webmail preferences. The .Mac e-mail preferences load.
- Click the Accounts tab.
The Accounts preferences load (Figure 2.82).
Figure 2.82. The .Mac Mail Accounts preferences let you create and manage e-mail aliases, forward e-mail, check other e-mail accounts, and set an automatic reply.

- In the Email Aliases section at the top of the page, click the Create Alias button. The page for creating a new e-mail alias opens (Figure 2.83).
Figure 2.83. The e-mail alias page allows you to create an e-mail alias and choose a color for mail sent to that alias.
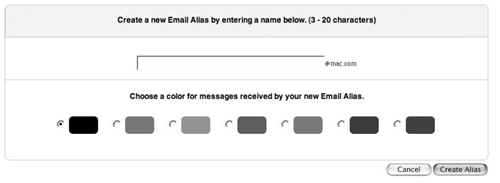
- In the text field, type an e-mail alias (it can’t have any spaces or other nonalphanumeric characters, or it won’t work) (Figure 2.84).
Figure 2.84. Type a word or phrase that you’d like to use for an alias—but remember, you can’t use spaces or other non-alphanumeric characters.
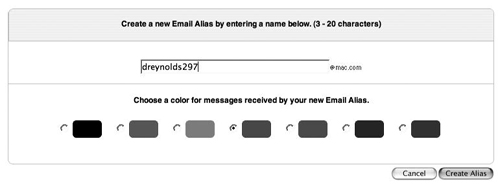
- Click the radio button next to the color you’d like to assign to messages sent to that alias (Figure 2.84). The color you choose affects only the listing in your inbox (the From and Subject text for example); it doesn’t affect the way mail you send appears to the recipient(s).
- Click the Create Alias button.
The new e-mail alias is now ready. You can send e-mail to that alias (with @mac.com at the end, as in [email protected]), and it will arrive in your main .Mac Inbox.
Tip
• You can have up to five aliases at a time on a given .Mac account. If you have five aliases and you delete one, you’ll have to wait seven days before you can create a new alias.
To edit an existing alias
- On the Accounts tab of your .Mac Webmail preferences, click the radio button next to the alias that you want to edit (Figure 2.85).
Figure 2.85. To edit or delete an e-mail alias, click the radio button to the left of the alias, and then click the Edit or Delete button.
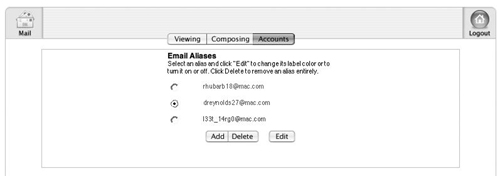
The Edit button becomes active.
- Click the Edit button.
The alias-editing page opens (Figure 2.86).
Figure 2.86. On the alias-editing page, you can choose a color for an alias or set whether or not an alias is active.

- Do one of the following:
• To turn on an alias, click the Active radio button.
• To turn off an alias, click the Inactive radio button.
• To change the color of messages arriving at that alias, click the radio button next to your preferred color.
- Click Save.
The changes to your alias take effect immediately.
To Delete an Existing Alias
- On the Accounts tab of your .Mac Webmail preferences, click the radio button next to the alias that you want to delete (Figure 2.87).
Figure 2.87. Click the radio button next to the e-mail alias you want to delete.
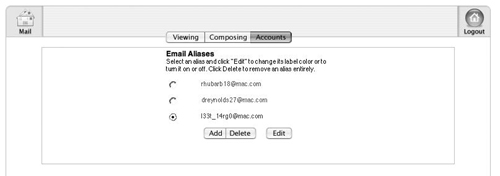
The Delete button becomes active.
- Click the Delete button.
A new page opens asking if you’re sure you want to delete the alias (Figure 2.88).
Figure 2.88. Click the Delete button to delete the alias.
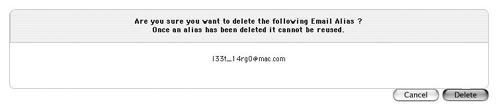
- Click Delete.
The alias is deleted from your account and cannot be reused.
Tip
• Remember: Once you delete an e-mail alias, it can’t be reused, so be sure this is something you want to do.
To forward all of your .Mac mail
There may be times (when you’re on vacation, for instance) when it’s useful to route mail from your .Mac account to another mail account (that of a co-worker, perhaps). Here’s how to do that:
- On the Accounts tab of your .Mac Webmail preferences, check the Email Forwarding box (Figure 2.89).
Figure 2.89. Check the Email Forwarding box and provide an e-mail address as the destination for forwarded mail, if you want your .Mac e-mail to arrive in another e-mail inbox.

- In the text box below the Email Forwarding check box, type the e-mail address to which you want the messages forwarded.
- Click Save.
Your messages are forwarded to the account you specified until you turn off mail forwarding.
Tip
• If you want to leave the forwarded messages in your .Mac e-mail account, be sure to check the Leave Forwarded Messages on Server box. To retrieve these messages later, simply connect to your .Mac account with your e-mail client and check your mail as you normally would.
To set up an auto reply
If you’ll be unable to answer mail from your .Mac account for a while, here’s how you can set up an automatic response message, letting people who send you mail know you’re away, and when you’ll be back in action:
- On the Accounts tab of your .Mac Webmail preferences, check the Auto Reply box (Figure 2.90).
Figure 2.90. Anyone who sends a message to your .Mac e-mail address will receive the text you type into the Auto Reply text box as a reply.
- In the text box below the Auto Reply check box, type the message that you want to have sent as your auto reply.
- Click Save.
Your automatic reply is sent to everyone who sends you an e-mail message.
To check other E-mail accounts
Here’s how you can use .Mac Webmail to check e-mail from other (non-.Mac) mail accounts. (Note that this works only with POP mail accounts; IMAP accounts typically require you to use their own Webmail-style interfaces to get messages.)
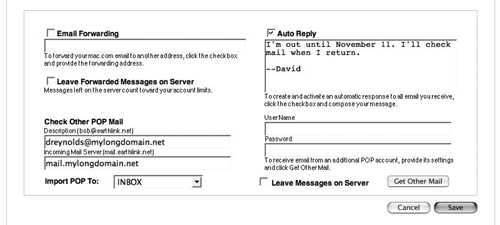
- On the Accounts tab of your .Mac Webmail preferences, scroll down to the Check Other POP Mail section (Figure 2.91).
Figure 2.91. Filling in the relevant fields enables you to check other e-mail accounts and import that mail into your .Mac e-mail Inbox.

- In the Description field, type the e-mail address of the account you want to check.
- In the Incoming Mail Server field, enter the name of the incoming mail server for the account you want to check (Figure 2.92).
Figure 2.92. Your incoming-mail-server address (with a short description of the account) is key to checking another e-mail account.
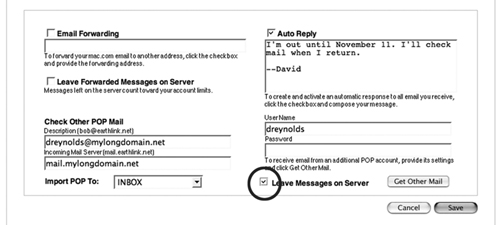
- In the UserName field, enter the member name of your account (Figure 2.93). Typically, the user name is the first part of the e-mail address, before the @ symbol. Check with the service provider that handles that particular e-mail address to be sure.
Figure 2.93. Provide the user name and password to check e-mail from another account.

- In the Password field, enter the password of the account you want to check. All e-mail accounts have associated passwords (or they should). This is what you typed when you first set up your e-mail account; if you’re not sure what this is, check with the service provider that handles that particular e-mail address.
- Check the Leave Messages on Server box if you want the messages to remain on the other mail server for later pickup (Figure 2.94).
Figure 2.94. Check this box to ensure that messages are left on the original mail server.
- Click the Get Other Mail button.
After a short delay, any mail waiting in the other account is imported into the Inbox of .Mac’s Webmail.
Tip
• Once you’re done working with your email, you’ll want to log out of your .Mac account. To do so, simply click your user name in the Log Out area on the right side of the toolbar or click the Logout button in the Mail toolbar (either of which logs you out of your .Mac account).
About iCards
iCards aren’t part of your .Mac e-mail account, but they work closely with it. Your .Mac account comes with hundreds of high-quality electronic greeting cards that you can send to anyone via e-mail. There are a number of categories to choose from (just like going into your own Hallmark store), including seasonal, birthdays, romance, and get well. If you’re feeling extra-creative, you can send a custom iCard—one that contains your own pictures—rather than using one of the prefab pictures.
To send an iCard
- Go to www.mac.com and log in to your .Mac account.
The main .Mac page opens.
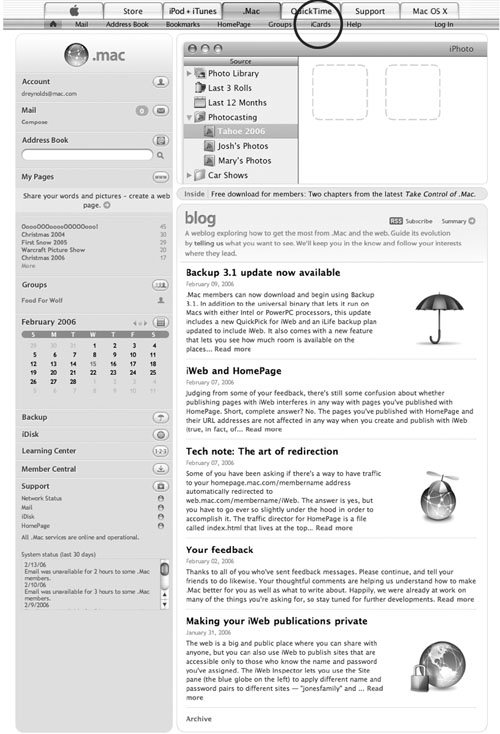
- In the toolbar at the top of the page, click the iCards link (Figure 2.95).
Figure 2.95. Click the iCards link in the toolbar to be taken to the main iCards page.
The iCards page opens.
- Click the card you want to send to select it. You can choose from a large number of categories on the left, and then you can browse through the various cards in a category.
The Compose/Edit page opens (Figure 2.96).
Figure 2.96. On the Compose/Edit page, you can create your own custom iCard.

- Click the radio button next to the font you want to use.
- In the message text field, type your message (Figure 2.97). The message will appear in boring plain text, but the font you picked will appear in the copy the recipient sees.
Figure 2.97. Type the message you want to send in the text box.

- Click the Continue button in the lower right corner of the page.
The Address & Send page opens with the name and e-mail address associated with your .Mac account already entered in the appropriate fields (Figure 2.98).
Figure 2.98. Enter your name and address information on the Address & Send page if it hasn’t been automatically filled in correctly.
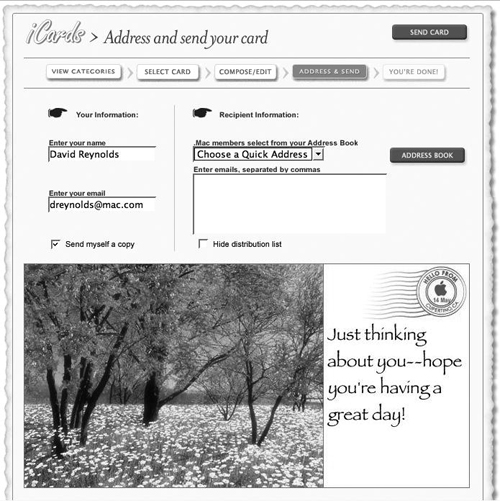
- In the “Enter your name” field, type your name if the information that’s already entered is incorrect.
- In the “Enter your email” field, type your e-mail address if the information that’s already entered is incorrect.
- Do one or more of the following:
• From the “.Mac members select from your Address Book” pop-up menu, choose the e-mail addresses to which you want to send the card from your Quick Addresses list.
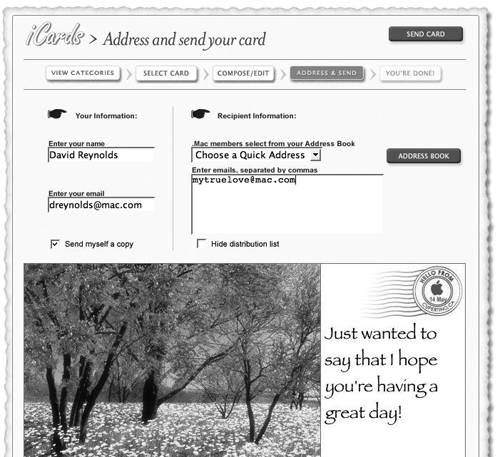
• In the “Enter emails, separated by commas” text box, type the e-mail addresses to which you want to send the card (Figure 2.99). If you want to send the card to more than one e-mail address, separate multiple addresses by commas.
Figure 2.99. Type the e-mail addresses to which you want to send the card in the “Enter emails, separated by commas” field.

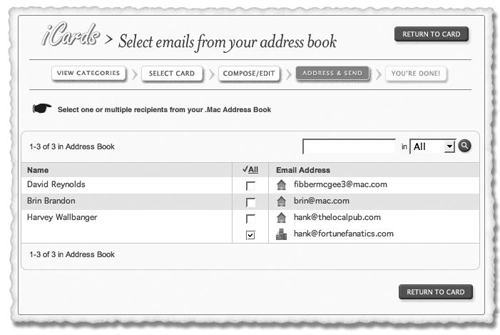
• Click the Address Book button to select e-mail addresses from your .Mac Address Book. Check the boxes next to the addresses you want to use, and then click Return to Card (Figure 2.100).
Figure 2.100. Check the boxes for the addresses from your Address Book to which you want to send the iCard.
- In the upper right corner of the page, click the Send Card button (Figure 2.101).
Figure 2.101. Click the Send Card button to send the iCard.
The card is sent to the e-mail addresses you’ve specified, and you’re given a hearty congratulations on a job well done (Figure 2.102).
Figure 2.102. Nice work—you’ve sent an iCard!

Tips
• To view all of the card styles before making your selection, click Browse All Cards at the bottom of the iCards Categories list on the main iCards page.
• To have a copy of the iCard sent to you as well, check the “Send myself a copy” box before sending the card.
• If you want the people to whom you’re sending the card to be unable to see who else received it, check the “Hide distribution list” box.
To send a custom iCard
- Go to www.mac.com and log in to your .Mac account.
The main .Mac page opens.
- In the toolbar at the top of the page, click the iCards link.
The iCards page opens.
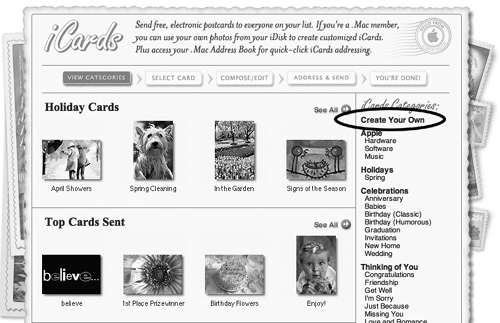
- In the iCards Categories list on the right, click Create Your Own (Figure 2.103).
Figure 2.103. The Create Your Own link is your key to making a custom iCard.
The “Select an image” page opens. The column on the left shows the contents of your iDisk’s Pictures folder.
- From the left column, click the name of an image to select it.
A preview of the image opens on the right (Figure 2.104).
Figure 2.104. When you select an image from your iDisk for an iCard, a preview appears on the right.
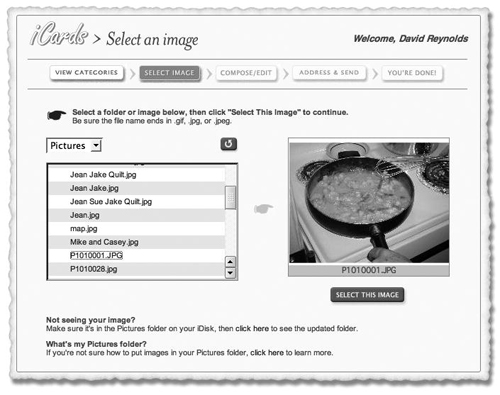
- Click the Select This Image button. The Compose/Edit page opens (Figure 2.105).
Figure 2.105. On the Compose/Edit page you can add custom text to your custom card.
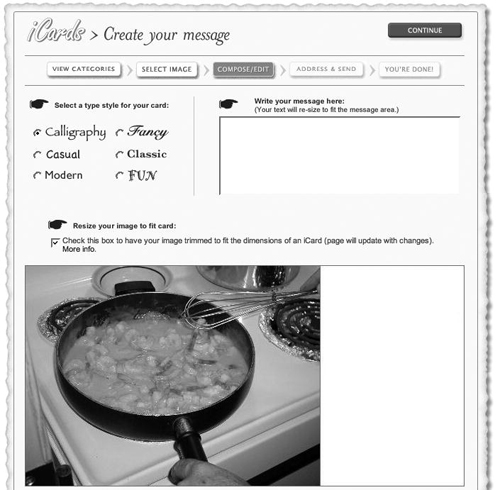
- Click the radio button next to the font you want to use.
- In the message text box, type your message.
- Check the “Resize your image to fit card” box to trim the image to proper size.
- Click the Continue button.
The Address & Send page opens with the name and e-mail address associated with your .Mac account already entered in the appropriate fields.
- In the “Enter your name” field, type your name if the information that’s already entered is incorrect.
- In the “Enter your email” field, type your e-mail address if the information that’s already entered is incorrect.
- Do one or more of the following:
• From the “.Mac members select from your Address Book” pop-up menu, choose an e-mail address.
• In the “Enter emails, separated by commas” field, type an e-mail address.
• Click the Address Book button to select an e-mail address from your .Mac Address Book. Check the boxes next to the addresses you want to use, and then click Return to Card.
- Click the Send Card button.
The card is sent to the e-mail addresses you’ve specified.