
Chapter 1. Getting Started
Back at the turn of the millennium, Apple came out with a suite of Internet tools called iTools, which consisted of a mac.com e-mail address as well as KidSafe (a filter for child-friendly Web sites), HomePage (an easy-to-use tool for building Web sites), and iDisk (20 MB of online storage that was accessible using just about any Internet connection). Apple’s Internet strategy basically boiled down to a nifty set of Mac-only tools meant to make Mac users’ online lives a little easier.
Fast-forward half a dozen years. The tools are no longer free and the name has changed—iTools now goes by .Mac (pronounced “dot mac”)—but the goal remains the same: make Mac users’ online lives easier. With a mac.com e-mail address, iDisk, and HomePage still at its core, .Mac now also includes tight integration with Mac OS X, as well as a host of other features, all for just $99 a year. Sounds expensive until you look at it this way: It amounts to just 27 cents a day. If you’re like me, you can find that under your couch cushions, along with a few stale snacks.
In this chapter, I’ll show you how to create your .Mac account, set your .Mac preferences, manage your .Mac account, and set up your iDisk.
About .Mac
.Mac isn’t just a single application or Web site. It’s a suite of Internet services that’s meant to help Mac users get more from their Macs. I’ll quickly walk through each of the .Mac services now before going into greater detail on how to use each one later in the book.
• .Mac Mail. At the center of your .Mac membership is a full e-mail account ending in @mac.com. You can use this e-mail account to send and receive e-mail on any computer that has a POP or IMAP client available, and that’s pretty much every one out there. In addition, .Mac Mail is Web based, so you can send and receive e-mail from any Web browser.
• iDisk. All .Mac accounts come with 1 GB of online storage that you can use to keep mail and files on your iDisk. Support for iDisk is built into Mac OS X, and using it is a lot like using any other network server—or even a hard drive, for that matter. iDisk serves as the backbone for publishing Web pages and synchronizing information between Macs.
• iLife ’06 Integration. With iWeb and iPhoto, members of the iLife suite of applications, you can easily publish Web pages and sites to your .Mac account, as well as create shareable photo albums called Photocasts. And with GarageBand, you can create your own high-quality enhanced podcasts, complete with images, and share them through .Mac.
• HomePage. Your .Mac membership includes access to HomePage, handy Web-based software that allows you to quickly build Web pages that serve as photo albums, movie theaters, and file-download pages.
HomePage uses files that you upload to your iDisk. HomePage is also integrated with iPhoto, making it incredibly easy to share your pictures.
• Groups. Use your .Mac account to organize your soccer team, your grade-school classroom, or your online-gaming guild. A .Mac Group gives members a group e-mail, a message board, a calendar, and iDisk space—just for Group members.
• Backup. Each .Mac membership comes with Backup, a free utility designed to automate data backups to your .Mac account as well as to CDs, DVDs, and external hard drives. Making sure your important files get backed up doesn’t sound very sexy, but when you’re facing a corrupt hard drive and you don’t have a backup, a simple and free backup utility starts looking pretty good.
• Address Book. Your .Mac account lets you synchronize your Address Book data so that it’s available to you anywhere you have access to a Web browser. And with Mac OS X v10.4 Tiger, you can share your Address Book with others.
• iCards. With a .Mac account, you can create and send e-mail greeting cards, drawn from Apple’s professionally designed assortment or chosen from your own custom creations.
• .Mac Sync. With Mac OS X v10.4, you can synchronize important information, such as Keychain passwords, Mail’s Smart Mailboxes, and Safari bookmarks, to your .Mac account—which lets you keep that information in sync with another Mac and provides you with a backup copy. Even those running Mac OS X v10.3 Panther can use iSync with .Mac to keep their information synchronized across Macs.
Hardware and Software Requirements
You don’t need much to run .Mac—its requirements are pretty minimal. To take advantage of .Mac and all of its features, you’ll need a Macintosh running Mac OS X 10.3.9 or later, 128 MB of RAM, and an up-to-date browser such as Safari or Firefox. The iDisk Utility for Windows requires—you guessed it—a PC running Windows XP.
 Tip
Tip
• You can find a full rundown of all .Mac system requirements at www.mac.com/1/systemrequirements.html.
.Mac Family Pack
.Mac provides a great way to give every member of your family his or her own not-so-little corner of your .Mac account. For $179.95 a year, you get five accounts: one master account and four subaccounts, each with a unique e-mail address, storage space, Web pages, and synchronization. The master account gets a full 1 GB of storage space (split between e-mail and iDisk), and each subaccount gets 250 MB of storage space (split between e-mail and storage).
Configuring Mac OS X
After you’ve bought and paid for your .Mac account, you can go to www.mac.com, log in, and begin using some features—such as Mail—right away. However, to get the most out of your .Mac account, you’ll want to configure your Mac’s operating system to work with it by setting up your .Mac preferences. After all, one of the chief benefits of having a .Mac account is its tight integration with Mac OS X. If you entered your .Mac account information when installing Mac OS X, your operating system is already configured to work with your .Mac account. If, however, you ever need to change your .Mac login information (say, you change your .Mac account), you’ll need to follow a similar procedure.
To set up Mac OS X to work with a .Mac account
- From the Apple menu, choose System Preferences (Figure 1.1).
Figure 1.1. To set up Mac OS X to access your .Mac account, you’ll need to first open System Preferences by choosing System Preferences from the Apple menu.

The System Preferences window opens.
- Do one of the following:
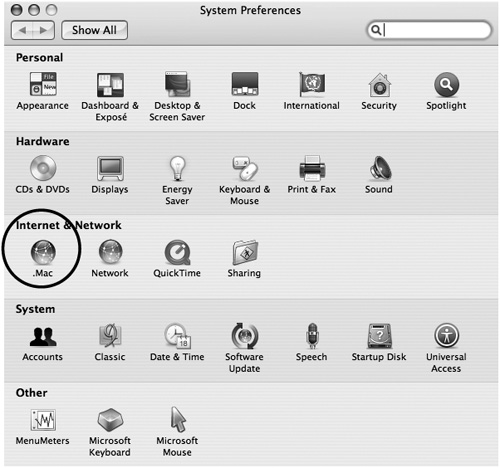
• In the Internet & Network section, click the .Mac icon to select it (Figure 1.2).
Figure 1.2. The .Mac preferences are nestled in the Internet & Network section of the System Preferences window. Click the .Mac globe icon, and the .Mac preference pane will load.
• From the View menu, choose .Mac. The .Mac pane opens.
- Click the Account tab to select it, if it is not already selected.
- In the .Mac Member Name field, enter your .Mac member name.
- In the Password field, enter your password (Figure 1.3).
Figure 1.3. The Account tab of the .Mac preference pane asks for your .Mac member name and password, and it reminds you of how long you have until your account expires. This page offers more options in Mac OS X v10.4 than it did in earlier versions, including the new Sync area, in which you can choose what information gets synchronized, and the Advanced area, which shows which computers are registered to be synchronized.

- From the System Preferences menu, choose Quit System Preferences (Command-Q) (Figure 1.4).
Figure 1.4. When you quit System Preferences, any changes you make to the .Mac pane are saved automatically.

Mac OS X is now set up to access your .Mac account.
Tips
• You can choose whatever you like for your password, as long as it’s 6 to 14 characters long. Make sure it’s something you can remember but isn’t easy to guess.
• If you don’t yet have a .Mac account, click the Learn More button in the lower right portion of the .Mac preference pane. This takes you to the .Mac homepage, where you can become a .Mac member by purchasing an annual .Mac subscription.
Changing Account Settings
Your .Mac account has a wide range of settings that you can only change online. If you want to make changes to your personal information, credit card information, password, or e-mail settings—or if you want to purchase additional iDisk space—you need to first log in to your .Mac account using a Web browser.
To log in to your .Mac Account settings
- Type www.mac.com in your Web browser.
The .Mac Web page opens (Figure 1.5).
Figure 1.5. Welcome to .Mac! When you first load the .Mac homepage in a Web browser, you’ll be greeted by a page that looks like this (although it may be different, since Web pages can change on a dime).

- In the upper left corner of the .Mac page, click Account to select it (Figure 1.6).
Figure 1.6. In the upper left corner of the .Mac homepage you’ll see the Account link. Click it to load the login page of your .Mac account.

Your .Mac login page opens.
- In the Member name field, type your .Mac e-mail address. You can also use your member name—it’s the portion of your .Mac e-mail address that precedes the @ symbol. (Figure 1.7).
Figure 1.7. To log in to .Mac, enter your .Mac member name and password, and then click the Login button.
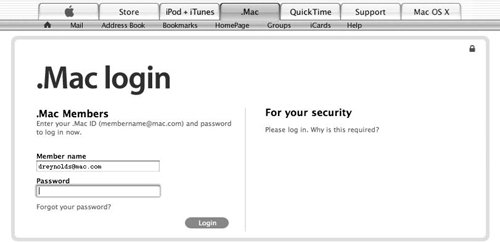
- In the Password field, type your password.
- Click the Login button.
Your .Mac Account Settings page opens, and you can now make changes to your account (Figure 1.8).
Figure 1.8. This is your main .Mac Account Settings page. Here you can manage your e-mail accounts, buy more storage, and change your personal information, credit card information, and a plethora of other settings.

Tip
• If you’ve forgotten your .Mac password, you can click the “Forgot your password?” link on the login page to retrieve it.
To change your personal information
- Log in to your .Mac account settings as described in “To log in to your .Mac account settings”.
The Account Settings page opens.
- On the Account Settings page, click the Personal Info button as shown in Figure 1.8.
Your Personal Info page opens (Figure 1.9).
Figure 1.9. Your .Mac Personal Info page lets you change your member name, assign an alternate e-mail address, set your preferred language, and request a subscription to the .Mac Newsletter. The newsletter is well worth subscribing to, and it’s free to .Mac members.

- On the Personal Info page, do any of the following:
• In the First Name field, change your first name.
• In the Last Name field, change your last name.
• In the Alternate Email Address field, change or edit your alternate e-mail address (where you can be contacted regarding .Mac, in case your .Mac address isn’t available for some reason).
• In the Preferred Language pop-up menu, select your preferred language in which to view .Mac (currently the options are English, French, German, and Japanese).
• In the News and Info section, check the box to change your opt-in e-mail setting (when checked, this tells Apple that you don’t mind being sent the .Mac Newsletter and other .Mac communications).
- Click the Submit button.
Apple applies the changes you made to your .Mac account’s personal information settings.
Changing credit card information
.Mac is built around an annual subscription, and therefore it keeps your credit card information on file (just in case you want to sign up for the optional automatic renewal). Of course, as soon as you get that new card with 0 percent interest on all balance transfers and new purchases, you’ll probably want to change the credit card information stored in your .Mac account.
To change your credit card information
- Log in to your .Mac account settings as described in “To log in to your .Mac account settings”.
The Account Settings page opens.
- On the Account Settings page, click the Credit Card Info button, as shown in Figure 1.8.
The Credit Card Info page opens (Figure 1.10).
Figure 1.10. Your .Mac Credit Card Info page lets you adjust settings that include your credit card type and number, your name and billing address, and autorenewal of your account.
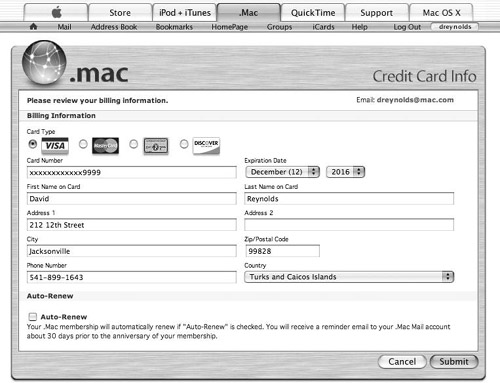
- On the Credit Card Info page, do any of the following:
• Change your credit card number and billing information.
• Check the Auto-Renew box to set your .Mac membership to automatically renew.
• If the Auto-Renew check box is already selected and you don’t want your .Mac membership to automatically renew, click the check box to deselect it.
- Click Submit.
Apple applies the changes you made to your .Mac account’s credit card settings.
Tip
• If you do select the Auto-Renew check box on the Credit Card Info settings page, you’ll get an e-mail about 30 days before your account is set to automatically renew, notifying you of the impending action.
Changing password settings
When logged in to your .Mac account settings, you can also change your .Mac password and your .Mac password verification, including your birthday, password question, and password answer.
To change your password settings
- Log in to your .Mac account settings as described in “To log in to your .Mac account settings”.
The Account Settings page opens.
- On the Account Settings page, click the Password Settings button, as shown in Figure 1.8.
Your Password Settings page opens (Figure 1.11).
Figure 1.11. Your .Mac Password Settings page lets you change your password (although you can’t view it—all you see is bullets). You can also use it to set password-verification information—namely, your birthday and a password question and answer.
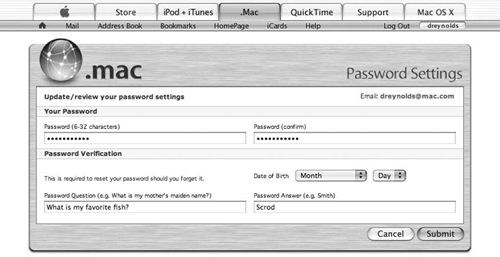
- On the Password Settings page, do any of the following:
• In the Password fields, type a new password and confirm it.
• From the Date of Birth pop-up menus, change your birth date.
• In the Password Question field, type a new password question.
• In the Password Answer field, type a new answer to your password question.
- Click Submit.
Apple applies the changes you made to your .Mac account’s password settings.