CHAPTER 20
GAME SOUND AND MUSIC
In the last chapter you saw how to create and edit sounds using Audacity. We’re now going to move to the next level, using those sounds for effects initiated by the player, by weapons and ammo, by vehicles, and by places and things in the world at large.
Also, we’ll touch on the issue of in-game music and how you can use it. I’m not going to even attempt to teach you how to compose music—that’s far out of scope for this book. However, I will include some musical pieces on the DVD that you are free to experiment with as we look at the issue. You can find them in RESOURCESCH20 MUSIC. They are in MP3 format (fully compatible with Torque). You can find more free music at http://www.nosoapradio.us/.
KOOB
In the following chapter and in later chapters, we will be using audio features a great deal more, so we will take the time here to add some more files to your sample program.
First, copy your Emaga19 directory, and use it to start a new project folder called “Koob20”. We’ll be using Koob instead of Emaga from now to the end of the book, but notwithstanding that, follow the procedure you used in earlier chapters to use the project of the previous chapter as the starting point for the current chapter. It’s described in detail in a note near the beginning of Chapter 18.
You want to change everything to Koob20. Take care that in your searching, when you find code that refers to an asset with emaga (without a chapter number) in the name, like emaga_chatwidgetarray, that you do not change those names. They are generic support assets, and you need the code to match the asset’s name in its folder. Now if you want to go and change all of the names of the files on the disk to match, go ahead, but I strongly suggest you leave them as is.
In the last chapter, we set up some audio descriptions and profiles to fiddle with. Now it’s time to put that code where it properly belongs. Create a new script file: controlclientmiscsndprofiles.cs.
Insert the following lines of code:
new SFXProfile(AudioButtonOver)
{
 filename = "assets/sound/buttonOver.ogg";
 description = "AudioGui";
 preload = true;
};
Tip
You may already have the SFXDescription object AudioButtonOver, defined at the top of control/client/initialize.cs. If you do, you should go delete the code that defines it in initialize.cs to prevent console error messages. The proper place for this definition now is sndprofiles.cs, as I’ve shown you. Yeah, yeah, I know ...I’ve made up my mind and it stays in sndprofiles.cs from now on.
This sets up a profile for use on our client.
Note
Another thing to notice is this code that also resides in initialize.cs:
  new SFXDescription(AudioGui)
 {
   volume   = 1.0;
   isLooping= false;
   is3D     = false;
   type     = $GuiAudioType;
 };

 new SFXDescription(AudioMessage)
 {
   volume   = 1.0;
   isLooping= false;
   is3D     = false;
   type     = $MessageAudioType;
 };
Back in the early days of our Emaga programs, we had that code in case it was needed for some of the GUIs we were working with. As part of our tidying up here, you should delete those two SFXDescriptions from client/initialize.cs. That’s because we also already have them defined in our core code and now we can go ahead and use the core versions.
Also, at the top of control/client/initialize.cs you should find a block of audio initialization and preferences code that looks like this:
$pref::SFX::autoDetect = true;
$pref::SFX::provider = "";
$pref::SFX::device = "OpenAL";
$pref::SFX::useHardware = false;
$pref::SFX::maxSoftwareBuffers = 16;
$pref::SFX::frequency = 44100;
$pref::SFX::bitrate = 32;
$pref::SFX::masterVolume = 0.8;
$pref::SFX::channelVolume1 = 1;
$pref::SFX::channelVolume2 = 1;
$pref::SFX::channelVolume3 = 1;
$pref::SFX::channelVolume4 = 1;
$pref::SFX::channelVolume5 = 1;
$pref::SFX::channelVolume6 = 1;
$pref::SFX::channelVolume7 = 1;
$pref::SFX::channelVolume8 = 1;
It’s in the wrong place. Now when the code was put there many chapters ago, it was the right place for the adolescent game context at the time. But now our game is almost all grown up, so it’s time for it to move away from home and into a place of its own.
Locate the file controlclientpresets.cs and move that audio prefs code into it. Delete the code from its old home.
Below those global prefs settings that you just moved from client/initialize.cs to client/presets.cs is this bunch of code:
$GuiAudioType     = 1; // Interface.
$SimAudioType     = 2; // Game.
$MessageAudioType = 3; // Notifications.
$MusicAudioType   = 4; // Music.

$AudioChannels[ 0 ] = AudioChannelDefault;
$AudioChannels[ $GuiAudioType ] = AudioChannelGui;
$AudioChannels[ $SimAudioType ] = AudioChannelEffects;
$AudioChannels[ $MessageAudioType ] = AudioChannelMessages;
$AudioChannels[ $MusicAudioType ] = AudioChannelMusic;
Just as with the SFXDescriptions we deleted earlier in client/initialize.cs, we want to also delete those audio type and audio channel lines from client/initialize.cs for exactly the same reason: we don’t need them anymore because the core code has it all.
Okay, no typing, copying, or deleting for this next bit. Open the file core/scripts/client/audioDescriptions.cs. You should find the following code (don’t type it in):
singleton SFXDescription( AudioDefault3D : AudioEffect )
{
    is3D              = true;
    ReferenceDistance = 20.0;
    MaxDistance       = 100.0;
};

singleton SFXDescription( AudioSoft3D : AudioEffect )
{
    is3D              = true;
    ReferenceDistance = 20.0;
    MaxDistance       = 100.0;
    volume = 0.4;
};

singleton SFXDescription( AudioClose3D : AudioEffect )
{
    is3D              = true;
    ReferenceDistance = 10.0;
    MaxDistance       = 60.0;
};

singleton SFXDescription( AudioClosest3D : AudioEffect )
{
    is3D              = true;
    ReferenceDistance = 5.0;
    MaxDistance       = 10.0;
};

//--------------------------------------------------------------------------
// Looping sounds
//--------------------------------------------------------------------------

singleton SFXDescription( AudioDefaultLoop3D : AudioEffect )
{
    isLooping         = true;
    is3D              = true;
    ReferenceDistance = 20.0;
    MaxDistance       = 100.0;
};

singleton SFXDescription( AudioCloseLoop3D : AudioEffect )
{
    isLooping         = true;
    is3D              = true;
    ReferenceDistance = 18.0;
    MaxDistance       = 25.0;
};

singleton SFXDescription( AudioClosestLoop3D : AudioEffect )
{
    isLooping         = true;
    is3D              = true;
    ReferenceDistance = 5.0;
    MaxDistance       = 10.0;
};

//--------------------------------------------------------------------------
// 2d sounds
//--------------------------------------------------------------------------

// Used for non-looping environmental sounds (like power on, power off)
singleton SFXDescription( Audio2D : AudioEffect )
{
  isLooping        = false;
};

// Used for Looping Environmental Sounds
singleton SFXDescription( AudioLoop2D : AudioEffect )
{
  isLooping        = true;
};

singleton SFXDescription( AudioStream2D : AudioEffect )
{
  isStreaming      = true;
};

singleton SFXDescription( AudioStreamLoop2D : AudioEffect )
{
  isLooping      = true;
  isStreaming    = true;
};

//--------------------------------------------------------------------------
// Music
//--------------------------------------------------------------------------
singleton SFXDescription( AudioMusic2D : AudioMusic )
{
  isStreaming        = true;
};

singleton SFXDescription( AudioMusicLoop2D : AudioMusic )
{
  isLooping      = true;
  isStreaming    = true;
};

singleton SFXDescription( AudioMusic3D : AudioMusic )
{
  isStreaming    = true;
  is3D           = true;
};

singleton SFXDescription( AudioMusicLoop3D : AudioMusic )
{
  isStreaming    = true;
  is3D           = true;
  isLooping      = true;
};
Notice that there are two general types of SFXDescriptions: 2D and 3D. The 2D datablocks are for use when in the GUI, or simply when playing sounds that would only be heard by the client player in a multiplayer game, and not heard by every other player. There are two types of such sound effects: looping and not looping. There are also two specialty uses for 3D sounds: streaming (general) and streaming (music).
The 3D datablocks are to be used for sounds that will be generated within the game world, and will have some positional or 3D relationship to the players in the game world. So logically, they also have various versions for close, closest, looping, and so on.
Note also that all of these datablocks are derived from one of two master SFXDescriptions: AudioEffect and AudioMusic. The master descriptions are contained in corescriptsclientaudio.cs shown here for your persusal, not for typing:
singleton SFXDescription( AudioGui )
{
  volume       = 1.0;
  sourceGroup  = AudioChannelGui;
};

// Master description for game effects audio.
singleton SFXDescription( AudioEffect )
{
  volume       = 1.0;
  sourceGroup  = AudioChannelEffects;
};

// Master description for audio in notifications.
singleton SFXDescription( AudioMessage )
{
  volume       = 1.0;
  sourceGroup  = AudioChannelMessages;
};

// Master description for music.
singleton SFXDescription( AudioMusic )
{
  volume       = 1.0;
  sourceGroup  = AudioChannelMusic;
};
All of this sets up audio datablocks for the server—we will use them later in this chapter.
PLAYER SOUNDS
In a first-person shooter—styled game, player sounds add to the sense of “being there,” sometimes in a big way. There are two kinds of player sounds: world sounds and client-only sounds.
World sounds are effects that are generated on the server that represent sound effects emitted by your player-avatar in the game world. In this sense, they are much the analogue of the way you emit sounds in real life: walking, talking, firing weapons, banging on doors, and so on. The server places a sound effect “in the world” at your location and then updates all the affected clients so that they will emit the sound (if the client’s player-avatars are close enough to hear the sound) as it was made, with appropriate modifications, such as attenuation because of distance or Doppler effect due to the sound source moving toward or away from the listener.
These sorts of sounds are usually called 3D sounds. The actual sound effects have no inherent 3D characteristics, but the game client handles them in a manner that imparts 3D positional information to each client.
Client-only sounds are those sounds that a player’s avatar makes that really only matter to the player. These can be personal noises, like the sounds of heavy breathing to portray exertion, the sound of something being hit by a bullet, or the rustle of clothing. Nothing is cut-and-dried though. You might want to use the sounds in some of those examples as world sounds in order to perhaps betray the location of a player who is sneaking around in the dark. It all depends on your game play design.
Some sounds can be attached to the player, like the sounds of footsteps, triggered by a frame in the animation. The MilkShape DTS Exporter supports this capability, using an interface in the DTSPlus Exporter.
However, that being said, there is a way for us to handle attached sound effects like footsteps using program code, and that’s what we’ll be doing in the next section, except we will be making our clothes rustle instead.
Other sounds can be emitted in an ad hoc fashion, wherever and whenever we want. Some examples of these sorts of sounds are utterances or taunts. You press a key, and your player’s avatar utters a taunt of some sort, such as “Loser!” or “Ha ha, ya missed me!” You can also use ad hoc sounds to issue prerecorded audible commands. The limits are your imagination. Heck, you could have your player carry around a boom box and play annoying music!
When you use world sounds, you also have the choice of using them in 3D mode, where the sound is played on all the clients as if they were emanating from a specific location in the game world, or in 2D mode, where the server still directs the clients to play the sounds, but they have no positional quality to them.
Before we get started, there is a small change to make to your code to fully incorporate the sound profiles we did back in Chapter 19. Open controlserverserver.cs, find the function OnServerCreated, and inside it, locate the line
Exec("./misc/camera.cs");
And immediately above it, insert the following line:
Exec("./misc/sndprofiles.cs");
That little number makes sure that the sound profiles we created at the end of Chapter 19 actually get loaded up when the server starts. If you feel the urge, save your work, and then go run Koob now. You will finally hear the rain and thunder.
Rustlers
In our first example we are going to use the serverPlay3D function to make rustling clothing for our player. Each time the player takes a step, his pants swish together and the arms of his jacket rustle against his sides. First, you should record some rustling. Just a single recording will be enough, if you like, but if you record a half dozen or so different versions that are all similar though slightly different, you can offer a more natural sound effect by randomly choosing which sound to play for a given footfall. Make sure to record the sound at 22050 Hz or maybe even 11025 Hz to keep the file size fairly small. Save the sound as assetssound rustle1.ogg.
After you have the sound effect made, you need to add the following code in control serverplayersplayer.cs at the start of the file (above the line that reads: datablock PlayerData(MaleAvatarDB)).
datablock SFXProfile(Rustle1)
{
  fileName = "assets/sound/rustle1.ogg";
  description = AudioClosest3d;
  preload = true;
};

function serverCmdStartRustle(%client)
{
  %client.player.schedule(200,playRustle);
  %client.player.rustleon= true;
}
function serverCmdStopRustle(%client)
{
  %client.player.rustleon = false;
}

function Player::playRustle( %this )
{
  if(%this.rustleon)
  {
    serverPlay3D(Rustle1,%this.getTransform());
    %this.schedule(500,playRustle);
  }
}
First, there is an SFXProfile datablock. This datablock tells the engine where the sound effect is and which SFXDescription to use. The particular SFXDescription in question already resides in controlservermiscsndprofiles.cs and looks like the following (do not type this in because we already created it a few pages ago):
datablock SFXDescription(AudioClosest3d)
{
  volume   = 1.0;
  isLooping= false;

  is3D     = true;
  ReferenceDistance= 5.0;
  MaxDistance= 30.0;
  type     = $SimAudioType;
};
The next thing in the new code we added was a message handler for receiving a message from a client. We defined the message in this case to be StartRustle, and our only parameter is the handle to the client that sends the message. That handler makes a call to a method of the Player object called schedule. This schedules a function execution event for processing sometime later. We also set the flag %client.player.rustleon to true for future reference. The event delay is set to 200 milliseconds, or a fifth of a second, in the future. You can change this value to something else or even have it vary according to movement speed. At the appointed time, that function, playRustle, is called, and provided that the %this.rustleon property is set to true, it executes the serverPlay3D function. Note that in this case, %this is set to be the handle of the object the method is being called for. That object is the Player object, which happens to be exactly the same object as %client.player, and it’s a good thing that it is, too!
The way serverPlay3D works is that it accepts an SFXProfile and 3D coordinates in the world space. Conveniently we can get those coordinates from a simple call to getTransform. The serverPlay3D function then internally tells all clients to play that sound effect at those world coordinates.
And hey, presto! You have a rustle.
You might have trouble hearing the rustling over the sound of the crashing lightning, if you still have the storms enabled. If so, you can simply set the number of strikesPerMinute in the properties of ElectricalStorm to 0. You can set them back to 12 or whatever you want when you are done.
Another way to stop the thunder from interfering is to open the console, and type (assuming you did not change the datablock pointers as described in the last paragraph):
ElectricalStorm.strikesperminute=0;
This will change the thunderstorm so that there are no strikes.
Of course, another option is to simply remove the rain and lightning from the mission file.
Before exiting playRustle, the schedule method is called again to schedule another rustle in half a second. It will keep doing this until told to stop. You tell it to stop by using the stopRustle message, whose handler merely sets %client.player. rustleon to false, so that the next time playRustle is called, the flag is found to be false, the sound is played, and the event isn’t rescheduled.
So that’s the guts of getting the sounds to play, but we still need to deal with when to play them. We want the steps to happen when the player is running and to stop when he stops moving.
We can easily do this as part of the work-around by trapping the keyboard inputs that tell the player to move and stop. The function that does this is a client-side function located in controlclientmiscpresetkeys.cs.
Open that file, and locate the function GoAhead, which looks like this:
function GoAhead(%val)
//--------------------------------------------------------------------------
// running forward
//--------------------------------------------------------------------------
{
  $mvForwardAction = %val;
}
Change it to this:
function GoAhead(%val)
//--------------------------------------------------------------------------
// running forward
//--------------------------------------------------------------------------
{
   $mvForwardAction = %val;
   if (%val)
      commandToServer('startRustle'),
   else
      commandToServer('stopRustle'),
}
In GoAhead the parameter %val is nonzero when the key that has been mapped to this function is being pressed, and it is zero when the key is released. Therefore, the simple if-else code block will send the startRustle message to the server when the GoAhead key is pressed and the stopRustle message when it is released. The GoAhead key is defined later in the same file to be the W key.
If you like, you can pop into Koob and check out the rustling clothes. I’ll be here when you get back.
Now if you have been browsing around controlserversndProfiles.cs looking at the datablocks in there, you might have come across another work-around you’re tempted to try—the AudioClosestLooping3d datablock. You might look at that and say to yourself, “Dude, that has looping built in. No need to fool with scheduling events on a repeating basis.” And you would be right in making that deduction. However, there is a problem with that approach. Once you trigger that sound effect at a particular location, it will continue looping, all right—but at the same location. The rustling won’t follow your player.
Like I said earlier, the absolute best way to do these kinds of repetitive player sounds is to attach them to the player’s movement animations via triggers in the model. However, this approach, while inferior to triggered footsteps, is actually a pretty convenient way to add repetitive sounds like clinking armor, clattering ammo cans, jingling change, and what have you.
Footsteps
You’re probably tired of having your player fella gliding along with what seems like gossamer wings, when you know darn well that he’s tromping along just in that way that guys with big feet do. Well, let’s put some code in there to hear his tromping.
First, find the file footstep1.ogg in the RESOURCESCH20 folder, and copy it to assetssound.
Next, use Torsion to open controlserverplayersplayer.cs. Locate the datablock definition for the MaleAvatarDB that starts with this line:
datablock PlayerData(MaleAvatarDB)
Scroll down to the end of the datablock, and just after the line that says:
maxInv[CrossbowAmmo] = 20;
FootSoftSound       = FootLightSoftSound;
FootHardSound       = FootLightHardSound;
FootMetalSound      = FootLightMetalSound;
FootSnowSound       = FootLightSnowSound;
FootShallowSound    = FootLightShallowSplashSound;
FootWadingSound     = FootLightWadingSound;
FootUnderwaterSound = FootLightUnderwaterSound;
These are properties of the PlayerData datablock, and we are pointing them to various SFXProfile datablocks for different flavors of footsteps. So now we need to put those datablocks in as well.
So, in that same file, type the following, inserting it just above the code you typed in for the rustling clothes near the top of the player.cs file:
datablock SFXProfile(FootLightSoftSound)
{
  filename    = "assets/sound/footstep1.ogg";
  description = AudioClosest3d;
  preload = true;
};
datablock SFXProfile(FootLightHardSound)
{
  filename    = "assets/sound/footstep1.ogg";
  description = AudioClose3d;
  preload = true;
};
datablock SFXProfile(FootLightMetalSound)
{
  filename    = "assets/sound/footstep1.ogg";
  description = AudioClose3d;
  preload = true;
};
datablock SFXProfile(FootLightSnowSound)
{
  filename    = "assets/sound/footstep1.ogg";
  description = AudioClosest3d;
  preload = true;
};
datablock SFXProfile(FootLightShallowSplashSound)
{
  filename    = "assets/sound/footstep1.ogg";
  description = AudioClose3d;
  preload = true;
};
datablock SFXProfile(FootLightWadingSound)
{
  filename    = "assets/sound/footstep1.ogg";
  description = AudioClose3d;
  preload = true;
};
datablock SFXProfile(FootLightUnderwaterSound)
{
  filename    = "assets/sound/footstep1.ogg";
  description = AudioClosest3d;
  preload = true;
};
Save your work, and go fire up Koob. You should be able to hear the running footsteps and the rustling clothes. Notice that you will hear the footsteps no matter which way you run, but you can only hear the rustling when you run forward. The footsteps are handled by animation triggers in the sequence files for the model. You, of course, are responsible for the rustling. It shouldn’t take you too long to get the rustling happening for sideways and backward movement as well as forward movement.
Utterances
Let’s make our avatar guy say something, something that other players can hear, by pressing a key. The process is going to be similar in some ways to the rustling clothes.
First, make another recording, at the sample rate of your choosing. Holler something into the mic, like, “Your mother wears army boots!” or something equally endearing. Save it as assetssoundinsult1.wav.
Then add the following code in controlserverplayersplayer.cs at the end of the file.
datablock SFXProfile(Insult1)
{
  fileName = "assets/sound/insult1.ogg";
  description = AudioClose3d;
  preload = true;
};

function serverCmdHurlInsult(%client)
{
  serverPlay3D(Insult1,%client.player.getTransform());
}
In this code, serverCmdHurlInsult is the message handler on the server that receives a direct message sent from the client (which we will get to just a little further on). There is noticeably less stuff than for the rustling clothes, because we don’t need to loop the sound effect. We just hurl our insult and maybe run for cover after that! Now, notice that the profile uses a different SFXDescription. This time it’s AudioClose3d. (Don’t type this in—it’s already in controlservermiscsndProfiles.cs.)
datablock SFXDescription(AudioClose3d)
{
  volume   = 1.0;
  isLooping= false;
  is3D     = true;
  ReferenceDistance= 10.0;
  MaxDistance= 60.0;
  type     = $SimAudioType;
};
The reason for using this datablock is because it defines a sound effect that can be heard from farther away. The ReferenceDistance is 10 world units. This means that the sound effect attenuates (the volume decreases) over a longer distance, so it can be heard from farther away than the rustling clothes.
Next, we need to send the message from the client to the server so that the server can then notify all the other clients. We’ll do that again with a client-side function that we’ll call Yell.
Open controlclientmiscpresetkeys.cs, and add the following to the end:
function Yell(%val)
{
  if (%val)
      commandToServer('HurlInsult'),
}
PlayerKeymap.bind(keyboard, "y", Yell);
The function sends the HurlInsult message to the server, but only when the key is pressed (%val is nonzero), not when it’s released. Then we need to bind a key to press to trigger the whole thing. We use PlayerKeymap.bind to do that, pointing it to the Yell function.
There you go—you’re in business.
One more variation you should try is recording several different insults and saving them as insult1.ogg, insult2.ogg, insult3.ogg, and so on. Let’s go ahead and record five additional different insults.
Now make five more different SFXProfiles that have incremental names starting with Insult2 and ending with Insult6. Each should uniquely point at one of the six recordings you made. Then right after the opening brace of the message handler, serverCmdHurlInsult, use a bit of random number code to pick a number from 1 to 6.
%n=getRandom(5) + 1;
This will pick an integer from 0 to 5 and then increment it by 1 so that the result will be between 1 and 6.
Then rewrite the call to serverPlay3D to look like this:
serverPlay3D("Insult" @ %n, %client.player.getTransform());
This will modify the name of the SFXProfile by putting the random number at the end. Then every time you hurl the insult, a different epithet will be directed with withering precision on your foe. Fun for the whole family!
While we’re at it, you might want to hear what utterances a dying dude makes (it’s gruesome), so add the following to the top of the file controlserverplayersplayer.cs, above all those SFXProfile datablocks you typed in earlier for the rustling clothes and footsteps:
datablock SFXProfile(DeathCrySound)
{
  fileName = "assets/sound/death.ogg";
  description = AudioClose3d;
  preload = true;
};

datablock SFXProfile(PainCrySound)
{
  fileName = "assets/sound/pain.ogg";
  description = AudioClose3d;
  preload = true;
};
And add the following to the very end of that same file:
function Player::playDeathCry( %this )
{
  %this.playAudio(0,DeathCrySound);
}
function Player::playPain( %this )
{
  %this.playAudio(0,PainCrySound);
}
Don’t close the file just yet—one more change to go. While still in player.cs, locate the function MaleAvatarDB::onDisabled and type these two lines in at the start of the function, after the opening brace:
%obj.playDeathCry();
%obj.playDeathAnimation();
That’s a wrap. Save your work.
Death sounds and pain sounds. Oh joy. Well, if we want to actually hear those in all their excruciating, um, excruciatingness, we’ll need some sound files too. Copy pain.ogg and death.ogg from RESOURCESCH20 to assetssound, Then go and find an enemy orc to kill you. Naturally it’s a little weird getting plonked by an orc. Well, that just happens to be covered next....
WEAPON SOUNDS
Weapon sounds are an interesting study. Weapons have specific support in Torque, through the use of a programming construct called a state machine. The basic idea is that we break the operation of a weapon down into different stages, called states, and we define a specific set of behaviors for each state. Within each state, we are not aware of what the previous state was, only what needs to be done in this state.
Using this system, we can quite readily define some rather complex behaviors.
Remapping Keys
The Setup screen (accessed by clicking on the Setup button on the main menu) works like the Options screen in the Torque Demo. All of the functionality is already there, as a result of the work you did in Chapter 18. All of the functionality, except one bit, that is—remapping the key command bindings.
The key bindings are already predefined (hard coded) in the file controlclientmiscpresetkeys.cs (this module is functionally the same as FPS Examplegamescriptsclientdefault.bind.cs in the DEMO Examples folder). This is how we can ensure that there will always be key bindings for the commands that absolutely need them. But we also may want to allow our users to redefine the bindings, and that is what the Controls tab in the Settings screen is for.
When the changes are made, the user’s key bindings are saved to controlclientconfig.cs. When the game restarts, it should load the config.cs module after it has loaded the presetkeys.cs file, thus overriding the predefined key bindings with the user’s choices. To get the game to actually do this, you need to open up controlmain.cs and near the top, immediately below the lines about loading presetkeys.cs, insert this line:
     if (isFile("./config.cs"))
         Exec("./config.cs");
You are also going to need a button on your main menu screen in order to access the Setup screen. Open controlclientinterfacesmenuscreen.gui and locate the last line that consists of a closing brace/semi-colon pair }; and place the following code above that line:
    new GuiButtonCtrl() {
      command = "Canvas.pushDialog(SetupScreen);";
      text = "Setup";
    };
That is what I call a minimalist button control! Only the text of the button and the command it needs to execute are specified. All the other properties receive default values from Torque. This means that the button will appear at the upper-left corner of your screen, and it won’t be sized to match the other buttons. Have no fear! You can use the GUI Editor (invoked by the F10 key) to move and resize your button, and so on. Or you can peruse the other button controls in menuscreen.gui and let them guide you in making the changes manually in code.
Oh, and by the way—I’m leaving the actual implementation of the key remapping as an exercise for the reader. But I’m not that evil. The Setup screen is already mostly functional; it’s mainly the actual key remapping that needs to be made to work. Here are some clues: you need to copy the file myremapdialog.gui from the Chapter 20 resources folder into one of the folders in control. You will also need to add a line of code to ensure that the file is loaded and run during the initialization of the game. Look elsewhere in this section, in this chapter, and maybe even back to Chapter 18 for some guidance, if you need to.
Crossbow Sounds
We’re going to make your tommy gun from an earlier chapter generate its sound effects, but before we do that, let’s get the sound humming along for the crossbow. From your RESOURCESCH20 folder, copy the following files to your assetssound folder:
ammo_pickup.ogg
crossbow_explosion.ogg
crossbow_firing.ogg
crossbow_firing_empty.ogg
crossbow_reload.ogg
Next, copy RESOURCESCH20crossbow.cs to the controlserverweapons folder. You should get a message box asking you if you want to replace the existing file. Click on Yes. Then run your KOOB game, go grab a crossbow and some ammo, and go make lots of explosions.
If you don’t see a crossbow, use the World Editor to insert one from the Weapons section of the Library.
The difference between the two crossbow.cs files is that the new one contains all of the audio profile declarations that we need, plus a few path tweaks. Now go ahead and jump into the game and make some big booms. You know you want to.
Tommy Gun Preparation
To set up for getting the tommy gun sounds going, go find the tommy gun model you created back in Chapter 16, and copy the model (the DTS file) and the artwork (the PNG file) that goes with the model to assetsmodelsweapons. Then go to the folder 3D3ERESOURCESCH20 and copy the file tommygun.cs into controlserver weapons.
Next, from the same resources directory, copy the following files to assetsmodels weapons:
ammo.jpg
bullethole.png
muzzleflash.png
tgammo.dts
tgprojectile.dts
tgshell.dts
Now for the sounds. I’m not going to make you record your own sounds. You can copy them from the same resources directory. Deposit these sound files into assets sound.
ammo_pickup.ogg
dryfire.ogg
shortreload.ogg
tommygun.ogg
weapon_pickup.ogg
weapon_switch.ogg
Now open the file controlserverserver.cs, and find the function OnServerCreated at the start of the file. Inside that function is a block of Exec() statements. Insert the following at the bottom of that block of statements, after the line about the crossbow:
Exec("./weapons/tommygun.cs");
This tells the engine to load our tommy gun definition file.
Next, open the file controlserverplayersplayer.cs, and near the beginning of the file, find the line that reads as follows:
datablock PlayerData(MaleAvatarDB)
At the end of the datablock that starts with that line, before the closing brace (“}”) that ends the datablock, insert the following lines:
   maxInv[Tommygun] = 1;
   maxInv[TommygunAmmo] = 20;
This indicates how many of the listed items the player can have in his possession, or inventory, at any given time.
And finally, open the file you copied earlier, controlserverweapons ommygun.cs, and at the very top of the file add the following lines :
datablock SFXProfile(TommyGunMountSound)
{
  filename    = "assets/sound/shortreload.ogg";
  description = AudioClose3d;
  preload = true;
};

datablock SFXProfile(TommyGunReloadSound)
{
  filename    = "assets/sound//Weapon_pickup.ogg";
  description = AudioClose3d;
  preload = true;
};

datablock SFXProfile(TommyGunFireSound)
{
  filename    = "assets/sound/tommygun.ogg";
  description = AudioClose3d;
  preload = true;
};

datablock SFXProfile(TommyGunDryFireSound)
{
  filename    = "assets/sound/dryfire.ogg";
  description = AudioClose3d;
  preload = true;
};

datablock SFXProfile(WeaponSwitchSound)
{
  filename    = "assets/sound/Weapon_switch.ogg";
  description = AudioClose3d;
  preload = true;
};
And now, add the following rather long datablock to the end of controlserverweapons ommygun.cs
//----------------------------------------------------------------------------
// TommyGun image which does all the work. Images do not normally exist in
// the world, they can only be mounted on ShapeBase objects.

datablock ShapeBaseImageData(TommyGunImage)
{
  shapeFile = "assets/models/weapons/TommyGun.dts";
  offset = "0 0 0";
  mountPoint = 0;
  emap = true;

  className = "WeaponImage";

  item = TommyGun;
  ammo = TommyGunAmmo;
  projectile = TommyGunProjectile;
  projectileType = Projectile;
  casing = TommyGunShell;
  armThread = "look2";

  // State Data
  stateName[0]                       = "Preactivate";
  stateTransitionOnLoaded[0]         = "Activate";
  stateTransitionOnNoAmmo[0]         = "NoAmmo";

  stateName[1]                       = "Activate";
  stateTransitionOnTimeout[1]        = "Ready";
  stateTimeoutValue[1]               = 0.7;
  stateSequence[1]                   = "Activated";
  stateSound[1]                      = WeaponSwitchSound;

  stateName[2]                       = "Ready";
  stateTransitionOnNoAmmo[2]         = "NoAmmo";
  stateTransitionOnTriggerDown[2]      = "Fire";
  stateScript[2]                     = "onReady";
  stateTransitionOnReload[2]         = "Reload";

  stateName[3]                       = "Fire";
  stateTransitionOnTimeout[3]        = "Ready";
  stateTimeoutValue[3]               = 0.096;
  stateFire[3]                       = true;
  stateRecoil[3]                     = LightRecoil;
  stateAllowImageChange[3]           = false;
  stateSequence[3]                   = "Fire";
  stateScript[3]                     = "onFire";
  stateSound[3]                      = TommyGunFireSound;
  stateEmitter[3]                    = TommyGunFireEmitter;
  stateEmitterTime[3]                = 1.0;
  stateEmitterNode[3]                = "muzzlePoint";

  stateName[4]                       = "Reload";
  stateTransitionOnNoAmmo[4]         = "NoAmmo";
  stateTransitionOnTimeout[4]        = "FinishedReloading";
  stateTimeoutValue[4]               = 3.5; // 0.25 load, 0.25 spinup
  stateAllowImageChange[4]           = false;
  stateSequence[4]                   = "Reload";
  stateScript[4]                     = "onReload";
  stateSound[4]                      = TommyGunReloadSound;

  stateName[5]                       = "FinishedReloading";
  stateTransitionOnTimeout[5]        = "Activate";
  stateTimeoutValue[5]               = 0.04;
  stateScript[5]                     = "onFinishedReloading";

  stateName[6]                       = "NoAmmo";
  stateTransitionOnAmmo[6]           = "Reload";
  stateSequence[6]                   = "NoAmmo";
  stateScript[6]                     = "onNoAmmo";
  stateTransitionOnTriggerDown[6]    = "DryFire";

  stateName[7]                       = "DryFire";
  stateSound[7]                      = TommyGunDryFireSound;
  stateScript[7]                     = "onDryFire";
  stateTimeoutValue[7]               = 0.5;
  stateTransitionOnTimeout[7]        = "NoAmmo";

  stateName[8]                       = "WaitTriggerRelease";
  stateScript[8]                     = "onWaitTriggerRelease";
  stateTransitionOnTimeout[8]        = "WaitTriggerRelease";
  stateTimeoutValue[8]               = 0.01;
  stateTransitionOnTriggerUp[8]      = "Ready";

  autoFire = true;
  weaponDamage = 60;
  minSpread = 0.01;
  maxSpread = 0.045;
  spreadRate = 0.019;   // amount spread should increase per shot
  spreadRecoverRate = 0.003;
};
The first thing this new code does is define a bunch of audio profiles, TommyGunMountSound, TommyGunReloadSound, TommyGunFireSound, TommyGunDryFireSound, and WeaponSwitchSound. These profiles are used in each of the different weapon firing states. Those states are defined in the next part of the new code.
That next part of the new code is a datablock of the type ShapeBaseImageData. This is what defines the gun itself and how it works.
First, there is a set of basic properties, like where to find the model that represents the image and so on. For this example, I have used the same model as the one that is used for the external view—the view of your player-model that everyone else sees. You, though, only see the weapon image. This means that to do this right, you will need to make another model of the weapon for use in this image. Later on you will see why this matters.
Now we add the WeaponImage namespace as a parent. The WeaponImage namespace provides some hooks into the inventory system that are necessary for picking up the gun.
Next are a bunch of pointers that tell what various resources we will need in order to use this gun.
Finally, we encounter the code that defines the state machine. What happens is that when you pick up the gun, the Torque Engine sets it to the first state: Preactivate.
In the Preactivate state, we have only two variables, and they tell the state machine what to do immediately next. If the gun is loaded, it should change to the Activate state; if not, it should change to the NoAmmo state. If you scroll down until you find the line that says stateName[6] = “NoAmmo”; you will find that state’s definition.
In the NoAmmo state, there are several directives that the engine must follow while in this state. If we suddenly receive some ammo, then we change to the Reload state. If the gun’s trigger is pressed, we enter the DryFire state. Note that there is also a pointer to a function (the onNoAmmo function) that we can execute when we find ourselves in this state. This can also be called the state handler.
All the rest of the states operate in a similar way, and the directives are quite easy to read and follow. The important ones for this chapter are the stateSound directives, which tell the engine what audio profiles to use when we arrive in that state.
The state machine definition in the TommyGunImage datablock you’ve just seen is really quite easy to follow. You can modify it in all sorts of ways to accommodate any variation you might imagine.
Now after getting controlserverweapons ommygun.cs typed in and double-checking it all, you’re going to want to test it out. Well in order to do that, you will need to be able to place objects in the mission. And that means having the freedom to go where you want, and that means you’ll need to be able to use the camera fly mode, just like you do in the Torque demo. Well, the code for that is in the scripts, but the key bindings aren’t. So that means we’ll have to add the key bindings. This is a good opportunity to try out the new Setup button.
Launch Koob, and click on the Setup button in your main menu screen. Next, click on the Controls button, then scroll down to the very bottom of the list of controls.
Double-click on the “Toggle Camera” entry, then press the F6 key when the little dialog saying REMAP “Toggle Camera” pops up. Next, in the same way, assign F8 to “Drop Camera at Player”. Finally, use F7 for “Drop Player at Camera”.
By the way: “Drop Camera at Player” is the same as entering World Camera, Standard mode, or what I like to call “Camera Fly mode.” Because my version is cooler. Actually it’s because these camera modes have had many different names in different releases of Torque. So I tend to stick with the most descriptive phrase that works for me. You could call it Clementine, and I’m sure it would work just as well.
“Drop Player at Camera” is the same as entering Player Camera mode. Which I call “Player Camera mode,” usually. Heh.
Oh yes, and don’t forget, Alt-C will toggle you back and forth between the two camera modes.
Launch your Koob game. Once you have spawned in, you are going to use the World Editor to insert a tommy gun and some ammo into the game world. You would have already done things like this in earlier chapters, so I will try not to be as detailed as I was earlier. But there is a little bit of new and shiny here, so I’ll start off gently, and not toss you to the wolves too early.
1. Press F8. This will set your player into camera fly mode.
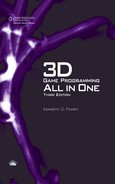
2. Press F11. This will open up the World Editor, as shown in Figure 20.1. It should open in the Object Editor by default, with the Scene tree over on the right side. If your editor doesn’t look the one in the picture, press F1 to get the Object Editor.
Tip
Oh, and by the way? In that Figure 20.1? The screenshot? <Cave Johnson voice> Heh, heh, well I’m sure you’ll notice the “No Material” marker on the terrain. Do. Not. Worry. That’s just little ole me fooling around with terrain materials. It will not have any effect on you in this chapter, so don’t fret. Really. I mean it.</Cave Johnson voice>
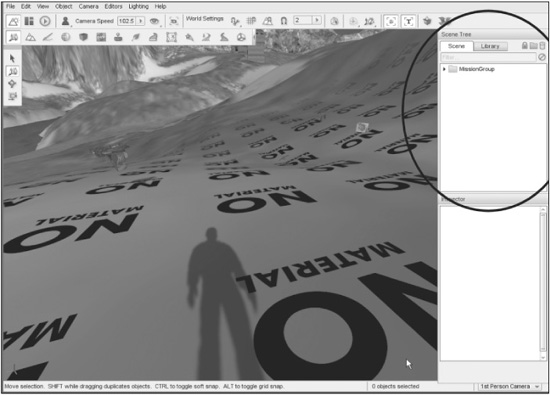
3. In the Scene tree, click on the little arrow to the left of “Mission Groups.” This will expand the Scene tree, as shown in Figure 20.2.
4. In the Scene tree view, click the Library tab. This gains you access to your game assets.
5. Click on the Scripted sub-tab, then double-click on the Weapon button. You should now have a Scene tree view similar to Figure 20.3.
6. Make sure that the center of your world view in the game world window is situated in an open area about 20 virtual feet in front of you. Just take a guess at it. Remember that to move the view in the World Editor left and right or up and down, hold down the right mouse button and move the mouse.
Figure 20.2
Object Editor with Mission Group in the Scene tree expanded.
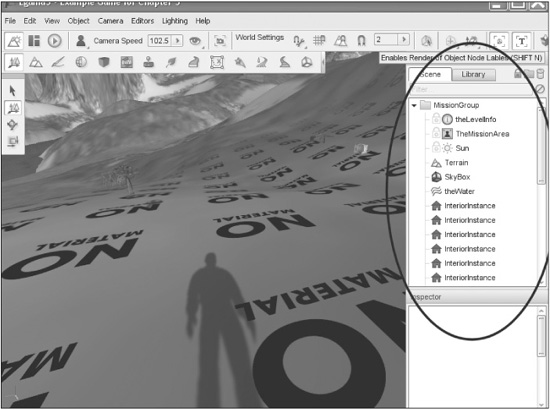
Figure 20.3
The Scripted Weapon view in the Library.
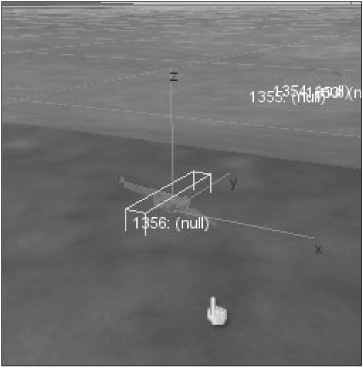
7. Click Tommygun in the Scripted Weapon view. The tommy gun model will appear; if it shows up directly in front of you, just move it away from you and perhaps a little closer to the ground. Figure 20.4 shows the tommy gun; it will be rotating.
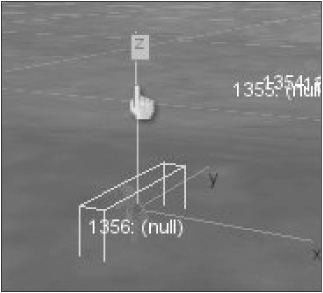
8. Move the cursor over on top of the vertical axis line (labeled Z) that sprouts from the top of the gun model. The Z-axis label will become highlighted in yellow, as shown in Figure 20.5.
9. Click the vertical Z-axis line, and drag it up or down until the gun is positioned just above the ground, as depicted in Figure 20.6.
Figure 20.6
Repositioned tommy gun.
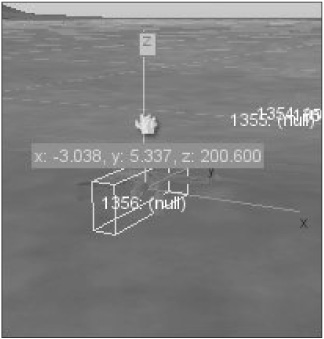
This is the reason why you needed to switch to camera fly mode before entering the World Editor. If you had stayed in normal player camera mode, you might not have been able to grab the Z-axis line and move it as easily.
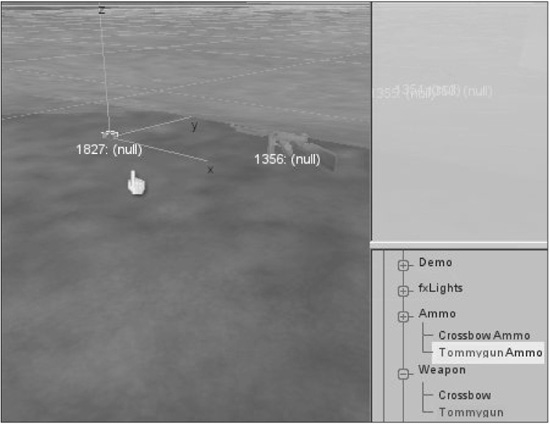
10. Now turn your view slightly to the side, and repeat the same process by placing an ammo box, as shown in Figure 20.7. The ammo box can be found in the Tree view at Library, Scripted, Ammo, TommygunAmmo.
Tip
You should consider placing lots and lots of ammo boxes. Submachine guns like the tommy gun go through ammo at a prodigious rate! If you do put lots of ammo boxes in, you might consider modifying the player datablock so that the player can have more tommy gun ammo in his inventory.
11. Now press F11 to toggle out of the World Editor. If you are in camera fly mode, press Alt-C or F6 to toggle yourself back into your player character. Alternatively, you can just fly over to where you placed the ammo, then press F7 to spawn your player there.
Okay, now run on over and pick up the ammo and the tommy gun by just passing right over on top of them. Take note; don’t pick up the crossbow first, because you have no way of getting rid of it right now. Also, wait several seconds after you have picked up both the gun and the ammo before actually trying to shoot. There is a several second delay in the sequence to simulate the time it takes to mount the magazine in the gun, pull back the charging handle, and so on.
You will immediately notice that the gun doesn’t carry properly. However, go ahead and shoot it, and listen to the firing sequence and all the sounds we’ve been dealing with. You can make another model to act as the mounted (carried) version of the gun. Also, you will need to adjust your model animations to ensure the model will carry the gun properly—the provided example character doesn’t do that.
Tip
If you find that the ammo doesn’t disappear, fret not! Check your control/server/misc/item.cs file and look in the Item::Respawn function for this line:
%this.Hide(true);
And replace the word Hide with SetHidden, then run your game and test again.
You can go back to your ShapeBaseImageData in the tommygun.cs file and fiddle with the state machine and other variables and see how they affect your gun’s behavior. For example, you can move the carry position of the gun by changing the offset property in the TommyGunImage.
VEHICLE SOUNDS
Vehicles are obvious sound sources. An idling engine, squealing tires, whirring propellers—the kind of vehicle dictates the needs. Torque has several defined vehicle types, but we’ll just look at the wheeled vehicle and add some sound effects to the runabout.
To start, you will need to record sound effects for the following:
![]() engine idle (caridle.ogg)
engine idle (caridle.ogg)
![]() acceleration (caraccel.ogg)
acceleration (caraccel.ogg)
![]() wheel impact (impact.ogg)
wheel impact (impact.ogg)
![]() wheel squeal (squeal.ogg)
wheel squeal (squeal.ogg)
![]() soft crash (vcrunch.ogg)
soft crash (vcrunch.ogg)
![]() hard crash (vcrash.ogg)
hard crash (vcrash.ogg)
In lieu of creating your own, feel free to use the sounds that I have provided at 3D3E RESOURCESCH20. Deposit the files into assetssound.
Next, copy the car definition module, 3D3ERESOURCESCH20car.cs, to control servervehicles. If the directory doesn’t exist, create it.
Then copy your runabout model (from Chapters 9 and 15) and all its artwork into assetsmodelsvehicles. Again, if the directory doesn’t exist, create it. Make sure your runabout is named runabout.dts and the wheel model is named wheel.dts. Your texture files would be runabout.jpg and wheel.jpg, unless you used different names.
Now open the file controlserverserver.cs, and find the function OnServerCreated at the start of the file. Inside that function is a block of Exec() statements. Insert the following at the bottom of that block of statements:
Exec("./vehicles/car.cs");
This tells the game engine to load your car definition file.
And finally, open that very same definition file, controlservervehiclescar.cs, and add the following lines to the beginning, just above the TireParticle ParticleData datablock:
datablock SFXProfile(CarSoftImpactSound)
{
  filename    = "assets/sound/vcrunch";
  description = AudioClose3d;
  preload = true;
};

datablock SFXProfile(CarHardImpactSound)
{
  filename    = "assets/sound/vcrash";
  description = AudioClose3d;
  preload = true;
};

datablock SFXProfile(CarWheelImpactSound)
{
  filename    = "assets/sound/impact";
  description = AudioClose3d;
  preload = true;
};

datablock SFXProfile(CarThrustSound)
{
  filename    = "assets/sound/caraccel";
  description = AudioDefaultLooping3d;
  preload = true;
};

datablock SFXProfile(CarEngineSound)
{
  filename    = "assets/sound/caridle";
  description = AudioClose3d;
  preload = true;
};

datablock SFXProfile(CarSquealSound)
{
  filename    = "assets/sound/squeal";
  description = AudioClose3d;
  preload = true;
};
Be sure to replace the Ogg Vorbis filename that I used in those SFXProfiles with the ones you recorded yourself.
Now add this following block of code to the same file, car.cs, but this time put it at the very end of the file:
datablock WheeledVehicleData(DefaultCar)
{
  category = "Vehicles";
  className = "Car";
  shapeFile = "assets/models/vehicles/runabout.dts";
  emap = true;

  maxDamage = 1.0;
  destroyedLevel = 0.5;

  maxSteeringAngle = 0.785;  // Maximum steering angle
  tireEmitter = TireEmitter; // All the tires use the same dust emitter

  // 3rd person camera settings
  cameraRoll = true;         // Roll the camera with the vehicle
  cameraMaxDist = 6;         // Far distance from vehicle
  cameraOffset = 1.5;        // Vertical offset from camera mount point
  cameraLag = 0.1;           // Velocity lag of camera
  cameraDecay = 0.75;        // Decay per sec. rate of velocity lag

  // Rigid Body
  mass = 200;
  massCenter = "0 -0.5 0";   // Center of mass for rigid body
  massBox = "0 0 0";         // Size of box used for moment of inertia,
                             // if zero it defaults to object bounding box
  drag = 0.6;                // Drag coefficient
  bodyFriction = 0.6;
  bodyRestitution = 0.4;
  minImpactSpeed = 5;        // Impacts over this invoke the script callback
  softImpactSpeed = 5;       // Play SoftImpact Sound
  hardImpactSpeed = 15;      // Play HardImpact Sound
  integration = 4;           // Physics integration: TickSec/Rate
  collisionTol = 0.1;        // Collision distance tolerance
  contactTol = 0.1;          // Contact velocity tolerance

  // Engine
  engineTorque = 4000;       // Engine power
  engineBrake = 600;         // Braking when throttle is 0
  brakeTorque = 8000;        // When brakes are applied
  maxWheelSpeed = 30;        // Engine scale by current speed / max speed
  // Energy
  maxEnergy = 100;
  jetForce = 3000;
  minJetEnergy = 30;
  jetEnergyDrain = 2;

  // Sounds
  engineSound = CarEngineSound;
  jetSound = CarThrustSound;
  squealSound = CarSquealSound;
  softImpactSound = CarSoftImpactSound;
  hardImpactSound = CarHardImpactSound;
  wheelImpactSound = CarWheelImpactSound;
};
As you’ve seen in earlier sections, we start out with a gaggle of SFXProfiles that define each of our sounds.
After that comes the vehicle datablock. Most of the properties are explained in the code commentary or are self-explanatory. The ones that we are most interested in are at the end.
The engineSound property is the sound the vehicle makes while idling. As long as the vehicle is running, it will make this noise.
The jetSound property is the one used when the vehicle accelerates. The name is a holdover from the Tribes 2 game engine in the early Torque days.
The squealSound property is the sound emitted by the tires when the vehicle is manhandled around a corner, causing the tires to slip.
The two impact sound properties, softImpactSound and hardImpactSound, are used when the vehicle collides with objects at different speeds, as defined by the softImpactSpeed and hardImpactSpeed properties earlier in the datablock.
Finally, the wheelImpactSound is the sound emitted when the wheels hit something at greater than the minimum impact speed, defined by minImpactSpeed earlier in the datablock.
Now we have to make some changes to our player’s behavior. What we want is to have the player get in the car when he goes up to it.
Open the file controlserverplayersplayer.cs, and locate these lines in the MaleAvatarDB::onCollision function:
  {
   %obj.pickup(%col);
  }
and insert the following after the second brace:
  %this = %col.getDataBlock();
  if ( %this.className $= "Car")
  {
     %node = 0;   // Left Front seat
     %col.mountObject(%obj,%node);
     %obj.mVehicle = %col;
  }
Next, add the following code to the end of the file:
function MaleAvatarDB::onMount(%this,%obj,%vehicle,%node)
{
  %obj.setTransform("0 0 0 0 0 1 0");
  %obj.setActionThread(%vehicle.getDatablock().mountPose[%node]);
  if (%node == 0)
  {
    %obj.setControlObject(%vehicle);
    %obj.lastWeapon = %obj.getMountedImage($WeaponSlot);
    %obj.unmountImage($WeaponSlot);
    %db = %vehicle.getDatablock();
  }
}

function MaleAvatarDB::onUnmount( %this, %obj, %vehicle, %node )
{
  %obj.mountImage(%obj.lastWeapon, $WeaponSlot);
}

function MaleAvatarDB::doDismount(%this, %obj, %forced)
{
  // Position above dismount point
  %pos    = getWords(%obj.getTransform(), 0, 2);
  %oldPos = %pos;

  %vec[0] = " 1 1 1";
  %vec[1] = " 1 1 1";
  %vec[2] = " 1 1 -1";
  %vec[3] = " 1 0 0";
  %vec[4] = "-1 0 0";
  %impulseVec = "0 0 0";
  %vec[0] = MatrixMulVector( %obj.getTransform(), %vec[0]);

  // Make sure the point is valid
  %pos = "0 0 0";
  %numAttempts = 5;
  %success     = -1;

  for (%i = 0; %i < %numAttempts; %i++)
  {
     %pos = VectorAdd(%oldPos, VectorScale(%vec[%i], 3));
     if (%obj.checkDismountPoint(%oldPos, %pos))
     {
       %success = %i;
       %impulseVec = %vec[%i];
       break;
     }
  }
  if (%forced && %success == -1)
     %pos = %oldPos;
  %obj.unmount();
  %obj.setControlObject(%obj);
  %obj.mountVehicle = false;

  // Position above dismount point
  %obj.setTransform(%pos);
  %obj.applyImpulse(%pos, VectorScale(%impulseVec, %obj.getDataBlock().mass));
}
This code allows us to get in (mount) the car and then get out (dismount). When we get out of the car, we want to get far enough away from it so that we don’t automatically get back into the car—that’s what the impulse vector calculation is all about. There’s nothing about the sound in there, but it is convenient to have this ability to get in and out whenever we want.
Now that we have code for mounting and dismounting, we need mechanisms to invoke them. Mounting, or getting into the car, is easy—all we have to do is collide with the car, have the script detect that collision, and in we hop.
Dismounting requires some extra intervention. We’ll set up a key binding for Ctrl-X to eject us from the car.
Type the following code into the bottom of controlclientmiscpresetkeys.cs:
function eject()
{
  commandToServer('dismountVehicle'),
}
PlayerKeymap.bindCmd(keyboard, "ctrl x","eject();","");
The eject function uses the out-of-band (or direct) messaging system to tell the server to execute the dismountVehicle function (kind of like a remote procedure call).
Next, open the file controlservervehiclescar.cs and type the following in at the very end of the file:
function serverCmdDismountVehicle(%client)
{
  %car = %client.player.getControlObject();
  %passenger = %car.getMountNodeObject(0);
  %passenger.getDataBlock().doDismount(%passenger, true);
  %client.setControlObject(%client.player);
}
This function finds what object the player (client) is controlling, and what game object is mounted at node 0, then dismounts the player. Finally, it sets the client to be controlling the player avatar now, and not the car anymore.
Now use the same procedures with the World Editor as with the tommy gun to insert the car into the game world. You will find the car in the Tree view under Shapes, Vehicles. Remember to tug the model up out of the ground if it’s embedded in the ground—but don’t tug it too hard, or you might fling it into outer space!
Run up to the car, and you will automatically go inside and be seated. Use the normal forward movement key (Up Arrow) to accelerate and the mouse to steer left and right. Press Ctrl-X to jump out. Have at it!
Tip
If you find that when you jump out of the car, your character dies, there are several ways to change this. You can increase his starting energy level, for example. I prefer to tweak the minimum impact speed. This is the speed below which you will incur no damage, so I raise the minImpactSpeed property of the player a bit. Look in controlserverplayersplayer.cs and locate the MaleAvatarDB datablock. The minImpactSpeed property is in there.
ENVIRONMENTAL SOUNDS
A silent world is a dreary one. You can liven up your game world by inserting sounds to give a sense of the environment using sound emitters.
First, copy the file 3D3ERESOURCESCH20loon.ogg over to assetssound.
Then open controlservermiscsndprofiles.cs, and add the following SFXProfile to the end of the file:
datablock SFXProfile(LoonSound)
{
  filename    = "assets/sound/loon";
  description = AudioDefaultLooping3d;
  preload = true;
};
Run your game, and open the World Editor, ensuring that you are in the Object Editor as before.
Next, in the Scene tree view, locate Library, Level, double-click on Environment, then find Sound Emitter, as shown in Figure 20.8. Click Sound Emitter while facing a location where you would like to place the Sound Emitter.
In the Inspector pane below the Scene tree view (see Figure 20.9), click the track button in the Media rollout. From the list that opens, choose the LoonSound profile.
Figure 20.8
Sound Emitter in the Scene tree view.
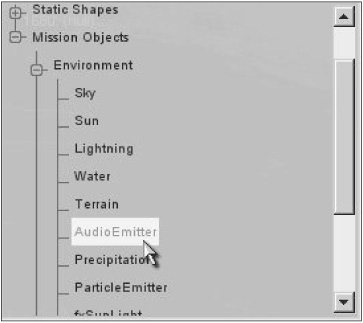
Figure 20.9
The Inspector pane for the Sound Emitter.
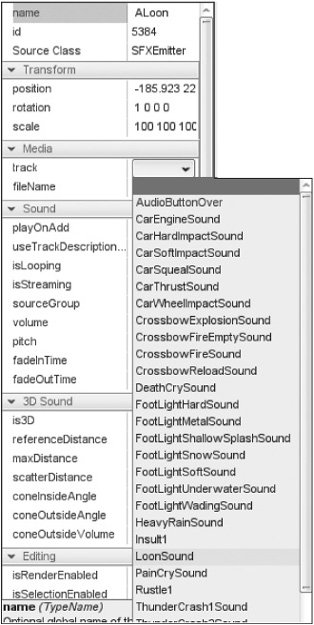
Make sure the playOnAdd, useTrackdescription, isLooping, and is3D checkboxes are selected.
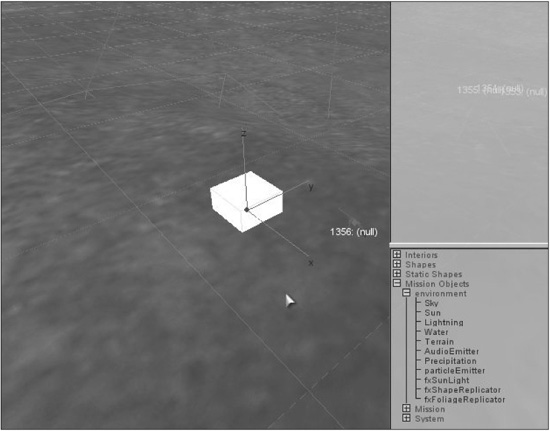
A Sound Emitter marker will be placed in the game world at the center of your screen, on the ground, as shown in Figure 20.10.
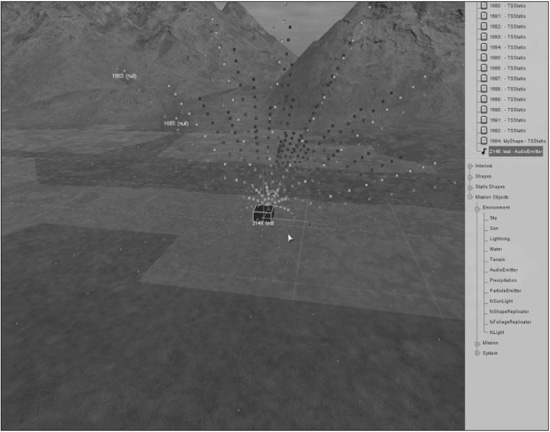
Now exit the editor by toggling the F11 key, make sure you are in camera fly mode, and move up and away from where you placed the marker. Then go back in to the editor. You should see several concentric spheres, as shown in Figure 20.11. The inner sphere is very faintly defined with gray dots in the figure, while the outer sphere is defined with dark gray shading. In the Torque Editor, the inner sphere is made with blue dots, and the outer sphere is made with red shading.
Figure 20.10
The Sound Emitter marker.
The inner sphere represents the reference (or minimum) distance, and the outer sphere represents the maximum distance. The larger the outer sphere, the more gradual the drop-off in sound as you move away from the emitter. The larger the inner sphere, the farther the sound will carry.
MUSIC
You can handle music in much the same way as the simple sound effect I showed you at the beginning of this chapter. A useful way to employ music is to provide a background for the different dialog boxes or menu screens in the GUI. Of course, you can also insert music into the game as Sound Emitters or even attach it to vehicles or players.
Figure 20.11
The Sound Emitter spheres.
We’ll take a slightly more conventional approach and put in some start-up music. First, locate the file 3D3ERESOURCESCH20TWLOGO.OGG, and copy it over to assetssound.
Next, open the file controlclientmiscsndprofiles.cs, and add the following code to the top of the file, after the Channel assignments:
$CurrentMusicPlaying=0;
new SFXProfile(AudioIntroMusicProfile)
{
  filename    = "assets/sound/twlogo.wav";
  description = "AudioMusic";
  preload = true;
};
function PlayMusic(%handle)
{
  if (!$CurrentMusicPlaying)
   $CurrentMusicPlaying = sfxPlayOnce(%handle);
}

function StopMusic()
{
   $CurrentMusicPlaying.stop(0);
   $CurrentMusicPlaying = 0;
}
Now open controlclientinitialize.cs, and above the call to the configureCanvas function type in the line:
Exec("./misc/sndprofiles.cs");
Below the call to configureCanvas type in this line:
PlayMusic(AudioIntroMusicProfile);
This will start the opening music playing as soon as the sound system is activated immediately after the game application has been launched.
Now open the file controlclientclient.cs, and insert the following line as the first line in the LaunchGame() function:
StopMusic();
This line will ensure that if the opening music is still playing when you actually go to start the game, it will be turned off.
Now go ahead and launch the game and listen to the music.
You can use the same technique in combination with the CommandToClient (XXXX)clientCmdXXXX system that we’ve used in earlier chapters to have the server trigger music cues on all or selected clients whenever you want.
MOVING RIGHT ALONG
There you go. Enough sound that the people around you will be pestering you to turn the blasted game down!
You’ve seen the ways that sounds can be added for player-avatars, vehicles, and weapons. You’ve seen what a state machine does and how it helps define what sounds occur, and when, when using a weapon.
Then there’s the ability to hurl insults at other players—a very important feature to know how to put into a game!
You’ve seen how to add sounds into your game world at specific locations, so that you can bring life to a babbling brook or make the wind howl on an open plain.
Finally, adding music to your game is really no more complex than adding any other sound, and in some cases it’s easier. You’ve seen how you can control the playing of music using TorqueScript.
In the next chapter we begin rolling together all the things covered in earlier chapters, by starting to create a game world.