CHAPTER 2
INTRODUCTION TO PROGRAMMING
The point of this chapter is to help you understand programming concepts and techniques and leave you with a foundation upon which you can build more advanced skills. By the end of this chapter, you should be proficient with a powerful programming editor; understand what an IDE offers, and how to use one to best effect; understand how to create, compile, and run programs you’ve written yourself; have a reasonable sense of programming problem-solving methods; and be familiar with valuable debugging tips and techniques.
TORSION
To write our programs, we will need to use a text editor, or programming editor. This kind of editor differs from a word processor, which is what most people use for writing documents, books, memos, and church bulletins.
A good programming editor has several useful features:
![]() A project feature that allows you to organize your source files
A project feature that allows you to organize your source files
![]() Full search (find in file, search files on disk or in project, and replace) capability
Full search (find in file, search files on disk or in project, and replace) capability
![]() Syntax highlighting
Syntax highlighting
![]() A function finder or reference
A function finder or reference
![]() Auto-completion
Auto-completion
![]() Code block folding
Code block folding
![]() Bookmarks
Bookmarks
![]() Text balancing or matching
Text balancing or matching
I use an editor called Torsion, created by Sickhead Games, LLC, included on the companion DVD for this book. It’s also available for free from GarageGames on their website. It also has several other useful features that I’ll demonstrate later in this chapter.
Program Setup and Configuration
If you haven’t already installed the companion DVD per the instructions near the end of Chapter 1, it might be a good idea to go back and review that section. Briefly: after you insert the companion DVD into your computer’s DVD drive, use Explorer to browse the DVD and locate the folder called 3D3E. Drag this folder from your DVD to your hard drive, which will presumably be C:, though you can use whatever hard drive you want. Make sure you have a couple of gigabytes of hard drive space available, to hold both the DVD contents you copy and the installed versions of the software tools that you will be installing as you work through this book. When you’ve finished copying, you are free to remove the DVD and store it in a safe place. For instance, setting it on a windowsill in the hot sun is not a safe place. I’m just sayin’....
Now, browse your way into the new 3D3E folder on your hard drive and dive down into into the folder path called TOOLSTORQUEWINDOWS. In there you will find TorsionInstall_1_1_3.exe, double-click it, and follow the installation instructions that appear.
Tip
This is really important. I mean, really, really, important. In fact, it is so important that it probably should be a WARNING and not just a mere tip.
WARNING
If you didn’t already know it, Microsoft thinks it knows how you should use your computer better than you do. Consequently, they do a lot of things to “protect” you from yourself.
One of those things they do is hide files from you that Microsoft thinks you shouldn’t know about. They also hide the file extensions, because they think you are too dumb to understand them. They really do.
This is a bad thing for you as a game developer (or any other kind of software developer for that matter).
So here’s what you MUST do in order to be able to develop games sensibly, and even to follow along in this book. You need to change how Windows deals with hiding system files (disable the ability), and enable the viewing of file extensions.
In Windows XP, find any folder, and choose the Tools menu from the menubar. At the bottom of that menu is the Folder Options...command—choose it.
When the Folder Options dialog opens, choose the View tab.
Then scroll through the listing and find the entry “Hidden files and folders”. Make sure you select the “Show hidden files and folders” option. We want to be able to see ALL files.
Below that, you will see two more settings: “Hide extensions for known file types” and “Hide protected operating system file (recommended)”. Well I DON’T recommend it. Make sure that both settings are unselected (unchecked).
In Windows 7, choose Start, Control Panel, Appearance and Personalization, Folder Options. The rest is the same as it is for Windows XP after choosing Folder Options.
Do.
It.
Right.
Now.
Setting Up Projects and Files
Torsion isn’t merely an editor, it happens to be an Integrated Development Environment, or IDE. This means that in addition to providing you with standard editor features, like searching for and replacing text, it provides you mechanisms for organizing your game project files, managing and manipulating files and folders on the hard drive, and debugging your game code.
Torsion allows us to organize the files we want to work with using a projects concept. You can create files and folders in your project and have them automatically created on your hard drive in their proper place in the drive’s folder hierarchy. This provides easy access to Torsion editable files without having to navigate your way around the Windows Explorer. Torsion will also open non-text project files automatically in the appropriate external editor, if needed.
Finally, Torsion is supported directly by the Torque 3D Toolbox. You can launch the Torsion project of any of your projects from the Toolbox merely by selecting it and clicking the Torsion button.
Setting up your projects doesn’t take much effort. Let’s dive in and set up a project.
Setting up Torsion
The two example projects that come with the Tools Demo already have Torsion projects set up for you. These are configured out-of-box to use a debug build of Torque 3D. Unfortunately, the Torque 3D Tools Demo doesn’t include a debug build! So you need to use the other supplied configuration—Release.
After you open Torsion, look at the right side of the toolbar. You will see two white boxes. The first box, which is the configuration field, (the one on the left of the two) will probably say Debug. You want to change this. Simply click on the box, and you will get a drop-down list. Choose Release. That’s it. Now you are ready to use the Torsion project.
However, you might want to create your own Torsion projects for your later projects. Let’s go over how to do this.
Creating a New Torsion Project
1. Launch Torsion. You can do this by opening an existing Torsion project from the hard drive, or using the Toolbox, or whatever. Or you can launch Torsion from the Programs menu in the Start button. It doesn’t matter.
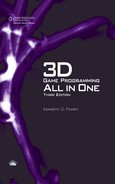
2. Choose File, New, Project. You should get the New Project dialog, as shown in Figure 2.1.
3. In the Name field, type in a name for your project. Don’t use spaces in the name—instead, use underscores, dots, or hyphens. Spaces in pathnames or filenames are not generally a good idea when programming. Also, don’t bother even trying to use spaces in variable names and other programming identifiers. More about this later in this chapter.
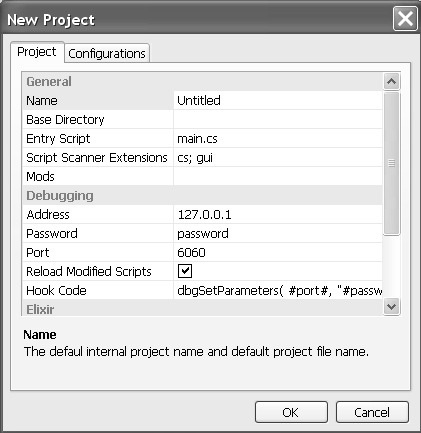
4. Next, click in the Base Directory field. The field will become highlighted as shown in Figure 2.2. Note that there is now a button to the right of the field, with an ellipsis in it (three dots).
Figure 2.2
The Base Directory field.
5. Click on the ellipsis button ![]() . This will open a hard drive browser dialog. Find your way to the folder where you want to keep the Torsion project file. For best results, this should be your game folder—and that’s the folder where the Torque 3D executable that you are using resides.
. This will open a hard drive browser dialog. Find your way to the folder where you want to keep the Torsion project file. For best results, this should be your game folder—and that’s the folder where the Torque 3D executable that you are using resides.
6. When you’ve located your game folder, don’t browse into it. Just select it, then click the OK button. This will insert the path to this folder into the New Project dialog as the Base Directory.
7. You need to have a valid configuration before you can use Torsion. So next change tabs in the dialog by clicking on the Configurations tab, near the top. You should be rewarded with a nice big blank white box of nothing in the Configuration tab. Har! A clean slate! This is good.
8. Click on the New ... button. This will yield the New Configuration button, of which you must now partake.
9. Give this configuration a name in the Name field. I suggest Release, but you can call it Clementine if you like, it only matters that you know what it means.
10. Next, specify where to find the Torque 3D executable by clicking in the Executable field, and then clicking on the ellipsis button to open the Choose a file dialog.
11. Browse your way to your game folder again, but this time do go into the folder, locate the Torque 3D executable, select it, and click on the Open button. The path to the executable will be deposited in the appropriate field in the New Configuration dialog.
Note that in the PhysX demo that comes with the Tools Demo, the executable is called PhysX.exe. Likewise, the executable for the FPS Example is FPS Example.exe. Now remember, you don’t need to set up Torsion projects for those two projects, they come already set up for you. But if you use those executables in another project of your own, which we will be talking about later in this book, you will need to go through this process to set up your new Torsion project.
12. Click OK, and you will see that the configuration is now added to that empty list.
13. Click OK again, and you will see that the configuration field now says Clementine, or Release, or whatever it was that you named your configuration.
14. Click OK one more time to create the project.
15. There’s a button on the left in the Project tab, in the little “button bar,” that looks like a folder with a black line through it. Press this to Show All Mods. This ensures that all possible folders you might create in the root folder are visible. When active, it should have a small light blue background surrounding the folder. Along with Show All Mods, you should also have Show All Files and Synch With Editor active as well. You can hover the cursor over each button to make sure you have the right ones.
The Torsion Interface
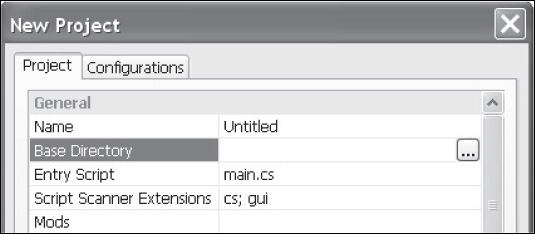
Let’s do a little survey of what we have now in front of us with Torsion. Figure 2.3 shows a complete Torsion interface. In the picture, I’m using the FPS Example project to model for us.
Along the top is a menu bar that has a fairly complete list of menus: File, Edit, View, Project, and so on. Below that is the toolbar. If you run your mouse over the toolbar buttons, you will see tool tips pop up to tell you what each button does. These buttons are basically single-click versions of the menus. You can see that in the picture, the configuration field is showing the Release configuration.
Below the toolbar, there are two panels. The left panel is for viewing the contents of the project in one of two ways: either by file browsing in the Project tab (the way I usually use it) or by code functions in the Code Browser.
The Project tab contains a tree view that is quite similar to the Windows Explorer you use to browse your hard drive. If you know object names and functions, you can use the Code Browser tab to locate code that interests you.
Figure 2.3
The Torsion interface.
The large panel on the right is the editor panel. Notice the filename, main.cs, in the tab at the top. Every time you open a new file, a new tab is created. You can jump between files by clicking on their tabs, provided they are open. When you change to a different files tab, that file is automatically selected in the Project view on the left side.
At the bottom on the right is the run-time window. It contains quite a few tabs.
The Output tab shows you an echo of the script console as Torque runs (you can also see the console output inside Torque if you want to, by using the Tilde key to open the console). The contents of the console are also written to disk into the file console.log every time your game is run. Figure 2.4 shows some sample console output in an expanded output tab.
The Watch tab is where we can assign variables to be watched while the game is running. We’ll cover its functionality later when we talk about debugging. Figure 2.5 shows the Watch tab in operation, with two global variables (left side) and their respective values (right side).
Figure 2.4
Sample console output.
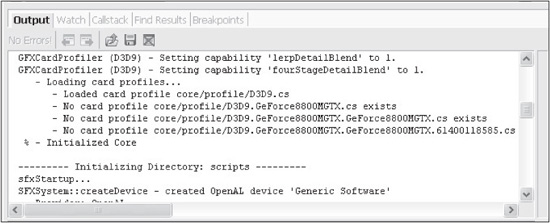
Figure 2.5
Watch tab in operation.

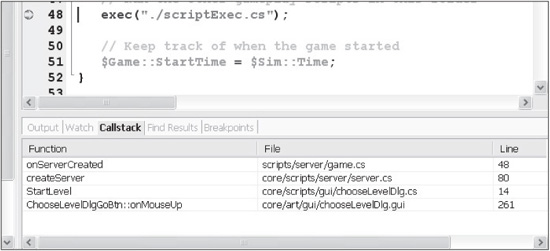
The next tab over is another debugging tool, the Callstack. This is where we can see the history of what functions were called, in order and where, to get to wherever we’ve stopped, if we’ve hit a breakpoint. See Figure 2.6. Note that in the picture, you can see the breakpoint in the code window above the run-time window. It is marked by a red circle (the “meatball”) to the left of the line number. The yellow program counter arrow has stopped over top of the meatball, indicating that execution has stopped at that point. You can’t see the colors in the picture, but you will see them when you run Torsion. Again, more on this when we talk about debugging.
Figure 2.6
Callstack in operation.
Then there is the Find Results tab. When we search for text in our files, the output shows the lines and the files the text was found in, in this tab.
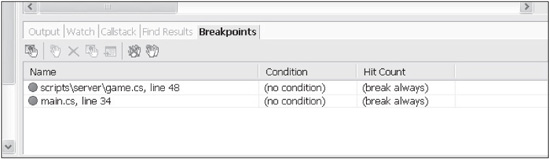
Finally, there’s the list of breakpoints. Breakpoints can be viewed and managed in this tab. Figure 2.7 shows the Breakpoint tab with two breakpoints visible. The listing shows the filename and path, the line number, and what conditions, if any, exist for the breakpoint.
Bookmarks
One feature I use quite frequently is the Bookmark capability. Its purpose is to help you quickly find your way around large files. When you are working in an area that you think you may need to come back to later, just set a bookmark, and then when you are working in another place in your document, you can use the Next Bookmark command to jump through each bookmark you’ve set until you find the one you want. This sure beats scrolling through all your open files looking for that one spot you worked on two hours ago!
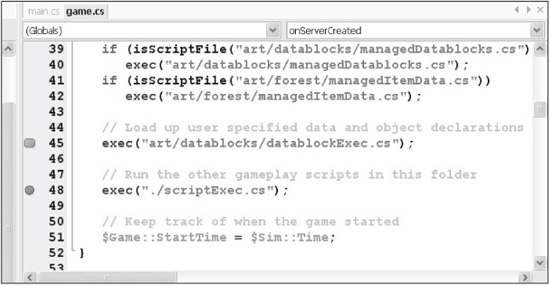
To set a bookmark, click your mouse on a line of text, and then select the menu item Edit, Bookmarks, Toggle Bookmark. The line where the bookmark is set will be indicated by a lozenge-shaped cyan box to the left of the line number on the left margin (see Figure 2.8). In the figure, line 45 is the bookmarked line.
To remove a bookmark, click your mouse in the bookmarked line, and select Edit, Bookmarks, Toggle Bookmark again. This will turn off the bookmark for that line. You can also use the Ctrl-F2 key combo to toggle a bookmark.
To remove all bookmarks, select Edit, Bookmarks, Clear All, and all bookmarks that you previously set will vanish.
Tip
As long as your files are associated with a project, all the bookmarks you’ve set will be saved and restored the next time you open those files.
To navigate between the bookmarks, choose Edit, Bookmarks, Next Bookmark, and your insertion point will jump to the next bookmark in sequence. You can also choose Edit, Bookmarks, Previous Bookmark to jump in the reverse direction from bookmark to bookmark. You can also use F2 and Shift-F2 to do these navigation actions.
Tip
Most commands available in the menus have keyboard shortcuts available. Rather than listing them here, I’ll just point you to the menu items. The keyboard shortcut for the command, if available, is written next to the menu selection. Some menu items, like Clear All, have no shortcut assigned.
Code Folding
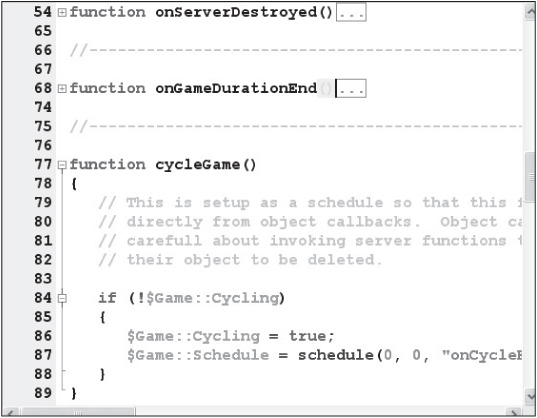
When navigating large files, with gobs and gobs of code, it’s often helpful to hide some of the code from view, in such a way that you can still make sense of what is going on. Code folding is a feature that allows us to “fold up” blocks of code that are clearly defined by the programming languages syntax. In TorqueScript the braces { and } are used to define code blocks. You will learn the detail of this later. But for our purposes, just note that all of the code between a matching pair of braces can be folded up, so that only the first line of code shows, with a little plus (+) sign showing. Figure 2.9 shows a code block before folding.
Figure 2.9
Code blocks before folding.

Before you fold it, the code block shows a minus symbol in a little box point with a line at the first line of code of the code block. Click on the minus sign to fold the code. Once it has been folded, an ellipsis in a box shows to the right of the remaining code line. Click on the plus symbol at the left of the code line to unfold.
Figure 2.10 shows a code block after folding.
After unfolding a code block, you might find a funny black symbol with CR written inside at the end of what was the first line of the code block. Don’t worry about it; just scroll it off the page and it will be gone.
Also, when you look at the code in Torsion, you will notice that different bits of code are colored differently. This is called syntax highlighting. Torsion has the ability to recognize keywords, operators, and so on, and display them in different colors with the goal of making it easier for you see what the code is doing. You can change the color assignments by choosing Tools, Preferences, and changing the settings in the Syntax Highlighting section.
There is another feature called auto-complete, which is a handy timesaver. As you start to type function names in the editor, Torsion tries to guess what you are typing and complete the name for you. As a side effect, the auto-complete feature is a handy way to check on the syntax of functions.
Figure 2.10
Code blocks after folding.
Tip
Syntax is merely the rules that govern how program code is put together so that the Script Manager in Torque 3D can understand it.
Torsion Review
So now you’ve had a little peak at what are, in my opinion, the most important features of Torsion—Torque 3D native debugging, console echo, breakpoints, watches, the callstack, the editor itself with code folding, and bookmarks—and you’ve seen how Torsion can be configured in a project format to make it easy to use files in an organized fashion.
There is plenty of online help available for Torsion in the forums at the Torque website, if you run into a stumbling block of some sort.
As we work through the rest of this chapter, in fact, the rest of this book, we will be using Torsion quite a bit. As required, I will show you in detail how to use each of these Torsion features in the appropriate context.
Remember that Torsion is an IDE with an editor, not a word processor, so there aren’t a great deal of visual formatting features in the program, which is just as well because we are using it to write code and not to write documents or books. The focus is on the steak, not the sizzle.
Speaking of steak, it is now time to get to the meat of this chapter, coming up next!
CONTROLLING COMPUTERS WITH PROGRAMS
When you create a computer program, you are creating a set of instructions that tell the computer exactly and completely what to do. Now before you jump all over me and hammer me with comments like, “Well, duh! Of course programming a computer is like telling it what to do,” I want you to read the first sentence again. It is not an analogy, and it is not some kind of vague and airy all-encompassing cop-out.
Everything that a computer does, at any time, is decided by at least one programmer. In the vast majority of cases, the computer’s instructions—contained in programs—are the work-product of hundreds, if not thousands, of programmers. All of the programs that a computer uses are organized and classified in many different ways. The organization helps us humans keep track of what they do, why we need them, how to link one program with another, and other useful things. The computer’s operating system is a huge collection of programs designed to work in conjunction with other programs, or sometimes to work alone, but in the context created by other programs.
We leverage the efforts of other programmers when we sit down to program a computer for any purpose. One of the results of many that have gone before is the creation of programming languages. Computers operate using a language that is usually unique to each brand and model, called machine code. Machine code is designed to directly control the computer’s electronics—the hardware. Machine code is not very friendly to humans.
To give you an idea, we’ll look at an example of machine code that tells a computer using an Intel 80386 chip to add together two numbers and save the result somewhere. What we will do is add A and B together and leave the result in C. To start, A will equal 4 and B will equal 6.
So our formula will be a simple math problem:
A = 4
B = 6
C = A + B
The computer machine code looks like this:
1100011100000101000000000000000000000000000000000000001000000000000000000000000011
0001110000010100000000000000000000000000000000000001100000000000000000000000001010
0001000000000000000000000000000000000000001100000101000000000000000000000000000000
00101000 1100000000000000000000000000000000
Now go ahead and look carefully at that and tell yourself honestly whether you could work with a computer using machine code for longer than, oh, about 12 minutes! My personal best is somewhere around 30 seconds, but that’s just me. The number system used here is the binary system.
Each one of those 1s and 0s is called a bit and has a precise meaning to the computer. This is all the computer actually understands—the 1s, the 0s, their location and organization, and when and how they are to be used. To make it easier for humans to read machine code at those rare times when it is actually necessary, we normally organize the machine code with a different number system, called hexadecimal (or hex), which is a base-16 number system (rather than base-10 like the decimal system we use in everyday work). Every 4 bits becomes a hex numeral, using the symbols from 0 to 9 and the letters A to F. We pair two hex numerals to carry the information contained in 8 bits from the machine code. This compresses the information into an easier-to-read and more manageable size. Here is the same calculation written in the hex form of machine code:
C7 05 00 00 00 00 04 00 00 00 C7 05 00 00 00 00 06 00 00 00 A1 00 00 00 00 03 05 00 00 00 00 A3
00 00 00 00
Much better and easier on the eyes! There are many people who work close to the computer hardware who work in hex quite often, but it still is pretty obscure. Fortunately, there is a human-readable form of the machine code for every microprocessor or computer, which in general is known as assembly language. In this case, we use words and symbols to represent meaningful things to us as programmers. Tools called assemblers convert assembly language programs to the machine code we looked at earlier. Here is the Intel 80386 Assembler version of our little math problem:
mov      DWORD PTR a, 4      ; (1)
mov      DWORD PTR b, 6      ; (2)
mov      eax, DWORD PTR a    ; (3)
add      eax, DWORD PTR b    ; (4)
mov      DWORD PTR c, eax    ; (5)
Now we are getting somewhere! Let’s take a closer look. Lines 1 and 2 save the numbers 4 and 6 in memory somewhere, referenced by the symbols a and b. The third line gets the value for a (4) and stores it in some scratch memory. Line 5 gets the value for b (6), adds it to the 4 in scratch memory, and leaves the result in the same place. The last line moves the result into a place represented by the symbol c. The semicolon tells the assembler tool to ignore what comes after it; we use the area after the semicolon to write commentary and notes about the program. In this case, I’ve used the comment space to mark the line numbers for reference.
Now that, my friends, is a program! Small and simple, yes, but it is clear and explicit and in complete control of the computer.
As useful as assembly language code is, you can see that it is still somewhat awkward. It is important to note that some large and complex programs have been written in assembly language, but it is not done often these days. Assembly language is as close to the computer hardware as one would ever willingly want to approach. You are better served by using a high-level language. The next version of our calculation is in a powerful high-level language called C. No, really! That’s the name of the language. Here is our calculation written in C:
a = 4;      // (1)
b = 6;      // (2)
c = a + b;  // (3)
Now, if you’re thinking what I think you’re thinking, then you’re thinking, “Hey! That code looks an awful lot like the original formula!” And you know what? I think you are right. And that’s part of the point behind this rather long-winded introduction. When we program, we want to use a programming language that best represents the elements of the problem we want to solve. Another point is that quite a few things are done for the programmer behind the scenes—there is a great deal of complexity. Also, you should realize that there are even more layers of complexity “below” the machine code, and that is the electronics. We’re not even going to go there. The complexity exists simply because it is the nature of the computer software beast. But be aware that the same hidden complexity can sometimes lead to problems that will need to be resolved. But it’s not magic—it’s software.
The C language you’ve just seen is what is known as a procedural language. It is designed to allow programmers to solve problems by describing the procedure to use and defining the elements that are used during the procedure. Over time, programmers started looking for more powerful methods of describing problems, and one such method that surfaced was called Object-Oriented Programming (OOP).
The simplest point behind OOP is that programmers have a means to describe the relationships between collections of code and variables that are known as objects. The C language eventually spawned a very popular variant called C++. C++ includes the ability to use the original C procedural programming techniques, as well as the new object-oriented methods. So we commonly refer to C/C++, acknowledging the existence of both procedural and object-oriented capabilities. From here on, in the book, I will refer to C/C++ as the general name of the language, unless I need to specifically refer to one or the other for some detailed reason.
PROGRAMMING CONCEPTS
For the rest of this chapter, we are going to explore basic programming techniques. We will be using TorqueScript for all of our code examples and running our little programs in the Torque 3D engine to see what they do.
Now, we just covered the simple math problem in the previous section. I showed you what the program looked liked in binary machine language, hex machine language, assembly language, and finally C/C++. Well, here is one more version—TorqueScript:
%a = 4;       // (1)
%b = 6;       // (2)
%c = %a + %b; // (3)
Notice the similarity to C/C++? Even the comments are done the same way!
As demonstrated, TorqueScript is much like C/C++. There are a few exceptions, the most notable being that TorqueScript is typeless and does not require forward declarations of variables. Also, as you can see for yourself in the preceding code, TorqueScript requires scope prefixes (the percent signs) on its variable names.
Typeless? Forward Declarations? Huh?
In many languages, variables have a characteristic called type. In its simplest form, a type merely specifies how much memory is used to store the variable. TorqueScript doesn’t require you to specify what type your variable has. In fact, there is no way to do it!
Forward declarations are a construct whereby the programmer must first indicate, usually at the beginning of a file or a subroutine block, what variables will be used and what their types are. TorqueScript also doesn’t require this and again provides no mechanism for using forward declarations.
So now that you know what types and forward declarations are, you can forget about them!
The goal for you to achieve by the end of this chapter is the ability to put together simple programs to solve problems and have enough understanding of program techniques to make sensible decisions about the approaches to take.
How to Create and Run the Example Programs
There is an ancient and well-understood programming cycle called the Edit-Compile-Link-Run cycle. The same cycle applies with Torque, with the exception being that there is no link step. So for us, it can be thought of as the Edit-Compile-Run cycle. A further wrinkle to toss in is the fact that Torque will automatically compile a source file (that is, a program file that ends with .cs) into the binary byte code file (ends with .cs.dso), if there is no binary version of the file, or if the source file has changed since the last binary was created.
So I guess my point is, for us the cycle can now be regarded as the Edit-Run cycle.
![]() Put all user programs in the scripts folder, located inside the FPS Example game folder, as filename.cs where “filename” is a name you’ve either made up yourself or one that I’ve suggested here in the book.
Put all user programs in the scripts folder, located inside the FPS Example game folder, as filename.cs where “filename” is a name you’ve either made up yourself or one that I’ve suggested here in the book.
![]() Run the demo by clicking the Start button in Torsion.
Run the demo by clicking the Start button in Torsion.
Hello World
Our first program is somewhat of a tradition. Called the Hello World program, it is used as an early confidence builder and test program to make sure that the reader (that would be you, if you are reading this book!) has everything in place on his computer to successfully edit, compile, and run a program.
So, assuming that you have correctly copied the 3D3E folder from your DVD to your hard drive, and you’ve installed Torsion, you can use your newly acquired Torsionicity to open the FPS Example project (remember, use the Torque 3D Toolbox to select the FPS Example project, and then click the Torsion button) and create a new script file that you will save in the scripts folder (which is inside the FPS Example game folder).
To create the new script file in Torsion, choose File, New, Script. A new empty file will be opened for you in the editor. Immediately save this file in the scripts folder as HelloWorld.cs. If you look to the Project view on the left, you will see your new file appear in the scripts folder.
Type into the file these lines of code:
// ========================================================================
// HelloWorld.cs
//
// This module is a program that prints a simple greeting on the screen.
//
// ========================================================================
function runHelloWorld()
// ----------------------------------------------------
//   Entry point for the program.
// ----------------------------------------------------
{
  echo("Hello World");
}
Save your work! Now, use the following procedure to run your program:
1. In Torsion, on the toolbar, make sure that you have Release (and not Debug) showing in the configuration field.
2. Locate, again on the toolbar, the right-point blue arrow (same as the Play button on your DVD or video tape player). This is the Start button. It’s the fourth button to the left of the configuration field that says Release. Click the Start button. Torsion will proceed to pre-compile the scripts, and then launch Torque 3D.
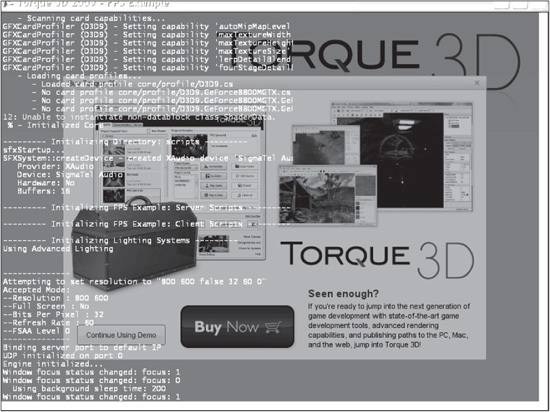
3. After the splash screen appears and fades, the FPS Example window appears, displaying a promotional screen. Don’t click any buttons; just press the Tilde (“~”) key. This is the key on the left side of the keyboard that is normally to the left of the “1” (or shifted “!”) key and above the Tab key. The Tilde key shares the keyspace with the Grave (“’”) key. Get to know this key intimately—it is the console key.
4. The console will appear on your screen, looking something like Figure 2.11.
5. In the console window, type the following (the typing will appear in an entry box at the bottom of the screen):
exec("scripts/helloworld.cs");
If all goes well, you should see nothing in the console (the output). If you mistyped the code statement, or perhaps named the file differently than you intended, you might see this error message:
Missing file: xxxxx
Where xxxxx is the filename you used in the command. If you get the following error message:
Parse error
Then you are probably missing a double-quote character, or parenthesis in the code statement you typed in. If you get the error:
<input> (0): unable to find function xxxx
Figure 2.11
Output of the Hello World program.
Then you probably mistyped the exec part of the code statement.
Now if you get the next error (a big display of output) then your problem is a mistake in your code:
scripts/helloworld.cs Line: 13 - parse error
>>> Advanced script error report. Line 13.
>>> Some error context, with ## on sides of error halt:
// ========================================================================
function runHelloWorld()
// --------------------------------------------------
//     Entry point for the program.
// --------------------------------------------------
{
  echo"Hello World");
##}##
>>> Error report complete.
I deliberately made a mistake (I omitted the left parenthesis from between the word echo and the first double quote (“) where there should be a left parenthesis). You’ll notice that the error message is generated when the file is exec’d and not when I tried to run the function (which I hadn’t even done yet). The double-pound signs mark where the Script Manager was when it realized there was an error. It is not the exact location of error. The one thing you can be sure of is that the error will be somewhere at or before the double pound-signs.
6. Next, type the following:
runhelloworld();
You should see the following output:
Hello World!
If you don’t see that output, you might get a syntax error message. Or you might get a parse error. Or you might get an error message like this:
scripts/helloworld.cs (13): Unable to find function xxxxx
With xxxxx being a mistyped function name or a function that doesn’t exist.
Heh. Well, if you didn’t get any of those errors, and you did get “Hello World!” in your console, then you have just successfully written and executed your first Torque-Script program! And if you’ve done this all before, then what are you doing here now? Move along...
IMPORTANT!
If you are using the Windows default desktop setup with the default folder settings, you may have trouble locating some files in the Windows Explorer browser. This is because the default settings for Windows have the folder property that allows you to see file extensions turned off. You really, really should have this ability enabled (not only to use this book, but in all of your uses of Windows). Enable the ability to see file extensions by opening a window view to your computer (double-clicking the My Computer icon on your desktop is the quickest way), choosing the Tools menu for the window, and then choosing Folder Options.
When the Folder Options dialog box opens, choose the View tab. In the Advanced settings area, locate the Hide extensions for known file types checkbox, and remove the checkmark. Do the same for the Hide protected operating system files checkbox. Now close the Folder Options dialog box, and get on with it!
Let’s have a closer look at the code. The first thing you will notice is this stuff:
// ========================================================================
// HelloWorld.cs
//
// This module is a program that prints a simple greeting on the screen.
//
// ========================================================================
This is the module header block. It is not executable code—it’s what we call a comment. The double-slash operator (“//”) tells the Torque 3D engine to ignore everything from the slashes to the end of the line.
So if the engine ignores the module header block, why do we use it? Well, it’s included in order to document what the module does so that later, when we’ve completely forgotten the details, we can easily refresh our memory. It also is included to help other programmers who may come along and need to understand the module so they can add new features or fix bugs.
Tip
Whenever I tell you to open the console, you should immediately leap into action and press the Tilde (“~”) key. Just making doubly sure you know, you know... now back to the action.
There are no real rules regarding the format of these headers, but most programmers or development shops have some sort of template that they want followed. At a minimum, the header should include the module filename, copyright notices, and a general description of what the code in the module is for. Sometimes we might include other details that are necessary for another person to understand how the module is used.
Then there is this part:
function runHelloWorld()
That is executable code. It is the declaration of the function block called runHello-World. This is the function we call from within the console. Following that, there is this:
// -------------------------------------
//     Entry point for the program.
// -------------------------------------
This is the function header comment. The function header comment is included in order to describe the specifics of a function—what it does, how it does it, and so on. In this case it is fairly simple, but function header comments can get to be quite descriptive, as you’ll see later. Again, this is not executable code (note the double slash) and is not required to make your program work. The dashes could just as well be stars, equal signs, or nothing at all. It is good practice to always use function header comments to describe your functions.
{
  echo("Hello World");
}
That would be the function body—the guts of the function where the work is done. The function body is also sometimes called a function block and more generically (when used in other contexts that you’ll see later) called a code block.
It is important to note the way a function block is made. It always begins with the keyword function followed by one or more spaces and whatever name you want it to have. After the name comes the argument list (or parameter list). In this case there are no parameters. Then comes the opening, or left, brace (or curly bracket). After the opening brace comes the body of the function, followed by the closing, or right, brace.
All functions have this same structure. Some functions can be several pages long, so the structure may not be immediately obvious, but it’s there.
Tip
If you have trouble in the following exercise getting your code to work, it is most likely the case that you’ve typed something wrong. So take a long hard look at your code, and compare it to what it says here in the book. Watch out for things like the letter l and the number 1, which are close to identical. Also, zeros and the letter capital O. The difference between the braces { and } and the parentheses ( and ) can be very, very subtle.
If you still find you are having trouble finding where your problems are, you might consider skipping to the “Debugging and Problem Solving” section to learn how to use the Torsion debugger, then coming back and completing the exercise. Or not. The choice is yours, I’m just tossing that out there.
The actual code that does anything interesting is a single line. As you know by now, the line simply prints the text “Hello World” in the Torque console window.
Expressions
When we write program code, most of the lines, or statements, that we create can be evaluated. A statement can be a single TorqueScript line of any kind terminated by a semicolon, or it can be a compound statement, which is a sequence of statements enclosed in left and right braces that acts as a single statement. A semicolon does not follow the closing right brace. Here is an example of a statement:
echo("Hi there!");
if (%tooBig == true) echo("It's TOO BIG!");
And here is one final example of a valid statement:
  {
      echo("Nah! It's only a little motorcycle.");
  }
Statements that can be evaluated are called expressions. An expression can be a complete line of code or a fragment of a line, but the important fact is that it has a value. In Torque the value may be either a number or text (a string)—the difference is in how the value is used. Variables are explained in the next section, but I’ll sneak a few in here without detailed coverage in order to illustrate expressions.
Here is an expression:
5 + 1
This expression evaluates to 6, the value you get when 5 and 1 are added.
Here is another expression:
%a = 67;
This is an assignment statement, but more importantly right now, it is an expression that evaluates to 67.
Another:
%isOpen = true;
This expression evaluates to 1. Why? Because true evaluates to the value 1 in Torque. Okay, so I hadn’t told you that yet—sorry about that. Also, false evaluates to 0. We can say the statements evaluate to true or false, instead of 1 and 0. It really depends on whatever makes sense in the usage context. You’ll notice that the evaluation of the statement is determined by whatever expression is to the right of the equal sign. This is a pretty hard-and-fast rule.
Consider this code fragment:
%a = 5;
if (%a > 1 )
What do you figure that the (%a > 1) evaluates to, if %a has been set to 5? That’s right—it evaluates to true. We would read the line as “if %a is greater than 1.” If it was written as (%a > 10), it would have been false, because 5 is not greater than 10.
Another way we could write the second line is like this:
if ( (%a > 1) == true )
It would be read as “if the statement that %a is greater than 1 is true.” However, the Department of Redundancy Department could have written that example. The first way I showed you is more appropriate.
Just for your information, in the preceding examples, %a and %isOpen are variables, and that’s what is coming up next.
Variables
Variables are chunks of memory where values are stored. A program that reads a series of numbers and totals them up will use a variable to represent each number when it’s entered and another variable to represent the total. We assign names to these chunks of memory so that we can save and retrieve the data stored there. This is just like high school algebra, where we were taught to write something like “Let v stand for the velocity of the marble” and so on. In that case v is the identifier (or name) of the variable. TorqueScript identifier rules state that an identifier has the following characteristics:
![]() It must not be a TorqueScript keyword.
It must not be a TorqueScript keyword.
![]() It must start with an alphabetical character.
It must start with an alphabetical character.
![]() It must consist only of alphanumeric characters or an underscore symbol (“_”).
It must consist only of alphanumeric characters or an underscore symbol (“_”).
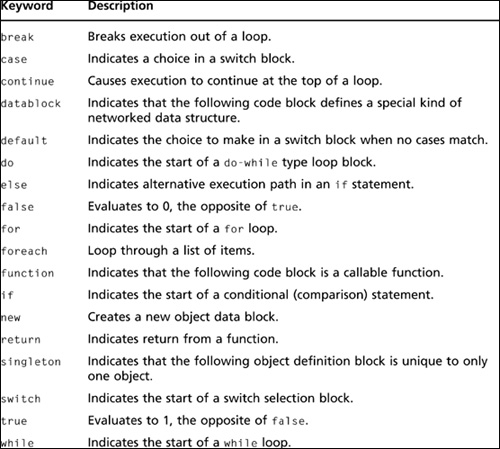
A keyword is an otherwise valid identifier that has special significance to Torque. Table 2.1 provides a keyword list. Note that unlike identifiers, keywords are case-sensitive.
For the purposes of Torque identifiers, the underscore symbol is considered to be an alphanumeric character. The following are valid variable identifiers:
isOpen Today X the_result item_234 NOW
These are not legal identifiers:
5input miles-per-hour function true +level
It’s up to you as the programmer to choose the identifiers you want to use. You should always try to use meaningful identifiers—choose them to be significant to your program and what it is doing. Note that Torque 3D is not case-sensitive with respect to identifiers. Lowercase letters are not treated as distinct from uppercase letters.
Table 2.1 TorqueScript Keywords
You assign values to variables with an assignment statement:
$bananaCost = 1.15;
$appleCost = 0.55;
$numApples = 3;
$numBananas = 1;
You can see that each variable has a dollar sign (“$”) preceding it. This is a scoping prefix. This means that the variable has global scope—it can be accessed from anywhere in your program, inside any function, or even outside functions and in different program files.
There is another scope prefix—the percent sign (“%”). The scope of variables with this prefix is local. This means that the values represented by these variables are valid only within a function, and only within the specific functions where they are used. We will delve into scoping in more detail later.
Using our fruit example, we can calculate the number of fruit as follows:
$numFruit = $numBananas + $numApples;
And we can calculate the total cost of all the fruit like this:
$numPrice = ($numBananas * $bananaCost) + ($numApples * $appleCost);
Here is a complete small program you can use to try it out yourself:
// ========================================================================
// Fruit.cs
//
// This program adds up the costs and quantities of selected fruit types
// and outputs the results to the display
// ========================================================================

function runFruit()
// -------------------------------------
//     Entry point for the program.
// -------------------------------------
{
 $bananaCost=1.15; // initialize the value of our variables
 $appleCost=0.55;  //   (we don't need to repeat the above
 $numApples=3;     //   comment for each initialization, just
 $numBananas=1;    //   group the init statements together.)

 $numFruit=0;      // always a good idea to initialize *all* variables!
 $total=0;         // (even if we know we are going to change them later)

 echo("Cost of Bananas(ea.):$"@$bananaCost);
              // the value of $bananaCost gets concatenated to the end
              // of the "Cost of Bananas:" string. Then the
              // full string gets echoed. same goes for the next 3 lines
echo("Cost of Apples(ea.):$"@$appleCost);
 echo("Number of Bananas:"@$numBananas);
 echo("Number of Apples:"@$numApples);

 $numFruit=$numBananas+$numApples; // add up the total number of fruits
 $total = ($numBananas * $bananaCost) +
          ($numApples * $appleCost); // calculate the total cost
         //(notice that statements can extend beyond a single line)
 echo("Total amount of Fruit:"@$numFruit); // output the results
 echo("Total Price of Fruit:$"@$total@"0");// add a zero to the end
                              // to make it look better on the screen
}
Save the program in the same way you did the Hello World program. Use a name like Fruit.cs and run it to see the results. Note that the asterisk (“*”) is used as the multiplication symbol and the plus sign (“+”) is used for addition. These operators—as well as the parentheses used for evaluation precedence—are discussed later in this chapter.
Arrays
When your Fruit program runs, a variable is accessed in expressions using the identifier associated with that variable. At times you will need to use long lists of values; there is a special kind of variable called an array that you can use for lists of related values. The idea is to just use a single identifier for the whole list, with a special mechanism to identify which specific value—or element—of the list you want to access. Each value has numerical position within the array, and we call the number used to specify the position the index of the array element in question.
Let us say you have a list of values and you want to get a total, like in the previous example. If you are only using a few values (no more than two or three), then a different identifier could be used for each variable, as we did in the Fruit program.
However, if you have a large list—more than two or three values—your code will start to get awkwardly large and hard to maintain. What we can do is use a loop and iterate through the list of values, using the indices. We’ll get into loops in detail later in this chapter. Following is a new version of the Fruit program that deals with more types of fruit. There are some significant changes in how we perform what is essentially the same operation. At first glance, it may seem to be more unwieldy than the original Fruit program, but look again, especially in the computation section.
// ========================================================================
// FruitLoopy.cs
//
// This program adds up the costs and quantities of selected fruit types
// and outputs the results to the display. This module is a variation
// of the Fruit.cs module
// ========================================================================
function runFruitLoopy()
// -------------------------------------
//     Entry point for the program.
// -------------------------------------
{
   //
   // ------------------------- Initialization ----------------------------
   //

   %numFruitTypes = 5; // so we know how many types are in our arrays

   %bananaIdx=0;    // initialize the values of our index variables
   %appleIdx=1;
   %orangeIdx=2;
   %mangoIdx=3;
   %pearIdx=4;

   %names[%bananaIdx] = "bananas"; // initialize the fruit name values
   %names[%appleIdx] = "apples" ;
   %names[%orangeIdx] = "oranges";
   %names[%mangoIdx] = "mangos" ;
   %names[%pearIdx] = "pears";

   %cost[%bananaIdx] = 1.15; // initialize the price values
   %cost[%appleIdx] = 0.55;
   %cost[%orangeIdx] = 0.55;
   %cost[%mangoIdx] = 1.90;
   %cost[%pearIdx] = 0.68;

   %quantity[%bananaIdx] = 1; // initialize the quantity values
   %quantity[%appleIdx]  = 3;
   %quantity[%orangeIdx] = 4;
   %quantity[%mangoIdx]  = 1;
   %quantity[%pearIdx]   = 2;

   %numFruit=0;   // always a good idea to initialize *all* variables!
   %totalCost=0;  // (even if we know we are going to change them later)

   //
   // ------------------------- Computation ---------------------------
   //

   // Display the known statistics of the fruit collection
   for (%index = 0; %index < %numFruitTypes; %index++)
   {
     echo("Cost of " @ %names[%index] @ ":$" @ %cost[%index]);
     echo("Number of " @ %names[%index] @ ":" @ %quantity[%index]);
   }

   // count up all the pieces of fruit, and display that result
   for (%index = 0; %index <= %numFruitTypes; %index++)
   {
     %numFruit = %numFruit + %quantity[%index];
   }
   echo("Total pieces of Fruit:" @ %numFruit);


   // now calculate the total cost
   for (%index = 0; %index <= %numFruitTypes; %index++)
   {
     %totalCost = %totalCost + (%quantity[%index]*%cost[%index]);
   }
   echo("Total Price of Fruit:$" @ %totalCost);
}
Type this program in, save it as scriptsFruitLoopy.cs, and then run it.
Of course, you will notice right away that I’ve used comments to organize the code into two sections, initialization and computation. This was purely arbitrary. But it is a good idea to label sections of code in this manner, to provide signposts, as it were. You should also notice that all the variables in the program are local, rather than global, in scope. This is more reasonable for a program of this nature, where having everything contained in one function puts all variables in the same scope.
Next you will see that I’ve actually created three arrays: name, cost, and quantity. Each array has the same number of elements, by design. Also, I have assigned appropriately named variables to carry the index values of each of the fruit types. This way I don’t need to remember which fruit has which index when it comes time to initialize them with their names, prices, and counts.
Then it is just a simple matter of looping through the list to perform the operation I want.
Elegant, huh? But it could be better. See if you can find a way to reduce the number of lines of code in the computation section even more, and write your own version and try it out for yourself. I’ve written my own smaller version; you can find it in the 3D3ERESOURCESCH2 folder, named ParedFruit.cs.
If you haven’t noticed, it’s time you did: when we deal with paths in Windows, we use the backslash (“”), as seen with C:3D3E. However, in TorqueScript (as in Linux and the Mac OS X), we use the forward slash (“/”) for the paths, as seen with scripts/FruitLoopy.cs. You’ll run into a lot more of this later. Just keep this in mind if you are having path troubles.
For a further illuminating exercise, try this: rewrite FruitLoopy.cs to perform exactly the same operations, but without using arrays at all. Go ahead—take some time and give it a try. You can compare it with my version in the 3D3ERESOURCESCH2 folder, named FermentedFruit.cs.
Now, the final exercise is purely up to you and your mind’s eye. Imagine that you have 33 types of fruit instead of five. Which program would you rather modify—ParedFruit.cs or FermentedFruit.cs? Can you see the advantage of arrays now?
Another thing to point out is that the initialization section of the code would probably read in the values from a database or an external file with value tables in it. It would use a loop to store all the initial values—the names, costs, and quantities. Then the code would really be a lot smaller!
To review, an array is a data structure that allows a collective name to be given to a group of elements of the same type. An individual element of an array is identified by its own unique index (or subscript).
An array can be thought of as a collection of numbered boxes, each containing one data item. The number associated with the box is the index of the item. To access a particular item, the index of the box associated with the item is used to access the appropriate box. The index must be an integer and indicates the position of the element in the array.
Strings
We’ve already encountered strings in our earlier example programs. In some languages strings are a special type of array, like an array of single characters, and can be treated as such. In Torque, strings are in essence the only form of variable. Numbers and text are stored as strings. They are handled as either text or numbers depending on which operators are being used on the variables.
As we’ve seen, two basic string operations are assignment and concatenation, as illustrated here:
%myFirstName = "Ken";
%myFullName = %myFirstName @ " Finney";
In the first line, the string “Ken” is assigned to %myFirstName, then the string “Finney” is concatenated (or appended) to %myFirstName, and the result is assigned to %myFullName. Familiar stuff by now, right? Well, try this one on for size:
%myAge = 30;             // (actually it isn't you know !)
%myAge = %myAge + 12;   // getting warmer !
At this point, the value in %myAge is 42, the sum of 30 and 12. Now watch this trick:
%aboutMe = "My name is " @ %myFullName @ " and I am " @ %myAge @ " years old.";
I’m sure you can figure out what the value of the variable %aboutMe is. That’s right, it’s one long string—“My name is Ken Finney and I am 42 years old.”—with the number values embedded as text, not numbers. Of course, that isn’t my age, but who’s counting?
What happened is that the Torque 3D engine figured out by the context what operation you wanted to perform, and it converted the number to a string value before it added it to the larger string.
Another form of string variable is called the tagged string. This is a special string format used by Torque to reduce bandwidth utilization between the client and the server. We’ll cover tagged strings in more detail in a later chapter.
Operators
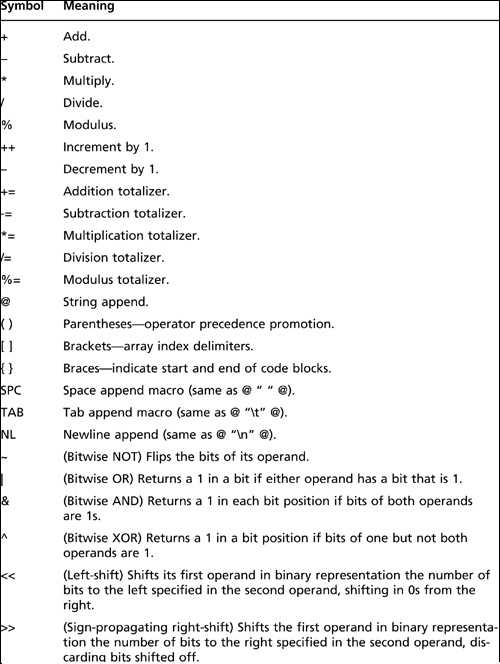
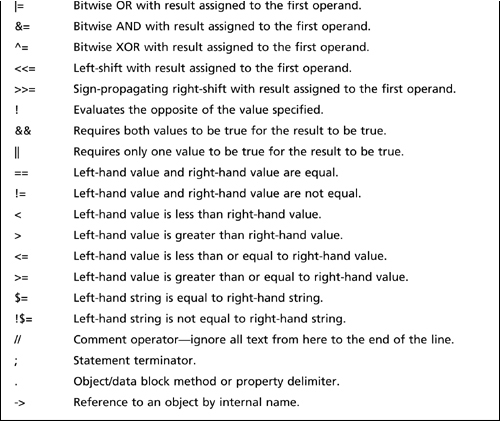
Table 2.2 is a list of operators. You will find it handy to refer back to this table from time to time.
Operators range from the familiar to the mighty weird. The familiar will be the ones like add (“+”) and subtract (“−”). A little strange for those who are adept with standard secondary school math but new to programming languages is the multiplication symbol—an asterisk (“*”). The division symbol, though not the regular handwritten one, is still a somewhat familiar slash (“/”). A mighty weird operator would be the vertical pipe (“|”), which is used to perform an OR operation on the bits of a variable.
Some of the operators are probably self-explanatory or understandable from the table. Others may require some explanation, which you will find in the following sections of this chapter.
You’ll recall that strings and numbers are treated the same; there is, however, one exception, and that is when comparing strings to strings or numbers to numbers. We use different operators for those comparisons. For number comparisons, we use == (that’s not a typo—it’s two equal signs in a row; read it as “is identical to”), and for string comparisons, we use $= (read it as “string is identical to”). These operators will be discussed more in the sections called “Conditional Expressions” and “Branching.”
Table 2.2 TorqueScript Operators Symbol Meaning
Operator Precedence
An issue with evaluating expressions is that of order of evaluation. Should %a + %b * %c be evaluated by performing the multiplication first or by performing the addition first? In other words, as %a + (%b * %c) or as (%a + %b) * %c?
Torque and other languages (such as C/C++) solve this problem by assigning priorities to operators; operators with high priority are evaluated before operators with low priority. Operators with equal priority are evaluated in left-to-right order. The priorities of the operators seen so far are, in order of high to low priority, as follows:
( )
* / %
+ -
=
Therefore, %a + %b * %c is evaluated as if it had been written as %a + (%b * %c) because multiplication (*) has a higher priority than addition (+). If the + needed to be evaluated first, then parentheses would be used as follows: (%a + %b) * %c.
If you have any doubt, then use extra parentheses to ensure the correct order of evaluation. Note that two arithmetic operators cannot be written in succession.
Increment/Decrement Operators
There are some operations that occur so frequently in assignment statements that Torque has shorthand methods for writing them. One common situation is that of incrementing or decrementing an integer variable. For example,
  %n = %n + 1; // increment by one
  %n = %n - 1; // decrement by one
Torque has an increment operator (++) and a decrement operator (--). Thus
%n++;
can be used for the increment and
%n--;
can be used for the decrement.
The ++ and -- operators here have been written after the variable they affect; they are called the postincrement and postdecrement operators, respectively. Torque does not have preincrement and predecrement operators (which are written before the variable), as you would find in C/C++.
Totalizers
Totalizers are a variation on the increment and decrement theme. Instead of bumping a value up or down by 1, a totalizer does it with any arbitrary value. For example, a common situation that occurs is an assignment like this:
%total = %total + %more;
where a variable is increased by some amount and the result is assigned back to the original variable. This type of assignment can be represented in Torque by the following:
%total += %more;
This notation can be used with the other arithmetic operators (+, -, *, /, and %), as you can see in the following:
%prod = %prod * 10;
which can be written as this:
%prod *= 10;
You can use totalizers in compound assignment statements quite easily as well. Here’s an example:
%x = %x/(%y + 1);
becomes
%x /= %y + 1;
and
%n = %n % 2;
becomes
%n %= 2;
Be careful on that last one! The percent sign in front of the number 2 is the modulus operator, not a scope prefix. You can tell by the space that separates it from the 2—or in the case of the totalizer example, you can tell by the fact that the percent sign is adjacent to the equal sign on the right. They are certainly subtle differences, so make sure you watch for them if you work in code that uses these constructs.
In all cases, you must be performing these operations on numbers and not strings. That wouldn’t make any sense!
Loops
Loops are used for repetitive tasks. We saw an example of a loop being used in the FruitLoopy sample program. This loop was used to step through the available types of fruit. The loop was a bounded one that had a specified start and end, a characteristic built into the loop construct we used, the for loop. The other kind of loop we are going to look at is the while loop.
The while Loop
The following piece of TorqueScript demonstrates a while loop. It gets a random number between 0 and 10 from the Torque 3D engine and then prints it out.
// ========================================================================
// WhilingAway.cs
//
// This module is a program that demonstrates while loops. It prints
// random values on the screen as long as a condition is satisfied.
//
// ========================================================================

function runWhilingAway()
// -------------------------------------
//     Entry point for the program.
// -------------------------------------
{
    %value = 0;          // initialize %value
    while (%value < 7)  // stop looping if %n exceeds 7
    {
      %value = GetRandom(10);  // get a random number between 0 and 10
      echo("value="@%value );  // print the result
    }                          // now back to the top of the loop
                               // ie. do it all again
}
Save this program as scriptsWhilingAway.cs and run it. Note the output. Now run it again. Note the output again—and the fact that this time it’s different. That’s the randomness in action, right there. But the part that we are really interested in right now is the fact that as long as the number is less than 7, the program continues to loop.
The general form of a while statement is this:
while ( condition )
        statement
While the condition is true the statement is executed over and over. Each time the condition is satisfied and the statement executed is called an iteration. The statement may be a single statement (terminated by a semicolon) or code block (delimited by braces) when you want two or more statements to be executed. Note the following points. It must be possible to evaluate the condition on the first entry to the while statement or it will never be satisfied, and its code will never be executed. This means that all variables used in the condition must have been given values before the while statement is encountered. In the preceding example the variable %value was started at 0 (it was initialized) and it was given a random number between 0 and 10 during each iteration of the loop.
Now you have to make sure that at least one of the variables referenced in the condition can be changed in the statement portion that makes up the body of the loop. If you don’t, you could end up stuck in an infinite loop. In the preceding example by making sure that the randomly chosen %value would always eventually cause the condition to fail (10 is greater than 7) we ensure that the loop will stop at some point. In fact, the random number code will return 7, 8, 9, and 10 at some point or other—any one of which will cause the code to break out of the loop.
Here is the important thing about while loops. The condition is evaluated before the loop body statements are executed. If the condition evaluates to false when it is first encountered, then the body is never entered. In the preceding example if we had initialized %value with 10, then no execution of the statements in the body of the while loop would have happened.
And now here’s a little exercise for you. Write a program, saving it as scripts LoopPrint.cs. Make the program print all the integers starting at 0 up to and including 250. That’s a lot of numbers! Use a while loop to do it.
The for Loop
When programming, we often need to execute a statement a specific number of times. Consider the following use of a while statement to output the numbers 1 to 10. In this case the integer variable count is used to control the number of times the loop is executed.
%count = 1;
while (%count <= 10)
{
  echo("count="@%count);
  %count++;
}
Three distinct operations take place:
![]() Initialization. Initializes the control variable %count to 1.
Initialization. Initializes the control variable %count to 1.
![]() Evaluation. Evaluates the value of an expression (%count <= 10).
Evaluation. Evaluates the value of an expression (%count <= 10).
![]() Update. Updates the value of the control variable before executing the loop again (%count++).
Update. Updates the value of the control variable before executing the loop again (%count++).
The for statement is specially designed for these cases—where a loop is to be executed starting from an initial value and iterates until a control condition is satisfied, meanwhile updating the value of the control variable each time around the loop. It has all three operations rolled up into its principal statement syntax. It’s sort of the Swiss army knife of loop statements.
The general form of the for statement is
for ( initialize ; evaluate ; update )
    statement
which executes the initialize operation when the for statement is first entered. The evaluate operation is then performed on the test expression; if it evaluates to true, then the loop statement is executed for one iteration followed by the update operation. The cycle of test, iterate, update continues until the test expression evaluates to false; control then passes to the next statement in the program.
Functions
Functions save work. Once you’ve written code to solve a problem, you can roll the code into a function and reuse it whenever you encounter that problem again. You can create functions in a manner that allows you to use the code with different starting parameters and either create some effect or return a value to the code that uses the function.
When solving large problems we often use a divide-and-conquer technique, sometimes called problem decomposition. We break a big problem down into smaller problems that are easier to solve. This is often called the top-down approach. We keep doing this until problems become small enough that a single person can solve them. This top-down approach is essential if the work has to be shared among a team of programmers; each programmer ends up with a specification for a small part of the bigger system that is to be written as a function (or a collection of functions). The programmer can concentrate on the solution of only this one problem and is likely to make fewer errors. The function can then be tested on its own for correctness compared to the design specification.
There are many specialized problem areas, and not every programmer can be proficient in all of them. Many programmers working in scientific applications will frequently use math function routines like sine and cosine but would have no idea how to write the code to actually perform those operations. Likewise, a programmer working in commercial applications might know little about how an efficient sorting routine can be written. A specialist can create such routines and place them in a public library of functions, however, and all programmers can benefit from this expertise by being able to use these efficient and well-tested functions.
In the “Arrays” section earlier in this chapter we calculated a total price and total count of several types of fruit with the FruitLoopy program. Here is that program modified somewhat (okay, modified a lot) to use functions. Take note of how small the entry point function—called runTwotyFruity—has become now that so much code is contained within the three new functions.
// ========================================================================
// TwotyFruity.cs
//
// This program adds up the costs and quantities of selected fruit types
// and outputs the results to the display. This module is a variation
// of the FruitLoopy.cs module designed to demonstrate how to use
// functions.
// ========================================================================

function InitializeFruit()
// -------------------------------------------------------------------
//     Set the starting values for our fruit arrays, and the type
//     indices
//
//     RETURNS: number of different types of fruit
//
// ------------------------------------------------------------------
{
   %numTypes = 5; // so we know how many types are in our arrays
   $bananaIdx=0;    // initialize the values of our index variables
   $appleIdx=1;
   $orangeIdx=2;
   $mangoIdx=3;
   $pearIdx=4;

   $names[$bananaIdx] = "bananas"; // initialize the fruit name values
   $names[$appleIdx] = "apples" ;
   $names[$orangeIdx] = "oranges";
   $names[$mangoIdx] = "mangos";
   $names[$pearIdx] = "pears";

   $cost[$bananaIdx] = 1.15; // initialize the price values
   $cost[$appleIdx] = 0.55;
   $cost[$orangeIdx] = 0.55;
   $cost[$mangoIdx] = 1.90;
   $cost[$pearIdx] = 0.68;
   $quantity[$bananaIdx] = 1; // initialize the quantity values
   $quantity[$appleIdx]  = 3;
   $quantity[$orangeIdx] = 4;
   $quantity[$mangoIdx]  = 1;
   $quantity[$pearIdx]   = 2;

   return(%numTypes);
}

function addEmUp(%numFruitTypes)
// ------------------------------------------------------------------
//     Add all prices of different fruit types to get a full total cost
//
//PARAMETERS: %numFruitTypes - the number of different fruit that are tracked
//
//     RETURNS: total cost of all fruit
//
// ------------------------------------------------------------------
{
   %total = 0;
   for (%index = 0; %index <= %numFruitTypes; %index++)
   {
     %total = %total + ($quantity[%index]*$cost[%index]);
   }
   return %total;
}


// ------------------------------------------------------------------
// countEm
//
//   Add all quantities of different fruit types to get a full total
//
//PARAMETERS: %numFruitTypes - the number of different fruit that are tracked
//
//   RETURNS: total of all fruit types
//
// ------------------------------------------------------------------
function countEm(%numFruitTypes)
{
  %total = 0;
  for (%index = 0; %index <= %numFruitTypes; %index++)
  {
    %total = %total + $quantity[%index];
  }
  return %total;
}
function runTwotyFruity()
// ------------------------------------------------------------------
//    Entry point for program. This program adds up the costs
//    and quantities of selected fruit types and outputs the results to
//    the display. This program is a variation of the program FruitLoopy
//
// ------------------------------------------------------------------
{
   //
   // ------------------------- Initialization -------------------------
   //

   %numFruitTypes=InitializeFruit(); // set up fruit arrays and variables
   %numFruit=0;    // always a good idea to initialize *all* variables!
   %totalCost=0;   // (even if we know we are going to change them later)

   //
   // ------------------------- Computation -------------------------
   //

   // Display the known statistics of the fruit collection
   for (%index = 0; %index < %numFruitTypes; %index++)
   {
   echo("Cost of " @ $names[%index] @ ":$" @ $cost[%index]);
   echo("Number of " @ $names[%index] @ ":" @ $quantity[%index]);
   }

   // count up all the pieces of fruit, and display that result
   %numFruit = countEm(%numFruitTypes);
   echo("Total pieces of Fruit:" @ %numFruit);

   // now calculate the total cost
   %totalCost = addEmUp(%numFruitTypes);
   echo("Total Price of Fruit:$" @ %totalCost);
}
Save this program as scriptsTwotyFruity.cs and run it in the usual way. Now go and run your FruitLoopy program, and compare the output. Hopefully, they will be exactly the same.
In this version all the array initialization has been moved out of the runFruitLoopy function and into the new InitializeFruit function. Now, you might notice that
I have changed the arrays to be global variables. The reason for this is that Torque does not handle passing arrays to functions in a graceful manner. Well, actually it does, but we would need to use ScriptObjects, which are not covered until a later chapter, so rather than obfuscate things too much right now, I’ve made the arrays into global variables. This will serve as a useful lesson in contrast between global and local variables anyway, so I thought, why not?
The global arrays can be accessed from within any function in the file. The local ones (with the percent sign prefix), however, can only be accessed within a function. This is more obvious when you look at the addEmUp and countEm functions. Notice that they both use a variable called %total. But they are actually two different variables whose scope does not extend outside the functions where they are used. So don’t get mixed up!
Speaking of addEmUp and countEm, these functions have another construct, called a parameter. Sometimes we use the word argument instead, but because we are all friends here, I’ll stick with parameter.
Functions with No Parameters
The function main has no parameters, so you can see that parameters are not always required. Because the arrays are global, they can be accessed from within any function, so we don’t need to try to pass in the data for them anyway.
Functions with Parameters and No Return Value
Parameters are used to pass information into a function, as witnessed with the functions addEmUp and countEm. In both cases we pass a parameter that tells the function how many types of fruit there are to deal with.
The function declaration looked like this:
function addEmUp(%numFruitTypes)
and when we actually used the function we did this:
%totalCost = addEmUp(%numFruitTypes);
where %numFruitTypes indicates how many types of fruit there are—in this case, five. This is known as a call to the function addEmUp. We could have written it as
%totalCost = addEmUp(5);
but then we would have lost the flexibility of using the variable to hold the value for the number of fruit types.
This activity is called parameter passing. When a parameter is passed during a function call, the value passed into the function is assigned to the variable that is specified in the function declaration. The effect is something like %numTypes = %numFruit-Types; now this code doesn’t actually exist anywhere, but operations are performed that have that effect. Thus, %numTypes (inside the function) receives the value of %numFruitTypes (outside the function).
Tip
Parameters are also called arguments.
Functions That Return Values
The function InitializeFruit returns a number for the number of different fruit types with this line:
return(%numTypes);
and the functions addEmUp and countEm both have this line:
return %total;
Notice that the first example has the variable sitting inside some parentheses, and the second example does not. Either way is valid.
Now what happens is that when Torque encounters a return statement in a program, it gathers up the value in the return statement and then exits the function and resumes execution at the code where the function was called. There isn’t always a return statement in a function, so don’t be annoyed if you see functions without them. In the case of the InitializeFruit function, that would have been the line near the start of runTwotyFruity that looks like this:
%numFruitTypes=InitializeFruit(); // set up fruit arrays and variables
If the function call was part of an assignment statement, as above, then whatever value was gathered at the return statement inside the function call is now assigned in the assignment statement. Another way of expressing this concept is to say that the function evaluated to the value of the return statement inside the function.
Return statements don’t need to evaluate to anything, however. They can be used to simply stop execution of the function and return control to the calling program code with a return value. Both numbers and strings can be returned from a function.
Conditional Expressions
A conditional or logical expression is an expression that can only evaluate to one of two values: true or false. A simple form of logical expression is the conditional expression, which uses relational operators to construct a statement about a given condition. The following is an example of a conditional expression:
%x < %y
This reads as %x is less than %y, which evaluates to true if the value of the variable %x is less than the value of the variable %y. The general form of a conditional expression is
operandA relational_operator operandB
The operands can be either variables or expressions. If an operand is an expression, then the expression is evaluated and its value is used as the operand. The relational operators allowable in Torque are shown in Table 2.3.
Note
Another name for logic that involves only the values true or false is Boolean logic.
Note that equality is tested for using the operator == because = is already used for assigning values to variables. The condition evaluates to true if the values of the two operands satisfy the relational operator and false if they don’t.
Here are some examples:
%i < 10
%voltage >= 0.0
%total < 1000.0
%count != %n
%x * %x + %y * %y < %r * %r
Table 2.3 Relational Operators
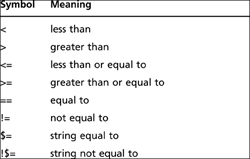
Depending on the values of the variables involved, each of the preceding expressions is true or false. If %x has the value 3, %y is 6, and %r is 10, then the last expression evaluates to true, but if %x was 7 and %y was 8, then it would evaluate to false.
The value of a logical expression can be stored in a variable for later use. Any numerical expression can be used for the value of a condition, with 0 being interpreted as false and non-zero as true.
This means that the value to which a logical expression evaluates can be used in arithmetical operations. Programmers often do this, but it is a practice not to be recommended. It can lead to code obscurity, creating a program that is difficult to understand.
Logical Expressions
We can create more complex conditions than those that can be written using only the relational operators described in the preceding section. There are explicit logical operators for combining the logical values true and false.
The simplest logical operator is NOT, which is represented in Torque by the exclamation point (“!”). It operates on a single operand and returns false if its operand is true and true if its operand is false.
The operator AND, represented by two ampersands (“&&”), takes two operands and is true only if both of the operands are true. If either operand is false, the resulting value is false.
The final logical operator is OR, which is represented by two vertical pipes (“||”). It results in true if either operand is true. It returns false only if both its operands are false.
The logical operators can be defined by truth tables as seen in Table 2.4. The “F” character is used for false and “T” is used for true in these tables.
These tables show that NOT reverses the truth value of the operand A; that the AND of two operands is only true if both operands are true; and that the OR of two operands is true if either or both of its operands are true. Now we can write pretty complex logical operations.
If %i has the value 15, and %j has the value 10, then the expression (i > 10) && (j > 0) is evaluated by evaluating the relation i > 10 (which is true), then evaluating the relation %j > 0 (which is also true), to give true. If %j has the value −1, then the second relation would be false, so the overall expression would be false. If i has the value 5, then the first relation would be false, and the expression will be false irrespective of the value of the second relation. Torque does not even evaluate the second relation in this situation. Similarly, if the first relation is true in an OR (||) expression, then the second relation will not be evaluated. This short-circuit evaluation enables many logical expressions to be efficiently evaluated.
Table 2.4 Logical Operator Truth Tables NOT (!)
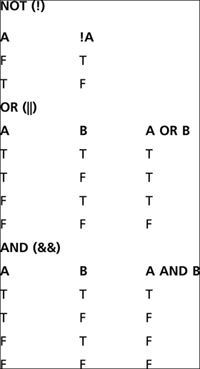
Examples Using Logical Operators
Note that in the last of the examples that follow, an actual truth value (0 or false) was used as one of the operands of &&. This means that whatever the value of %i, this logical expression evaluates to false. In these examples parentheses have been used to clarify the order of operator application.
(%i < 10) && (%j > 0)
((%x + %y) <= 15) || (%i == 5)
!((%i >= 10) || (%j <= 0))
(%i < 10) && 0
You’ve got to be careful not to confuse the assignment operator = with the logical equality operator ==.
Using Table 2.4 and the earlier section about operator precedence with the following expression
x + y < 10 && x/y == 3 || z != 10
shows that the operators are evaluated in the order /, +, <, ==, !=, &&, and ||. This is the same as using parentheses on the expression in this way: ((((x + y) < 10) && ((x/y) == 3)) || (z != 10)).
Similarly, the expressions given above could be written without parentheses as follows:
i < 10 && j > 0
x + y <= 15 || i == 5
!(i >= 10 || j <= 0)
i < 10 && 0
Now that we’ve covered the logical expressions (or conditions) in Torque, let’s move on and take a look at the conditional control mechanisms in Torque.
Branching
The term branching refers to the idea that code can follow different execution paths depending on, well, something. What it depends on... ummm... depends. Well, let me try that again. It depends on what your program is doing and what you want it to do. Like this: say you are driving on a road, and you reach a T junction. The sign points left and says “Toronto 50 km.” Another sign points right and says “Toronto (Scenic Route) 150 km.” Which way are you going to go, left or right? Well, you see? It depends. The fastest way to Toronto might be to go left, but what if you aren’t in a hurry—maybe you’re interested in the scenic route? Just as we saw earlier with looping, there are conditions that will dictate what path your code will take.
That act of taking one path over others available is branching. Branching starts out with some sort of decision-making test. In addition to the two looping statements we’ve already covered—which employ branching of sorts—there are also two branch-specific statements: the if statement and the switch statement.
The if Statement
The simplest way to select the next thing to do in a program based upon conditions is to use the if statement. Check this out:
if (%n > 0)
     echo("n is a positive number");
This will print out the message “n is a positive number” only if %n is positive. The general form of the if statement is this:
if (condition)
    statement
where condition is any valid logical expression as described in the “Conditional Expressions” section we saw earlier.
This if statement adds % something to the variable %sum if % something is positive:
if (%something > 0)
 %sum += %something;
If %something isn’t positive, then the program branches past the totalizer statement, and so %sum doesn’t get incremented by %something.
This next piece of code similarly adds %something to %sum, but it also increments a positive number counter called %counter:
if (%something > 0)
{
  %sum += %something;
  %counter++;
}
Note how in the second example a compound statement has been used to carry out more than one operation if the condition is true. If it had been written like this:
if (%something > 0)
 %sum += %something;
 %counter++;
then if %something was greater than 0, the next statement would be executed—that is, %sum would be incremented by the amount of %something. But the statement incrementing %counter is now going to be treated as the next statement in the program and not as part of the if statement. The program execution is not going to branch around it. The effect of this would be that %counter would be incremented every time it is encountered, no matter whether %something is positive or negative.
The statements within a compound statement can be any Torque statements. In fact, another if statement could be included. For example, the following code will print a message if a quantity is negative and a further message if no overdraft has been arranged:
if ( %balance < 0 )
{
  echo ("Your account is overdrawn. Balance is: " @ %balance );
  if ( %overdraft <= 0 )
       echo ("You have exceeded your overdraft limit");
}
Now we could have done the same thing using two sequential if statements and more complex conditions:
if ( %balance < 0 )
   echo ("Your account is overdrawn. Balance is: " @ %balance );
if ( %balance < 0 && %overdraft <= 0 )
     echo ("You have exceeded your overdraft limit");
You should note that one of these versions will generally execute a little bit faster than the second when dealing with accounts that are not overdrawn. Before I tell you later in this chapter, see if you can figure out which one, and why.
The if-else Statement
A simple if statement only allows a single branch to a simple or compound statement when a condition holds. Sometimes there are alternative paths, some that need to be executed when the condition holds, and some to be executed when the condition does not hold. The two forms can be written this way:
if (%coffeeholic == true)
      echo ("I like coffee.");
if (%coffeeholic == false)
      echo ("I don't like coffee.");
This technique will work while the statements that are executed as a result of the first comparison do not alter the conditions under which the second if statement is executed. Torque provides a direct means of expressing these kinds of choices. The if-else construct specifies statements to be executed for both possible logical values of the condition in an if statement. The following example of an if-else statement writes out one message if the variable %coffeeholic is positive and another message if %coffeeholic is negative:
if (%coffeeholic == true)
      echo ("I like coffee.");
else
      echo ("I don't like coffee.");
The general form of the if-else statement is this:
if ( condition )
   statementA
else
   statementB
If the condition is true, then statementA is executed; otherwise, statementB is executed. Both statementA and statementB may be either simple or compound statements.
The following if-else statement evaluates if a fruit is fresh or not, and if it is, the statement increments a fresh fruit counter. If the fruit isn’t fresh, the statement increments the rotten fruit counter. I’m going to program my refrigerator’s fruit crisper to do this one day and send me reports over the Internet. Well, I can wish, can’t I?
if (%fruitState $= "fresh")
{
    %freshFruitCounter++;
}
else
{
    %rottenFruitCounter++;
}
Time for another sample program! Type the following program in, and save it as scriptsGeometry.cs and then run it.
// ========================================================================
// Geometry.cs
//
// This program calculates the distance around the perimeter of
// a quadrilateral as well as the area of the quadrilateral and outputs the
// values.It computes whether the quadrilateral is a square or a rectangle and
// modifies its output accordingly. Program assumes that all angles in the
// quadrilateral are equal. Demonstrates the if-else statement.
// ========================================================================

function calcAndPrint(%theWidth, %theHeight)
// ----------------------------------------------------------------
//    This function does the shape analysis and prints the result.
//
//    PARAMETERS: %theWidth - horizontal dimension
//                %theHeight - vertical dimension
//
//    RETURNS: none
// ----------------------------------------------------------------
{
  // calculate perimeter
  %perimeter = 2 * (%theWidth+%theHeight);

  // calculate area
  %area = %theWidth * %theHeight;

  // first, set up the dimension output string
  %prompt = "For a " @ %theWidth @ " by " @
            %theHeight @ " quadrilateral, area and perimeter of ";

  // analyze the shape's dimensions and select different
  // descriptors based on the shape's dimensions
  if (%theWidth == %theHeight)           // if true, then it's a square
      %prompt = %prompt @ "square: ";
  else                                   // otherwise it's a rectangle
      %prompt = %prompt @ "rectangle: ";

  // always output the analysis
  echo (%prompt @ %area @ " " @ %perimeter);
}

function runGeometry()
// ----------------------------------------------------------------
//     Entry point for the program.
// ----------------------------------------------------------------
{

   // calculate and output the results for three
   // known dimension sets
   calcAndPrint(22, 26); // rectangle
   calcAndPrint(31, 31); // square
   calcAndPrint(47, 98); // rectangle
}
What we’ve done here is analyze a shape. In addition to printing its calculated measurements, we modify our output string based upon the (simple) analysis that determines if it is a square or a rectangle. I realize that a square is a rectangle, but let’s not get too picky, okay? Not yet, at least.
Nesting if Statements
You saw earlier in “The if Statement” section how an if statement can contain another if statement. These are called nested if statements. There is no real limit to how deep you can nest the statements, but try to be reasonable and only do it if it is absolutely necessary for functional reasons. It might be good to do it for performance reasons, and that’s fine as well.
By the way, I had asked if you could tell which of the two examples would execute faster, remember that? The answer is that the nested version will execute faster when there is no overdraft condition. This is because only one condition is tested, resulting in less work for the computer to do. The sequential version will always perform both tests, no matter what the bank balance is.
The if and if-else statements allow a choice to be made between two possible alternatives. Well, sometimes we need to choose between more than two alternatives. For example, the following sign function returns −1 if the argument is less than 0, returns +1 if the argument is greater than 0, and returns 0 if the argument is 0.
function sign (%value)
//  determines the arithmetic sign of a value
//
//  PARAMETERS: %value - the value to be analyzed
//
//  RETURNS:  -1   - if value is negative
//             0   - if value is zero
//             1   - if value is positive
{
  if (%value < 0) // is it negative ?
  {
   return -1;
  }
  else        // nope, not negative
  {
    if (%value == 0) // is it zero ?
   {
     return 0;
   }
   else       // nope, then it must be positive
   {
     return 1;
   }
  }
}
So there you go. The function has an if-else statement in which the statement following the else is also an if-else statement. If %value is less than 0, then sign returns −1, but if it is not less than 0, the statement following the else is executed. In that case if %value is equal to 0, then sign returns 0; otherwise, it returns 1. I used the compound statement form in order to make the nesting stand out more. The nesting could also be written like this:
if (%value < 0) // is it negative ?
   return -1;
else         // nope, not negative
   if (%value == 0) // is it zero ?
      return 0;
    else      // nope, then it must be positive
      return 1;
This is nice and compact, but it can sometimes be hard to discern where the nesting properly happens, and it is easier to make mistakes. Using the compound form formalizes the nesting a bit more, and personally, I find it more readable.
Newbie programmers sometimes use a sequence of if statements rather than nested if-else statements when the latter should be used. They would write the guts of the sign function like this:
if (%value < 0)
    %result = -1;
if (%value == 0)
    %result = 0;
if (%value > 0)
    %result = 1;
    return %result;
It would work and it’s fairly easy to read, but it’s inefficient because all three conditions are always tested.
If nesting is carried out to too deep a level and indenting is not consistent, then deeply nested if or if-else statements will be confusing to read and interpret. You should note that an else always belongs to the closest if without an else.
The switch Statement
We just explored how we can choose between more than two possibilities by using nested if-else statements. There is a sleeker and more readable method available for certain kinds of multiple-choice situations—the switch statement. For example, the following switch statement will set a game’s weapon label based upon a numeric weapon type variable:
switch (%weaponType)
{
   case 1: %weaponName = "knife";
   case 2: %weaponName = "pistol";
   case 3: %weaponName = "shotgun" ;
   case 4: %weaponName = "bfg1000" ;
   default: %weaponName = "fist";
}
Here is what that would look like using if-else:
if (%weaponType == 1)
    %weaponName = "knife";
else if (%weaponType == 2)
    %weaponName = "pistol";
else if (%weaponType == 3)
    %weaponName = "shotgun" ;
else if (%weaponType == 4)
    %weaponName = "bfg1000" ;
else
    %weaponName = "fist";
It’s pretty obvious from that simple example why the switch statement is so useful.
The general form of a switch statement is this:
switch ( selection-variable )
{
    case label1:
                statement1;
    case label2:
                statement2;
      ...
    case labeln:
                statementn;
    default:
                statementd;
}
The selection-variable may be a number or a string or an expression that evaluates to a number or a string. The selection-variable is evaluated and compared with each of the case labels. The case labels all have to be different. If a match is found between the selection-variable and one of the case labels, then the statements that follow the matched case until the next case statement will be executed. If the value of the selection-variable can’t be matched with any of the case labels, then the statements associated with default are executed. The default is not required but should only be left out if it is certain that the selection-variable will always take the value of one of the case labels.
Here is another example, which writes out the day of the week depending on the value of the number variable %day.
switch (%day)
{
  case 1 :
          echo("Sunday");
  case 2 :
          echo("Monday");
  case 3 :
          echo("Tuesday");
  case 4 :
          echo("Wednesday");
  case 5 :
          echo("Thursday");
  case 6 :
          echo("Friday");
  case 7 :
          echo("Saturday");
 default :
          echo("Not a valid day number");
}
Debugging and Problem Solving
When you run your programs, the Torque 3D engine will automatically compile them and output a new .cs.dso file if it needs to. Therefore, Geometry.cs (the source code) will become Geometry.cs.dso (the compiled code). There is a gotcha though. If the script compiler detects an error in your code, it will abort the compilation but will not stop the program execution—rather, it will use the existing compiled version if one exists. This is an important point to remember. If you are changing your code, yet you don’t see any change in behavior, then you should check the log file in console.log and look for any compile errors.
As you’ve seen earlier in this chapter, the log output is pretty verbose and should guide you to the problem area pretty quickly. It writes out a piece of code around the problem area and then inserts a pair of pound-sign characters (“##”) on either side of the exact spot where the compiler decides that there is a problem.
Once you’ve fixed the first problem, don’t assume you are done. Quite often, once one problem is fixed, the compiler marches on through the code and finds another problem. The compiler always aborts as soon as it encounters the first problem.
Of the large number of programming errors that the compiler catches and identifies, here are a few specific ones that frequently crop up:
![]() Missing semicolon at the end of a statement
Missing semicolon at the end of a statement
![]() Missing a slash in double-slash comment operator
Missing a slash in double-slash comment operator
![]() Missing % or $ (scope prefix) from variable names
Missing % or $ (scope prefix) from variable names
![]() Using uninitialized variables
Using uninitialized variables
![]() Mixing global and local scope prefixes
Mixing global and local scope prefixes
![]() Unbalanced parentheses or braces
Unbalanced parentheses or braces
Later we will cover how to use the console mode in Torque in more detail. That will give us access to three built-in Torque 3D functions—echo, warn, and error—which are quite useful for debugging.
Having said all that, the best tool for debugging TorqueScript code is Torsion’s built-in debugger.
Debugging with Torsion
As I mentioned earlier in this chapter, Torsion provides a built-in debugging tool that actually connects to the Torque 3D engine while it is running, and allows you to control the program execution, view the values for variables, and monitor activities while your program executes.
To follow along with my exhortations and pronouncements and other general ranting and raving, you should run the Torque 3D demo called FPS Example. Select FPS Example in the Torque 3D Toolbox, and then launch Torsion with the Torsion button on the right side of the Toolbox dialog.
Torsion provides a menu, a section of the toolbar, portions of the editor window, the context (right-click) menu, and the run-time window as interfaces to the debugger. Figure 2.12 shows these aspects of the debugger in the Torsion IDE. The Debug features are highlighted, and labeled as follows:
1. The Debug menu
2. The Debug toolbar
3. The Editor margin
4. The run-time window (Watch tab)
Figure 2.12
The Debugger features.
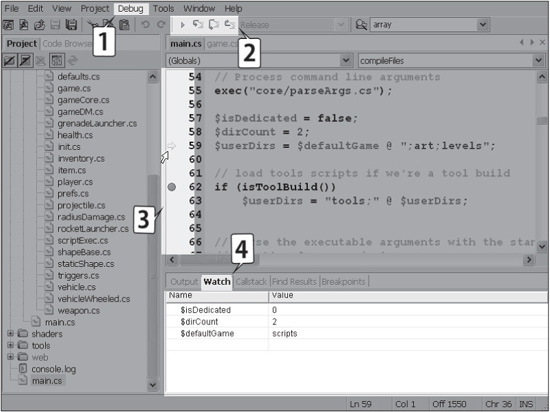
The Debug Menu
The Debug menu provides access to most of the Debug-related commands, as depicted in Figure 2.13. You can start, stop, and pause the debugger by using the Debug menu. To control the debugging activity, you will find Step, Step Over, and Step Out. You will also find commands for manipulating break points. All of these commands have other, sometimes easier and more direct, ways to invoke them, but the menu is a useful and sometimes necessary backstop. There are keyboard shortcuts for many of these commands, and browsing through the menus is the best way to find out what they are.
The Debug Toolbar
The Debug toolbar provides a handy way to start the debugger (and in doing so, launch your game) using the Start button ![]() . Clicking on this button will cause Torsion to:
. Clicking on this button will cause Torsion to:
a. Insert temporary debugging configuration code into the root main.cs file of your project.
b. Launch Torque 3D.
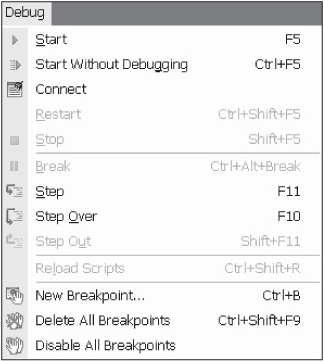
c. Connect via telnet to Torque 3D.
d. Begin displaying the output from the Torque 3D console in your Torsion console.
e. Change the Start button icon from a blue triangle pointing to the right to two blue vertical bars, signifying Pause.
Below the Start button are three control buttons: Step ![]() , Step Over
, Step Over ![]() , and Step Out
, and Step Out ![]() . The Pause button
. The Pause button ![]() appears in the same location as the Start button on the left end of the Debug toolbar.
appears in the same location as the Start button on the left end of the Debug toolbar.
Start
Using the Start command is fairly straightforward. You should take notice that this command actually means “start debugging” and not “start the game” or “start Torque 3D.” This is significant, because this means that the debugger is always run when you use the Start command, whether from the menu or the toolbar. If you just want to run your game or the Torque 3D example or whatever without using the debugger, then you need to choose Debug, Start Without Debugging. This will launch whatever game or Torque 3D setup that is specified in the configuration window without invoking the debugger.
After starting the debugger, Torsion will change the Start button icon from a blue triangle pointing to the right to two blue vertical bars, signifying Pause. When you click the new Pause button, Torsion will pause the Torque 3D simulation, and change the Pause button back to a Start button. This will also happen if the debugger stops execution at a breakpoint.
Using Step, Step Out, the Context Menu, and the Watch & Callstack Tabs
Instead of starting the debugging with the Start button, you can start by using the Step button. When you click on this, Torsion will do most of the same things that it does when you click the Start button—specifically steps a to d shown in the earlier procedural description—but it will pause execution at the beginning of the very first executable line of script code that it encounters. Try it (but make sure Torque is not running before you do this)—click on the Step button, and Torsion will start running everything, then pause at the line of code that looks like this:
$appName =“FPS Example”;
Note the yellow arrow, also known as the program counter, in the left margin of the editor window, next to the number 10 (which happens to be the line number of the program code in this file). When program execution is paused, the program counter points to the next statement that Torque 3D will execute. This point is important, because it means that any variable assignments that take place in the statement pointed to by the program counter will not have taken place yet. Likewise, this applies to function calls and calculations, and any other operations that will change the internal state of the program.
Caution
When you single-step to start debugging, like I describe in the text, you might notice that a line of code, the “temporary debugging information” I mentioned in step a, becomes inserted above (hence before) the $appname... statement. You may then feel inclined to hurl out “gotcha!” and proceed to give yourself +1 XP for catching me in a mistake. Well, you might find mistakes—I’m not perfect,—but this isn’t one of them.
Torsion inserted that line, and will remove it when you stop debugging. It is not the first line of program code in the script other than when it is shoehorned in by Torsion at run time.
Also—and this matters—the root main.cs module is the only place in the scripts where this now-you-see-it/now-you-don’t behavior takes place. As you work through the text following the program counter, you will see why it matters that only the root main.cs file has this code inserted and removed.
With that bit of defensive whining behind me, I need to point out something that really could throw you for a loop.
Every so often—maybe 1 in 15 or 20 times, when I single-step to start debugging, nothing seems to happen. Nada. Zilch. Stopping and restarting debugging (which can solve many odd behaviors) sometimes doesn’t fix it.
What always does work for me though is to go to the Task Manager and kill the T3Ddemo process that is hiding there, apparently not wanting to come out to play.
Then I start the debugging again. Everything always goes fine after that.
To prevent it from happening at all, I use a breakpoint on that first line of code, and start debugging using the Start button. I will describe both of these concepts very shortly.
Okay, right now I want you to hover your mouse over the global variable
$appName
in line 10. Now right-click your mouse while holding your mouse cursor over the variable. The debugger context menu will pop up. Scroll down the menu and choose Add Watch, as shown in Figure 2.14.
Figure 2.14
The debugger context menu.

You will see the variable appear below in the Watch tab of the run-time panel. If you have the Output tab selected (and you probably do) choose the Watch tab now, and you will see the variable in the Name column of the Watch tab. In the Value column, you will see a NULL string (“”), which is a string with no characters or numbers in it. This means that no value has been assigned to the variable yet.
Tip
Notice that in the text I said “...hover your mouse over the global variable $appName in line 10.”
That statement will only be on line 10 if you are running in the Torsion debugger. If you are not running the debugger when you look at that statement, it will be on line 7. That’s because of the “temporary debugging information” that I mentioned earlier being inserted at the very top of the file when you run the debugger. During this chapter I will make all references to line numbers based on having the debugger running.
Click the Step button once. You will advance to the next valid statement on line 13, and if you look down into the Watch window, you will see that the variable $app-Name now has a value: the string “FPS Example” (except that the quotes I just used do not appear in the value). So you see, the assignment only takes place when the line is actually executed, and the program counter appears on the first valid statement line after the executed statement.
Go ahead and click on the Step button one more time so that the program counter is pointing at the statement on line 16. Take note of the next statement, on line 18. It is a function definition as we explored earlier in this chapter. Function definitions are read into memory at the time that a script file is exec’d. When the script executive is actually running through your program, it doesn’t execute the code inside them.
Instead, it loads the code block (the part surrounded by the braces { and } ) into memory, and takes note of the memory location. The memory location where the function definition was saved is stored, along with the function name (in this case, the function name is createCanvas), in a lookup table.
Later, when the code encounters the function name again in an executable statement with the correct syntax, the script executive calls, or invokes, the function. But that’s not what is happening on line 18. Click on the Step button again, and you will see that the program counter skips to the first line of executable code after the function definition, way down at line 37.
Keep clicking the Step button until you come to line 62. Wait here.
Tip
By now, you’ve probably noticed that the TorqueScript executive doesn’t execute the code line-by-line, like one might be tempted to think. Rather, it executes the code statement-by-statement. Just thought I’d point that out.
The isToolBuild function contained in the comparison in this if statement at line 62 will return a true, causing the evaluation in the statement on line 62 to succeed, and thus pass execution on to the statement on line 63.
The isToolBuild function returns true if the currently running build of Torque 3D has the editor tools included in it, as this Torque 3D Tools Demo does.
Go ahead and click the Step button one more time. Your program counter will move to line 63. Take note of this—and also realize that isToolBuild is a function that is defined inside the Torque 3D engine, unlike the createCanvas function we encountered a few lines ago, which we saw is defined in this file in TorqueScript. This distinction matters, as we will see in a few moments.
It’s now time to single-step some more, but this time you need to do it by clicking the Step Over button 12 times (yup, that’s what I said, twelve more times, and by using Step Over, not Step), and you should arrive at line 214, which contains a statement that calls loadDirs. Okay, now we’re done with the Step Over button for a while—back to using Step.
When you next click the Step button, you will see your program counter jump backward (up). Don’t panic. Go ahead, click the Step button now, once.
You should now be on line 204.
The program counter is pointing at the first executable statement inside the function definition of the loadDirs function.
Remember when we single-stepped those 12 times? Well, the 12th time we clicked on the Step button, the program counter stepped over the function definition of load-Dirs. It didn’t ignore it—it loaded it into memory and did all that stuff I talked about earlier when function definitions are encountered by the script executive. Then at line 214, the function was called, and here we are, up to our elbows in it.
Down in the run-time pane, click on the Callstack tab. You will now see the Callstack window, with columns for Function name, File name, and Line number.
There will be two rows filled in. The top row will always reflect the current program counter location. The previous rows, in reverse order from top-down, show line number and function (and the file where they are found) from which you came to get here. The oldest (or earliest, or first, or however you want to think of it) location is always the bottom entry. Okay, let’s return our attention back to the editor window.
Now, we could go ahead and step through the rest of this function, but don’t do that. Instead, let’s be witnesses to the Step Out command doing its thing. Click on the Step Out button (the last one on the right in the Debug toolbar).
Wham! We end up almost back where we started in main.cs, except one statement farther along—at line 215.
Okay, let’s interrupt this debug-fest. I want to show you something else. Choose Debug, Stop. The Torque 3D engine is stopped, and Torsion returns to normal editing mode. The program counter disappears.
Using Step Over and Setting Breakpoints
Now click to the left of the line number on line 211 in main.cs, making sure to do it on the left side of the margin, but still inside the margin. This is the line where the statement calls loadDirs. When you were running the debugger, this was line 214. Now with the debugger off, it is line 211.
After clicking to the left of the line number, you will see the “meatball” (a large red dot) appear. This is a breakpoint marker, and by clicking there and making the meat-ball appear, you have inserted a breakpoint.
Look down in the run-time pane, and choose the Breakpoints tab. You will see an entry there that looks like Figure 2.15
Figure 2.15
The Breakpoints tab.
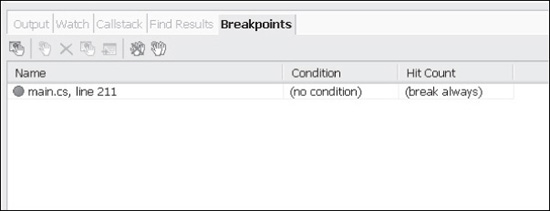
If you see other entries, you’ve probably accidentally inserted some breakpoints while fooling around in the editor. Delete all of the other ones by clicking on those entries, one at a time, and then pressing the Delete key (Backspace doesn’t work).
If you click on the meatball beside line 211 again, you will see the entry disappear from the Breakpoints window. Okay, now put it back in. We need that breakpoint for the next bit.
With the breakpoint in place on line 211, go ahead and click on the Start button (the blue triangle arrow in the Debug toolbar). Torsion will load up the FPS Example, and execute all the way up to line 214, where it will halt, but not execute the statement it is pointing at. Notice that the program counter now sits inside the meatball, on line 211.
Also notice that the line is 214, not 211, as it was when we clicked on it before running the debugger. Also, if you look down into the Breakpoints tab, you will see that the breakpoint entry is still apparently set to line 211. If, while remaining paused in the debugger, you clear the breakpoint (by clicking on the meatball again, an action we affectionately call toggling) and then you reset the breakpoint to the very same line, you will see that the breakpoint entry in the Breakpoints tab will now assert that it is now on line 214. And it will disavow any knowledge of line 211, or any of its relatives, as it casts you a sideways glance and wonders why you would think such crazy things. Or at least that what I thought I saw it do one night at 3 a.m.
I swear.
Now click on the Step Over button (yup, that’s the one between Step and Step Out). Notice that this time we don’t find ourselves inside the loadDirs function. Instead, we’ve simply moved to the next statement at line 215. This is a very handy feature. We often really don’t want to go rummaging around in some rat hole of code found in some obscure file of utility code somewhere. Using the Step Over command allows us to avoid getting our fingers dirty in places we don’t really want them to be.
Alright, there’s one more useful debugging feature I want to share with you—conditional breakpoints.
Conditional Breakpoints
Right now, I want you to make sure that there are meatballs (breakpoints) set on both lines 79 and 127.
Next, hover your cursor over line 79, right click, and choose Breakpoint Properties. In the Breakpoint Properties dialog that appears, put a checkmark in the Break on true checkbox. In the field next to that checkbox, type in $isDedicated. Then click OK.
Notice the small white box appear over one corner of the meatball on line 79. This indicates that a condition has been set for this breakpoint
Now run your program using the Start button. Eventually, you see the program counter appear on line 127, which I had you insert specifically to behave as a “backstop” after the area of code we are interested in, just in case program execution didn’t stop in the area of interest—which is the case right now. There is no executable code between 79 and 127. All that code that is there is a series of function definitions that are loaded, but not executed.
But wait! It skipped right past line 79 when we clicked the Start button! The reason is that the condition we set was for the breakpoint to be valid when $isDedicated held the value true. But if you look back at line 57, you will see that the value false was assigned to $isDedicated. Hah! Therefore, we didn’t stop on line 79.
So how can we get it to stop on line 79? Well, we could just remove the condition on the breakpoint, but that would be cheating, at least within the context of this little exercise.
No, we can do it in a much more complicated way than that! First, stop the debugger again, using Debug, Stop. Then go open the Breakpoint Properties dialog again for line 79. This time put
$isDedicated == false
in the field next to the Break on true checkbox.
Now run the debugger again. See that? Now it stops on line 79. Not only does this demonstrate that the conditional breakpoints actually do work, but also that you can put any evaluation code into the field, and if it evaluates to true, the breakpoint is valid.
On your own, you should try some more complex conditions. Like maybe
($isDedicated == false) && ($dirCount == 2)
and try changing the two to different values or change the false to true, and so on.
You can see that this is a very powerful tool, especially useful when debugging things like loops, where you may only want to break if some variable hits a certain value, or a loop counter gets to a certain number of iterations, and so on.
In fact, breaking a loop to examine variable values after a certain number of iterations is done so often that the conditional breakpoint feature of Torsion actually has a special method for doing exactly that.
In the Breakpoint Properties dialog, notice that there is another checkbox called Break on pass. If you check this box, you can put a number in the field that specifies how many times you will let Torque 3D execute the relevant statement without breaking and halting execution, before it does actually break. You can also use both of the conditions at the same time: break on evaluating a statement to true, but only after passing over the code so many times.
Debugging Exercise
Tell you what—here is a different version of the TwotyFruity program. Type it in, and save it as scriptsWormyFruit.cs. I’ve put five bugs in this version. See if you can spot them (in addition to any you might introduce while typing).
// ========================================================================
// WormyFruit.cs
//
// Buggy version of TwotyFruity. It has five known bugs in it.
// This program adds up the costs and quantities of selected fruit types
// and outputs the results to the display. This module is a variation
// of the FruitLoopy.cs module designed to demonstrate how to use
// functions.
// ========================================================================

function InitializeFruit()
// ----------------------------------------------------------------
//    Set the starting values for our fruit arrays, and the type
//    indices
//
//    RETURNS: number of different types of fruit
//
// ----------------------------------------------------------------
{
     numTypes = 5; // so we know how many types are in our arrays
     $bananaIdx=0;    // initialize the values of our index variables
     $appleIdx=1;
     $orangeIdx=2;
     $mangoIdx=3;
     $pearIdx=3;

     $names[$bananaIdx] = "bananas"; // initialize the fruit name values
     $names[$appleIdx] = "apples";
     $names[$orangeIdx] = "oranges";
     $names[$mangoIdx] = "mangos";
     $names[$pearIdx] = "pears";

     $cost[$bananaIdx] = 1.15; // initialize the price values
     $cost[$appleIdx] = 0.55;
     $cost[$orangeIdx] = 0.55;
     $cost[$mangoIdx] = 1.90;
     $cost[$pearIdx] = 0.68;

     $quantity[$bananaIdx] = 1; // initialize the quantity values
     $quantity[$appleIdx]  = 3;
     $quantity[$orangeIdx] = 4;
     $quantity[$mangoIdx]  = 1;
     $quantity[$pearIdx]   = 2;

     return(%numTypes);
}

function addEmUp(%numFruitTypes)
// ----------------------------------------------------------------
//   Add all prices of different fruit types to get a full total cost
//
//PARAMETERS: %numFruitTypes -the number of different fruit that are tracked
//
//   RETURNS: total cost of all fruit
//
// ----------------------------------------------------------------
{
   %total = 0;
   for (%index = 0; %index <= $numFruitTypes; %index++)
   {
     %total = %total + ($quantity[%index]*$cost[%index]);
   }
   return $total;
}


// ----------------------------------------------------------------
// countEm
//
//   Add all quantities of different fruit types to get a full total
//
//PARAMETERS: %numFruitTypes -the number of different fruit that are tracked
//
//   RETURNS: total of all fruit types
//
// ----------------------------------------------------------------
function countEm(%numFruitTypes)
{
  %total = 0;
  for (%index = 0; %index <= $numFruitTypes; %index++)
  {
    %total = %total + $quantity[%index];
  }
}

function runWormyFruit()
// ----------------------------------------------------------------
//   Entry point for program. This program adds up the costs
//   and quantities of selected fruit types and outputs the results to
//   the display. This program is a variation of the program FruitLoopy
//
// ----------------------------------------------------------------
{
   //
   // ---------------------- Initialization -------------------------
   //

   %numFruitTypes=InitializeFruit(); // set up fruit arrays and variables
   %numFruit=0     // always a good idea to initialize *all* variables!
   %totalCost=0;    // (even if we know we are going to change them later)

   //
   // ------------------------- Computation -------------------------
   //

   // Display the known statistics of the fruit collection
   for (%index = 0; %index < %numFruitTypes; %index++)
   {
   echo("Cost of " @ $names[%index] @ ":$" @ $cost[%index]);
   echo("Number of " @ $names[%index] @ ":" @ $quantity[%index]);
   }

   // count up all the pieces of fruit, and display that result
   %numFruits = countEm(%numFruitTypes));
   echo("Total pieces of Fruit:" @ %numFruit);

   // now calculate the total cost
   %totalCost = addEmUp(%numFruitTypes);
   echo("Total Price of Fruit:$" @ %totalCost);
}
Run the program, and use the original TwotyFruity output as a specification to tell you whether or not this program is working correctly.
Best Practices
Programming is as much an art as it is anything else. There are often quite strenuous discussions between programmers about the best way to do certain things. However, there is consensus on a few practices that are considered to be good.
So take the following list as a guideline, and develop a style that is comfortable for you.
![]() Use module and function header comments to document your code.
Use module and function header comments to document your code.
![]() Sprinkle lots of commentary through your code, and make sure that it actually explains what is happening.
Sprinkle lots of commentary through your code, and make sure that it actually explains what is happening.
![]() Don’t comment obvious things. Save the effort for the stuff that matters.
Don’t comment obvious things. Save the effort for the stuff that matters.
![]() Use white space (blank lines and spaces) to improve readability.
Use white space (blank lines and spaces) to improve readability.
![]() Indent your code with readability in mind.
Indent your code with readability in mind.
![]() Decompose large problems into small ones, and assault the small problems with functions.
Decompose large problems into small ones, and assault the small problems with functions.
![]() Organize your code into separate modules, and make sure the module filename is appropriate for the content, and vice versa.
Organize your code into separate modules, and make sure the module filename is appropriate for the content, and vice versa.
![]() Restrict the number of lines of code you put in a module. Pick a size that suits you—about 1,000 lines should be near your upper limit.
Restrict the number of lines of code you put in a module. Pick a size that suits you—about 1,000 lines should be near your upper limit.
![]() Use descriptive and meaningful variable names.
Use descriptive and meaningful variable names.
![]() While keeping your variable names descriptive, don’t let the names get too long.
While keeping your variable names descriptive, don’t let the names get too long.
![]() Never embed tabs in code—use spaces instead. When you view your code later, you may have different tab settings, and therefore find the code hard to read. Using spaces guarantees that the visual appearance is consistent. Three spaces for an indent is a good number.
Never embed tabs in code—use spaces instead. When you view your code later, you may have different tab settings, and therefore find the code hard to read. Using spaces guarantees that the visual appearance is consistent. Three spaces for an indent is a good number.
![]() Be consistent in your programming style decisions.
Be consistent in your programming style decisions.
![]() Be alert to what programming decisions you make that work well for you, and try to consistently employ those techniques.
Be alert to what programming decisions you make that work well for you, and try to consistently employ those techniques.
![]() Keep a change log of your work so you can keep track of the evolution of your programs.
Keep a change log of your work so you can keep track of the evolution of your programs.
![]() Use revision control software to manage your program versions.
Use revision control software to manage your program versions.
MOVING RIGHT ALONG
You’ve now bitten off a fairly big chunk o’ stuff. You learned a new tool—in fact, a new kind of tool—an Integrated Development Environment. After getting a handle on Torsion, we looked at how software does its thing bringing people and computer hardware together by using programming languages.
We then went off and started bullying the computer around using one of those programming languages called TorqueScript.
Then we messed with its head, using Torsion’s built-in Debugger.
Coming up next, we’ll delve into the world of 3D programming and discover the basics of 3D objects and then how we can manipulate them with TorqueScript.