CHAPTER 4
GAME PROGRAMMING
In the preceding two chapters you were introduced to a few new concepts: programming, 3D graphics, 3D object manipulation, and stuff like that. Most of it was fairly broad, in order to give you a good grasp of what you can do to make your game.
The next bunch of chapters get down and dirty, so to speak. We’re going to muck around with our own hands examining things, creating things, and making things happen.
In this chapter we’re going to hammer at TorqueScript for a bit, writing actual code that will be used to develop our game. We’ll examine in detail how the code works in order to gain a thorough understanding of how Torque 3D works. The game we are going to create has the rather unoriginal name of Emaga, which is just a game spelled backward. The Chapter 4 version will be called EMAGA4. Of course, you may—and probably should—substitute whatever name you wish!
TORQUESCRIPT
As I’ve said before, TorqueScript is much like C/C++, but there are a few differences. TorqueScript is typeless—with a specific exception regarding the difference between numbers and strings—and you don’t need to preallocate storage space with variable declarations.
If you haven’t already read Chapter 2, “Introduction to Programming,” and followed the exercises in detail, then you should do it before proceeding with this chapter. If you are an experienced programmer, you might just want to simply skim Chapter 2, looking for new and unfamiliar things (like global and local variable scope prefixes). In any case, you should read up on Torsion and Debugging in Torque 3D, both of which are covered in Chapter 2, and very useful in the programming chapters to come in this book.
You can control all aspects of a game—from game rules and nonplayer character behavior to player scoring and vehicle simulation—through the use of TorqueScript. A script comprises statements, function and datablock declarations, and package declarations.
Most of the syntax in the Torque 3D TorqueScript language is similar to C/C++ language, with a high correlation of keywords (see Table A.3 in Appendix A) between the two, although, as is often the case in scripting languages, there is no type enforcement on the variables, and you don’t declare variables before using them. If you read a variable before writing it, it will be an empty string or zero, depending on whether you are using it in a string context or a numeric context.
The engine has rules for how it converts between the script representation of values and its own internal representation. Most of the time the correct script format for a value is obvious; numbers are numbers (also called numerics), and strings are strings. The tokens true and false can be used for ease of code reading to represent 1 and 0, respectively. More complicated data types will be contained within strings; the functions that use the strings need to be aware of how to interpret the data in the strings.
Strings
String constants are enclosed in single quotes or double quotes. A single-quoted string specifies a tagged string—a special kind of string used for any string constant that needs to be transmitted across a network connection. The full string is sent once, the first time. And then whenever the string needs to be sent again, only the short tag identifying that string is sent. This dramatically reduces bandwidth consumption by the game.
A double-quoted (or standard) string is not tagged; therefore, whenever the string is used, storage space for all of the characters contained in the string must be allocated for whatever operation the string is being used for. In the case of sending a standard string across connections, all of the characters in the string are transmitted, every single time the string is sent. Chat messages are sent as standard strings, and because they change each time they are sent, creating tag ID numbers for chat messages would be pretty useless.
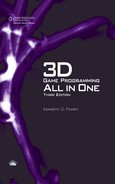
Strings can contain formatting codes, as described in Table 4.1.
Table 4.1 TorqueScript String Formatting Codes
Objects
Objects are instances of object classes, which are a collection of properties and methods that together define a specific set of behaviors and characteristics. A Torque 3D object is an instantiation of an object class. After creation, a Torque 3D object has a unique numeric identifier called its handle. When two handle variables have the same numeric value, they refer to the same object. An instance of an object can be thought of as being somewhat like a copy of an object.
When an object exists in a multiplayer game with a server and multiple clients, the server and each client allocate their own handle for the object’s storage in memory. Note that datablocks (a special kind of object) are treated differently—more about this a little later.
Note
Methods are functions that are accessible through objects. Different object classes may have some methods that are core between them, and they may have some methods that are unique to themselves. In fact, methods may have the same name, but work differently, when you move from one object class to another.
Properties are variables that belong to specific objects and, like methods, are accessed through objects.
Creating an Object
When creating a new instance of an object, you can initialize the object’s fields in the new statement code block, as shown here:
%handle = new InteriorInstance()
{
   position = "0 0 0" ;
   rotation = "0 0 0" ;
   interiorFile = %name;
};
The handle of the newly created InteriorInstance object is inserted into the variable %handle when the object is created. Of course, you could use any valid and unused variable you want, like %obj, %disTing, or whatever. Note in the preceding example that %handle is a local variable, so it is only in scope—or valid—within the function where it is used. Once the memory is allocated for the new object instance, the engine then initializes the object’s properties as directed by the program statements embedded inside the new code block. Once you have the object’s unique handle—as assigned to %handle in this case—you can use the object.
There is a nuance to using the new keyword that is important to understand. In older versions of Torque, like TGE, if you create a second object with the same name as an existing object using the new operator, space will be allocated for the new object, and Torque will assign the name to that object globally. Now both the old and the new objects will report the same name, and answer to the same namespace, but the global name will only reference the new object and not the old. So for all intents and purposes, the old object becomes at the least a superfluous waste of space, but could potentially become a more malevolent obfuscating demon lurking in your code.
The solution to this and similar problems is to slightly redefine how new works, and introduce another keyword to deal with intentional creation of new objects with already-used-names.
So now, in Torque 3D, any attempt to create a new object with the same name as an existing object, using the new operator, will simply fail.
But there will be times when you are creating new objects and you expect the creation code to be called multiple times. If you really only want one (the original) version of an object to exist but want to update its properties, then use the keyword singleton instead of new. Thus, when the executive encounters your object creation code, the singleton keyword informs the executive to not create a new object with the same name, if the name is already in use. It will reuse the original definition, and update it with the newer definition properties. This saves a ton of manual defensive programming.
Using Objects
To use or control an object, you can use the object’s handle to access its properties and functions. If you have an object handle contained in the local variable %handle, you can access a property of that object this way:
%handle.aproperty = 42;
Handles are not the only way to access objects. You can assign objects by name, if you don’t have a handle at hand. Objects are named using strings, identifiers, or variables containing strings or identifiers. For example, if the object in question is named MyObject, all of the following code fragments (A, B, C, D) have the same effect.
A
MyObject.aproperty = 42;
B
"MyObject".aproperty = 42;
C
    %objname = MyObject;
    %objname.aproperty = 42;
D
    %objname = "MyObject";
    %objname.aproperty = 42;
These examples demonstrate accessing a property field of an object; you invoke object methods (functions) in the same way. Note that the object name —MyObject—is a string literal, not a variable. There is no % or $ prefixed to the identifier. A string literal is a string embedded in the code, as you see in B and D above with “MyObject”.
Object Functions
You can call a function referenced through an object this way:
%handle.afunction(42, "arg1", "arg2");
Note that the function afunction can also be referred to as a method of the object contained in %handle. In the preceding example, the function named afunction will be executed. There can be multiple instances of functions named afunction in a script, but each must be part of different namespaces. The particular instance of afunction to be executed will be selected according to the object’s namespace and the namespace hierarchy. For more about namespaces, see the sidebar.
Namespaces
Namespaces are means of defining a formal context for variables. Using namespaces allows us to use different variables that have the same name without confusing the game engine or ourselves.
If you recall the discussion in Chapter 2 about variable scope, you will remember that there are two scopes: global and local. Variables of global scope have a “$” prefix, and variables of local scope have a “%” prefix. Using this notation, we can have two variables—say, $maxplayers and %maxplayers—that can be used side by side, yet whose usage and meaning are completely independent from each other. %maxplayer can only be used within a specific function, while $maxplayer can be used anywhere in a program. This independence is like having two namespaces.
In fact, %maxplayer can be used over and over in different functions, but the values it holds only apply within any given specific function. In these cases, each function is its own de facto namespace.
We can arbitrarily assign variables to a namespace by using special prefixes like this:
   $Game::maxplayers

   $Server::maxplayers
We can have other variables belonging to the namespace as well:
   $Game::maxplayers

   $Game::timelimit

   $Game::maxscores
The identifier between the “$” and the “::” can be completely arbitrary—in essence, it is a qualifier. By qualifying the variable that follows, it sets a context in which the variable is meaningful.
Just as functions have a de facto namespace (the local scope), objects have their own namespaces. Methods and properties of objects are sometimes called member functions and member variables. The “member” part refers to the fact that they are members of objects. This membership defines the context, and therefore the namespace, of the methods and properties (member functions and member variables).
So, you can have many different object classes that have properties of the same name, yet they refer only to the objects that belong to that class. You can also have many different instances of an object, and the methods and properties of each instance belong to the individual instance.
In these examples:
   $myObject.maxSize

   $explosion.maxSize

   $beast.maxSize
the maxSize property could have three entirely different meanings. For $myObject, maxSize might mean the number of items it can carry. For $explosion, it might mean how large the blast radius is. For $beast, it might mean how tall the creature is.
When an object’s function is called, the first parameter is the handle of the object containing the function. Therefore, the function definition of the afunction method in the preceding example would actually have four parameters in its parameter list, the first of which will be the %this parameter. Note that only the last three parameters are used when you call the afunction method. The first parameter that corresponds to the %this parameter in the definition is automagically inserted by the engine when you call the function. You may be familiar with the this token in C/C++; however, in Torque 3D there is nothing special about it. By prior convention, that variable name is often used when referring to an object’s handle within one of its methods, but you could call that parameter anything you want.
If you want to access a field of an object, you always have to use something that evaluates to an object handle or a name followed by a dot followed by the field name, as in the A, B, C, and D code fragments seen earlier. The only exception to this rule is in the sequence of field initialization statements when creating an object with the new statement.
Datablocks
A datablock is a special kind of object containing a set of characteristics that are used to describe another object’s properties. Datablock objects exist simultaneously on the server and all its connected clients. Every copy of a given datablock uses the same handle whether it is on the server or a client.
By convention, datablock identifiers have the form NameData. VehicleData, PlayerData, and ItemData are all examples of datablock identifiers. Although datablocks are objects, we typically don’t explicitly call them objects when referring to them, in order to avoid semantic confusion with regular objects.
A VehicleData datablock contains many attributes describing the speed, mass, and other properties that can be applied to a Vehicle object. When created, a Vehicle object is initialized to reference some already-existing VehicleData datablocks that will tell it how to behave. Most objects can come and go throughout the course of the game, but datablocks are created once and are not deleted. Datablocks have their own specific creation syntax:
datablock ClassIdentifier(NameIdentifier)
{
      InitializationStatements
};
The value of this statement is the handle of the created datablock.
ClassIdentifier is an existing datablock class name, like PlayerData. Name Identifier is the datablock name you’ve chosen. In both cases, you must use valid identifiers. InitializationStatements is a sequence of assignment statements.
The assignment statements assign values to datablock field identifiers. It’s possible for the contents of these fields to be accessible by both the script code and the engine code—and in fact that is often the case. In that situation you of course need to assign a value to the field that makes sense for the type of information it’s supposed to be holding.
You don’t have to restrict yourself to only initializing (and later using) fields that are accessible by the engine code. An object can have other fields as well; the engine code can’t read them, but the scripts can.
Finally, note that there’s a variation on the datablock creation syntax:
datablock ClassIdentifier(NameIdentifier : CopySourceIdentifier)
{
      InitializationStatements
};
CopySourceIdentifier specifies the name of some other datablock from which to copy field values before executing InitializationStatements. This other data-block must be of the same class as the datablock you are creating, or a superclass of it. This is useful if you want to make a datablock that should be almost exactly like a previously created datablock (with just a few changes) or if you want to centralize the definitions of some characteristics in one datablock that can then be copied by multiple other datablocks.
Oh and by the way: the singleton keyword can also be used instead of the data-block keyword and it works the same way it does when substituting for the new keyword.
GAME STRUCTURE
When you create your game, you can use pretty well any organizational structure you like. Your game will be comprised of script program modules, graphics images, 3D models, audio files, and various other data definition modules.
The only real limitation in how you structure your game folders is that the root main module must reside in the same folder as the Torque 3D game engine executable, and this folder will be the game root folder.
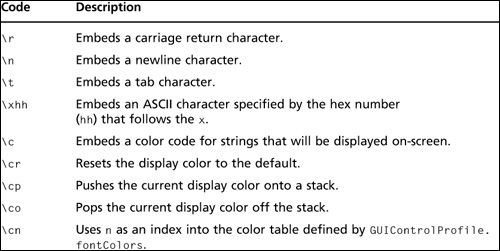
The least you should do to sensibly organize your game folders is to have a subtree that contains the core code—code that would be essentially the same between game types and variations—another subtree that would contain the control code, and yet another that contains specific assets that pertain to a particular game, game type, or game variation. Finally, you may need a folder tree that contains files that support the processes within the engine without being game code or assets—in this case you would likely employ a folder of support files. Torque uses these four basic subtrees, core, control, support, and assets in its sample games, although the company uses different names (such as scripts for control, art and levels for assets, shaders for support) for variations of the control subtree. See Figure 4.1 for a simple breakdown diagram.
Figure 4.1
Generalized game folder tree.
In the game we are creating in this chapter, we will call the control subtree control.
Source files for TorqueScript have the .cs extension. After the source files are compiled, they have an extension of .cs.dso. There is no way to convert a .cs.dso file back into a .cs file, so you must make sure to hang on to your original source files and back them up regularly. But not to worry—new to Torque 3D is the Project Packager. You no longer have to worry about looking after your .dso files. By default, Torque 3D does not generate the .dso files until you run the Product Packager to prepare your game for release. This makes life a whole lot easier.
When you launch Torque 3D, it looks for the module main.cs located in the same folder (the game root folder, shown in the following general tree format used for the Emaga set of tutorial sample games used in this book) as the Torque 3D executable.
In this chapter we will be using a simplified version of this tree. In the distribution of the Torque 3D Tools Demo you receive with the DVD, the executable is called FPS Example.exe in the FPS Example project, and PhysX.exe in the Physics demo.
The executable that I include with the chapter resources is called T3Ddemo.exe for all of the chapter projects, for simplicity’s sake.
For practical purposes, these are the same Torque 3D executable with different names. The particular main.cs file located in the game root folder can be thought of as the root main module. This expression is useful for distinguishing that particular main.cs module from others with the same name that aren’t in the game root folder.
The following is an example folder hierarchy:
exampleGame (root folder)
       art
            datablocks
                   vehicles
                   weapons
            decals
            environment
                   precipitation
                   water
            gui
                   weaponHud
            shapes
                   actors
                   groundCover
                   items
                   particles
                   trees
                   weapons
                   vehicles
            skies
                   cubemap
            sound
                   Burg
                   environment
                   gui
                   weapons
            terrains
                   desertX
                   test
       core
            art
            fonts
            profile
            scripts
            unifiedShell
            levels
            scripts
                   database
                   client
                   gui
                   server
            shaders
            tools
            web
These other main.cs modules are the root modules for the packages in the game. Although it isn’t explicitly designated as such, the root main module functions as the root package of the game.
It’s important to realize that the folder structure just outlined is not cast in stone. Note that although it is similar, it is still not exactly the same as the format used in the Torque 3D sample games. As long as the root main module is in the same folder as the Torque 3D engine executable, you can use whatever folder structure suits your needs. Of course, you will have to ensure that all of the hard-coded paths in the source modules reflect your customized folder structure.
Packages, Add-ons, Mods, and Modules
If you find the terminology confusing, don’t fret—it is a little bit less than straightforward at first blush.
The first thing to understand is that the term Mod is an abbreviated, or truncated, form of the word modification. Mods are changes that people make to existing games, customizing the games to look or play differently. The term is often used in the independent game development scene. The word Mod is often capitalized.
What we are doing when we create the EMAGA game is in many ways similar to creating a Mod—much like a certain kind of Mod that is often called a Total Conversion. Torque 3D, however, is not a game; it is an engine. So we are in reality not modifying an existing game, but, rather, we are creating our own.
Also, there is a bit of an extra wrinkle here. When we create our game, we are going to provide some features that will allow other people to modify our game! To avoid total confusion, we are going to call this capability an add-on capability rather than a Mod capability. And we’ll refer to the new or extra modules created by other people for our game as add-ons.
A module is essentially the melding of a program source file in text form with its compiled version. Although we usually refer to the source code version, both the source file version and the compiled (object code, or in the case of Torque 3D, byte code) version are just different forms of the same module.
A package is a Torque 3D construct that encapsulates functions that can be dynamically loaded and unloaded during program execution. Scripts often use packages to load and unload the different game types and related functions. Packages can be used to dynamically overload functions using the parent::function script mechanism in the packaged function. This is useful for writing scripts that can work with other scripts without any knowledge of those scripts.
To replace the graphical Help features in the Torque 3D demo, for example, you could create one or more source code modules that define the new Help features and that together could compose a Mod to the graphical Help package and that could also be considered a Mod to the Torque 3D demo game as a whole.
Clear as mud?
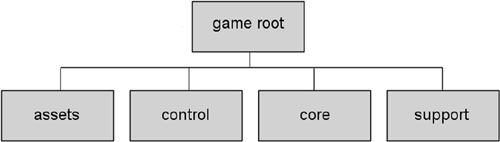
Figure 4.2 shows the simplified folder tree we will be using for this chapter’s sample game, EMAGA4. The rectangles indicate folder names, the partial rectangles with the wavy bottoms are source files, and the lozenge shapes indicate binary files. Those items that are not in gray are the items we will be dealing with in this chapter.
Figure 4.2
The EMAGA4 folder tree.
SERVER VERSUS CLIENT DESIGN ISSUES
The Torque 3D game engine provides built-in client/server capability. In fact, the engine is designed and built around the client/server model to such a degree that even if you are going to create a single-player game, you will still have both a server side and a client side to your code.
A well-designed online multiplayer game puts as much of the decision-making activity into the hands of the server as possible. This greatly reduces the chances that dishonest players could modify their clients to enable cheating or otherwise gain advantage over other, more honest players.
Conversely, a well-designed online multiplayer game only uses the client side to manage the interface with the human player—accepting input, displaying or generating output, and providing setup and game navigation tools.
This emphasis on server-side decisions has the potential to rapidly drain network bandwidth. This can lead to lag, a situation where a player’s actions are not reflected on the server in a timely fashion. Torque 3D has a highly optimized networking system designed to mitigate against these kinds of problems. For example, most strings of data are transmitted only once between clients and the game server. Anytime a string that has already been transmitted needs to be sent again, a tag is sent instead of the full string. The tag is nothing more than a number that identifies the string to be used, so the full string need not be sent again. Another approach is an update masking system that allows the engine to only provide, from the server to its clients, updates of data that has actually changed since the last update.
We will follow these guidelines when designing our sample game.
CORE FUNCTIONALITY
The core subtree contains scripts and assets for the following capabilities:
![]() Common server functions and utilities, such as authentication
Common server functions and utilities, such as authentication
![]() Common client functions and utilities, such as messaging
Common client functions and utilities, such as messaging
![]() Lighting management and lighting cache control code
Lighting management and lighting cache control code
![]() Basic and default art assets
Basic and default art assets
![]() User interface definitions, widget definitions, profiles, and images
User interface definitions, widget definitions, profiles, and images
We will not be using all of these features in the code we’ll be looking at in this chapter, but by the end of the book, we will be using all of it!
PREPARATION
In this chapter we will be concentrating on the scripts found in the control subtree, as outlined in Figure 4.2. To prepare for this, you need to set up your development tree, as follows:
1. In your 3D3ERESOURCESCH4 folder, locate the EMAGA4 BASE FILES folder (not the EMAGA4 CODE FROM BOOK folder).
2. Copy the EMAGA4 BASE FILES folder to your root folder on your hard drive, and rename it to simply EMAGA4, so that the path to the new folder is EMAGA4 (you can use any hard drive you want; I won’t be specifying the hard drives in the paths).
Disk space shouldn’t really be an issue in this day and age. Having said that, you probably won’t use more than an additional 30 MB of disk space, but you should have a gigabyte or so of free disk space available for backups and temporary files and so on.
You will note that there is no main.cs file in the same folder as T3Ddemo.exe. This is by design, because that is one of the files you will be creating. Also note that there are no .cs files in the control folder either. Again, this is intentional—you will be creating them from this chapter.
The code in EMAGA4 is pretty close to the bare minimum in terms of the game control code with a player character. In later chapters, we will expand on this skeletal implementation as we add more and more useful features and flesh out the game.
ROOT MAIN
Once it has found the root main module, Torque 3D compiles it into a special binary version containing byte code, a machine-readable format. The game engine then begins executing the instructions in the module. The root package can be used to do anything you like, but the convention established with the TorqueScript code is that the root package carries out the following functions:
![]() Performs generic initialization
Performs generic initialization
![]() Defines a callback that gets called from Torque 3D to generate a 3D view
Defines a callback that gets called from Torque 3D to generate a 3D view
![]() Performs the command line parameter parsing and dispatch
Performs the command line parameter parsing and dispatch
![]() Defines the command line help package
Defines the command line help package
![]() Invokes packages and add-ons (Mods)
Invokes packages and add-ons (Mods)
Here is the root main.cs module. Type it in, and save it as EMAGA4main.cs. You can skip the comments if you like, in order to minimize your typing.
//-----------------------------------------------------------------------
// ./main.cs   v0.3
//
// root main module for 3D3E EMAGA4 sample game
//
// Copyright (c) 2003, 2006, 2011 by Kenneth C. Finney.
//-----------------------------------------------------------------------

// ========================================================================
// ========================= Initializations ===============================
// ========================================================================

$usageFlag = false; //help won't be displayed unless the command line
                   //switch ( -h ) is used

$logModeEnabled = true; //track the logging state we set in the next line.
SetLogMode(2);   // overwrites existing logfile & closes log file at exit.
// ========================================================================
// ======================= Function Definitions ============================
// ========================================================================
function createCanvas(%windowTitle)
{
  // Create the Canvas
  new GuiCanvas(Canvas);

  // Set the window title
  if (isObject(Canvas))
     Canvas.setWindowTitle("EMAGA4 - 3D3E Simple Game");
  else
     return false;

  return true;
}

function OnExit()
//-----------------------------------------------------------------------
// This is called from the common code modules. Any last gasp exit
// activities we might want to perform can be put in this function.
// We need to provide a stub to prevent warnings in the log file.
//-----------------------------------------------------------------------
{
}
function OnStart()
//-----------------------------------------------------------------------
// This is called from the common code modules. Any last initial
// activities we might want to perform can be put in this function.
// We need to provide a stub to prevent warnings in the log file.
//-----------------------------------------------------------------------
{
}

function ParseArgs()
//-----------------------------------------------------------------------
// handle the command line arguments
//
// this function is called from the common code
// NOTE: some variables used in the function are globals (use the $)
// because we need their values that are set inside this function to
// also be accessible outside this function as well.
//-----------------------------------------------------------------------
{
  for(%i = 1; %i < $Game::argc ; %i++) //loop thru all command line args
  {
    %currentarg    = $Game::argv[%i];   // get current arg from the list
    %nextArgument     = $Game::argv[%i+1]; // get arg after the current one
    %nextArgExists = $Game::argc-%i > 1;// if there *is* a next arg,note that
    $logModeEnabled = false;           // turn this off-let the args dictate
                                // if logging should be enabled.

    switch$(%currentarg)
    {
      case "-?":     // the user wants command line help, so this causes the
       $usageFlag = true;  // Usage function to be run, instead of the game
       $argumentFlag[%i] = true;            // adjust the argument count

      case "-h":       // exactly the same as "-?"
       $usageFlag = true;
       $argumentFlag[%i] = true;
    }
  }
}

function Usage()
//-----------------------------------------------------------------------
// Display the command line usage help
//-----------------------------------------------------------------------
{
// NOTE: any logging entries are written to the file 'console.log'
  Echo("

emaga4 command line options:

" @
         " -h, -?              display this message
" );
}

function LoadAddOns(%list)
//-----------------------------------------------------------------------
// Exec each of the startup scripts for add-ons.
//-----------------------------------------------------------------------
{
  if (%list $= "" )
     return;
  %list = NextToken(%list, token, ";");
  LoadAddOns(%list);
  Exec(%token @  "/main.cs");
}

// ========================================================================
// ================ Module Body - Inline Statements =========================
// ========================================================================

// Either display the help message or start the program.
if ($usageFlag)
{
  %saveWinConsole = $winConsole;
  EnableWinConsole(false);// send logging output to a windows console window
  Usage();
  EnableWinConsole(%saveWinConsole);//restore windows console mode
  Quit();
}
else
{

  // scan argument list, and log an Error message for each unused argument
  // NOTE the $i is used, not %i. This code is NOT in a function -it is inline,
  // so we need to use the $ (global scope) and not the % (local scope).
  for ($i = 1; $i < $Game::argc; $i++)
  {
      if (!$argumentFlag[$i])
      Error("Error: Unknown command line argument:  " @ $Game::argv[$i]);
  }
  if (!$logModeEnabled)
  {
      SetLogMode(6);      // Default to a new logfile each session.
  }
  // Execute startup script for the common code modules
  Exec("core/main.cs");

  // Execute startup script for the control specific code modules
  Exec("control/main.cs");

  // Execute startup script for the control specific code modules
  Exec("tools/main.cs");

  // Execute startup scripts for all user add-ons
  Echo("------- Loading Add-ons -------" );
  LoadAddOns($addonList);
  Echo("Engine initialization complete." );
  OnStart();
}
This is a fairly robust root main module. Let’s take a closer look at it.
In the initializations section, the $usageFlag variable is used to trigger a simple Help display for command line use of T3Ddemo.exe. It is set to false here; if the user specifies the -? or -h flags on the command line, then this flag will be set to true.
After the usage flag, we set the log mode and enable logging. Logging allows us to track what is happening within the code. When we use the Echo, Warn, or Error functions, their output is sent to the console.log file, in the root game folder.
After that, we have some callback functions—functions that are called from within Torque 3D somewhere, that we need to provide the actual definitions for. In this case, the first two are CreateCanvas and ResetCanvas. CreateCanvas is called when we first need a canvas to draw the game in. The primary role of this function is to create a GuiCanvas object, and if we want it to work (and we do want it to work!) the object needs to be named Canvas.
This function also receives an argument that contains the string that is to be the canvas window title. In our example, we ignore the incoming string argument, and simply use a string literal in the call to Canvas.setWindow to put something more pertinent to our current situation in the canvas window’s title bar.
The stub routines OnExit and OnStart are the next two callbacks. A stub routine is a function that is defined but actually does nothing. The core code modules have a call to these routines, but we have nothing for it to do. We could just leave it out, but a good policy is to provide an empty stub to avoid warning messages from appearing in our log file—when the Torque 3D engine tries to call a nonexistent function, it generates a warning.
Then there is the ParseArgs function. Its job is to step through the list of command line arguments, or parameters, and perform whatever tasks you want based upon what arguments the user provided. In this case, we’ll just include code to provide a bare-bones usage, or Help, display.
Next is the actual Usage function that displays the Help information.
This is followed by the LoadAddOns routine. Its purpose is to walk through the list of add-ons specified by the user on the command line and to load the code for each. In EMAGA4 there is no way for the user to specify add-ons or Mods, but (you knew there was a but coming, didn’t you?) we still need this function, because we treat our core and control modules as if they were add-ons. They are always added to the list in such a way that they get loaded first. So this function is here to look after them.
After the function definitions we move into the in-line program statements. These statements are executed at load time—when the module is loaded into memory with the Exec statement. When Torque 3D runs, after the engine gets itself sorted out, it always loads the root main module (this module) with an Exec statement. All of the other script modules are loaded as a result of what this module does.
The first thing that happens is a call to the ParseArgs function, which we saw earlier. It sets the $usageFlag variable for us, you will recall.
Next is the block of code that examines the $usageFlag and decides what to do: either display the usage Help information or continue to run the game program. If we are not displaying the usage information, we move into the code block after the else.
The first thing we do in here is check to see if there are any unused arguments from the command line. If there are, that means the program doesn’t understand the arguments and there was some kind of error, which we indicate with the Error function and a useful message.
After that we set the log mode, if logging has been enabled.
Next, we build the lists that help Torque 3D find our add-ons.
Then we call the main module for the core code. This will proceed to load all the required core modules into memory, initialize the core functions, and basically get the ball rolling over there. We will talk about the core code modules in a later chapter.
After that, we do the same thing for the control code modules, the details of which we will cover later in this chapter.
Then we actually start loading the add-ons using the previously defined LoadAddOns function.
Finally, we make a call to OnStart. This will call all versions of OnStart that appear in the add-on packages in order of their appearance in $addonList, with core being first, control next, and finally this root main module. If there is an OnStart defined in core, then it gets called. Next, the one in control, and so on.
When we get to the end of the module, the various threads initiated by the OnStart calls are ticking over, doing their own things.
So now what? Well, our next point of interest is the control/main.cs module, which we called with the Exec function just before we started loading the add-ons.
CONTROL MAIN
The main.cs module for the control code is next on our tour. Its primary purposes in EMAGA4 are to define the control package and to call the control code initialization functions. (In later chapters, we will expand on the role of this module.) Following is the control/main.cs module. Type it in, and save it as EMAGA4controlmain.cs.
//-----------------------------------------------------------------------
// control/main.cs
// main control module for 3D3E emaga4 tutorial game
//
// Copyright (c) 2003, 2006, 2011 by Kenneth C. Finney.
//-----------------------------------------------------------------------
//
//----------------------------------------------------------------------------

//----------------------------------------------------------------------------
// Package overrides to initialize the mod.
package control {

function OnStart()
//-----------------------------------------------------------------------
// Called by root main when package is loaded
//-----------------------------------------------------------------------
{
  Parent::OnStart();
  Echo("
------- Initializing control module -------");

  // The following scripts contain the preparation code for
  // both the client and server code. A client can also host
  // games, so they need to be able to act as servers if the
  // user wants to host a game. That means we always prepare
  // to be a server at anytime, unless we are launched as a
  // dedicated server.
  Exec("./initialize.cs");
  InitializeServer(); // Prepare the server-specific aspects
  InitializeClient(); // Prepare the client-specific aspects
}

function OnExit()
//-----------------------------------------------------------------------
// Called by root main when package is unloaded
//-----------------------------------------------------------------------
{
  Parent::onExit();
}
}; // Client package
ActivatePackage(control); // Tell Torque3D to make the client package active
Not a whole lot happens in here at the moment, but it is a necessary module because it defines our control package.
First, the parent OnStart function is called. This would be the version that resides in root main, which we can see doesn’t have anything to do.
Then the initialize.cs module is loaded, after which the two initialization functions are called.
Finally, there is the OnExit function, which does nothing more than pass the buck to the OnExit function in the root main module.
All in all, control/main.cs is a fairly lazy, though important, little module.
Debugging Scripts Using the trace Function
The engine adds extra commentary to the log file. Extremely useful are the notations that tell you when the engine execution has just begun executing in a particular function or is just about to leave a particular function. The trace lines include the values of any arguments used when the function is entered and the contents of the return value when leaving a function.
Here is a fragmentary example of what the trace output can look like:
Entering clientCmdMissionStartPhase2(1, assets/book_ch4.mis)
   *** Phase 2: Download Ghost Objects
Leaving clientCmdMissionStartPhase2() - return
Mapping string: MissionStartPhase2Ack to index: 1
Entering serverCmdMissionStartPhase2Ack(1556, 1)
   Entering onGhostAlwaysObjectReceived()
   Leaving onGhostAlwaysObjectReceived() - return
   Entering onGhostAlwaysObjectReceived()
   Leaving onGhostAlwaysObjectReceived() - return
Leaving serverCmdMissionStartPhase2Ack() - return
Entering onGhostAlwaysStarted(4)
Leaving onGhostAlwaysStarted() - return
Entering GameConnection::onGhostAlwaysObjectsReceived(1556)
Leaving GameConnection::onGhostAlwaysObjectsReceived() - return
Ghost Always objects received.
Mapping string: MissionStartPhase3 to index: 10
Entering clientCmdMissionStartPhase3(1, assets/book_ch4.mis)
   Client Replication Startup has Happened!
   fxFoliageReplicator - replicated client foliage for 0 objects
   *** Phase 3: Mission Lighting
   Entering sceneLightingComplete()
     Mission lighting done
   Leaving sceneLightingComplete() - return
Leaving clientCmdMissionStartPhase3() - return
Mapping string: MissionStartPhase3Ack to index: 2
Entering serverCmdMissionStartPhase3Ack(1556, 1)
   Entering GameConnection::startMission(1556)
   Leaving GameConnection::startMission() - return
   Entering GameConnection::onClientEnterGame(1556)
     Entering GameConnection::spawnPlayer(1556)
       Entering GameConnection::createPlayer(1556, 0 0 0 1 0 0 0)
       Leaving GameConnection::createPlayer() - return
     Leaving GameConnection::spawnPlayer() - return
   Leaving GameConnection::onClientEnterGame() - return
Leaving serverCmdMissionStartPhase3Ack() - return
Mapping string: MissionStart to index: 11
Entering clientCmdMissionStart(1)
Leaving clientCmdMissionStart() - return
[MaterialList::mapMaterials] Creating missing material for texture: assets/player
Entering GameConnection::InitialControlSet(1555)
     Setting Initial Control Object
     Entering [CanvasCursorPackage]GuiCanvas::setContent(Canvas, PlayGui)
     Entering PlayGui::onWake(1554)
        Activating DirectInput...
     Leaving PlayGui::onWake() - return
     Entering [CanvasCursorPackage]GuiCanvas::checkCursor(Canvas)
        Entering hideCursor()
        Leaving hideCursor() - return
     Leaving [CanvasCursorPackage]GuiCanvas::checkCursor() - return
   Leaving [CanvasCursorPackage]GuiCanvas::setContent() - return
Leaving GameConnection::InitialControlSet() - return
Entering DoYaw(-2)
Leaving DoYaw() - return
Entering DoPitch(6)
Leaving DoPitch() - return
DirectInput deactivated.
Window focus status changed: focus: 0
Using background sleep time: 200
To turn on the trace function, add the following statement to the first line of your root main.cs file, not to be confused with the control/main.cs file:
trace(1);
To turn off the trace function, insert this statement at the place in the code where you would like to turn tracing off:
trace(0);
INITIALIZATION
The control/initialize.cs module will, in later chapters, become two different modules—one for the server code and one for the client code. Right now, we have a fairly limited amount of work to do, so we’ll just house the initialization functions for the two ends in the same module. Here is the control/initialize.cs module. Type it in, and save it as EMAGA4controlinitialize.cs.
//============================================================================
// control/initialize.cs    v0.2
//
// control initialization module for 3D3E EMAGA4 sample game
//
// Copyright (c) 2003, 2006, 2011 by Kenneth C. Finney.
//============================================================================


function InitializeServer()
//---------------------------------------------------------------------------
// Prepare some global server information & load the game-specific module
//---------------------------------------------------------------------------
{
    Echo("
------- Initializing module: emaga server -------" );

    exec( "core/scripts/server/defaults.cs" );

    // Specify where the mission files are.
    $Server::MissionFileSpec = "*/missions/*.mis";

    InitBaseServer(); // basic server features defined in the common modules

    // Load up game server support script
    Exec("./server.cs");

    createServer("SinglePlayer", "assets/book_ch4.mis");
}


function InitializeClient()
//---------------------------------------------------------------------------
// Prepare some global client information, fire up the graphics engine,
// and then connect to the server code that is already running in another
// thread.
//---------------------------------------------------------------------------
{
  Echo("
------- Initializing module: emaga client -------" );

  exec( "core/scripts/client/defaults.cs" );

  // these are necessary graphics settings
  $pref::Video::allowOpenGL  = true;
  $pref::Video::displayDevice = "D3D9";
  $pref::Video::mode = "1024 768 false 32 60 0";
  $pref::Video::windowedRes = "1024 768";
  $pref::Video::Resolution = "1024 768";
  $pref::Video::fullScreen = 0;
  $pref::Video::BitsPerPixel = "32" ;
  $pref::Video::RefreshRate = "60";

    $pref::lightManager = "Basic Lighting";
    InitBaseClient(); // basic client features defined in the common modules
  // Make sure a canvas has been built before any gui scripts are
  // executed because many of the controls depend on the canvas to
  // already exist when they are loaded.

  // Use our prefs to configure our Canvas/Window
  configureCanvas();

  Exec("./client.cs");

  %conn = new GameConnection(ServerConnection);
  %conn.connectLocal();
}
First is the InitializeServer function definition. This is where we set up a global variable that indicates to the game engine the filter that will be used to locate the mission files that are used to define Torque 3D’s maps (a term that refers to the environment described in the mission file).
Next, we prepare the server for operation by performing the core code initialization using the InitBaseServer function. This allows us to get the server code running full-bore, which we can do using the createServer call. We tell the function that this will be a single-player game and that we are going to load up the mission map assets/book_ch4.mis.
After that, we load the module that contains the game code, which is server-side code.
Then we do the client-side initialization in the InitializeClient function. This is a bit more involved. After setting up some global variables that the engine uses to prepare the graphics system for start-up, we perform the core code initialization by invoking the InitBaseClient function.
After initializing the base client, we create the canvas by calling configureCanvas, which utilizes the globals we assigned a few lines ago, and makes a call back to our CreateCanvas function that we saw in the root main.cs module earlier. The parameter we pass in is a string that specifies the name of the window that the game will be running in.
Then we load the control/client.cs module, which we’ll cover next in this chapter.
We’re getting warm now!
Next, we create a connection object using the GameConnection function. This gives us an object that we will use from now on when referring to the connection.
Now we use that connection object to connect to the server using a local connection. We don’t ever actually use the network or any network ports.
CLIENT
The control/client.cs module is chock-full of good stuff. This is another module that will need to have some of its code divested when it grows in later chapters. The main activities taking place in here are as follows:
![]() Creation of a key map with key bindings
Creation of a key map with key bindings
![]() Definition of a camera datablock for non-player views of the game world
Definition of a camera datablock for non-player views of the game world
![]() Code that enables and disables player input
Code that enables and disables player input
![]() Definition of an interface to hold the 3D view of the game world
Definition of an interface to hold the 3D view of the game world
![]() Definition of a series of functions that hook key commands to avatar motion
Definition of a series of functions that hook key commands to avatar motion
![]() A series of stub routines
A series of stub routines
Here is the control/client.cs module. Type it in, and save it as EMAGA4control client.cs.
//============================================================================
// control/client.cs
//
// This module contains client specific code for handling
// the setup and operation of the player's in-game interface.
//
// 3D3E EMAGA4 tutorial game
//
// Copyright (c) 2003, 2006, 2011 by Kenneth C. Finney.
//============================================================================

if ( IsObject( playerKeymap ) ) // If we already have a player key map,
  playerKeymap.delete();       // delete it so that we can make a new one
new ActionMap(playerKeymap);

$movementSpeed = 1;           // m/s   for use by movement functions

datablock CameraData(Observer)
{
    mode = "Observer";
};


//---------------------------------------------------------------------------
// The player sees the game via this control
//---------------------------------------------------------------------------
new GameTSCtrl(PlayerInterface) {
    profile = "GuiContentProfile";
    noCursor = "1";
};

function PlayerInterface::onWake(%this)
//---------------------------------------------------------------------------
// When PlayerInterface is activated, this function is called.
//---------------------------------------------------------------------------
{
    $enableDirectInput = "1";
    activateDirectInput();

    // restore the player's key mappings
    playerKeymap.push();
}

function PlayerInterface::onSleep(%this)
//---------------------------------------------------------------------------
// When PlayerInterface is deactivated, this function is called.
//---------------------------------------------------------------------------
{
    // remove the keymaps
    playerKeymap.pop();
}

function GameConnection::InitialControlSet(%this)
//---------------------------------------------------------------------------
// This callback is called directly from inside the Torque Engine
// during server initialization.
//---------------------------------------------------------------------------
{
  Echo ("Setting Initial Control Object");

  // The first control object has been set by the server
  // and we are now ready to go.

  Canvas.SetContent(PlayerInterface);
}

//---------------------------------------------------------------------------
// Utility function necessary to quit game in the Demo only - would not be
// used with the full version SDK.
//---------------------------------------------------------------------------
function quitGame()
{
  Canvas.setContent( UnifiedMainMenuGui );
}

//============================================================================
// Motion Functions
//============================================================================

function GoLeft(%val)
//---------------------------------------------------------------------------
// "strafing "
//---------------------------------------------------------------------------
{
    $mvLeftAction = %val;
}

function GoRight(%val)
//---------------------------------------------------------------------------
// "strafing "
//---------------------------------------------------------------------------
{
    $mvRightAction = %val;
}

function GoAhead(%val)
//---------------------------------------------------------------------------
// running forward
//---------------------------------------------------------------------------
{
    $mvForwardAction = %val;
}

function BackUp(%val)
//---------------------------------------------------------------------------
// running backwards
//---------------------------------------------------------------------------
{
    $mvBackwardAction = %val;
}

function DoYaw(%val)
//---------------------------------------------------------------------------
// looking, spinning or aiming horizontally by mouse or joystick control
//---------------------------------------------------------------------------
{
      $mvYaw += %val * ($cameraFov / 90) * 0.02;
}

function DoPitch(%val)
//---------------------------------------------------------------------------
// looking vertically by mouse or joystick control
//---------------------------------------------------------------------------
{
    $mvPitch += %val * ($cameraFov / 90) * 0.02;
}

function DoJump(%val)
//---------------------------------------------------------------------------
// momentary upward movement, with character animation
//---------------------------------------------------------------------------
{
    $mvTriggerCount2++;
}

//============================================================================
// View Functions
//============================================================================

function Toggle3rdPPOVLook( %val )
//---------------------------------------------------------------------------
// Enable the "free look" feature. As long as the mapped key is pressed,
// the player can view his avatar by moving the mouse around.
//---------------------------------------------------------------------------
{
  if ( %val )
  $mvFreeLook = true;
  else
  $mvFreeLook = false;
}

function Toggle1stPPOV(%val)
//---------------------------------------------------------------------------
// switch between 1st and 3rd person point-of-views.
//---------------------------------------------------------------------------
{
  if (%val)
  {
  ServerConnection.setFirstPerson(!ServerConnection.isFirstPerson());
  }
}

//============================================================================
// keyboard control mappings
//============================================================================
// these ones available when player is in game
playerKeymap.Bind( mouse, button0, MouseAction ); // left mouse button
playerKeymap.Bind(keyboard, w, GoAhead);
playerKeymap.Bind(keyboard, s, BackUp);
playerKeymap.Bind(keyboard, a, GoLeft);
playerKeymap.Bind(keyboard, d, GoRight);
playerKeymap.Bind(keyboard, space, DoJump );
playerKeymap.Bind(keyboard, z, Toggle3rdPPOVLook );
playerKeymap.Bind(keyboard, tab, Toggle1stPPOV );
playerKeymap.Bind(mouse, xaxis, DoYaw );
playerKeymap.Bind(mouse, yaxis, DoPitch );

// these ones are always available
GlobalActionMap.BindCmd(keyboard, escape, "", "quit();");
GlobalActionMap.Bind(keyboard, tilde, ToggleConsole);

//============================================================================
// The following functions are called from the client common code modules.
// These stubs are added here to prevent warning messages from cluttering
// up the log file.
//============================================================================
function onServerMessage()
{
}
function onMissionDownloadPhase1()
{
}
function onPhase1Progress()
{
}
function onPhase1Complete()
{
}
function onMissionDownloadPhase2()
{
}
function onPhase2Progress()
{
}
function onPhase2Complete()
{
}
function onPhase3Complete()
{
}
function onMissionDownloadComplete()
{
}
Right off the bat, a new ActionMap called playerKeymap is created. This is a structure that holds the mapping of key commands to functions that will be performed—a mechanism often called key binding, or key mapping. We create the new ActionMap with the intent to populate it later in the module.
Tip
You can call the ActionMaps you create anything you want. You need to be aware though, that when you work on your project, and you want to use the editor tools (covered in a later chapter), you will need to create an ActionMap specifically called moveMap. The editor tools scripts have some hard-coded references to moveMap in them.
Then we define the 3D control (TS, or ThreeSpace) we call PlayerInterface (because that’s what it is), which will contain our view into the 3D world. It’s not a complex definition. It basically uses a profile defined in the core code—something we’ll explore in a later chapter. If we want to use our mouse to provide view manipulation, we must set the noCursor property of the control to 1, or true.
After that, we create a camera datablock. This datablock is used by Torque for the non-player views that might be invoked during the game. One example would be the third-person, or over-the-shoulder view. When you define a player model, an eye node is created as part of the model’s node hierarchy. The location of the eye node in the model determines where the player’s-eye view is originated, which is the normal player view in a first-person perspective. However, there is another node called cam, for camera, and this node defines where the third-person view will originate from.
In addition to the third-person view, Torque 3D has another use for non-player views in the game, and that is as what’s often called the “death cam.” In the core scripts, there is code that is invoked when your player character dies. When the player dies, a death animation is initiated, and the camera view switches from the player (who can’t see obviously, because he is dead) to a view that is orbiting the dying player, primarily so that you can see the death animation. After the animation stops, the view continues to orbit the corpse (sometimes called a “husk”), while maintaining the corpse in the center of the view.
In both cases, the camera datablock is used to provide a structure for the camera to work with.
Next, we define methods for the PlayerInterface control that describe what to do when the control becomes active (“wakes up”), or inactive (“sleeps”). It’s not much, but what OnWake does is activate DirectInput in order to grab any user inputs at the keyboard or mouse and then make the playerKeymap bindings active. OnSleep simply removes the keymap. Of course, they can do whatever else you might decide you need to have done in your game at these stages.
Then we define the InitialControlSet callback method for the GameConnection object (you know, the one we created back there in control/main.cs). The engine invokes this method internally when the server has established the connection and is ready to hand control over to us. In this method, we assign our player interface control to the Canvas we created earlier in the InitializeClient function in the control/initialize.cs module.
After that, we define a whole raft of motion functions to which we will later bind keys. Notice that they employ global variables, such as $mvLeftAction. This variable and others like it, each of which starts with $mv, are seen and used internally by the engine.
Then there is a list of key bindings. Notice that there are several variations of the Bind calls. First, there are binds to our playerKeymap, which makes sense. Then there are binds to the GlobalActionMap; these bindings are available at all times when the program is running, not just when an actual game simulation is under way, which is the case with a normal action map.
Finally, there is a list of stub routines. All of these routines are called from within the core code package. We don’t need them to do anything yet, but as before, in order to minimize log file warnings, we create stub routines for the functions.
SERVER
The control/server.cs module is where game-specific server code is located. Most of the functionality that is carried in this module is found in the form of methods for the GameConnection class. Here is the control/server.cs module. Type it in, and save it as EMAGA4controlserver.cs.
//============================================================================
// control/server.cs
//
// server-side game specific module for 3D3E EMAGA4 tutorial game
// provides client connection management and player/avatar spawning
//
// Copyright (c) 2003, 2006, 2011 by Kenneth C. Finney.
//============================================================================
function OnServerCreated()
//---------------------------------------------------------------------------
// Once the engine has fired up the server, this function is called
//---------------------------------------------------------------------------
{
  $Pref::Server::MaxPlayers = 64; // The core server-code needs to know this
  Exec("./player.cs"); // Load the player datablocks and methods
}

//============================================================================
// GameConnection Methods
// Extensions to the GameConnection class. Here we add some methods
// to handle player spawning and creation.
//============================================================================

function GameConnection::OnClientEnterGame(%this)
//---------------------------------------------------------------------------
// Called when the client has been accepted into the game by the server.
//---------------------------------------------------------------------------
{
  // Create a camera object.
  %this.camera = spawnObject(Camera, Observer);
  // Create a player object.
  %this.spawnPlayer();
}

function GameConnection::SpawnPlayer(%this)
//---------------------------------------------------------------------------
// This is where we place the player spawn decision code.
// It might also call a function that would figure out the spawn
// point transforms by looking up spawn markers.
// Once we know where the player will spawn, then we create the avatar.
//---------------------------------------------------------------------------
{

  %this.createPlayer("0 0 0 1 0 0 0");
}

function GameConnection::CreatePlayer(%this, %spawnPoint)
//---------------------------------------------------------------------------
// Create the player's avatar object, set it up, and give the player control
// of it.
//---------------------------------------------------------------------------
{
  if (%this.player > 0)//The player should NOT already have an avatar object.
  {                   // If he does, that's a Bad Thing.
  Error( "Attempting to create an angus ghost!" );
  }

  // Create the player object
  %player = new Player() {
     dataBlock = MaleAvatar;    // defined in player.cs
     client = %this;            // the avatar will have a pointer to its
  };                           // owner's connection

  // Player setup...
  %player.setTransform(%spawnPoint); // where to put it

  // Give the client control of the player
  %this.player = %player;
  %this.setControlObject(%player);
}
//============================================================================
// The following functions are called from the server core code modules.
// These stubs are added here to prevent warning messages from cluttering
// up the log file.
//============================================================================
function ClearCenterPrintAll()
{
}
function ClearBottomPrintAll()
{
}
The first function, OnServerCreated, manages what happens immediately after the server is up and running. In our case we need the player-avatar datablocks and methods to be loaded up so they can be transmitted to the client.
Then we define some GameConnection methods. The first one, OnClientEnter-Game, calls the SpawnPlayer method, which then calls the CreatePlayer method using the hard-coded transform provided.
CreatePlayer then creates a new player object using the player datablock defined in control/player.cs (which we will review shortly). It then applies the transform (which we created manually earlier and received via the sole argument) to the player’s avatar and then transfers control of the net connection to the player object.
Finally, there are a couple more stub routines—and that’s the end of them for now—I promise!
The Mysterious Circumstance of Reincarnation and the Angus Ghost
One of my pet peeves regarding programmers is how, as a definable group, we are so abysmal at naming things. You will encounter my rants about specific naming issues elsewhere in this book. You might even agree with those rants, once you’ve read them.
However, every once in a while I stumble across a peculiar naming circumstance that makes me just chuckle. It’s hard to rant against something that makes you chuckle!
And the Mysterious Circumstance of Reincarnation and the Angus Ghost, besides looking like the title of a Hardy Boys mystery, is something that makes me smile.
You might have noticed in the code above, in the CreatePlayer method, when we check to see if a Player object already exists, if it is found to already exist, an error message is generated that explains that you are, “Attempting to create an angus ghost!” This error message can be traced in the script code for creating a new player all the way back to the days when Torque 3D was called “V12” before it was renamed to Torque (and then subsequently to Torque 3D after passing through a couple of other transmogrifications) due to pre-existing trademark issues.
I’d wondered for years what an angus ghost was. All I knew was that it must have been something bad. In fact, back in 2002, I’d posted a query in the Torque forums (at the time they were the “GarageGames forums”) with this question:
Angus Ghost!
What *exactly* is it?
But more importantly, why the name “Angus”? Why not, say, Holstein? or Arbuckle, or Casper, or ...
And nobody knew where the name came from. There were a few guesses, and some funny ones. Someone even posted a picture of the label of a brand of certified beef! But we weren’t any closer to a solution to the mystery.
Then in 2006, a former Dynamix employee (Dynamix was the creator of Tribes, the game whose engine is the great-great-grandfather to Torque 3D) and current GarageGames employee, Ben Vesco, who stated in a belated response to my Angus Ghost thread:
I work with Angus. He is the one who discovered the bug. They didn’t
have a name for it, so it’s named after him.
AHA!
Mystery solved, film at eleven!
PLAYER
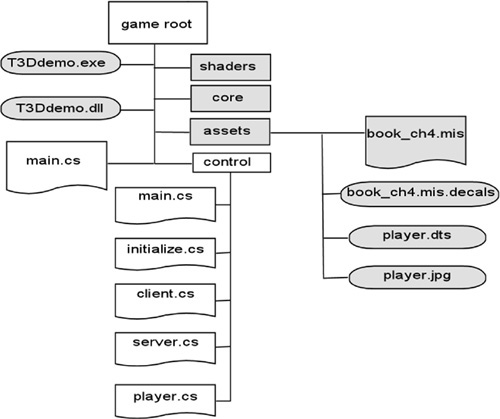
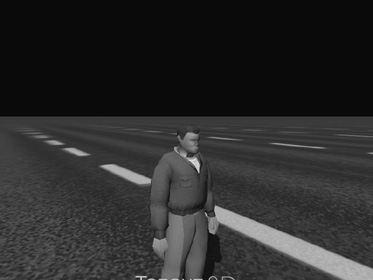
The control/player.cs module defines the player datablock and methods for use by this datablock for various things. The datablock will use the TubettiWorld standard male model, which in this case has been named player.dts. Figure 4.3 shows the standard male avatar in the EMAGA4 game world.
Figure 4.3
Player avatar in EMAGA4.
Here is the control/player.cs module. Type it in, and save it as EMAGA4control player.cs.
//-----------------------------------------------------------------------
// control/player.cs
//
// player definition module for 3D3E EMAGA4 tutorial game
//
// Copyright (c) 2003, 2006, 2011 by Kenneth C. Finney.
//-----------------------------------------------------------------------
datablock PlayerData(MaleAvatar)
{
 className = Avatar;
 shapeFile = "assets/player.dts";
 emap = true;
 renderFirstPerson = false;
 cameraMaxDist = 4;
 mass = 100;
 density = 10;
 drag = 0.1;
 maxdrag = 0.5;
 maxEnergy = 100;
 maxDamage = 100;
 maxForwardSpeed = 15;
 maxBackwardSpeed = 10;
 maxSideSpeed = 12;
 minJumpSpeed = 20;
 maxJumpSpeed = 30;
 runForce = 4000;
 jumpForce = 1000;
 boundingBox = "1 1 2";
 swimBoundingBox = "1 2 2";
 pickupRadius = 1;
};

//---------------------------------------------------------------------------
// Avatar Datablock methods
//---------------------------------------------------------------------------

//---------------------------------------------------------------------------

function Avatar::onAdd(%this,%obj)
{
}

function Avatar::onRemove(%this, %obj)
{
 if (%obj.client.player == %obj)
   %obj.client.player = 0;
}
The datablock used is the PlayerData class. It is stuffed to the gun’ls with useful things. Table 4.2 provides a summary description of each of the properties.
Table 4.2 EMAGA4 Avatar Properties
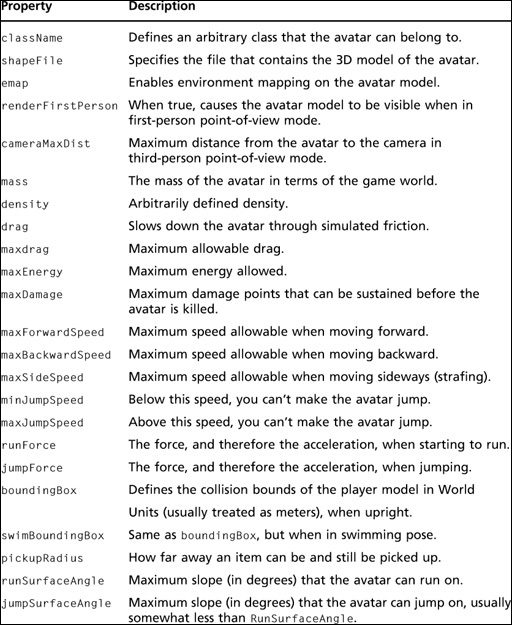
There are many more properties that we aren’t using right now, available for the avatar. We can also define our own properties for the datablock and access them through an instance object of this datablock, from anywhere in the scripts.
Last but not least, there are two methods defined for the datablock. The two basically define what happens when we add a datablock and when we remove it. We will encounter others in later chapters.
RUNNING EMAGA4
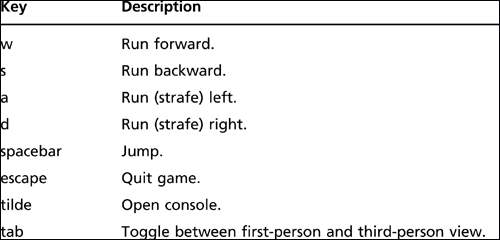
Once you’ve typed in all the modules, you should be in a good position to test EMAGA4. EMAGA4 is a fairly minimalist program. When you run EMAGA4, you will be deposited directly into the game. Once you have been deposited in the game, you have a small set of keyboard commands available to control your avatar, as shown in Table 4.3.
After you have created all of the modules and copied the assets, you can run EMAGA4 simply by clicking the Start button in Torsion. Do not run EMAGA4 directly from an explorer window. Due to the way that the Torque 3D Tools Demo was created, you will not be able to kill EMAGA4 without using the Task Manager to kill the process. So use Torsion, and when it is time to end the game, just press Alt-Tab to get back to the Torsion window, and then choose the Stop command from the Debug menu of Torsion.
Table 4.3 EMAGA4 Navigation Keys
There’s a button on the left just below “Project” that’s a folder with a black line through it. Click that button to “show all mods,” if you don’t see all your folders when you open the Torsion file in the EMAGA4 directory.
You will “spawn” into the game world above the ground and then drop down. When you hit the ground, your view will shake from the impact. If you turn your player around, using the mouse, you will see the view shown in Figure 4.4.
Figure 4.4
Looking around the EMAGA4 game world.
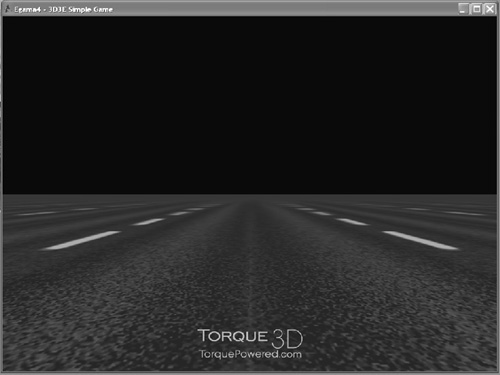
After spawning, you can run around the countryside, admire the “view,” and jump.
Note
If you are examining the output in the console, or in console.log, you might find a line saying that the file default.cs is missing—don’t worry, that file isn’t used in EMAGA4 (or any of the other example programs you will encounter). It is called from the core code base, which I will not be modifying, because I want to keep it “pristine”—exactly the same as it appears in the demo provided by Torque.
You should feel free to dive into the core code base, find the offending line that is trying to load the nonexistent file, and remove it, change it, or whatever. There are enough clues in the console log to guide you. It’s good practice!
MOVING RIGHT ALONG
You should have a fairly simple game now. I’ll be the first to admit that there is not much to do within the game, but then that wasn’t the point, really. By stripping down to a bare-bones code set, we get a clearer picture of what takes place in our script modules.
By typing in the code presented in this chapter, you should have added the following files in your EMAGA4 folder:
EMAGA4main.cs
EMAGA4controlmain.cs
EMAGA4controlclient.cs
EMAGA4controlserver.cs
EMAGA4controlinitialize.cs
EMAGA4controlplayer.cs
The program you have will serve as a fine skeleton program upon which you can build your game in the manner that you want.
By creating it, you’ve seen how the responsibilities of the client and server portions of the game are divvied out.
You’ve also learned that your player’s avatar needs to have a programmatic representation in the game that describes the characteristics of the avatar and how it does things.
In the next chapter, we will expand the game by adding game play code on both the client and the server sides.