CHAPTER 19
CREATING AND PROGRAMMING SOUND
As I mentioned in Chapter 1, audio artists compose the music and sound in a game. Good designers work with creative and inspired audio artists to create musical compositions that intensify the game experience.
It also bears repeating that audio artists work closely with the game designers, determining where the sound effects are needed and what the character of the sounds should be. They often spend quite a bit of time experimenting with sound-effect sources, looking for different ways to generate the precise sound needed. Visit an audio artist at work and you might catch him slapping rulers and dropping boxes in front of a microphone. After capturing the basic sound, an audio artist will then massage the sound with sound-editing tools, varying the pitch, speeding up the sound or slowing it down, removing unwanted noise, and so on. It’s often a tightrope walk balancing realistic sounds with the need sometimes to exaggerate certain characteristics in order to make the right point in the game context.
When creating your game, you have a choice between two basic approaches: obtain a good source of sound effects and music (like an audio library) or create your own sounds. Of course, you also have the option to combine the two approaches. Audio libraries are available from a wide variety of sources; the commercial ones are quite thorough and professionally made. Some audio libraries are available free via the Internet, but the quality of these sources varies widely in breadth, depth, and recording fidelity.
In this book we are going to take the do-it-yourself approach. The main advantage of going this way is the price; a secondary advantage is that you have total control over the contents of your sound files.
AUDACITY
There are several tools available to use for recording and editing sound effects and music. A very good open-source program—it doesn’t cost you anything to use and is made available under the GNU General Public License—is Audacity.
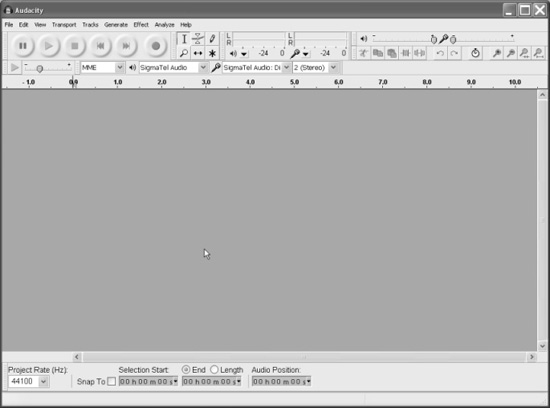
This chapter will show you how to use Audacity (see Figure 19.1) to make sounds for use in your game.
Installing Audacity
To install Audacity, do the following:
1. Browse to your DVD in the TOOLSAUDACITY folder.
2. Locate the audacity-win-1.2.4b.exe file, and double-click it to run it.
3. Click the Next button on the Welcome screen.
4. Follow the various screens, and take the default options for each one, unless you know you have a specific reason to do otherwise.
Figure 19.1
Audacity main window.
Using Audacity
You need to ensure that you’ve got your microphone set up properly—connected to the MIC or microphone input jack on your sound card. Of course, you don’t need to obtain your sounds directly from a microphone; you can record from a CD or another audio source. In any event, you need to have that source connected to the correct input and ensure that your audio mixer is set up to record from that source. You should refer to your sound card documentation if you don’t know how to do this.
The basic operation of Audacity is quite straightforward for recording, simple editing, playback, and saving your data.
Tip
If, when you launch Audacity, you don’t see all the toolbars that are shown in Figure 19.1, you can fix that up in a jiffy. Choose View, Toolbars. If, for example, you are missing the Mixer toolbar (shown as Output Displays in Figure 19.9), then make sure that the Enable Mixer Toolbar checkbox is checked, and away you go.
Also, you can move toolbars around to different positions at the top to suit your preferences, by dragging on the “handle” at the left end of any given toolbar. Just drag the toolbar to the new position and drop it there.
Recording
Let’s record some sound:
1. Launch Audacity by choosing Start, Programs, Audacity. You will get the main window, as you saw earlier, in Figure 19.1.
2. Click the Record button, as shown in Figure 19.2.
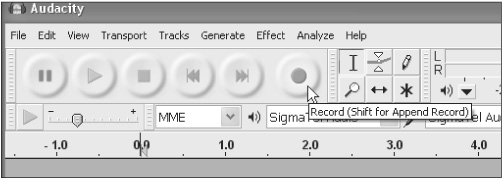
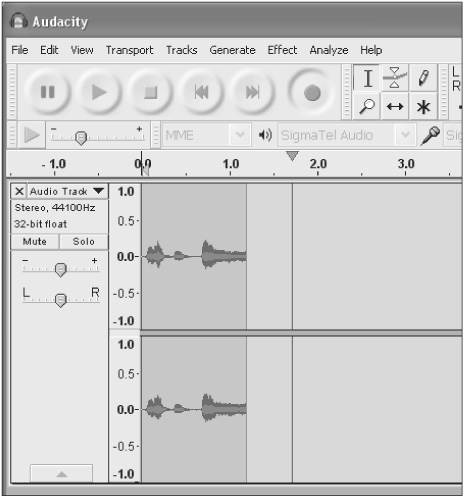
The program is now recording from the microphone. You can see the progress of the recording and the waveforms of the sounds in the window as the recording proceeds, as shown in Figure 19.3.
Figure 19.3
Recording in progress.
3. Speak into the microphone, or if you don’t want to hear your own voice, make a noise, like slapping a book down on the desk or something. You will see the sound you made appear in the waveform. Figure 19.4 shows the waveform created when I tapped a pen on the desk next to the microphone.
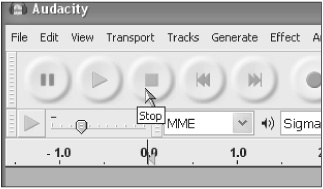
4. When you have your sound recorded, click the Stop button, as shown in Figure 19.5.
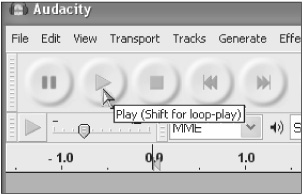
5. Now you can play back your recording, by clicking the Play button, as shown in Figure 19.6.
We’ll continue working with Audacity in a moment, but first I want to point out that if you have a waveform but don’t hear any sound, make sure that you have the volume turned up high enough on your speakers. Also be sure that it is turned up high enough—and is not muted—in your Windows Volume Control applet (in the Control Panel, and usually on the Windows System Tray on the right side of the taskbar). Finally, check the microphone level in the Mixer Control in Audacity, and ensure that it isn’t too low. How low is too low is hard to say, because Windows also has recording level controls in its own mixer application. Try to make sure everything is set roughly halfway between 0 and maximum, and you should be fine—at least to start with, anyway.
Figure 19.4
Waveform in Audacity.
Simple Editing
Now, if you’re like me you probably have a long period of dead air before the sound effect you made and another chunk afterward. That’s fine, because it’s easy to fix. So, picking up where we left off in the previous section:
6. Ensure the Selection tool is selected, and then place your cursor to one side of the portion of the waveform you want to eliminate, and drag it across to the other side. This selects an area to be worked on. See Figure 19.7.
7. Choose Edit, Remove Audio, Delete. The selected portion will be excised from the waveform.
8. Repeat the preceding two steps for the unwanted portions of the waveform on the other side of your sound effect. Eventually you will end up with something like Figure 19.8.
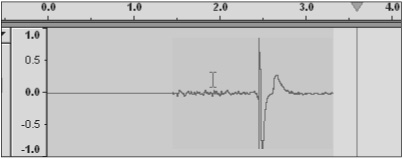
We’re not finished with our procedure yet; there’s still some exporting to do. But before we cover that, I want to mention that above the waveform panel is a series of numbers on a scale. This is the elapsed timescale. The example in Figure 19.8 shows that my final waveform is just a little more than three-quarters of a second in duration.
Figure 19.7
Selecting a portion of the waveform.

Figure 19.8
The final waveform of the sound effect.

Exporting
Now, once again picking up where we left off, you need to save the sound effect as a file before you can use it:
9. Choose File, Export....
10. In the Export File dialog, in the pop-up menu labeled “Save as type”, choose Ogg Vorbis Files.
11. Name your file, and save it somewhere convenient for the moment, such as on your desktop.
12. Browse to your desktop (or wherever you saved your file), and double-click your newly created file. Whichever program is set up to play sounds in Windows on your computer will be launched and play your sound.
There are other export options available, but we’ll stick with the OGG format because Torque 3D supports it and file sizes for a given amount of audio quality are typically much smaller than the other available formats. If you are working on a Macintosh, you may want to use AIFF instead.
Audacity Reference
This section contains some useful reference details to help you use Audacity.
The Main Screen
Figure 19.9 shows the Audacity main screen, with some of the major components labeled. This section will provide some detail on these and other useful components.
Figure 19.9
The Audacity main screen.
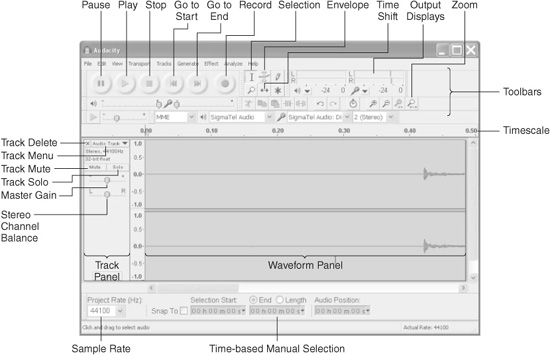
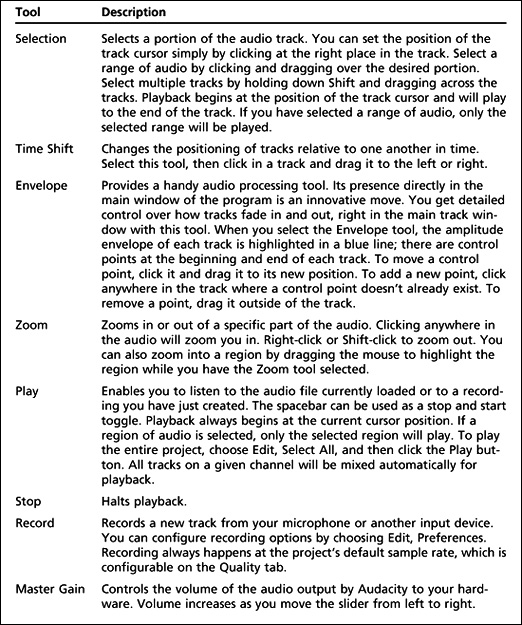
The toolbar is where you will find the tools that you will probably use more than any other tools available with Audacity. Use Figure 19.9 to locate the tools in the toolbar, and refer to Table 19.1 to review their functions. To get the output displays to show, just widen the window a little bit—about ten pixels or so.
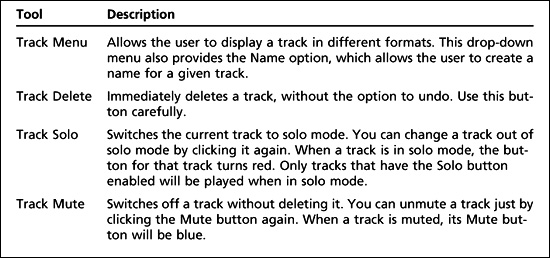
The Track Panel contains tools for managing specific tracks and groups of tracks. See Table 19.2 for details.
Audacity supports four different track types that can be viewed simultaneously when they exist in a single channel. These four track types let you view waveform, time data, MIDI information, and label information for a given audio file. (See Table 19.3.)

Note
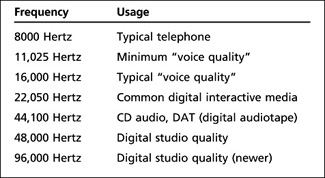
Common values for audio sample rates are shown in Table 19.4.
Menus
The Audacity menus provide access to functions for managing files, editing, adjusting views, managing Audacity projects, creating special effects, and other features. There is also a standard Help menu. We’ll take a look at the most commonly used features.
Table 19.4 Common Sample Rates
The Audacity manual in PDF form is included in the TOOLS folder on the 3D3E DVD, if you want to further explore the program.
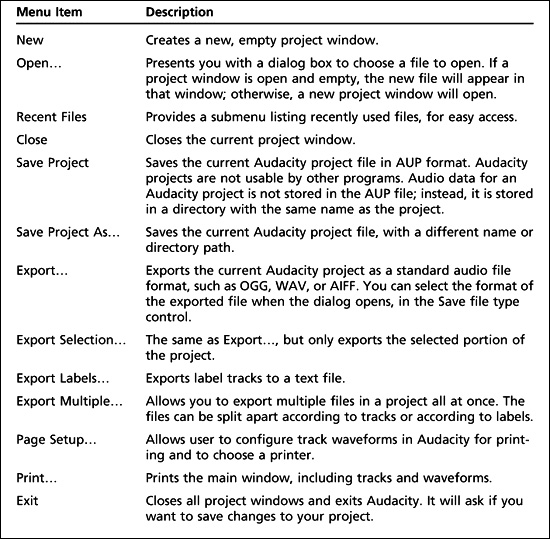
The File Menu Table 19.5 contains an itemized description of the more commonly used features of this menu. Note that menu items that have names ending with three ellipsis points (three dots) will bring up a dialog box where you can fill in some parameters.
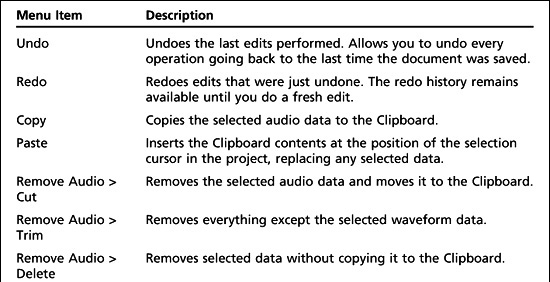
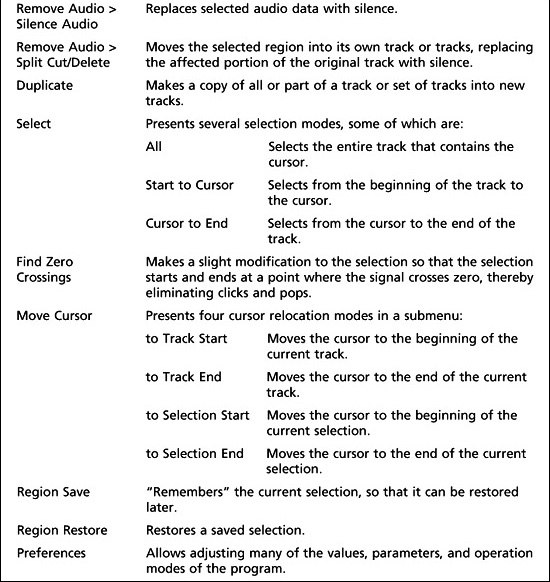
The Edit Menu Table 19.6 contains an itemized description of the more commonly used features of this menu. Parts of this menu contain the standard Cut, Copy, and Paste functions; the rest are related functions that are specific to Audacity’s capabilities.
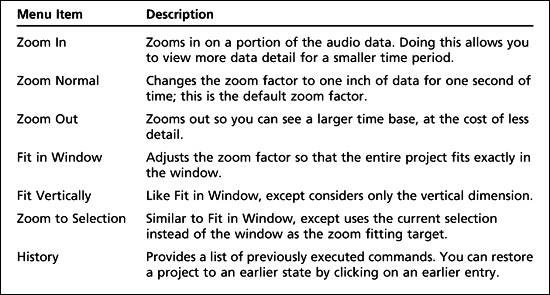
The View Menu The View menu provides functions that you can use to control what you see in the Audacity window and how you see it. Table 19.7 contains an itemized description of the more commonly used features of this menu.
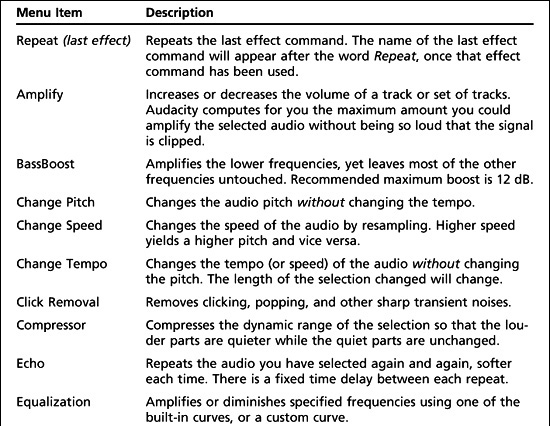
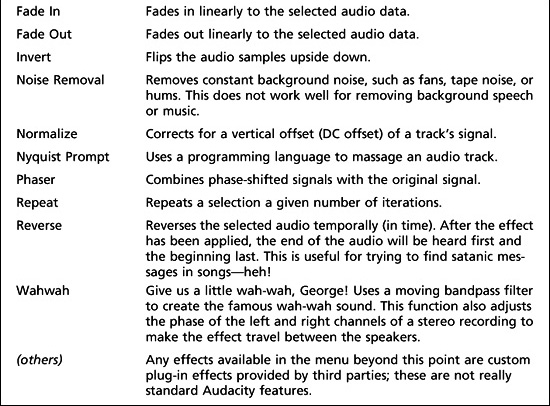
The Effect Menu Audacity includes many built-in effects and also lets you use plug-in effects. To apply an effect, simply select part or all of the tracks you want to modify, and select the effect from the menu. Table 19.8 contains an itemized description of the more commonly used features of this menu.
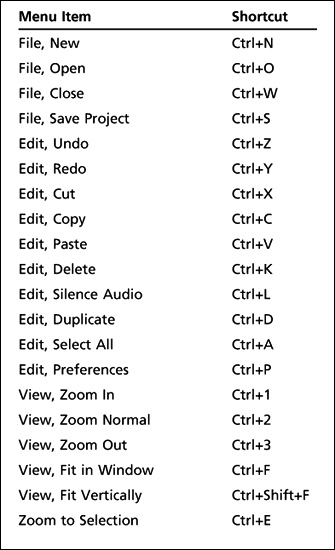
Many menu items can be invoked by the use of the standard Windows accelerator key combinations, such as Ctrl+W, to close a window. Table 19.9 lists the shortcut keys.
OPENAL
Torque, along with many other game engines, uses OpenAL—an open-source audio API (Application Programmer’s Interface)—XAudio, and DirectSound, and can support other audio formats as well, like FMOD. In this book we won’t be directly addressing programming specifically with any of the systems, but we will be using one of them. The Settings interface you will put in Chapter 20 will allow you to choose whichever available audio system you like.
AUDIO PROFILES AND DATABLOCKS
Torque uses the concept of datablocks and profiles to help define and organize resources for use in the game. We encountered this concept when building our Emaga n sample games in earlier chapters.
There are essentially two ways to make sounds occur in a Torque game. We can directly activate a sound (or music, for that matter) with program code, or we can attach sounds to in-game objects and let the Torque Engine activate and control the sounds indirectly on our behalf.
Most of the time we will use the latter—indirect—approach because once the relationship of sound-effects file to object has been defined in the right place, we don’t need to worry about it anymore. However, the first approach—direct activation—is more flexible. We’ll look at both approaches in the remainder of this chapter.
Audio Descriptions
Audio datablocks are used no matter whether we directly or indirectly activate sounds. Audio datablocks are defined using the class name SFXDescription when they are defined. Here is an example of an audio description datablock:
$AudioTestDescription = new SFXDescription(AudioTestDB)
{
  volume   = 1.0;
  isLooping= false;
  is3D     = false;
  type     = 0;
};
In this example $AudioTestDescription is the handle to this description.
The volume property indicates the default volume for this channel. This property is itself not changeable, but when the audio channel is used, the volume can be changed via script statements.
The property isLooping indicates whether to repeat the sound after it has finished playing.
The is3D property is used to tell Torque whether this channel needs to be processed to produce positional information.
The type property is essentially the channel for this sound. All sounds on a given channel can be controlled via script statements that are channel specific.
With this datablock we have defined the nature of the AudioTest sound, so to speak—its characteristics. However, there’s obviously not enough here to actually produce any sound. We need at least a sound file with a sample waveform in it, and then we need to associate that file with the appropriate SFXDescription. This is how we do it programmatically:
$Test = sfxCreateSource($AudioTestDescription,"assets/sound/test.ogg");
This statement creates an audio object. The first parameter is the datablock we saw earlier. The second parameter contains the path of the file relative to the root main folder. The return value is a handle to the actual audio object created by Torque.
Now to activate the sound, we simply call the following:
sfxPlay ($Test);
As you see, we just needed to tell sfxPlay the name of the object, and away it goes.
We can adjust the volume for this playback, but we need to do it before we play the sound. We do that this way:
$AudioTestDescription.volume = %volume;
Tip
Also, if we only need to play a sound once in a while, we don’t need to go all the way and create a source, we can directly play the file, like this:
sfxPlayOnce($AudioTestDescription,“assets/sound/testing.ogg”);
Now using sfxPlay this way is useful for sounds that have no positional information requirements, like GUI button beeps or the sound of a player’s throbbing headache. But what if we want to place the sound in the game world?
In this case, we need to first create a profile:
new SFXProfile(AudioTestSound)
{
  filename = "assets/sound/test.ogg";
  description = "AudioTestDB";
};
Notice that now the filename is contained in the profile. The second property, description, points to the datablock we defined earlier, but using its name this time, and not its handle saved in a variable. We then activate the sound as follows:
sfxPlay(AudioTestSound, 100.0, 100.0, 100.0);
Notice now that the function call refers to the profile, not the source datablock. The three parameters that follow define a location in 3D coordinates in the game world. The sound, when played, will seem to come from that location. It’s important to understand that when activating sounds in this manner, you must ensure that the sound file contains a monophonic sound and not stereo. Also, the is3D property in the datablock must be set to true.
Tip
Take note of whether you are creating the SFXDescription or SFXProfile on the client or the server.
On the client, you define it this way:
new SFXDescription(AudioTest)
{
};

   and
new SFXProfile(AudioTestProfile)
{
}

   If the code resides on the server, do it this way:
datablock SFXDescription(AudioTest)
{
};

   and
datablock SFXProfile(AudioTestProfile)
{
}
In point of fact, this rule applies for all datablock types, because the server can only define true datablocks.
Trying It Out
At this point, you should create an Emaga project for this chapter. Remember to rename the folder, the Torsion project files, and the various bits in code to reflect Chapter 19. If you need to, you can flip back to one of the earlier chapters, like the note near the beginning of Chapter 18, to freshen up on everything that needs to be changed.
Let’s try it out, using your Emaga19 sample game. Open up your root main file (main.cs), and add the following lines to the very top:
new SFXDescription(myAudioTest)
{
  volume   = 1.0;
  isLooping= false;
  is3D     = false;
  type     = 0;
};
new SFXProfile(myAudioTestProfile)
{
  filename = "assets/sound/rain.ogg";
  description = "myAudioTest";
};
function AudioTestA(%volume)
{
  echo("AudioTest volume="@%volume);
  myAudioTest.volume = %volume;
  $AudioTestHandleA = sfxCreateSource("myAudioTest", "assets/sound/rain.ogg");
  echo("AudioTest object="@$AudioTestHandleA);
  sfxPlay($AudioTestHandleA);
}
function AudioTestB(%volume)
{
  echo("AudioTest volume="@%volume);
  myAudioTest.volume = %volume;
  sfxPlay(myAudioTestProfile, 100, 100, 100);
}
This is NOT where you would normally put such code, but it’s only temporary, for a quick demonstration. Go ahead and delete it after you’ve tried it out.
Now launch your game. When you get to the main menu, where you see “Click mouse to continue”, open the console window (using the Tilde key), and type in the following:
AudioTestA(1.0);
You should hear the sound of rain falling. Play with the volume setting, trying different values less than 1.0.
Next, type this into the console window:
AudioTestB(1.0);
Here comes the rain again, but this time seeming to come from a specific direction.
Again, play with the volume setting, trying different values less than 1.0. You can also play with the 3D coordinate values in the call to sfxPlay() in the AudioTestB() function.
MOVING RIGHT ALONG
In this chapter you’ve explored a new tool—this time for dealing with sound. You’ve learned how to create and export a WAV file for use in a game and then how to insert a sound into a Torque game. You’ve also seen how you can adjust a sound using TorqueScript, as well as position a sound in the 3D game world.
In the next chapter we’ll look at sound effects in the game world in more detail.