CHAPTER 5
GAME PLAY
In Chapter 4 we created a small game, EMAGA4. Well, not really a game—more of a really simple virtual reality simulation. We created a few important modules to get the ball rolling.
In this chapter, we’ll build on that humble beginning and grow toward something with some game play challenge in it, called EMAGA5. Within the game, there will be some tasks to perform (goals) and some things to make those tasks just that much harder (dramatic tension).
To make this happen we’ll have to add a fair number of new control modules, modify some of the existing ones, and reorganize the folder tree somewhat. We’ll do that in reverse order, starting with the reorganization.
Note
I should emphasize the fact that the code and asset organization that we are following here is not the same as the one that GarageGames has created for their demos. There are similarities in intent, but some significant differences in execution. Some people might prefer to stick with the “out-of-the-box” Torque 3D scripting structure, but one of the learning outcomes here is to understand that it’s not the directory tree or the module naming that dictates how the game works—it’s the interaction between the component modules. You need to organize your material in a manner that best helps you and your team, if you have one, with respect to workflow and understanding of your own game. Not someone else’s game.
Also, working with several different organization schemes will help you understand things much more completely.
THE CHANGES
You will recall that there are two key code branches in the folder tree: core and control. As before, we won’t worry about the core branch. There were also two ancillary branches, assets and shaders. We’ll treat the shaders branch the same as the core branch—we won’t touch either of them, and both of those branches are identical to the Torque 3D versions.
Our focus is on game control, and the game assets.
Folders
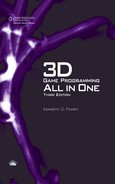
The control branch contained all of our code in the Chapter 4 version. For this chapter we’ll use a more sophisticated structure. It’s important for you to become familiar with the EMAGA5 folder structure, so study Figure 5.1 for a few minutes.
Note that anything you need for this chapter for the assets, shaders, or core branches is supplied in the RESOURCES folder for this chapter.
Figure 5.1
EMAGA5 folder structure.
Modules
You will not need to type in the root main module again, because it won’t be any different this time around. You can use the one you created for EMAGA4.
In the control branch, the first major difference is that the initialize.cs module has been split in two, with a client version and a server version. Each of the new modules is now located in its respective branch: control/server/and control/client/. They still perform the same tasks as before, but splitting the initialize functions and putting them in their permanent homes prepares us for all our later organizational needs.
There were also the two modules: control/server.cs and control/client.cs. We will now expand these and relocate them as control/server/server.cs and control/client/client.cs, respectively.
The final module from Chapter 4 is player.cs. We will be expanding it greatly and relocating it to control/server/players/player.cs.
Furthermore, we will add several new modules to handle various functional features of the game. We’ll address each file as we encounter it in the chapter.
Make sure you have copied the EMAGA5 BASE FILES folder from the RESOURCESCH5 folder up to your hard drive’s root folder before proceeding, because that will create our folder tree for us.
CONTROL MODULES
As before, the control modules are where we focus our game-specific programming energies. In the root control folder is the control main module. The rest of the code modules are divided between the client and server branches. The data branch is where our art and other data definition resources reside.
control/main.cs
Type in the following code, and save it as the control main module at EMAGA5 controlmain.cs. In order to save space, there are fewer source code comments than in the last chapter.
//----------------------------------------------------------------------
// control/main.cs
// Copyright (c) 2003, 2006, 2012 Kenneth C. Finney
//----------------------------------------------------------------------
Exec("./client/presets.cs" );
Exec("./server/presets.cs" );
package control {
function OnStart()
{
  Parent::OnStart();
  Echo("
++++++++++++ Initializing control module ++++++++++++");
  Exec("./client/initialize.cs" );
  Exec("./server/initialize.cs" );
  InitializeServer(); // Prepare the server-specific aspects
  InitializeClient(); // Prepare the client-specific aspects
}
function OnExit()
{
  Parent::onExit();
}
}; // Client package
ActivatePackage(control); // Tell Torque to make the client package active
Right off the bat, we can see some new additions. The two Exec statements at the beginning load two files that contain presets. These are script variable assignment statements. We make these assignments here to specify standard or default settings. Some of the variables in those files pertain to graphics settings; others specify input modes, and things like that.
Finally, we define and activate the control package, which has a few minor changes in its OnStart function. This is where we load the two new initialization modules and then call the initialization functions for the server and then the client.
CLIENT CONTROL MODULES
Modules that affect only the client side of the game are contained in the control/client folder tree. The client-specific activities deal with functions like the interface screens and displays, user input, and coordinating game start-up with the server side of the game.
control/client/client.cs
Many features that were in client.cs in the last chapter are now found in other modules. The key mapping and interface screen code that were located in this module, client.cs, have been given homes of their own, as you’ll see later. Type in the following code, and save it as EMAGA5controlclientclient.cs.
//============================================================================
// control/client/client.cs
// Copyright (c) 2003, 2006 by Kenneth C. Finney.
//============================================================================
function LaunchGame()
{
  createServer("SinglePlayer", "assets/maps/book_ch5.mis");
  %conn = new GameConnection(ServerConnection);
  %conn.setConnectArgs("Reader");
  %conn.connectLocal();
}
function ShowMenuScreen()
{
  // Start up the client with the menu...
  Canvas.setContent( MenuScreen );
  Canvas.setCursor("DefaultCursor");
}
function SplashScreenInputCtrl::onInputEvent(%this, %dev, %evt, %make)
{
  if(%make)
  {
    ShowMenuScreen();
  }
}
//============================================================================
// stubs
//============================================================================
function onServerMessage()
{
}
function onMissionDownloadPhase1()
{
}
function onPhase1Progress()
{
}
function onPhase1Complete()
{
}
function onMissionDownloadPhase2()
{
}
function onPhase2Progress()
{
}
function onPhase2Complete()
{
}
function onMissionDownloadPhase3()
{
}
function onPhase3Progress()
{
}
function onPhase3Complete()
{
}
function onMissionDownloadComplete()
{
}
We’ve added three new functions, the first of which is LaunchGame. The code contained should be familiar from EMAGA4. This function is executed when the user clicks the Start Game button on the front menu screen of the game. (The other options available on the front screen are Setup and Quit.)
Next is ShowMenuScreen, which is invoked when the user clicks the mouse or hits a key when viewing the splash screen. The code it invokes is also familiar from EMAGA4.
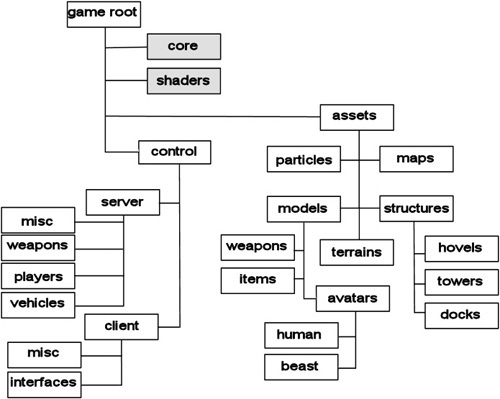
The third function, SplashScreenInputCtrl::onInputEvent, is a callback method used by a GuiInputControl (in this case the SplashScreenInputCtrl). SplashScreenInputCtrl::onInputEvent is attached to the splash screen for the narrow purpose of simply waiting for user input; when that happens, it closes the splash screen. We get the user input value in the %make parameter. Figure 5.2 shows what the splash screen looks like.
Figure 5.2
The EMAGA5 splash screen.
The rest of the functions are the by-now-famous stub routines. These are mostly client/server mission (map) loading and coordination functions. These will get more attention in later chapters. You are free to leave out the stub routines, but if you do, you will end up with a ton of warning messages in the log file.
control/client/interfaces/menuscreen.gui
All the user interface and display screens now have modules of their own, and they reside in the interfaces branch of the client tree. Note that the extension of these modules is .gui. Functionally, a .gui is the same as a .cs source module. They both can contain any kind of valid script code, and both compile to the .dso binary format. Type in the following code, and save it as EMAGA5controlclientinterfaces menuscreen.gui.
new GuiChunkedBitmapCtrl(MenuScreen) {
  profile = "GuiContentProfile";
  horizSizing = "width" ;
  vertSizing = "height" ;
  position = "0 0";
  extent = "640 480";
  minExtent = "8 8" ;
  visible = "1" ;
  helpTag = "0" ;
  bitmap = "./interfaces/emaga_background";
  useVariable = "0" ;
  tile = "0";
  new GuiButtonCtrl() {
   profile = "GuiButtonProfile"   ;
   horizSizing = "right"  ;
   vertSizing = "top";
   position = "29 300";
   extent = "110 20" ;
   minExtent = "8 8" ;
   visible = "1" ;
   command = "LaunchGame();"   ;
   helpTag = "0" ;
   text = "Start Game";
   groupNum = "-1" ;
   buttonType = "PushButton"   ;
  };
  new GuiButtonCtrl() {
   profile = "GuiButtonProfile"   ;
   horizSizing = "right"  ;
   vertSizing = "top";
   position = "29 400" ;
   extent = "110 20" ;
   minExtent = "8 8" ;
   visible = "1" ;
   command = "Quit();" ;
   helpTag = "0" ;
   text = "Quit" ;
   groupNum = "-1";
   buttonType = "PushButton";
 };
};
What we have here is a hierarchical definition of nested objects. The object that contains the others is the MenuScreen itself, defined as a GuiChunkedBitmapCtrl. Many older video cards have rather restrictive texture size limits; for some nothing larger than 512 pixels by 512 pixels can be used. The ChunkedBitmap splits large textures into sections to avoid these limitations. This is usually used for large 640 by 480 or 800 by 600 background artwork.
MenuScreen has a profile property of GuiContentProfile, which is a standard Torque profile for large controls that will contain other controls. Profiles are collections of properties that can be applied in bulk to interface (or gui) objects. Profiles are much like style sheets (which you will be familiar with if you do any HTML programming), except that they use TorqueScript syntax.
The definition of GuiContentProfile is pretty simple:
if(!IsObject(GuiContentProfile)) new GuiControlProfile (GuiContentProfile)
{
  opaque = true;
  fillColor = "255 255 255";
  category = "Core";
};
Basically, the object is opaque (no transparency allowed, even if an alpha channel exists in the object’s source bitmap image). If the bitmap object doesn’t fill the screen, then the unused screen space is filled with white (RGB = 255 255 255).
The category field is used to distinguish between core script code that typically remains unchanged between games, and non-core code. Non-core code can be thought of as your game code. Our control scripts are non-core code. It’s useful to be able to query our profiles to see if we are dealing with a profile that we created for our game, and the default core profile.
After the profile, the sizing and position information properties are set. See the sidebar titled “Profile Sizing Settings: horizSizing and vertSizing” for more information.
The extent property defines the horizontal and vertical dimensions of MenuScreen. The minExtent property specifies the smallest size that the object can have.
The visible property indicates whether the object can be seen on the screen. Using a “1” will make the object visible; a “0” will make it invisible.
The last significant property is the bitmap property. This specifies what bitmap image will be used for the background image of the object.
There are two GuiButtonCtrl objects contained in the MenuScreen. Most of the properties are the same as found in the GuiChunkedBitmapCtrl. But there are a few that are different and important.
The first is the command property. When the user clicks this button control, the function specified in the command property is executed.
The helpTag property is used to keep track of whether a user has encountered this object previously or not. Set to zero, it means that no help has been displayed for this object. If you decide to display help, then set the helpTag to a non-zero value so you can choose not to display help.
Next, the text property is where you can enter the text label that will appear on the button.
The groupNum property is used to indicate which group a button belongs to. It is used mostly with Radio buttons.
Finally, the buttonType property is how you specify the particular visual style of the button.
Figure 5.3 shows the MenuScreen in all its glory.
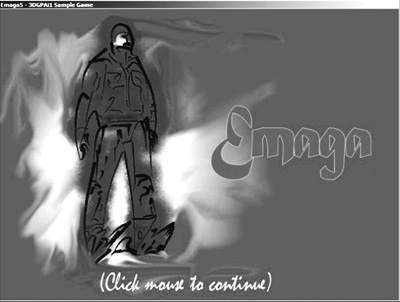
Profile Sizing Settings: horizSizing and vertSizing
These settings are used to define how to resize or reposition an object when the object’s container is resized. The outermost container is the Canvas; it will have a starting size of 640 pixels by 480 pixels. The Canvas and all the objects within it will be resized or repositioned from this initial size.
When you resize a container, all of its child objects are resized and repositioned according to their horizSizing and vertSizing properties. The resizing action will be applied in a cascading manner to all subobjects in the object hierarchy.
The following property values are available:
control/client/interfaces/playerinterface.gui
The PlayerInterface control is the interface that is used during the game to display information in real time. The Canvas is the container for PlayerInterface. Type in the following code, and save it as EMAGA5controlclientinterfacesplayer-interface.gui.
Figure 5.3
The EMAGA5 MenuScreen.
new GameTSCtrl(PlayerInterface) {
  profile = "GuiContentProfile";
  horizSizing = "right"
  vertSizing = "bottom";
  position = "0 0";
  extent = "640 480";
  minExtent = "8 8";
  visible = "1";
  helpTag = "0";
   noCursor = "1";
  new GuiCrossHairHud() {
   profile = "GuiDefaultProfile";
   horizSizing = "center";
   vertSizing = "center";
   position = "304 224";
   extent = "32 32";
   minExtent = "8 8";
   visible = "1";
   helpTag = "0";
   bitmap = "./interfaces/emaga_gunsight";
   wrap = "0";
   damageFillColor = "0.000000 1.000000 0.000000 1.000000";
   damageFrameColor = "1.000000 0.600000 0.000000 1.000000";
   damageRect = "50 4";
   damageOffset = "0 10";
  };
  new GuiHealthBarHud() {
   profile = "GuiDefaultProfile";
   horizSizing = "right";
   vertSizing = "top";
   position = "14 315";
   extent = "26 138";
   minExtent = "8 8";
   visible = "1";
   helpTag = "0";
   showFill = "1";
   displayEnergy = "0";
   showFrame = "1";
   fillColor = "0.000000 0.000000 0.000000 0.500000";
   frameColor = "0.000000 1.000000 0.000000 0.000000";
   damageFillColor = "0.800000 0.000000 0.000000 1.000000";
   pulseRate = "1000";
   pulseThreshold = "0.5";
     value = "1";
};
new GuiBitmapCtrl() {
    profile = "GuiDefaultProfile";
    horizSizing = "right";
    vertSizing = "top";
    position = "11 299";
    extent = "32 172";
    minExtent = "8 8";
    visible = "1";
    helpTag = "0";
    bitmap = "./interfaces/emaga_healthwidget";
    wrap = "0";
};
new GuiHealthBarHud() {
    profile = "GuiDefaultProfile";
    horizSizing = "right";
    vertSizing = "top";
    position = "53 315";
    extent = "26 138";
    minExtent = "8 8";
    visible = "1";
    helpTag = "0";
    showFill = "1";
    displayEnergy = "1";
    showFrame = "1";
    fillColor = "0.000000 0.000000 0.000000 0.500000";
    frameColor = "0.000000 1.000000 0.000000 0.000000";
    damageFillColor = "0.000000 0.000000 0.800000 1.000000";
    pulseRate = "1000";
    pulseThreshold = "0.5";
     value = "1";
};
new GuiBitmapCtrl() {
    profile = "GuiDefaultProfile";
    horizSizing = "right";
    vertSizing = "top";
    position = "50 299";
    extent = "32 172";
    minExtent = "8 8";
    visible = "1";
    helpTag = "0";
    bitmap = "./interfaces/emaga_healthwidget";
    wrap = "0";
};
 new GuiTextCtrl(scorelabel) {
  profile = "ScoreTextProfile";
  horizSizing = "right";
  vertSizing = "bottom";
  position = "10 3";
  extent = "50 20";
  minExtent = "8 8";
  visible = "1";
  helpTag = "0";
  text = "Score";
  maxLength = "255";
 };
 new GuiTextCtrl(Scorebox) {
  profile = "ScoreTextProfile";
  horizSizing = "right";
  vertSizing = "bottom";
  position = "50 3";
  extent = "100 20";
  minExtent = "8 8";
  visible = "1";
  helpTag = "0";
  text = "0";
  maxLength = "255";
  };
};
Note
In this game, EMAGA5, the name PlayerInterface is used for this object. In the demo scripts from GarageGames, the name used is PlayGui. The fact that we can use our own names for objects, files, and so on, is one of the learning outcomes that I want to impart.
HOWEVER, you should know that a minor flaw in the Torque 3D demo is the fact that the name PlayGui is hard-coded in a couple of places in the core script code. This means that some functionality in the game is going to be absent or wonky, because there will actually be no user interface gui called PlayGui. Rather than give up the use of the name PlayerInterface (a far superior name, if I do say so myself. And I do), I’ve dived into the core code and changed the hard-coded usage to PlayerInterface to match the control code. This violates the “rule” of not touching the script code. Well, there was a good reason to do it. So there!
If you need to make the same change yourself, you can find the offending code by doing a file search in Torsion for “PlayGui”. But being the nice guy I am, I’ll tell you where to find the uses:
![]()
PlayerInterface is the main TSControl through which the game is viewed; it also contains the HUD controls.
The object GuiCrossHairHud is the targeting crosshair. Use this to aim your weapons.
There are two GuiHealthBarHud controls, one for health and one for energy. It is essentially a vertical bar that indicates the state of health or energy of the player. Each GuiHealthBarHud is paired with a GuiBitmapCtrl, which is a bitmap that can be used to modify the appearance of the health and energy displays by overlaying on the GuiHealthBarHud.
Note
HUD is a TLA (Three-Letter Acronym) that means Heads-Up Display. The expression is adopted from the world of high-tech military aircraft. The HUD comprises information and graphics that are projected onto the canopy or a small screen at eye level in front of the pilot. This allows the pilot to continue to look outside for threats, while still having instant visual access to flight- or mission-critical information. In game graphics the term HUD is used for visual displays that appear in-game, in a fashion that mirrors the real-world application.
There are two GuiTextCtrl objects, one for holding the accumulated score (scorebox) and one to provide a simple label for the scores box (scorelabel). We will be modifying the value of the text property from within the control source code in another module.
control/client/interfaces/splashscreen.gui
The SplashScreen control displays an informational screen (you saw it in Figure 5.2) when the game is started from Windows. A mouse click or key press makes this screen go away. Type in the following code, and save it as EMAGA5controlclientinterfacessplashscreen.gui.
new GuiChunkedBitmapCtrl(SplashScreen) {
    profile = "GuiDefaultProfile";
    horizSizing = "width" ;
    vertSizing = "height" ;
    position = "0 0";
    extent = "640 480";
    minExtent = "8 8" ;
    visible = "1" ;
    helpTag = "0" ;
    bitmap = "./interfaces/emaga_splash";
    useVariable = "0" ;
    tile = "0";
    noCursor=1;
  new GuiInputCtrl(SplashScreenInputCtrl) {
    profile = "GuiInputCtrlProfile";
    position = "0 0" ;
    extent = "10 10" ;
  };
};
The only thing special about this module is the new control, GuiInputCtrl. This control is used to accept input from the user: mouse clicks, key presses, and so on. With this control defined we can then define our own handler methods for the control’s object and therefore act upon the inputs. In our case here SplashScreenInputCtrl::onInputEvent is the handler method we’ve defined; it’s contained in the client module we talked about earlier.
control/client/misc/screens.cs
The screen.cs module is where our programmed control and management activity is located. Type in the following code, and save it as EMAGA5controlclientmisc screens.cs.
//============================================================================
// control/client/misc/screens.cs
//
// Copyright (c) 2003, 2006 by Kenneth C. Finney
//============================================================================
function PlayerInterface::onWake(%this)
{
  $enableDirectInput = "1";
  activateDirectInput();
  // just update the key map here
  playerKeymap.push();
}
function PlayerInterface::onSleep(%this)
{
  playerKeymap.pop();
}
function refreshBottomTextCtrl()
{
  BottomPrintText.position = "0 0" ;
}
function refreshCenterTextCtrl()
{
  CenterPrintText.position = "0 0" ;
}
function LoadScreen::onAdd(%this)
{
  %this.qLineCount = 0;
}
function LoadScreen::onWake(%this)
{
  CloseMessagePopup();
}
function LoadScreen::onSleep(%this)
{
  // Clear the load info:
  if ( %this.qLineCount !$= "" )
  {
   for ( %line = 0; %line < %this.qLineCount; %line++ )
    %this.qLine[%line] = "";
  }
  %this.qLineCount = 0;
  LOAD_MapName.setText( "" );
  LOAD_MapDescription.setText( "" );
  LoadingProgress.setValue( 0 );
  LoadingProgressTxt.setValue( "WAITING FOR SERVER" );
}
The methods in this module are representative of the sort of methods you can use for interface controls. You will probably use OnWake and OnSleep quite a bit in your interface scripts.
OnWake methods are called when an interface object is told to display itself, either by the Canvas’s SetContent or PushDialog methods.
OnSleep methods are called whenever an interface object is removed from display via the PopDialog method or when the SetContent call specifies a different object.
When PushDialog is used the interface that is shown operates like a modal dialog control—all input events are relayed through the dialog.
There is another pair of interface display methods for other objects, called just Push and Pop. These will display the interface in a modeless manner, so that other controls or objects on the screen will still receive input events they are interested in.
PlayerInterface::onWake enables capturing mouse and keyboard inputs using DirectInput. It then makes the PlayerKeymap key bindings active using the Push method. When the PlayerInterface is removed from display, its OnSleep method removes the PlayerKeymap key bindings from consideration. You will need to ensure that you have defined global bindings for the user to employ; these will take over when the PlayerKeymap isn’t in use anymore.
RefreshBottomTextCtrl and RefreshCenterTextCtrl just reposition these output controls to their default locations on the screen, in case you have moved them somewhere else during the festivities.
There is also a method called LoadScreen::OnAdd. OnAdd methods are called when an object is added to a scene or another object. They are usually used to initialize properties of the object that might differ from the default property values.
LoadScreen::OnWake is called when we want to display the mission loading progress. It closes the message interface, if it happens to be open. The LoadScreen contents are modified elsewhere for us in the mission loading process, which is covered in Chapter 6.
When LoadScreen::OnSleep is called, it clears all of its text buffers and then outputs a message to indicate that all we need now is for the server to chime in.
control/client/misc/presetkeys.cs
Key bindings are the mapping of keyboard keys and mouse buttons to specific functions and commands. In a fully featured game we would provide the user with the ability to modify the key bindings using a graphical interface. Right now we will satisfy ourselves with creating a set of key bindings for the user, which we can keep around to be used as the initial defaults as we later expand our program.
Type in the following code, and save it as EMAGA5controlclientmiscpresetkeys.cs.
//============================================================================
// control/client/misc/presetkeys.cs
// Copyright (c) 2003, 2006 by Kenneth C. Finney
//============================================================================
if ( IsObject(PlayerKeymap) ) // If we already have a player key map,
   PlayerKeymap.delete();     // delete it so that we can make a new one
new ActionMap(PlayerKeymap);

function DoExitGame()
{
  MessageBoxYesNo( "Quit Mission", "Exit from this Mission?", "Quit();", "");
}
//============================================================================
// Motion Functions
//============================================================================
function GoLeft(%val)
{
  $mvLeftAction = %val;
}
function GoRight(%val)
{
  $mvRightAction = %val;
}
function GoAhead(%val)
{
  $mvForwardAction = %val;
}
function BackUp(%val)
{
  $mvBackwardAction = %val;
}
function DoYaw(%val)
{
  $mvYaw += %val * ($cameraFov / 90) * 0.02;
}
function DoPitch(%val)
{
  $mvPitch += %val * ($cameraFov / 90) * 0.02;
}
function DoJump(%val)
{
  $mvTriggerCount2++;
}
//============================================================================
// View Functions
//============================================================================
function Toggle3rdPPOVLook( %val )
{
  if ( %val )
    $mvFreeLook = true;
  else
    $mvFreeLook = false;
}
function MouseAction(%val)
{
    $mvTriggerCount0++;
}
$firstPerson = true;
function Toggle1stPPOV(%val)
//-----------------------------------------------------------------------
// switch between 1st and 3rd person point-of-view.
//-----------------------------------------------------------------------
{
  if (%val)
  {
  $firstPerson = !$firstPerson;
  ServerConnection.setFirstPerson($firstPerson);
  }
}function dropCameraAtPlayer(%val)
{
  if (%val)
   commandToServer('dropCameraAtPlayer' );
}
function dropPlayerAtCamera(%val)
{
  if (%val)
   commandToServer('DropPlayerAtCamera' );
}
function toggleCamera(%val)
{
  if (%val)
   commandToServer('ToggleCamera'),
}
//============================================================================
// keyboard control mappings
//============================================================================
// available when player is in game
PlayerKeymap.Bind( mouse, button0, MouseAction ); // left mouse button
PlayerKeymap.Bind(keyboard, w, GoAhead);
PlayerKeymap.Bind(keyboard, s, BackUp);
PlayerKeymap.Bind(keyboard, a, GoLeft);
PlayerKeymap.Bind(keyboard, d, GoRight);
PlayerKeymap.Bind(keyboard, space, DoJump );
PlayerKeymap.Bind(keyboard, z, Toggle3rdPPOVLook );
PlayerKeymap.Bind(keyboard, tab, Toggle1stPPOV );
PlayerKeymap.Bind(mouse, xaxis, DoYaw );
PlayerKeymap.Bind(mouse, yaxis, DoPitch );// always available
GlobalActionMap.Bind(keyboard, escape, DoExitGame);
GlobalActionMap.Bind(keyboard, tilde, ToggleConsole);
The first three statements in this module prepare the ActionMap object, which we call PlayerKeymap. This is the set of key bindings that will prevail while we are actually in the game. Because this module is used in the initial setup, we assume that there should not already be a PlayerKeymap ActionMap, so we check to see if Player Keymap is an existing object, and if it is we delete it and create a new version.
We define a function to be called when we exit the game. It throws a MessageBox YesNo dialog up on the screen, with the dialog’s title set to the contents of the first parameter string. The second parameter string sets the contents of the dialog’s prompt. The third parameter specifies the function to execute when the user clicks the Yes button. The fourth parameter indicates what action to perform if the user clicks No—in this case nothing.
There are two other canned MessageDialog objects defined in the common code base: MessageBoxOk, which has no fourth parameter, and MessageBoxOkCancel, which accepts essentially the same parameter set as MessageBoxYesNo.
Next we have a series of motion function definitions. Table 5.1 provides a description of the basic motion functions. These functions employ player event control triggers to do their dirty work. These triggers are described in detail in Chapter 6.
Of particular note in these functions is that they all have a single parameter, usually called %val. When functions are bound to keys or mouse buttons via a Bind method, the parameter is set to a nonzero value when the key or button is pressed and to 0 when the button is released. This allows us to create toggling functions, such as with Toggle1stPPOV, which will switch between first-person perspective and third-person perspective each time the bound key is pressed.
Table 5.1 Basic Movement Functions
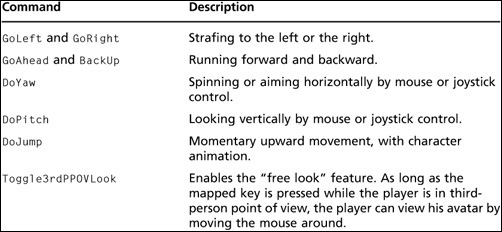
After all the function definitions, we have the actual key bindings. With the Bind method, the first parameter is the input type, the second is the key or button identifier, and the third is the name of the function to be called.
After all the PlayerKeymap bindings, there are a few for GlobalActionMap, which is a globally predefined action map that is always available but can be overridden by other action maps. In this case we use GlobalActionMap for those bindings we want to be universally available.
SERVER CONTROL MODULES
Any game play features you want to implement should probably be done as a server control module, or part of one. If you are going to make a multiplayer online game, that should probably back there will change to a must. The only way we can ensure a level playing field and game play code security is to run the code on the server, and not on the client.
control/server/server.cs
On the server side, the server module is probably the single most influential module. It carries the server control–oriented GameConnection methods for handling players and other game objects, as well as straightforward server control routines.
Type in the following code, and save it as EMAGA5controlserverserver.cs.
//============================================================================
// control/server/server.cs
// Copyright (c) 2003, 2006 by Kenneth C. Finney.
//============================================================================
function OnServerCreated()
//-----------------------------------------------------------------------
// Once the engine has fired up the server, this function is called
//-----------------------------------------------------------------------
{
  Exec("./misc/camera.cs");
  Exec("./misc/shapeBase.cs" );
  Exec("./misc/item.cs");
  Exec("./players/player.cs" );
  Exec("./players/beast.cs");
  Exec("./players/ai.cs");
  Exec("./weapons/weapon.cs" );
  Exec("./weapons/crossbow.cs");
}
function StartGame()
{
  if ($Game::Duration) // Start the game timer
     $Game::Schedule = Schedule($Game::Duration * 1000, 0, "onGameDurationEnd");
  $Game::Running = true;
  schedule(2000, 0, "CreateBots");
}
function OnMissionLoaded()
{
  StartGame();
}
function OnMissionEnded()
{
  Cancel($Game::Schedule);
  $Game::Running = false;
}
function GameConnection::OnClientEnterGame(%this)
{
   // Create a new camera object.
   %this.camera = new Camera() {
     dataBlock = Observer;
   };
   MissionCleanup.Add( %this.camera );
   %this.camera.ScopeToClient(%this);
   %this.SpawnPlayer();
}
function GameConnection::SpawnPlayer(%this)
{

   %this.CreatePlayer("0 0 201 1 0 0 0");
}
function GameConnection::CreatePlayer(%this, %spawnPoint)
{
  if (%this.player > 0)//The player should NOT already have an avatar object.
  {                   // If he does, that's a Bad Thing.
   Error( "Attempting to create an angus ghost!" );
  }
  // Create the player object
  %player = new Player() {
   dataBlock = MaleAvatarDB;   // defined in players/player.cs
   client = %this;             // the avatar will have a pointer to its
  };                          // owner's GameConnection object
  %player.SetTransform(%spawnPoint); // where to put it
  // Update the camera to start with the player
  %this.camera.SetTransform(%player.GetEyeTransform());
  %player.SetEnergyLevel(100);
  // Give the client control of the player
  %this.player = %player;
  %this.setControlObject(%player);
}
function GameConnection::OnDeath(%this, %sourceObject, %sourceClient, %damageType,
%damLoc)
{
  // Switch the client over to the death cam and unhook the player object.
  if (IsObject(%this.camera) && IsObject(%this.player))
  {
    %this.camera.SetMode("Death",%this.player);
    %this.setControlObject(%this.camera);
  }
  %this.player = 0;
  if (%damageType $= "Suicide" || %sourceClient == %this)
  {
  }
  else
  {
    // good hit
  }
}
//============================================================================
// Server commands
//============================================================================
function ServerCmdToggleCamera(%client)
{
  %co = %client.getControlObject();
  if (%co == %client.player)
  {
    %co = %client.camera;
    %co.mode = toggleCameraFly;
  }
  else
  {
    %co = %client.player;
    %co.mode = observerFly;
  }
  %client.SetControlObject(%co);
}
function ServerCmdDropPlayerAtCamera(%client)
{
  if ($Server::DevMode || IsObject(EditorGui))
  {
   %client.player.SetTransform(%client.camera.GetTransform());
   %client.player.SetVelocity("0 0 0");
   %client.SetControlObject(%client.player);
  }
}
function ServerCmdDropCameraAtPlayer(%client)
{
  %client.camera.SetTransform(%client.player.GetEyeTransform());
  %client.camera.SetVelocity("0 0 0");
  %client.SetControlObject(%client.camera);
}
function ServerCmdUse(%client,%data)
{
  %client.GetControlObject().use(%data);
}
// stubs
function ClearCenterPrintAll()
{
}
function ClearBottomPrintAll()
{
}
function onNeedRelight()
{
}
The first function in this module, OnServerCreated, is pretty straightforward. When called, it loads all the specific game play modules we need.
After that comes StartGame, which is where we put stuff that is needed every time a new game starts. In this case if we have prescribed game duration, then we start the game timer using the Schedule function.
Schedule is an extremely important function, so we’ll spend a little bit of time on it here. The usage syntax is
%event = Schedule(time, reference, command, <param1...paramN>)
The function will schedule an event that will trigger in time milliseconds and execute command with parameters. If reference is not 0, then you need to make sure that reference is set to be a valid object handle. When the reference object is deleted, the scheduled event is discarded if it hasn’t already fired. The Schedule function returns an event ID number that can be used to track the scheduled event or cancel it later before it takes place.
In the case of our game timer, there is no game duration defined, so the game is open-ended, and the Schedule call will not take place. If, for example, $Game:: Duration had been set to 1,800 (for 30 minutes times 60 seconds per minute), then the call to Schedule would have had the first parameter set to 1,800 times 1,000, or 1,800,000, which is the number of milliseconds in 30 minutes.
OnMissionLoaded is called by LoadMission once the mission is finished loading. All it really does is start up the game play, but this is an ideal location to insert code that needs to adjust its capabilities based upon whatever mission was loaded.
The next function, OnMissionEnded, is called at the conclusion of the running of a mission, usually in the DestroyServer function. Here it cancels the end-of-game event that has been scheduled; if no game duration was scheduled—as is our case at the moment—then nothing happens, quietly.
After that is the GameConnection::OnClientEnterGame method. This method is called when the client has been accepted into the game by the server—the client has not actually entered the game yet though. The server creates a new observer mode camera and adds it to the MissionCleanup group. This group is used to contain objects that will need to be removed from memory when a mission is finished. Next, it scopes the camera to the client. This process is similar to key binding, except that it “connects” a network object (in this case, through a GameConnection object, via %this) to a game object. This way Torque knows where to send network events and messages. Then we initiate the spawning of the player’s avatar into the game world.
The GameConnection::SpawnPlayer is a “glue” method, which will have more functionality in the future. Right now we use it to call the CreatePlayer method with a fixed transform to tell it where to place the newly created player-avatar. Normally this is where we would place the player spawn decision code. It might also call a function that would figure out the spawn point transforms by looking up spawn markers. Once we know where the player will spawn, then we would create the avatar by calling CreatePlayer.
GameConnection::CreatePlayer is the method that creates the player’s avatar object, sets it up, and then passes control of the avatar to the player. The first thing to watch out for is that we must ensure that the GameConnection does not already, or still, have an avatar assigned to it. If it does, then we risk creating what the GarageGames guys call an Angus Ghost. This is a ghosted object, on all the clients, that has no controlling client scoped to it. We don’t want that! Once that is sorted out, we create the new avatar, give it some energy, and pass control to the player, the same way we did previously in Chapter 4.
GameConnection::onDeath is called from a player’s Damage handler method if the player’s damage exceeds a certain amount. What we do is switch the client over to the death cam and unhook the player object. This allows the player to swivel his view in orbit around the “corpse” of his avatar until he decides to respawn. There is a code block containing the comment “good hit” where we would add code to provide points scoring and other game play functionality if we want it. We can also penalize a player for committing suicide, by either evaluating the damage type or the ID of the owner of the weapon that killed the player.
There then is a series of ServerCmd message handlers that change whether the player controls the camera or the avatar based on the message received.
ServerCmdToggleCamera alternates between attaching the player to the camera or to his avatar as the control object. Each time the function is called, it checks to see which object is the control object—camera or avatar—and then selects the other one to be the new control object.
ServerCmdDropPlayerAtCamera will move the player’s avatar to wherever the camera object is currently located and sets the player-avatar’s velocity to 0. The control object is always set to be the player’s avatar when the function exits.
ServerCmdDropCameraAtPlayer does just the opposite. It sets the camera’s transform to match the player-avatar’s and then sets the velocity to 0. The control object is always set to be the camera when the function exits.
The next function, ServerCmdUse, is an important game play message handler. We call this function whenever we want to activate or otherwise use an object that the player controls, “has mounted,” or holds in inventory. When called, this function figures out the handle of the client’s control object and then passes the data it has received to that object’s use method. The data can be anything but is often the activation mode or sometimes a quantity (like a powerup or health value). You’ll see how the back end of this works later in the item module.
Finally, there are a few stub routines. As you will recall, these functions are called from within the common code script modules. We don’t need their functionality for what we are doing here, so they are empty. They are included in order to minimize error messages in the console.
control/server/players/player.cs
This is “the biggie.” You will probably spend more time working with, tweaking, adjusting, and yes, possibly even cursing this module—or your own variations of this module—than any other.
Type in the following code, and save it as EMAGA5controlserverplayersplayer.cs.
//============================================================================
// control/server/players/player.cs
// Copyright (c) 2003, 2006 by Kenneth C. Finney.
//============================================================================
exec("~/data/models/avatars/orc/player.cs");

datablock PlayerData(MaleAvatarDB)
{
  className = MaleAvatarClass;
  shapeFile = "assets/models/avatars/male/player.dts";
  emap = true;
  renderFirstPerson = false;
  cameraMaxDist = 3;
  mass = 100;
  density = 10;
  drag = 0.1;
  maxdrag = 0.5;
  maxDamage = 100;
  maxEnergy = 100;
  maxForwardSpeed = 15;
  maxBackwardSpeed = 10;
  maxSideSpeed = 12;
  minJumpSpeed = 20;
  maxJumpSpeed = 30;
  runForce = 1000;
  jumpForce = 1000;
  runSurfaceAngle = 40;
  jumpSurfaceAngle = 30;
  maxStepHeight = 1.5;
  runEnergyDrain = 0.05;
  minRunEnergy = 1;
  jumpEnergyDrain = 20;
  minJumpEnergy = 20;
  recoverDelay = 30;
  recoverRunForceScale = 1.2;
  minImpactSpeed = 10;
  speedDamageScale = 3.0;
  repairRate = 0.03;
  maxInv[Copper] = 9999;
  maxInv[Silver] = 99;
  maxInv[Gold] = 9;
  maxInv[Crossbow] = 1;
  maxInv[CrossbowAmmo] = 20;
};
//============================================================================
// Avatar Datablock methods
//============================================================================
function OrcClass::onAdd(%this,%obj)

{
  %obj.mountVehicle = false;

  // Default dynamic Avatar stats
  %obj.setRechargeRate(0.01);
  %obj.setRepairRate(%this.repairRate);
}
function OrcClass::onRemove(%this, %obj)
{
  %client = %obj.client;
  if (%client.player == %obj)
  {
   %client.player = 0;
  }
}
function OrcClass::onCollision(%this,%obj,%col,%vec,%speed)
{
  %obj_state = %obj.getState();
  %col_className = %col.getClassName();
  %col_dblock_className = %col.getDataBlock().className;
  %colName = %col.getDataBlock().getName();
  if ( %obj_state $= "Dead")
   return;
  if (%col_className $= "Item" || %col_className $= "Weapon" )
  {
     %obj.pickup(%col);
  }
}
//============================================================================
// MaleAvatarDB (ShapeBase) class methods
//============================================================================
function MaleAvatarDB::onImpact(%this,%obj,%collidedObject,%vec,%vecLen)
{
  %obj.Damage(0, VectorAdd(%obj.getPosition(),%vec),
   %vecLen * %this.speedDamageScale, "Impact");
}
function MaleAvatarDB::Damage(%this, %obj, %sourceObject, %position, %damage,
%damageType)
{
  if (%obj.getState() $= "Dead")
    return;
  %obj.applyDamage(%damage);
  %location = "Body";
  %client = %obj.client;
  %sourceClient = %sourceObject ? %sourceObject.client : 0;
  if (%obj.getState() $= "Dead")
  {
  %client.onDeath(%sourceObject, %sourceClient, %damageType, %location);
  }
}
function MaleAvatarDB::onDamage(%this, %obj, %delta)
{
  if (%delta > 0 && %obj.getState() !$= "Dead")
  {
    // Increment the flash based on the amount.
    %flash = %obj.getDamageFlash() + ((%delta / %this.maxDamage) * 2);
    if (%flash > 0.75)
      %flash = 0.75;

    if (%flash > 0.001)
    {
     %obj.setDamageFlash(%flash);
    }
    %obj.setRechargeRate(0.01);
    %obj.setRepairRate(0.01);
  }
}
function MaleAvatarDB::onDisabled(%this,%obj,%state)
{
  %obj.clearDamageDt();
  %obj.setRechargeRate(0);
  %obj.setRepairRate(0);
  %obj.setImageTrigger(0,false);
  %obj.schedule(5000, "startFade", 5000, 0, true);
  %obj.schedule(10000, "delete" );
}
The first line of code loads and executes a “glue module” called player.cs. This module provides a mapping between animation sequence names and animation sequence files. How this works is covered later in Chapter 14 when we actually get around to creating an animated model for use with the Torque Engine. For now, the important thing to understand is that if we use animation sequence files (of the type .dsq), then we need to relate those files to the sequence names that Torque uses to trigger the animations, and also that we describe that relationship with an animation sequence glue module like the one being exec’d in this line.
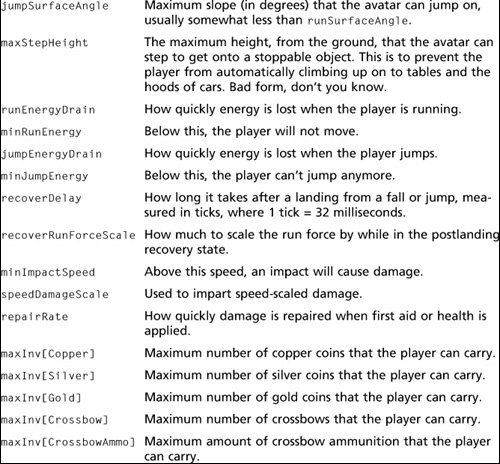
Next is a datablock definition for a datablock called MaleAvatarDB of the Player Data datablock class. Table 5.2 provides a quick reference description of the items in this datablock.
Table 5.2 EMAGA5 Avatar Properties
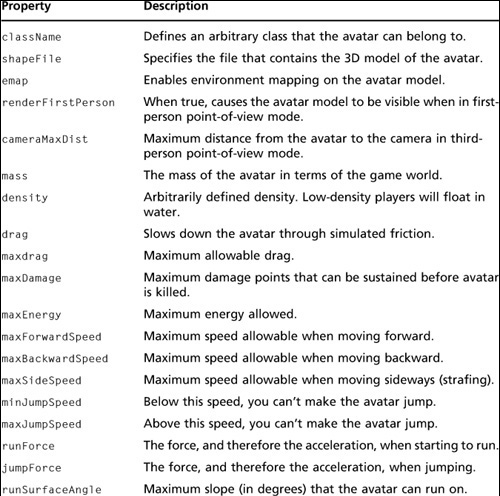
A brief word about the classname property. It’s a GameBase classname property for this datablock, which in this case is MaleAvatarClass. We use this class name to provide a place to hang various methods, which are defined later in the module.
In Chapter 3 we encountered environment mapping, which is a rendering technique that provides a method of taking the game world appearance and surroundings into account when rendering an object. You can enable environment mapping when rendering the avatar model by setting the emap property to true.
If we set the property renderFirstPerson to true, then when we are playing in first-person point-of-view mode, we will be able to see our avatar, our “body,” as we look around. With it set to false, then we won’t see it, no matter which way we look.
To control your avatar’s energy depletion, you will want to adjust the following properties: maxEnergy, runEnergyDrain, minRunEnergy, jumpEnergyDrain, and minJumpEnergy. Generally, the minimum jump energy should be set higher than the minimum run energy. Also, jump energy drain should be faster, thus a higher number, than the run energy drain value.
Caution
In the current Torque 3D demo scripts, and as a matter of policy now, this player.cs file is broken into two parts: the datablock, and the methods. The reason for this is to separate the server-only code (the methods) from the server and client code (the datablock). This allows us to ship games without the server code. I have kept it in the original form here. It works fine as is. But just be aware of the new approach in case you want to ship client-only versions of your game.
Next is a series of methods that are used when dealing with the avatar as a GameBase class.
The first, the MaleAvatarClass::onAdd, is the method called whenever a new instance of an avatar is added to the game. In this case, we initialize a few variables and then transfer the value of the datablock’s repairRate property (remember that a datablock is static and unchangeable once transferred to the client) to Player object in order to have it available for later use. The %obj parameter refers to the Player object handle.
Of course, we also need to know what to do when it’s time to remove the avatar, which is what MaleAvatarClass::onRemove does. It’s nothing spectacular—it just sets the handle properties to 0 and moves on.
One of the methods that gets the most exercise from a healthy and active avatar is the MaleAvatarClass::onCollision method. This method is called by the engine whenever it establishes that the avatar has collided with some other collision-enabled object. Five parameters are provided. The first is the handle of this datablock, the second is the handle of the player object, the third is the handle of the object that hit us (or that we hit), the fourth is the relative velocity vector between us and the object we hit, and the fifth is the scalar speed of the object we hit. Using these inputs, we can do some pretty fancy collision calculations.
What we do, though, is just find out what the state of our avatar is (alive or dead) and what kind of object we hit. If we are dead (our avatar’s body could be sliding down a hill, for example), we bail out of this method; otherwise, we try to pick up the item we hit, providing it is an item or a weapon.
The engine calls MaleAvatarDB::onImpact when our avatar hits something. Unlike onCollision, this method detects any sort of impact, not just a collision with an item in the world. Collisions occur between ShapeBase class things, like items, player-avatars, vehicles, and weapons. Impacts occur with those things, as well as terrain and interiors. So, onImpact provides essentially the same five parameters. We use that data to calculate how much damage the player should incur, and we apply that damage to the avatar’s object using its Damage method.
The MaleAvatarDB::Damage is where we try to ascertain what effect the damage will have on the avatar. If we want to implement hit boxes, or damage calculations based on object components, we would do that here. In this case if the player is dead, we again bail. If not, we apply the damage (which increases the accumulated damage value) and then obtain the object’s current state. If the object is now dead, we call the OnDeath handler and exit the function.
Next is the MaleAvatarDB::onDamage method, which is activated by the engine whenever the object’s damage value changes. This is the method we want to use when applying some sort of special effect to the player when damage occurs—like making the screen flash or using some audio. In this case we do flash the screen, and we also start a slow energy drain caused by the damage. At the same time, we start a slow damage repair, which means that after some period of time, we will have regained some of our health (negative health equals positive damage).
When the player’s damage exceeds the maxDamage value, the player object is set to the disabled state. When that happens, the function MaleAvatarDB::onDisabled is called. This is where we deal with the final stages of the death of a player’s avatar. What we are doing is resetting all the various repair values, disabling any mounted weapons, and then beginning the process of disposing of the corpse. We keep it around for a few seconds before letting it slowly fade away.
control/server/weapons/weapon.cs
This Weapon module contains namespace helper methods for Weapon and Ammo classes that define a set of methods that are part of a dynamic namespaces class. All ShapeBase class images are mounted into one of eight slots on a shape.
There are also hooks into the inventory system specifically for use with weapons and ammo. Go ahead and type in the following module, and save it as EMAGA5controlserverweaponsweapon.cs.
//============================================================================
// control/server/weapons/weapon.cs
// Copyright (c) 2003, 2006 Kenneth C. Finney2003, 2006 by Kenneth
// Portions Copyright (c) 2001 GarageGames.com
// Portions Copyright (c) 2001 by Sierra Online, Inc.
//============================================================================
$WeaponSlot = 0;
function Weapon::OnUse(%data,%obj)
{
  if (%obj.GetMountedImage($WeaponSlot) != %data.image.GetId())
  {
   %obj.mountImage(%data.image, $WeaponSlot);
   if (%obj.client)
     MessageClient(%obj.client, 'MsgWeaponUsed', 'c0Weapon selected'),
  }
}
function Weapon::OnPickup(%this, %obj, %shape, %amount)
{
 if (Parent::OnPickup(%this, %obj, %shape, %amount))
 {
   if ( (%shape.GetClassName() $= "Player" ||
        %shape.GetClassName() $= "AIPlayer"  ) &&
        %shape.GetMountedImage($WeaponSlot) == 0)
   {
     %shape.Use(%this);
   }
 }
}
function Weapon::OnInventory(%this,%obj,%amount)
{
  if (!%amount && (%slot = %obj.GetMountSlot(%this.image)) != -1)
     %obj.UnmountImage(%slot);
}
function WeaponImage::OnMount(%this,%obj,%slot)
{
  if (%obj.GetInventory(%this.ammo))
      %obj.SetImageAmmo(%slot,true);
}
function Ammo::OnPickup(%this, %obj, %shape, %amount)
{
  if (Parent::OnPickup(%this, %obj, %shape, %amount))
  {

  }
}
function Ammo::OnInventory(%this,%obj,%amount)
{
  for (%i = 0; %i < 8; %i++)
  {
    if ((%image = %obj.GetMountedImage(%i)) > 0)
      if (IsObject(%image.ammo) && %image.ammo.GetId() == %this.GetId())
         %obj.SetImageAmmo(%i,%amount != 0);
  }
}
function RadiusDamage(%sourceObject, %position, %radius, %damage, %damageType,
%impulse)
{
   InitContainerRadiusSearch(%position, %radius, $TypeMasks::ShapeBaseObjectType);

   %halfRadius = %radius / 2;
   while ((%targetObject = ContainerSearchNext()) != 0) {
   %coverage = CalcExplosionCoverage(%position, %targetObject,
      $TypeMasks::InteriorObjectType | $TypeMasks::TerrainObjectType |
      $TypeMasks::ForceFieldObjectType | $TypeMasks::VehicleObjectType);
   if (%coverage == 0)
      continue;
   %dist = ContainerSearchCurrRadiusDist();
   %distScale = (%dist < %halfRadius)? 1.0:
      1.0 - ((%dist - %halfRadius) / %halfRadius);
   %targetObject.Damage(%sourceObject, %position,
     %damage * %coverage * %distScale, %damageType);
   if (%impulse) {
     %impulseVec = VectorSub(%targetObject.GetWorldBoxCenter(), %position);
     %impulseVec = VectorNormalize(%impulseVec);
     %impulseVec = VectorScale(%impulseVec, %impulse * %distScale);
     %targetObject.ApplyImpulse(%position, %impulseVec);
   }
 }
}
The weapon management system contained in this module assumes all primary weapons are mounted into the slot specified by the $WeaponSlot variable.
The first method defined, Weapon::onUse, describes the default behavior for all weapons when used. Mount it into the object’s $WeaponSlot weapon slot, which is currently set to slot 0. A message is sent to the client indicating that the mounting action was successful. Picture this: you are carrying a holstered pistol. When the Use command is sent to the server after being initiated by some key binding, the pistol is removed from the holster, figuratively speaking, and placed in image slot 0, where it becomes visible in the player’s hand. That’s what takes place when you “use” a weapon.
The next method, Weapon::onPickup, is the weapon’s version of what happens when you collide with a weapon, and the onCollision method of the MaleAvatar decides you need to pick this weapon up. First, the parent Item method performs the actual pickup, which involves the act of including the weapon in our inventory. (The Item method is discussed later in this chapter.) After that has been handled, we get control of the process here. What we do is automatically use the weapon if the player does not already have one in hand.
When the Item inventory code detects a change in the inventory status, the Weapon::onInventory method is called in order to check if we are holding an instance of the weapon in a mount slot, in case there are none showing in inventory. When the weapon inventory has changed, make sure there are no weapons of this type mounted if there are none left in inventory.
The method WeaponImage::onMount is called when a weapon is mounted (used). We use this method to set the state according to the current inventory.
If there are any special effects we want to invoke when we pick up a weapon, we would put them in the Ammo::onPickup method. The parent Item method performs the actual pickup, and then we take a crack at it. If we had booby-trapped weapons, this would be a good place to put the code.
Generally, ammunition is treated as an item in its own right. The Ammo::onInven-tory method is called when ammo inventory levels change. Then we can update any mounted images using this ammo to reflect the new state. In the method we cycle through all the mounted weapons to examine each mounted weapon’s ammo status.
RadiusDamage is a pretty nifty function that we use to apply explosion effects to objects within a certain distance from where the explosion occurred and to impart an impulse force on each object to move it if called for.
The first statement in the function uses InitContainerRadiusSearch to prepare the container system for use. It basically indicates that the engine is going to search for all objects of the type $TypeMasks::ShapeBaseObjectType located within %radius distance from the location specified by %position. See Table A.1 in Appendix A for a list of available type masks. Once the container radius search has been set up, we then will make successive calls to ContainerSearchNext. Each call will return the handle of the objects found that match the mask we supplied. If the handle is returned as 0, then the search has finished.
So we enter a nicely sized while loop that will continue as long as Container-SearchNext returns a valid object handle (nonzero) in %targetObject. With each object found, we calculate how much of the object is affected by the explosion but only apply this calculation based on how much of the explosion is blocked by certain types of objects. If an object of one of these types has completely blocked the explosion, then the explosion coverage will be 0.
Then we use the ContainerSearchCurrRadiusDist to find the approximate radius of the affected object and subtract that value from the center-of-explosion to center-of-object distance to get the distance to the nearest surface of the object. Next, damage is applied that is proportional to this distance. If the nearest surface of the object is less than half the radius of the explosion away, then full damage is applied.
Finally, a proportional impulse force vector, if appropriate, is applied using modified distance scale. This has the effect of pushing the object away from the center of the blast.
control/server/weapons/crossbow.cs
For each weapon in our game, we need a definition module that contains the specifics for that weapon—its datablocks, methods, particle definitions (if they are going to be unique to the weapon), and other useful stuff.
There is a lot of material here, so if you want to exclude some stuff to cut back on typing, then leave out all the particle and explosion datablocks. You won’t get any cool-looking explosions or smoke trails, and you will get some error warnings in your console log file, but the weapon will still work.
The crossbow is a somewhat stylized and fantasy-based crossbow—rather medieval in flavor. It fires a burning bolt projectile that explodes like a grenade on impact. It’s cool.
Type in the following code, and save it as EMAGA5controlserverweaponscross-bow.cs.
//============================================================================
// control/server/weapons/crossbow.cs
// Copyright (c) 2003, 2006 by Kenneth C. Finney
// Portions Copyright (c) 2001 GarageGames.com
// Portions Copyright (c) 2001 by Sierra Online, Inc.
//============================================================================
datablock ParticleData(CrossbowBoltParticle)
{
  textureName      = "~/data/particles/smoke";
  dragCoefficient      = 0.0;
  gravityCoefficient   = -0.2;   // rises slowly
  inheritedVelFactor   = 0.00;
  lifetimeMS           = 500; // lasts 0.7 second
  lifetimeVarianceMS   = 150; // ... more or less
  useInvAlpha = false;
  spinRandomMin = -30.0;
  spinRandomMax = 30.0;
  colors[0]     = "0.56 0.36 0.26 1.0";
  colors[1]     = "0.56 0.36 0.26 1.0";
  colors[2]     = "0 0 0 0";
  sizes[0]      = 0.25;
  sizes[1]      = 0.5;
  sizes[2]      = 1.0;
  times[0]      = 0.0;
  times[1]      = 0.3;
  times[2]      = 1.0;
};
datablock ParticleEmitterData(CrossbowBoltEmitter)
{
  ejectionPeriodMS = 10;
  periodVarianceMS = 5;
  ejectionVelocity = 0.25;
  velocityVariance = 0.10;
  thetaMin         = 0.0;
  thetaMax         = 90.0;
  particles = CrossbowBoltParticle;
};
datablock ParticleData(CrossbowExplosionParticle)
{
  textureName       = "~/data/particles/smoke";

  dragCoefficient        = 2;
  gravityCoefficient     = 0.2;
  inheritedVelFactor     = 0.2;
  constantAcceleration   = 0.0;
  lifetimeMS             = 1000;
  lifetimeVarianceMS     = 150;
  colors[0]     = "0.56 0.36 0.26 1.0";
  colors[1]     = "0.56 0.36 0.26 0.0";
  sizes[0]      = 0.5;
  sizes[1]      = 1.0;
};
datablock ParticleEmitterData(CrossbowExplosionEmitter)
{
  ejectionPeriodMS = 7;
  periodVarianceMS = 0;
  ejectionVelocity = 2;
  velocityVariance = 1.0;
  ejectionOffset   = 0.0;
  thetaMin         = 0;
  thetaMax         = 60;
  phiReferenceVel  = 0;
  phiVariance      = 360;
  particles = "CrossbowExplosionParticle";
};
datablock ParticleData(CrossbowExplosionSmoke)
{
  textureName       = "~/data/particles/smoke";

  dragCoefficient      = 100.0;
  gravityCoefficient   = 0;
  inheritedVelFactor   = 0.25;
  constantAcceleration = -0.80;
  lifetimeMS           = 1200;
  lifetimeVarianceMS   = 300;
  useInvAlpha = true;
  spinRandomMin = -80.0;
  spinRandomMax = 80.0;

  colors[0]     = "0.56 0.36 0.26 1.0";
  colors[1]     = "0.2 0.2 0.2 1.0" ;
  colors[2]     = "0.0 0.0 0.0 0.0" ;

  sizes[0]      = 1.0;
  sizes[1]      = 1.5;
  sizes[2]      = 2.0;

  times[0]      = 0.0;
  times[1]      = 0.5;
  times[2]      = 1.0;

};
datablock ParticleEmitterData(CrossbowExplosionSmokeEmitter)
{
  ejectionPeriodMS = 10;
  periodVarianceMS = 0;
  ejectionVelocity = 4;
  velocityVariance = 0.5;
  thetaMin         = 0.0;
  thetaMax         = 180.0;
  lifetimeMS       = 250;
  particles = "CrossbowExplosionSmoke";
};
datablock ParticleData(CrossbowExplosionSparks)
{
  textureName           = "~/data/particles/spark";

  dragCoefficient      = 1;
  gravityCoefficient   = 0.0;
  inheritedVelFactor   = 0.2;
  constantAcceleration = 0.0;
  lifetimeMS           = 500;
  lifetimeVarianceMS   = 350;
  colors[0]     = "0.60 0.40 0.30 1.0" ;
  colors[1]     = "0.60 0.40 0.30 1.0" ;
  colors[2]     = "1.0 0.40 0.30 0.0";
  sizes[0]      = 0.5;
  sizes[1]      = 0.25;
  sizes[2]      = 0.25;

  times[0]      = 0.0;
  times[1]      = 0.5;
  times[2]      = 1.0;
};
datablock ParticleEmitterData(CrossbowExplosionSparkEmitter)
{
  ejectionPeriodMS = 3;
  periodVarianceMS = 0;
  ejectionVelocity = 13;
  velocityVariance = 6.75;
  ejectionOffset   = 0.0;
  thetaMin         = 0;
  thetaMax         = 180;
  phiReferenceVel  = 0;
  phiVariance      = 360;
  overrideAdvances = false;
  orientParticles  = true;
  lifetimeMS       = 100;
  particles = "CrossbowExplosionSparks";
};
datablock ExplosionData(CrossbowSubExplosion1)
{
  offset = 1.0;
  emitter[0] = CrossbowExplosionSmokeEmitter;
  emitter[1] = CrossbowExplosionSparkEmitter;
};
datablock ExplosionData(CrossbowSubExplosion2)
{
  offset = 1.0;
  emitter[0] = CrossbowExplosionSmokeEmitter;
  emitter[1] = CrossbowExplosionSparkEmitter;
};
datablock ExplosionData(CrossbowExplosion)
{
  lifeTimeMS = 1200;
  particleEmitter = CrossbowExplosionEmitter; // Volume particles
  particleDensity = 80;
  particleRadius = 1;
  emitter[0] = CrossbowExplosionSmokeEmitter;   // Point emission
  emitter[1] = CrossbowExplosionSparkEmitter;
  subExplosion[0] = CrossbowSubExplosion1; // Sub explosion objects
  subExplosion[1] = CrossbowSubExplosion2;
  shakeCamera = true;          // Camera Shaking
  camShakeFreq = "10.0 11.0 10.0";
  camShakeAmp = "1.0 1.0 1.0";
  camShakeDuration = 0.5;
  camShakeRadius = 10.0;
  lightStartRadius = 6;         // Dynamic light
  lightEndRadius = 3;
  lightStartColor = "0.5 0.5 0";
  lightEndColor = "0 0 0";
};
datablock ProjectileData(CrossbowProjectile)
{
  projectileShapeName = "~/data/models/weapons/bolt.dts";

  directDamage      = 20;
  radiusDamage      = 20;
  damageRadius      = 1.5;
  explosion         = CrossbowExplosion;
  particleEmitter   = CrossbowBoltEmitter;
  muzzleVelocity    = 100;
  velInheritFactor  = 0.3;
  armingDelay       = 0;
  lifetime          = 5000;
  fadeDelay         = 5000;
  bounceElasticity  = 0;
  bounceFriction    = 0;
  isBallistic       = true;
  gravityMod  = 0.80;
  hasLight    = true;
  lightRadius = 4.0;
  lightColor  = "0.5 0.5 0";
};
function CrossbowProjectile::OnCollision(%this,%obj,%col,%fade,%pos,%normal)
{
  if (%col.getType() & $TypeMasks::ShapeBaseObjectType)
   %col.damage(%obj,%pos,%this.directDamage,"CrossbowBolt");
RadiusDamage(%obj,%pos,%this.damageRadius,%this.radiusDamage,"CrossbowBolt",0);
}
datablock ItemData(CrossbowAmmo)
{
  category = "Ammo";
  className = "Ammo" ;
  shapeFile = "~/data/models/weapons/boltclip.dts"     ;

  mass = 1;
  elasticity = 0.2;
  friction = 0.6;

   // Dynamic properties defined by the scripts
   pickUpName = "crossbow bolts";
  maxInventory = 20;
};
datablock ItemData(Crossbow)
{
  category = "Weapon";
  className = "Weapon";
  shapeFile = "~/data/models/weapons/crossbow.dts"     ;

  mass = 1;
  elasticity = 0.2;
  friction = 0.6;
  emap = true;
  pickUpName = "a crossbow";
  image = CrossbowImage;
};
datablock ShapeBaseImageData(CrossbowImage)
{
shapeFile = "~/data/models/weapons/crossbow.dts" ;

emap = true;
mountPoint = 0;
eyeOffset = "0.1 0.4 -0.6";
correctMuzzleVector = false;
className = "WeaponImage";
item = Crossbow;
ammo = CrossbowAmmo;
projectile = CrossbowProjectile;
projectileType = Projectile;

stateName[0]                     = "Preactivate" ;
stateTransitionOnLoaded[0]       = "Activate" ;
stateTransitionOnNoAmmo[0]       = "NoAmmo" ;
stateName[1]                     = "Activate" ;
stateTransitionOnTimeout[1]      = "Ready" ;
stateTimeoutValue[1]             = 0.6;
stateSequence[1]                 = "Activate" ;
stateName[2]                     = "Ready" ;
stateTransitionOnNoAmmo[2]       = "NoAmmo" ;
stateTransitionOnTriggerDown[2]  = "Fire" ;
stateName[3]                     = "Fire" ;
stateTransitionOnTimeout[3]      = "Reload" ;
stateTimeoutValue[3]             = 0.2;
stateFire[3]                     = true;
stateRecoil[3]                   = LightRecoil;
stateAllowImageChange[3]         = false;
stateSequence[3]                 = "Fire" ;
stateScript[3]                   = "onFire" ;
stateName[4]                     = "Reload" ;
stateTransitionOnNoAmmo[4]       = "NoAmmo" ;
stateTransitionOnTimeout[4]      = "Ready" ;
stateTimeoutValue[4]             = 0.8;
stateAllowImageChange[4]         = false;
stateSequence[4]                 = "Reload" ;
stateEjectShell[4]               = true;
stateName[5]                     = "NoAmmo" ;
stateTransitionOnAmmo[5]         = "Reload" ;
stateSequence[5]                 = "NoAmmo" ;
stateTransitionOnTriggerDown[5]  = "DryFire" ;
stateName[6]                     = "DryFire" ;
stateTimeoutValue[6]             = 1.0;
stateTransitionOnTimeout[6]      = "NoAmmo" ;
};
function CrossbowImage::onFire(%this, %obj, %slot)
{
  %projectile = %this.projectile;
  %obj.decInventory(%this.ammo,1);
  %muzzleVector = %obj.getMuzzleVector(%slot);
  %objectVelocity = %obj.getVelocity();
  %muzzleVelocity = VectorAdd(
    VectorScale(%muzzleVector, %projectile.muzzleVelocity),
    VectorScale(%objectVelocity, %projectile.velInheritFactor));
  %p = new (%this.projectileType)() {
    dataBlock      = %projectile;
    initialVelocity = %muzzleVelocity;
    initialPosition = %obj.getMuzzlePoint(%slot);
    sourceObject       = %obj;
    sourceSlot     = %slot;
    client         = %obj.client;
  };
  MissionCleanup.add(%p);
  return %p;
}
We will cover the contents of the particle, explosion, and weapon datablocks in detail in later chapters when we start creating our own weapons. Therefore we will skip discussion of these elements for now and focus on the datablock’s methods.
The first method, and one of the most critical, is the CrossbowProjectile:: OnCollision method. When called, it looks first to see if the projectile has collided with the right kind of object. If so, then the projectile’s damage value is applied directly to the struck object. The method then calls the RadiusDamage function to apply damage to surrounding objects, if applicable.
When shooting the crossbow, the CrossbowImage::onFire method is used to handle the aspects of firing the weapon that cause the projectile to be created and launched. First, the projectile is removed from inventory, and then a vector is calculated based upon which way the muzzle is facing. This vector is scaled by the specified muzzle velocity of the projectile and the velocity inherited from the movement of the crossbow (which gets that velocity from the movement of the player).
Finally, a new projectile object is spawned into the game world at the location of the weapon’s muzzle—the projectile possesses all the velocity information at the time of spawning, so when added, it immediately begins coursing toward its target.
The projectile is added to the MissionCleanup group before the method exits.
control/server/misc/item.cs
This module contains the code needed to pick up and create items, as well as definitions of specific items and their methods. Type in the following code, and save it as EMAGA5controlservermiscitem.cs.
//============================================================================
// control/server/misc/item.cs
// Copyright (c) 2003, 2005 by Kenneth C. Finney.
//============================================================================
$RespawnDelay = 20000;
$LoiterDelay = 10000;
function Item::Respawn(%this)
{
  %this.StartFade(0, 0, true);
  %this.Hide(true);
  // Schedule a resurrection
  %this.Schedule($RespawnDelay, "Hide", false);
  %this.Schedule($RespawnDelay + 10, "StartFade" , 3000, 0, false);
}
function Item::SchedulePop(%this)
{
  %this.Schedule($LoiterDelay - 1000, "StartFade" , 3000, 0, true);
  %this.Schedule($LoiterDelay, "Delete");
}
function ItemData::OnThrow(%this,%user,%amount)
{
  // Remove the object from the inventory
  if (%amount $= "")
     %amount = 1;
  if (%this.maxInventory !$= "")
     if (%amount > %this.maxInventory)
      %amount = %this.maxInventory;
  if (!%amount)
     return 0;
  %user.DecInventory(%this,%amount);
  %obj = new Item() {
    datablock = %this;
    rotation = "0 0 1 " @ (GetRandom() * 360);
    count = %amount;
  };
  MissionGroup.Add(%obj);
  %obj.SchedulePop();
  return %obj;
}
function ItemData::OnPickup(%this,%obj,%user,%amount)
{
  %count = %obj.count;
  if (%count $= "")
     if (%this.maxInventory !$= "") {
      if (!(%count = %this.maxInventory))
        return;
     }
    else
      %count = 1;
  %user.IncInventory(%this,%count);
  if (%user.client)
     MessageClient(%user.client, 'MsgItemPickup', 'c0You picked up %1',
  %this.pickupName);
    if (%obj.IsStatic())
      %obj.Respawn();
     else
       %obj.Delete();

     return true;
}
function ItemData::Create(%data)

{
  %obj = new Item() {
    dataBlock = %data;
    static = true;
    rotate = true;
   };
   return %obj;
}
datablock ItemData(Copper)
{
  category = "Coins";
  // Basic Item properties
  shapeFile = "~/data/models/items/kash1.dts";
  mass = 0.7;
  friction = 0.8;
  elasticity = 0.3;
  respawnTime = 30 * 60000;
  salvageTime = 15 * 60000;
  // Dynamic properties defined by the scripts
  pickupName = "a copper coin";
  value = 1;
};
datablock ItemData(Silver)
{
  category = "Coins";
  // Basic Item properties
  shapeFile = "~/data/models/items/kash100.dts";
  mass = 0.7;
  friction = 0.8;
  elasticity = 0.3;
  respawnTime = 30 * 60000;
  salvageTime = 15 * 60000;
  // Dynamic properties defined by the scripts
  pickupName = "a silver coin";
  value = 100;
};
datablock ItemData(Gold)
{
  category = "Coins";

  // Basic Item properties
  shapeFile = "~/data/models/items/kash1000.dts";

  mass = 0.7;
  friction = 0.8;
  elasticity = 0.3;
  respawnTime = 30 * 60000;
  salvageTime = 15 * 60000;
  // Dynamic properties defined by the scripts
  pickupName = "a gold coin";
  value = 1000;
};
datablock ItemData(FirstAidKit)
{
  category = "Health";
  // Basic Item properties
  shapeFile = "~/data/models/items/healthPatch.dts";

  mass = 1;
  friction = 1;
  elasticity = 0.3;
  respawnTime = 600000;
  // Dynamic properties defined by the scripts
  repairAmount = 200;
  maxInventory = 0; // No pickup or throw
};
function FirstAidKit::onCollision(%this,%obj,%col)
{
   if (%col.getDamageLevel() != 0 && %col.getState() !$= "Dead" )
   {
   %col.applyRepair(%this.repairAmount);
   %obj.respawn();
   if (%col.client)
   {
     messageClient
       (%col.client,'MSG_Treatment','c2Medical treatment applied'),
   }
 }
}
$RespawnDelay and $LoiterDelay are variables used to manage how long it takes to regenerate static items or how long they take to disappear when dropped.
After an item has been picked, if it is a static item, a new copy of that item will eventually be added to the game world using the Item::Respawn method. The first statement in this method fades the object away, smoothly and quickly. Then the object is hidden, just to be sure. Finally, we schedule a time in the future to bring the object back into existence—the first event removes the object from hiding, and the second event fades the object in smoothly and slowly over a period of three seconds.
If we drop an item, we may want to have it removed from the game world to avoid object clutter (and concomitant bandwidth loss). We can use the Item:: SchedulePop method to make the dropped object remove itself from the world after a brief period of loitering. The first event scheduled is the start of a fade-out action, and after one second the object is deleted.
We can get rid of held items by throwing them using the ItemData::OnThrow method. It removes the object from inventory, decrements the inventory count, creates a new instance of the object for inclusion in the game world, and adds it. It then calls the SchedulePop method just described to look after removing the object from the game world.
The ItemData::OnPickup method is the one used by all items. It adds the item to the inventory and then sends a message to the client to indicate that the object has been picked up. If the object picked was a static one, it then schedules an event to add a replacement item into the world. If not, then the instance picked is deleted, and we see it no more.
The ItemData::Create method is the catchall object-creation method for items. It creates a new datablock based upon the passed parameter and sets the static and rotate properties to true before returning.
Next comes a collection of datablocks defining our coin and first-aid items. We will cover first-aid items in more detail later, in Chapter 16.
The last method of interest is FirstAidKit::onCollision. This method will restore some health, by applying a repair value to colliding objects if it needs it. Once the treatment has been applied, a message is sent to the client for display.
RUNNING EMAGA5
Once you’ve typed in all the modules, you should be in a good position to test EMAGA5. Table 5.3 shows the game action bindings that apply to in-game navigation.
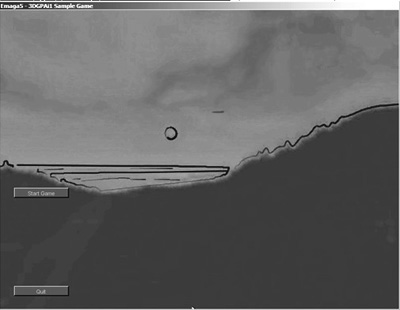
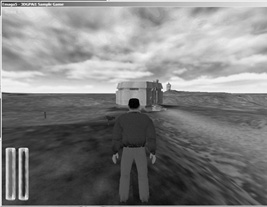
Figure 5.4 shows your player-avatar shortly after spawning in EMAGA5.
To test the game, travel around the world collecting gold, silver, and copper coins, and watch the total increase. You will have to watch out, though. The AI beasts will track you and then shoot you if they spot you. Like the saying goes, you can run, but you’ll only die tired! You can grab a crossbow and shoot back. In some of the huts you will find first-aid kits that will patch you up. One more thing—don’t fall off cliffs. Not healthy.
Table 5.3 EMAGA5 Game Action Bindings
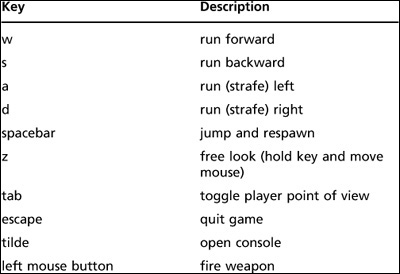
Figure 5.4
The avatar in EMAGA5.
As an exercise, investigate how you would enable a game timer to limit how much time you have to gather up the coins. Also, display a message if your score exceeds a certain value.
Have fun!
MOVING RIGHT ALONG
So, in this chapter you were exposed to more game-structuring shenanigans—though nothing too serious. It’s always a good idea to keep your software organized in ways that make sense according to the current state of the project. It just makes it that much easier to keep track of what goes where and why.
You also learned that hard-coding values can cause difficult-to-trace problems. Whenever possible, use variable values.
Then we looked at how we can add more features: splash screens, interfaces, and so on. You should be able to extrapolate from the small amount of game play stuff we added, like crossbows and pickable items, that the world really can be your oyster. What your game will do is limited only by your imagination.
In the next chapter we’ll poke a little deeper under the hood at one of the more hidden, yet very powerful capabilities that any decent game will need—messaging.
We’ll also add more enhancements to our game to allow us to connect to a master server.