
In This Chapter
In the previous chapter, we discussed all the lofty goals of the ASP.NET MVC framework. In this chapter, we completely ignore them. In this chapter, we build a simple database-driven ASP.NET MVC application in the easiest way possible. We ignore design principles and patterns. We don’t create a single unit test. The goal is to clarify the basic mechanics of building an ASP.NET MVC application.
Over the course of this chapter, we build a simple Toy Store application. Our Toy Store application enables us to display a list of toys and create new toys. In other words, it illustrates how to build a web application that performs basic database operations.
Let’s start by creating a new ASP.NET MVC application and removing all the sample files. Follow these steps to create a new ASP.NET MVC Web Application project:
- Launch Visual Studio 2008.
- Select the menu option File, New Project.
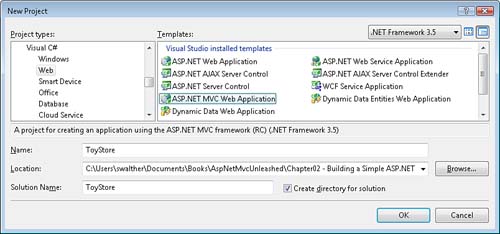
- In the New Project dialog, select your preferred programming language and select the ASP.NET MVC Web Application template (see Figure 2.1).
- Name your new project
ToyStoreand click the OK button.
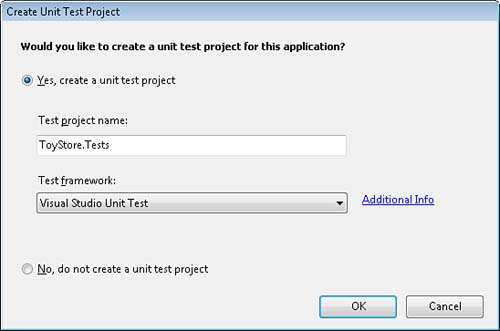
When you create a new ASP.NET MVC project, the Create Unit Test Project dialog appears automatically (see Figure 2.2). When asked whether you want to create a unit test project, select the option Yes, Create a Unit Test Project. (In general, you should always select this option because it is a pain to add a new unit test project to your solution after your ASP.NET MVC project is already created).
Note
The Create Unit Test Project dialog won’t appear when you create an ASP.NET MVC application in Microsoft Visual Web Developer. Visual Web Developer does not support Test projects.
As we discussed in the previous chapter, when you create a new ASP.NET MVC application, you get several sample files by default. These files get in our way as we build a new application. Delete the following files from your ASP.NET MVC project:
(C#)
ControllersHomeController.cs
ViewsHomeAbout.aspx
ViewsHomeIndex.aspx
(VB)
ControllersHomeController.vb
ViewsHomeAbout.aspx
ViewsHomeIndex.aspx
Delete the following file from your Test project:
(C#)
ControllersHomeControllerTest.cs
(VB)
ControllersHomeControllerTest.vb
We need to create a database and database table to contain our list of toys for our toy store. The ASP.NET MVC framework is compatible with any modern database including Oracle 11g, MySQL, and Microsoft SQL Server.
In this book, we use Microsoft SQL Server Express for our database. Microsoft SQL Server Express is the free version of Microsoft SQL Server. It includes all the basic functionality of the full version of Microsoft SQL Server. (It uses the same database engine.)
Note
You can install Microsoft SQL Server Express when you install Visual Studio or Visual Web Developer. (It is an installation option.) You also can download Microsoft SQL Server Express by using the Web Platform Installer that you can download from the following website: www.asp.net/downloads/.
Follow these steps to create a new database from within Visual Studio:
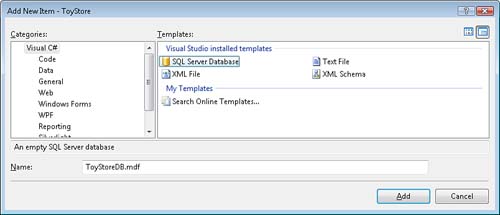
- Right-click the App_Data folder in the Solution Explorer window and select the menu option Add, New Item.
- In the Add New Item dialog, select the SQL Server Database template (see Figure 2.3).
- Give the new database the name
ToyStoreDB. - Click the Add button.
After you create the database, you need to create the database table that will contain the list of toys. Follow these steps to create the Products database table:
- Double-click the ToyStoreDB.mdf file in the App_Data folder to open the Server Explorer window and connect to the ToyStoreDB database.
- Right-click the Tables folder and select the menu option Add New Table.
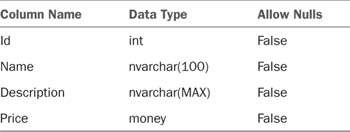
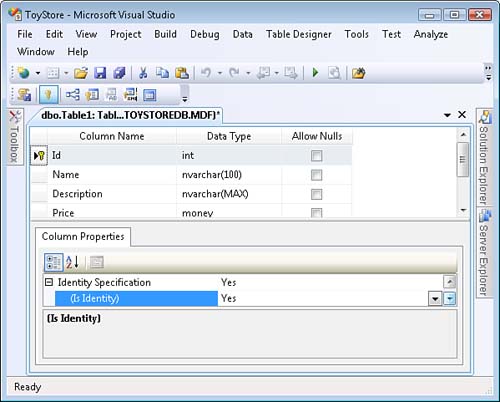
- Enter the columns listed in Table 2.1 into the Table Designer (see Figure 2.4).
- Set the Id column as an Identity column by expanding the Identity Specification node under Column Properties and setting the (Is Identity) property to the value Yes.
- Set the Id column as the primary key column by selecting this column in the Table Designer and clicking the Set Primary Key button (the button with an icon of a key).
- Save the new table by clicking the Save button (the button with the anachronistic icon of a floppy disk).
- In the Choose Name dialog, enter the table name
Productsand click OK.
After you finish creating the Products database table, you should add some database records to the table. Right-click the Products table in the Server Explorer window and select the menu option Show Table Data. Enter two or three products—you can enter anything you want (see Figure 2.5).

We need to create model classes to represent our database tables in our ASP.NET MVC application. The easiest way to create the data model classes is to use an Object Relational Mapping (ORM) tool to generate the classes from a database automatically.
You can use your favorite ORM with the ASP.NET MVC framework. The ASP.NET MVC framework is not tied to any particular ORM. For example, ASP.NET MVC is compatible with Microsoft LINQ to SQL, NHibernate, and the Microsoft Entity Framework.
In this book, we use the Microsoft Entity Framework to generate our data model classes. We focus on the Microsoft Entity Framework because the Microsoft Entity Framework is Microsoft’s recommended data access solution.
Follow these steps to generate the data model classes:
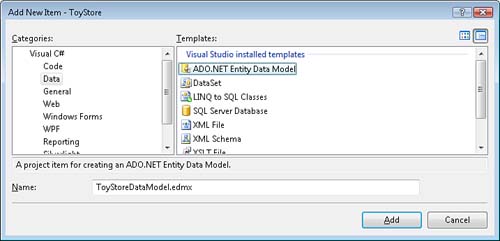
- Right-click the Models folder in the Solution Explorer window and select the menu option Add, New Item.
- Select the Data category and the ADO.NET Entity Data Model template (see Figure 2.6).
- Name the data model
ToyStoreDataModel.edmxand click the Add button.
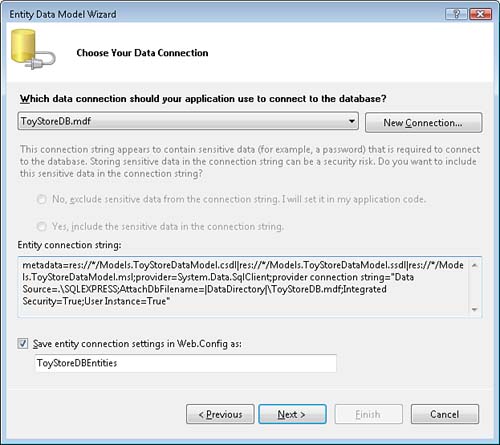
After you complete these steps, the Entity Model Data Wizard launches. Complete these wizard steps:
- In the Choose Model Contents step, select the Generate From database option.
- In the Choose Your Data Connection step, select the ToyStoreDB.mdf data connection and name the entity connection
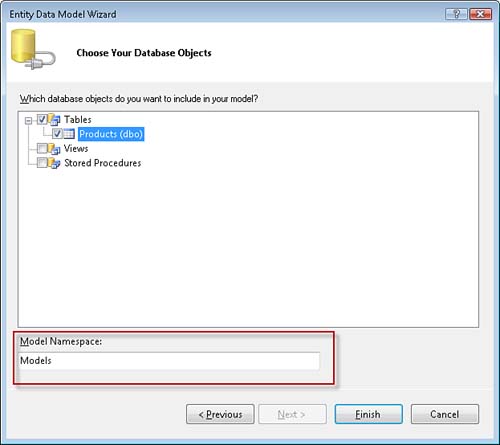
ToyStoreDBEntities(see Figure 2.7). - In the Choose Your Database Objects step, select the Products database table and enter
Modelsfor the namespace (see Figure 2.8). - Click the Finish button to complete the wizard.
After you complete the Entity Data Model Wizard, the Entity Designer appears with a single entity named Products (see Figure 2.9). The Entity Framework has generated a class named Products that represents your Products database table.
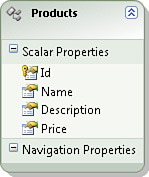
Most likely, you want to rename the classes generated by the Entity Framework. The Entity Framework simply names its entities with the same names as the database tables. Because the Products class represents a particular product, you want to change the name of the class to Product (singular instead of plural).
Right-click the Products entity in the Entity Designer and select the menu option Rename. Provide the new name Product.
At this point, we have successfully created our data model classes. We can use these classes to represent our ToyStoreDB database within our ASP.NET MVC application.
The controllers in an ASP.NET MVC application control the flow of application execution. The controller that is invoked by default is named the Home controller. We need to create the Home controller by following these steps:
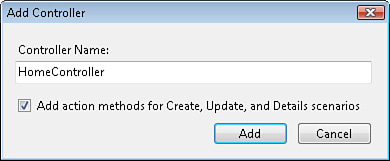
- Right-click the Controllers folder and select the menu option Add Controller.
- In the Add Controller dialog, enter the controller name
HomeControllerand select the option labeled Add Action Methods for Create, Update, and Details scenarios (see Figure 2.10). - Click the Add button to create the new controller.
The Home controller is contained in Listing 2.1.
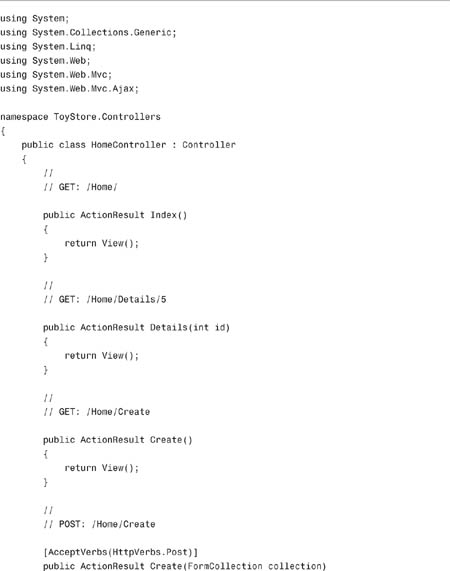

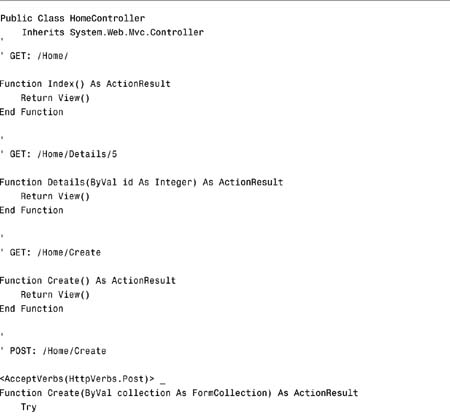
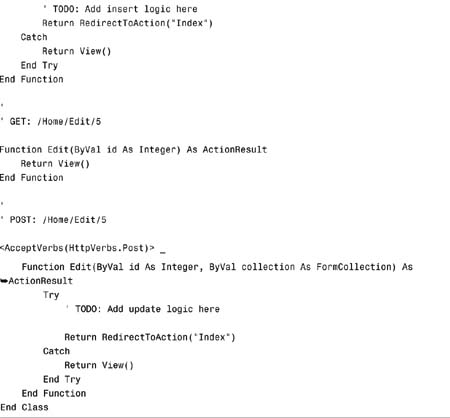
Because we selected the option to generate Create, Update, and Details methods when creating the Home controller, the Home controller in Listing 2.1 includes these actions. In particular, the Home controller exposes the following actions:
• Index()—This is the default action of the controller. Typically, this action displays a list of items.
• Details(id)—This action displays details for a particular item.
• Create()—This action displays a form for creating a new item.
• Create(collection)—This action inserts the new item into the database.
• Edit(id)—This action displays a form for editing an existing item.
• Edit(id, collection)—This action update the existing item in the database.
Currently, the Home controller contains only stubs for these actions. Let’s go ahead and take advantage of the data model classes that we created with the Entity Framework to implement the Index() and Create() actions. The updated Home controller is contained in Listing 2.2.
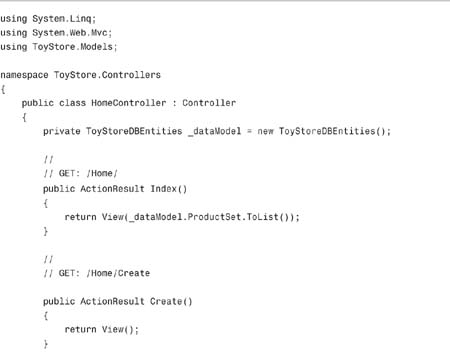
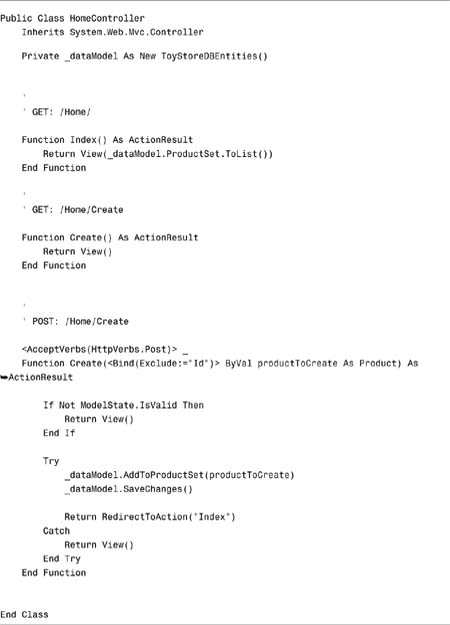
Notice that a private field named _dataModel of type DBStoreEntities is defined at the top of the controller in Listing 2.2. The DBStoreEntities class was one of the classes that was generated by the Entity Model Data Wizard. We use this class to communicate with the database.
The Index() action has been modified to return a list of products. The expression _dataModel.ProductSet.ToList() returns a list of products from the Products database table.
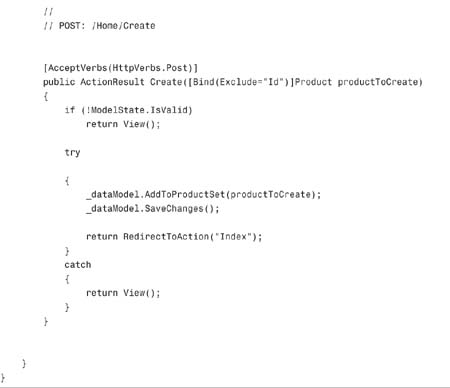
There are two Create() actions. The first Create() action displays the form for creating a new product. The form is submitted to the second Create() action that actually performs the database insert of the new product.
Notice that the second Create() action has been modified to accept a Product parameter. The Product class also was generated by the Entity Model Data Wizard. The Product class has properties that correspond to each column in the underlying Products database table.
Finally, the Create() action calls the following methods to add the new product to the database:
(C#)
![]()
(VB)
![]()
Our Home controller now contains all the necessary database logic. We can use the controller to return a set of products, and we can use the controller to create a new product.
Notice that both the Index() action and the first Create() action return a view. The next and final step is to create these views.
An MVC view contains all the HTML markup and view logic required to generate an HTML page. The set of views exposed by an ASP.NET MVC application is the public face of the application.
Our simple application needs two views: the Index view and the Create view. We use the Index view to displays the list of products and the Create view to display a form for creating new products.
Let’s start by creating the Index view. Follow these steps:
- Build your application by selecting the menu option Build, Build Solution.
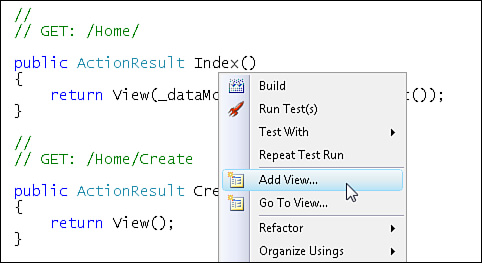
- Right-click the
Index()action in the Code Editor window and select the menu option Add View (see Figure 2.11). - In the Add View dialog, select the option Create a Strongly Typed View.
- In the Add View dialog, from the drop-down list labeled View Data Class, select the ToyStore.Models.Product class.
- In the Add View dialog, from the drop-down list labeled View Content, select List.
- Click the Add button to add the new view to your project (see Figure 2.12).

Note
You need to build your ASP.NET MVC application before adding a view with the Add View dialog to build the classes displayed by the View Data Class drop-down list. If your application has build errors, this list will be blank.
Views are added to the Views folder. Views follow a particular naming convention. A view returned by the Index() action exposed by the Home controller class is located at the following path:
ViewsHomeIndex.aspx
In general, views adhere to the following naming convention:
ViewsController NameAction Name.aspx
The contents of the Index view are contained in Listing 2.3. This view loops through all the products and displays the products in an HTML table (see Figure 2.13).
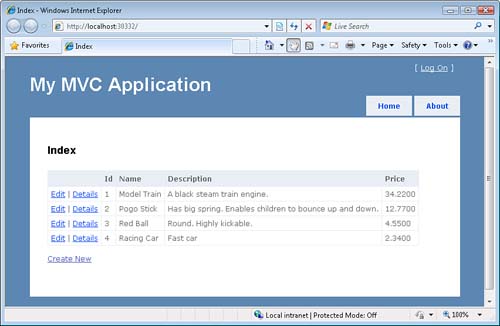
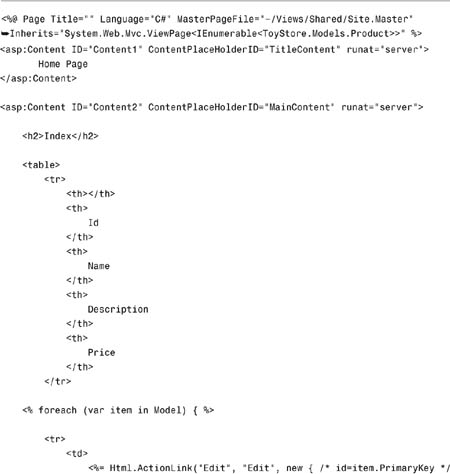
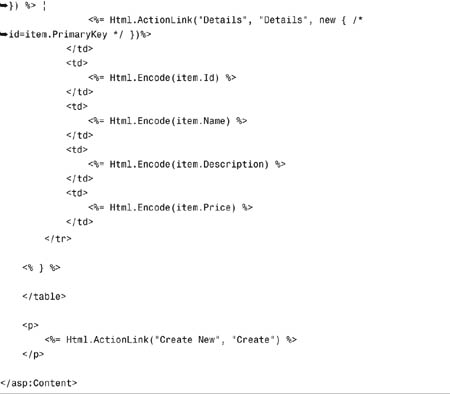
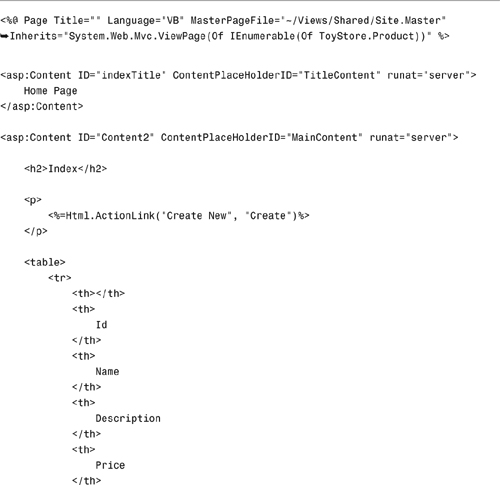
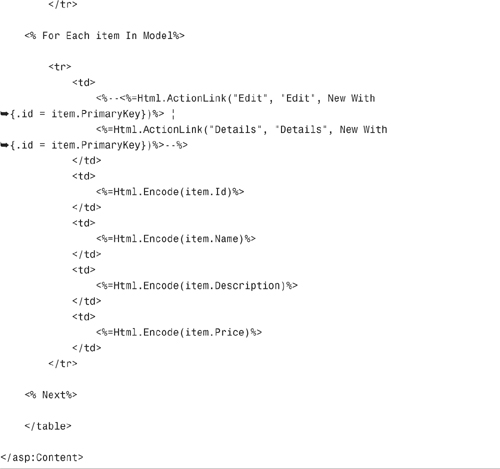
Notice that the Index view includes a link labeled Create New that appears at the bottom of the view. We add the Create view in the next section.
The Create view displays the HTML form for adding a new product. We can follow a similar set of steps to add the Create view:
- Right-click the first
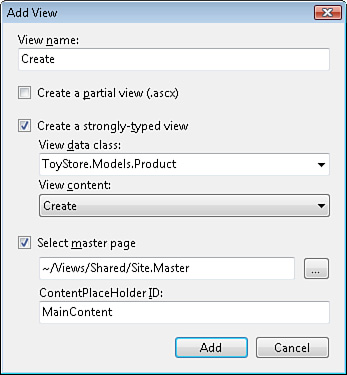
Create()action in the Code Editor window and select the menu option Add View. - In the Add View dialog, select the option Create a Strongly Typed View.
- In the Add View dialog, from the drop-down list labeled View Data Class, select the
ToyStore.Models.Productclass. - In the Add View dialog, from the drop-down list labeled View Content, select Create.
- Click the Add button to add the new view to your project (see Figure 2.14).
The Create view is added to your project at the following location:
ViewsHomeCreate.aspx
The contents of the Create view are contained in Listing 2.4.
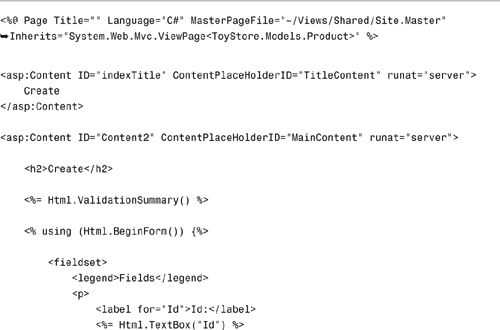

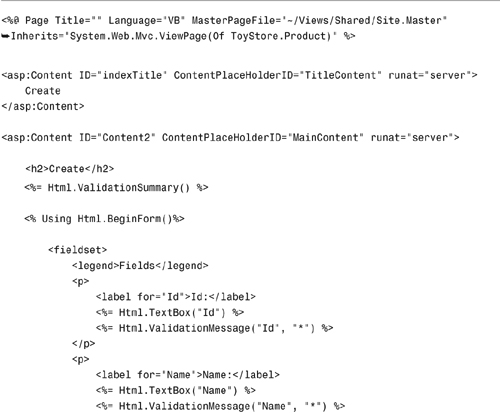
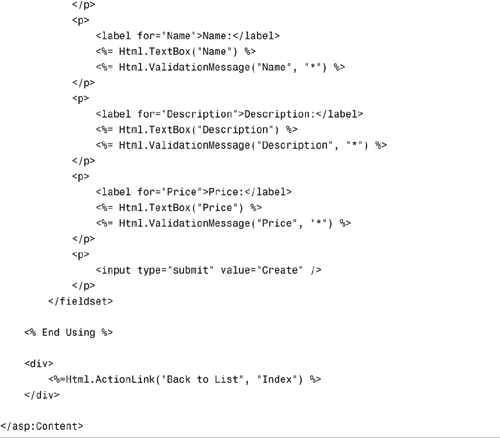
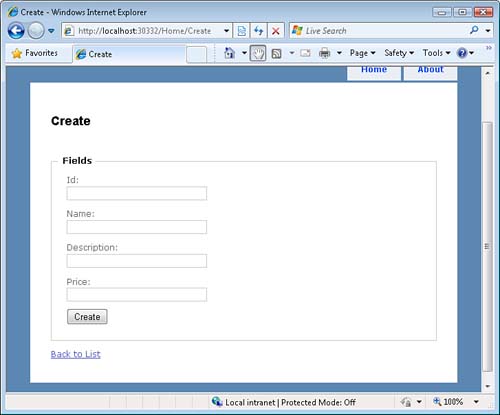
The Create view displays an HTML form for creating new products (see Figure 2.15). The Add View dialog generates HTML form fields that correspond to each of the properties of the Product class. If you complete the HTML form and submit it, a new product will be created in the database.
In this chapter, we used the ASP.NET MVC framework to build a simple database-driven web application. We created models, views, and controllers.
First, we created a database and a database model. We used Microsoft SQL Server Express for our database. We created our database model classes by taking advantage of the Microsoft Entity Framework.
Next, we created the Home controller. We used Visual Studio to generate the actions for our Home controller automatically. We added a few lines of data access logic to interact with our database.
Finally, we created two views. We created an Index view that displays a list of all the products in an HTML table. We also added a Create view that displays an HTML form for adding a new product to the database.