
In This Chapter
In this chapter, we start building our Unleashed Blog application. We start with the list of user stories written on the napkin in Figure 17.1.
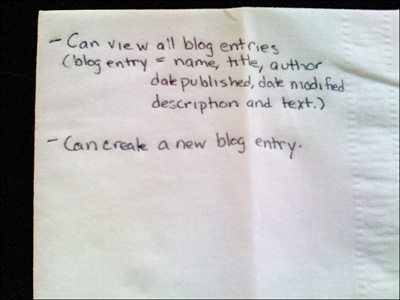
As you can read on the napkin, in this chapter, we focus on implementing the data access code for our blog application.
These stories get converted into the following rough requirements:
But, before we can do anything else, we need to create our ASP.NET MVC application in Visual Studio.
Create a new ASP.NET MVC application by launching Visual Studio 2008 and selecting the menu option File, New Project (see Figure 17.2). Select the ASP.NET MVC Web Application project template and give the new application the name UnleashedBlog.

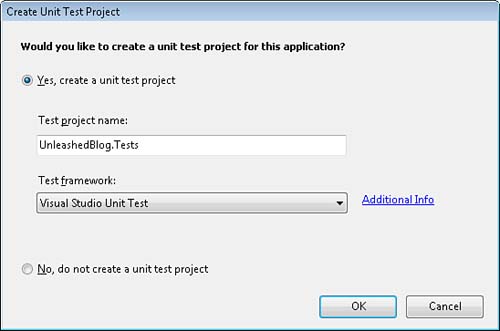
After you click the OK button, the Create Unit Test Project dialog in Figure 17.3 appears. Select the option to create a unit test project and click the OK button.
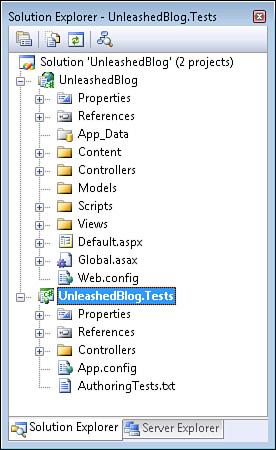
After you complete these steps, your solution contains two projects named UnleashedBlog and UnleashedBlog.Tests (see Figure 17.4). The UnleashedBlog project contains all the code for the ASP.NET MVC application. The UnleashedBlog.Tests project contains all the tests for the application.
When you create a new ASP.NET MVC project in Visual Studio, you get several sample files automatically. Because we want to start with a clean slate, we need to delete these sample files. Delete the following files and folders from the Solution Explorer window:
- UnleashedBlogControllersAccountController.cs
- UnleashedBlogControllersHomeController.cs
- UnleashedBlogViewsAccount
- UnleashedBlogViewsHome
- UnleashedBlog.TestsControllersAccountControllerTest.cs
- UnleashedBlog.TestsControllersHomeControllerTest.cs
Now, we have a nice clean project with which we can start building a new ASP.NET MVC application.
So, where do we start? What code do we write first? Because we build the Unleashed Blog using test-driven development, we start with a test.
Note
Before we write our first test, we have already implicitly made several design decisions. For example, we have made the decision to use a model-view-controller architecture. We also make the assumption that we should start with the controller and data access. (Someone else might decide to start with the domain model.) The general interaction of the model, view, and controller are already defined by the framework in which we work. But still, we can use test-driven development to fill in the details.
Follow these steps to add our first test:
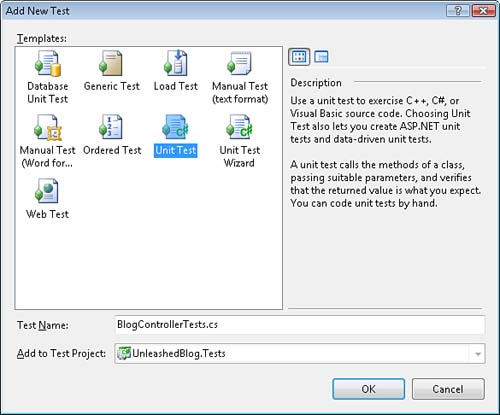
- Right-click the Controllers folder in the UnleashedBlog.Tests project and select the menu option Add, New Test.
- In the Add New Test dialog (see Figure 17.5), select the Unit Test template and give your test the name BlogControllerTests.cs.
- Modify the BlogControllerTests.cs file so that it contains the test code in Listing 17.1.
Warning
When adding tests, do not select the menu option Add, Unit Test. Selecting this option launches the Create Unit Tests Wizard that adds the wrong type of tests to your test project.
The wizard generates a unit test that spins up the web server. Because we are practicing test-driven development, and our tests need to run fast, we want to run our tests independently of the web server.
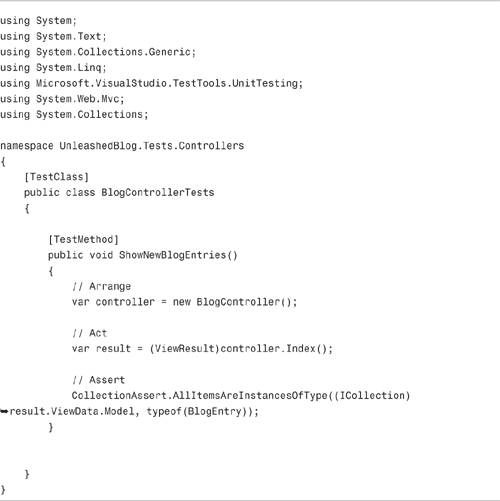
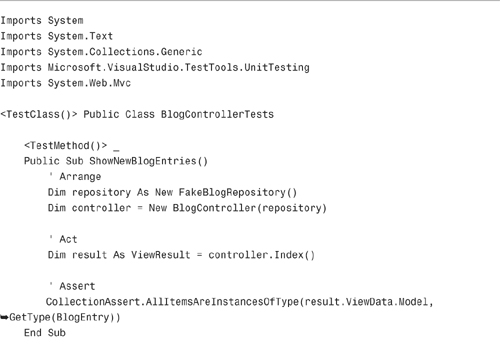
The test class in Listing 17.1 contains a test named ShowNewBlogEntries. This test verifies that the Blog controller returns a list of BlogEntry objects from its Index() method.
The test has three sections named Arrange, Act, and Assert. In the Arrange section, an instance of the Blog controller class is created. In the Act section, the Blog controller Index() action is invoked. Finally, in the Assert section, the CollectionAssert class is used to verify that the view data returned by the Index() action represents a list of BlogEntry objects.
Note
When practicing test-driven development, I strongly recommend that you disable automatic statement completion in Visual Studio. Otherwise, you will be constantly fighting against Visual Studio whenever you type the names of classes that don’t exist. Select the menu option Tools, Options. Under Text Editor, C# or Text Editor, Basic, uncheck the option Auto List Members.
After you write this test, you get the red squiggly warnings under the BlogController and BlogEntry classes (see Figure 17.6). This reaction of the Visual Studio editor is not surprising given that we have not created these classes yet.
Our test project won’t even build at this point. Our test fails to even fail as a test.
Before we can even get our test to fail, we need to create the BlogController and BlogEntry classes to make the red squiggles go away. The BlogEntry class is contained in Listing 17.2 and the BlogController class is contained in Listing 17.3.
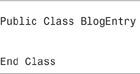
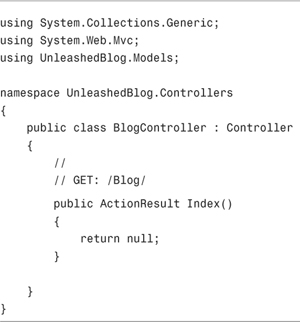

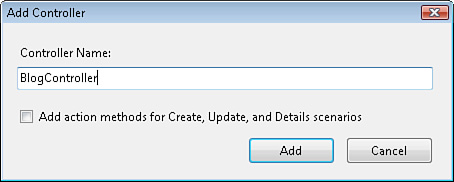
You can add the BlogEntry class in Listing 17.2 to your project by right-clicking the UnleashedBlogModels folder and selecting the menu option Add, Class. You can add the controller in Listing 17.3 by right-clicking the Controllers folder and selecting the menu option Add, Controller (see Figure 17.7).
You might be disappointed with the code for the BlogEntry and BlogController classes. The BlogEntry represents a blog entry. However, it currently doesn’t contain any properties. For example, it does not contain a property for the blog title or text.
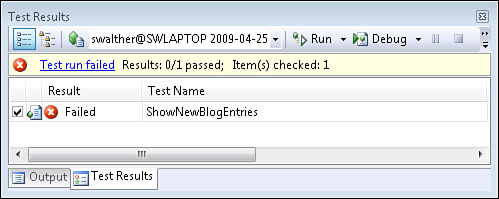
Furthermore, the Index() action in the BlogController class simply returns null (nothing). We know that we haven’t written enough code to make our test pass, but that is a good thing because we want to experience a failing test before we reach green (see Figure 17.7A).
Note
After you create the BlogEntry and BlogController classes, you need to import several namespaces before you can compile the test contained in Listing 17.1. The fastest way to import a necessary namespace is to click any class that has a red bar in the code editor and hit the keyboard combination Ctrl+. (hold the Control key while pressing the period key). This keyboard combination prompts you to add the necessary namespace.
You can run the failing test by entering the keyboard combination Ctrl+R, A. This keyboard combination runs all the tests in your solution.
Now that we have a failing test, we can allow ourselves to start writing code in earnest. Let’s try revising our Blog controller Index() action so that it looks like this:
(C#)
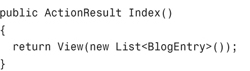
(VB)
We’ve modified the Index() action so that it returns a collection of BlogEntry classes. This might not seem like a huge improvement (we still aren’t retrieving the blog entries from the database) but it is enough of a change to pass the test (see Figure 17.8).
So, it is time to celebrate! We created our first test and wrote enough application code (and only enough application code) to pass our first test. Yippee!
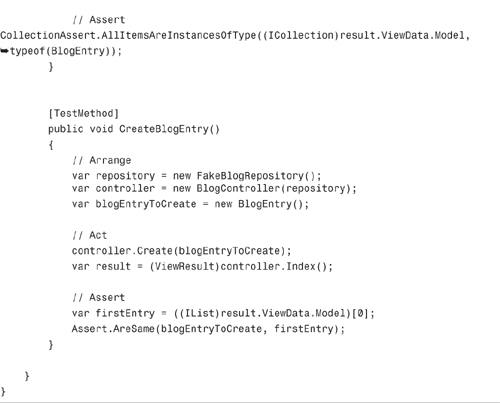
After a long night of partying and celebration, I am back and ready to write my second test. We want to express the requirement that a person can create a new blog entry with a test. Our second test is contained in Listing 17.4.
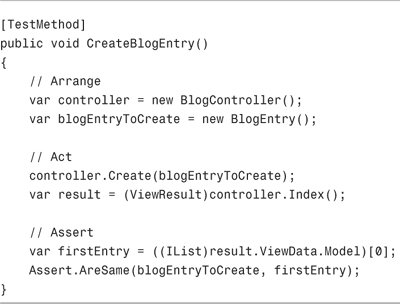
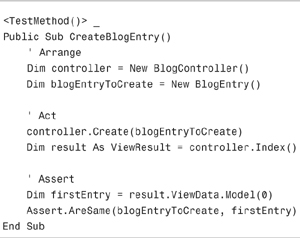
The test in Listing 17.4 verifies that, after you create a new blog entry by invoking the Create() action, the new blog entry can be retrieved by invoking the Index() action.
The test has three sections. In the Arrange section, a Blog controller and BlogEntry class is created. Next, in the Act section, two actions of the Blog controller are invoked. First, the Create() action is invoked and then the Index() action is invoked. Finally, in the Assert section, the assertion is made that the new blog entry is the first item returned by the Index() action.
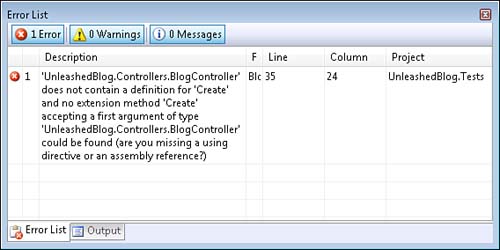
After you add the test in Listing 17.4 to your project, your project won’t even build. Your project won’t build because the Blog controller does not have a Create() method (see Figure 17.9).
The fact that the project won’t build means that we, once again, failed to create a failing test. Before we can even compile the test, we need to add a Create() action that accepts a blog entry parameter to our Blog controller like this:
(C#)


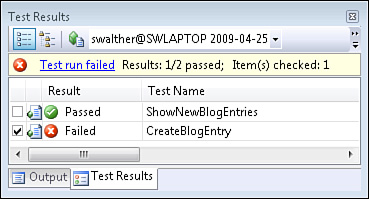
After we add this Create() action, our test successfully compiles and fails. If you press the Ctrl+R, A keyboard combination, you can witness the test fail (see Figure 17.9A). We have successfully created another failing test. Now, we can focus on writing the code required to go green.
The updated Blog controller is contained in Listing 17.5.
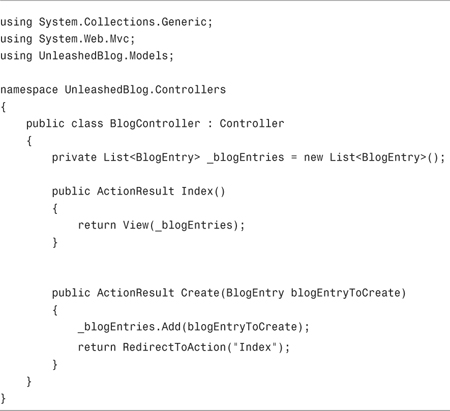

The new version of the Blog controller in Listing 17.5 has a class level field named _blogEntries that represents a collection of blog entries. When you invoke the Create() action with a new blog entry, the new blog entry is added to this collection. When you invoke the Index() action, the blog entries are retrieved from this collection.
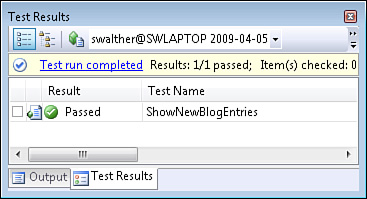
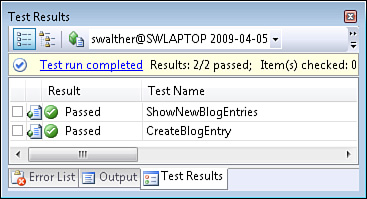
We’ve written just enough code to pass our test. If you enter the keyboard combination Ctrl+R, A then you can see that we pass all of our tests (see Figure 17.10). Filled with a sense of accomplishment, I’m done with work for today—I’m going to go see a movie.
At this point, we created two tests and built enough application code to pass the tests. We can list blog entries and create new blog entries.
This is a good point to consider refactoring our code. Right now, the Blog controller is storing and retrieving blog entries from an in-memory collection. However, we know that we need to store the blog entries in a database eventually.
We want to use a database to store our blog entries, but we want to test our application code without accessing a database. We want our application to use an in-memory database when the application is tested. However, we want our application to use a real database when the application is used in production.
Warning
In general, when practicing test-driven development, you don’t want to access a database when running tests. Executing tests against a database is slow. Because you might need to run hundreds, or even thousands, of tests each and every time you modify your code, your tests cannot be slow or you will never get any work done.
We need to refactor our blog application to use something called the Repository pattern. When you use the Repository pattern, you create an interface or abstract class that describes all the methods for retrieving and storing objects from a repository. Then, you can implement the interface or abstract class in multiple ways.
We create a repository base class that describes the methods for storing and retrieving blog entries. Next, we implement the repository base class in two different ways. We create both a fake blog repository that stores blog entries in memory and a real blog repository that stores blog entries in a database.
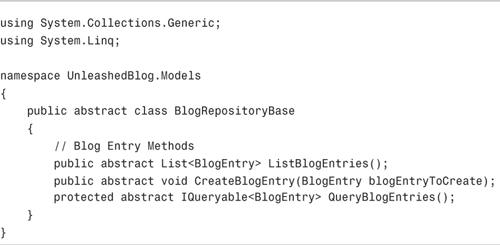
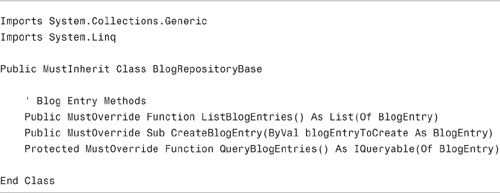
The first iteration of our repository base class is contained in Listing 17.6. This base class has three abstract (must inherit) methods named ListBlogEntries(), CreateBlogEntry(), and QueryBlogEntries().
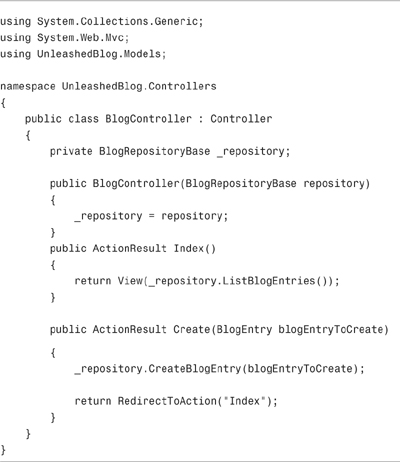
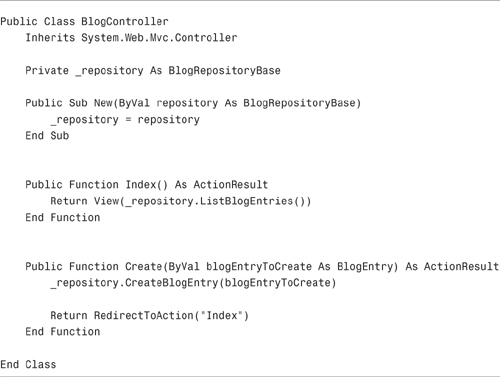
The Blog controller in Listing 17.7 has been refactored to use the BlogRepositoryBase class. Notice that it has a constructor that requires a repository that inherits from the BlogRepositoryBase class. The two actions exposed by the Blog controller use the base class.
A concrete implementation of the BlogRepositoryBase class is contained in Listing 17.8. This class represents a fake blog repository—an in-memory version of the blog repository that we use in our tests.
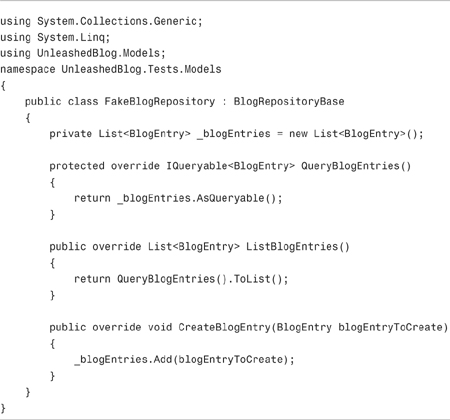
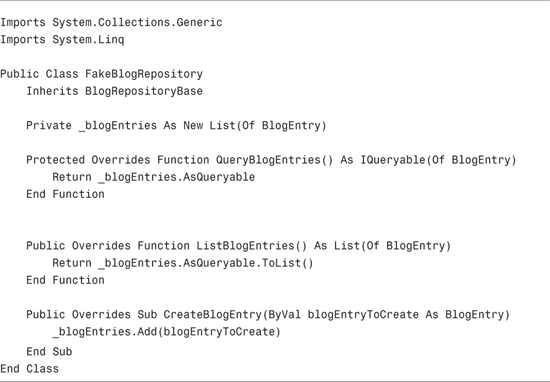
Notice that the repository class in Listing 17.8 inherits from the BlogRepositoryBase class. This implementation of the base class stores and retrieves blog entries from a collection stored in memory.
We can use the fake blog repository in our tests. A refactored version of the Blog controller tests is contained in Listing 17.9.
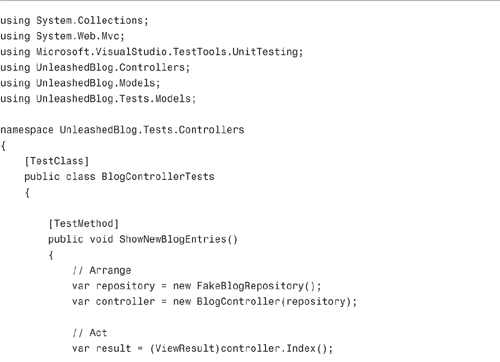

Notice that both tests in Listing 17.9 use the fake blog repository. An instance of the fake blog repository is created in the Arrange section of both tests and passed to the constructor of the Blog controller.
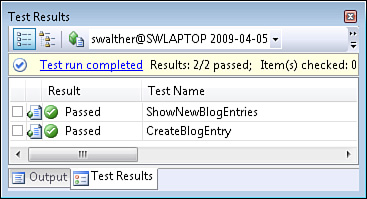
We rewrote a lot of code in this section. However, we can rewrite our code fearlessly because it is covered by tests. If we press the keyboard combination Ctrl+R, A then all of our tests still pass (see Figure 17.11).
In this final section, we make everything real by implementing an Entity Framework blog repository. Unlike the fake blog repository, the Entity Framework blog repository actually stores the blog entries in a database.
To create an Entity Framework blog repository, we need to complete each of the following steps:
- Create a database that contains a
BlogEntriestable. - Create an Entity Framework data model.
- Implement the Entity Framework blog repository class.
We use SQL Server Express for our database. This database is free, and it can be downloaded with Visual Studio or Visual Web Developer. Follow these steps to create a new SQL Server Express database and database table:
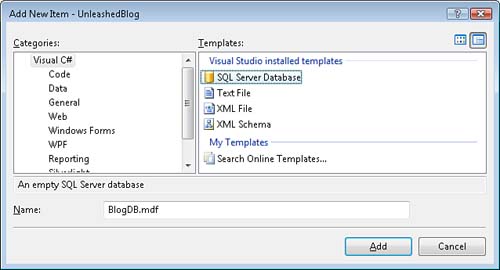
- Right-click the App_Data folder and select the menu option Add, New Item. Select the SQL Server Database template, name the database BlogDB.mdf, and click the Add button (see Figure 17.12).
- Double-click the BlogDB.mdf file in the App_Data folder to open the Server Explorer window.
- Right-click the Tables folder and select the menu option Add New Table.
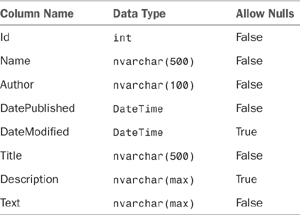
- Enter the columns in Table 17.1.
- Mark the Id column as a primary key column by selecting the Id column and clicking the button with the icon of a key.
- Mark the Id column as an Identity column by expanding the Identity Specification property under Column properties and assigning the value Yes to the (Is Identity) property.
- Click the Save button (the button with an icon of a floppy disk) and give the new table the name
BlogEntries.
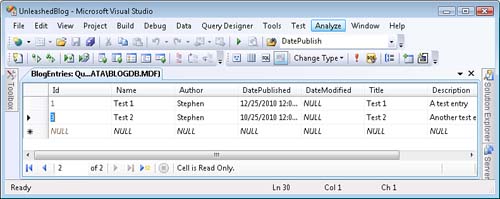
After you create the new database, you should add some fake blog entries to the database so that you have something to look at when you run the application. Right-click the BlogEntries table and select the menu option Show Table Data. Add a few blog entries to the table (see Figure 17.13).
Next, we need to create the data model. In other words, we need to create a set of C# or VB.NET classes that represents our database in our ASP.NET MVC application.
Follow these steps to create a data model using the Microsoft Entity Framework:
- Add a new folder to the Models folder named
EntityFramework. - Right-click the ModelsEntityFramework folder and select the menu option Add, New Item.
- Select the Data category and the ADO.NET Entity Data Model template. Name your data model
DataModel.edmxand click the Add button (see Figure 17.14).

After you complete these steps, the ADO.NET Entity Data Model Wizard launches. Complete the following wizard steps:
- In the Choose Model Contents step, select the Generate from Database option.
- In the Choose Your Data Connection step, select BlogDB.mdf for the data connection and BlogDBEntities for the entity connection settings.
- In the Choose Your Database Objects step, select the BlogEntries database table. Enter the namespace
UnleashedBlog.Models.EntityFrameworkfor the model namespace. - Click the Finish button to complete the wizard.
After you complete these steps, the Entity Framework Designer opens. The designer displays a class that corresponds to the BlogEntries database table.
We have one last step to complete. We need to rename the entity from BlogEntries to BlogEntryEntity. Right-click the BlogEntries entity in the designer and select the menu option Rename. Give the entity the name BlogEntryEntity (see Figure 17.15).
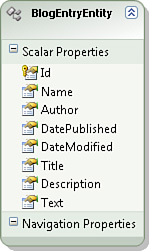
Why do we name the entity BlogEntryEntity instead of BlogEntry? Our application will have both a BlogEntry and BlogEntryEntity class. The BlogEntry class is used in our application code. The BlogEntryEntity class will be encapsulated within our Entity Framework repository class. That way, we avoid introducing any dependency on the Entity Framework outside of our Entity Framework repository.
Now that we created a database and data model, we can implement the Entity Framework blog repository. The code for the new repository is contained in Listing 17.15.
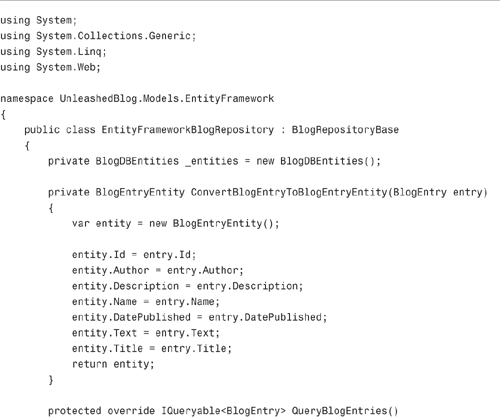

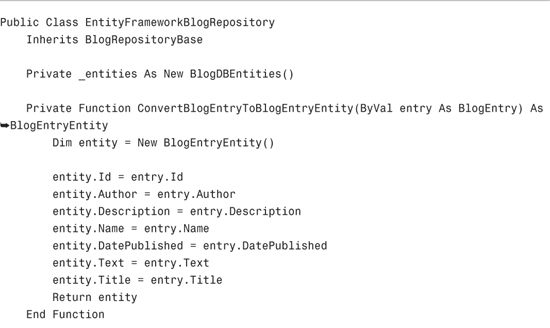
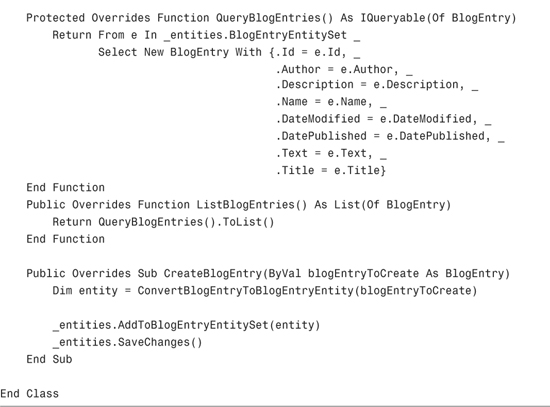
The repository in Listing 17.15 exposes two public methods named ListBlogEntries() and CreateBlogEntry(). There are the two methods called within the Blog controller.
The Entity Framework blog repository converts back and forth from instances of the BlogEntry class to instances of the BlogEntryEntity class. These classes—the BlogEntry and the BlogEntryEntity classes—have an identical set of properties. Why do we need both classes?
Note
I updated the BlogEntry class so that it has the same set of properties as the BlogEntryEntity class. We take a shortcut here. If we were following strict test-driven development, we wouldn’t add properties to the BlogEntry class until we had a test that required it. However, because updating the Entity Framework data model is time-consuming, we are going to cheat.
The BlogEntryEntity class is generated by the Entity Framework Designer automatically. Internally, the BlogEntryEntity class depends on the Microsoft Entity Framework. The BlogEntry class, in contrast, does not depend on the Microsoft Entity Framework.
Because we want to maintain a sharp separation of concerns in our blog application, we don’t want to use the BlogEntryEntity class in the remainder of our application. We want to isolate our data access logic from the remainder of our application logic.
There are two benefits that result from maintaining this sharp separation of concerns. First, in the future, we can easily switch to some other technology for our data access logic. For example, we could implement a LINQ to SQL blog repository or an NHibernate blog repository without modifying the remainder of our application code.
Second, maintaining a sharp separation of concerns between our data access logic and the remainder of our application makes our application more testable. Because our tests interact with the BlogEntry class and never the BlogEntryEntity class, we do not need to add a reference to the Microsoft Entity Framework to our test project.
We now are ready to try out our new Entity Framework blog repository class. First, we need to update our blog controller (see Listing 17.16).
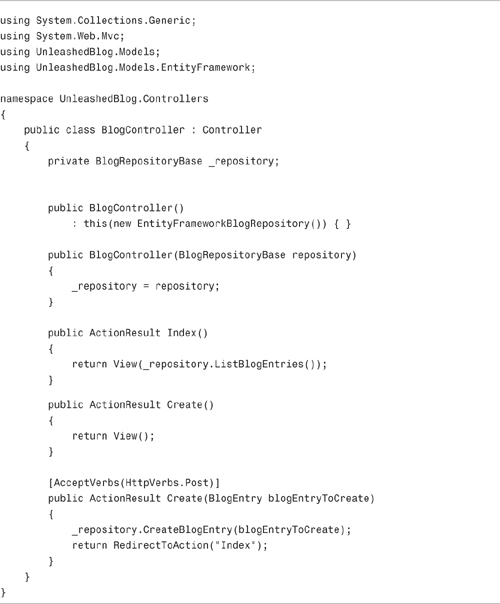
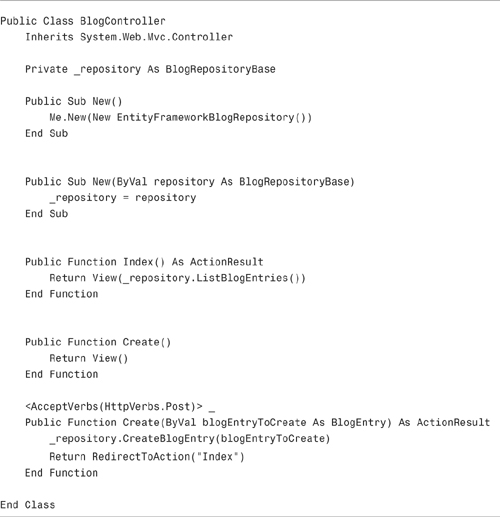
Notice that the blog controller in Listing 17.16 has been modified so that it has two constructors. The first constructor—the parameterless constructor—is called when the application is used in production. This constructor creates a new instance of the Entity Framework blog repository and passes it to the second constructor.
The second constructor accepts an instance of the blog repository class. This second constructor is called in the tests. Within a test, an instance of the fake blog repository class is passed to this second constructor.
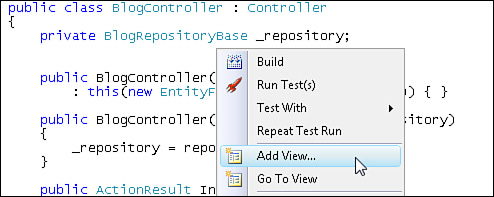
To run our blog application, we need to add two views to the application. Right-click the Index() action and select the menu option Add View (see Figure 17.16).
Check the check box labeled Create a Strongly-Typed View. For View Data Class, select the BlogEntry class. For View Content, select List. Click the Add button to generate the view.
Warning
If nothing appears in the View Data Class drop-down list, verify that you can build the application. If there are build errors, the drop-down list will be empty.
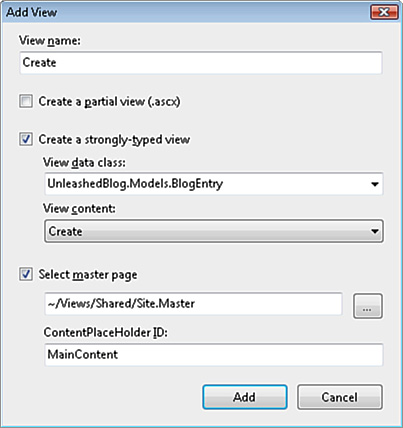
Next, create a view for the Create() action by right-clicking the Create() action and selecting the menu option Add View. Create a strongly typed view that represents the BlogEntry class. For View Content, select Create (see Figure 17.17). Click the Add button to generate the Create view.
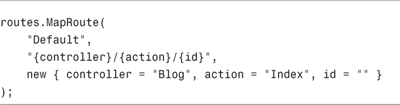
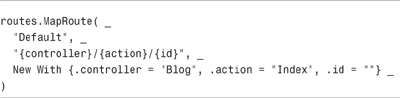
We need to make one last change before we can run the blog application. We need to modify the route table in the Global.asax file so that the default controller for our application is the Blog controller instead of the Home controller. Modify the Default route in the Global.asax file so that it looks like Listing 17.17.
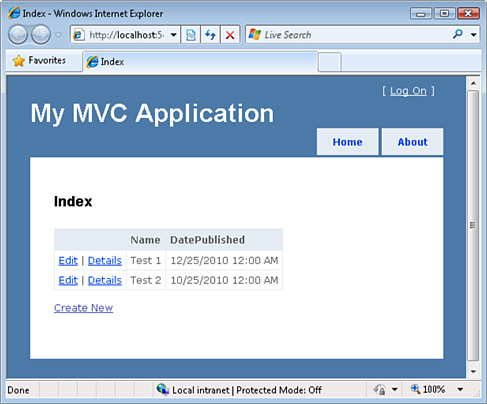
You can run the blog application by pressing F5 (or by selecting the menu option Debug, Start Debugging). The page in Figure 17.18 appears in your browser. If you click the Create New link, you can add a new blog entry. (Warning: We haven’t added any validation to the Create form yet.)
So, we are off to a good start. In this chapter, we created the first iteration of our Unleashed Blog application. We can list blog entries and we can create new blog entries.
In this chapter, we stuck to good test-driven development practices. We started by writing a failing test. Then we wrote just enough code to satisfy the requirements expressed by the test.
We also took advantage of the Repository pattern. The Repository pattern enables us to maintain a sharp separation of concerns. By following the Repository pattern, we also made our application code more testable. We implemented two concrete blog repositories: a fake repository and an Entity Framework repository.