
In This Chapter
This chapter is devoted to the topic of deploying your ASP.NET MVC application to a web server and getting the application to work. In the first section, you learn how to configure Internet Information Services to work with ASP.NET MVC. In particular, you learn how to get ASP.NET MVC to work with Internet Information Services 7.0 and earlier versions of Internet Information Services.
Next, you learn how to use ASP.NET MVC with an existing Web Forms application. You are provided with a step-by-step guide to converting an existing Web Forms application into an application that supports both Web Forms and MVC.
Finally, you learn how you can deploy an ASP.NET MVC application to a hosting company that does not have the ASP.NET MVC framework installed. You learn how to take advantage of bin deployment.
The ASP.NET MVC framework depends on ASP.NET Routing to route browser requests to controller actions. To take advantage of ASP.NET Routing, you might have to perform additional configuration steps on your web server. It all depends on the version of Internet Information Services (IIS) and the request-processing mode for your application.
Table 13.1 summarizes the different versions of IIS, whether special configuration is required, and which version of Windows the IIS version is included with.

IIS 7.0 can process requests using two different request-processing modes: integrated and classic. Integrated mode provides better performance and more features. Classic mode is included for backward compatibility with earlier versions of IIS.
The request-processing mode is determined by the application pool. You can determine which processing mode is used by a particular web application by determining the application pool associated with the application. Follow these steps:
- Launch the Internet Information Services Manager.
- In the Connections window, select an application.
- In the Actions window, click the Basic Settings link to open the Edit Application dialog box (see Figure 13.1).
- Take note of the application pool selected.
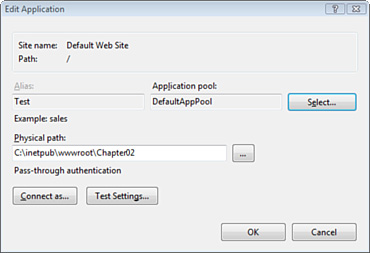
By default, IIS is configured to support two application pools: DefaultAppPool and Classic .NET AppPool. If DefaultAppPool is selected, your application is running in integrated request-processing mode. If Classic .NET AppPool is selected, your application runs in classic request-processing mode.
Notice that you can modify the request-processing mode within the Edit Application dialog. Click the Select button and change the application pool associated with the application. Realize that there are compatibility issues when changing an ASP.NET application from classic to integrated mode.
If an ASP.NET application is using the DefaultAppPool, you don’t need to perform any additional steps to get ASP.NET Routing (and therefore ASP.NET MVC) to work. However, if the ASP.NET application is configured to use the Classic .NET AppPool, keep reading; you have more work to do.
If you need to use ASP.NET MVC with a version of IIS older than IIS 7.0, or you need to use IIS 7.0 in classic mode, you have two options. First, you can modify the route table to use file extensions. For example, instead of requesting a URL like /Store/Details, you can request a URL like /Store.aspx/Details.
The second option is to create something called a wildcard script map. A wildcard script map enables you to map every request into the ASP.NET framework.
If you don’t have access to your web server (for example, your ASP.NET MVC application is hosted by an Internet service provider), you need to use the first option. If you don’t want to modify the appearance of your URLs, and you have access to your web server, you can use the second option.
We explore each option in detail in the following sections.
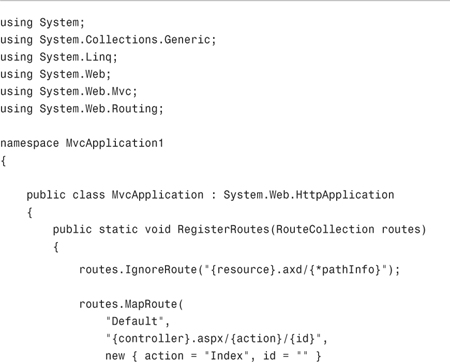
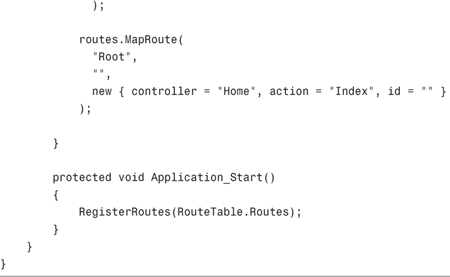
The easiest way to get ASP.NET Routing to work with older versions of IIS is to modify your route table in the Global.asax file. The default and unmodified Global.asax file in Listing 13.1 configures one route named the Default route.

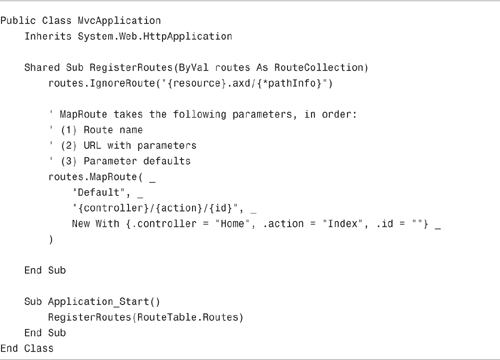
The Default route configured in Listing 13.1 enables you to route URLs that look like this:
/Home/Index
/Product/Details/3
/Product
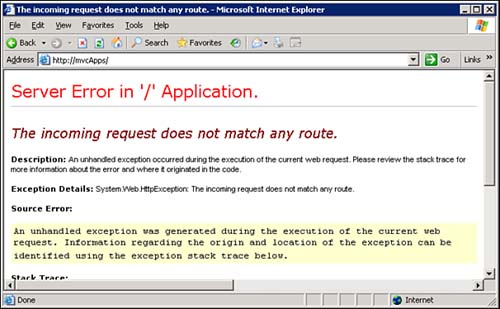
Unfortunately, older versions of IIS won’t pass these requests to the ASP.NET framework. Therefore, these requests won’t get routed to a controller. For example, if you make a browser request for the URL /Home/Index, you get the error page in Figure 13.2.
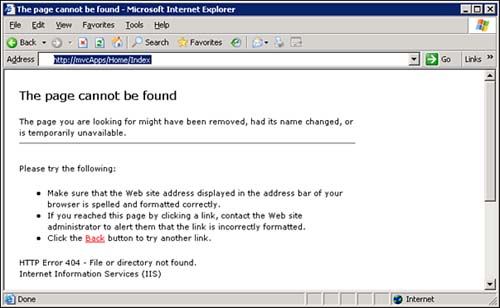
Older versions of IIS map only certain requests to the ASP.NET framework. The request must be for a URL with the right file extension. For example, a request for /SomePage.aspx gets mapped to the ASP.NET framework. However, a request for /SomePage.htm does not.
Therefore, to get ASP.NET Routing to work, we must modify the Default route so that it includes a file extension that is mapped to the ASP.NET framework.
When you install the ASP.NET MVC framework, a script named registermvc.wsf is added to the following folder:
C:Program FilesMicrosoft ASP.NETASP.NET MVCScripts
Executing this script registers a new .mvc extension with IIS. After you register the .mvc extension, you can modify your routes in the Global.asax file so that the routes use the .mvc extension.
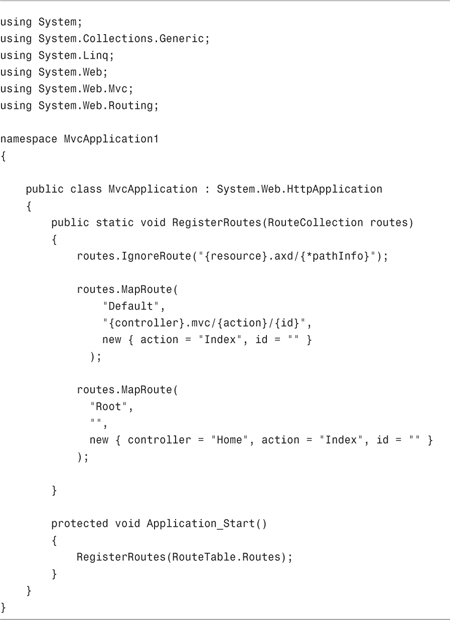
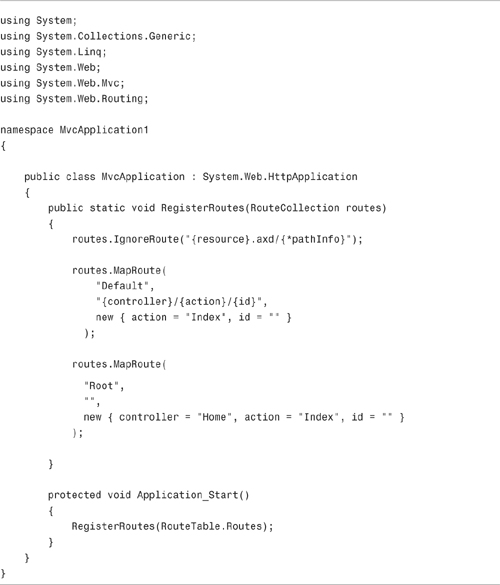
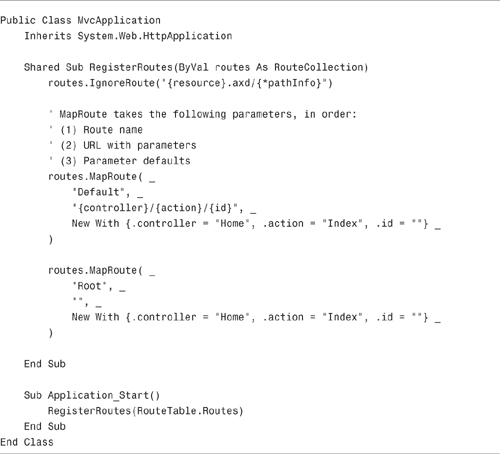
The modified Global.asax file in Listing 13.2 works with older versions of IIS.

Warning
Important: Remember to build your ASP.NET MVC application again after changing the Global.asax file.
There are two important changes to the Global.asax file in Listing 13.2. There are now two routes defined in the Global.asax. The URL pattern for the Default route, the first route, now looks like this:
{controller}.mvc/{action}/{id}
The addition of the .mvc extension changes the type of files that the ASP.NET Routing module intercepts. With this change, the ASP.NET MVC application now routes requests like the following:
/Home.mvc/Index/
/Product.mvc/Details/3
/Product.mvc/
The second route, the Root route, is new. This URL pattern for the Root route is an empty string. This route is necessary for matching requests made against the root of your application. For example, the Root route matches a request that looks like this:
After making these modifications to your route table, you need to make sure that all of the links in your application are compatible with these new URL patterns. In other words, make sure that all your links include the .mvc extension. If you use the Html.ActionLink() helper method to generate your links, you should not need to make any changes.
You don’t always have access to your web server. For example, if you host your ASP.NET MVC application using an Internet hosting provider, you won’t necessarily have access to IIS.
In that case, you should use one of the existing file extensions that are mapped to the ASP.NET framework. Examples of file extensions mapped to ASP.NET include the .aspx, .axd, and .ashx extensions.
For example, the modified Global.asax file in Listing 13.3 uses the .aspx extension instead of the .mvc extension.
The Global.asax file in Listing 13.3 is exactly the same as the previous Global.asax file except for the fact that it uses the .aspx extension instead of the .mvc extension. You don’t have to perform any setup on your remote web server to use the .aspx extension.
If you don’t want to modify the URLs for your ASP.NET MVC application, and you have access to your web server, you have an additional option. You can create a wildcard script map that maps all requests to the web server to the ASP.NET framework. That way, you can use the default ASP.NET MVC route table with IIS 7.0 (in classic mode) or IIS 6.0.
Be aware that this option causes IIS to intercept every request made against the web server. This includes requests for images, classic ASP pages, and HTML pages. Therefore, enabling a wildcard script map to ASP.NET does have performance implications.
Here’s how you enable a wildcard script map for IIS 7.0:
- Select your application in the Connections window.
- Make sure that the Features view is selected.
- Double-click the Handler Mappings button.
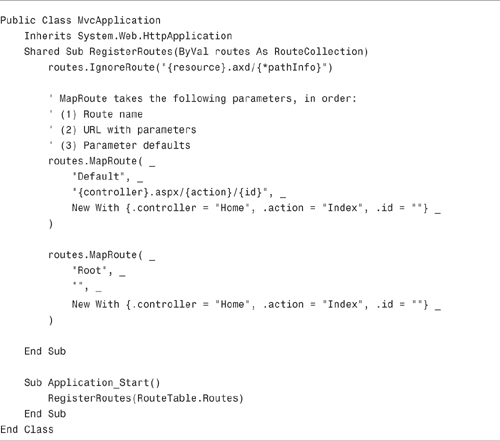
- Click the Add Wildcard Script Map link (see Figure 13.3).
- Enter the path to the aspnet_isapi.dll file. (You can copy this path from the PageHandlerFactory script map.)
- Enter the name
MVC. - Click the OK button.
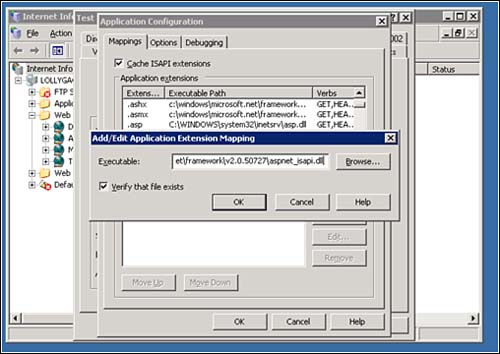
Follow these steps to create a wildcard script map with IIS 6.0:
- Right-click a website and select Properties.
- Select the Home Directory tab.
- Click the Configuration button.
- Select the Mappings tab.
- Click the Insert button (see Figure 13.4).
- Paste the path to the aspnet_isapi.dll into the Executable field. (You can copy this path from the script map for .aspx files.)
- Uncheck the check box labeled Verify That File Exists.
- Click the OK button.
After you enable wildcard script maps, you need to modify the route table in the Global.asax file so that it includes a Root route. Otherwise, you get the error page in Figure 13.5 when you make a request for the root page of your application. You can use the modified Global.asax file in Listing 13.4.
After you enable a wildcard script map for either IIS 7.0 or IIS 6.0, you can make requests that work with the default route table that look like this:
/
/Home/Index
/Product/Details/3
/Product
Microsoft provides two major frameworks built on the ASP.NET framework: ASP.NET Web Forms and ASP.NET MVC. If you have already invested years of development effort into building an ASP.NET Web Forms application, you might not want to throw the existing application out and start over.
Note
You could argue that Microsoft actually provides four frameworks built on ASP.NET: ASP.NET Web Forms, ASP.NET MVC, ASP.NET AJAX, and Dynamic Data.
Fortunately, you can mix ASP.NET Web Forms and ASP.NET MVC. You can build parts of your application using ASP.NET Web Forms and parts of your application using ASP.NET MVC. This provides you with a gradual migration path from ASP.NET Web Forms to ASP.NET MVC.
In this section, you learn how to modify an existing ASP.NET Web Forms application so that it supports ASP.NET MVC. There are four steps:
- Modify the Visual Studio Project file.
- Add the required assemblies.
- Modify the web configuration files.
- Modify the Global.asax file.
Warning
ASP.NET MVC is compatible with web application projects and not websites. If your existing ASP.NET Web Forms application is a website instead of a web application project, you need to first convert your Web Forms application into a web application project.
The quickest way to determine whether you have a website or web application is to look at the Visual Studio menu bar. If you see Website in the menu bar, you have a website. If you see Project, you have a web application project.
If you want to take advantage of Visual Studio menu options such as Add Controller or Add View, you need to modify your Visual Studio project file. Follow these steps:
- Close Visual Studio.
- Navigate to the location of your Visual Studio project and open the .csproj or .vbproj file.
- Find the ProjectTypeGuids element and change it using Notepad so that it includes the additional GUID for MVC applications.
(Web Forms C#)

(Web Forms VB)

(MVC C#)

(MVC VB)

Notice that there is one additional GUID in the case of the MVC ProjectTypeGuids.
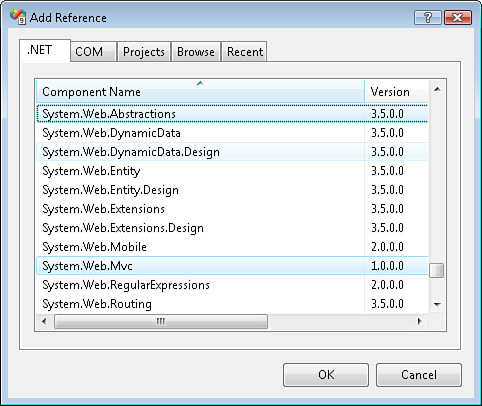
The first step in using ASP.NET MVC with an existing Web Forms application is to add the assemblies (DLL files) required by the ASP.NET MVC framework. The ASP.NET MVC requires the following three assemblies:
• System.Web.Routing—This assembly contains the classes used by ASP.NET routing.
• System.Web.Mvc—This assembly contains all the core classes of the ASP.NET MVC framework.
• System.Web.Abstractions—This assembly contains wrappers around the intrinsic ASP.NET classes such as the HttpContext class.
Follow these steps to add these assemblies:
- Select the menu option Project, Add Reference.
- In the Add Reference dialog, select the .NET tab (see Figure 13.6).
- From the list box, select the System.Web.Routing, System.Web.Mvc, and System.Web.Abstractions assemblies.
- Click the OK button.
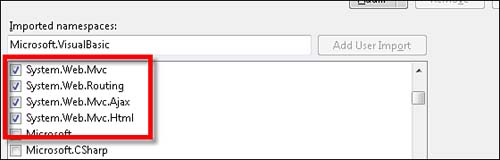
There is an additional step related to assemblies when your project is a VB project. You must import the necessary namespaces for your application. Right-click your project in the Solution Explorer window and select the Properties menu option. Select the References tab. Under Imported Namespaces, import the System.Web.Mvc, System.Web.Mvc.Html, System.Web.Mvc.Ajax, and System.Web.Routing (see Figure 13.7).
The next step—and this is the most difficult step—is to change the configuration of your application. You need to modify the existing root web configuration file and create a new web configuration file located in the Views folder.
First, you need to modify the web.config file located in the root of your application. Here are the (important) places in which the default Web Forms configuration file differs from the default MVC configuration file:
(Web Forms)
(MVC)
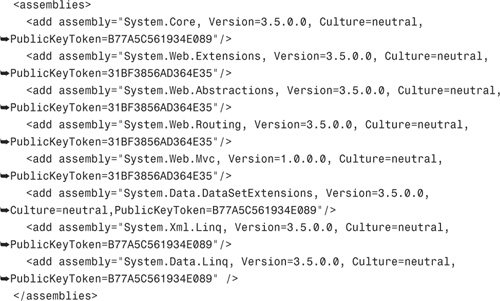
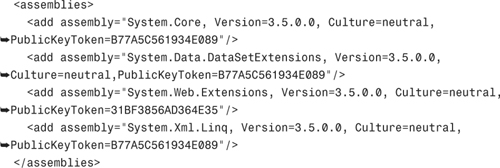
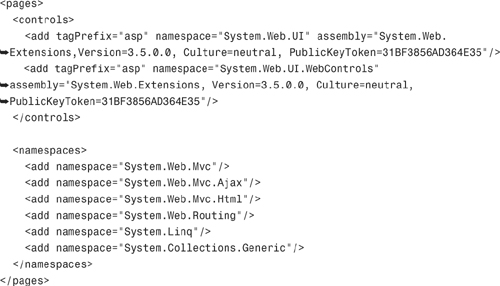
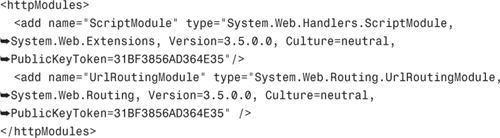
The assemblies section of the web configuration file determines which assemblies are available to use in your .aspx files:
(Web Forms)
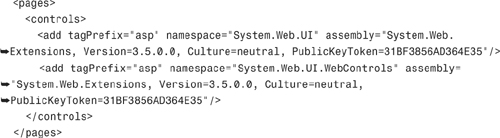
(MVC)
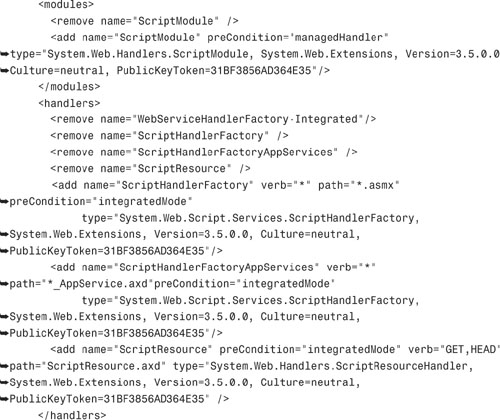
(Web Forms)
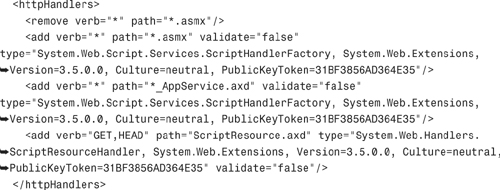
(MVC)
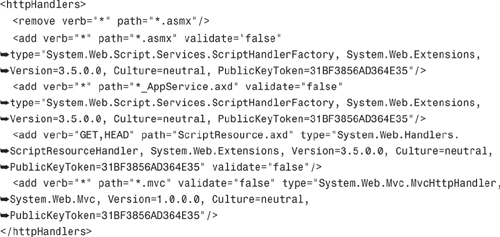
Notice that the MVC handlers section includes a *.mvc handler:
(Web Forms)

(MVC)
If you want to deploy your MVC application on IIS 7.0, you need to make the following changes:
(Web Forms)
(MVC)

After you make all these changes to the root web configuration, you need to add a new web configuration file to your project. Create a new folder named Views and create a web configuration file with the contents in Listing 13.5.
Note
I recommend copying the configuration file in Listing 13.5 from an ASP.NET MVC project instead of typing it.

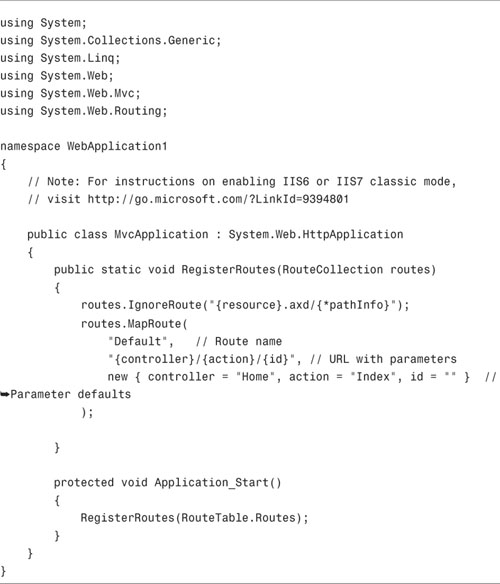
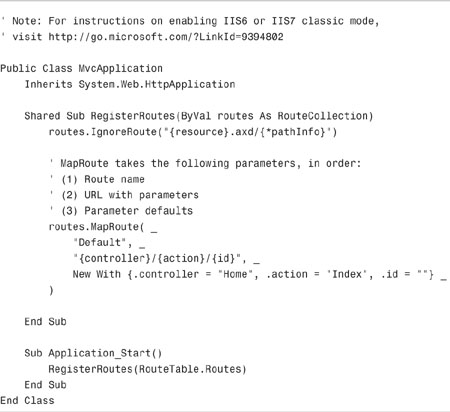
The last step is to modify the Global.asax file so that your application includes the default ASP.NET MVC routes. If your Web Forms application does not already have a Global.asax file, create one. Modify the Global.asax file so that it looks like the file in Listing 13.6.
You need to modify the markup in the Global.asax file to refer to the right class. Right-click the Global.asax file in the Solution Explorer window and select the menu option View Markup. Change the Inherits attribute so that it matches the namespace and name of your global application class. For example
(C#)
Inherits="WebApplication1.MvcApplication"
(VB)
Inherits="WebApplication1.MvcApplication"
After you make all the changes previously described to your Web Forms application, you can start adding controllers and views to the application just like you would in a normal ASP.NET MVC application. You also can continue to add Web Form pages.
The default routes configured in the previous section enable you to request Web Form pages. For example, if you request the page MyPage.aspx, the MyPage.aspx is executed.
You can deploy an ASP.NET MVC application to a web server that does not have the ASP.NET MVC framework installed. For example, if your Internet hosting company does not yet support ASP.NET MVC, you can still deploy ASP.NET MVC applications to your hosting company.
The only requirement for using ASP.NET MVC is that your hosting company supports ASP.NET 3.5. The ASP.NET MVC framework requires ASP.NET 3.5.
Note
If your hosting company supports ASP.NET 3.5 Service Pack 1, you do not need to deploy the System.Web.Routing and System.Web.Abstractions assemblies. These assemblies are included in Service Pack 1.
The assemblies required by the ASP.NET MVC framework are bin deployable. This means that you can copy the required assemblies—System.Web.Mvc, System.Web.Abstrations, and System.Web.Routing—to your host when you deploy the rest of your application.
You need to do only one special thing to deploy the necessary assemblies when you deploy your application. You need to create local copies of the assemblies.
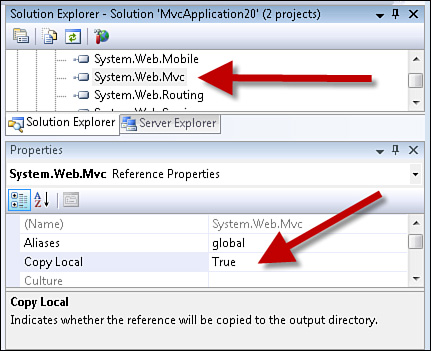
In a C# project, you can indicate that you want a local copy of an assembly by selecting the assembly in the References folder and assigning the value True to the Copy Local property in the Properties sheet (see Figure 13.8). You need to do this for the System.Web.Mvc, System.Web.Abstractions, and System.Web.Routing assemblies.
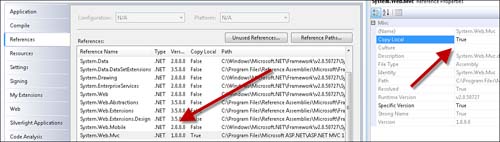
In a VB project, you need to right-click your project in the Solution Explorer and select Properties. Next, select the References tab and find the System.Web.Mvc, System.Web.Abstractions, and System.Web.Routing assemblies. Double-click on each assembly to open the Properties sheet. Assign the value True to the Copy Local property (see Figure 13.9).
After you make these changes, you can copy your website to your hosting company using your favorite method. For example, you can use the Visual Studio Build, Publish menu option, or you can use FTP. After the assemblies are copied local, they are present in the Bin folder so that they can be copied with everything else.
In this chapter, you learned how to overcome various challenges associated with deploying an ASP.NET MVC application. In the first section, you learned how to configure IIS to support ASP.NET MVC. (Or more accurately, you learned how to configure IIS to support ASP.NET Routing.)
Next, you learned how you can modify an existing ASP.NET Web Forms application so that it supports ASP.NET MVC. You learned how you can mix ASP.NET MVC controllers and views with ASP.NET Web Forms pages.
Finally, you learned how the assemblies required by the ASP.NET MVC framework are bin deployable. You learned how you can deploy an ASP.NET MVC application to an Internet hosting provider that supports ASP.NET 3.5, but not ASP.NET MVC.