
In This Chapter
When you request a page from an ASP.NET MVC application, the request gets routed to a particular controller. In this chapter, you learn how to use the ASP.NET Routing module to control how browser requests get mapped to controllers and controller actions.
In the first part of this chapter, you learn about the default route that you get when you create a new ASP.NET MVC application. You learn about the standard parts of any route.
Next, you learn how to debug the routes in your ASP.NET MVC applications. You learn how to use the Route Debugger project included with this book to see how browser requests get mapped to particular routes.
You also learn how to create custom routes. You learn how to extract custom parameters from a URL. You also learn how to create custom constraints that restrict the URLs that match a particular route.
Finally, you tackle the important topic of testing your routes. You learn how to build unit tests for custom routes and route constraints.
You configure ASP.NET Routing in an application’s Global.asax file. This makes sense because the Global.asax file contains event handlers for application lifecycle events such as the application Start and application End events. Because you want your routes to be enabled when an application first starts, routing is set up in the application Start event.
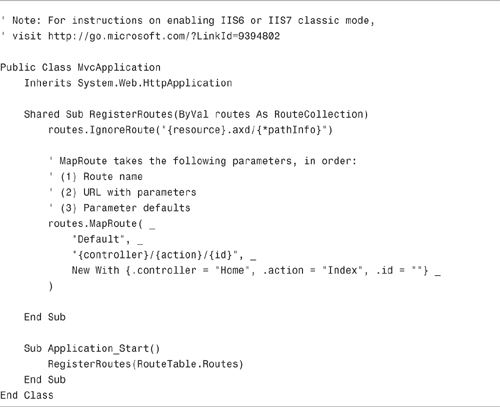
When you create a new ASP.NET MVC application, you get the Global.asax file in Listing 9.1.
Note
The default route defined in the Global.asax file works only with Internet Information Server 7.0 and the ASP.NET Development Web Server. If you need to deploy your ASP.NET MVC application to an older version of Internet Information Server, see Chapter 13, “Deploying ASP.NET MVC Applications.”
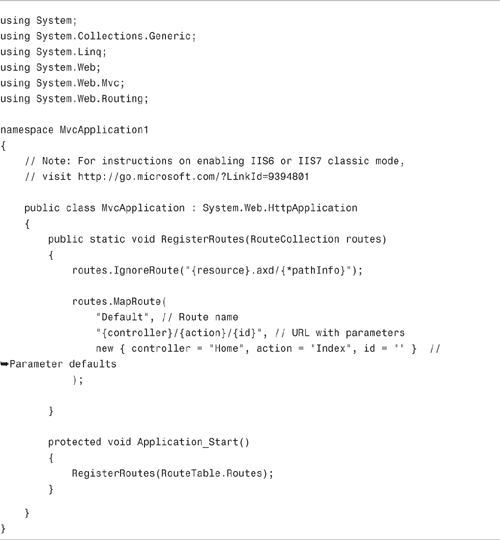
The Global.asax file in Listing 9.1 includes two methods named Application_Start() and RegisterRoutes(). The Application_Start() method is called once, and only once, when an ASP.NET application first starts. In Listing 9.1, the Application_Start() method simply calls the RegisterRoutes() method.
Note
Why does the Global.asax file include a separate method called RegisterRoutes()? Why isn’t the code in the RegisterRoutes() method simply contained in the Application_Start() method?
A separate method was created to improve testability. You can call the RegisterRoutes() method from your unit tests without instantiating the HttpApplication class.
The RegisterRoutes() method is used to configure all the routes in an application. The RegisterRoutes() method in Listing 9.1 configures the default route with the following code:
(C#)

(VB)

You configure a new route by calling the MapRoute() method. This method accepts the following parameters:
• Name—The name of the route
• URL—The URL pattern for the route
• Defaults—The default values of the route parameters
• Constraints—A set of constraints that restrict the requests that match the route
• Namespaces—A set of namespaces that restrict the classes that match the route
The MapRoute() method has multiple overloads. You can call the MapRoute() method without supplying the Defaults, Constraints, or Namespaces parameters.
The default route configured in the Global.asax file in Listing 9.1 is named, appropriate enough, Default.
The URL parameter for the Default route matches URLs that satisfy the pattern {controller}/{action}/{id}. Therefore, the Default route matches URLs that look like this:
/Product/Insert/23
/Home/Index/1
/Do/Something/Useful
However, the Default route does not match a URL that looks like this:
/Product/Insert/Another/Item
The problem with this last URL is that it has too many segments. It has four different segments (four forward slashes) and the URL pattern {controller}/{action}/{id} matches only URLs that have three segments.
The URL pattern {controller}/{action}/{id} maps the first segment to a parameter named controller, the second segment to a parameter named action, and the final segment to a parameter named id.
The controller and action parameters are special. The ASP.NET MVC framework uses the controller parameter to determine which MVC controller to use to handle the request. The action parameter represents the action to call on the controller in response to the request.
If you create additional parameters that are not named controller or action, they are passed to an MVC controller action when the action is invoked. For example, the id parameter is passed as a parameter to a controller action.
Finally, the Default route includes a set of default values for the controller, action, and id parameters. By default, the controller parameter has the value Home, the action parameter has the value Index, and the id parameter has the value "" (empty string).
For example, imagine that you enter the following URL into the address bar of your browser:
In that case, the controller, action, and id parameters would have the following values:
Now, imagine that you request the default page for a website:
In that case, the controller, action, and id parameters would have the following values:
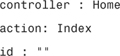
In this case, the ASP.NET MVC framework would invoke the Index() action method on the HomeController class.
Note
The code used to specify the defaults for a route might appear strange to you. This code is taking advantage of two new features of the Visual Basic .NET 9.0 and the C# 3.0 languages called anonymous types and property initializers. You can learn about these new language features by reading Appendix A, “C# and VB.NET Language Features.”
In the next section, I show you how you can add custom routes to the Global.asax file. However, before we start creating custom routes, it is important to have some way to debug our routes. Otherwise, things quickly get confusing.
Included with the code that accompanies this book is a project named Route Debugger. If you add a reference to the assembly generated by this project, you can debug the routes configured within any ASP.NET MVC application.
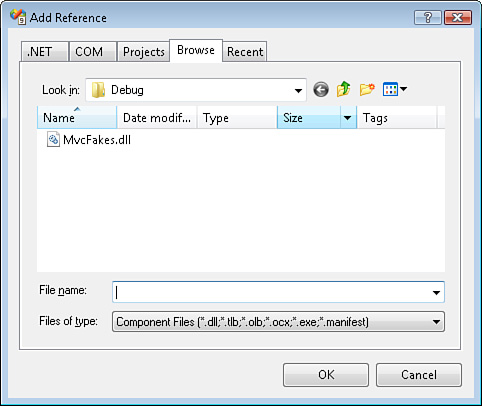
Here’s how you add a reference to the RouteDebugger assembly. Select the menu option Project, Add Reference to open the Add Reference dialog box (see Figure 9.1).
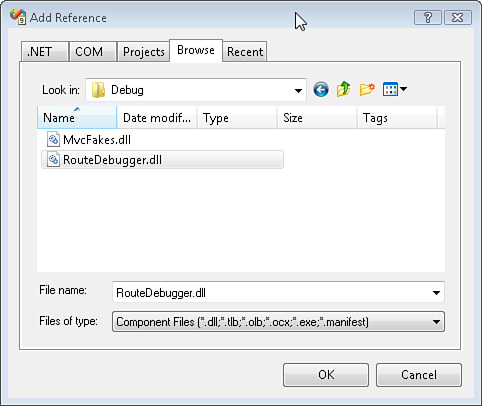
Select the Browse tab and browse to the assembly named RouteDebugger.dll located in the RouteDebuggerBinDebug folder. Click the OK button to add the assembly to your project.
After you add the RouteDebugger assembly to an ASP.NET MVC project, you can debug the routes in the project by entering the following URL into the address bar of your browser:
/RouteDebugger
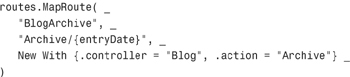
Invoking the Route Debugger displays the page in Figure 9.2. You can enter any relative URL into the form field and view the routes that match the URL. The URL should be an application-relative URL and start with the tilde character (~).
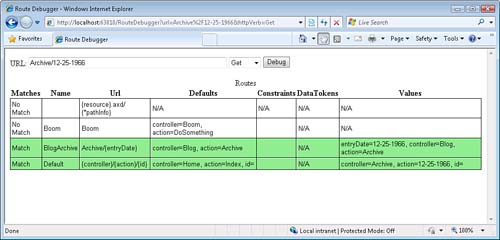
Whenever you enter a URL into the Route Debugger, the Route Debugger displays all the routes from the application’s route table. Each route that matches the URL is displayed with a green background. The first route that matches the URL is the route that would actually be invoked when the application runs.
You can build an entire ASP.NET MVC application without creating a single custom route. However, there are situations in which it makes sense to create a new route. For example, imagine that you want to create a blog application and you want to route requests that look like this:
/Archive/12-25-2008
When someone requests this URL, you want to display blog entries for the date 12-25-2008.
The Default route defined in the Global.asax would extract the following parameters from this URL:
Controller:
ArchiveAction:
12-25-1966
This is wrong. You don’t want to invoke a controller action named 12-25-1966. Instead, you want to pass this date to a controller action.
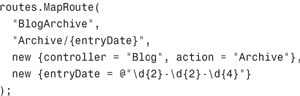
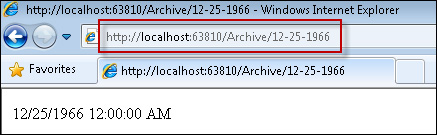
Listing 9.2 contains a custom route, named BlogArchive, which correctly handles requests for blog entries. For example, a request for Archive/12-25-1966 gets mapped to the Blog controller and Archive action. The value 12/-25-1966 is passed as the entryDate parameter (see Figure 9.3).
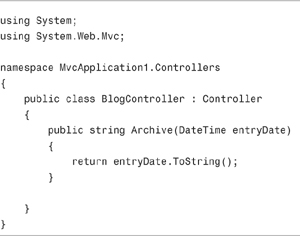
You can use the controller in Listing 9.3 with the BlogArchive route. This controller contains an Archive() action method that echoes back the value of the entryDate parameter.

The order that you add a custom route to the Global.asax file is important. The first route matched is used. For example, if you reverse the order of the BlogArchive and Default routes in Listing 9.2, then the Default route would always be executed instead of the BlogArchive route.
When you create a custom route, you can include route constraints. A constraint restricts the requests that match a route. There are three basic types of constraints: regular expression constraints, the HttpMethod constraint, and custom constraints.
You can use a regular expression constraint to prevent a request from matching a route unless a parameter extracted from the request matches a particular regular expression pattern. You can use regular expressions to match just about any string pattern including currency amounts, dates, times, and numeric formats.
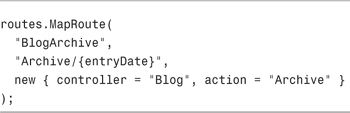
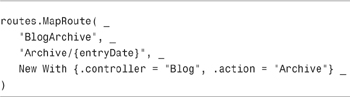
For example, the BlogArchive custom route that we created in the previous section was created like this:
(C#)
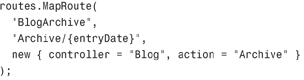
(VB)
This custom route matches the following URLs:
/Archive/12-25-1966
/Archive/02-09-1978
Unfortunately, the route also matches these URLs:
/Archive/apple
/Archive/blah
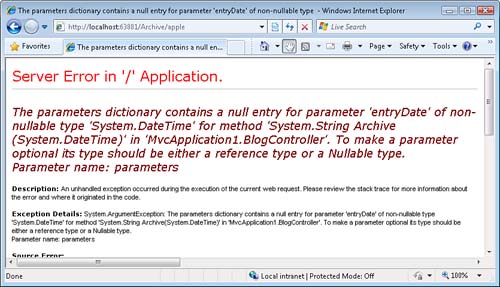
There is nothing to prevent you from entering something that is not a date in the URL. If you request a URL such as /Archive/apple, you get the error page in Figure 9.4.
We really need to prevent URLs that don’t contain dates from matching our BlogArchive route. The easiest way to fix our route is to add a regular expression constraint. The following modified version of the BlogArchive route won’t match URLs that don’t contain dates in the format 01-01-0001:
(C#)
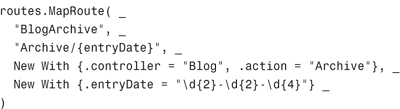
The fourth parameter passed to the MapRoute() method represents the constraints. This constraint prevents a request from matching this route when the entryDate parameter does not match the regular expression d{2}-d{2}-d{4}. In other words, the entryDate must match the pattern of two decimals followed by a dash followed by two decimals followed by a dash followed by four decimals.
You can quickly test your new version of the BlogArchive route with the Route Debugger. The page in Figure 9.5 shows the matched routes when an invalid date is entered. Notice that the BlogArchive route is not matched.

The URL routing framework includes a special constraint named the HttpMethod constraint. You can use the HttpMethod constraint to match a route to a particular type of HTTP operation. For example, you might want to prevent a particular URL from being accessed when performing an HTTP GET but not when performing an HTTP POST.
Note
Instead of using the HttpMethod constraint, consider using the AcceptVerbs attribute. You can apply the AcceptVerbs attribute to a particular controller action or an entire controller to prevent a controller action from being invoked unless the action is invoked with the right HTTP method. We discuss the AcceptVerbs attribute in Chapter 3, “Understanding Controllers and Actions.”
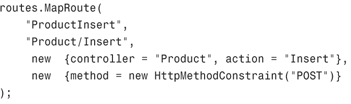
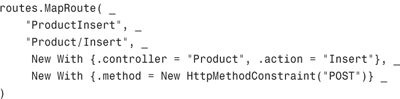
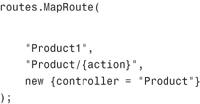
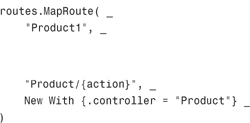
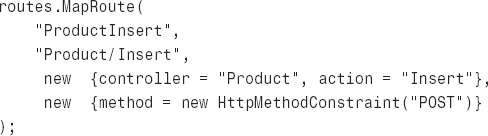
For example, the following route, named ProductInsert, can be called only when performing an HTTP POST operation:
(C#)
(VB)
You can check whether the ProductInsert route works by taking advantage of the Route Debugger. The Route Debugger enables you to pick an HTTP method that you want to simulate. The page in Figure 9.6 illustrates testing the ProductInsert route when performing an HTTP POST operation.
If you need to create a more complicated constraint—something that you cannot easily represent with a regular expression—you can create a custom constraint. You create a custom constraint by creating a class that implements the IRouteConstraint interface. This interface is easy to implement because it includes only one method: the Match() method.
For example, Listing 9.4 contains a new constraint named the AuthenticatedConstraint. The AuthenticatedConstraint prevents a request from matching a route when the request is not made by an authenticated user.
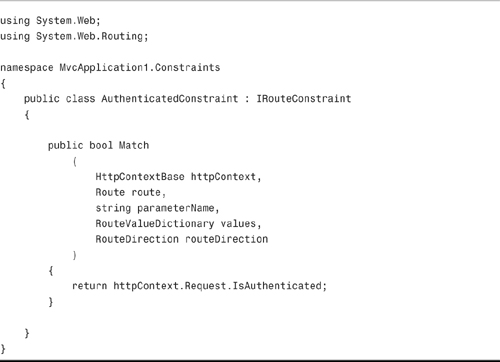
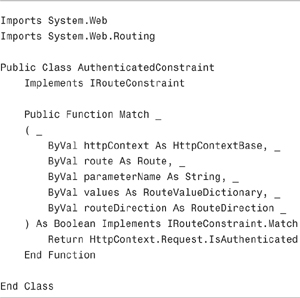
In Listing 9.4, the Match() method simply returns the value of the HttpContext.Request.IsAuthenticated property to determine whether the current request is an authenticated request. If the Match() method returns the value False, the request fails to match the constraint and the route is not matched.
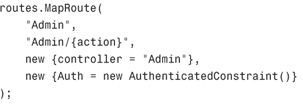
After you create the AuthenticatedConstraint, you can use it with a route like this:
(C#)
(VB)
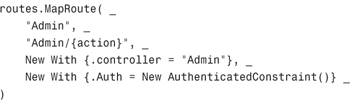
It is important to understand that the AuthenticatedConstraint prevents only a particular route from matching a request. Another route, that does not include the AuthenticatedConstraint, might match the same request and invoke the same controller action. In the next section, I show you how to create a constraint that prevents a route from ever invoking a particular controller.
Note
The ASP.NET MVC framework includes an Authorize attribute that you can apply to either a particular action or entire controller to prevent access from unauthorized users. We discuss the Authorize attribute in Chapter 3.
If you want to create a route that never matches a particular controller action—or more generally, that never matches a particular route parameter value—you can create a NotEqual constraint.
The code for the NotEqual constraint is contained in Listing 9.5.

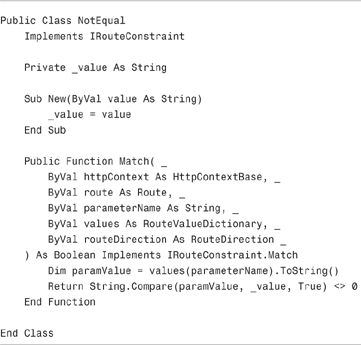
The NotEqual constraint performs a case-insensitive match of the value of a parameter against a field named _value. If there is a match, the constraint fails and the route is skipped.
After you create the NotEqual constraint, you can create a route that uses the constraint like this:
(C#)
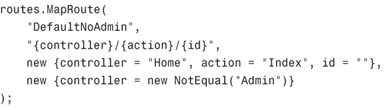
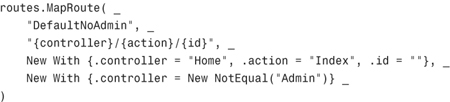
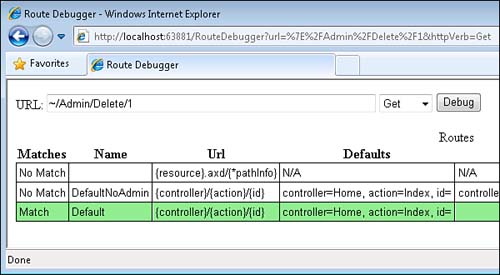
This route works just like the Default route except that it never matches when the controller parameter has the value Admin. You can test the NotEqual constraint with the Route Debugger. In Figure 9.7, the URL /Admin/Delete matches the Default route, but it does not match the DefaultNoAdmin route.
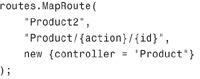
Normally, to match a route, a URL must contain a particular number of segments. For example, the URL /Product/Details matches the following route:
(C#)
(VB)
However, it does not match the following route:
(VB)

This route requires a URL to have three segments, and the URL /Product/Details has only two segments (two forward slashes).
Note
The URL requested is not required to have the same number of segments as a route’s URL parameter. When a route parameter has a default value, a segment is optional. For example, the URL /Home/Index matches a route that has the URL pattern {controller}/{action}/{id} when the id parameter has a default value.
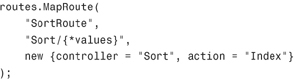
If you want to match a URL, regardless of the number of segments in the URL, you need to create something called a catch-all parameter. Here’s an example of a route that uses a catch-all parameter:
(C#)
(VB)
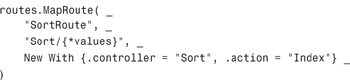
Notice that the route parameter named values has a star (*) in front of its name. The star marks the parameter as a catch-all parameter. This route matches any of the following URLs:
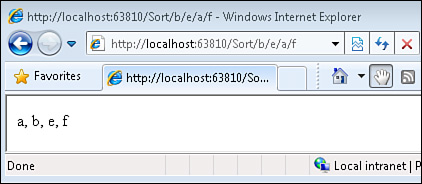
/Sort
/Sort/a/b/d/c
/Sort/Women/Fire/Dangerous/Things
All the segments after the first segment are captured by the catch-all parameter.
Note
A catch-all parameter must appear as the last parameter. Think of a catch-all parameter as a parameter array.
The Sort controller in Listing 9.6 illustrates how you can retrieve the value of a catch-all parameter within a controller action.
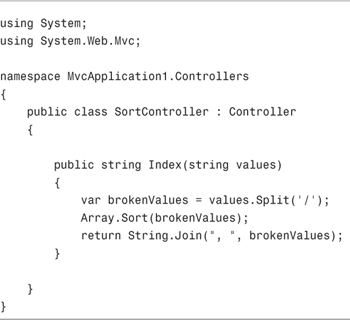
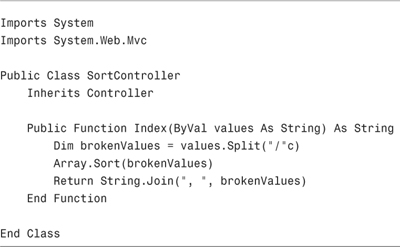
Notice that the catch-all parameter is passed to the Index() action as a string. (You cannot pass the value as an array.) The Index() method simply sorts the values contained in the catch-all parameter and returns a string with the values in alphabetical order (see Figure 9.8).
Every feature of the ASP.NET MVC framework was designed to be highly testable and URL routing is no exception. In this section, I describe how you can unit test both your routes and your route constraints.
Why would you want to build unit tests for your routes? If you build route unit tests, you can detect whether changes in your application break existing functionality automatically. For example, if your existing routes are covered by unit tests, you know immediately whether introducing a new route prevents an existing route from ever being called.
To unit test your custom routes, I recommend that you add references to two assemblies: the RouteDebugger and the MvcFakes assemblies.
If you want to test your routes by name, you need to add a reference to the RouteDebugger assembly. The RouteDebugger assembly replaces the anonymous routes in your MVC application with named routes. That way, you can build tests that check whether a particular route is called by name.
I also recommend that you add a reference to the MvcFakes assembly. The MvcFakes assembly contains a set of fake objects that you can use in your unit tests. For example, MvcFakes includes a FakeHttpContext object. You can use the FakeHttpContext object to fake every aspect of a browser request.
Both of these assemblies are included with the code that accompanies this book. You can add references to these assemblies to your test project by selecting the menu option Project, Add Reference, selecting the Browse tab, and browsing to the following two assemblies (see Figure 9.9): RouteDebugger.dll and MvcFakes.dll.

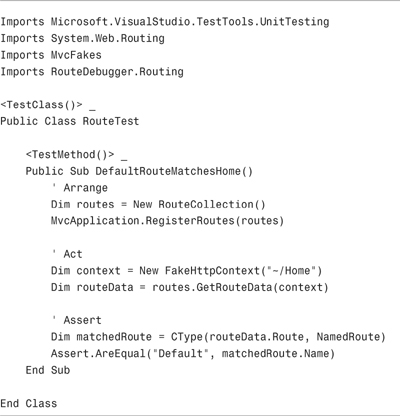
Let’s start with a basic but useful unit test. Let’s create a unit test that verifies that a particular URL matches a particular route. The unit test is contained in Listing 9.7.
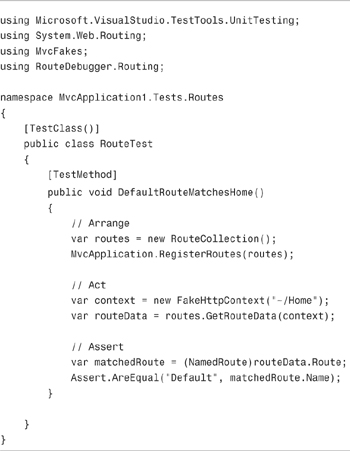
You can add the unit test in Listing 9.7 to a Test project by selecting the menu option Project, Add New Test and selecting the Unit Test template. Remember to add the assembly references discussed in the previous section or the unit test won’t compile.
Warning
Don’t select the Unit Test Wizard. Also, don’t select the tempting menu option Project, Add New Unit Test. Either option launches the Unit Test Wizard. The Unit Test Wizard creates a unit test that launches a web server. (We don’t want to do that.) Instead, always pick the menu option Project, Add New Test and select the Unit Test template.
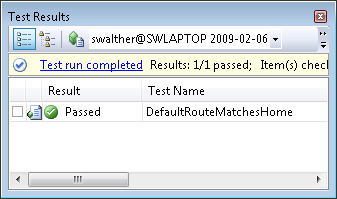
After you create the unit test in Listing 9.7, you can run it by entering the keyboard combination Ctrl+R, A. Alternatively, you can click the Run All Tests in Solution button contained on the Test toolbar (see Figure 9.10).
The test in Listing 9.7 verifies that the URL ~/Home matches the route named Default. The unit test consists of three parts.
The first part, the Arrange part, sets up the routes by creating a new route collection and passing the route collection to the RegisterRoutes() method exposed by the Global.asax file. (Notice that you use the MvcApplication class to refer to the class exposed by Global.asax.)
The second part, the Act part, sets up the fake HttpContext that represents the browser request for ~/Home. The FakeHttpContext object is part of the MvcFakes project. The FakeHttpContext object is passed to the GetRouteData() method. This method takes an HttpContext and returns a RouteData object that represents information about the route matched by the HttpContext.
Finally, the Assert part verifies that the RouteData represents a route named Default. At this point, the unit test either succeeds or fails. If it succeeds, you get the test results in Figure 9.11.
Let’s try testing a slightly more complicated route. Earlier in this chapter, we discussed the HttpMethodConstraint that you can use to match a route only when the right HTTP method is used. For example, the following route should only match a browser request performed with an HTTP POST operation:
(C#)
(VB)

The HttpMethodConstraint restricts this route to match only POST requests. This is the intention; how do you test it? Easy, fake the HTTP operation with the FakeHttpContext object.
The unit test in Listing 9.8 contains two unit tests. The first test verifies that the ProductInsert route is matched when performing a POST operation. The second test verifies that the ProductInsert route is not matched when performing a GET operation.
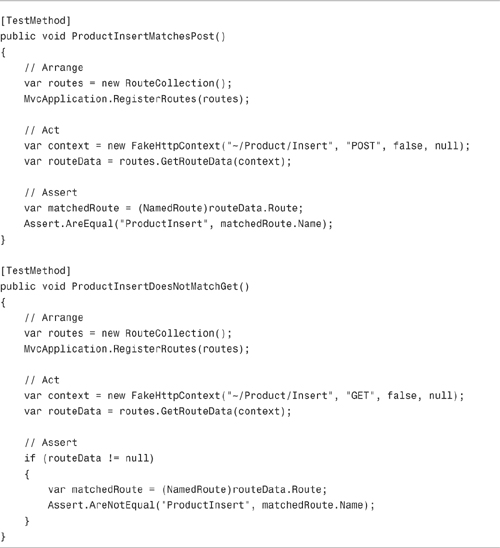
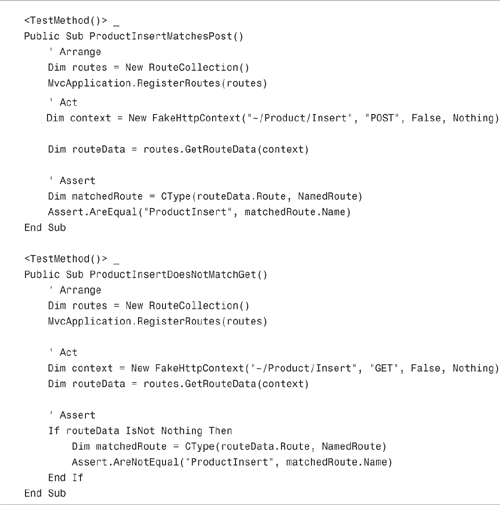
The second parameter passed to the constructor for the FakeHttpContext object determines the HTTP operation that the FakeHttpContext object represents.
In this chapter, you learned how to control how browser requests map to controllers and controller actions by taking advantage of ASP.NET Routing. We started by discussing the standard parts of a route.
You also learned how to debug the routes contained in the Global.asax file by taking advantage of the RouteDebugger assembly. We took advantage of the Route Debugger when building our custom routes.
We also discussed how you can use route constraints to limit the routes that match a browser request. In particular, you learned how to use regular expression route constraints, HttpMethod route constraints, and custom route constraints.
Finally, you learned how to build unit tests for your custom routes. You learned how to take advantage of the FakeHttpContext object to fake different browser requests and test the routes that are matched.