
In This Chapter
The set of views in an ASP.NET MVC application is the public face of the application. ASP.NET MVC views are responsible for rendering the HTML pages that people see when they visit your website.
In this chapter, you learn how to create and work with views. You learn how to pass information from a controller to a view. You also learn how to create both typed and untyped views. Finally, you learn strategies for testing your views.
The easiest way to create a new view is to create the view from an existing controller action. You can right-click any controller action within the Visual Studio Code Editor window and select the menu option Add View to create a new view automatically (see Figure 4.1).

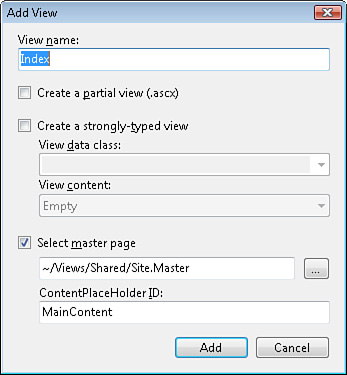
When you select the Add View menu option, the Add View dialog opens (see Figure 4.2). This dialog enables you to set various view options. For example, you can specify whether a view uses a view master page.
Note
We discuss view master pages in detail in Chapter 10, “Understanding View Master Pages and View User Controls.” A view master page provides you with a way to create a common page layout for all of the content pages in your application.
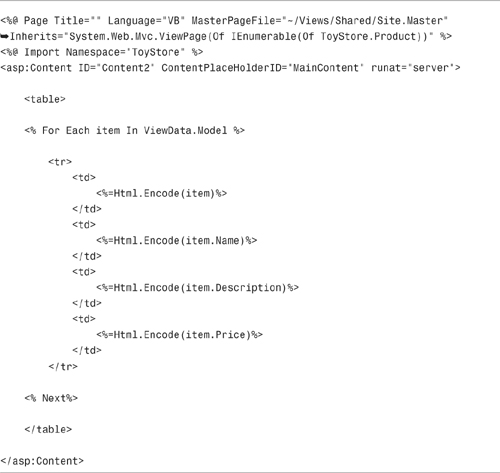
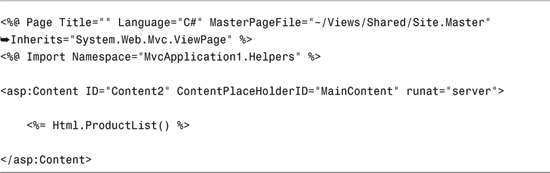
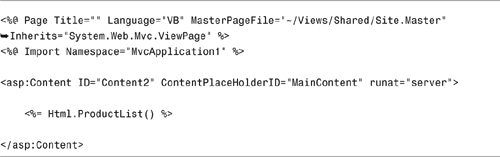
For example, if you open a controller named Customer and right-click the Index() action to add a view, and you leave the default options selected in the Add View dialog, you’ll get the view in Listing 4.1.
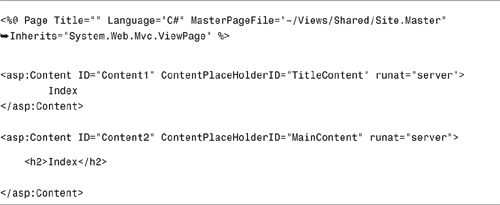
The file in Listing 4.1 looks almost like a standard HTML document. This view contains two <asp:Content> tags. Any content that you place within the first <asp:Content> tag appears in the <title> tag of the resulting HTML document. Any content that you place within the second <asp:Content> tag appears in the <body> tag of the resulting HTML document.
For example, the modified Index view in Listing 4.2 has been modified to display the current time.
Note
Notice that the first <asp:Content> tag has been removed from the view in Listing 4.2. If you don’t need to modify the contents of the <title> tag, you don’t need the first <asp:Content> tag.
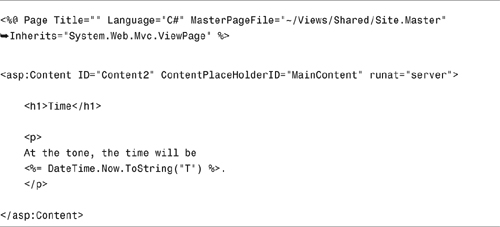
The view in Listing 4.2 contains familiar HTML tags such as the <h1> and <p> tags. You can put anything that you would put in a normal HTML page within a view including images, iframes, Java applets, Flash, and Silverlight.
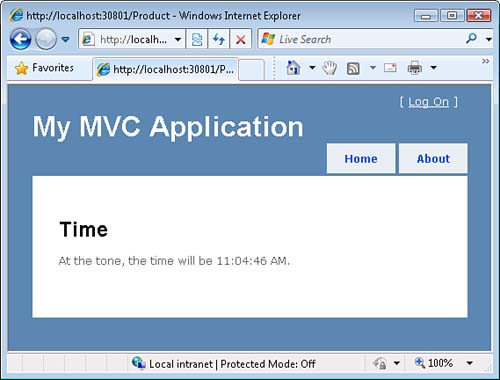
The view also contains a script that displays the time. The expression DateTime.Now.ToString("T") returns the current time (see Figure 4.3).
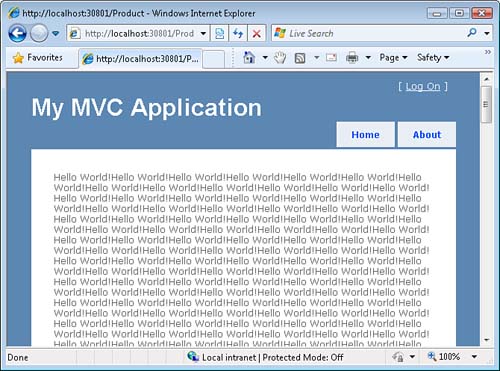
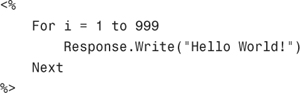
You embed a script in a view by using the <% %> script delimiters. For example, if for some bizarre reason you want to display the string Hello World! 999 times in a page, you could embed the following script in a page (see Figure 4.4):
(C#)

The <%= %> script delimiters are shorthand for <% Response.Write %>. You can use the <%= %> script delimiters to write the value of an expression to the browser. The following two scripts do exactly the same thing:
(C#)
![]()
(VB)
![]()
You pass information between a controller and a view by taking advantage of something called view data. You can use view data to represent any type of information including strings, objects, and database records.
For example, imagine that you want to display a set of database records in a view. In that case, you would use view data to pass the set of records from a controller action to a view.
You add an item to view data within a controller by adding the item to the view data dictionary exposed by the controller’s ViewData property. For example, you could add the following code to a controller action to add a new item to view data named message:
(C#)
ViewData["message"] = "Hello World!";
ViewData("message") = "Hello World!"
View data works like a dictionary. You can add any key and value pair that you want to the view data dictionary. The key must be a string, but the value can be any type of data whatsoever.
After you add one or more items to view data, you can display these items in a view by accessing the view data dictionary exposed by the view’s ViewData property. For example, the view in Listing 4.3 displays the value of the message item from view data.
In the previous section, you learned how to add items to the view data dictionary. One problem with the view data dictionary is that it represents everything as untyped objects. This means that you must cast items to a particular data type before you can use the items in a view.
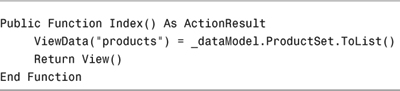
Consider, for example, the controller action in Listing 4.4. This action adds a set of database records representing products to view data.

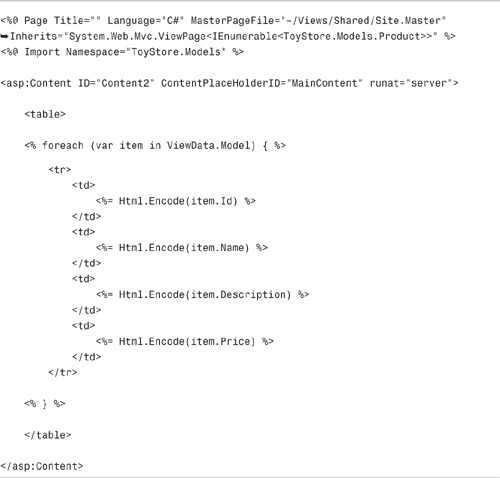
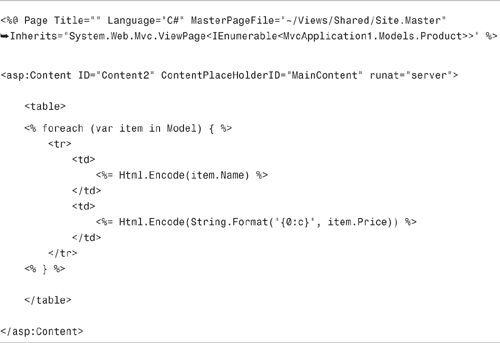
The view in Listing 4.5 illustrates how you can display the records from the database table in an HTML table.
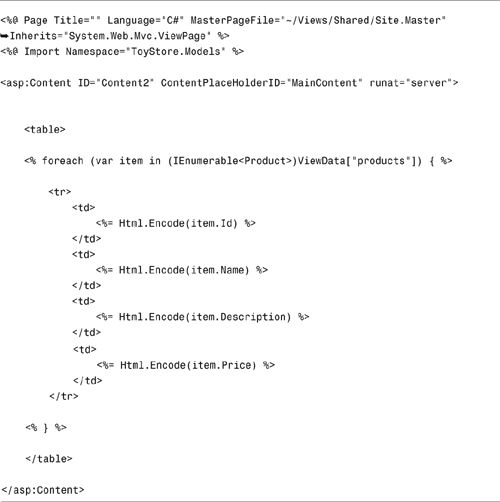
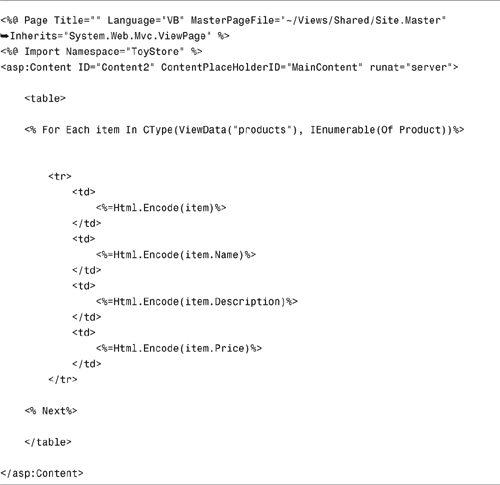
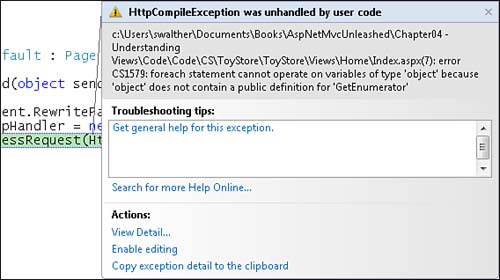
In Listing 4.5, notice that the products item from view data is cast to an IEnumerable of Product. An IEnumerable is something that you can enumerate over—something you can loop through. If you write your view with C#, then you must cast the products item to an IEnumerable or you get an error (see Figure 4.5). Regardless of whether you use C# or VB.NET, you won’t get Intellisense for Product properties unless you cast.
Note
If you have Option Strict enabled, Visual Basic, like C#, generates an error when you don’t cast the product item to an IEnumerable.
If you don’t want to clutter your views by casting the view data, you can create a strongly typed view.
The view data dictionary exposes a property named Model. Within a controller you can assign anything you want to the view data model. For example, the controller action in Listing 4.6 assigns the Product database records to the Model property.
Note
The ViewDataDictionary class derives from the standard generic Dictionary class (more precisely, IDictionary) and adds additional properties. So, you can use all of the standard generic Dictionary methods with the ViewDataDictionary class.
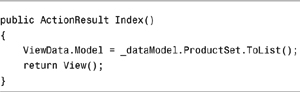

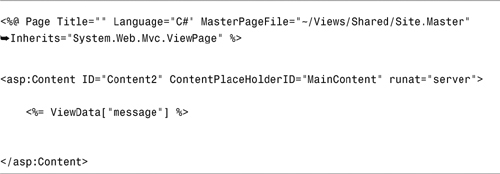
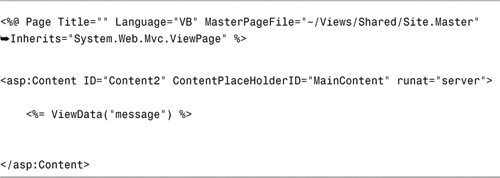
The advantage of assigning a value to the ViewData.Model property is that you can cast the Model property automatically in a view. In a view, you can specify the type of object that the Model represents with the <%@ Page %> directive Inherits attribute.
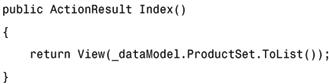
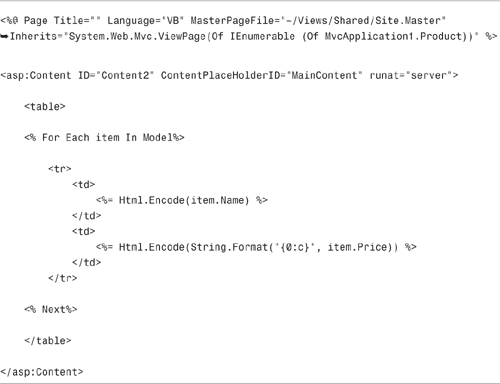
For example, the strongly typed view in Listing 4.7 renders the exact same page as the previous untyped view.
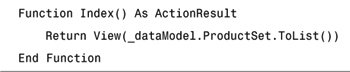
Notice the Inherits attribute in Listing 4.7. The view inherits from the following class:
(C#)
System.Web.Mvc.ViewPage<IEnumerable<ToyStore.Models.Product>>
(VB)
System.Web.Mvc.ViewPage(Of IEnumerable(Of ToyStore.Product))
This Inherits attribute casts the ViewData.Model property to an IEnumerable of Product. For this reason, in the body of the view, you do not need to cast the ViewData.Model property before looping through its items.
The ViewPage class is the base class for all ASP.NET MVC views. There is both a generic and nongeneric version of this class. When you use the generic ViewPage class, you must supply a generic type parameter that represents the type of the model class.
Providing the proper value for the Inherits attribute for a typed view can be tricky. Because you don’t get any Intellisense for the Inherits attribute, you can easily make a mistake, and your view generates an error.
Instead of creating a strongly typed view by hand, you can take advantage of the Visual Studio Add View dialog to create a strongly typed view automatically (see Figure 4.6). You open this dialog by right-clicking a controller action and selecting the menu option Add View. Alternatively, you can right-click a folder located in the Views folder and select the menu option Add, View.
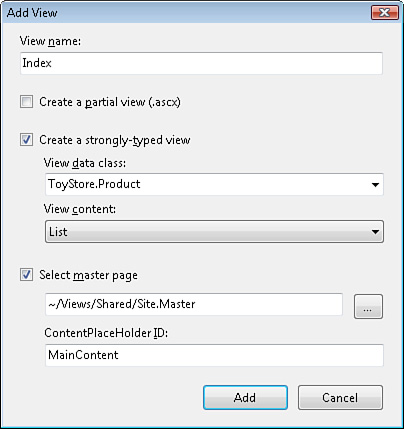
The Add View dialog includes a check box labeled Create a Strongly Typed View. If you check this check box, you can specify the view data class and the view content.
Warning
The View Data Class drop-down list will be empty until you successfully build your application. It is a good idea to select the menu option Build, Build Solution before opening the Add View dialog.
The View Data Class drop-down list enables you to pick a class from your project. The Inherits directive uses this class. For example, you can pick the Product class.
The View Content drop-down list enables you to pick the type of view that you want to create. Your options are Create, Details, Edit, Empty, and List. If you pick List, your view data model is cast to an IEnumerable of Products. Otherwise, if you pick any of the other options, your view data model is cast to a Product.
When you submit form data using a view, the ASP.NET MVC framework validates the form data automatically. If the framework identifies potentially malicious markup, the framework throws an exception (see Figure 4.7).
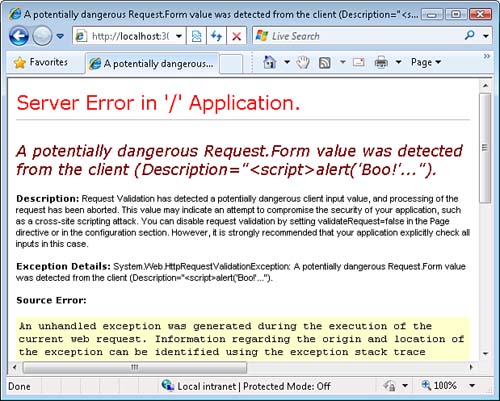
What counts as malicious markup? Anything that could potentially open your website to a JavaScript injection attack. For example, submitting the following text generates an error:
<script>alert('Boo!')</script>
Note
JavaScript injection attacks include cross-site scripting (XSS) attacks. A good introduction to XSS attacks can be found at http://en.wikipedia.org/wiki/Cross-site_scripting.
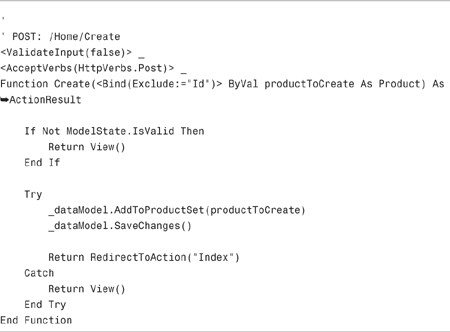
In some situations, you don’t want to perform this validation. For example, if you host a discussion forum on building websites, you most likely want to enable users to post messages that contain HTML tags.
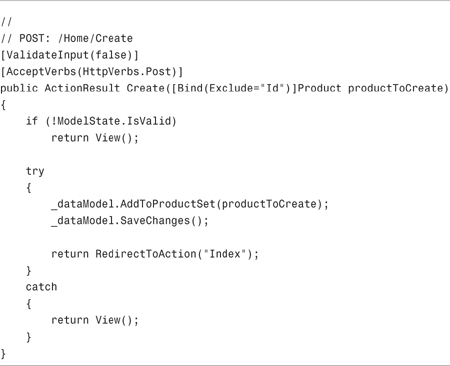
You disable request validation with the [ValidateInput] attribute. You apply this attribute to the controller action that accepts the HTML form input. For example, the Create() action in Listing 4.8 has request validation disabled.
Note
Unlike ASP.NET Web Forms, you cannot disable request validation with the <%@ Page ValidateRequest="false" %> directive, and you cannot disable request validation in the web configuration (web.config) file. In an ASP.NET MVC application, the only way to disable request validation is with the ValidateInput attribute.
If you disable request validation, ensure that you never display user-submitted content without first HTML encoding the content. HTML encoding text converts potentially dangerous characters such as < and > into safe entities such as < and >. Use the Html.Encode() helper to HTML encode all user-submitted content in your views.
The default view engine for the ASP.NET MVC framework is the Web Forms view engine. The Web Forms view engine uses ASP.NET pages as views.
The ASP.NET MVC framework was designed to support alternative view engines, and there are already several open source alternatives to the Web Forms view engine. Here’s a list of some of the more interesting and popular ones:
• NHaml (pronounced enamel)—NHaml is an implementation of the popular RAILS Haml view engine for the ASP.NET MVC framework. Distributed under the open source MIT license.
http://code.google.com/p/nhaml
• Spark—The idea behind the Spark view engine is to allow “the HTML to dominate the flow and the code to fit seamlessly.”
• Brail—A port of the Brail view engine from MonoRail to the ASP.NET MVC framework. The Brail view engine is part of the MVCContrib project.
• nVelocity—The nVelocity view engine is a port of the Java Apache Software Foundation Velocity project to the .NET framework. The nVelocity view engine is part of the MVCContrib project.
The different view engines enable you to write your views in radically different ways. For example, Listing 4.9 contains a sample of a view written with the NHaml view engine.
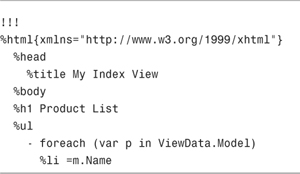
The NHaml view in Listing 4.9 loops through all the products represented by the ViewData.Model property and renders the value of the Product Name property. Just like the Web Forms view engine, the NHaml view engine renders HTML. However, notice the terseness of the syntax. You can render a valid and complete HTML page that displays a set of database records with a minimum of effort.
You can use multiple view engines in the same ASP.NET MVC application by registering multiple engines in the Global.asax file. Each view engine can handle a file with a different extension. For example, all .aspx files can be rendered by the Web Forms view engine, whereas all .haml files can be rendered by the NHaml view engine. We look at a concrete example of registering alternative view engines in the next section.
Creating a simple custom view engine for the ASP.NET MVC framework is not difficult. When you create a custom view engine, you get to decide how you want to write your views.
The easiest approach to create a custom view engine is to derive a new view engine from the abstract VirtualPathProviderViewEngine class. This is the base class of the WebFormsViewEngine (the default view engine). The VirtualPathProviderViewEngine class takes care of all the low-level mechanics of finding and caching views.
The view engine in Listing 4.10 is the simplest view engine that I could imagine. (That’s why I call it the Simple View Engine.) The Simple View Engine derives from the VirtualPathProviderViewEngine class and returns simple views.
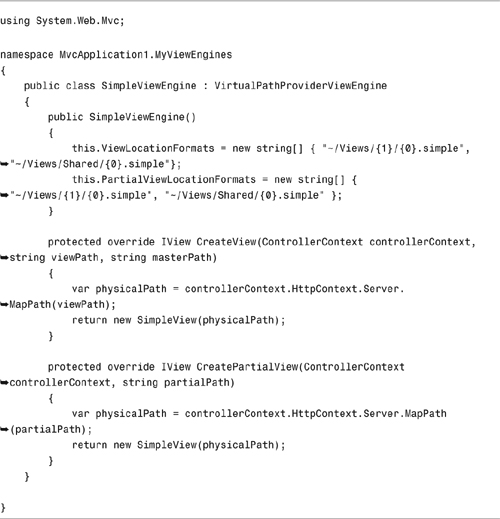
When you implement the VirtualPathProviderViewEngine class, you are required to implement two methods named CreateView() and CreatePartialView(). In Listing 4.10, these methods simply return an instance of the SimpleView class.
Notice that two properties of the base VirtualPathProviderViewEngine class are set in the constructor. These properties indicate where the view engine should search to find a matching view or partial view. The parameter {1} represents the name of the controller and the parameter (0) represents the name of the action. Therefore, if you request the URL /Product/Index, the Simple View Engine searches in the following locations for a matching view:
ViewsProductIndex.simple
ViewsSharedIndex.simple
The SimpleView class implements the IView interface. The SimpleView class is responsible for actually rendering the view. This class is contained in Listing 4.11.
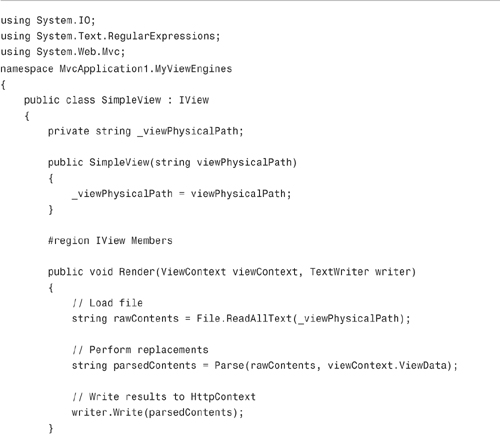
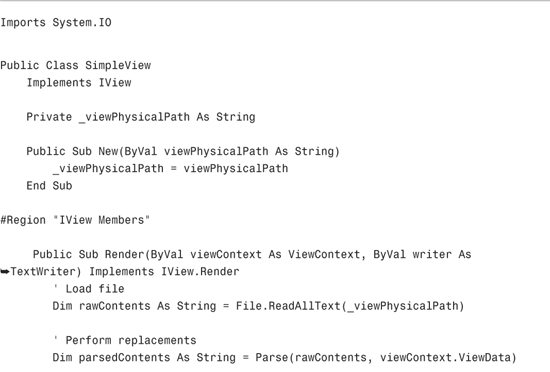
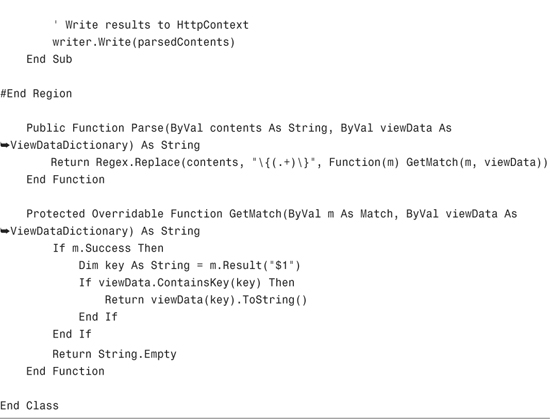
In Listing 4.11, the Render() method loads the file that contains the view, performs regular expression replacements in the file, and writes the result to a text writer.
The regular expression replacements inject view data into the view. For example, if the view contains the expression {message}, the message item from view data is injected into that location in the view.
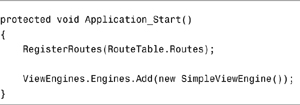
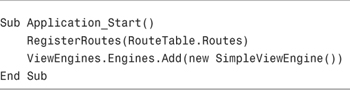
To use a custom view engine, you must register the view engine in the Global.asax file. The SimpleViewEngine is registered in the Application_Start() method in Listing 4.12.
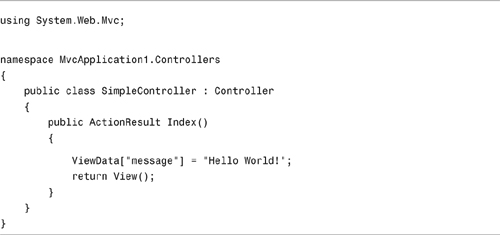
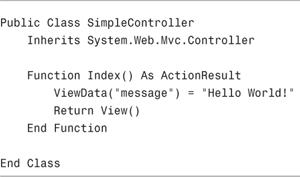
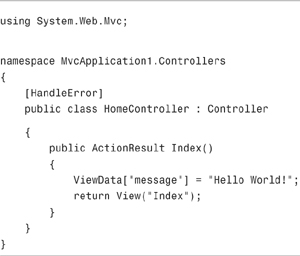
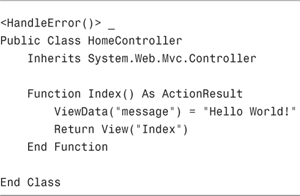
You don’t need to make any changes to your controllers to use a custom view engine. For example, the Index action in Listing 4.13 adds an item named message to view data and returns a view.
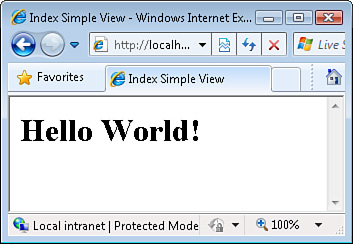
The view in Listing 4.14 is named Index.simple. This view is returned by the Simple controller when you request the URL /Simple/Index.
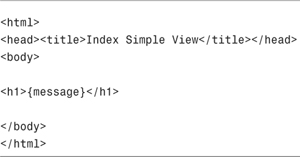
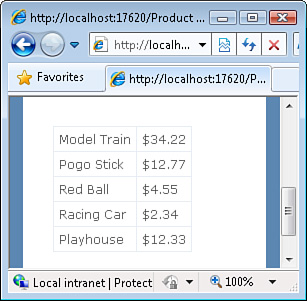
The SimpleView class loads the Index.simple file, replaces {message} with Hello World!, and renders the HTML page in Figure 4.8.
Note
Of course, Visual Studio does not contain a template for .simple files because we just made up this type of file. To add the file in Listing 4.14 to your project, add an HTML file and then change its extension.
You might want to build unit tests for the views in your ASP.NET MVC application. For example, you might want to test whether a particular view renders an HTML page that contains a particular string. After all, the more you can test, the stronger the safety net for your code.
Unfortunately, there is no easy way to build unit tests for views created with the default Web Forms view engine. The default Web Forms view engine relies on classes such as the VirtualPathProvider class and the HttpRuntime class down to its bones.
Therefore, if you want to test the views in your ASP.NET MVC application, you must seek an alternative. In this section, we discuss three methods to test your views that do not depend on the default Web Forms view engine.
In many cases, what you actually need to test is not the view, but the view result. In particular, you need to test whether a controller returns the view and view data expected.
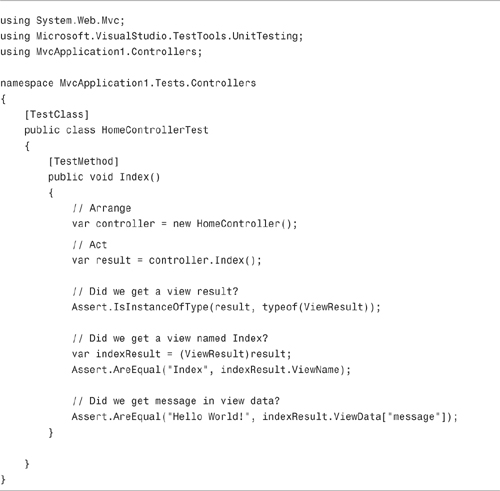
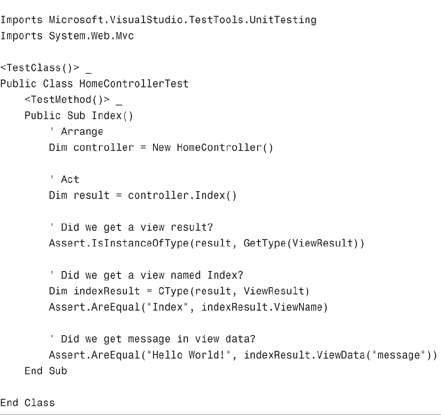
Consider the controller in Listing 4.15. This controller returns a view named Index and an item in view data named message.
You can write unit tests that verify several properties of the view result returned by the Index action in Listing 4.15. The unit test in Listing 4.16 verifies the type of action result returned by the controller, the name of the view result, and the view data associated with the view result.
When using the default Web Forms view engine, the best option for testing your views is to move any view logic that you want to test into an HTML helper. Although you cannot easily write unit tests for views, you can easily write unit tests for HTML helpers.
Note
We discuss HTML helpers in detail in Chapter 6, “Understanding HTML Helpers.” Roughly speaking, an HTML helper is a method that renders HTML content to the browser.
For example, imagine that you want to display a list of products from a database in a view (see Figure 4.9). You could create the view in Listing 4.17. The problem with this view, however, is that it is not easily testable.
Instead of placing the logic to display the database records in a view, you can place the logic in an HTML helper. The HTML helper in Listing 4.18 displays the set of products.
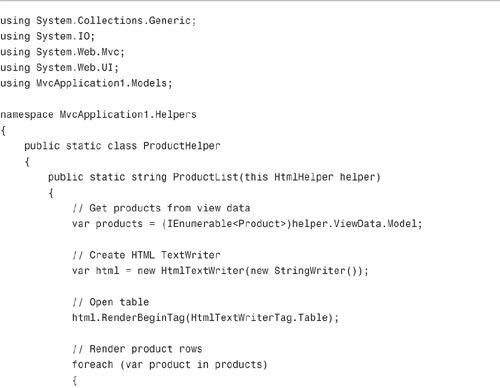
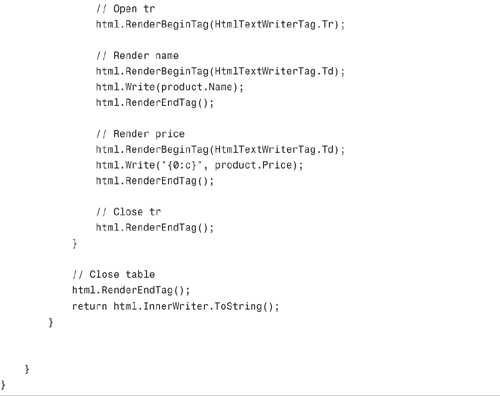
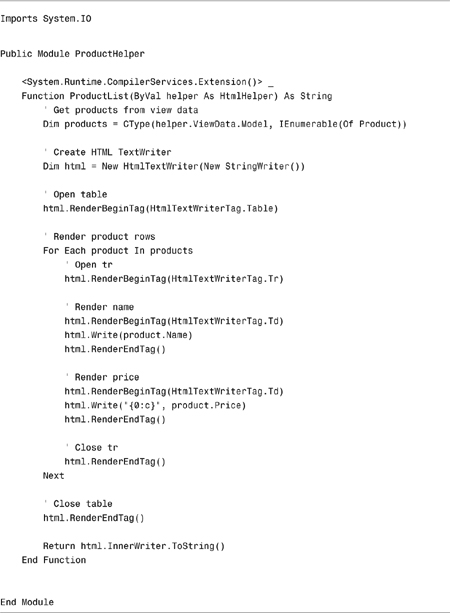
The view in Listing 4.19 uses the Html.ProductList() helper to render the list of products. All the view logic for rendering the HTML table is now encapsulated within the helper method.
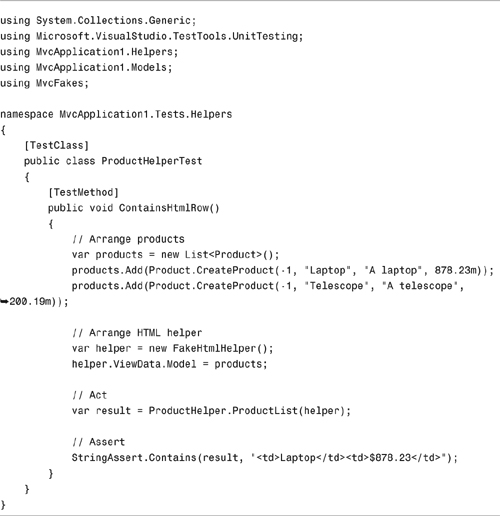
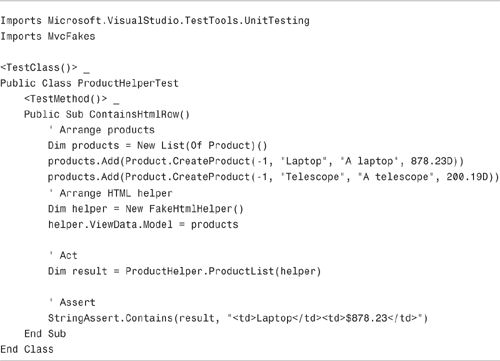
Unlike a view, an HTML helper can be tested. The unit test in Listing 4.20 verifies that the first row of the HTML table rendered by the ProductList() helper matches the string "<td>Laptop</td><td>$878.23</td>".
Note
The unit test in Listing 4.20 takes advantage of the MvcFakes project. The FakeHtmlHelper class is defined in the MvcFakes project included with the code that is on the book’s website (www.informit.com/title/9780672329982). The FakeHtmlHelper class simplifies the work that you must perform to test a helper method.
Whenever you need to build unit tests for your view logic, consider moving the view logic into a separate HTML helper. You can’t easily unit test the page rendered by a view, but you can easily test the content rendered by an HTML helper.
The final option for building unit tests for view is (most likely) the least appealing option. You can easily test views when you use a view engine other than the default Web Forms view engine. I claim that this is the least appealing option because I expect the vast majority of developers to use the default Web Forms view engine.
For example, earlier in this chapter, we created a Simple View Engine (see Listing 4.11). The Simple View Engine returns simple views (see Listing 4.10). Simple views are easy to test, as illustrated by the unit test in Listing 4.21.
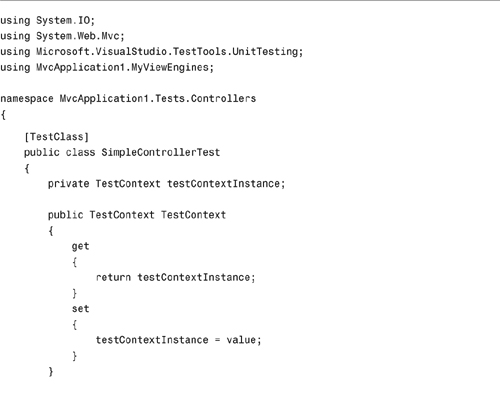
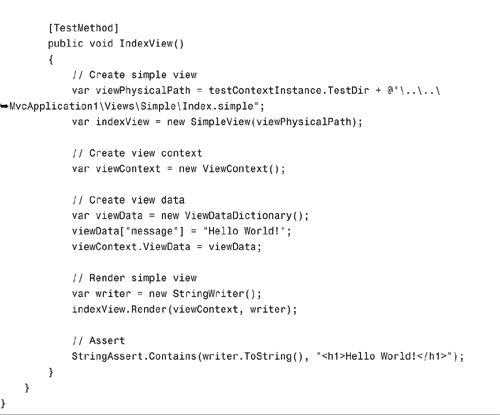
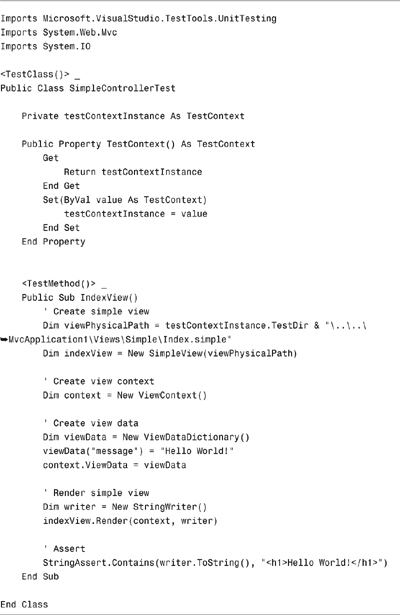
The unit test in Listing 4.21 instantiates a simple view by passing the physical path to the view to the SimpleView class constructor. Next, the SimpleView.Render() method is called to render the view to a string writer. Finally, an assertion is made that the writer contains the text "<h1>Hello World!</h1>".
This chapter was devoted to the subject of ASP.NET MVC views. First, you learned how to create views, and you learned about the distinction between typed and untyped views. You learned how to pass data from a controller to a view by using view data.
Next, we discussed the important subject of preventing JavaScript injection attacks. You learned how to disable request validation by using the [ValidateInput] attribute.
You also were provided with an overview of alternative view engines, and you learned how to create a custom view engine of your own. You learned how to create the Simple View Engine and simple views.
Finally, we leapt into the important topic of testing your views. You learned several different strategies for building unit tests for your views. You learned how to test view results, how to test HTML helpers, and how to test custom views.