
In This Chapter
An ASP.NET MVC model contains all the business, validation, and data access logic required by your application. In other words, a model contains all your application logic except the view logic and controller logic. When building an ASP.NET MVC application, the bulk of your time and effort is devoted to building your model classes.
The focus of this chapter is on creating model classes for data access. In particular, you learn how to build model classes by using the Microsoft Entity Framework.
This chapter is divided into four parts. The first part provides you with an overview of the Microsoft Entity Framework. You learn how to perform basic database operations such as listing, inserting, updating, and deleting records.
Next, you learn about the Repository software design pattern. Things change. New technologies for data access are introduced every few years. The Repository pattern enables you to isolate your data access logic from the remainder of your application so that your application can adapt gracefully to change.
In the next section—and this is my favorite section of this chapter—you learn how to create a generic repository. I show you how you can avoid writing a new repository class each time you build a new application. I explain how you can create a single generic repository that works with both the Microsoft Entity Framework and LINQ to SQL (and other new data access technologies that might be introduced in the future).
Finally, we discuss how you write units tests for application logic that interacts with data access logic. You learn how to both mock and fake a repository layer.
In this book, we focus on using the Microsoft Entity Framework to build our data model. The Microsoft Entity Framework is Microsoft’s recommended data access technology.
It is important to emphasize, however, that the ASP.NET MVC framework is not tied to the Microsoft Entity Framework. You can use your favorite data access technology with ASP.NET MVC. For example, ASP.NET MVC is entirely compatible with alternative data access technologies such as Microsoft LINQ to SQL or NHibernate.
The Microsoft Entity Framework (in part) is an Object Relational Mapping (ORM) tool. You can use the Microsoft Entity Framework to generate data model classes from a database automatically. That way, you do not have to undergo the tedious process of building these data model classes by hand.
For example, if you have a database table named Products, you can use the Microsoft Entity Framework to generate a class named Product that represents a particular row from the table. In your code, instead of interacting with the Products database directly, you interact with the Entity Framework object context and the Product class.
The Entity Framework shields you from needing to interact directly with the database. By taking advantage of the Entity Framework, you never need to write SQL queries again. You can write all your data access code in C# or VB.NET instead of SQL.
Note
To use the Microsoft Entity Framework, you need .NET Framework 3.5 Service Pack 1. The Entity Framework is included in Service Pack 1.
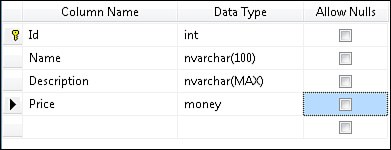
Imagine that you created a database named ProductsDB and a database table named Products. The columns for the Products table are listed in Figure 5.1. This table has four columns. The first column, the Id column, is a primary key column and an identity column.
Now, imagine that you want to access this table from an ASP.NET MVC application. The first step is to use the Microsoft Entity Framework to generate a data model. Follow these steps:
- Right-click the Models folder in the Solution Explorer window and select the menu option Add, New Item.
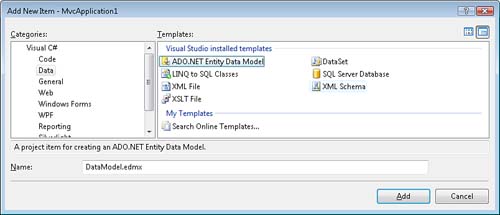
- In the Add New Item dialog, pick the Data category and the ADO.NET Entity Data Model template (see Figure 5.2). Name your data model
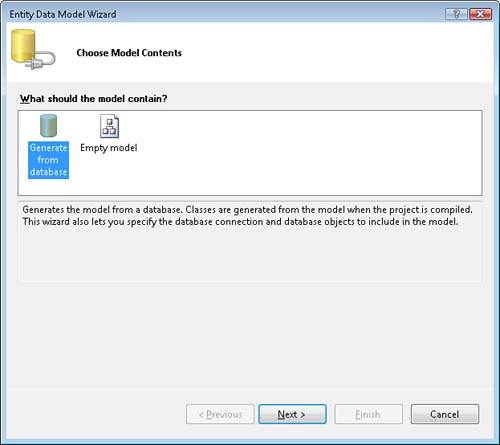
DataModel.edmxand click the Add button. After you click the Add button, the Entity Data Model Wizard appears (see Figure 5.3). - In the Choose Model Contents step, select Generate from database.
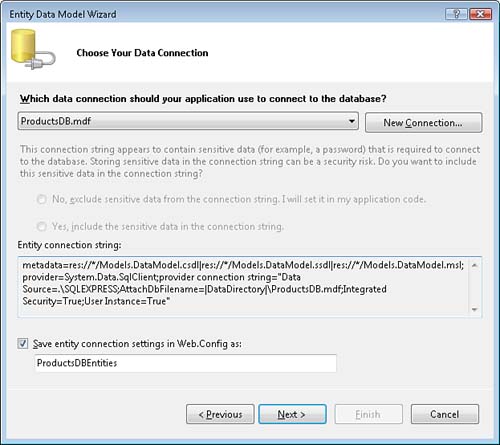
- In the Choose Your Data Connection step, pick the ProductsDB.mdf database for the data connection and use
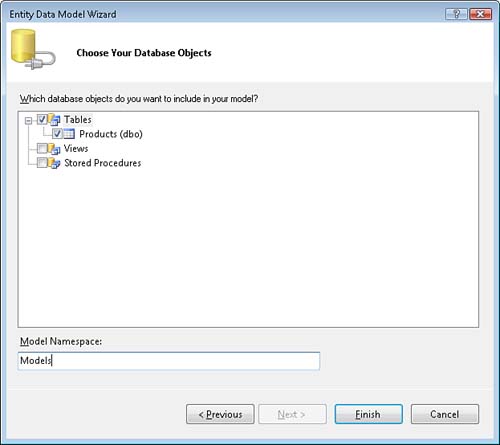
ProductsDBEntitiesfor the connection settings name (see Figure 5.4). - In the Choose Your Database Objects step, select the Products table and enter the namespace
Models(see Figure 5.5). - Click the Finish button to complete and close the wizard.
After you complete the wizard, the ADO.NET Entity Designer appears (see Figure 5.6). The designer displays a single entity class named Products that corresponds to the Products database table. The class contains a property that corresponds to each column from the database.
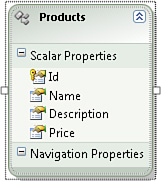
Notice that the name of the entity class is Products. The wizard generates an entity class with the same name as the corresponding database table. Because we want to use the entity class to represent a particular product, you should change the name of the entity class from Products to Product (singular). Right-click the entity on the designer surface and select the menu option Rename to rename the class. Click the Save button (the button with the anachronistic icon of a floppy disk) to save the renamed entity.
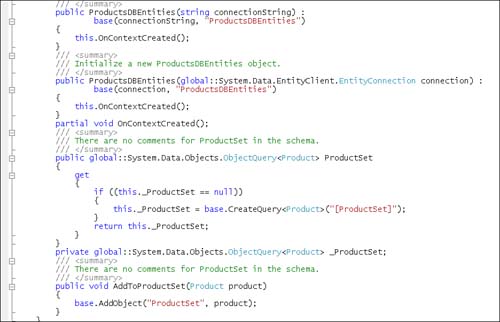
Each entity displayed in the ADO.NET Entity Designer corresponds to a C# or VB.NET class. When you modify entities in the designer and save the changes, the ADO.NET Entity Framework generates the C# or VB.NET classes in the background. You can see these classes by expanding the DataModel.edmx node in the Solution Explorer window and double-clicking the DataModel.Designer file to open the file in the Visual Studio Code Editor (see Figure 5.7).
Note
In a Visual Basic project, the DataModel.Designer file is hidden. To see the file, you need to select the menu option Project, Show All Files.
Currently, our Entity Framework designer file contains definitions for two classes named ProductsDBEntities and Product. The ProductsDBEntities class represents an Entity Framework object context class. The object context class is the class that you use to interact with the database in your code.
In the following sections, you learn how to use the ProductsDBEntities and the Product classes to list, insert, edit, and delete database records.
You use the Entity Framework object context—in our case, the ProductsDBEntities class—to retrieve a set of database records. Instead of using a SQL SELECT command, you use LINQ to represent the query.
For example, the Index() action in Listing 5.1 illustrates how you can retrieve all the products from the Products database table.


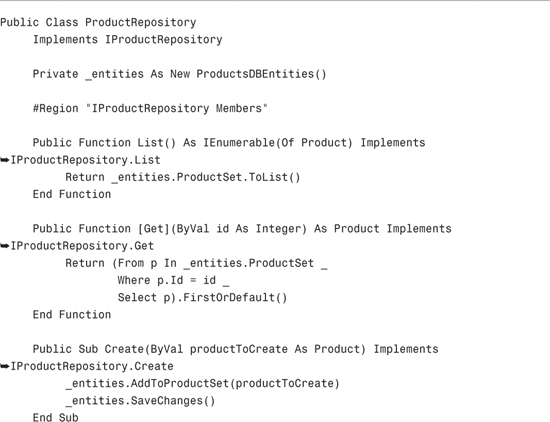
Notice that the Home controller has a private field named _entities that represents an Entity Framework object context. The expression _entities.ProductSet.ToList() returns a generic list of Product classes that represent all the records from the Products database table.
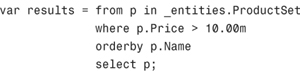
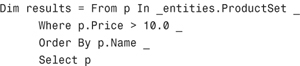
Of course, you can use LINQ to perform more complicated types of queries. The following query returns all the products that have a price greater than $10.00 and returns the products in order of the product name:
(C#)
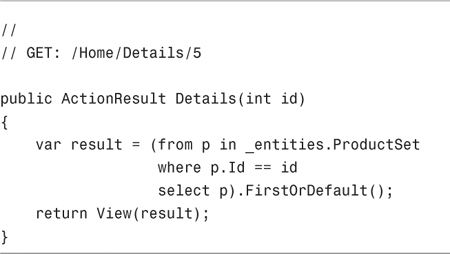
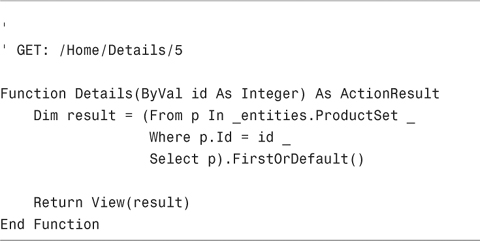
You use a different LINQ query when retrieving a single record. For example, the Details() action in Listing 5.2 retrieves the product record from the Products database that has an Id of 2.
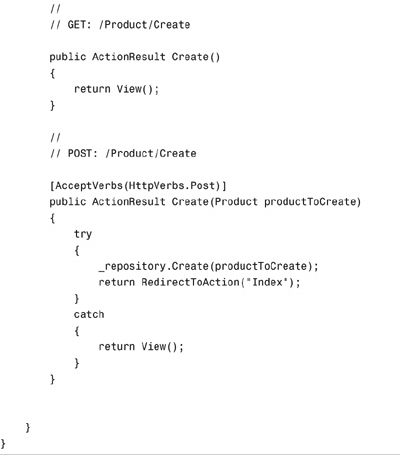
You also use the Entity Framework object context to create new database records. For example, the second Create() action in Listing 5.3 adds a new product to the Products database table.
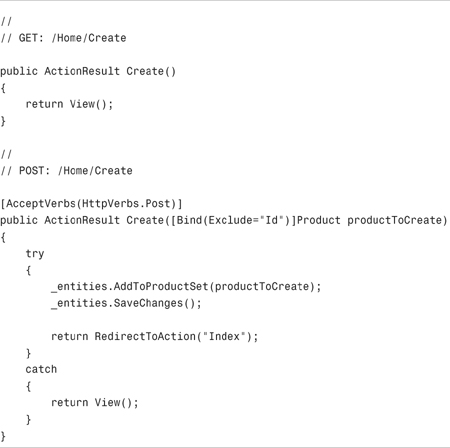
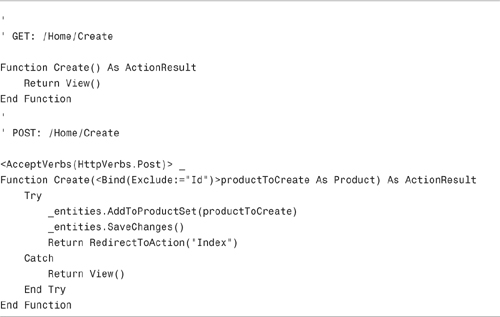
The first Create() action displays the HTML form for creating a new product. The HTML form is submitted to the second Create() action. This action actually adds the new product to the database.
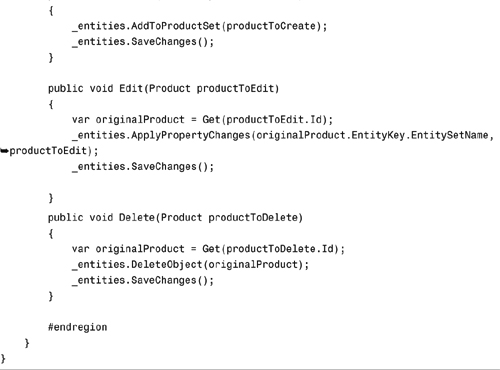
Notice that two commands must be executed to add the new product to the database. First, the new product is added to the set of products represented by the Entity Framework object context by calling the AddToProductSet() method. Next, the SaveChanges() method is called to actually save the new record to the underlying database.
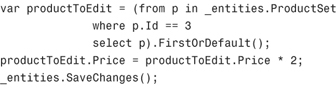
You can update a database record simply by modifying the properties of an entity and calling the SaveChanges() method. For example, the following three statements can be used to double the price for a product:
(C#)
(VB)

However, when creating an ASP.NET MVC action, you typically do not retrieve an entity before modifying it. Instead, an instance of the entity is handed to you as a parameter of the action method. For example, the second Create() action in Listing 5.4 accepts a Product parameter.
The object context can track changes to an entity only when the entity is attached to the context. When the ASP.NET MVC framework creates the entity as an action method parameter, the entity is not attached.
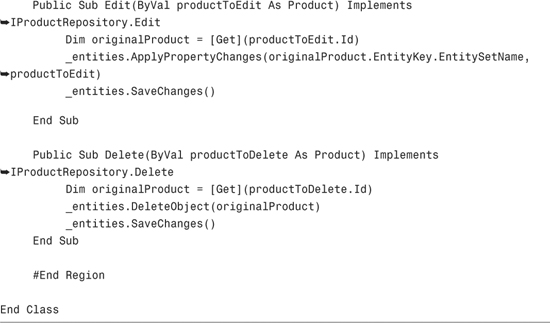
In this situation, you need to retrieve the original entity, apply any property changes to the original entity, and then call SaveChanges() to update the database. For example, the second Edit() action in Listing 5.4 updates a product in the database.
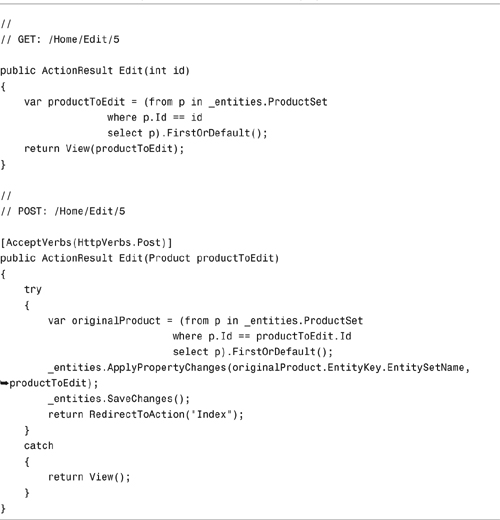

The first Edit() action in Listing 5.4 retrieves the product so that it can be displayed in an HTML form. The second Edit() action is invoked when the HTML form is submitted and this Edit() action performs the actual update in the database.
The second Edit() action
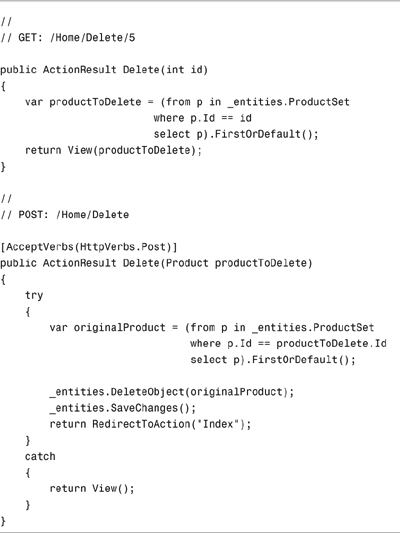
Finally, you can use the Entity Framework object context to delete records. For example, the Delete() action in Listing 5.5 deletes a product record from the database.
In Listing 5.5, there are two actions named Delete(). The first Delete() action displays a delete confirmation page. The second Delete() action performs the actual delete against the database.

Things change. When I originally wrote this chapter, I wrote all the code samples using Microsoft LINQ to SQL instead of the Microsoft Entity Framework. When Microsoft announced that the Entity Framework is the recommended data access technology, I rewrote this chapter.
When you build an application, you should build the application to gracefully adapt to change. If you believe that code is likely to change in the future, you should encapsulate the code into a separate class. That way, when the volatile code changes, you don’t have to touch any of your other code.
In this section, you learn how to use a software design pattern named the Repository pattern to isolate your data access layer from the remainder of your application. By taking advantage of the Repository pattern, you can easily modify your application to take advantage of a different data access technology in the future.
Let’s create a product repository that encapsulates all our data access logic for working with products. We need to create two objects:
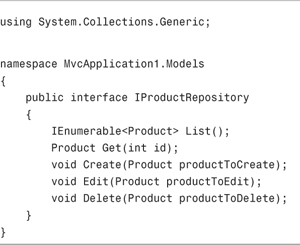
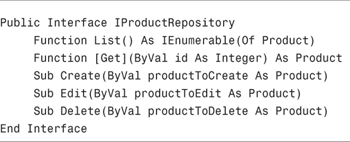
• IProductRepository—This interface describes the methods for listing, getting, inserting, updating, and deleting products.
• ProductRepository—This class implements the IProductRepository interface.
Why do we need to create both an interface and a class? In our application code, we always program against the interface. We call methods of the IProductRepository interface instead of calling methods of the ProductRepository class. That way, we can change our implementation of the interface in the future without needing to rewrite any of the application code that interacts with the interface.
The IProductRepository interface is contained in Listing 5.6. This interface describes five methods named List(), Get(), Create(), Edit(), and Delete().
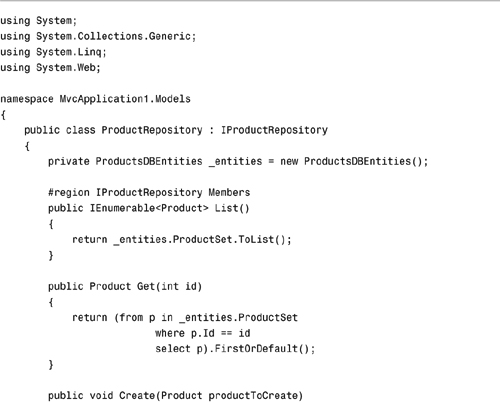
The ProductRepository class in Listing 5.7 implements the IProductRepository interface. This implementation of the IProductRepository interface uses the Microsoft Entity Framework. However, we could implement the IProductRepository interface with a class that uses Microsoft LINQ to SQL, NHibernate, or just about any other data access technology.
Finally, the Product controller in Listing 5.8 uses the product repository in its Index() and Create() actions.
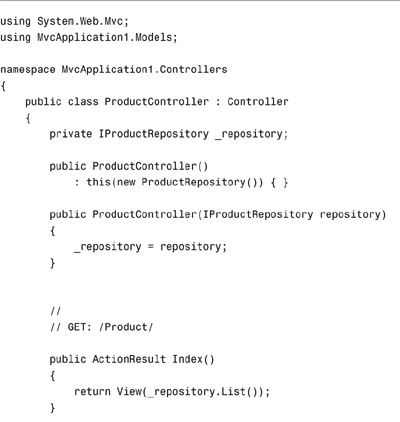
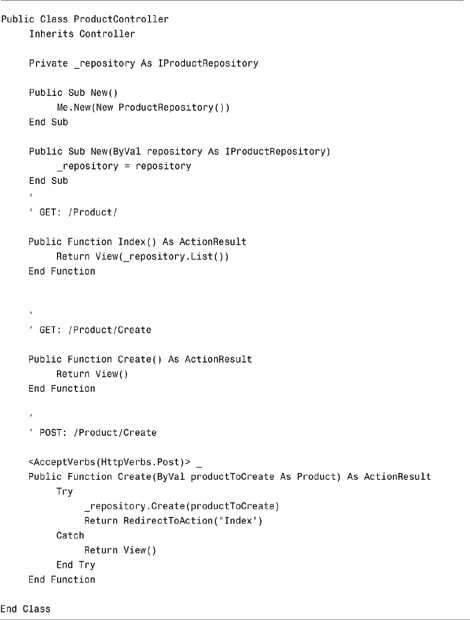
Notice that the Product controller in Listing 5.8 has two constructors. The first constructor, the parameterless constructor, calls the second constructor. The first constructor creates an instance of the ProductRepository class and passes the instance to the second constructor.
The only place in the Product controller that the ProductRepository class is used instead of the IProductRepository interface is in this first constructor. If you want to use a different class that implements the IProductRepository, you need to change only the code in the first constructor.
The Product controller uses a software design pattern called the Dependency Injection pattern. In particular, it uses a pattern named Constructor Dependency Injection.
Note
The Dependency Injection pattern, like many of the software design patterns discussed in this book, was first described by Martin Fowler. Go to http://martinfowler.com/articles/injection.html.
The Constructor Dependency Injection pattern enables you to “loosely couple” two classes. Class A is dependent on Class B. In our case, our Product controller class is dependent on a product repository class. Because we might need to change Class B in the future, we want to change Class B with the minimum impact on the code in Class A.
The Constructor Dependency Injection pattern enables us to limit the contact between the Product controller and the product repository to a single point of contact. A concrete implementation of the product repository is used only in one place—within the Product controller constructor. If we yank the two classes apart, the only part that would break would be the constructor.
Note
If you want to eliminate any reference to the ProductRepository class within the ProductController class, you can take advantage of a Dependency Injection (DI) framework such as the Microsoft Managed Extensibility Framework (MEF) or StructureMap.
Later in this chapter—in the section titled “Testing Data Access”—you see another advantage of using the Dependency Injection pattern. The Dependency Injection pattern enables us to easily unit test our application code.
Whenever you discover that you are writing the same code over and over again, you should step back and question your sanity. Most likely, you are wasting away precious moments of your life that could be better spent seeing movies or taking a walk in the park.
Recently, I realized that I was writing pretty much the same repository class over and over again. Therefore, I decided to create a generic repository. Creating a generic repository has several benefits:
- I can use the generic repository as a starting point for all my repository classes in the future.
- I can use the generic repository with both the Microsoft Entity Framework and LINQ to SQL. Better yet, I can use the generic repository with some future and unknown data access technology.
- I can use the generic repository in my unit tests.
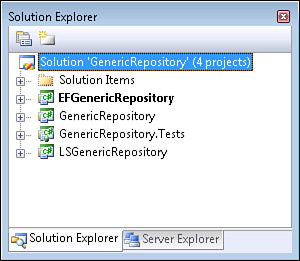
In the code on the book’s website (www.informit.com/title/9780672329982), you can find a GenericRepository solution. This solution contains four projects (see Figure 5.8). Here’s a description of each project:
• GenericRepository project—Contains the IGenericRepository interface. Also contains the FakeGenericRepository.
• EFGenericRepository project—Contains the implementation of the IGenericRepository interface for the Microsoft Entity Framework.
• LSGenericRepository project—Contains the implementation of the IGenericRepository interface for Microsoft LINQ to SQL.
• GenericRepository.Tests project—Contains unit tests for the FakeGenericRepository.
• The IGenericRepository interface is contained in Listing 5.9.
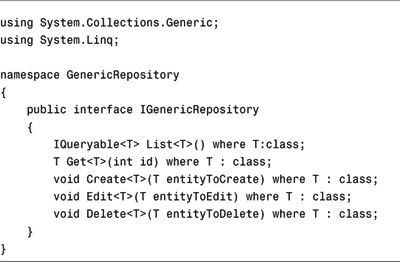
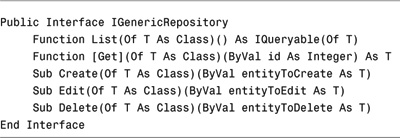
Notice that each of the methods contained in the IGenericRepository interface is a generic method. The methods contain an open generic type parameter for the entity. For example, you can get a customer with a particular Id by executing the following code:
(C#)
var customerToEdit = _repository.Get<Customer>(3)
(VB)
Dim customerToEdit =_repository.Get(Of Customer)(3)
You can get a list of all products with a price less than $50.00 with the following code:
(C#)
![]()
(VB)
![]()
If you want to use the generic repository with the Microsoft Entity Framework, you need to add references to two assemblies to your ASP.NET MVC project. You need to add a reference to the assembly generated by the GenericRepository project (the GenericRepository.dll assembly), and you need to add a reference to the assembly generated by the EFGenericRepository project (the EFGenericRepository.dll assembly).
In your ASP.NET MVC project, you generate your data model classes with the Entity Framework Wizard in the normal way. After you generate the data model classes, you can use the classes with the generic repository.
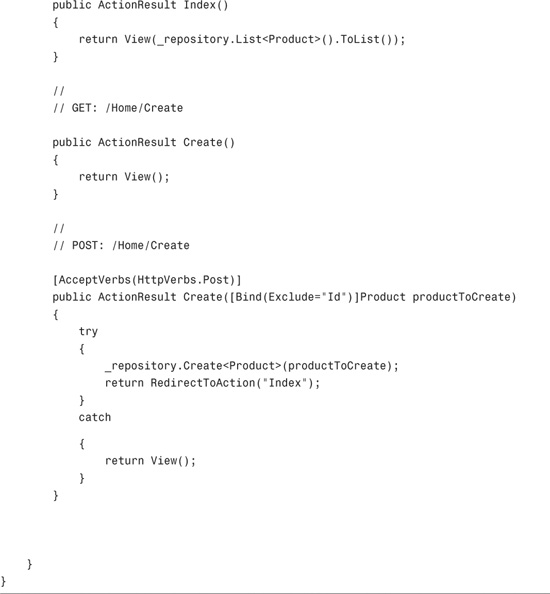
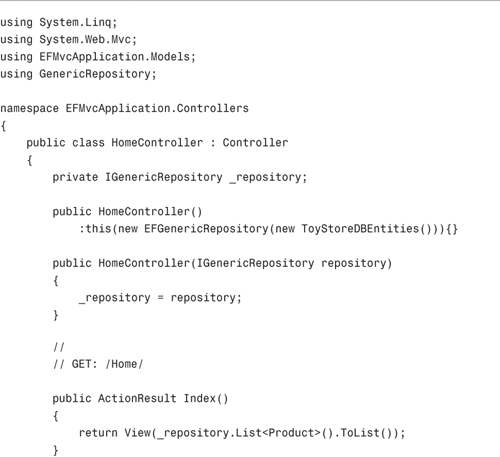
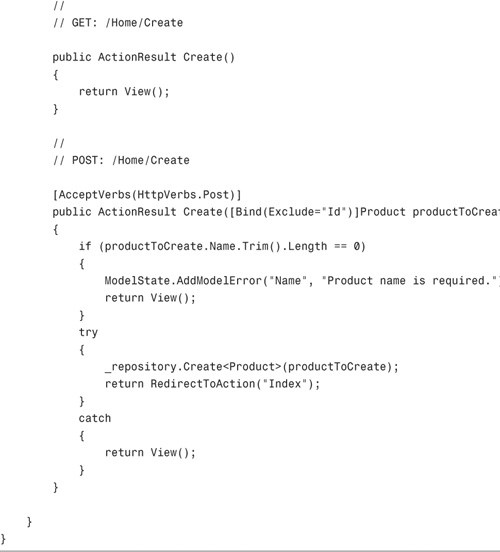
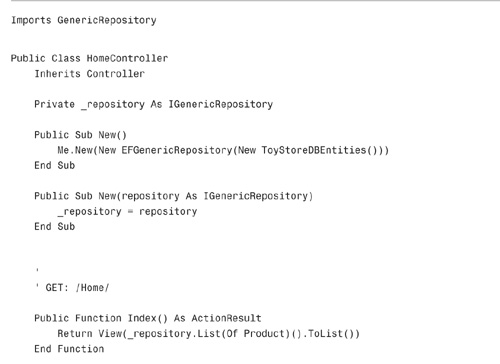
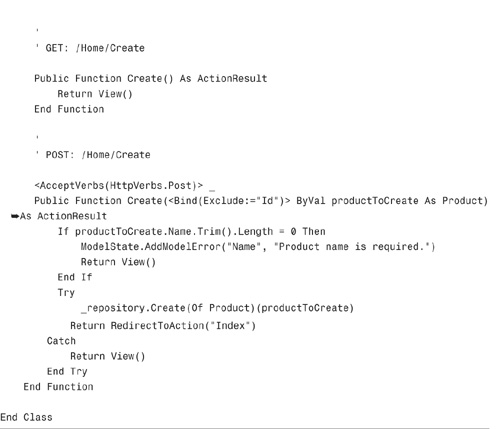
The controller in Listing 5.10 uses the EF generic repository in its Index() and Create() actions.
Note
The code in Listing 5.10 is contained in the EFMvcApplication project included with the source code files on the book’s website (www.informit.com/title/9780672329982).
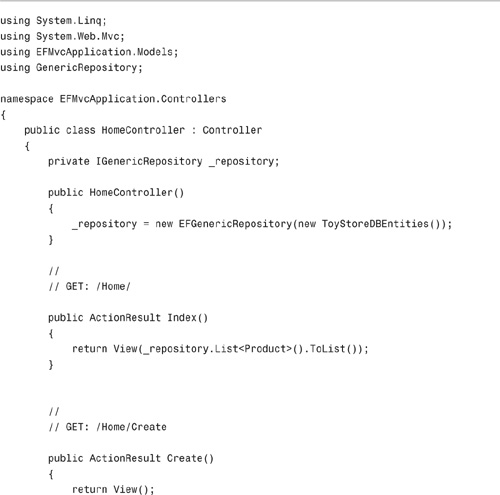
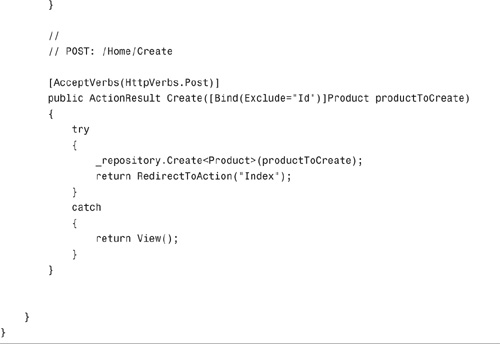
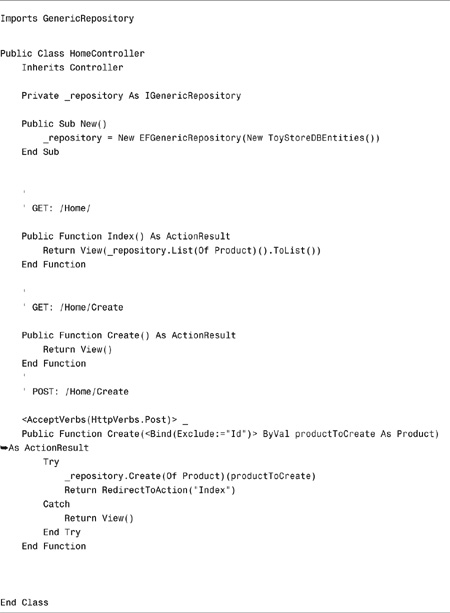
Notice that an instance of the EFGenericRepository class is created in the controller’s constructor. The EFGenericRepository class is instantiated by passing an Entity Framework object context to the constructor for the EFGenericRepository class.
To use the generic repository with LINQ to SQL, you need to add references to two assemblies to your ASP.NET MVC project. You need to add a reference to the assembly generated by the GenericRepository project (the GenericRepository.dll assembly), and you need to add a reference to the assembly generated by the LSGenericRepository project (the LSGenericRepository.dll assembly).
You generate your data model classes in the standard way: Drag your database tables onto the LINQ to SQL designer.
The controller in Listing 5.11 uses the LS generic repository.
Note
The code in Listing 5.11 is contained in the LSMvcApplication project included on the book’s website (www.informit.com/title/9780672329982).
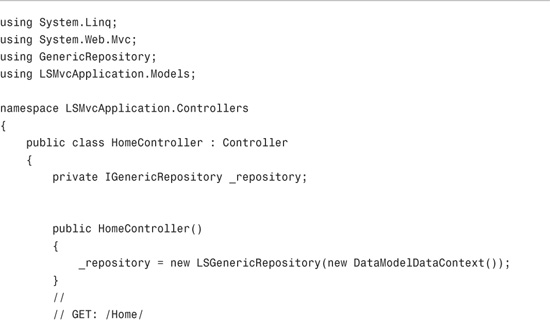
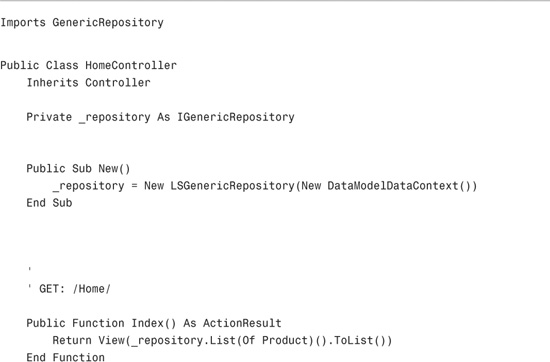
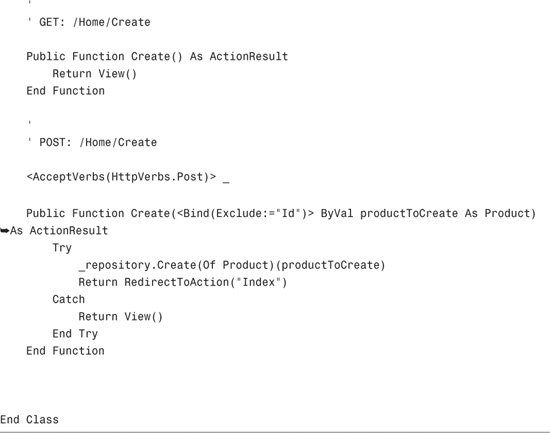
The LSGenericRepository is created in the controller’s constructor. You create an LSGenericRepository by passing a LINQ to SQL DataContext to the constructor for the LSGenericRepository class.
The generic repository is meant to act only as a starting point. At some point, you need to add custom methods to the generic repository. The easiest way to extend the generic repository is to create two new types:
• IRepository—Create a custom interface that inherits from the IGenericRepository interface.
• Repository—Create a custom class that implements the IRepository interface and inherits from a GenericRepository class such as the EFGenericRepository or LSGenericRepository.
For example, imagine that you want to create a custom method named ProductCount() that returns a count of products in the database. You find it more intuitive to call the custom method than to call the generic method List<Product>().Count(). In that case, you can create the interface in Listing 5.12.
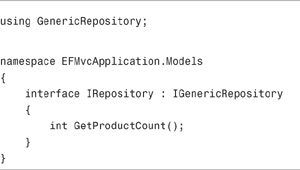
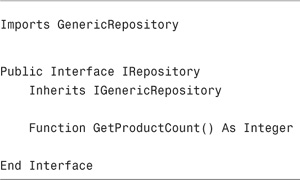
Notice that the interface in Listing 5.12 inherits from the IGenericRepository interface. Any class that implements the IRepository interface must implement every method from the IGenericRepository interface.
The new repository class in Listing 5.13 inherits from the EFGenericRepository class. However, the new class includes a new method named GetProductCount().
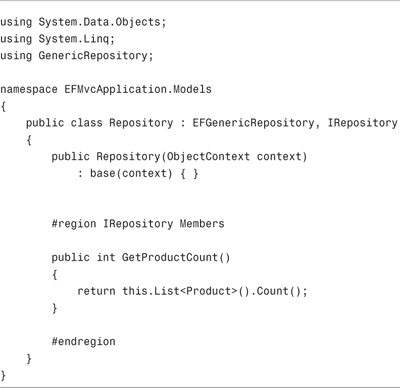
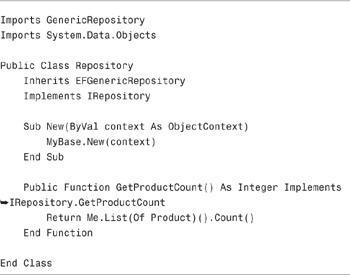
After you create the IRepository and Repository types, you can use these types in your controllers in exactly the same way as you use the IGenericRepository and GenericRepository types. But now you are free to extend the generic repository as much as you please.
Note
Some people object to the idea of inheriting from a generic repository class because the repository class ends up exposing all sorts of methods that a developer should never call. For example, the repository would expose methods for updating tables that are intended as read-only lookup tables.
If you are concerned about this issue then you can encapsulate the generic repository class within another class and selectively expose methods. That way, you can control exactly which generic methods get exposed to the world.
Normally, when you execute unit tests, you don’t want to test code that interacts with an actual database. In other words, you want to avoid unit testing data access logic.
For unit tests to be useful, you need to execute them quickly. Unfortunately, accessing a database is one of the slowest operations that you can perform in a website. Therefore, you want to avoid interacting with a real database in your unit tests.
Instead of testing your data access logic, test all the business logic that interacts with the data access logic. For example, you definitely want to build unit tests for all the controller logic and all the validation logic in your application. The challenge is testing this business logic without testing the data access logic.
In this section, we discuss two approaches to overcoming this challenge. You learn how you can mock your repository and how you can fake your repository.
One approach to testing code that interacts with a repository is to mock the repository by using a Mock Object Framework such as Moq. You can use Moq to generate a mock class from any interface. For example, you can generate a mock generic repository from the IGenericRepository interface.
Consider the controller action in Listing 5.14. This action validates whether the product FirstName property has a value before creating the product in the database.
Note
We discuss validation in detail in Chapter 8, “Validating Form Data.” We discuss Moq in Appendix C, “Using a Mock Object Framework.”
Imagine that you want to test the Create() action in Listing 5.14. You want to ensure that a validation error message is created when someone attempts to submit a new product without supplying a value for the Name property.
The unit test in Listing 5.15 contains two methods. The first method, named Initialize(), creates a mock generic repository. The Moq framework generates the mock generic repository from the IGenericRepository interface.
The second method, named NameIsRequired(), represents the unit test. This unit test creates an instance of the HomeController class with the mock generic repository. Next, the unit test invokes the Create() action and validates that an error message was, in fact, added to model state.
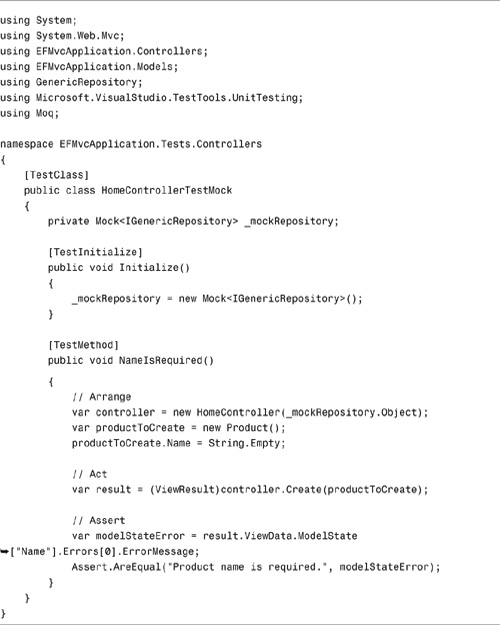
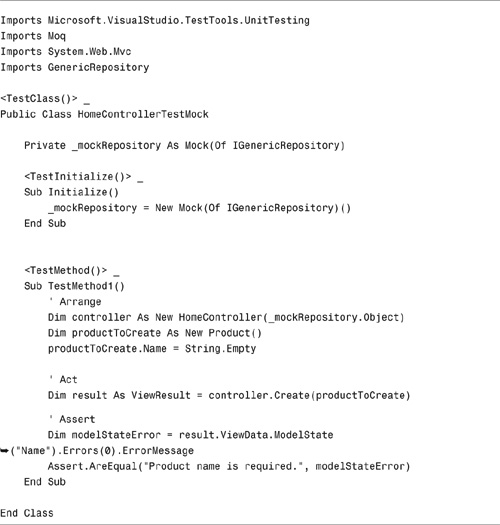
We are able to substitute the mock repository for the actual repository in our unit test because the Home controller uses dependency injection. We can take advantage of the second constructor that accepts any class that implements the IGenericRepository interface.
When practicing test-driven development, you want your repository layer to behave just like a real repository layer in your tests. For example, if you create a new product by calling a repository method, you want to retrieve the new product by calling another repository method.
If you need to fake the behavior of the generic repository layer in a unit test, you can take advantage of the fake generic repository. The fake generic repository is an implementation of the IGenericRepository interface that works with a simple in-memory database.
For example, the unit test in Listing 5.16 verifies that when you invoke the List() action you can get back a product that you just created by invoking the Create() action.
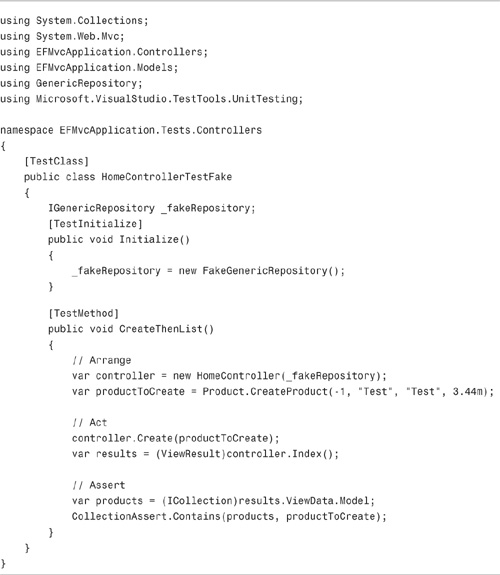
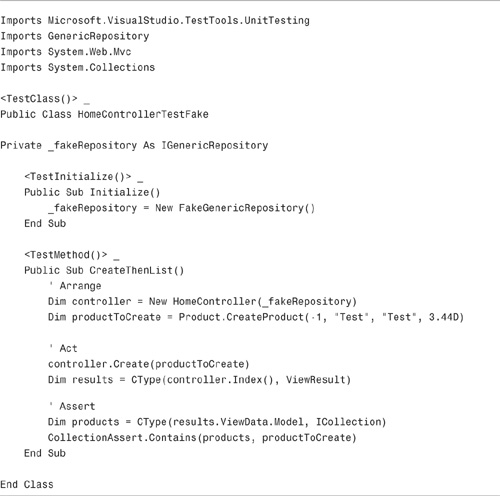
Notice that a FakeGenericRepository class is created in the Initialize() method. The fake generic repository stores objects in memory instead of touching a real database server.
In this chapter, we concentrated on building data model classes. In the first section, you were provided with a brief introduction to the Microsoft Entity Framework. You learned how to perform basic database operations such as listing, creating, editing, and deleting database records.
Next, you learned how to implement the Repository software design pattern. You learned how to move database logic from your controllers into a separate repository layer. Moving your database logic into a repository layer makes your application more resilient to change.
We also discussed how you can create a generic repository layer, so you don’t need to reimplement the same data access logic every time you create a new ASP.NET MVC project. You learned how to use the generic repository layer with both the Microsoft Entity Framework and Microsoft LINQ to SQL.
Finally, you learned how to unit test code that interacts with a repository layer. We discussed how you can mock a repository layer by taking advantage of the Moq Mock Object Framework. You also learned how to fake a repository layer by taking advantage of the FakeGenericRepository class.