
In This Chapter
You use HTML helpers in a view to render HTML content. An HTML helper, in most cases, is just a method that returns a string.
You can build an entire ASP.NET MVC application without using a single HTML helper; however, HTML helpers make your life as a developer easier. By taking advantage of helpers, you can build your views with far less work.
In this chapter, you learn about the standard HTML helpers included with the ASP.NET MVC framework. You learn how to use the standard helpers to render HTML links and HTML form elements.
You also learn how to create custom helpers. We discuss the utility classes included in the ASP.NET framework that make it easier to build custom helpers. You learn how to work with the TagBuilder and the HtmlTextWriter classes.
Next, we tackle building a more complicated HTML helper: We build a DataGrid helper. The DataGrid helper enables you to easily display database records in an HTML table. It also supports paging and sorting.
Finally, we end this chapter with a discussion of how you can build unit tests for your custom HTML helpers.
Note
In the ASP.NET MVC world, HTML helpers are the equivalent of ASP.NET Web Form controls. Like a Web Form control, an HTML helper enables you to encapsulate the rendering of HTML. However, unlike a Web Form control, HTML helpers are extremely lightweight. For example, an HTML helper does not have an event model and does not use view state.
The ASP.NET MVC framework includes a standard set of helpers that you can use to render the most common types of HTML elements. For example, you can use the standard set of helpers to render HTML links and HTML text boxes.
The easiest way to render an HTML link in a view is to use the HTML.ActionLink() helper. The Html.ActionLink() does not link to a view. Instead, you use the Html.ActionLink() helper to create a link to a controller action.
For example, the view in Listing 6.1 includes a link to an action named About (see Figure 6.1).
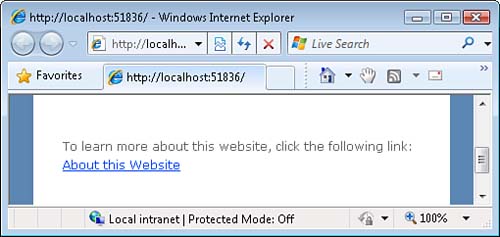
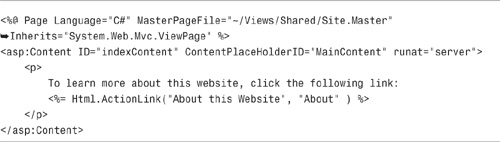
In Listing 6.1, the first parameter passed to the Html.ActionLink() represents the link text, and the second parameter represents the name of the controller action. This Html.ActionLink() helper renders the following HTML:
<a href="/Home/About">About this Website</a>
The Html.ActionLink() helper has several overloads and supports several parameters:
• linkText—The label for the link.
• actionName—The action that is the target of the link.
• routeValues—The set of values passed to the action.
• controllerName—The controller that is the target of the link.
• htmlAttributes—The set of HTML attributes to add to the link.
• protocol—The protocol for the link (for example, HTTPS).
• hostname—The hostname for the link (for example, www.MyWebsite.com).
• fragment—The fragment (anchor target) for the link. For example, to link to a div in a view with an id of news, you would specify news for the fragment.
Notice that you can pass route values from an Html.ActionLink() to a controller action. For example, you might need to pass the Id of a database record that you want to edit. Here’s how you pass an Id parameter to the Edit() action:
(C#)
<%= Html.ActionLink("Edit Record", "Edit", new {Id=3})
(VB)
<%= Html.ActionLink("Edit Record", "Edit", New With {.Id=3})%>
When this Html.ActionLink() is rendered to the browser, the following link is created:
<a href="/Home/Edit/3">Edit Record</a>
Unfortunately, you can’t use the Html.ActionLink() helper to render an image link. Because the Html.ActionLink() helper HTML encodes its link text automatically, you cannot pass an <img> tag to this method and expect the tag to render as an image.
Instead, you need to use the Url.Action() helper to generate the proper link. Here’s how you can generate a delete link with an image:
![]()
The Url.Action() helper supports a set of parameters that are similar to those supported by the Html.ActionLink() helper.
There are several HTML helpers that you can use to render HTML form elements:
• BeginForm()
• CheckBox()
• DropDownList()
• EndForm()
• Hidden()
• ListBox()
• Password()
• RadioButton()
• TextArea()
• TextBox()
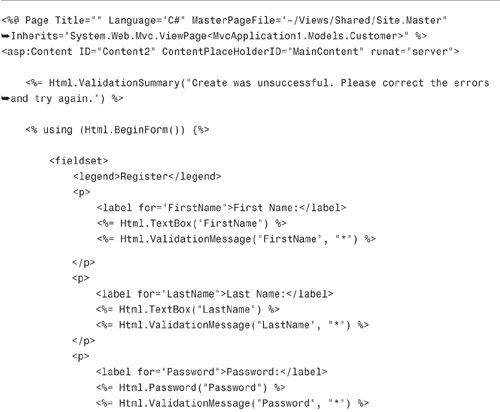
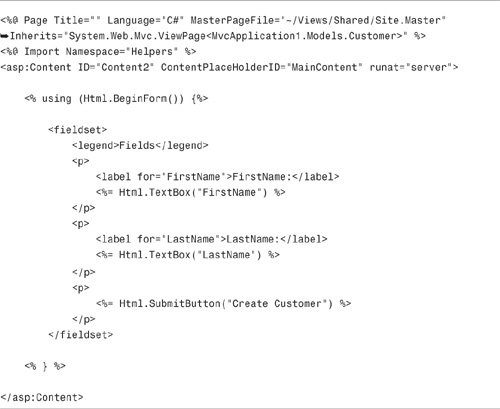
The view in Listing 6.2 illustrates how you can use several of these HTML helpers. The view renders an HTML page with a simple user registration form (see Figure 6.2).
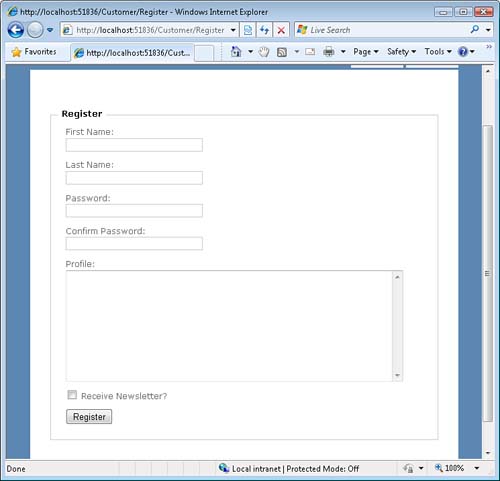
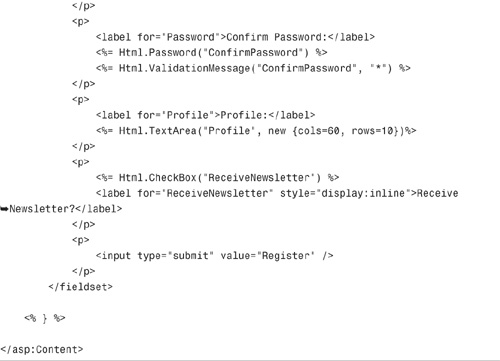
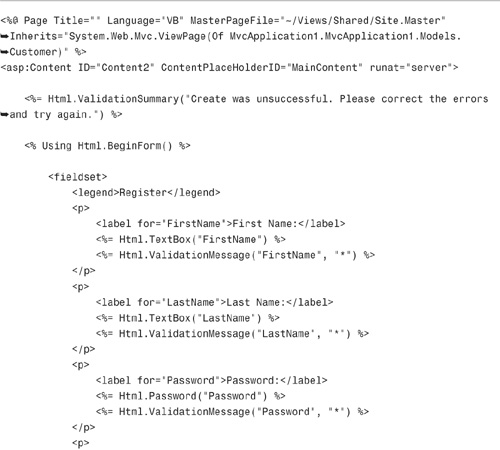
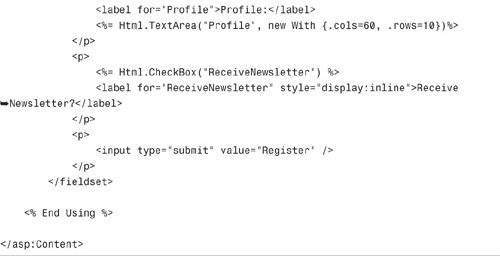
You can try the page in Listing 6.2 by entering the address Customer/Register in the address bar of your web browser.
It is worth emphasizing, once again, that these form helpers are simply rendering strings. For example, the Html.TextBox() helper renders a string that includes an "<input>" tag. If you prefer, you can create the view in Listing 6.2 without using any of these helpers.
Note
You might have noticed that Listing 6.2 includes validation helpers. We discuss the validation helpers—Html.ValidationMessage() and Html.ValidationSummary—in Chapter 8, “Validating Form Data.”
In Listing 6.2, the opening and closing <form> tags are created with a using statement. The opening and closing tags are created like this:
(C#)
![]()
(VB)
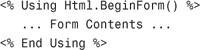
The advantage of opening and closing a <form> tag with a using statement is that you won’t accidentally forget to close the <form> tag.
However, if you find this syntax confusing or otherwise disagreeable, you don’t need to use a using statement. Instead, you can open the <form> tag with Html.BeginForm() and close the <form> with Html.EndForm() like this:
(C#)
![]()
(VB)
![]()
By default, the Html.BeginForm() method renders a form that posts back to the same controller action. In other words, if you retrieve the view by invoking the Customer controller Details() action, the Html.BeginForm() renders a <form> tag that looks like this:
<form action="/Customer/Details" method="post">
</form>
If you want to post to another action, or to modify any other property of the <form> tag, you can call the Html.BeginForm() helper with one or more parameters. The Html.BeginForm() helper accepts the following parameters:
• routeValues—The set of values passed to the action.
• actionName—The action that is the target of the form post.
• controllerName—The controller that is the target of the form post.
• Method—The HTTP method of the form post. The possible values are restricted to POST and GET. (You can’t use other HTTP methods within HTML, you must use JavaScript.)
• htmlAttributes—The set of HTML attributes to add to the form.
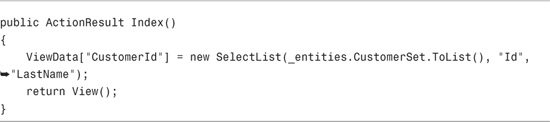
You can use the Html.DropDownList() helper to render a set of database records in an HTML <select> tag. You represent the set of database records with the SelectList class.
For example, the Index() action in Listing 6.3 creates an instance of the SelectList class that represents all the customers from the Customers database table. You can pass the following parameters to the constructor for a SelectList when creating a new SelectList:
• items—The items represented by the SelectList
• dataValueField—The name of the property to associate with each item in the SelectList as the value of the item
• dataTextField—The name of the property to display for each item in the SelectList as the label of the item
• selectedValue—The item to select in the SelectList
In Listing 6.3, the SelectList is assigned to ViewData with the name CustomerId.

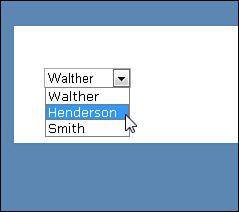
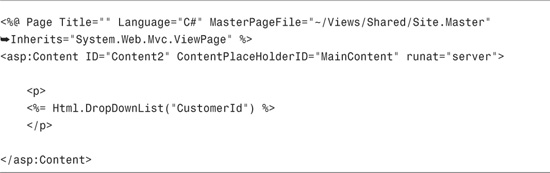
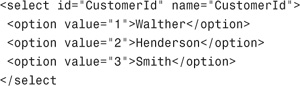
In a view, you can display a SelectList by calling the Html.DropDownList() helper with the name of the SelectList. The view in Listing 6.4 displays the CustomerId SelectList (see Figure 6.3).
The view in Listing 6.4 renders the following HTML <select> tag:
The Html.DropDownList() helper also supports an optionLabel parameter. You can use this parameter to create a default option at the top of the drop-down list (see Figure 6.4). You add an optionLabel like this:
<%= Html.DropDownList("CustomerId", "Select a Customer") %>
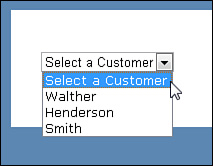
If a user submits a form with the option label selected, an empty string is submitted to the server.
You should always HTML encode user-submitted content. Otherwise, an evil hacker can initiate a JavaScript injection attack and, potentially, steal sensitive information from your users, such as passwords and credit card numbers.
In a JavaScript injection attack, a hacker submits a JavaScript script when completing an HTML form. When the value of the form field is redisplayed, the script steals information from the page and sends the information to the hacker.
For example, because users typically select their own usernames, you should always HTML encode usernames that you display in a view like this:
<%= Html.Encode(UserName) %>
HTML encoding replaces characters with special meaning in an HTML document with safe characters:
• < becomes <
• > becomes >
• " becomes "
• & becomes &
Imagine that a hacker submits the following script as the value of a form field:
<script>alert('Boom!')</script>
When this script is HTML-encoded, the script no longer executes. The script gets encoded into the harmless string:
<script>alert('Boom!')</script>
Note
The ASP.NET MVC framework prevents a hacker from submitting a form that contains suspicious characters automatically through a feature called request validation. We discussed request validation in Chapter 4, “Understanding Views.”
There is a particular type of JavaScript injection attack that is called a cross-site request forgery (CSRF) attack. In a CSRF attack, a hacker takes advantage of the fact that you are logged in to one website to steal or modify your information at another website.
Note
To learn more about CSRF attacks, see the Wikipedia entry at http://en.wikipedia.org/wiki/Csrf. The example discussed in this section is based on the example described in the Wikipedia entry.
For example, imagine that you have an online bank account. The bank website identifies and authenticates you with a cookie. Now, imagine that you visit a forums website. This forums website enables users to post messages that contain images. An evil hacker has posted an image to the forums that looks like this:
<img src="http://www.BigBank.com/withdraw?amount=9999" />
Notice that the src attribute of this image tag points to a URL at the bank website.
When you view this message in your browser, $9,999 dollars is withdrawn from your bank account. The hacker can withdraw money from your bank account because the bank website uses a browser cookie to identify you. The hacker has hijacked your browser.
If you create the bank website, you can prevent a CSRF attack by using the Html.AntiForgeryToken() helper. For example, the view in Listing 6.5 uses the Html.AntiForgeryToken() helper.
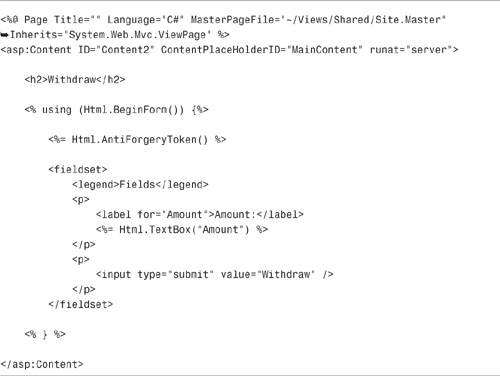
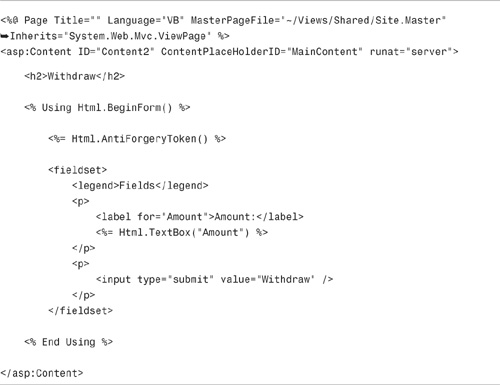
This helper creates a hidden input field that represents a cryptographically strong random value. Each time you request the view, you get a different random value in a hidden field that looks like this:
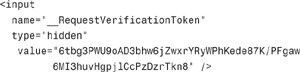
The helper also creates a cookie that represents the random value. The value in the cookie is compared against the value in the hidden form field to determine whether a CSRF attack is being performed.
The Html.AntiForgeryToken() helper accepts the following optional parameters:
• salt—Enables you to add a cryptographic salt to the random value to increase the security of the antiforgery token.
• domain—The domain associated with the antiforgery cookie. The cookie is sent only when requests originate from this domain.
• path—The virtual path associated with the antiforgery cookie. The cookie is sent only when requests originate from this path.
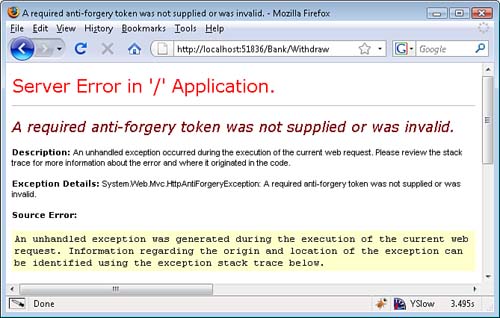
Generating the random value with the Html.AntiForgeryToken() helper is only half the story. To prevent CSRF attacks, you also must add a special attribute to the controller action that accepts the HTML form post. The Withdraw() controller action in Listing 6.6 is decorated with a ValidateAntiForgeryToken attribute.

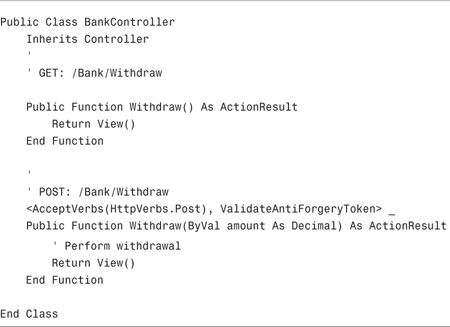
The ValidateAntiForgeryToken attribute compares the hidden form field to the cookie. If they don’t match, the attribute throws the exception in Figure 6.5.
The ASP.NET MVC framework ships with a limited number of HTML helpers. The members of the ASP.NET MVC team identified the most common scenarios in which you would need a helper and focused on creating helpers for these scenarios.
Fortunately, creating new HTML helpers is an easy process. You create a new HTML helper by creating an extension method on the HtmlHelper class. For example, Listing 6.7 contains a new Html.SubmitButton() helper that renders an HTML form submit button.
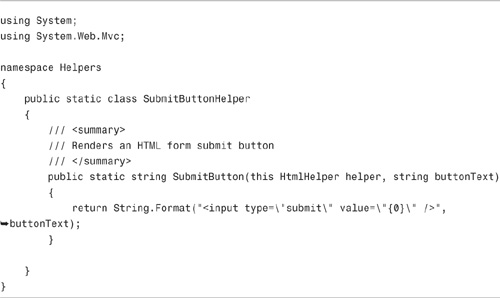
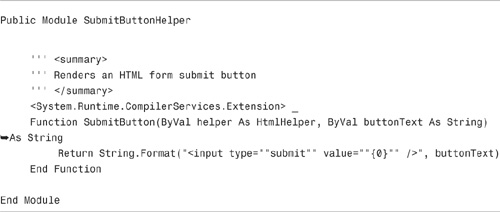
Listing 6.7 contains an extension method named SubmitButton(). The SubmitButton() helper simply returns a string that represents an HTML <input type="submit" /> tag.
Because the SubmitButton() method extends the HtmlHelper class, this method appears as a method of the HtmlHelper class in Intellisense (see Figure 6.6).
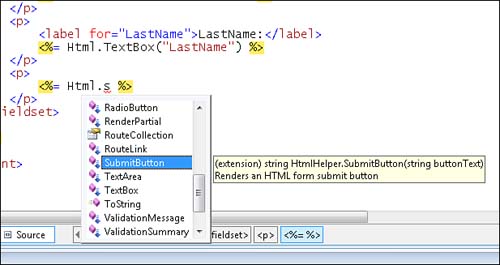
The view in Listing 6.8 uses the new Html.SubmitButton() helper to render the submit button for a form. Make sure that you import the namespace associated with your helper, or the helper won’t appear in Intellisense. The correct namespace is imported in Listing 6.8 with the help of the <%@ Import %> directive.
Note
As an alternative to registering a namespace for a particular view with the <%@ Import %> directive, you can register a namespace for an entire application in the system.web.pages.namespaces section of the web configuration (web.config) file.
Note
All of the standard HTML helpers, such as the Html.TextBox() helper, are also implemented as extension methods. This means that you can swap the standard set of helpers for a custom set of helpers if you don’t like the helpers that the ASP.NET team created.
The TagBuilder class is a utility class included in the ASP.NET MVC framework that you can use when building HTML helpers. The TagBuilder class, as it name suggests, makes it easier to build HTML tags.
Here’s a list of the methods of the TagBuilder class:
• AddCssClass()—Enables you to add a new class="" attribute to a tag.
• GenerateId()—Enables you to add an id attribute to a tag. This method automatically replaces periods in the id. (By default, periods are replaced by underscores.)
• MergeAttribute()—Enables you to add attributes to a tag. There are multiple overloads of this method.
• SetInnerText()—Enables you to set the inner text of the tag. The inner text is HTML-encoded automatically.
• ToString()—Enables you to render the tag. You can specify whether you want to create a normal tag, a start tag, an end tag, or a self-closing tag.
The TagBuilder class has four important properties:
• Attributes—Represents all the attributes of the tag.
• IdAttributeDotReplacement—Represents the character used by the GenerateId() method to replace periods. (The default is an underscore.)
• InnerHTML—Represents the inner contents of the tag. Assigning a string to this property does not HTML-encode the string.
• TagName—Represents the name of the tag.
These methods and properties give you all the basic methods and properties that you need to build up an HTML tag. You don’t actually need to use the TagBuilder class. You could use a StringBuilder class instead. However, the TagBuilder class makes your life a little easier.
The helper in Listing 6.9, the Html.ImageLink() helper, is created with a TagBuilder. The Html.ImageLink() helper renders an image link.
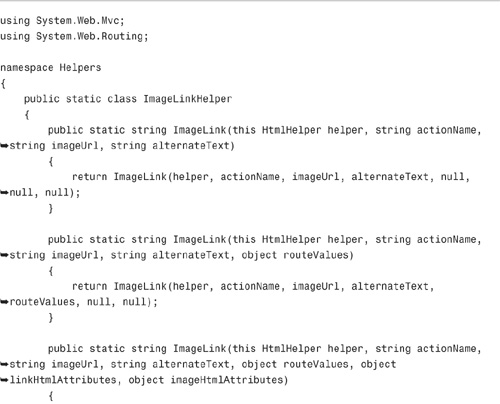

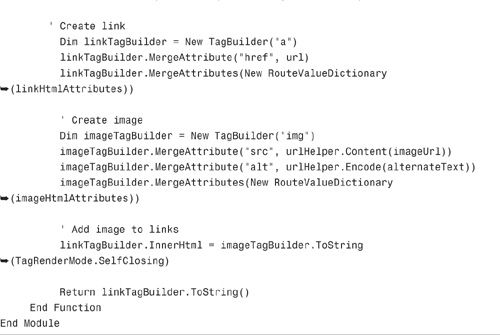
The Html.ImageLink() helper in Listing 6.9 has three overloads. The helper accepts the following parameters:
• actionName—The controller action to invoke
• imageUrl—The URL of the image to display
• alternateText—The alt text to display for the image
• routeValues—The set of route values to pass to the controller action
• linkHtmlAttributes—The set of HTML attributes to apply to the link
• imageHtmlAttribute—The set of HTML attributes to apply to the image
For example, you can render a delete link by calling the Html.ImageLink() helper like this:
(C#)
![]()
(VB)
![]()
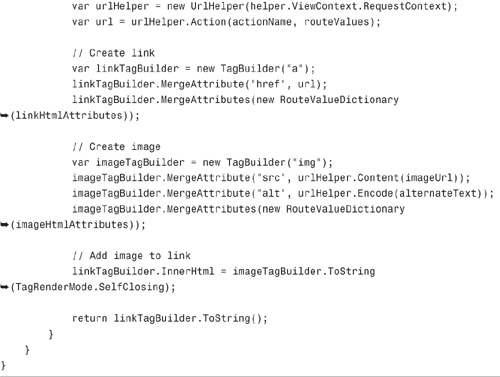
Two instances of the TagBuilder class are used in Listing 6.9. The first TagBuilder builds up the <a> link tag. The second TagBuilder builds up the <img> image tag.
Notice that an instance of the UrlHelper class is created. Two methods of this class are called. First, the UrlHelper.Action() method generates the link to the controller action.
Second, the UrlHelper.Content() method converts an application relative path into a full relative path. For example, if your application is named MyApplication, the UrlHelper.Content() method would convert the application relative path "~/Content/Delete.png" into the relative path "/MyApplication/Content/Delete.png".
As an alternative to using the TagBuilder class to build up HTML content in an HTML helper, you can use the HtmlTextWriter class. Like the TagBuilder class, the HtmlTextWriter class has specialized methods for building up a string of HTML.
Here is a list of some of the more interesting methods of the HtmlTextWriter class (this is not a comprehensive list):
• AddAttribute()—Adds an HTML attribute. When RenderBeginTag() is called, this attribute is added to the tag.
• AddStyleAttribute()—Adds a style attribute. When RenderBeginTag() is called, this style attribute is added to the tag.
• RenderBeginTag()—Renders an opening HTML tag to the output stream.
• RenderEndTag()—Closes the last tag opened with RenderBeginTag().
• Write()—Writes text to the output stream.
• WriteLine()—Writes a new line to the output stream (good for keeping your HTML readable when you do a browser View Source).
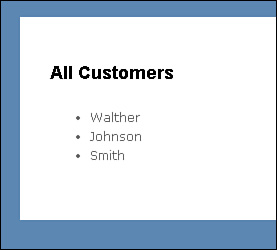
For example, the HTML helper in Listing 6.10 uses the HtmlTextWriter to create a bulleted list.
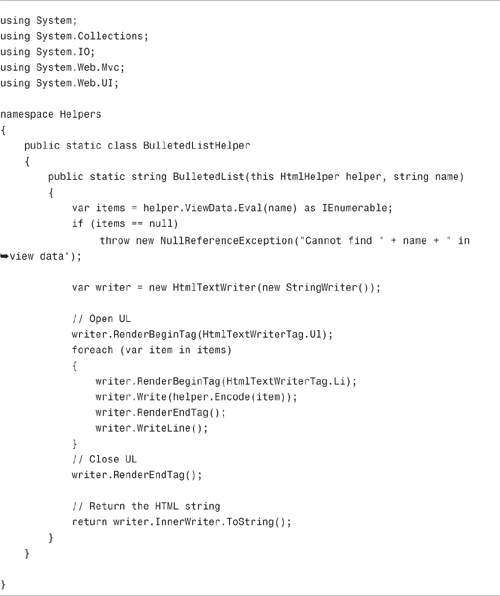
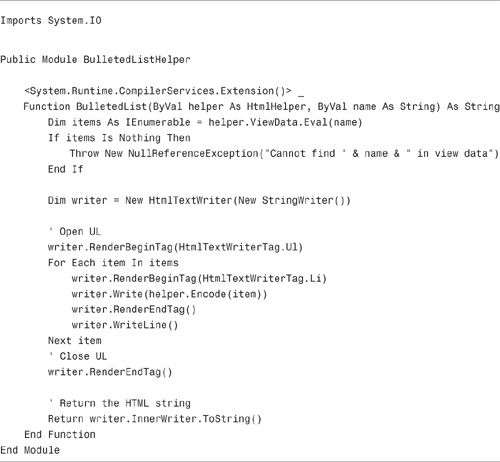
The list of customers is retrieved from view state with the help of the ViewData.Eval() method. If you call ViewData.Eval("Customers"), the method attempts to retrieve an item from the view data dictionary named Customers. However, if the Customers item cannot be retrieved from the view data dictionary, the method attempts to retrieve the value of a property with the name Customers from the view data model. (The view data dictionary takes precedence over the view data model.)
The HtmlTextWriter class renders the HTML <ul> and <li> tags needed to create the bulleted list. Each item from the items collection is rendered into the list.
You can call the Html.BulletedList() helper in a view like this:
<%= Html.BulletedList("Customers") %>
You can add the list of customers to view data with the controller action in Listing 6.11.
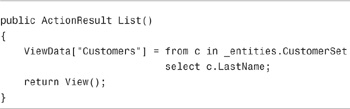

When you invoke the List() action, a list of customer last names are added to view state. When you call the Html.BulletedList() helper method, you get the bulleted list displayed in Figure 6.7.
There are multiple ways that you can build up HTML content within an HTML helper. You can use the TagBuilder class, the HtmlTextWriter class, or even the StringBuilder class. The choice is entirely a matter of preference.
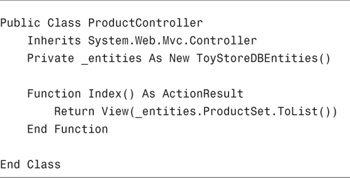
In this section, we tackle a more complicated HTML helper: We build an Html.DataGrid() helper that renders a list of database records in an HTML table. We start with the basics, and then we add sorting and paging to our Html.DataGrid() helper.
Note
In this section, we create multiple versions of the same DataGrid helper. To prevent conflicts, I commented out every version except the final version in the source code that accompanies this book. To use the DataGridHelperBasic version of the DataGrid helper, you need to uncomment the contents of the DataGridHelperBasic file and add comments to the DataGridHelperPaging file.
The basic Html.DataGrid() helper is contained in Listing 6.12.
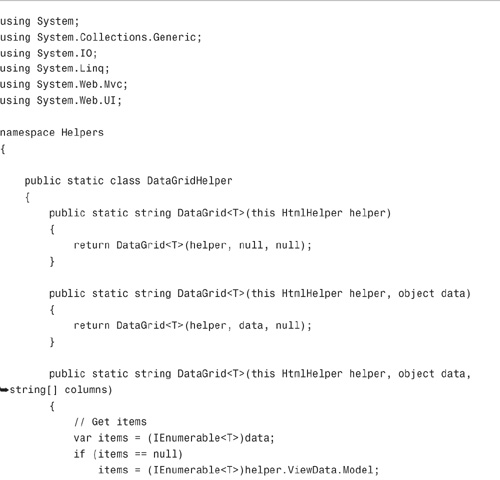
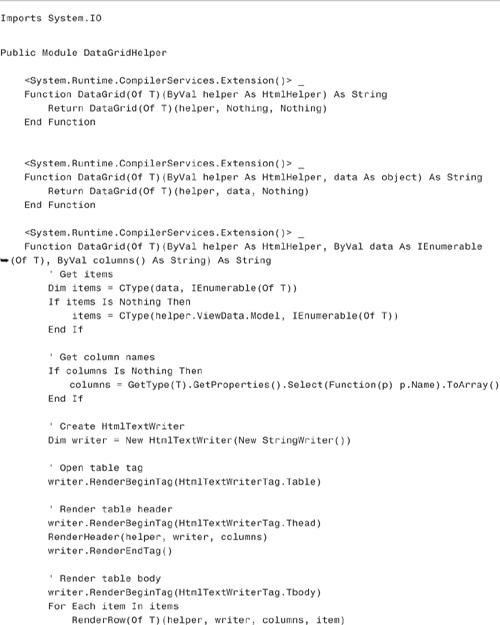
In Listing 6.12, the Html.DataGrid() helper method has three overloads. All three overloads are generic overloads. You must supply the type of object—for example, Product—that the Html.DataGrid() should render.
Here are some examples of how you can call the html.DataGrid() helper:
(C#)
![]()
![]()
In the first case, the Html.DataGrid() helper renders all the items in the view data model into an HTML table. All the public properties of the Product class are rendered in each row of the HTML table.
In the second case, the contents of the products item in view data is rendered into an HTML table. Again all the public properties of the Public class are rendered.
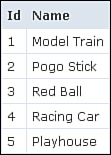
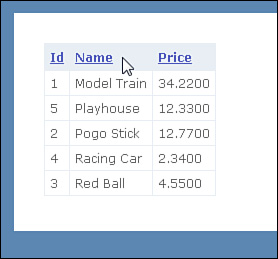
In the third case, once again, the contents of the view data model are rendered into an HTML table. However, only the Id and Name properties are rendered (see Figure 6.8).
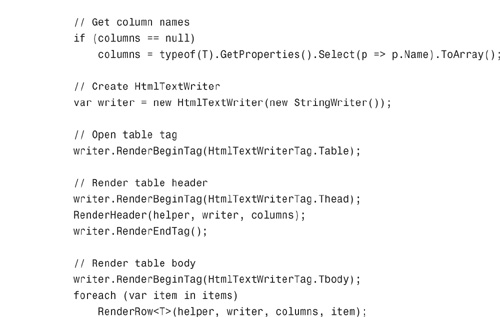
The Html.DataGrid() helper uses an HtmlTextWriter to render the HTML table <table>, <thead>, <tr>, <tbody>, <th>, and <td> tags. Rendering these tags by taking advantage of the HtmlTextWriter results in cleaner and more readable code than using string concatenation. (Please try to avoid string concatenation whenever possible!)
A tiny bit of reflection is used in the DataGrid() helper. First, reflection is used in the second DataGrid() method to retrieve the list of columns to display when no explicit list of columns is supplied to the helper:
(C#)
columns = typeof(T).GetProperties().Select(p => p.Name).ToArray();
(VB)
columns = GetType(T).GetProperties().Select(Function(p) p.Name).ToArray()
Also, reflection is used to retrieve the value of a property to display within the RenderRow() method:
(C#)
var value = typeof(T).GetProperty(columnName).GetValue(item, null) ?? String.Empty;
(VB)
Dim value = GetType(T).GetProperty(columnName).GetValue(item, Nothing)
if IsNothing(value) Then value = String.Empty
Note
Reflection is a .NET framework feature that enables you get information about classes, methods, and properties at runtime. You can even use reflection to dynamically load assemblies and execute methods at runtime.
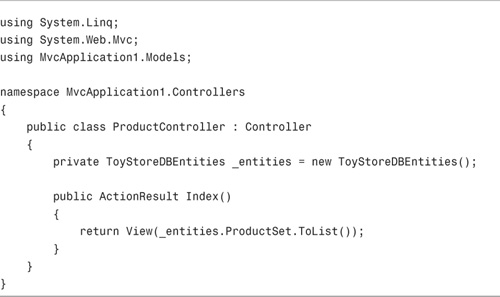
The Html.DataGrid() helper displays any collection of items that implements the IEnumerable<T> interface. For example, the controller action in Listing 6.13 assigns a set of products to the view data model property. This list of products can be displayed by the Html.DataGrid() helper.
Let’s make our Html.DataGrid() helper just a little more fancy. In this section, we add sorting support. When you click a column header in the HTML table rendered by the Html.DataGrid() helper, the HTML table is sorted by the selected column (see Figure 6.9).
To add the sorting support, we need to modify just one method of the existing DataGridHelper class. We need to modify the RenderHeader() method so that it renders links for headers. The modified RenderHeader() method is contained in Listing 6.14.
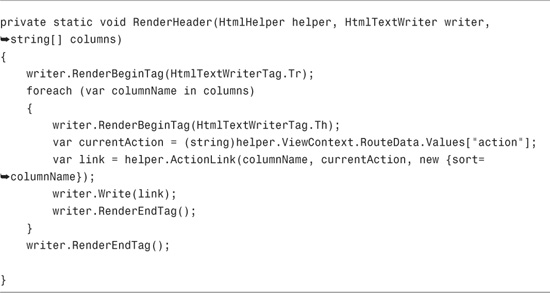
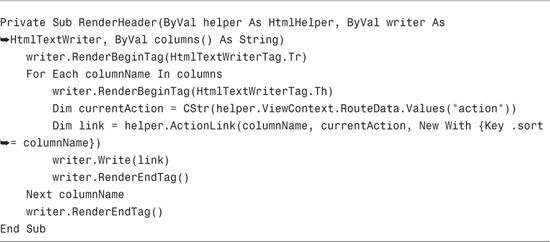
The modified RenderHeader() method in Listing 6.14 creates a link for each header column by calling the HtmlHelper.ActionLink() method. Notice that the name of the header column is included as a route value in the link. For example, the following link is rendered for the Price header:
/Product/SortProducts?sort=Price
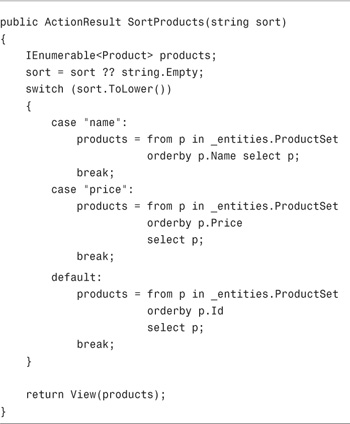
The actual database sorting happens within the Product controller. The SortProducts action in Listing 6.15 returns the products in different sort orders depending on the value of the sort parameter passed to the action.
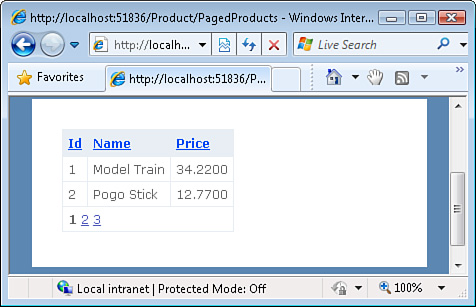
It really wouldn’t be a proper Html.DataGrid() helper unless the helper supported paging. In this section, we modify our Html.DataGrid() helper so that it supports efficient paging through a large set of database records (see Figure 6.10).
To add paging support, we need to create two new supporting classes:
• PagedList—An instance of this class is passed to the Html.DataGrid() helper to represent a single page of records.
• PagingLinqExtensions—This class contains extension methods that extend the IQueryable<T> interface with ToPagedList() methods that return a PagedList from a query.
The PagedList class is contained in Listing 6.16.
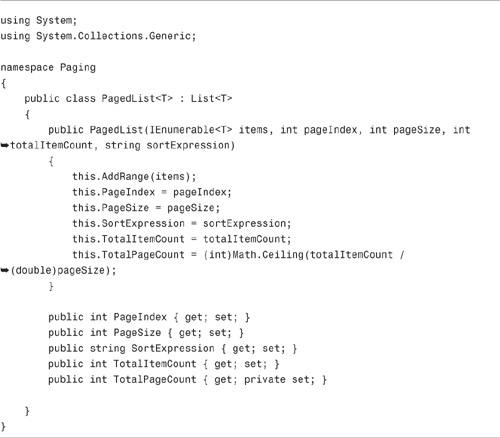
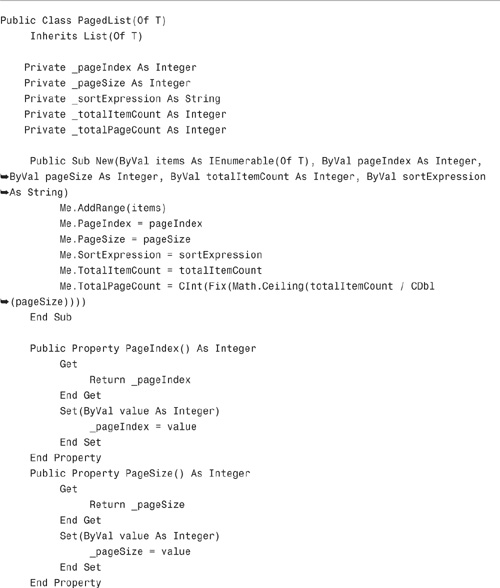
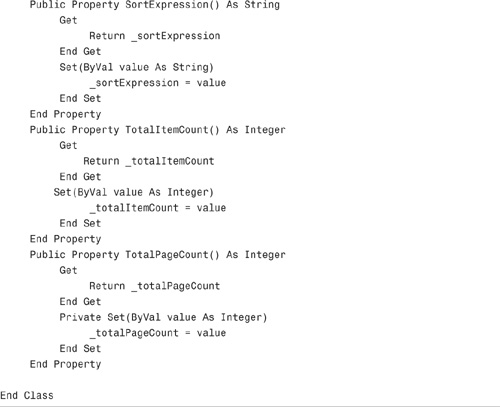
The PagedList class inherits from the base generic List class and adds specialized properties for paging. The PageList class represents the following properties:
• PageIndex—The currently selected page (zero-based)
• PageSize—The number of records to display per page
• SortExpression—The column that determines the sort order of the records
• TotalItemCount—The total number of items in the database
• TotalPageCount—The total number of page numbers to display
The second class, the PagingLinqExtensions class, extends the IQueryable interface to make it easier to return a PagedList from a LINQ query. The PagingLinqExtensions class is contained in Listing 6.17.
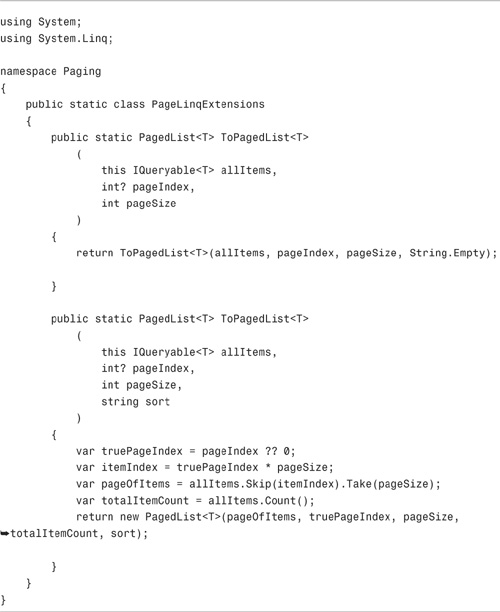
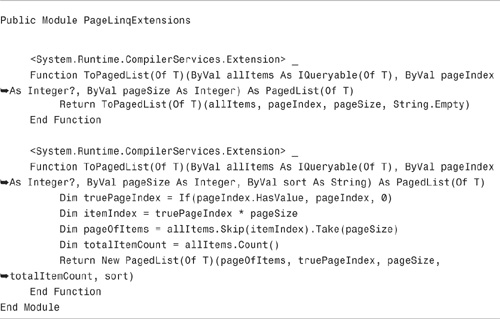
The PagingLinqExtensions class makes it possible to return a PagedList like this:
(C#)

(VB)
![]()
Notice how you can call ToPagedList() directly on a LINQ query. The PagingLinqExtensions class simplifies your code.
Finally, we need to modify our Html.DataGrid() class to use the PagedList class to represent database records. The modified Html.DataGrid() class includes the new RenderPagerRow() method contained in Listing 6.18.
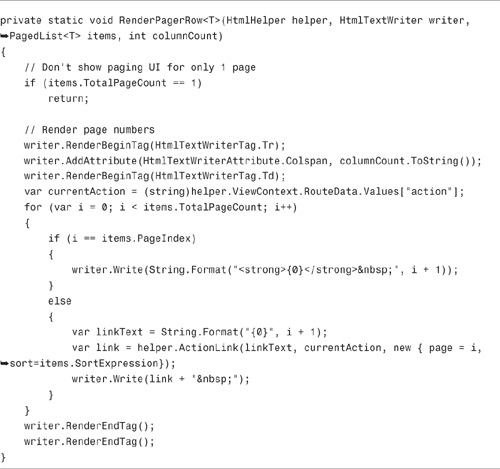
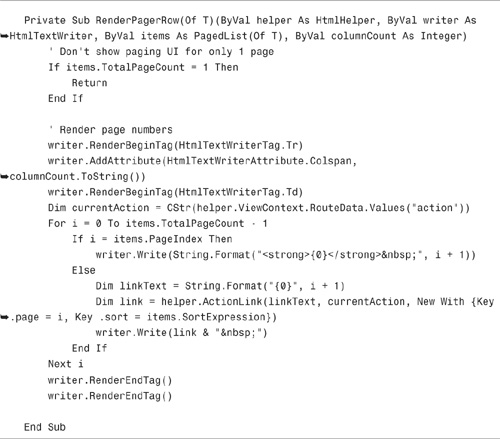
The RenderPagerRow() method in Listing 6.18 renders the user interface for paging. This method simply renders a list of page numbers that act as hyperlinks. The selected page number is highlighted with an HTML <strong> tag.
The modified Html.DataGrid() helper requires an instance of the PagedList class for its data parameter. You can use the controller action in Listing 6.19 to add the right data to view state.
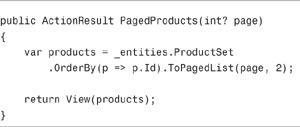
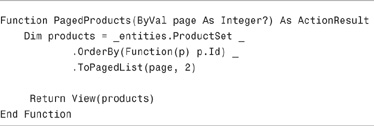
Warning
In Listing 6.19, notice that the ToPagedList() method is called on a LINQ query that includes a call to the OrderBy() method. When using the Entity Framework, you must order the results of a query before you can extract a page of records from the query.
If you want to both page and sort the products, you can use the controller action in Listing 6.20.
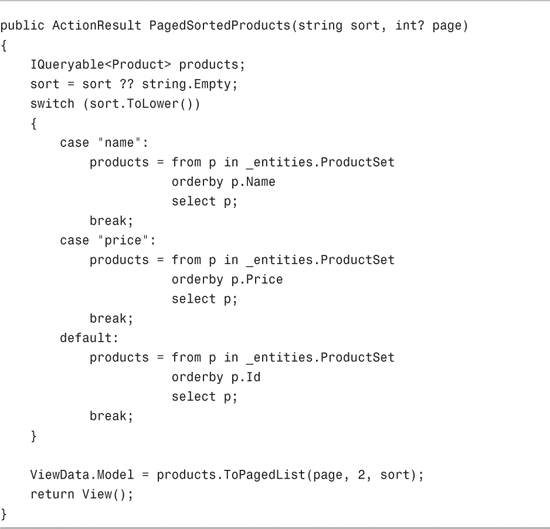
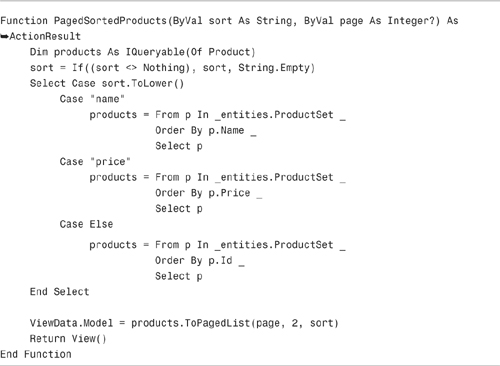
Notice that when you want to support sorting, you must pass the current sort column to the ToPageList() method. If you don’t pass the current sort column, clicking a page number causes the Html.DataGrid() to forget the sort order.
In general, you should place any complicated view logic in an HTML helper. There is a simple reason for this: You can test a helper, but you cannot test a view.
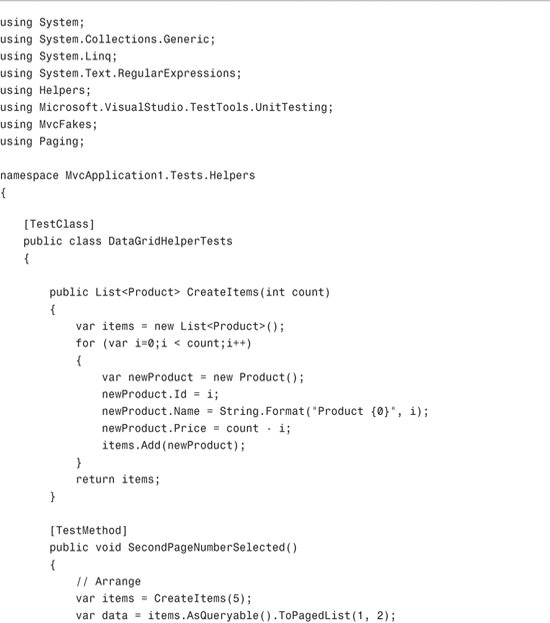
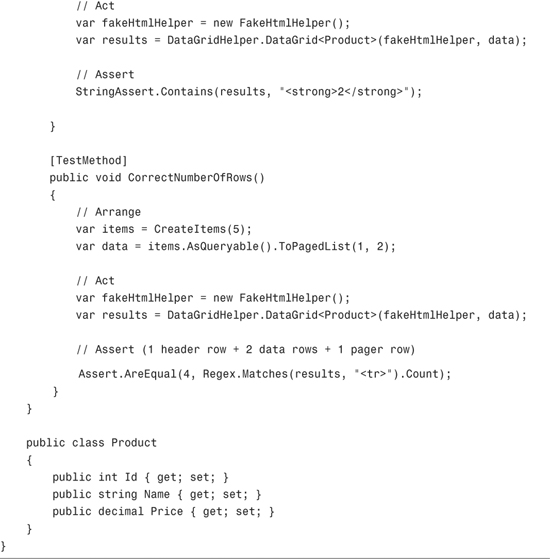
The Html.DataGrid() helper that we created in the previous section is a good example of a helper that requires unit tests. There are several things that I could have gotten wrong while writing this helper. You should never trust anything that you write!
Here are some expectations for our helper that we might want to test:
• The helper displays the right number of table rows. For example, if you specify that the page size is 2 rows, calling the Html.DataGrid() helper method should render an HTML table that contains 4 rows (1 header row + 2 data rows + 1 pager row).
• The helper selects the right page number. For example, if you specify that the current page index is 1, page number 2 should be highlighted in bold in the pager user interface.
The test class in Listing 6.21 contains unit tests for both of these expectations.
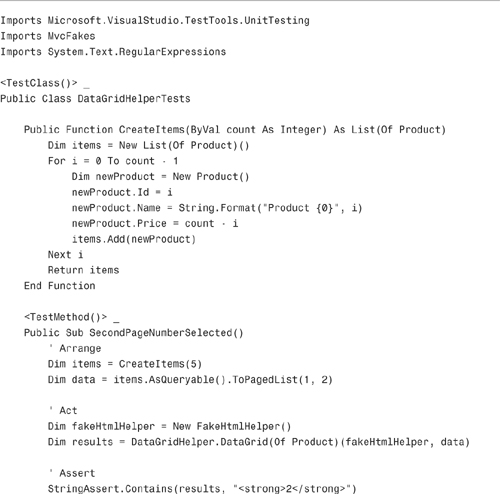
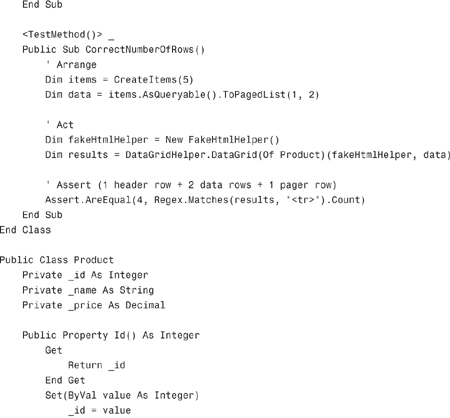
If I want to feel completely confident about the Html.DataGrid() helper, I would need to write several more unit tests than the two tests contained in Listing 6.21. However, Listing 6.21 is a good start.
Both of the unit tests in Listing 6.21 take advantage of a utility method named CreateItems() that creates a list that contains a specific number of products.
Both unit tests also take advantage of the FakeHtmlHelper class from the MvcFakes project. When you call an HTML helper, you must supply an instance of the HtmlHelper class as the first parameter. The FakeHtmlHelper enables you to easily fake this helper.
Note
Before you can run the tests in Listing 6.21, you must add a reference to the MvcFakes project to your Test project. The MvcFakes project is included in the code on the book’s website, www.informit.com/title/9780672329982.
This chapter was devoted to the topic of HTML helpers. You learned how to create views more easily by using HTML helpers to render HTML content.
In the first part of this chapter, you learned how to use the standard set of HTML helpers included with the ASP.NET MVC framework. For example, you learned how to create HTML links with the Html.ActionLink() and Url.Action() helpers. You also learned how to use the form helpers to render standard HTML form elements such as drop-down lists and text boxes.
We also discussed how you can make your websites more secure against JavaScript injection attacks by taking advantage of the Html.AntiForgeryToken() and Html.Encode() helpers.
In the next part of this chapter, we examined how you can create custom HTML helpers. We talked about the different utility classes that you can use when building a custom helper. In particular, you learned how to use the TagBuilder and HtmlTextWriter classes.
We then tackled building a real-world HTML helper. We created an Html.DataGrid() helper that renders database records in an HTML table. We added both sorting and paging support to our custom Html.DataGrid() helper.
In the final section of this chapter, you learned how to build unit tests for your custom HTML helpers. We created two unit tests for our Html.DataGrid() helper.