
In This Chapter
In this chapter, you learn how to add security to your ASP.NET MVC application. You learn how to password protect controllers and controller actions. You also learn how to register new users.
We also investigate how you can configure different types of authentication and Membership to use with an ASP.NET MVC application. For example, you learn how to authenticate users using Windows authentication and Forms authentication.
Finally, you learn how to create tests for controller actions that use authentication. You learn how to verify that only the right users can invoke a controller action.
Before we do anything else, we should start by creating some users and roles. We can use these users and roles in the remainder of the chapter to verify that we provide access to only the right users in the right roles. There are two ways that we can create new users: We can use the Web Site Administration Tool or use the Account controller.
You can take advantage of the Web Site Administration Tool to quickly create new users and roles. You can launch the Web Site Administration Tool from Visual Studio by selecting the menu option Project, ASP.NET Configuration.
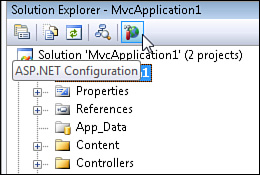
Alternatively, you can click the scary icon of the hammer hitting the world that appears at the top of the Solution Explorer window (see Figure 12.1).
Warning
Before launching the Web Site Administration Tool, make sure that you have built your application at least once. Otherwise, you get the error message Could Not Load Type ’MvcApplication1.MvcApplication’ when you click the Security tab.
The Web Site Administration Tool is implemented as an ASP.NET Application. If you are curious, you can take a look at the source for this application in the following folder:
C:WindowsMicrosoft.NETFrameworkv2.0.50727ASP.NETWebAdminFiles
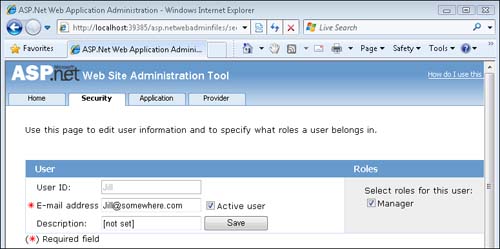
After you launch the Web Site Administration Tool, you can create new users and roles by clicking the Security tab. For example, I created two new users named Jack and Jill that I used to test the sample code in this chapter. (They both have the password secret.)
You also can enable roles and create roles. I created a role named Manager and added Jill to the role (see Figure 12.2).
If you need to create users (but not roles), you can use the Account controller included with the default Visual Studio ASP.NET MVC template. Follow these steps:
- Create a new ASP.NET MVC application and run it. (Press F5.)
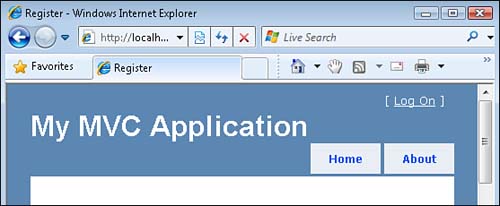
- Click the [Log On] link (see Figure 12.3).
- Click the Register link.
- Complete the registration form to create a new user (see Figure 12.4).

The Account controller is located in the Controllers folder just like any other controller. The Account controller exposes the following actions:
• LogOn()—Enables you to display a LogOn view
• LogOn(userName, password, rememberMe, returnUrl)—Enables you to authenticate
• LogOff()—Enables you to log off from the website
• Register()—Enables you to display the registration form
• Register(userName, email, password, confirmPassword)—Enables you to register a new user account
• ChangePassword()—Enables you to display the ChangePassword view
• ChangePassword(currentPassword, newPassword, confirmPassword)—Enables you to change a password
• ChangePasswordSuccess()—Enables you to display the ChangePasswordSuccess view
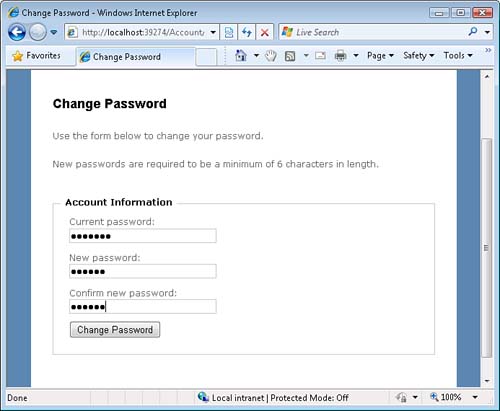
Notice that the Account controller exposes actions for changing a password. The sample ASP.NET MVC site does not provide you with a way to navigate to the ChangePassword view. (There is no link to this view.) You can get to the ChangePassword view by entering the following address into your browser address bar:
/Account/ChangePassword
You must be authenticated to navigate to the ChangePassword view. After you log on, you can use the ChangePassword view to change your password (see Figure 12.5).
If you want to allow only certain users, or only users in certain roles, to access a controller action, you need to specify the users or roles that are authorized to invoke the controller action. There are two ways that you can specify authorization: You can specify authorization declaratively, or you can specify authorization programmatically. We explore both approaches in the following sections.
You can decorate a controller action, or an entire controller class, with the Authorize attribute. If you use this attribute without specifying any additional properties, the attribute prevents any anonymous users from invoking the action.
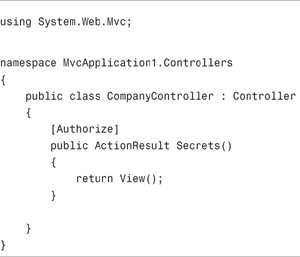
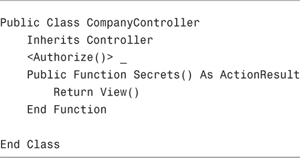
For example, the Secrets() action in Listing 12.1 is decorated with the Authorize attribute.
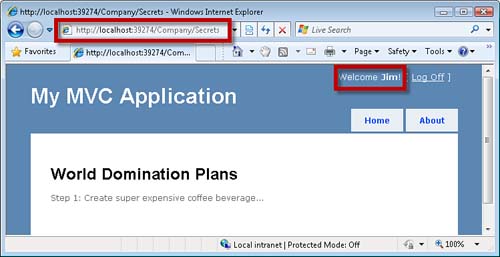
If you attempt to invoke the Secrets() action, and you are not logged in, you are redirected to the Account controller Login() action automatically. This action displays the Login view.
If, on the other hand, you are logged in, you can see the Secrets view in Figure 12.6.
If you want to authorize only certain users to invoke a controller action, you can use the Users property when applying the Authorize attribute to an action. The Users property accepts a comma-separate list of users.
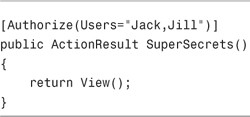
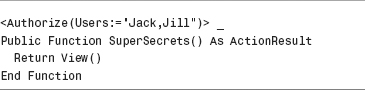
For example, the SuperSecrets() action in Listing 12.2 can be invoked only by Jack or Jill. If Jim attempts to invoke this action, he will be redirected to the LogOn view.
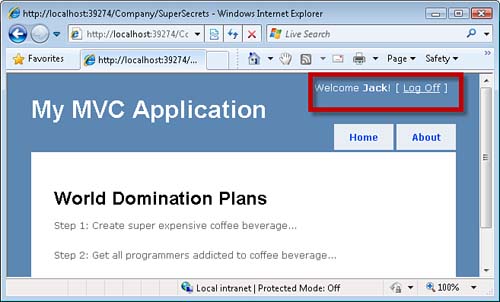
If either Jack or Jill invoke the SuperSecrets() action, they see the view in Figure 12.7.
You also can restrict access to a controller action by role. For example, you might want to enable only users in the Manager role to invoke a controller action.
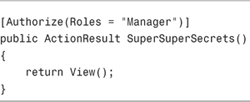
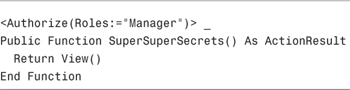
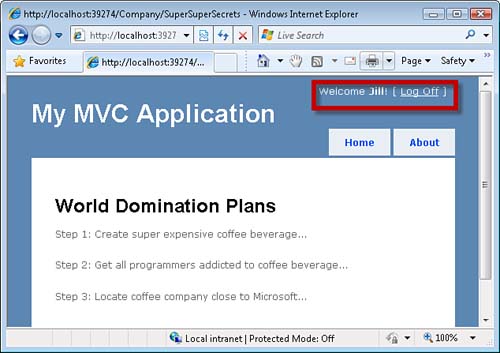
The Authorize attribute includes a Roles property. You can assign a comma-separate list of roles to this attribute. For example, the SuperSuperSecret() controller action in Listing 12.3 can be invoked only by members of the Manager role.
Because Jill is a member of the Manager role, she can successfully invoke the SuperSuperSecrets() action (see Figure 12.8). However, when anyone who is not a member of the Manager role attempts to invoke the action, that person is redirected to the Account controller LogOn() action.
If you prefer, you can implement authorization programmatically rather than declaratively. Instead of using the Authorize attribute, you can use the User property.
The User property is a property of the Controller class. The User property implements the IPrincipal interface and, therefore, it exposes the following method and property:
• IsInRole(role)—Returns true if the current user is a member of the specified role
• Identity—Return an object that implements the IIdentity interface that represents the current user
The expression User.Identity returns an object that represents the current user. The User.Identity object has three properties:
• AuthenticationType—Returns a string that represents the authentication type such as Forms or NTLM. This property returns an empty string when the user is not authenticated.
• IsAuthenticated—Returns true when the user is authenticated.
• Name—Returns the username.
The controller in Listing 12.4 illustrates how you can use these methods and properties. The Secrets() action returns different views to different users.
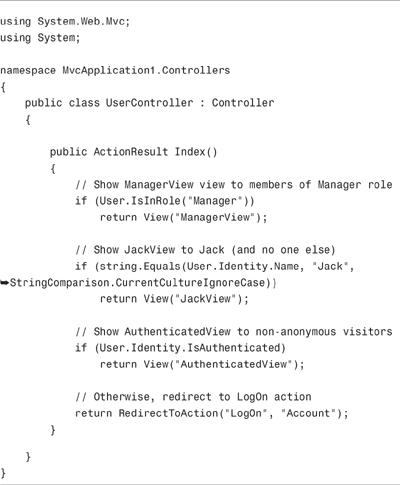
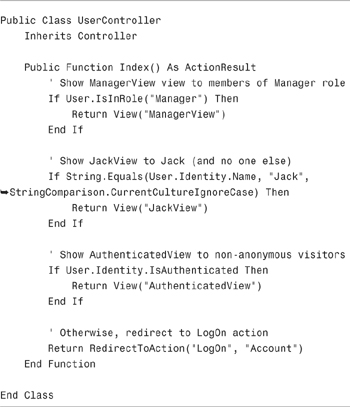
If you invoke the Index() action, and you are a member of the Manager role, you see the ManagerView. If your username happens to be Jack, you see the JackView. If you are an authenticated user, you see the AuthenticatedView. Finally, if you are an anonymous user, you are redirected to the Account controller LogOn action so that you can log in to the website.
In this section, you learn how to configure membership. For example, you learn how to specify where user account information is stored. You also learn how to configure membership with different password requirements.
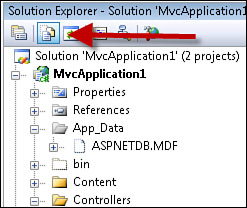
You might be curious about where user account information is stored. By default, user names and passwords are stored in a SQL Express database named ASPNETDB.mdf located in your application’s App_Data folder. You can see this database in the Solution Explorer window if you click the Show All Files button at the top of the Solution Explorer window (see Figure 12.9).
Using the ASPNETDB.mdf database is fine (and convenient) when you develop a new application. However, when you are ready to release the application into production, you need to store your user information in your production database.
Note
You can use ASP.NET membership with Microsoft SQL Server version 2000 or above. You can’t use membership with another type of database—for example, an Oracle database—without creating a custom membership provider.
If you want to store user account information in an alternative database, you need to complete the following three steps:
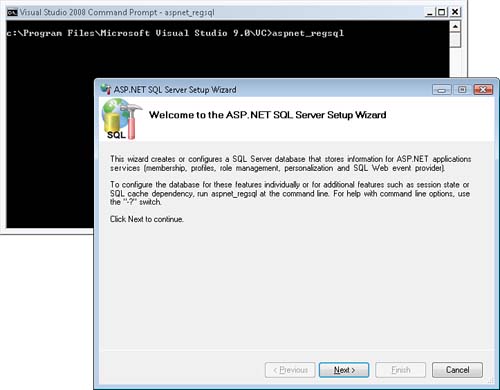
You can complete the first step, configuring your database, by using the aspnet_regsql.exe command line tool. From the Start menu, navigate to All Programs, Microsoft Visual Studio 2008, Visual Studio Tools, Visual Studio 2008 Command Prompt. Type aspnet_regsql.exe into the command prompt to launch the ASP.NET SQL Server Setup Wizard (see Figure 12.10).
Note
Your Windows account must have sufficient permissions to create the new objects in the database. The ASP.NET SQL Server Setup Wizard fails if you launch the tool while logged in to Windows without the necessary database permissions.
You use the ASP.NET SQL Server Setup Wizard to connect to a database (anywhere on your network) and create the necessary database objects. For example, the wizard creates the aspnet_Membership, aspnet_Users, aspnet_Roles, and aspnet_UsersInRoles table to store user and role information.
Note
If you don’t want to use the ASP.NET SQL Server Setup Wizard, you can find SQL scripts for adding the application services database objects in the following folder: C:WindowsMicrosoft.NETFrameworkv2.0.50727.
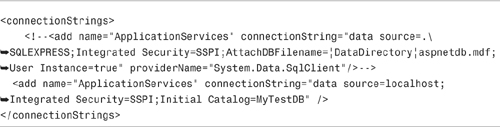
After you create the necessary database objects, you need to modify the database connection used by your MVC application. Modify the ApplicationServices connection string in your web configuration (web.config) file so that it points to the production database. For example, the modified connection in Listing 12.5 points to a database named MyTestDB (the original ApplicationServices connection string has been commented out).
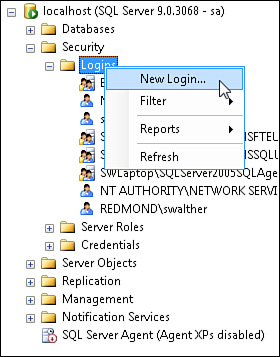
Finally, if you use Integrated Security to connect to your database, you need to add the correct Windows user account as a login to your database. The correct account depends on whether you use the ASP.NET Development Server or Internet Information Services as your web server. The correct user account also depends on your operating system.
If you use the ASP.NET Development Server (the default web server used by Visual Studio), your application executes within the context of your Windows user account. In that case, you need to add your Windows user account as a database server login.
Alternatively, if you use Internet Information Services, you need to add either the ASPNET account or the NT AUTHORITY/NETWORK SERVICE account as a database server login. If you use Windows XP, add the ASPNET account as a login to your database. If you use a more recent operating system, such as Windows Vista or Windows Server 2008, add the NT AUTHORITY/NETWORK SERVICE account as the database login.
You can add a new user account to your database by using Microsoft SQL Server Management Studio (see Figure 12.11).
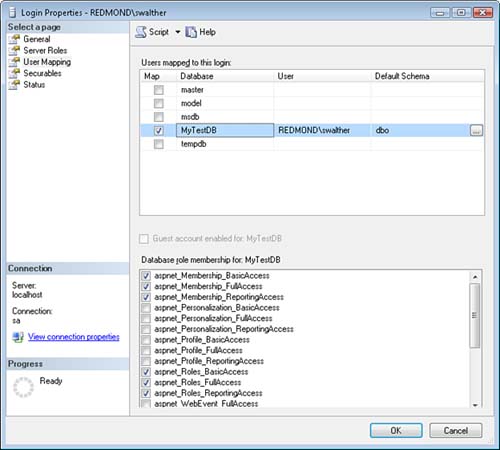
After you create the required login, you need to map the login to a database user with the right database roles. Double-click the login and select the User Mapping tab. Select one or more application services database roles. For example, to authenticate users, you need to enable the aspnet_Membership_BasicAccess database role. To create new users, you need to enable the aspnet_Membership_FullAccess database role (see Figure 12.12).
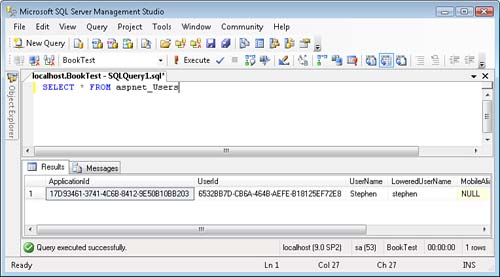
After you complete all these steps, your user account information will be stored in your production database. If you want to verify that everything is set up correctly, you can create a new user account within your ASP.NET MVC application and check whether the new user is added to the aspnet_Users table (see Figure 12.13).
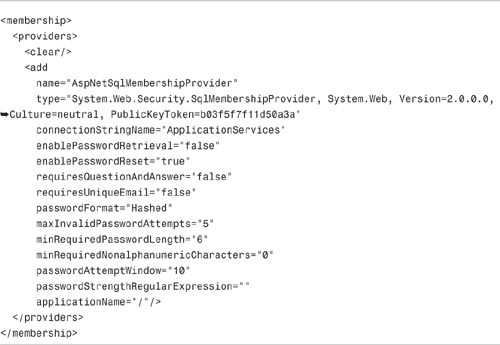
By default, ASP.NET MVC uses the SQL membership provider. This provider exposes several configuration settings that you can use to customize the behavior of the provider:
• ApplicationName—The name of the ASP.NET application associated with the membership information.
• Description—The description of the provider that is displayed in administrative tools.
• EnablePasswordReset—When true, users can reset their password to a random password.
• EnablePasswordRetrieval—When true, users can recover their password.
• MaxInvalidPasswordAttempts—An integer that represents the number of log on attempts after which the user account is locked.
• MinRequiredNonalphanumericCharacters—The minimum number of characters other than an alphabetic or numeric character that must appear in a password (for example, #%).
• MinRequiredPasswordLength—An integer that represents the minimum length of a valid password.
• Name—The friendly name for this provider.
• PasswordAttemptWindow—An integer that represents an interval in minutes. If you enter the wrong password more than the MaxInvalidPasswordAttempts within this interval, your account is locked.
• PasswordFormat—Determines how passwords are stored in the database. The three possible values are Clear, Encypted, and Hashed.
• PasswordStrengthRegularExpression—A regular expression that a valid password must match.
• RequiresQuestionAndAnswer—When true, you must answer a question before you can retrieve or reset your password.
• RequiresUniqeEmail—When true, you cannot create two accounts with the same email address.
The membership provider is configured with the settings in Listing 12.6 in the root web configuration (web.config) file.
You can toughen the requirements for a valid password by modifying these default settings. For example, if you want to require a password to be at least 10 characters and contain at least 1 nonalphanumeric characters, you can change the minRequiredPasswordLength and minRequiredNonalphanumericCharacters settings.
Notice the passwordFormat setting. By default, passwords are hashed with a one-way hash before stored in the database. When a user logs on, the password is hashed and compared against the hashed value in the database. So the actual user passwords are not stored anywhere.
The advantage of hashing passwords is that if your database server is ever compromised by an evil hacker, the hacker can’t steal any of your website user passwords. The disadvantage of hashing passwords is that you can never recover a forgotten password. If a user forgets a password, the password must be reset.
You also can set the passwordFormat setting to the value Clear or Encrypted. When a password is stored with passwordFormat Clear, the password is stored as plain text. When stored with ENCRYPTED, the password is encrypted before being stored in the database.
Under the covers, the Account controller uses the Membership API to authenticate and create users. You can work directly with the Membership API in your code.
The Membership API consists of two main classes: the Membership class and the MembershipUser class.
The Membership class exposes a number of useful methods including the following:
CreateUser()
DeleteUser()
FindUsersByEmail()
FindUsersByName()
GeneratePassword()
GetAllUsers()
GetNumberOfUsersOnline()
GetUser()
GetUserNameByEmail()
UpdateUser()
ValidateUser()
Several of these methods return either an individual MembershipUser or a collection of MembershipUser objects. The MembershipUser class has the following methods:
ChangePassword()
ChangePasswordQuestionAndAnswer()
GetPassword()
ResetPassword()
UnlockUser()
The MembershipUser class also has several useful properties:
Comment
CreationDate
Email
IsApproved
IsLockedOut
IsOnline
LastActivityDate
LastLoginDate
LastPasswordChangedDate
PasswordQuestion
UserName
The ASP.NET framework includes a Roles class that you can use to programmatically work with user roles. This Roles class has the following methods:
AddUsersToRole()
AddUsersToRoles()
AddUserToRole()
AddUserToRoles()
CreateRole()
DeleteCookie()
FindUsersInRole()
GetAllRoles()
GetRolesForUser()
GetUsersInRole()
IsUserInRole()
RemoveUserFromRole()
RemoveUserFromRoles()
RemoveUsersFromRole()
RemoveusersFromRoles()
RoleExists()
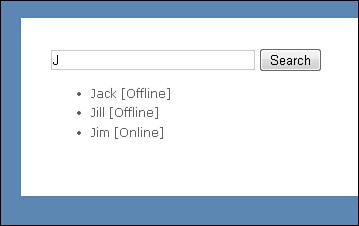
Let’s look at a concrete sample of how you can use one of these classes. We create a lookup form in which you can search for a user by name. The results display whether each user is currently online.
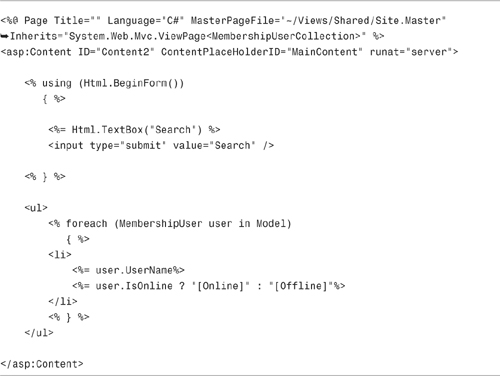
The Lookup controller is contained in Listing 12.7.
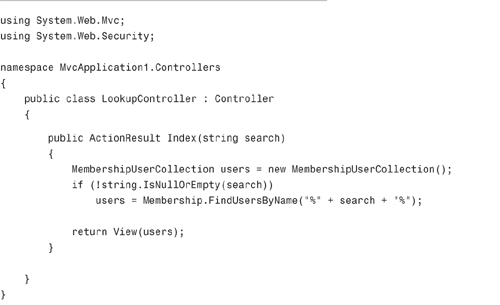
The controller has a single action named Index(). The Index() action retrieves all the users that match the search parameter passed to the action. Notice that the FindUsersByName() accepts the % wildcard.
The Index view is contained in Listing 12.8. Notice that it uses the IsOnline property to display whether each user is currently online (see Figure 12.14).
By default, an ASP.NET MVC application is configured to use Forms authentication and the SQL membership provider. If you want to authenticate your users against their Windows credentials, you can use Windows authentication.
In the following sections, you learn how to configure Windows authentication and use Windows authentication to authorize Windows users and groups.
Note
Another option, which we don’t discuss in this book, is to use the Active Directory membership provider. You can use the Active Directory membership provider with Forms authentication to authenticate users against Active Directory.
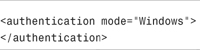
You can switch from Forms authentication to Windows authentication by changing the authentication section in your application root web configuration (web.config) file. You need to modify the authentication section so that it looks like Listing 12.9.
After you switch to Windows authentication, you delegate responsibility for authenticating users to your web server. In other words, the ASP.NET Development Server or Internet Information Services is responsible for authenticating users.
First, while developing an MVC application, you use the ASP.NET Development Web Server included with Visual Studio. By default, the ASP.NET Development Web Server executes all pages in the context of the current Windows account (whatever account you used to log in to Windows).
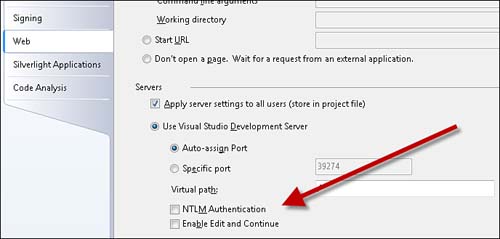
The ASP.NET Development Web Server also supports NTLM authentication. You can enable NTLM authentication by right-clicking the name of your project in the Solution Explorer window and selecting Properties. Next, select the Web tab and check the NTLM check box (see Figure 12.15).
For a production web application, on the other hand, you use IIS as your web server. IIS supports several types of authentication including the following:
• Basic authentication—Defined as part of the HTTP 1.0 protocol. Sends user names and passwords in clear text (Base64 encoded) across the Internet.
• Digest authentication—Sends a hash of a password, instead of the password itself, across the internet.
• Integrated Windows (NTLM) authentication—The best type of authentication to use in intranet environments using windows.
• Certificate authentication—Enables authentication using a client-side certificate. The certificate maps to a Windows user account.
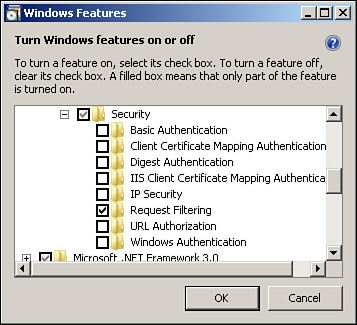
You can use Internet Information Services Manager to enable a particular type of authentication. Be aware that all types of authentication are not available in the case of every operating system. Furthermore, if you use IIS 7.0 with Windows Vista, you need to enable the different types of Windows authentication before they appear in the Internet Information Services Manager. Open Control Panel, Programs, Programs and Features; Turn Windows features on or off; and expand the Internet Information Services node (see Figure 12.16).
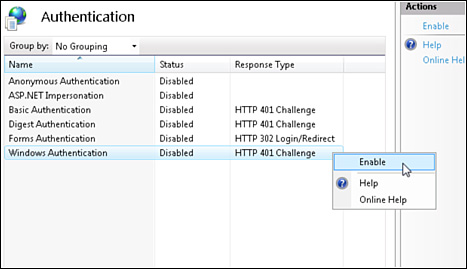
Using Internet Information Services, you can enable or disable different types of authentication. For example, Figure 12.17 illustrates disabling anonymous authentication and enabling Integrated Windows (NTLM) authentication when using IIS 7.0.
After you enable Windows authentication, you can authorize Windows users and groups in the same way as you authorize users and roles when using Forms authentication.
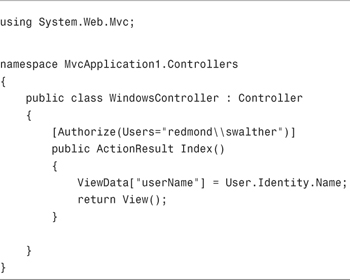
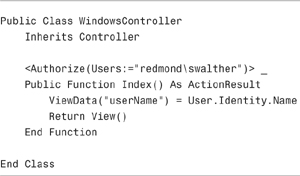
When Windows authentication is enabled, the Authorize attribute works against Windows users and groups. For example, the controller in Listing 12.10 prevents anyone from accessing the Index() action except for the user with the account redmondswalther.
Exactly what happens when a user attempts to access a controller action and the user is not authorized depends on the type of authentication enabled in the web server. For example, when using the ASP.NET Development Server, you simply get a blank page. The page is served with a 401 Not Authorized HTTP Response Status.
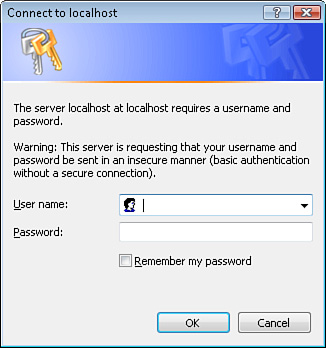
If, on the other hand, you use IIS with Anonymous authentication disabled and Basic authentication enabled, you keep getting a login dialog prompt each time you request the protected page (see Figure 12.18).
You also can use the Authorize attribute with Windows groups. That way, you can prevent an action from being invoked by anyone who is not the member of the right group.
Before you can use Windows groups, you need to enable the Windows token role provider. You can enable this provider by modify the roleManager section in your root web configuration (web.config) file to look like Listing 12.11.
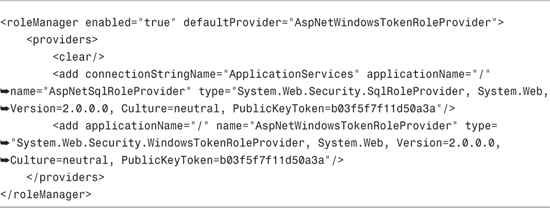
In Listing 12.11, the roleManager element has been modified with a defaultProvider attribute that points at the Windows token role provider.
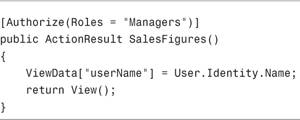
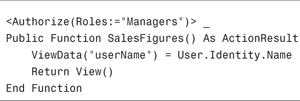
After you make this change, you can use the Authorize attribute with Windows groups. For example, the SalesFigures() action in Listing 12.12 can be invoked only by members of the Windows Managers group.
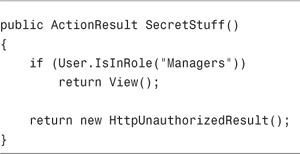
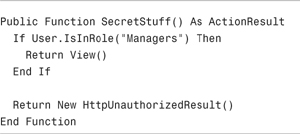
You also can programmatically verify a user’s group. This approach is taken in the SecretStuff() action in Listing 12.13.
Note
Because of Windows User Account Control (UAC), when working with Windows Vista or Windows Server 2008, the local Administrators group behaves differently than other groups. The [Authorize] attribute won’t correctly recognize a member of the local Administrators group unless you modify your computer’s UAC settings.
In this final section, we discuss two methods for testing authentication and authorization. In particular, you learn how to test that only the right user or right role has access to a controller action.
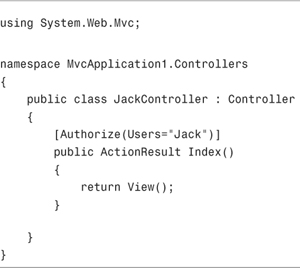
If you are using the Authorize attribute to protect controller actions, the easiest way to test authorization is to simply check for this attribute. For example, the controller in Listing 12.14 uses the Authorize attribute. The Authorize attribute prevents anyone except for Jack from invoking the Index() action.
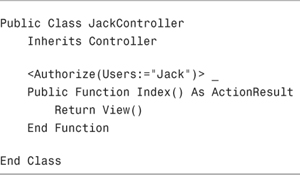
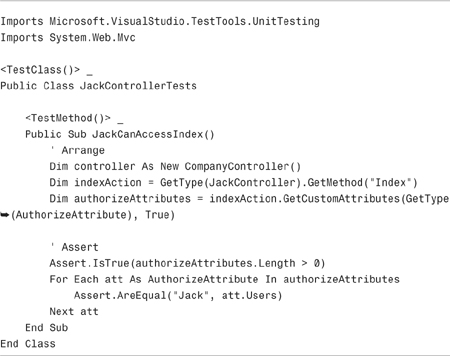
If you want to verify that the Authorize attribute is present on the Index() action, you can use the test in Listing 12.15. This test verifies that there is, in fact, an Authorize attribute on the Index() action and the Authorize attribute has a Users property set to the value "Jack".
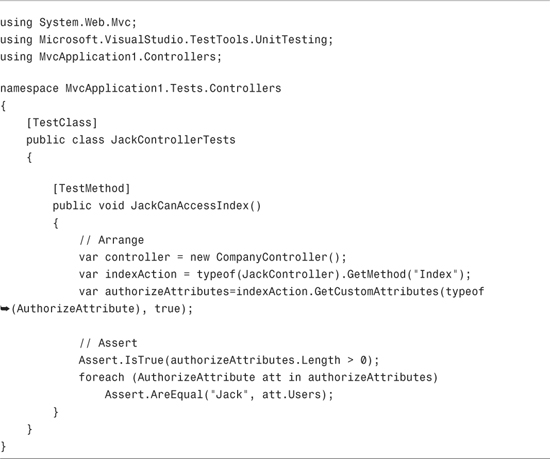
Personally, I find something unsatisfying about this test. The test does not actually capture our requirement. We want to test that only Jack is authorized to access the Index action. However, the test simply verifies that there is an Authorize attribute on the action.
In this section, we explore an alternative method of testing authorization. Instead of testing for the Authorize attribute, we use a custom model binder.
In Chapter 7, “Understanding Model Binders and Action Filters,” we created a custom model binder named the user model binder. The user model binder enables you to pass a user (an IPrincipal object) as a parameter to a controller action.
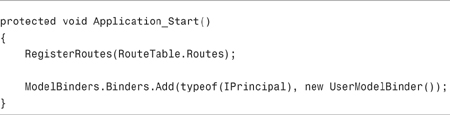
You register the user model binder in an application by adding the line of code to the Global.asax file contained in Listing 12.16.

After you register the user model binder, you can add an additional IPrincipal parameter to any controller action. For example, the controller action in Listing 12.17 displays the Index view only when the current user is Jill.
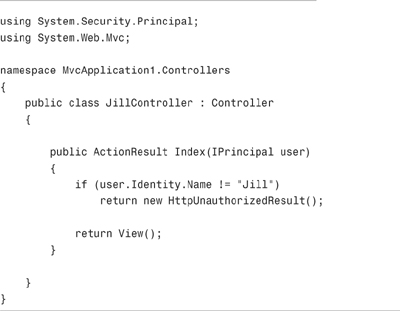
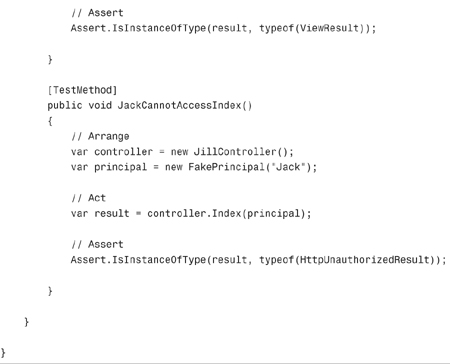
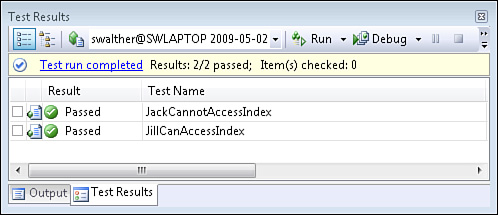
The controller action in Listing 12.17 is easy to test. The test class in Listing 12.18 contains two tests. The first test verifies that Jill can invoke the Index() action, and the second test verifies that Jack cannot invoke the controller action. Jill gets a view and Jack gets an HTTP Unauthorized result.

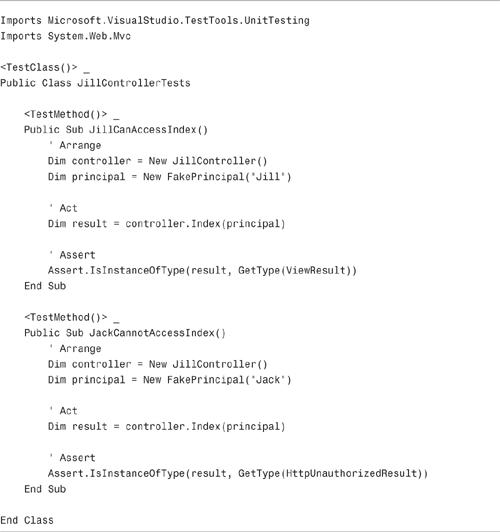
When you run the tests in Listing 12.18, both tests pass. This should give you some confidence that only Jill can invoke the Index action (see Figure 12.19).
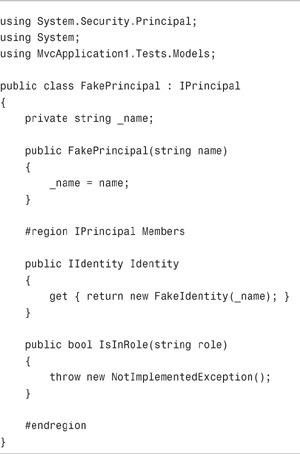
The tests in Listing 12.18 make use of a FakePrincipal class. This (extremely simple) class is contained in Listing 12.19.
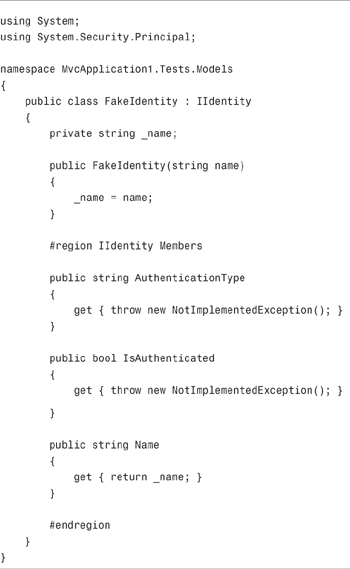
The FakePrincipal class uses a FakeIdentity class. For the sake of completeness, this class is included in Listing 12.20.

In this chapter, you learned how to control access to controller actions. In the first section, you learned how to use the Web Site Administration Tool and the Account controller to create users and roles.
Next, you learned how to authorize users both declaratively and programmatically. You learned how to decorate controller actions with the Authorize attribute. You also learned how to take advantage of the User property.
Next, you learned how to configure membership. You learned how to configure a database and your application to store user accounts in a production database server.
We also explored the topic of Windows authentication. You learned how to enable Windows authentication so that you can authorize Windows users and groups.
Finally, we tackled the topic of testing. We examined two ways of testing authorization.