
8. Working with Transitions
A transition is a jump from one video clip to the next, or from one scene to another. Typically, this jump changes the location, but it can also indicate time passing or a simple mood change. Often, you accomplish this change with a cut, as described in Chapter 6, “Fine-Tuning Your Edit,” but occasionally you need to employ a more subtle approach—something that doesn’t visually jar the audience. For example, you need to gradually change the image from a rampant party to the aftermath of the room the next day so that the audience isn’t left thinking, “What am I looking at?”
Sometimes you don’t need subtlety; the change itself clearly alerts the audience that the scene is about to shift. An example of this type of change might be to signify the start of an advertising break or mark the end of your video production. In either example, you use a transition. Liquid offers you a great selection of subtle and not-so-subtle transitions for use in your video projects. In this chapter, you’ll learn how to use and abuse these, placing them on the Timeline and editing their parameters to create original effects.
Understanding Transitions and the Single-Track Edit
Liquid uses a single-track edit system, which means all the media clips exist on a single track. However, you can have as many tracks as you want, and then you can stack them, one on top of the other, to create spectacular effects.
On the opposite side of the fence is the A/B roll method, which some of the other NLE programs use. This method needs three lines to create a transition; these lines are often static and can’t be customized to your individual needs.
Both single-track edit and A/B roll have advantages and disadvantages, particularly when it comes to the everyday use of transitions, which you’ll look at in the next few pages.
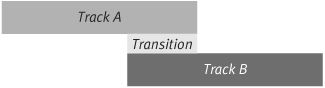
The A/B roll method
The A/B roll method uses the concept of two tracks—Track A at the top, and Track B at the bottom—and in between them, you insert a transition. Figure 8.1 shows a graphical representation of this. The mark-in point of the clip on Track B is the start of the transition; the mark-out point of the clip on Track A is the end of the transition.
Figure 8.1. The A/B roll method with overlapping clips.
The A/B roll method is easy to understand if you visualize it. You simply position the clips to overlap and then place the transition in the middle to fill the overlapping gap. But suppose you want to add a title above Track A and then add a transition at the beginning of the title so that it fades into the rest of the track smoothly. Well, you can’t. Your only option is to alter the transparency levels of the title, but this isn’t going to help you if you want a much more advanced type of transition, such as a band wipe or a water ripple.
The single-track edit system
In contrast, the single-track edit system is a little more complex on the surface. The clips still overlap, but you can’t see this overlap like you can with the A/B roll method. Instead, the clips are snuggled in behind each other (Figure 8.2). You can still manipulate the clips in the Trim Editor, but how you do this isn’t quite as obvious as being able to see the overlapping gap between two clips as is shown using the A/B roll system.
Figure 8.2. The top image shows the single track edit with hidden overlapping clips. Below this is a “side-on” graphical representation of the same image.
This makes using the single-track edit system a little more challenging, but not dramatically so. You don’t have to be a nuclear physicist to understand the concept, but the process is a little more cerebral than the building-block system used by the A/B roll method.
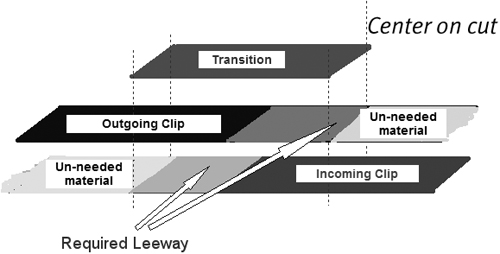
You’ll be happy to know there is an advantage to using this method that should alleviate any potential headaches you feel coming on. Unlike the A/B roll method, the single-track edit system can support transitions on any media clip on any track. This means that if you need a transition on any of the layers above the main clip—take the example of adding a title above your main clip—you can do this. It’s not a problem, as you can see in Figure 8.3, where a page curl transition is added to a title, while a CPU dissolve over two clips is under it.
Figure 8.3. Two video clips are midway through a Dissolve, while over the top a title is midway through a page curl transition.
This clear technical advantage goes a long way toward explaining why many NLE software programs prefer the single-track edit system to the A/B roll method.
Understanding Transition Handles
Although the single-track edit system is indisputably the more flexible of the two approaches to NLE, you don’t get something for nothing.
Because of the sheer power you wield by being able to place a transition on any track, you’ll have rules to follow so Liquid can fully understand exactly what you want it to do. These rules are not complex, and if you take certain precautions you can avoid the confusion that comes with learning how to use the single-track edit system.
The most important thing to know about the rules is to make sure you have enough available handles (on both clips) and that you know how to adjust a clip if you don’t have enough.
Using available handles
A handle is the bit of a clip you don’t see. It’s the bit that a transition needs in order to have a tangible piece of video with which to work. It’s also one of the more challenging aspects of single-track editing, particularly for users transferring from the easy A/B roll system. You’ll find that handles are simple enough once you know exactly what you are looking for.
To visualize the handle of a clip
1. Place any video clip in the Source Viewer.
2. Insert a mark-in point a few seconds after the start and a mark-out point a few seconds from the end on the Source Viewer Timeline (see Chapter 6 for details on this).
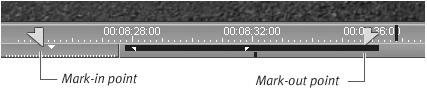
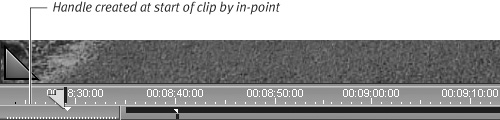
The first handle of the clip is the gap between the start of the media clip and the mark-in point. The other handle is the gap between the mark-out point and the end of the clip (Figure 8.4).
Figure 8.4. Mark-in and mark-out points added to a clip create handles at the start and end.
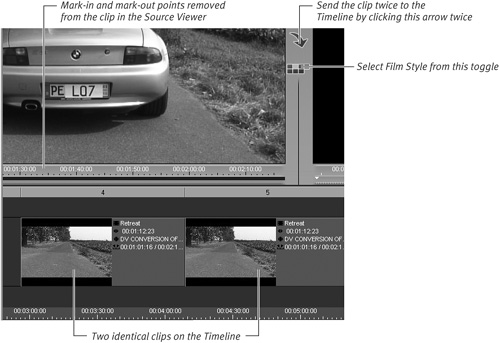
3. Send this clip to the Timeline using the Insert Source into Master button ![]() twice so that the clip appears as shown in Figure 8.5.
twice so that the clip appears as shown in Figure 8.5.
Figure 8.5. Two clips on the Timeline waiting for a transition.
Use the “Insert Grouped” option to avoid showing the audio tracks. See Chapter 6 for more details on this.
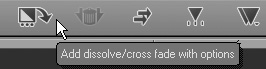
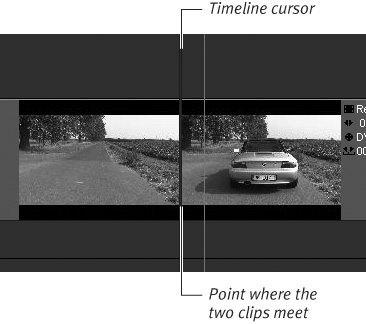
4. Place the Timeline cursor near to where the two clips meet and click the Add Dissolve/Cross Fade with Options button ![]() Leave all options as default, and click the check mark (Figure 8.6).
Leave all options as default, and click the check mark (Figure 8.6).
Figure 8.6. The Add Dissolve/Cross Fade with Options dialog.
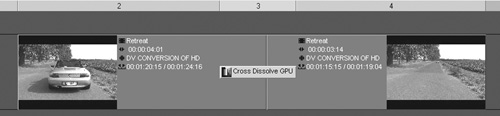
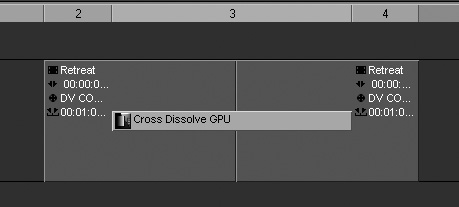
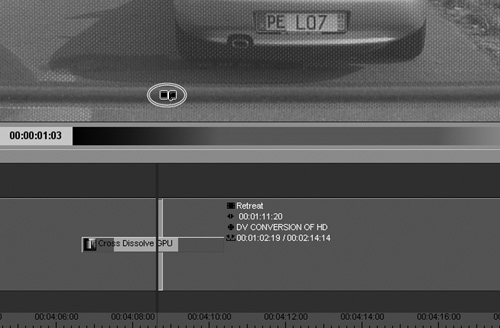
This will add a dissolve to the edit decision point, and a yellow slice will appear above the dissolve to indicate it is a Realtime FX and can be viewed without rendering (Figure 8.7).
Figure 8.7. The Cross Dissolve CPU added to the clips. A yellow slice appears above on the slice line.
Scrub through this clip and you will see that the first clip (the outgoing clip) dissolves into the image of the second clip (the incoming clip). The invisible areas you created by adding mark-in and mark-out points to the clip are being used by the transition.
If you don’t have enough handle length
Sometimes your clips do not have enough handle area for a transition to work effectively or correctly. If this is a problem, you can turn off the automatic safety feature that prevents Liquid from adding transitions to areas lacking the correct handle area.
This means that the transition can appear even if it doesn’t work correctly, allowing you to continue working without constantly worrying about available handle lengths. Trimming these clips so that they work with transitions is covered in the “Trimming Associated Clips” section later in this chapter.
To turn off “Restrict dragged Transitions to available handles”
1. Right-click the Timeline to bring up the Timeline Properties dialog box.
2. Switch to the General tab and deselect the “Restrict dragged Transitions to available handles” check box (Figure 8.8).
Figure 8.8. Turning off the Restrict dragged Transitions to available handles setting.
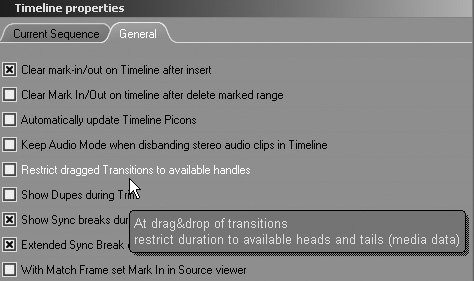
3. Click the check mark to accept this change.
• Once you make this change, you’ll have to manually trim any clips that don’t have enough handle space. See the “Trimming Associated Clips” section later in this chapter.
Adding a Transition
Once you understand the basic concept of using transitions on a single-track edit system, you’ll find that actually applying them is very easy. You can achieve this by either dragging and dropping or by right-clicking and sending.
To apply a transition to the Timeline
1. If it is not already open, click the Open Project Browser in Timeline button ![]() .
.
If you are using a dual-screen setup, the Project Browser may already be open in one of your monitors. The Lib tab referred to in this chapter will read Library.
If you are using Studio view, the Project Browser will be to the left of the Master/Source Viewer. The Lib tab referred to in this chapter will read Library.
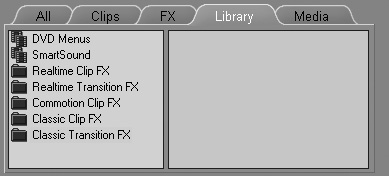
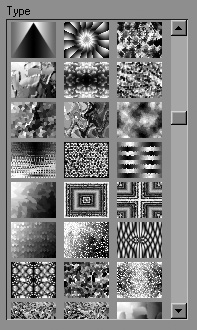
2. Select the Lib tab to show the folders containing all the effects Liquid has to offer (Figure 8.9).
Figure 8.9. The folders containing all effects found in Liquid 7.
3. Do one of the following:
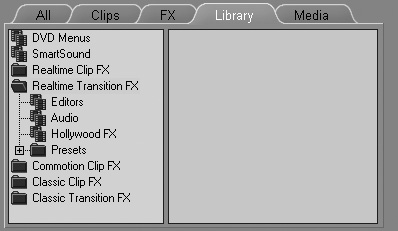
• Open the Realtime Transition FX folder if you intend to add a Realtime transition (Figure 8.10).
Figure 8.10. The Realtime Transition FX folder.
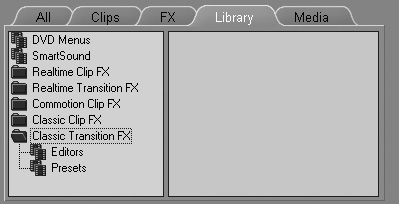
• Open the Classic Transition FX folder if you intend to use a non-Realtime transition (Figure 8.11).
Figure 8.11. The Classic Transition FX folder.
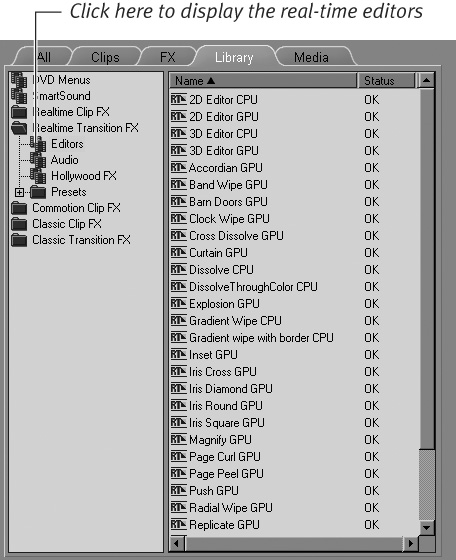
4. Once you’ve selected the type of transition you want, click the Editors Rack to display the contents of that Rack (Figure 8.12).
Figure 8.12. A selection of real-time editors.
5. Highlight the actual transition you want by clicking it once and apply the transition to the Timeline by doing one of the following:
• Left-click and hold the mouse button over the transition, then drag it to the Timeline. Release the mouse button when the transition is over the point where the two clips meet (Figure 8.13).
Figure 8.13. Dragging a transition to the edit point of two clips.
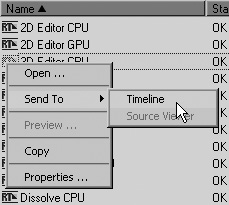
• Place the Timeline cursor roughly at the point where the two clips meet, then right-click the transition and select Send To > Timeline (Figure 8.14).
Figure 8.14. Sending a transition to the edit point by right-clicking.
• If you’re dragging a clip to the Timeline and you see the message “not enough media available to place transition,” or you send to the Timeline and nothing happens, then refer to the earlier section “To turn off ‘Restrict dragged Transitions to available handles.’”
• Transitions follow the same magnetic rules outlined in Chapter 6. By holding down the Shift key, you can toggle the magnets on and off. Press the Alt key to shift the polarity of the magnet from center to mark-out point, to mark-in point, and back to center.
• You can’t stack transitions. If you try adding another transition on top of an existing transition, you’ll discover that it replaces the original.
• Both the Realtime and Classic transitions offer a choice between Editors and Presets. The Realtime folder also contains a large collection of Hollywood effects presets. This folder is discussed in the “Adding a Preset Hollywood FX Transition” later in this chapter.
Applying the Default Transition
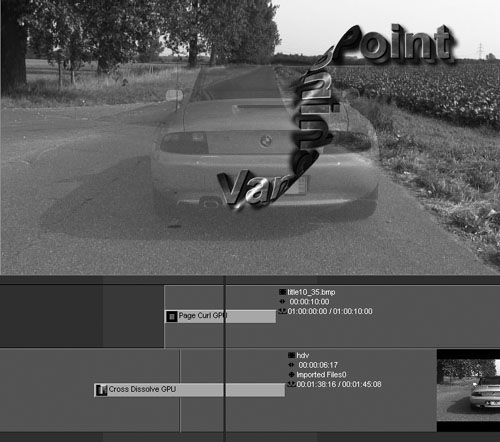
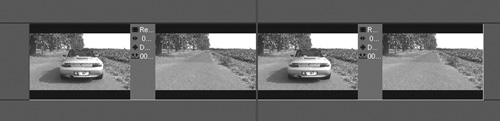
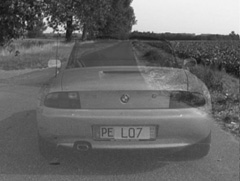
The most common type of transition, and arguably the only transition you’ll ever need, is the Dissolve. This transition gradually changes the scene from one image to the next using a series of subtle onscreen fades over a user-defined length of time (Figure 8.15).
Figure 8.15. Midway through a Dissolve. In this case, a camera on a locked tripod filmed an empty road and the road with the car. Using a dissolve between the two clips allows the car to appear Star Trek style!
Because this is such a commonly-used effect, it’s the only transition to earn a place as a shortcut button on the Liquid Toolbar (Figure 8.16).
Figure 8.16. The Dissolve shortcut button on the Liquid Toolbar.
You saw, briefly, how to use this transition during the explanation of handles. Here the process is covered in more detail.
• The default transition (Dissolve CPU) is a Realtime transition, and when applied to the Timeline a yellow slice will appear directly above it. Realtime effects can be viewed without rendering, but must be rendered if you want to send the project to DVD or tape. For more details on real-time and non–real-time rendering, see Chapter 1, “Getting Started.”
To apply the default transition
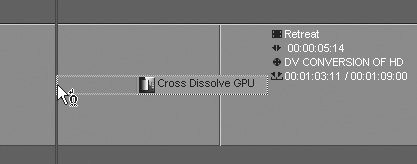
1. Once you have two clips on the Timeline, place the Timeline cursor roughly where the two clips meet (Figure 8.17).
Figure 8.17. Two clips on the Timeline. The Timeline cursor is over the edit point.
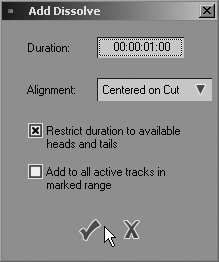
2. Click the Add Dissolve/Cross Fade with Options button once ![]() to bring up the Add Dissolve dialog box (Figure 8.18).
to bring up the Add Dissolve dialog box (Figure 8.18).
Figure 8.18. The Add Dissolve dialog box.
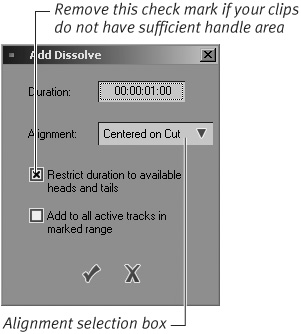
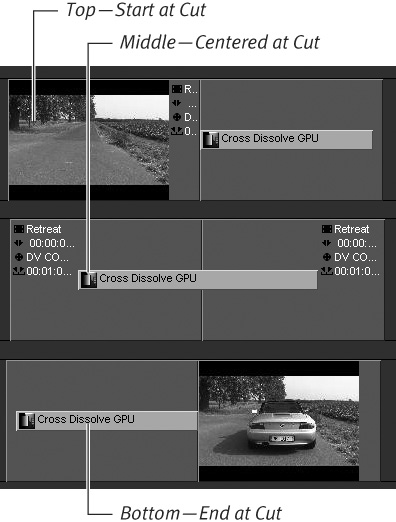
3. Alter the duration by entering numbers directly into this box if you wish, and then decide which alignment you want to use.
See the “Alignment Types” sidebar for more details.
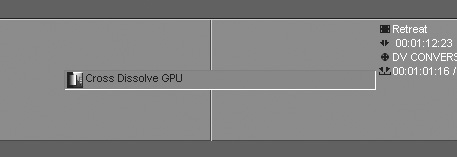
4. Click the check mark and the cross dissolve will be applied to its default position—centered on cut. (Figure 8.19).
Figure 8.19. A Dissolve added to the start of a cut.
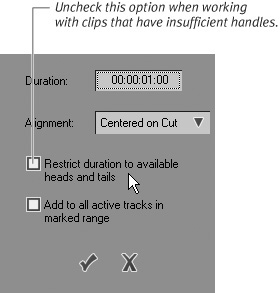
• If the transition doesn’t appear, this means you don’t have enough overlap between the two clips. Deselect the “Restrict duration to available heads and tails” check box to work around this. Then trim the handles of your clips to fit the transition. See the “Trimming Associated Clips” section later in this chapter.
Changing the Default Transition
If you don’t agree with the choice of default transition, you’ll be pleased to know that you can change it. But be warned, this is not a simple task and is not for the fainthearted. If you make a mistake, you may lose the ability to have the Dissolve as your default transition.
Changing the default transition is a two-stage operation. First you must create a backup of the Dissolve, and then you can create a link to a new default transition.
To create a backup of the Dissolve
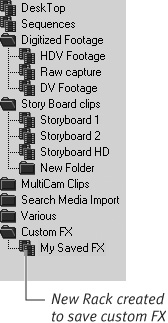
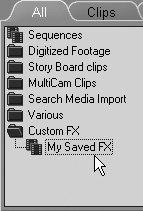
1. Under the All tab, create a new Rack in your Project Browser called My Saved FX (Figure 8.21). You can place this in a folder too if you wish.
Figure 8.21. Create a Rack to save your backup.
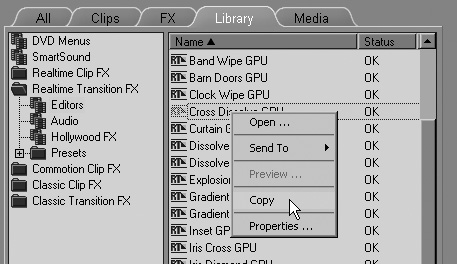
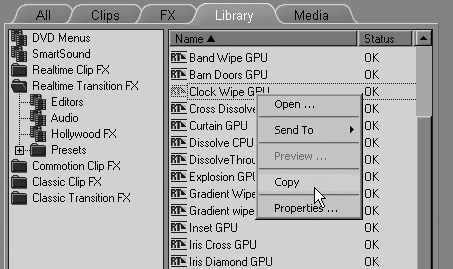
2. Select the Lib tab to open the list of racks and folders containing your effects.
3. Select the Realtime Transition FX folder and click the Editors Rack to access the Cross Dissolve GPU transition. Right-click the transition and select Copy (Figure 8.22).
Figure 8.22. Find the Cross Dissolve GPU transition and right-click to copy...
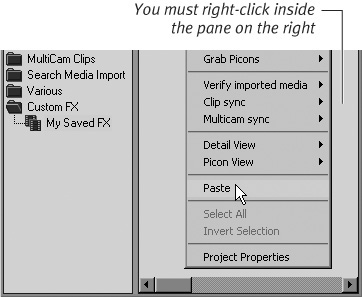
4. Return to the All tab and select the Transitions Rack that you created in Step 1 by clicking it once.
5. Then right-click the mouse in the right pane of the Project Browser and select Paste (Figure 8.23).
Figure 8.23. ...then paste it to your FX Rack.
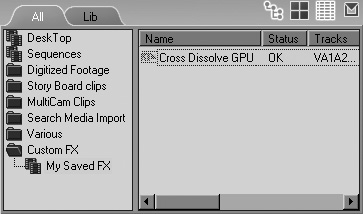
You’ve now created a fallback position so that you can easily return the default transition to a Cross Dissolve when you want to (Figure 8.24).
Figure 8.24. The Cross Dissolve transition safely stored in your backup Rack.
To change the default transition
1. Return to the list of racks and folders containing your effects by selecting the Lib tab again.
2. Choose from any of the transitions on display here.
You can use any of the Presets, Specials, or Editors. You can even choose a Hollywood Effect, although you might want to avoid using any from the Classic folders, as they will be non-Realtime.
3. Once you have made your choice, right-click it and select Copy (Figure 8.25).
Figure 8.25. Copy the transition you want to use as the new default.
4. Select the All tab to return to the My Saved FX Rack.
5. Then right-click the mouse in the right pane of the Project Browser and select Paste just as you did in Step 5 of the last example.
6. Highlight this transition by clicking it once, and then hold down the Ctrl key and right-click the transition.
The Set As System Object now appears on the menu.
7. Place the mouse over this item and the EDL Default DVE selection appears (Figure 8.26).
Figure 8.26. Once the transition is pasted into your FX Rack, hold down the Ctrl key and right-click to reveal a new option.
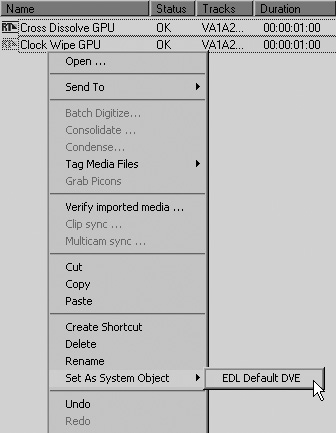
8. Click this and the transition you’ve highlighted is set as the default transition. Next time you click the “Add Dissolve/Cross Fade with Options button” ![]() , this new default transition will be used.
, this new default transition will be used.
• If you try holding down the Ctrl key while in the FX selection area, the Set As System Object option doesn’t appear. The transition must first be copied and pasted into a folder inside the All section of the Project Browser for this procedure to work.
• To return your default transition to that of a Cross Dissolve GPU, simply return to the My Saved FX Rack you created, and while holding down the Ctrl key, right-click the Cross Dissolve, and select Set As System Object > EDL Default DVE.
Trimming Transitions
You trim the overall length of a transition in the Timeline; this is a separate task from trimming the clips you use in the transition.
This process is fairly easy and painless, but trimming the clips underneath the transition is somewhat more complex, as you’ll see momentarily.
To trim a transition
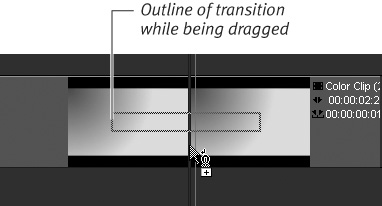
• Grab the mark-in or mark-out point of the transition and drag it whichever way you want (Figure 8.27).
Figure 8.27. You can trim a transition on the Timeline by grabbing the end and dragging it.
Trimming Associated Clips
If you have turned off “Restrict dragged Transitions to available handles” (mentioned earlier in this chapter), you may see transitions that contain red areas. These indicate that you haven’t allowed enough handle area for the transition to function correctly. In this case, you will need to trim the clip to increase the handle area (Figure 8.28 and Color Insert 8-28).
Figure 8.28. A transition with no handle area to work with appears red from end to end. See the color insert section also.
Trimming clips with the Trim Editor is covered in Chapter 6, with a more detailed explanation of how the Trim Editor works. However, when you’re dealing with a transition, the Trim Editor operates slightly differently.
In order to see the problem clearly, you need to prepare the Timeline before you attempt to trim clips under a transition.
1. Send a clip to the Source Viewer and remove any mark-in or mark-out points.
2. Switch the Timeline to Film Style by clicking once on the Film Style toggle button. Then click the Insert Source Into Master button twice to send two copies of the clip in the Source Viewer to an empty Timeline (Figure 8.29).
Figure 8.29. Two clips on the Timeline with no handle areas.
3. Drag and drop a transition to where the two clips join, or click the Add Dissolve/Cross Fade with Options button.
If you choose the latter method, make sure you deselect the “Restrict duration to available heads and tails” check box that appears in this dialog box (Figure 8.30).
Figure 8.30. Turning off the Restrict duration to available heads and tails option.
The transition appears on the Timeline colored completely red as seen in Figure 8.28 (see also Color Insert 8-28).
To trim clips under a transition
1. Place the Timeline cursor so that it falls roughly over the middle of the transition.
2. Open the Trim Editor by pressing F5.
3. Press the P key to select the incoming clip — the window on the right in the Trim Editor.
4. To remove the red area from the transition, do one of the following until all the red has disappeared.
• Press the right arrow key.
• Place the mouse cursor over the window on the right, hold down the left mouse button, and drag to the right (Figure 8.31).
Figure 8.31. Trimming the incoming clip with the mouse.
Both of these methods slice the right clip under the left clip.
5. Now trim the left clip by pressing the P key again; this sends the black selection bar to the left window. Then press the left arrow key or use the mouse to slide the left clip over the top of the right clip. Stop when the transition turns from red to gray.
6. Click the Play Preview button ![]() in the middle of the Trim interface to see the result. Don’t try to scrub the Timeline with the mouse, because doing so alters the trim points in the same way that pressing the left and right arrow keys does.
in the middle of the Trim interface to see the result. Don’t try to scrub the Timeline with the mouse, because doing so alters the trim points in the same way that pressing the left and right arrow keys does.
• When sliding the right clip underneath the left clip, take careful note of the frame displayed when you’ve finished pressing the right arrow key; this is the first frame of your transition for the incoming clip. When you trim the left clip, the last frame displayed is the mark-out point.
• If you place the transition at the beginning of the cut or at the end of the cut, you only need to slide one clip under or over the other. When you center the transition, you must slide both clips under or over the other for the transition to work correctly.
• If you delete or remove the transition using the Undo key, the clips remain in their trimmed position and you can add another transition without needing to retrim.
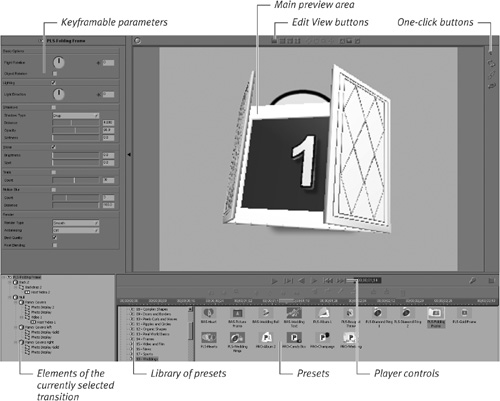
Editing with Keyframes
As you can see from the earlier examples, adding a transition is relatively easy. The fun really starts when you alter the basic parameters of that transition to create something unique in your project. This is called editing with keyframes (see the “Understanding Keyframes” sidebar for details).
The Transition Editor is similar in look and operation to the non-VST audio editors introduced in Chapter 7, “Working with Audio,” and you open them in a similar fashion.
To open a Transition Editor
Do one of the following:
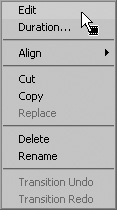
• Double-click the transition in the Timeline.
• Right-click the transition in the Timeline and select Edit (Figure 8.32).
Figure 8.32. Opening the Transition Editor via a right-click.
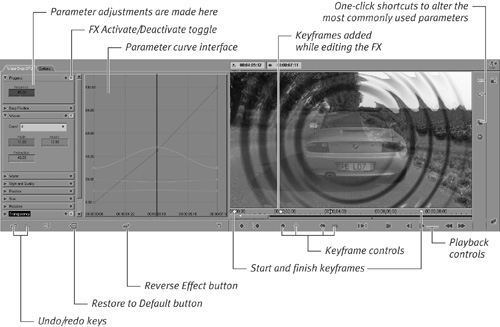
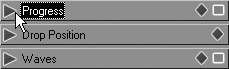
Either of these methods brings up the editor for that transition. Figure 8.33 shows the Water Drop Editor, which has several interesting adjustable parameters.
Figure 8.33. The Realtime Water Drop Editor.
• Right-clicking a transition allows you to access the full range of editing options allowed for each transition.
• Clicking the Maximum Inlay Size button on the Liquid toolbar will create a larger preview screen to use when adding transitions.
Editing a Transition
To create your own custom-made transition, you need to open the editor, scrub through the Timeline, and decide where and when to alter the various parameters. Experimenting is the only way to find out what each setting can do.
To edit a transition
1. Open the Transition Editor by doing one of the following:
• Double-click the transition.
• Right-click and select Edit to open the Edit interface.
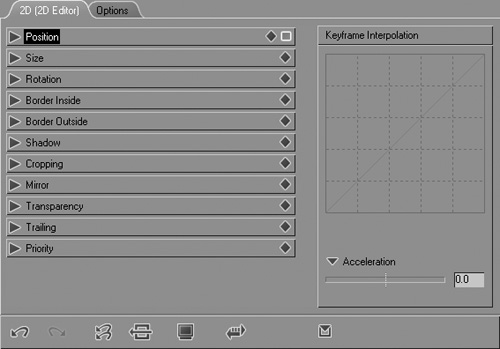
2. Open the parameter you wish to alter by clicking once on the small triangle to the left of the name (Figure 8.35).
Figure 8.35. Click this triangle to open the parameter settings.
3. You can alter this parameter in one of the following ways:
• Place the mouse cursor over any of the parameter boxes and a double-headed cursor appears (Figure 8.36). Hold down the mouse button and drag to the right to increase the value displayed. Drag back to the left to reduce the value displayed. You can also use the mouse wheel.
Figure 8.36. Use the mouse to alter the parameter...
![]()
• Double-click inside the display area, enter the numerical value required (Figure 8.37), and press Enter.
Figure 8.37. ...or enter the numerical value directly...
• Click inside the parameter curve (Bezier Curve) area on the line color that represents the parameter you wish to alter (Figure 8.38).
Figure 8.38. ...or use the parameter curve interface to dynamically add and alter keyframes.
Parameter lines and boxes always match up with coloring, but the line only appears if the parameter box is open, or if the parameter was previously adjusted.
One effect common to both the Classic and Realtime interfaces is the Revert Direction of Effect button ![]() . This button inverts the keyframes you have created, effectively playing the effect backward.
. This button inverts the keyframes you have created, effectively playing the effect backward.
• Some parameters also have matching shortcut buttons on the right side of the editor (see Figure 8.33). For example, the position button ![]() .
.
• After altering a parameter, you can play this clip inside the editor to see how your keyframes affect the final image. If it’s a Classic transition, you can only scrub through the image. To play a Classic transition, you must first exit the editor and allow the transition to render.
• Undo and redo are fully supported when you’re editing keyframes.
• Remember to refer to Chapter 9 to fully understand how keyframes are created and controlled.
Working with Parameter Curves
The Parameter Curve area (also know as the Bezier Curve area) inside the Editor, shows the adjustment between keyframes using curve diagrams. These in turn have several useful functions that act something like the Keyframe Interpolation previously found in the Classic filters only.
Using Bezier curves, it is possible to change the speed at which an effect occurs and also the rate at which it will approach or leave a keyframe. For example, this allows you to create a smooth pan or zoom shot between altered keyframes by adjusting the parameter curves via the Bezier handles.
To adjust a Parameter curve
1. With the Effects Editor open, adjust any parameter so that it creates a keyframe inside the Parameter Curve area.
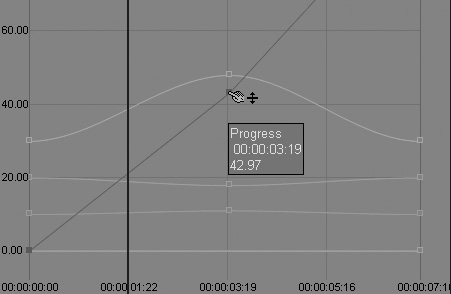
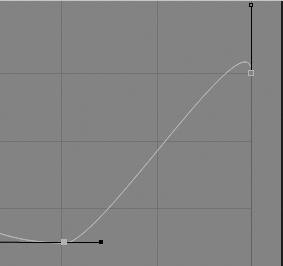
Figure 8.39 shows a keyframe that creates a zoom-out on a clip from 100% to 50% and then back again. This smooth curve is typical of a single-placement keyframe.
Figure 8.39. A parameter curve showing a zoom to 50% and back.
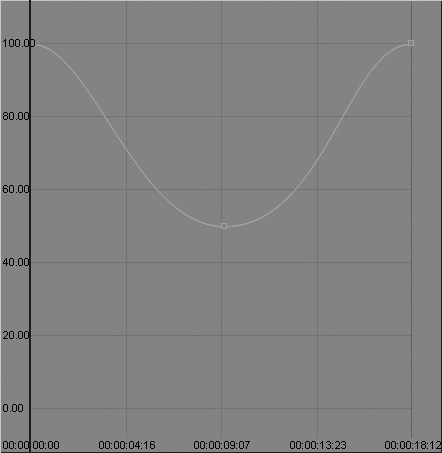
2. Click the actual keyframe inside the Parameter Curve area once. This should display the Bezier curve handles (Figure 8.40). If not, check that you have clicked directly on the keyframe in the Parameter Curve area.
Figure 8.40. Clicking the keyframe displays the Bezier handles.
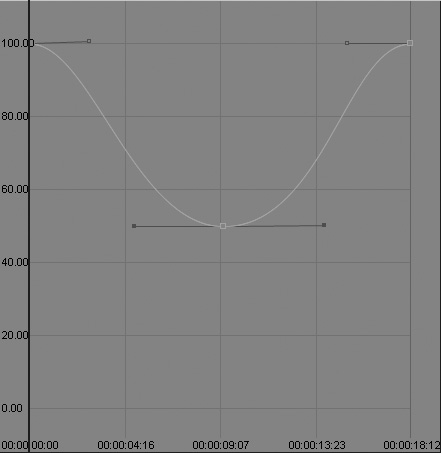
3. To adjust the Bezier curve, click the black dot at the end of the handle (Figure 8.41) and drag it directly to the left or right to extended or reduce the interpolation (time taken) between the two keyframes.
Figure 8.41. Placing the cursor over the dot at the end of the handle allows you to adjust it.
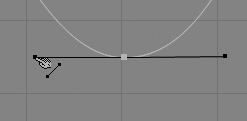
Figure 8.42 shows the left handle dragged away from the keyframe to increase the time between the first and second keyframe—creating a graceful change.
Figure 8.42. Dragging the Bezier point away from the keyframe increases the interpolation.

Figure 8.43 shows the right handle dragged toward the keyframe to reduce the time between the second keyframe and the last keyframe—creating a dramatic change.
Figure 8.43. Dragging the Bezier point toward the keyframe decreases the interpolation.

• The Bezier curve handle can also be rotated by dragging it up or down the curve area. This alters the properties of the parameter and the interpolation rate (Figure 8.44).
Figure 8.44. Dragging the Bezier point directly over the keyframe alters the keyframe properties (the zoom will now increase briefly beyond 100%) and the interpolation.
• The Undo/Redo key inside the filter editor also works with Bezier adjustments.
Working Without Keyframes
Although keyframes are very valuable tools, you may encounter times when you don’t want to use them. For example, you might have an exact transparency you want to carry through until the clip jumps into focus on the last frame of the transition.
To disable keyframes
1. With the editor open, select the Options tab.
2. Open the keyframes area by clicking the small triangle.
3. Click the Do not use Keyframes radio button (Figure 8.45).
Figure 8.45. Turning off keyframes.
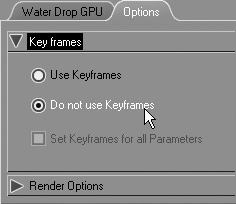
• Turning off keyframes is not generally useful in a transition because it tends to nullify the transition’s effectiveness. Turning off keyframes is more useful when you’re dealing with filters. See Chapter 9 for more details.
• When you turn off keyframes, you turn them all off. To deactivate specific keyframes, see Chapter 9.
Working with Classic Transitions
Classic transitions are the old non-Realtime transitions from previous incarnations of Liquid. They need to be rendered (in the background) before you can view them, which should put them at an immediate disadvantage. But because rules restrict the way Realtime transitions work, Classic effects have some additional tricks they can pull from their hypothetical sleeves (for example, full-screen mode).
To apply a Classic transition
• Open the Classic Transition FX folder and apply a classic filter (2D Editor in this example) after following the instructions above for adding a Realtime transition. Double-click the transition to open the editor. Here, you immediately see a different interface and a different set of parameters to alter (Figure 8.46).
Figure 8.46. The Classic Transitions editor.
• Once you add a Classic transition to the Timeline and you finish editing it, the slice above that transition goes red. Unless you have turned off background rendering, the slice immediately begins to render and gradually changes from red to green. During this render stage, you can still edit the Timeline.
• You can scrub through a Classic effect during render to get an idea of how it will look, but you must let the render finish before you send it to DVD or tape. Full details on rendering can be found in Chapter 1.
Editing the Classic Transition
Classic transitions work with or without keyframes, so editing them follows the same procedure as editing Realtime transitions. However, there are certain advantages to using Classic effects, which are dealt with in the next sections.
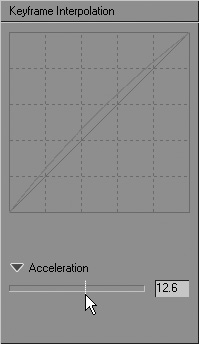
Keyframe Interpolation
One of the most interesting parameters available to non-Realtime transition users is Keyframe Interpolation. This governs the speed at which the effect happens between any two keyframes.
Note that this is the “speed at which the effect happens,” not the “speed of the actual clip.” The speed of a media clip can only be altered using the Timewarp non-Realtime filter (see Chapter 9 for details).
You use Keyframe Interpolation simply to alter the pace of an effect. The following example shows a 2D Editor using this parameter to zoom in on the incoming clip—first slowly, then, when it reaches the halfway mark, the zoom increases in speed until it reaches full speed at the end of the clip.
To alter Keyframe Interpolation
1. Add one of the Classic transitions to the Timeline.
2. Scrub to a keyframe on the Timeline, or use the Go to Next/Previous button to navigate to it, and alter the interpolation in one of the following ways:
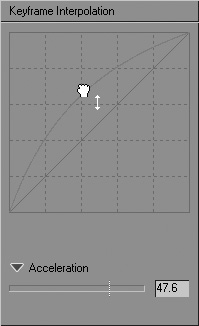
• Drag the acceleration line toward a positive (faster) or negative (slower) amount (Figure 8.47).
Figure 8.47. Adjusting the Keyframe Interpolation using the slider...
• Double-click inside this box and enter a number.
• Click inside the parameter curve area and drag the keyframe toward the value you require (Figure 8.48).
Figure 8.48. ...or the graph line.
3. Exit the editor by clicking the Running Man button ![]() in the top-right corner of the editor.
in the top-right corner of the editor.
The editor exits and the transition begins to render in the background.
4. Once the transition has finished rendering, set a mark-in and mark-out point on the Timeline on either side of the transition. Then play back the transition by clicking the Play from Mark-In to Mark-Out button ![]() .
.
Experimentation is the key when using this effect, as you can customize transitions to look highly original with the help of this underused parameter.
• Remember that the parameters of the Transition Editor always affect the incoming clip unless the transition is reversed using the Revert button.
• If you add an acceleration of 100 to the first keyframe, the effect happens immediately.
• A similar trick can be accomplished using a Realtime transition. See the “Working with Parameter Curves” section earlier in this chapter for details.
Full-Screen Mode
Another clear advantage of working with Classic transitions is that you can toggle full-screen mode on by clicking the Full-Screen Mode button ![]() . Doing so allows the Classic editor to take over the screen completely (Figure 8.49).
. Doing so allows the Classic editor to take over the screen completely (Figure 8.49).
Figure 8.49. A classic editor in full-screen mode. An inner square displays the TV visible area. Anything outside of this area must be panned and scanned to be seen by the audience.
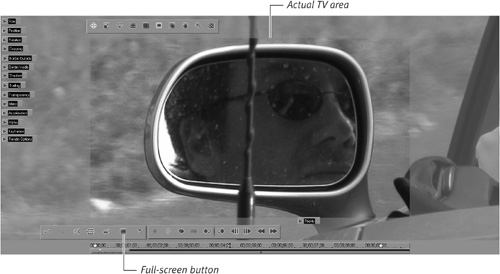
Using full-screen mode allows you to pan and scan oversized clips or clips you have zoomed in on to highlight certain areas.
• Return the editor to normal size by clicking the Full-Screen Mode button a second time.
• Pan and scan can be achieved by using the Re-size and Position quick buttons. For a full explanation of Pan and Track, see Chapter 9.
Saving a Customized Transition
Once you have created the most awesome transition the world has ever seen, you will probably be keen on saving it for future use. You can do this with just a few clicks of your mouse.
To save a customized transition
1. If you have not already done so from a previous exercise in this chapter, create a Rack called My Saved FX in the left pane of the Project Browser.
You can also create a folder for this Rack to go in if you wish (Figure 8.50).
Figure 8.50. Creating a Rack for saving your FX.
2. Return to the transition you have edited in the Timeline, right-click it, and select Copy from the contextual menu (Figure 8.51).
Figure 8.51. Right-click and select Copy.

3. Right-click inside the right pane of the Project Browser, select Paste, and the transition will be copied into this Rack for use later in your project.
• The transition appears in the Rack with its default name. To change this to something you will recognize in the future, right-click the effect and select Rename from the contextual menu.
• You can also use a saved transition as the default transition. You can find instructions for altering the default transition in the “To Change the Default Transition” section earlier in this chapter.
Using Transitions
To help you visualize what the Transition Editor can do and how cool keyframes are, the following sections show you how the basic concepts in the chapter actually work with a Realtime transition and a Classic transition.
Realtime 2D transition
The 2D and 3D transitions and their cousins, the 2D/3D filters, are probably the most used effects in NLE. Their effectiveness and lack of subtlety is open to question and at the mercy of what happens to be in vogue at any time, but there is no denying that they are great fun to play with.
The video clips used in the following example can be downloaded from www.peachpit.com/liquid7vqp, but you can also use your own clips to complete this task.
First, you need to create sufficient handles on these clips to prepare them to be inserted, then you can begin working with the editor.
To prepare the clips
1. Send the first clip (Rear left shot; if you have downloaded the sample clips) to the Source Viewer, and place a mark-out point just after the car begins to move off—about 9 seconds and 16 frames into the clip (Figure 8.52).
Figure 8.52. Creating a handle by adding a mark-out point in the Source Viewer.

2. Send the clip to the Timeline using the Insert Source into Master button ![]() .
.
3. Send the second clip (Approach) to the Source Viewer and add a mark-in point just as the car moves off—about 5 seconds into the clip (Figure 8.53).
Figure 8.53. Creating a handle by adding a mark-in point in the Source Viewer.
This creates a handle at the start of the clip, a few seconds in duration.
4. Send this clip to the Timeline so that it adjoins the first clip (Figure 8.54).
Figure 8.54. Both clips on the Timeline. They overlap each other using the handles created in Steps 1, 2, and 3, but these handles can’t be seen on a single-track edit system.

To add the 2D transition
1. Select the Lib tab from the Project Browser.
2. Open the Realtime Transitions FX folder by clicking it once. Locate the Editors Rack and click this so the editors are displayed in the right pane of the Project Browser.
3. Drag and drop the 2D Editor GPU to the point where the two clips meet.
1. Open the 2D Editor GPU by double-clicking the actual transition that should now be sitting on the line between the two clips (Figure 8.55).
Figure 8.55. The default effect for the 2D editor GPU.

The 2D Transition Editor comes with a built-in preset that brings in the incoming clip with a zoom and a rotation effect. Say you like the zoom effect but you don’t want the rotation.
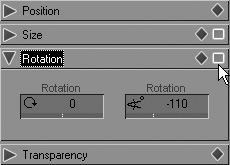
2. Turn rotation off by clicking the square Activate/Deactivate button in the Rotation text area (Figure 8.56).
Figure 8.56. Toggle rotation off by clicking the square Activate/Deactivate button in the Rotation text area.
Now the clip plays just the zoom effect. However, what you really want is for the clip to stop at about 50% of its actual size around a third of the way through the transition.
3. To do this, scrub the Timeline until the cursor is about a third of the way through the transition.
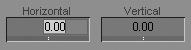
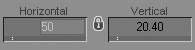
4. Then type the numerical value “50” into the horizontal size box (Figure 8.57).
Figure 8.57. Directly entering a numerical value.
5. Press the Tab key.
Once you do, this value is applied to both the horizontal and vertical boxes (because they are locked together with the padlock in the middle), and then a keyframe is created that holds this value.
Now the clip zooms in much faster, but you want it to hold the zoom at 50% of its total size and stay that way until the transition is two thirds of the way through.
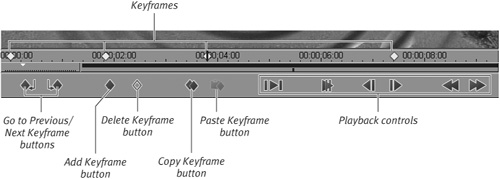
6. Using the Next Keyframe button, advance the Timeline cursor until it reaches the keyframe you created in steps 4 and 5. This should be the second keyframe on the Edit window Timeline. The first is the start keyframe at the very beginning. The third is the end keyframe at the very end.
7. Click the Copy Keyframe button ![]() .
.
8. Move the Timeline cursor to about two thirds of the way through the transition, and click the Paste Keyframe ![]() button to create a copy of the keyframe at this point.
button to create a copy of the keyframe at this point.
This now creates a transition that zooms in quickly to 50% of its total size, stays like that for a second, and then zooms to 100% of its total size when it reaches the original keyframe at the end of the Timeline (Figure 8.58).
Figure 8.58. The finished result. Each picture here represents keyframes 1 to 4 from left to right.

The transition looks promising, although you’re probably going to have to do a little more tweaking to make it look a whole lot better. See “The Next Step” sidebar for some ideas.
Figure 8.60. The Realtime gradient wipes.
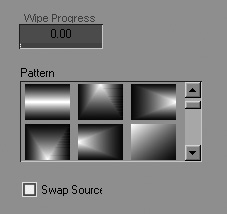
Figure 8.61. A small selection from the more organic range of non-Realtime gradient wipes.
Introducing Hollywood Effects
Hollywood Effects (HFX) is a popular plug-in integrated into Liquid for filters (see Chapter 9) and transitions. The plug-in offers a specific type of transition of the less subtle and more dramatic variety. Using these transitions, you will always be alerting the audience to a scene change. This is because using HFX is like holding up a flashing neon sign that says, “Yep, the scene is changing, and I want you to know about it.”
You’ll probably see HFX used mainly in wedding videos; in fact, a number of templates are included with the plug-in for just this purpose (Figure 8.62). You might also see a great many other HFX transitions in various hokey holiday videos.
Figure 8.62. A range of HFX wedding templates.

Most of these transitions are real-time, meaning they display a preview version under a yellow slice, which must be rendered before you can export to DVD or tape. But some are slightly more complex and require rendering. In such cases, they’re marked with a small red ball in the bottom left corner of the effects thumbnail (Figure 8.63).
Figure 8.63. The red ball marks a non-Realtime effect.

Some HFX transitions render with a big “P” watermark across the screen. To unlock these extra effects, you need to buy a serial number from Avid. You can accomplish this online via their Web site, www.avid.com.
Adding a Preset Hollywood Effects Transition
You add HFX preset transitions the same way as normal transitions; you just need to drag them from a different folder. The rules of handles and overlapping clips still apply, as does your ability to add an HFX transition to any video clip on any track, including titles and graphics.
To add a preset Hollywood Effects transition
1. With two clips on the Timeline, select the Lib tab in the Project Browser and open the Realtime Transition FX Folder.
2. The Hollywood Effects Rack is usually just above the presets folder. Click this, and the HFX transition icon will appear in the pane on the right.
3. Drag the HFX icon to the Timeline, and drop the HFX icon where the two clips meet.
HFX Presets are real-time, so once you drop the HFX icon onto the Timeline, you can immediately scrub or play it back to view the effect at work.
• HFX transitions don’t stack on top of each other. Dragging a preset transition on top of another erases the one under it.
Editing a Hollywood Effects Transition
Once the HFX transition has been applied, you can edit many different parameters. In fact, HFX is a somewhat complex program to work with outside of the presets, and it really needs a separate book to fully explain the vast potential it has to offer.
Many fan sites exist for HFX, but you might find Mike Shaw’s site of particular interest (www.mikeshaw.co.uk). He has been running this popular HFX Web site for many years, and his site offers CD tutorials and links to a range of downloadable HFX presets, assuming, of course, that you’ve already worked your way through those that came with Liquid 7. Mike is also very knowledgeable when it comes HFX, and this site should be your first port of call if you want to pick up some useful tips.
To open the Hollywood FX Editor
• Double-click the Hollywood FX transition in the Timeline and the Hollywood FX Editor loads, taking over the desktop (Figure 8.64).
Figure 8.64. The very scary-looking Hollywood FX Editor interface.
To select a preset
1. Open the editor.
2. Select any of the presets by simply selecting the category from the left of the album and double-clicking the preset you want.
• Adjust the preset you choose in any way you like, but always save your altered version under a different name; otherwise, you’ll overwrite the original.
• At the bottom of the menu selection is a range of real-world objects and preset movements that allow you to build your own FX from scratch.