
The previous recipe shows us how to adjust the timing of our character's actions, which is something extremely important to make our audience not only understand what is happening on the screen, but also know the weight and forces involved in the motion. Since timing is closely related to spacing, there is often confusion between the two concepts.
Timing in animation is the number of frames between two Extreme poses. Spacing is how the animated subject moves and shows variations of speed along these frames. Actions with the same timing and different spacing are perceived differently by the audience, and these principles combined are responsible for the feeling of weight of our actions.
We're going to see how the spacing works and how we can create eases and favoring poses to enhance movements.
- Open the file
007-Spacing.blend. It has our character Otto turning his head from right to left, just like in the timing recipe. We don't have a Breakdown position defined yet, and this action has a timing set to 15 frames.First, let's understand the most elementary type of spacing: linear, or even spacing. This is when the calculated intermediate positions between two keyframes have the same distance among them, without any kind of acceleration. This isn't something we're used to seeing in nature, thus it's not the default interpolation mode in Blender.
- To use it, select the desired keyframes in a DopeSheet or a Graph Editor window, press Shift + T, and choose the Linear interpolation mode. The curves between the keyframes will turn into straight lines, as you can see in the next screenshot showing the channels for the
Headbone.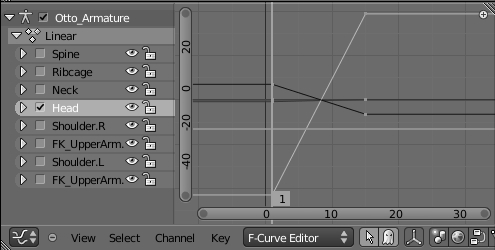
If you preview the animation with Alt + A, you'll see that the movement is very mechanical and unappealing, something we don't see in nature. That's why this interpolation mode isn't the default one.
Movements in nature all have some variation in speed, going from a resting state, accelerating to a peak velocity, then slowing down until another resting state. These variations of speed are called eases, and are represented with curved lines on the Graph Editor. When there is an increase in speed we have an ease out. When the movement slows down to a resting state, we have an ease in.
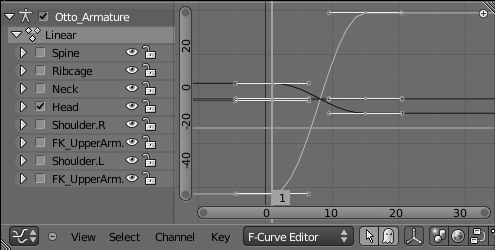
- This variation in speed is the default interpolation method in Blender, and you can enable it by selecting the desired keyframes in a DopeSheet or Graph Editor window, press Shift + T and select the Bezier interpolation mode. The next screenshot shows the same keyframes with easing:
When we adjust the curve handles on the Graph Editor, we're actually defining the eases of that movement. When you insert keyframes in Blender, it automatically creates both eases: out and in (with same speeds). Since not all movements have the same variation of speed at their beginning and end, it's a good idea to change the handles on the Graph Editor. This difference of speed between the start and end keyframes is called favoring.
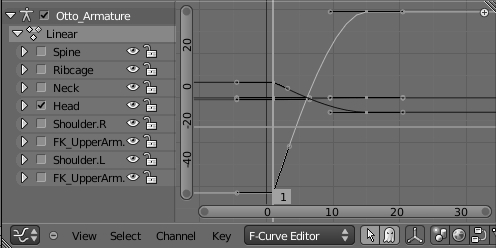
When the Spacing between two poses have different eases, we say the movement "favors" one of the poses, notably the one which has the bigger ease. In the next screenshot, the curves for the Head bone were adjusted so the movement favors the second pose. Note that there is a softer curve near the second pose, while the first has sharper lines near it. This will make the head leave the first pose very quick and slowly settle into the second one.
- Open the video file
007-Spacing.movin a video player, which enables navigating through the frames (such as DJV—http://djv.sourceforge.net), to watch the three actions at the same time. Although the timing of the action is unchanged, you can clearly notice how the interpolation changes the motion. In the next screenshot, you can see that at frame 8, the Favoring version has the face closer to the second pose: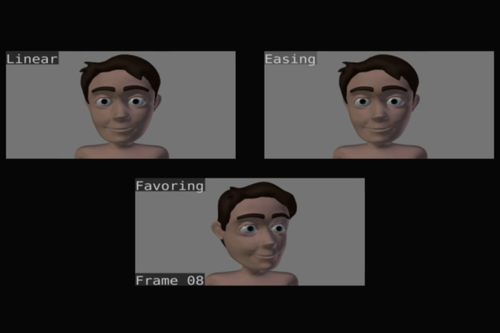
Now that you understand what spacing is, know the difference between the interpolation types, and can use eases to favor poses, let's add a Breakdown position. This action is pretty boring, since the head turn happens without any arcs. It's a good idea to tilt the head down a little during the turn, making an imaginary arc with the eyes.
- On the DopeSheet window, in the Action Editor, select the Favoring action. Go to frame 6, where the character looks to the camera. Select and rotate (R) the
HeadandNeckbones to front on their local X axis, as seen in the next screenshot, and insert a keyframe (I) for its rotation: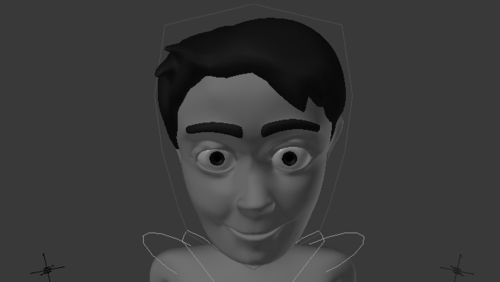
Since Blender automatically creates symmetrical eases on each new keyframe, it's time to adjust our spacing for the Head and Neck bones on the Graph Editor window. If you play the animation with Alt + A, you'll notice that the motion goes very weird because of that automatic ease. The F-Curves on the X axis of each bone for this motion are not soft. Ideally, since this is a Breakdown position, the curves between it and its surrounding Extreme poses should be smooth, regardless of the favoring.
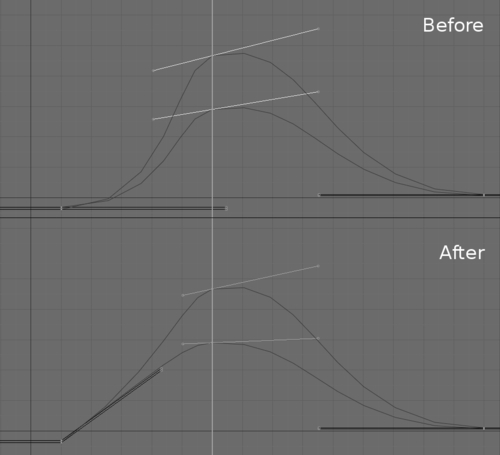
- Select the curve handles on frames 1 and 6, and move (G) them in order to soften the curve peak in that Breakdown position. The next screenshot shows the curves before and after editing. Notice how the peak curves at the Breakdown in the middle get smoother after editing:
Now the action looks more natural, with a nice Breakdown and favoring created using the F-Curves. The file 007-Spacing-complete.blend has this finished example for your reference, in which you can play the animation with Alt + A to see the results.
By understanding the principle of Spacing, you can create eases and favoring in order to create snappy and interesting motions. Just like visible shapes, the pace of motion in nature is often asymmetrical. To make your motions not only more interesting, but also more believable and with accents to reinforce the purpose behind the movements, you should master Spacing. Be sure to check out the interpolation curves in your animations: interesting movements normally have different eases between two Extreme positions.
Appendix: Extremes, Breakdowns, Inbetweens, ones and twos
Chapter 6: Non-linear animation
Chapter 6: Tracking animation arcs
Chapter 7: Adjusting and tracking the timing