
A human spine, also called vertebral column, is a bony structure that consists of several vertebrae (24 or 33, if you consider the pelvic region). It acts as our main axis and allows us a lot of flexibility to bend forward, sideways, and backward. And why is this important to know?
That number of vertebrae is something useful for us riggers. Not that we're going to create all those tiny bones to make our character's spine look real, but that information can be used within Blender. You can subdivide one physical bone for up to 32 logical segments (that can be seen in the B-Bone visualization mode), and this bone will make a curved deformation based on its parent and child bones. That allows us to get pretty good deformations on our character's spine while keeping the number of bones to a minimum.
This is good to get a realistic deformation, but in animation we often need the liberty to squash and stretch our character: and this is needed not only in cartoony animations, but to emphasize realistic poses too. We're going to see how to use some constraints to achieve that. We're going to talk about just the spine, without the pelvic region. The latter needs a different setup which is covered in another recipe in this book.
- Open the file
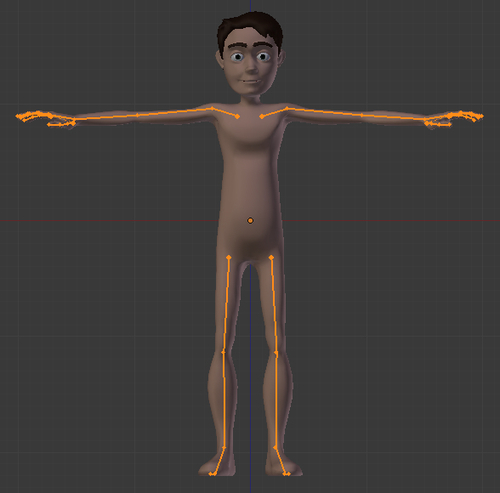
002-SpineStretch.blendfrom this book's support files. It's a mesh with some bones already set for the limbs, as you can see in the next screenshot. There's no weight painting yet, because it's waiting for you to create the stretchy spine.Tip
Downloading the example code
You can download the example code files for all Packt books you have purchased from your account at http://www.PacktPub.com. If you purchased this book elsewhere, you can visit http://www.PacktPub.com/support and register to have the files e-mailed directly to you. Alternatively, the author also maintains a copy of the code on his website at http://virgiliovasconcelos.com/blender-animation-cookbook/.
- Select the armature and enter into its Edit Mode (Tab). Go to side view (Numpad 3); make sure the 3D cursor is located near the character's back, in the line of what would be his belly button. Press Shift + A to add a new bone. Move its tip to a place near the character's eyes.
- Go to the Properties window, under the Object Data tab, and switch the armature's display mode to B-Bone. You'll see that this bone you just created is a bit fat, let's make it thinner using the B-Bone scale tool (Ctrl+ Alt + S). With the bone still selected, press (W) and select Subdivide.
Do the same to the remaining bones so we end up with five bones. Still in side view, you can select and move (G) the individual joints to best fit the mesh, building that curved shape common in a human spine, ending with a bone to serve as the head, as seen in the next screenshot:
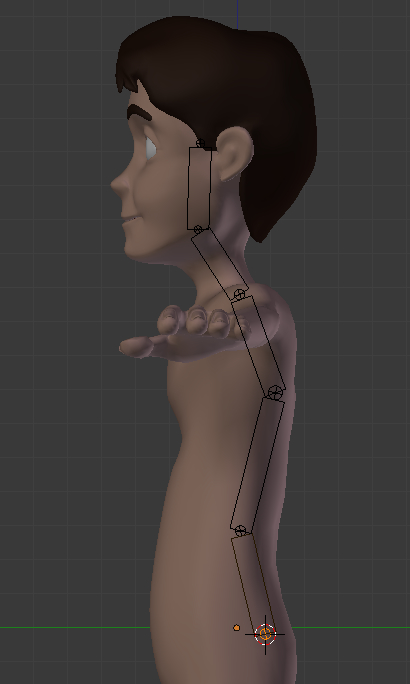
- Name these bones as
D_Spine1, D_Spine2, D_Spine3, D_Neck, andD_Head. - You may think just five bones aren't enough to build a good spine. And here's when the great rigging tools in Blender come to help us. Select the
D_Neckbone, go to the Properties Window, under the Bone tab and increase the value of Segments in the Deform section to6. You will not notice any difference yet. - Select the next bone below in the chain (D_Spine3) and change its Segments value to
8. Do the same to the remaining bones below, with values of8and6, respectively. To see the results, go out of Edit Mode (Tab). You should end up with a nice curvy spine as seen in the following screenshot: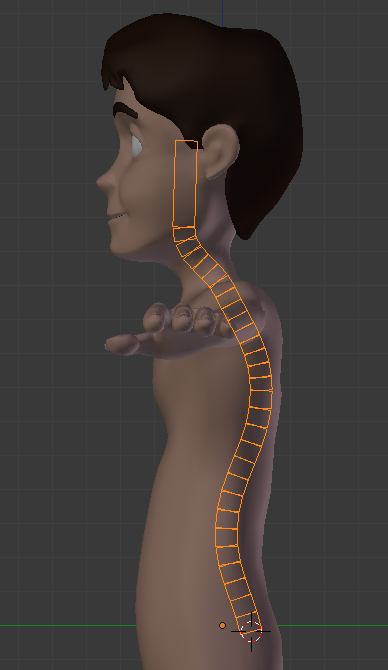
Since these bones are already set to deform the mesh, we could just add some shapes to them and move our character's torso to get a nice spine movement. But that's not enough for us, since we also want the ability to make this character stretch.
- Go back into Edit Mode, select the bones in this chain, press Shift + W, and select No Scale. This will make sure that the stretching of the parent bone will not be transferred to its children. This can also be accomplished under the Properties Window, by disabling the Inherit Scale option of each bone.
- Still in Edit Mode, select all the spine bones and duplicate (Shift + D) them. Press Esc to make them stay at the same location of the original chain, followed by Ctrl + Alt + S to make them fatter (to allow us to distinguish both chains). When in Pose Mode, these bones would also appear subdivided, which can make our view quite cluttered. Change back the Segments property of each bone to
1and disable their deform property on the same panel under the Properties Window. Name these new bones asSpine1, Spine2, Spine3, Neck, andHead, go out of Edit Mode (Tab) and you should have something that looks similar to the next screenshot: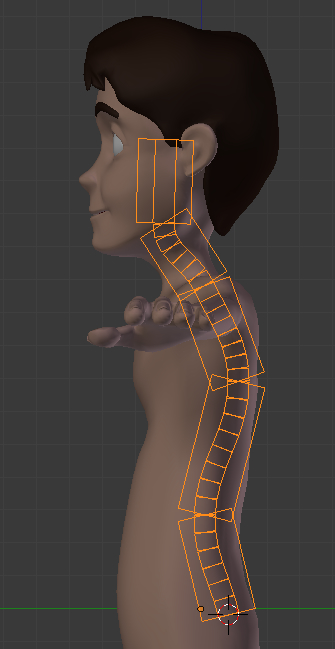
- Now let's create the appropriate constraints. Enter in Pose Mode Ctrl + Tab, select the bone
Spine1, hold Shift, and selectD_Spine1. Press Shift + Ctrl + C to bring up the Constraints menu. Select the Copy Location constraint. This will make the deformation chain move when you move theSpine_1bone.Note
The Copy Location constraint here is added because there is no pelvic bone in this example, since it's creation involves a different approach which we'll see in the next recipe, Rigging the pelvis. With the pelvic bone below the first spinal bone, its location will drive the location of the rest of the chain, since it will be the chain's root bone. Thus, this constraint won't be needed with the addition of the pelvis. Make sure that you check out our next recipe, dedicated to creating the pelvic bone.
- With those bones still selected, bring up the Constraints menu again and select the Stretch To constraint. You'll see that the deformation chain will seem to disappear, but don't panic.
- Go to the Properties Panel, under the Bone Constraints tab and look for the Stretch To constraint you have just created. Change the value of the Head or Tail slider to
1, so the constraint would be evaluated considering the tip of theSpine_1bone instead of its base. Things will look different now, but not yet correct. Press the Reset button to recalculate the constraints and make things look normal again. This constraint will cause the first deformation bone to be stretched when you scale (S) theSpine_1bone. Try it and see the results. The following screenshot shows the constraint values: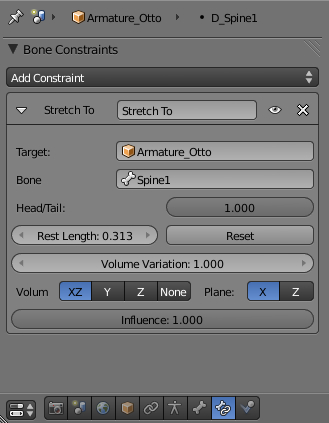
This constraint should be enough for stretching, and we may think it could replace the Copy Rotation constraint. That's not true, since the StretchTo constraint does not apply rotations on the bone's longitudinal Y axis. So, let's add a Copy Rotation constraint.
- On the 3D View, with the
Spine1andD_Spine1selected (in that order, that's important!), press Ctrl + Shift + C and choose the Copy Rotation constraint. Since the two bones have the exact same size and position in 3D space, you don't need to change any of the constraint's settings. - You should add the Stretch To and Copy Rotation constraints to the remaining controller bones exactly the same way you did with the
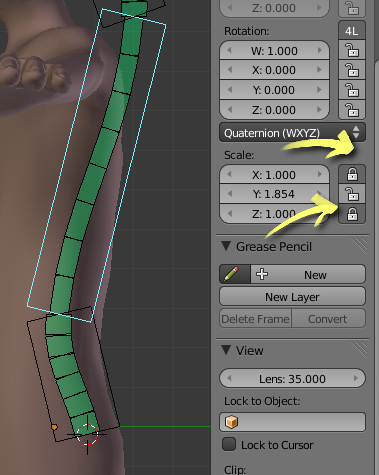
D_Spine1bone in steps 9 to 12. - As the icing on the cake, disable the X and Z scaling transformation on the controller bones. Select each, go to the Transform Panel (N), and press the lock button near the X and Z sliders under Scale. Now, when you select any of these controller bones and press S, the scale is just applied on their Y axis, making the deforming ones stretch properly. Remember that the controller bones also work as expected when rotated (R). The next screenshot shows the locking applied:
- Enter into Edit Mode (Tab), select the
Shoulder.Lbone, hold Shift, and select bothShoulder.RandSpine3(in this order; that's important). Press Ctrl + P and choose Keep Offset to make both shoulder controllers children of theSpine3bone and disable its scale inheriting either through Shift + W or the Bone tab on the Properties panel.
When you finish setting these constraints and applying the rig to the mesh through weight painting (refer to the recipe Tips on weight painting your character in Chapter 1, Get Rigging if in doubt), you can achieve something stretchy, as you can see in the next screenshot:

The file 002-SpineStretch-complete.blend has this complete recipe, for your reference in case of doubts.
When creating spine rigs in Blender, there's no need to create lots of bones, since Blender allows us to logically subdivide each one to get soft and curved deformations. The amount of curved deformation can also be controlled through the Ease In and Ease Out sliders, and it also works well with stretching.
When you scale a bone on its local Y axis in Pose Mode, it doesn't retain its volume, thus the mesh deformed by it would be scaled without the stretching feeling. You must create controller bones to act as targets to the Stretch To constraint, so when they're scaled, the constrained bones will stretch and deform the mesh with its volume preserved.
You should notice that the spine controllers will be hidden inside the character's body when you turn off the armature's X-Ray property. Therefore, you need to create some custom shapes for these controller bones in order to make your rig more usable. Refer to the recipe Customizing shapes and colors for your bones in Chapter 1,Get Rigging
Chapter 1: Tips on weight painting your character
Chapter 1: Customizing shapes and colors for your bones
Chapter 2: Rigging the pelvis