Scenario: Shooting Trouble with VLANs on Routers and Switches
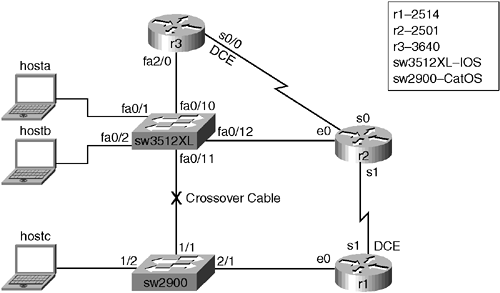
The chapter scenario uses some of the same routers and switches you have configured for the other scenarios. You modify your lab according to Figure 7-1 and start with everything in VLAN1.
Figure 7-1. Chapter 7 Scenario Physical Layout
Document your steps and any problems along the way. Remember, however, that there is not always one right way to accomplish the tasks presented. The ability to obtain the end result using good practices is extremely important in any real-world network. My troubleshooting and device configurations are presented starting in Example 7-1 so that you can compare your work and perhaps see a different approach to obtaining the end result. Use the previous troubleshooting checklists, your step-by-step troubleshooting methodology, and the VLAN checklist in Table 7-1 to assist in testing.
| CatOS | IOS |
|---|---|
| set vtp domain donna | #vlan database (vlan)#vtp domain donna |
| set vtp mode transparent | (vlan)#vtp transparent |
| vlan 2 name eng type ethernet | (vlan)#vlan 2 name eng media ethernet |
| show vlan show spantree vlan# | (vlan)#show #show spanning-tree vlan# |
| clear vlan 2 | (vlan)#no vlan 2 name eng media ethernet (vlan)#exit |
| show vtp domain | #show vtp status |
| set trunk 1/1-2 on | (config)#interface fa0/12 (config-if)#switchport mode trunk |
| show trunk | #show interface fa0/12 switchport |
| show spantree ? show port spantree 2/4 | #show spanning-tree ? #show spannting-tree interface fa0/1 |
| See also www.cisco.com/univercd/cc/td/doc/product/lan/cat2950/12111ea1/scg/swvlan.htm#xtocid7. | |
As I discuss real-world VLAN-to-VLAN communication—including issues such as addressing the broadcast domains, default gateways, VLAN Trunking Protocol (VTP) mode tuning, trunking issues, routing issues, vanishing VLANs, and so on—continue to identify targets and document the results using ping, trace, set, show, clear, Cisco Discovery Protocol (CDP), debug, protocol analyzers, and other troubleshooting tools.
First you should physically disconnect all serial and Ethernet cables and wire your lab according to Figure 7-1. My terminal server is a 2511 (not pictured in the diagram), r1 is a 2514, r2 is a 2501, r3 is a 3640, the IOS-based switch is a 3512XL, and the CatOS-based switch is a 2900. The 1900 used in the preceding chapter is not being used here. I am assuming you have a Fast Ethernet connection from r3 to the 3512XL switch as well as between the switches. My connections between r1/r2 and their respective switches are only 10 Mbps, but 10 or 100 is fine. Assuming you have the correct number and type of interfaces, other equipment is suitable, too. Configure the terminal server (optional) and clear the configurations. The write erase or erase startup-config command followed by the reload command works fine for the routers and the IOS-based switch. Use clear config all for the CatOS box.
Inspect the LEDs for all devices and prepare for console or terminal server connectivity to each device. Globally configure such items as hostnames and passwords. Configure what is appropriate for the router interfaces, including descriptions, speed and duplex settings, bandwidth, and clock rate. Remember to issue a no shut on the interfaces and turn on logging synchronous for the console. Use the default encapsulations but do not configure the IP parameters as of yet. Example 7-1 displays the r1 configuration.
Example 7-1. r1 Configuration
Router>enable Router#configure terminal Router(config)#hostname r1 r1(config)#enable secret donna r1(config)#line vty 0 4 r1(config-line)#login r1(config-line)#password donna r1(config-line)#interface ethernet 0 r1(config-if)#description r1e0 to sw2900 2/1 r1(config-if)#speed 10 r1(config-if)#duplex half r1(config-if)#no shut r1(config-if)#interface serial 1 r1(config-if)#description r1s1 to r2s1 r1(config-if)#bandwidth 64 r1(config-if)#clock rate 64000 r1(config-if)#no shut r1(config-if)#exit r1(config)#line console 0 r1(config-line)#logging synchronous r1(config-line)#end r1#copy running-config startup-config |
Speed and duplex settings may or may not be available depending upon your hardware and software.
Next configure r2 as in Example 7-2.
Example 7-2. r2 Configuration
Router(config)#hostname r2 r2(config)#enable secret donna r2(config)#line vty 0 4 r2(config-line)#login r2(config-line)#password donna r2(config-line)#interface ethernet 0 r2(config-if)#description r2e0 to sw3512xl fa0/12 r2(config-if)#speed 10 r2(config-if)#duplex half r2(config-if)#no shut r2(config-if)#interface serial 0 r2(config-if)#description r2s0 to r3s0/0 r2(config-if)#bandwidth 64 r2(config-if)#no shut r2(config-if)#interface serial 1 r2(config-if)#description r2s1 to r1s1 r2(config-if)#bandwidth 64 r2(config-if)#no shut r2(config-if)#exit r2(config)#line console 0 r2(config-line)#logging synchronous r2(config-line)#end r2#show ip interface brief Interface IP-Address OK? Method Status Protocol Ethernet0 unassigned YES unset up up Serial0 unassigned YES unset down down Serial1 unassigned YES unset up up r2# copy running-config startup-config |
Now that Layer 1 and Layer 2 are up for r1 and r2, move along to configure r3 as in Example 7-3.
Example 7-3. r3 Configuration
Router(config)#hostname r3 r3(config)#enable secret donna r3(config)#line vty 0 4 r3(config-line)#login r3(config-line)#password donna r3(config-line)#interface fastethernet 2/0 r3(config-if)#description r3 fa2/0 to sw3512xl fa0/10 r3(config-if)#speed 100 r3(config-if)#full-duplex r3(config-if)#no shut r3(config)#interface serial 0/0 r3(config-if)#description r3s0/0 to r2s0 r3(config-if)#bandwidth 64 r3(config-if)#clock rate 64000 r3(config-if)#no shut r3(config-if)#exit r3(config)#line console 0 r3(config-line)#logging synchronous r3(config-line)#end r3#show ip interface brief Interface IP-Address OK? Method Status Protocol Serial0/0 unassigned YES unset up up ... FastEthernet2/0 unassigned YES unset up up r3#copy running-config startup-config |
Now that the basic router configurations are in place, configure the switches as in Examples 7-4, 7-5, and 7-6 (including the hostnames, passwords, and most appropriate duplex, speed, and portfast settings). Verify CDP communications from both switches as a quick physical test as in Example 7-7.
Example 7-4. sw3512XL IOS Switch Configuration
Switch(config)#hostname sw3512xl sw3512xl(config)#enable secret donna sw3512xl(config)#line vty 0 4 sw3512xl(config-line)#login sw3512xl(config-line)#password donnna sw3512xl(config-line)#!!!better to fix this now than later sw3512xl(config-line)#password donna sw3512xl(config-line)#interface fastethernet 0/1 sw3512xl(config-if)#description sw3512xl fa0/1 to hosta sw3512xl(config-if)#speed 100 sw3512xl(config-if)#duplex full sw3512xl(config-if)#spanning-tree portfast sw3512xl(config-if)#no shut sw3512xl(config-if)#interface fastethernet 0/2 sw3512xl(config-if)#description sw3512xl fa0/2 to hostb sw3512xl(config-if)#speed 10 sw3512xl(config-if)#duplex half sw3512xl(config-if)#spanning-tree portfast sw3512xl(config-if)#no shut sw3512xl(config-if)#interface fastethernet 0/10 sw3512xl(config-if)#description sw3512xl fa0/10 to r3 fa2/0 sw3512xl(config-if)#speed 100 sw3512xl(config-if)#duplex full sw3512xl(config-if)#no shut sw3512xl(config-if)#interface fastethernet 0/11 sw3512xl(config-if)#description sw3512xl fa0/11 to sw2900 1/1 sw3512xl(config-if)#speed 100 sw3512xl(config-if)#duplex full sw3512xl(config-if)#no shut sw3512xl(config-if)#interface fastethernet 0/12 sw3512xl(config-if)#description sw3512xl fa0/12 to r2e0 sw3512xl(config-if)#speed 10 sw3512xl(config-if)#duplex half sw3512xl(config-if)#no shut sw3512xl(config-if)#exit sw3512xl(config)#line console 0 sw3512xl(config-line)#logging synchronous sw3512xl(config-line)#end sw3512xl#copy running-config startup-config |
The shaded output illustrates where I incorrectly typed the password. Because I realized it right away, I just quickly repeated the line (using the up arrow key) with the correct password. These self-inflicted errors always make troubleshooting a challenge.
Continue your configuration with the 2900. Example 7-5 illustrates clearing the existing configuration. Keep in mind this wouldn't be a best practice over a telnet connection because you lose all configuration, which includes your management interface, too. Example 7-6 displays the 2900 scenario configuration.
Example 7-5. Clearing the sw2900 CatOS Switch Configuration
sw2900 (enable) clear config all This command will clear all configuration in NVRAM. This command will cause ifIndex to be reassigned on the next system startup. Do you want to continue (y/n) [n]? y .duplicate IP address 0.0.0.0 sent from MAC address: 00-d0-79-68-84-80 ....... ................. System configuration cleared. |
Example 7-6. sw2900 CatOS Switch Configuration
Console> (enable) set system name sw2900 System name set. sw2900> (enable) set enablepass Enter old password: Enter new password: Retype new password: Password changed. sw2900> (enable) set port name ? Usage: set port name <mod_num/port_num> [port_name] sw2900> (enable) set port name 1/1 sw2900 1/1 to sw3512xl fa0/11 Name string must be less than 21 characters. sw2900> (enable) set port name 1/1 to sw3512xl fa0/11 Port 1/1 name set. sw2900> (enable) set port speed 100 Usage: set port speed <mod_num/port_num> <4 | 10 | 16 | 100 | auto> sw2900> (enable) set port speed 1/1 100 Feature not supported on Module 1. sw2900> (enable) set port duplex 1/1 full Port(s) 1/1 set to full-duplex. sw2900> (enable) set port enable 1/1 Port 1/1 enabled. sw2900> (enable) set port name 1/2 to hostc Port 1/2 name set. sw2900> (enable) set port speed 1/2 100 Feature not supported on Module 1. sw2900> (enable) set port duplex 1/2 full Port(s) 1/2 set to full-duplex. sw2900> (enable) set port enable 1/2 Port 1/2 enabled. sw2900> (enable) set port name 2/1 to r1e0 Port 2/1 name set. sw2900> (enable) set port speed 2/1 10 Port(s) 2/1 speed set to 10Mbps. sw2900> (enable) set port duplex 2/1 half Port(s) 2/1 set to full-duplex. Sw2900>!!!alternately could have set all the ports to full duplex as follows sw2900> (enable) set port duplex 1/1-2,2/1 full Ports 1/1-2,2/1 set to full-duplex. |
Now that the switches are configured, verify the neighboring devices from the perspective of both switches as in Example 7-7.
Example 7-7. CDP Testing
sw3512xl>show cdp neighbors Capability Codes: R - Router, T - Trans Bridge, B - Source Route Bridge S - Switch, H - Host, I - IGMP, r - Repeater Device ID Local Intrfce Holdtme Capability Platform Port ID 005352782(sw2900)Fas 0/11 172 T S WS-C2900 1/1 r2 Fas 0/12 176 R 2500 Eth 0 r3 Fas 0/10 162 R 3640 Fas 2/0 sw2900> (enable) show cdp neighbors Capability Codes: R - Router, T - Trans Bridge, B - Source Route Bridge S - Switch, H - Host, I - IGMP, r - Repeater Port Device-ID Port-ID Platform Capability -------- ----------------------- ----------------- ------------------ ---------- 1/1 sw3512xl FastEthernet0/11 cisco WS-C3512-XL S 2/1 r1 Ethernet0 cisco 2500 R |
Because the Physical and Data Link Layers are up and running, take a closer look at the chapter scenario. Using the same physical layout, you will assign IP addresses as required and control broadcast traffic using VLANs. I want to review a few things about VLANs before you configure them.