This chapter covers the basic Cisco IOS configuration commands for configuring Frame Relay on a Cisco router. After completion of this chapter, readers will be able to configure basic Frame Relay operations on Cisco routers in a router-based Frame Relay network. Along with the discussion of Cisco IOS Frame Relay configuration commands, the available Cisco IOS show commands for monitoring Frame Relay will be highlighted and explained. The use of diagnostic Cisco IOS debug commands for troubleshooting common Frame Relay problems and issues on the Frame Relay network will also be discussed.
The topics and questions that this chapter addresses include the following:
Enabling Frame Relay encapsulation
Configuring LMI type on a Frame Relay interface
Configuring static and dynamic DLCI to network layer address mapping
Configuring Frame Relay subinterfaces
Configuring point-to-point subinterfaces
Configuring multipoint subinterfaces
Configuring a Cisco router as a Frame Relay switch
Configuring Frame Relay switching using a local significance approach to DLCI assignment
Configuring Frame Relay switching using a global significance approach to DLCI assignment
Verifying Frame Relay connections with Cisco IOS show commands
Troubleshooting Frame Relay connections with IOS debug commands
After completing this chapter, readers will be able to perform the basic Frame Relay configuration commands with the Cisco IOS software. Readers will be able to configure a basic Frame Relay network involving Cisco equipment and to perform basic monitoring and troubleshooting using relevant Cisco IOS show and debug commands.
Frame Relay is configured on the Cisco router via the text-based Cisco IOS Command Line Interface (CLI). This section looks at the configuration commands required to configure basic Frame Relay operation on a Cisco router.
A basic setup involving the hardware configurations depicted in Figure 4-1 is used for this discussion and for illustration purposes. In the later part of this chapter, additional hardware will be required to explain more complex configuration tasks. In the setup used in this chapter, the Cisco routers are configured as Frame Relay access devices, or data terminal equipment (DTE), connected directly to a dedicated Frame Relay switch, or data circuit-terminating equipment (DCE). Note that Cisco routers can be configured to operate similarly as a Frame Relay switch as well. The configuration tasks will be fully explained in a later section.

NOTE
Different Cisco IOS software versions or releases may display slightly different outputs. To maintain consistency of the Cisco IOS Software Version, IOS 12.2(1) release is loaded on all routers used in the configuration examples of this chapter.
Example 4-1 displays the show output of the show version command on R1.
Example 4-1. IOS Version Loaded on the Lab Routers
R1#show version
Cisco Internetwork Operating System Software
IOS (tm) 7200 Software (C7200-JS-M), Version 12.2(1), RELEASE SOFTWARE (fc2)
Copyright (c) 1986-2001 by cisco Systems, Inc.
Compiled Thu 26-Apr-01 22:10 by cmong
Image text-base: 0x60008960, data-base: 0x616B0000
On a Cisco router, Frame Relay can be configured only on the supported interfaces; it's most commonly supported on synchronous serial interfaces. A single Cisco IOS command is all that is required to enable Frame Relay on the serial interface. The encapsulation frame-relay interface configuration command, as follows, is used to enable Frame Relay encapsulation and to allow Frame Relay processing on the supported interface.
R1(config)#interface serial4/2

R1(config-if)#encapsulation frame-relay [ietf]
To enable Frame Relay on a serial interface, follow the configuration steps listed below beginning in the global configuration mode:
Go into the interface configuration mode of the interface on which you want to enable Frame Relay.
(optional) Configure Frame Relay encapsulation to use either Cisco or IETF encapsulations. If the encapsulation type is not specified, by default Cisco encapsulation is used.
The no form of the encapsulation frame-relay command removes the Frame Relay encapsulation on the interface, as shown in Example 4-2. On a serial interface, the no encapsulation frame-relay command causes the interface to revert to the default High-Level Data Link Control (HDLC) encapsulation. Moreover, all preexisting Frame Relay configurations on the serial interface are automatically removed.
Example 4-2. Unconfiguring Frame Relay Encapsulation
R1#config terminal
Enter configuration commands, one per line.  End with CNTL/Z.
R1(config)#interface serial4/2
R1(config-if)#no encapsulation frame-relay
NOTE
Readers should note that Frame Relay can be configured only on certain supported interfaces, which presently include synchronous serial interfaces, High Speed Serial Interfaces (HSSI), and packets over SONET (POS) interfaces on the Cisco 12000 Series Gigabit Switch Router. It is not possible to configure Frame Relay on specialized interfaces such as Ethernet or ATM. An error message is returned by the CLI every time a user attempts to configure Frame Relay on nonsupported interfaces, as demonstrated in Example 4-3. In this chapter, the term Frame Relay interface refers to a Frame Relay-enabled interface, which can belong to any of the supported interfaces mentioned.
Example 4-3. Error Message Shown When Attempting to Configure Frame Relay Encapsulation on Nonserial Interfaces
R1#config terminal
Enter configuration commands, one per line.  End with CNTL/Z.
R1(config)#interface Ethernet1/0
R1(config-if)#encapsulation frame-relay
                                ^
_% Invalid input detected at '^' marker.
Cisco supports two different Frame Relay encapsulation types. The default Frame Relay encapsulation enabled on supported interfaces is the Cisco encapsulation. Cisco also supports the IETF Frame Relay encapsulation type, which is in conformance with RFC 1490 and RFC 2427. RFC 2427 supercedes RFC 1490. Both RFC specifications define standards allowing multiple routed protocols to be carried over Frame Relay. Readers can refer to http://www.faqs.org/rfcs/rfc2427.html and http://www.faqs.org/rfcs/rfc1490.html for references on both RFCs.
In general, the IETF Frame Relay encapsulation should be used when connecting a Cisco router to non-Cisco equipment across a Frame Relay network. The IETF Frame Relay encapsulation allows interoperability between equipment from multiple vendors. Example 4-4 describes the steps for enabling Frame Relay on a serial interface using the IETF encapsulation. The keyword ietf specifies IETF Frame Relay encapsulation to be used on the serial interface. If the encapsulation frame-relay command is entered without specifying the optional ietf keyword, the router defaults to using the Cisco encapsulation type on that interface.
Example 4-4. Configuring Frame Relay IETF Encapsulation at the Interface Level
R1#configure terminal
Enter configuration commands, one per line.  End with CNTL/Z.
R1(config)#interface serial 4/2
R1(config-if)#encapsulation frame-relay ?
  ietf  Use RFC1490/RFC2427 encapsulation
  <cr>
R1(config-if)#encapsulation frame-relay ietf
NOTE
Both Cisco and IETF encapsulations for Frame Relay can be configured on a per-virtual-circuit (VC) basis. This gives greater flexibility when configuring Frame Relay in a multivendor environment. A user can specify the Frame Relay encapsulation types to be used on different virtual circuits configured under the same physical interface.
Example 4-5. Configuring Frame Relay Cisco and IETF Encapsulation at the DLCI Level
R1#configure terminal
Enter configuration commands, one per line.  End with CNTL/Z.
R1(config)#interface serial 4/2
R1(config-if)#encapsulation frame-relay
R1(config-if)#frame-relay map ip 172.16.1.1 102 broadcast ietf
R1(config-if)#frame-relay map ip 192.168.1.1 103 broadcast cisco
After enabling Frame Relay encapsulation on the interface, it might be necessary to perform a no shutdown command at the interface level to bring up the interface if it was previously in the shutdown mode. Verify the status of the Frame Relay interface with the show interface type slot/port privileged EXEC mode command. When the Frame Relay interface is operational, the interface is in the Interface is up, line protocol is up state. Both configuration changes and the associated command output are illustrated in Example 4-6.
Example 4-6. Bringing Up the Interface and Displaying the Configured Frame Relay Encapsulation
R1#configure terminal
Enter configuration commands, one per line.  End with CNTL/Z.
R1(config)#inter serial4/2
R1(config-if)#no shutdown
R1(config-if)#
02:46:09: %LINK-3-UPDOWN: Interface Serial4/2, changed state to up
02:46:10: %LINEPROTO-5-UPDOWN: Line protocol on Interface Serial4/2, changed state to up
R1#sh
02:46:10: %SYS-5-CONFIG_I: Configured from console by conso
R1#show interface serial 4/2
Serial4/2 is up, line protocol is up
  Hardware is M4T
  Internet address is 172.16.1.1/24
  MTU 1500 bytes, BW 2048 Kbit, DLY 20000 usec,
     reliability 255/255, txload 1/255, rxload 1/255
  Encapsulation FRAME-RELAY, crc 16, loopback not set
  Keepalive set (10 sec)
  LMI enq sent  76, LMI stat recvd 78, LMI upd recvd 0, DTE LMI up
  LMI enq recvd 0, LMI stat sent  0, LMI upd sent  0
  LMI DLCI 1023  LMI type is CISCO  frame relay DTE
  FR SVC disabled, LAPF state down
  Broadcast queue 0/64, broadcasts sent/dropped 9/0, interface broadcasts 0
  Last input 00:00:09, output 00:00:09, output hang never
  Last clearing of "show interface" counters 00:14:03
  Input queue: 0/75/0/0 (size/max/drops/flushes); Total output drops: 0
  Queueing strategy: weighted fair
  Output queue: 0/1000/64/0 (size/max total/threshold/drops)
     Conversations  0/1/256 (active/max active/max total)
     Reserved Conversations 0/0 (allocated/max allocated)
     Available Bandwidth 1536 kilobits/sec
  5 minute input rate 0 bits/sec, 0 packets/sec
  5 minute output rate 0 bits/sec, 0 packets/sec
79 packets input, 1163 bytes, 0 no buffer
     Received 0 broadcasts, 0 runts, 0 giants, 0 throttles
     0 input errors, 0 CRC, 0 frame, 0 overrun, 0 ignored, 0 abort
     101 packets output, 1525 bytes, 0 underruns
     0 output errors, 0 collisions, 4 interface resets
     0 output buffer failures, 0 output buffers swapped out
     4 carrier transitions     DCD=up  DSR=up  DTR=up  RTS=up CTS=up
As shown in Example 4-6, the output of the show interface command also reveals the Frame Relay encapsulation type configured on that interface. Encapsulation FRAME-RELAY in the output indicates that Cisco Frame Relay encapsulation type is enabled. Encapsulation FRAME-RELAY IETF shows that IETF Frame Relay encapsulation type is in use.
Cisco supports three different Local Management Interface (LMI) types for Frame Relay: Cisco, ANSI Annex D, and Q933-A Annex A. Beginning with Cisco IOS Software Release 11.2, the LMI autosense feature allows a Frame Relay interface to autodetect the LMI type supported by the directly connected Frame Relay switch. Based on the LMI status messages it receives from the Frame Relay switch, the router automatically configures its Frame Relay interface with the supported LMI type acknowledged by the Frame Relay switch.
No extra configuration command is required on a Cisco router to activate the LMI autosense feature. With Cisco IOS Release 11.2 or later, LMI autosense is activated by default when an LMI type is not explicitly configured on the interface. After the no shutdown interface configuration command is used to activate the Frame Relay interface, the interface starts polling the Frame Relay switch for the supported LMI type by sending out LMI status requests for all three supported LMI types—ANSI, Q933-A, and Cisco—in quick succession.
In the debug output shown in Example 4-7, the debug frame-relay lmi command is used on a Cisco router to display the LMI exchanges between the router and the connected Frame Relay switch. The router sends out LMI status enquiries to the Frame Relay switch in an attempt to determine an LMI type supported by the switch. This is indicated by the observation of StEnq in the debugs. A status enquiry message is sent out for each LMI type in the following sequence: ANSI, Q933-A, and Cisco. The status reply message returned by the switch carries information on the supported LMI type, as well as the status of active permanent virtual circuits (PVCs). A successful exchange of LMI status messages with the Frame Relay switch increments the LMI sequence counter on the router.
After the router learns the LMI type supported by the Frame Relay switch, it installs the supported LMI type on its Frame Relay interface.
Example 4-7. Frame Relay Interface on Router R1 Sends Out LMI Status Requests to the Switch When Activated
R1#debug frame-relay lmi 02:51:41: %LINK-3-UPDOWN: Interface Serial4/2, changed state to up *Jul 5 00:20:53.535: Serial4/2(out): StEnq, myseq 1, yourseen 0, DTE up *Jul 5 00:20:53.535: datagramstart = 0x7000214, datagramsize = 14 *Jul 5 00:20:53.535: FR encap = 0x00010308 *Jul 5 00:20:53.535: 00 75 95 01 01 00 03 02 01 00 *Jul 5 00:20:53.535: *Jul 5 00:20:53.535: Serial4/2(out): StEnq, myseq 1, yourseen 0, DTE up *Jul 5 00:20:53.535: datagramstart = 0x70000D4, datagramsize = 13 *Jul 5 00:20:53.535: FR encap = 0x00010308 *Jul 5 00:20:53.535: 00 75 51 01 00 53 02 01 00 *Jul 5 00:20:53.535: *Jul 5 00:20:53.535: Serial4/2(out): StEnq, myseq 1, yourseen 0, DTE up *Jul 5 00:20:53.535: datagramstart = 0x7000214, datagramsize = 13 *Jul 5 00:20:53.535: FR encap = 0xFCF10309 *Jul 5 00:20:53.535: 00 75 01 01 00 03 02 01 00 *Jul 5 00:20:53.535: *Jul 5 00:20:53.547: Serial4/2(in): Status, myseq 1 *Jul 5 00:20:53.547: RT IE 1, length 1, type 0 *Jul 5 00:20:53.547: KA IE 3, length 2, yourseq 1 , myseq 1 *Jul 5 00:20:53.547: PVC IE 0x7 , length 0x6 , dlci 100, status 0x0 , bw 0 *Jul 5 00:21:03.535: Serial4/2(out): StEnq, myseq 2, yourseen 1, DTE up *Jul 5 00:21:03.535: datagramstart = 0x7000214, datagramsize = 13 *Jul 5 00:21:03.535: FR encap = 0xFCF10309 *Jul 5 00:21:03.535: 00 75 01 01 01 03 02 02 01 *Jul 5 00:21:03.535: *Jul 5 00:21:03.539: Serial4/2(in): Status, myseq 2 *Jul 5 00:21:03.539: RT IE 1, length 1, type 0 *Jul 5 00:21:03.539: KA IE 3, length 2, yourseq 2 , myseq 2 *Jul 5 00:21:03.539: PVC IE 0x7 , length 0x6 , dlci 100, status 0x2 , bw 0 *Jul 5 00:21:03.543: Serial4/2(o): dlci 100(0x1841), pkt encaps 0x0300 0x8000 0x00000x806 (ARP), datagramsize 34 *Jul 5 00:21:03.543: FR: Sending INARP Request on interface Serial4/2 dlci 100 for link 7(IP)
After the router has determined the supported LMI type to use via the LMI autosense feature, the show frame-relay lmi privileged EXEC mode command can be used to verify the LMI type used. Example 4-8 shows an output of the show frame-relay lmi command.
Example 4-8. Sample Output of show frame-relay lmi Command
R1#show frame-relay lmi

LMI Statistics for interface Serial4/2 (Frame Relay DTE) LMI TYPE = CISCO
  Invalid Unnumbered info 0             Invalid Prot Disc 0
  Invalid dummy Call Ref 0              Invalid Msg Type 0
  Invalid Status Message 0              Invalid Lock Shift 0
  Invalid Information ID 0              Invalid Report IE Len 0
  Invalid Report Request 0              Invalid Keep IE Len 0
  Num Status Enq. Sent 144              Num Status msgs Rcvd 145
  Num Update Status Rcvd 0              Num Status Timeouts 0
LMI autosense on the interface can be turned off by explicitly configuring an LMI type with the frame-relay lmi-type lmi-type interface configuration command. Disabling LMI autosense permits the user to specifically configure either the ANSI Annex D, the ITU Q933-A, or the Cisco LMI type to be used on an interface.
NOTE
Unlike Frame Relay encapsulation, LMI type cannot be configured on a per-DLCI basis. It has to be configured at the interface level.
When manually configuring the LMI type on the Frame Relay interface, the selected LMI type on the router must match the LMI type supported by the connected Frame Relay switch. If there is a mismatch of the LMI type running on the Cisco router and its connected Frame Relay switch, the router will not be able to discover any assigned Frame Relay PVCs or maintain LMI status with the switch.
Furthermore, individual Frame Relay PVCs configured under the same physical interface or subinterfaces cannot be set up to use a different LMI type. LMI type is configured only at the interface level. However, it is possible to allow individual Frame Relay PVCs under the same physical interface to use different Frame Relay encapsulations. The frame-relay map command allows the selected DLCI to use either Cisco or IETF Frame Relay encapsulation. The Frame Relay encapsulation type configured on the near-end Frame Relay device must match the Frame Relay encapsulation type configured on the far-end Frame Relay device. Table 4-1 summarizes the key points on the consistency of LMI and Frame Relay encapsulation types.
Example 4-9 shows a configuration example of the frame-relay lmi-type interface configuration command, which is used to explicitly configure an LMI type on a Frame Relay interface. Three LMI options are available: ansi, Cisco, and q933a. They represent the ANSI Annex D, Cisco, and ITU Q933-A (Annex A) LMI types, respectively. The no form of the frame-relay lmi-type command removes the explicit LMI type configured on the interface. Take note that after the explicit LMI type configuration is removed from an interface, the LMI autosense feature is used again for LMI type discovery on that interface. In an all-Cisco environment, the recommended LMI type to use is Cisco LMI.
Example 4-9. Configuring the LMI Type on the Interface
R1(config)#interface serial4/2
R1(config-if)#frame-relay lmi-type ?
  cisco
  ansi
  q933a

R1(config-if)#frame-relay lmi-type q933a
R1(config-if)#no shutdown
After router R1 is set up to use Q933-A LMI type on its serial interface 4/2 in Example 4-9, the next example, in Example 4-10, shows that R1 no longer sends out all three LMI status enquiry messages to poll for a supported LMI type on that interface. Instead, R1 starts exchanging status enquiry messages directly with the Frame Relay switch using the selected Q933-A LMI. In the debug output in Example 4-10, R1 sends out a lone status enquiry message to the Frame Relay switch as noted by the single StEng message. The Frame Relay switch acknowledges the enquiry with a status update message.
Example 4-10. Router Begins LMI Status Exchanges Directly with the Explicitly Configured LMI Type
R1#debug frame-relay lmi
*Jul  5 01:08:28.279: Serial4/2(out): StEnq, myseq 1, yourseen 0, DTE up
*Jul  5 01:08:28.279: datagramstart = 0x70000D4, datagramsize = 13
*Jul  5 01:08:28.279: FR encap = 0x00010308
*Jul  5 01:08:28.279: 00 75 51 01 00 53 02 01 00
*Jul  5 01:08:28.279:
*Jul  5 01:08:28.283: Serial4/2(in): Status, myseq 1
*Jul  5 01:08:28.283: RT IE 51, length 1, type 0
*Jul  5 01:08:28.283: KA IE 53, length 2, yourseq 1 , myseq 1
*Jul  5 01:08:28.283: PVC IE 0x57, length 0x3 , dlci 102, status 0x2
*Jul  5 01:08:38.279: Serial4/2(out): StEnq, myseq 2, yourseen 1, DTE up
*Jul  5 01:08:38.279: datagramstart = 0x70000D4, datagramsize = 13
*Jul  5 01:08:38.279: FR encap = 0x00010308
*Jul  5 01:08:38.279: 00 75 51 01 01 53 02 02 01
*Jul  5 01:08:38.279:
*Jul  5 01:08:38.283: Serial4/2(in): Status, myseq 2
*Jul  5 01:08:38.283: RT IE 51, length 1, type 1
*Jul  5 01:08:38.283: KA IE 53, length 2, yourseq 2 , myseq 2
When manually setting up the LMI type, it is necessary to configure the keepalive interval on the Frame Relay interface to prevent LMI status exchanges between the router and the Frame Relay switch from timing out. The LMI status exchange messages are used for the purpose of communication between the router and the switch to determine the status of the PVC connection. For example, a large mismatch in the keepalive interval on the router and the switch can cause the switch to declare the router dead.
By default, the keepalive time interval is 10 seconds on Cisco serial interfaces. The keepalive interval can be changed with the keepalive interface configuration command. Refer to Example 4-11 for an example of configuring the keepalive on the interface.
Example 4-11. Configuring the Keepalive on the Interface
Enter configuration commands, one per line.  End with CNTL/Z.
R1(config)#interface serial4/2
R1(config-if)#keepalive 30
To keep the LMI status exchanges between the router and the switch in synchronization, the keepalive interval configured at the router has to be equal to or lower than the corresponding keepalive interval configured on the switch interface. Failure to do so can result in a mismatch of sequence numbers in the status exchange messages, interface flapping, or even dropped connections. Then, when connecting to a public Frame Relay network and the LMI autosense feature is not supported, explicit configuration of the LMI type on the router interface is required.
Consider the following example to illustrate this issue. After the Frame Relay PVC connection becomes active, the keepalive interval of the Frame Relay router R1's interface is readjusted to a value three times higher than the default 10-second interval used by the Frame Relay switch's interfaces. Hence, keepalive 30 is used to increase the keepalive of router R1's interface to 30 seconds, while the keepalive value on the switch interface remains at the default 10 seconds. As a result of the configuration change, the Frame Relay switch interface continues to expect LMI status messages from router R1 at 10-second intervals but it hears an LMI status message from R1 only after every 30 seconds. This keepalive mismatch causes a timeout on the switch, and the Frame Relay switch declares the PVC connection to the router R1 as inactive. This can be observed in the output of the show frame-relay route command depicted in Example 4-12. On the router, it is not possible to reach its remote destination on the inactive Frame Relay PVC.
Example 4-12. Frame Relay Connection Status on the Frame Relay Switch with Mismatch Keepalive Intervals Between the Switch and R1
SW#show frame-relay route
Input Intf      Input Dlci      Output Intf     Output Dlci     Status
Serial1/0       102             Serial1/1       201             active
Serial1/1       201             Serial1/0       102             inactive
On the Frame Relay switch, the hardware interface connected to R1 transitions to the line protocol is down state because of the keepalive mismatch. The output of the show interface command executed on the Frame Relay switch in Example 4-13 reflects this.
Example 4-13. Mismatch Keepalive on R1 Causes an Interface Flap on the Frame Relay Switch
SW#show interface serial1/0
Serial1/0 is up, line protocol is down
  Hardware is cxBus Serial
  MTU 1500 bytes, BW 1544 Kbit, DLY 20000 usec,
     reliability 255/255, txload 1/255, rxload 1/255
  Encapsulation FRAME-RELAY, crc 16, loopback not set
  Keepalive set (10 sec)
  Restart-Delay is 0 secs
  LMI enq sent  0, LMI stat recvd 0, LMI upd recvd 0
  LMI enq recvd 65, LMI stat sent  65, LMI upd sent  0, DCE LMI down
  LMI DLCI 1023  LMI type is CISCO  frame relay DCE
  Broadcast queue 0/64, broadcasts sent/dropped 0/0, interface broadcasts 0
  Last input 00:00:00, output 00:00:00, output hang never
  Last clearing of "show interface" counters 00:17:56
  Input queue: 0/75/0/0 (size/max/drops/flushes); Total output drops: 0
  Queueing strategy: weighted fair
  Output queue: 0/1000/64/0 (size/max total/threshold/drops)
     Conversations  0/1/256 (active/max active/max total)
     Reserved Conversations 0/0 (allocated/max allocated)
     Available Bandwidth 1158 kilobits/sec
  5 minute input rate 0 bits/sec, 0 packets/sec
  5 minute output rate 0 bits/sec, 0 packets/sec
     73 packets input, 1426 bytes, 0 no buffer
     Received 0 broadcasts, 0 runts, 0 giants, 0 throttles
     0 input errors, 0 CRC, 0 frame, 0 overrun, 0 ignored, 0 abort
     71 packets output, 1503 bytes, 0 underruns
     0 output errors, 0 collisions, 1 interface resets
     0 output buffer failures, 0 output buffers swapped out
     1 carrier transitions
     RTS up, CTS up, DTR up, DCD up, DSR up
In Example 4-14, a standard ping is performed at Router R1, targeted to the destination address 172.16.1.2 at Router R2. As expected, with the Frame Relay PVC in the inactive state, all the packets sent out on DLCI 100 are dropped. The cause of this problem is the mismatch of the keepalive intervals for exchanging LMI updates between the router and the Frame Relay switch interface. This problem can be identified with the use of show and debug commands for Frame Relay verifying LMI, which will be introduced and explained subsequently in this chapter.
Example 4-14. Frame Relay Router's Connectivity to Remote Destination Is Lost After Keepalive Mismatch
R1#show ip route
Codes: C - connected, S - static, I - IGRP, R - RIP, M - mobile, B - BGP
       D - EIGRP, EX - EIGRP external, O - OSPF, IA - OSPF inter area
       N1 - OSPF NSSA external type 1, N2 - OSPF NSSA external type 2
       E1 - OSPF external type 1, E2 - OSPF external type 2, E - EGP
       i - IS-IS, L1 - IS-IS level-1, L2 - IS-IS level-2, ia - IS-IS inter area
       * - candidate default, U - per-user static route, o - ODR
       P - periodic downloaded static route

Gateway of last resort is not set

     172.16.0.0/24 is subnetted, 1 subnets
C       172.16.1.0 is directly connected, Serial4/2
R1#ping 172.16.1.2
Type escape sequence to abort.
Sending 5, 100-byte ICMP Echos to 172.16.1.2, timeout is 2 seconds:
.....
Success rate is 0 percent (0/5)
After the keepalive interval at Router R1's serial interface 4/2 is restored to 10 seconds to match the Frame Relay switch's settings, the LMI status messages are exchanged properly between R1 and the Frame Relay switch. The LMI status on R1 goes to the UP state and the PVC connection is in the active state again on the switch. Router R1 is able to ping router R2's address at 172.16.1.2, as shown in Example 4-15.
Example 4-15. Connectivity Is Restored After Correcting the Keepalive Interval Mismatch
R1#show interface serial 4/2
Serial4/2 is up, line protocol is up
  Hardware is M4T
  Internet address is 172.16.1.1/24
  MTU 1500 bytes, BW 2048 Kbit, DLY 20000 usec,
     reliability 255/255, txload 1/255, rxload 1/255
  Encapsulation FRAME-RELAY, crc 16, loopback not set
  Keepalive set (10 sec)
  LMI enq sent  94, LMI stat recvd 91, LMI upd recvd 0, DTE LMI up
  LMI enq recvd 0, LMI stat sent  0, LMI upd sent  0
  LMI DLCI 0  LMI type is CCITT  frame relay DTE
  FR SVC disabled, LAPF state down
  Broadcast queue 0/64, broadcasts sent/dropped 1/0, interface broadcasts 0
  Last input 00:00:06, output 00:00:06, output hang never
  Last clearing of "show interface" counters 00:27:06
  Input queue: 0/75/0/0 (size/max/drops/flushes); Total output drops: 0
  Queueing strategy: weighted fair
  Output queue: 0/1000/64/0 (size/max total/threshold/drops)
     Conversations  0/1/256 (active/max active/max total)
     Reserved Conversations 0/0 (allocated/max allocated)
     Available Bandwidth 1536 kilobits/sec
  5 minute input rate 0 bits/sec, 0 packets/sec
  5 minute output rate 0 bits/sec, 0 packets/sec
     108 packets input, 2901 bytes, 0 no buffer
     Received 0 broadcasts, 0 runts, 0 giants, 0 throttles
     0 input errors, 0 CRC, 0 frame, 0 overrun, 0 ignored, 0 abort
     128 packets output, 4276 bytes, 0 underruns
     0 output errors, 0 collisions, 1 interface resets
     0 output buffer failures, 0 output buffers swapped out
1 carrier transitions     DCD=up  DSR=up  DTR=up  RTS=up CTS=up
R1#ping 172.16.1.2

Type escape sequence to abort.
Sending 5, 100-byte ICMP Echos to 172.16.1.2, timeout is 2 seconds:
!!!!!
Success rate is 100 percent (5/5), round-trip min/avg/max = 56/57/60 ms
The discussion in this section demonstrates that a successful LMI status exchange between a Frame Relay DTE device (router) and a Frame Relay DCE device (Frame Relay switch) is required for communication and maintenance of the Frame Relay PVC status. A router cannot communicate with a Frame Relay network via a Frame Relay PVC in the inactive state. However, in order for the router to really send information to a remote destination network address, it needs to know which DLCI to use. This is accomplished by mapping a remote destination network address to a local DLCI address and is explained in the next section.
Before a Frame Relay router or access server can transmit frames on its outgoing virtual circuit to a remote destination, it needs a vital piece of information. The router needs to understand the relationship between the specified next hop protocol address of the remote destination and the specific DLCI of a local outgoing virtual circuit. In other words, before a Cisco router is able to transmit data to a remote destination over Frame Relay, it needs to know which DLCI to use. Cisco routers support all network layer protocols over Frame Relay, such as IP, IPX, and AppleTalk. This address-to-DLCI mapping can be accomplished either by static or dynamic mapping. Dynamic and static mapping of the next hop protocol address to a specific local DLCI value is explained in this section.
Dynamic address mapping relies on the Frame Relay Inverse Address Resolution Protocol (Inverse ARP), defined by RFC 1293, to resolve a next hop network protocol address to a local DLCI value. The Frame Relay router sends out Inverse ARP requests on its Frame Relay PVC to discover the protocol address of the remote device connected to the Frame Relay network. The responses to the Inverse ARP requests are used to populate an address-to-DLCI mapping table on the Frame Relay router or access server. The router builds and maintains this address-to-DLCI mapping table, which contains all resolved Inverse ARP requests, including both dynamic and static mapping entries.
When data needs to be transmitted to a remote destination address, the router performs a lookup on its routing table to determine whether a route to that destination address exists and the next hop address or directly connected interface to use in order to reach that destination. Subsequently, the router consults its address-to-DLCI mapping table for the local DLCI that corresponds to the next hop address. Finally, the router places the frames targeted to the remote destination on its identified outgoing local DLCI.
On Cisco routers, dynamic Inverse ARP is enabled by default for all network layer protocols enabled on the physical interface. Packets are not sent out for network layer protocols that are not enabled on the physical interface. For example, no dynamic Inverse ARP resolution is performed for IPX if ipx routing is not enabled globally and there is no active IPX address assigned to the interface. Because dynamic Inverse ARP is enabled by default, no additional Cisco IOS command is required to enable it on an interface.
Example 4-16 shows the output of the show frame-relay map privileged EXEC mode command. The address-to-DLCI mapping table displays useful information. The output of the command shows that the next hop address 172.16.1.2 is dynamically mapped to the local DLCI 102, broadcast is enabled on the interface, and the interface's status is currently active.
NOTE
After enabling Frame Relay on the interface, the Cisco router does not perform Inverse ARP until IP routing is enabled on the router. By default, IP routing is enabled on a Cisco router. If IP routing has been turned off, enable IP routing with the ip routing command in the global configuration mode. After IP routing is enabled, the router performs Inverse ARP and begins populating the address-to-DLCI mapping table with resolved entries.
Example 4-16. Example of Dynamic Mapping
R1#show frame-relay map
Serial4/2 (up): ip 172.16.1.2 dlci 102(0x64,0x1840), dynamic,
              broadcast,, status defined, active
Inverse ARP can be disabled explicitly for a specific protocol and DLCI pair on the interface. Inverse ARP should be disabled for a specific protocol when it is known that the protocol is not supported on the remote end of the connection. Inverse ARP is disabled using the no form of the frame-relay inverse-arp interface configuration command. Example 4-17 shows how the no frame-relay inverse-arp configuration command is performed to disable dynamic Inverse ARP on the serial interface 4/2 on Router R1.
Example 4-17. Disabling Inverse ARP on an Interface
R1(config)#interface serial4/2
R1(config-if)#no frame-relay inverse-arp ?
  <cr>
  apollo     Apollo Domain
  appletalk  AppleTalk
  bridge     Bridging
  decnet     DECnet
  interval   Set inarp time interval on an interface
  ip         IP
  ipx        Novell IPX
  pppoe      PPP over Ethernet
  qllc       qllc protocol
  vines      Banyan VINES
  xns        Xerox Network Services
R1(config-if)#no frame-relay inverse-arp ip ?
  <16-1007>  Set DLCI for inverse ARP

R1(config-if)#no frame-relay inverse-arp ip 102
To enable Frame Relay Inverse ARP on a specified interface or subinterface if Inverse ARP has been previously disabled, use the frame-relay inverse-arp interface configuration command on the specified interface.
Suppose that the conditions of the network change, resulting in reassignment of DLCI or protocol layer addresses. The clear frame-relay inarp privileged EXEC mode command can be used to clear the address-to-DLCI mapping table of obsolete entries. This clear command flushes the dynamic mapping entries in the table and forces the router to resend dynamic Inverse ARP requests to its neighbors. The clear frame-relay inarp command clears all dynamic Inverse ARP entries on the router. Optionally, the granular clear frame-relay inarp interface command can be used to clear a group of dynamic mapping entries based on the interface number. The clear frame-relay inarp interface type/num dlci dlci_number clears the dynamic mapping entries associated with a specific DLCI.
Cisco routers also allow users to populate the Frame Relay map table with manually defined Inverse ARP entries. User-created Inverse ARP mapping is also known as static mapping. Static mapping is explained in the next section.
With static mapping, the user can choose to override dynamic Inverse ARP mapping by supplying a manual static mapping for the next hop protocol address to a local DLCI. A static map works similarly to dynamic Inverse ARP by associating a specified next hop protocol address to a local Frame Relay DLCI.
For example, static address mapping should be used in situations when the router at the other side of the Frame Relay network does not support dynamic Inverse ARP for a specific network protocol. To provide accessibility, a static mapping is required to complete the remote network layer address to local DLCI resolution.
On a hub-and-spoke Frame Relay network, static address mapping should also be used on the spoke routers to provide spoke-to-spoke reachability. Because the spoke routers do not have direct connectivity with each other, dynamic Inverse ARP would not work between them. Dynamic Inverse ARP relies on the presence of a direct point-to-point connection between two ends. In this case, dynamic Inverse ARP only works between hub and spoke, and the spokes require static mapping to provide reachability to each other.
NOTE
When static mapping is configured on an interface for a protocol and a specific DLCI, the router automatically disables dynamic Inverse ARP for the protocol and the specific DLCI on the interface.
The frame-relay map protocol protocol-address dlci [broadcast] [ietf | cisco] configuration command in the interface or multipoint subinterface configuration mode is used to supply a static mapping of the specified next hop protocol address to a specified local DLCI.
Physical interface:
Router(config-if)#frame-relay map protocol protocol-address dlci [broadcast] [ietf | cisco]
Multipoint subinterface:
Router(config-subif)#frame-relay map protocol protocol-address dlci [broadcast] [ietf | cisco]
The no form of the frame-relay map command removes the static mapping for the specific next hop protocol address and the specific local DLCI. Table 4-2 lists the supported protocols and the corresponding keywords for protocol in the frame-relay map command.
Table 4-2. Supported Protocols and Keywords for frame-relay map Command
Supported Protocols for frame-relay map Command | Keyword for protocol |
|---|---|
IP | ip |
DECnet | decent |
AppleTalk | appletalk |
XNS | xns |
Novell IPX | ipx |
VINES | vines |
ISO CLNS | clns |
NOTE
A Frame Relay point-to-point subinterface is connected to an end-to-end virtual circuit provisioned between two locations. Therefore, a point-to-point subinterface can only accept one DLCI and the next hop protocol address is automatically linked to the sole outgoing local DLCI. Hence, the frame-relay map command is applicable only to multipoint subinterfaces and physical interfaces (physical interfaces are multipoint interfaces by default).
To configure a static mapping of the next hop protocol address to a specified DLCI on a physical interface or a multipoint subinterface, follow the configuration steps listed below:
Go into the interface or subinterface configuration mode of the interface on which you want to configuring static mapping.
Configure the Frame Relay static mapping for the specified next hop protocol address and the specified local DLCI.
(optional) Enter the broadcast keyword to allow the specified DLCI to forward broadcast and multicast packets. This can reduce the complexity of running dynamic routing protocols such as OSPF (which uses multicast updates) over Frame Relay.
(optional) Use the cisco or ietf keyword to specify the Frame Relay encapsulation to be used on the specified DLCI. Frame Relay encapsulation can be configured on a per-DLCI basis.
Example 4-18 shows a sample configuration of static mapping configured on the physical serial interface 3/0 of Router R2.
Example 4-18. Configuring Static Mapping
R2#configure terminal
Enter configuration commands, one per line.  End with CNTL/Z.
R2(config)#interface serial3/0
R2(config-if)#frame-relay map ip 172.16.1.1 201 broadcast cisco

R2#show running-config
<output omitted>

interface Serial3/0
 ip address 172.16.1.2 255.255.255.0
 encapsulation frame-relay
frame-relay map ip 172.16.1.1 201 broadcast cisco

<output omitted>

R2#show frame-relay map
Serial3/0 (up): ip 172.16.1.1 dlci 201(0xC8,0x3080), static,
              broadcast,
              CISCO, status defined, active
Referring to Example 4-18, the contents of the show output on router R2 indicate that the static address mapping is performed on interface serial 3/0 and the Frame Relay encapsulation used on the DLCI 200 is CISCO. As seen in the configuration steps, static mapping of the address using the frame-relay map command allows users to select the type of Frame Relay encapsulation used on a per-VC basis.
It was mentioned in an earlier section that static mapping using the frame-relay map command is important on partially meshed networks. The partially meshed Frame Relay network shown in Figure 4-2 is used to demonstrate when static mapping is required. In Figure 4-2, the spoke routers, R1 and R2, are using dynamic Inverse ARP between themselves and the hub router R3. Static mapping is used between a spoke router and its remote spoke router.
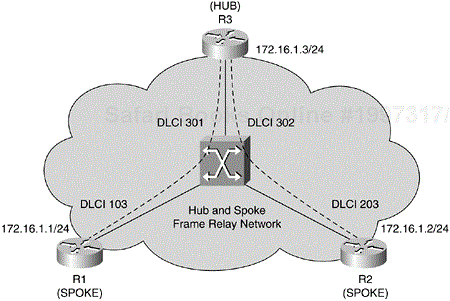
For example, the spoke router R1 uses static mapping to reach router R2 at 172.16.1.2 because there is no direct connectivity between them on the partially meshed network to use dynamic Inverse ARP. Because R1 and R3 are directly connected by a VC, they can rely on dynamic mapping to resolve the next hop protocol address via dynamic Inverse ARP. The same applies between router R2 and hub router R3. On router R1 and R2, static mapping needs to be used to instruct R1 to reach R2 via its local DLCI 103 and for R2 to reach R1 via its local DLCI 203.
The configuration file and the show frame-relay map command output of router R2 are shown in Example 4-19. After the static and dynamic mappings are resolved in the show frame-relay map table, R2 has complete connectivity to both the hub router and the remote spoke router. The configurations and the show frame-relay map output of router R1 will be similar to that of router R2.
Example 4-19. Static and Dynamic Mapping Under the Same Interface
R2#show running-config
Building configuration...
<output omitted>

interface Serial3/0
 ip address 172.16.1.2 255.255.255.0
 encapsulation frame-relay
 frame-relay map ip 172.16.1.1 203 broadcast

<output omitted>

R2#show frame-relay map
Serial3/0 (up): ip 172.16.1.3 dlci 203(0x64,0x1840), dynamic,
              broadcast,, status defined, active
Serial3/0 (up): ip 172.16.1.1 dlci 203(0x64,0x1840), static,
              broadcast,
CISCO, status defined, active

R2#ping 172.16.1.3

Type escape sequence to abort.
Sending 5, 100-byte ICMP Echos to 172.16.1.3, timeout is 2 seconds:
!!!!!
Success rate is 100 percent (5/5), round-trip min/avg/max = 56/57/60 ms
R2#ping 172.16.1.1

Type escape sequence to abort.
Sending 5, 100-byte ICMP Echos to 172.16.1.1, timeout is 2 seconds:
!!!!!
Success rate is 100 percent (5/5), round-trip min/avg/max = 112/114/120 ms
R2#
Although using a combination of both static mapping and dynamic Inverse ARP on a spoke router resolves the spoke-to-spoke reachability problem inherent in a hub-and-spoke Frame Relay network, another issue is presented. Recall that when static mapping is enabled for a particular network layer protocol on a specific DLCI, dynamic Inverse ARP for that network layer protocol on the same DLCI is automatically disabled on the interface. On router R2 in Figure 4-2, both static mapping and dynamic Inverse ARP are configured for IP on DLCI 200. This works fine if static mapping is added after dynamic Inverse ARP resolution has been completed. However, when router R2 is rebooted with the saved configurations, dynamic Inverse ARP will be turned off on interface serial3/0. In this case, router R2 will no longer be able to reach the hub router R3. A workable solution to this issue is to use static mapping instead for all remote destinations.
On partially meshed Frame Relay networks, the problem of split horizon can be overcome by using Frame Relay subinterfaces. Frame Relay provides a mechanism to allow a physical interface to be partitioned into multiple virtual interfaces. In a similar way, using subinterfaces allows a partially meshed network to be divided into a number of smaller, fully meshed point-to-point networks. Generally, each point-to-point subnetwork is assigned a unique network address. This allows packets received on one physical interface to be sent out from the same physical interface, albeit forwarded on VCs in different subinterfaces.
There are two types of subinterfaces supported by Cisco routers: point-to-point and multipoint subinterfaces. Each of these types will be described in the next sections.
In general, to configure a subinterface on a Frame Relay interface, follow the configuration commands listed below beginning in global configuration mode:
Go to the interface configuration mode of the interface on which you want to create Frame Relay subinterfaces and enable Frame Relay encapsulation.
Configure and create a point-to-point or multipoint subinterface.
Example 4-20 shows an example of the configuration steps required to create a point-to-point subinterface. Example 4-21 shows an example of the configuration steps required to create a multipoint subinterface. Both configuration commands are performed on the hub router R3 in Figure 4-2.
Example 4-20. Creating Point-to-Point Subinterfaces on a Physical Interface
R3#configure terminal
00:41:34: %SYS-5-CONFIG_I: Configured from console by console
Enter configuration commands, one per line.  End with CNTL/Z.
R3(config)#interface serial3/1
R3(config-if)#encapsulation frame-relay
R3(config-if)#interface serial3/1.1 point-to-point
R3(config-subif)#
Example 4-21. Creating Multipoint Subinterfaces on a Physical Interface
R3(config)#
00:43:57: %SYS-5-CONFIG_I: Configured from console by console
R3(config)#interface serial3/1
R3(config-if)#encapsulation frame-relay
R3(config-if)#interface serial3/1.2 multipoint
R3(config-subif)#
NOTE
Once you create a specific type of subinterface, you cannot change it without reloading the router. For example, you cannot create a multipoint subinterface serial0.2 and then change it to point-to-point. To change it, you need to either reload the router or create another subinterface. This is the way the Frame Relay code works in Cisco IOS software.
An example is used to illustrate how multiple subinterfaces can be created under the same physical interface. A fourth router, R4, is added to Figure 4-2. The resultant topology is shown in Figure 4-3.
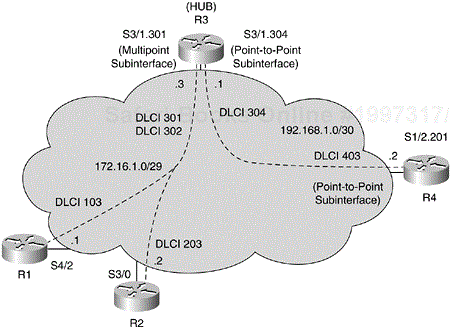
At the hub router R3, two subinterfaces are created on the physical serial interface 3/1. One multipoint subinterface is created, and an IP address for the 172.16.1.0/29 subnet is assigned. Under the same physical serial interface 3/1, another point-to-point subinterface can be created for the point-to-point connection to spoke router R4 for the IP subnet 192.168.1.0/30. Example 4-22 shows the configuration files of all four routers shown in Figure 4-3.
Example 4-22. Configuration Files of Routers in Figure 4-3
R1#show running-config
Building configuration...
!
hostname R1
!
<output omitted>
!
interface Serial4/2
 ip address 172.16.1.1 255.255.255.248
 encapsulation frame-relay
 frame-relay map ip 172.16.1.2 103 broadcast

R2#show running-config
Building configuration...
!
hostname R2
!
<output omitted>
!
interface Serial3/0
 ip address 172.16.1.2 255.255.255.248
 encapsulation frame-relay
frame-relay map ip 172.16.1.1 203 broadcast
!
<output omitted>

R3#show running-config
Building configuration...
!
hostname R3
!
<output omitted>
!
interface Serial3/1
 no ip address
 encapsulation frame-relay
!
interface Serial3/1.304 point-to-point
 ip address 192.168.1.1 255.255.255.252
 frame-relay interface-dlci 304
!
interface Serial3/1.301 multipoint
 ip address 172.16.1.3 255.255.255.248
 frame-relay interface-dlci 301
 frame-relay interface-dlci 302

R4#show running-config
Building configuration...
!
hostname R4
!
<output omitted>
!
interface Serial1/2
 no ip address
 encapsulation frame-relay
!
interface Serial1/2.403 point-to-point
 ip address 192.168.1.2 255.255.255.252
 frame-relay interface-dlci 403
!
On Frame Relay networks, a single VC is always provisioned for a point-to-point connection. The same VC originates at a local end and then terminates at the remote end. A subnet address is usually assigned to each point-to-point connection. Therefore, only one DLCI can be configured per point-to-point subinterface. In this example, the local referenced DLCI of the VC at hub router R3 and spoke router R4 are 304 and 403, respectively. The subnet address 192.168.1.0/30 is allocated to this point-to-point network. Typically, a 30-bit subnet mask is used for point-to-point connection to preserve address space.
On point-to-point subinterfaces, the destination is identified and configured with the frame-relay interface-dlci command beginning in interface configuration mode. When configured on a point-to-point subinterface, the command associates the selected point-to-point subinterface with a DLCI. The command also allows users to select the type of Frame Relay encapsulation to be used on the specific VC. The command can be executed without specifying the Frame Relay encapsulation type to be used. By default, the Cisco Frame Relay encapsulation type will be used. Example 4-23 shows the configuration command and the corresponding output of the show frame-relay map.
Example 4-23. Example of frame-relay interface-dlci Command and the Output of show frame-relay map
R4(config)#interface s1/2.403 point-to-point
R4(config-subif)#frame-relay interface-dlci ?
  <16-1007>  Define a switched or locally terminated DLCI

R4(config-subif)#frame-relay interface-dlci 403 ?
  cisco     Use CISCO Encapsulation
  ietf      Use RFC1490/RFC2427 Encapsulation
  ppp       Use RFC1973 Encapsulation to support PPP over FR
  protocol  Optional protocol information for remote end
<cr>
R4#show frame-relay map
Serial1/2.403 (up): point-to-point dlci, dlci 403(0xC9,0x3090), broadcast
          status defined, active
R4#
As shown in the show frame-relay map output in Example 4-23, the DLCI configured on point-to-point subinterface serial1/0.403 is 403. Note that the created subinterface number mirrors the DLCI of the referenced VC. Generally, when creating a Frame Relay subinterface, it is good practice to assign a Frame Relay subinterface number that mirrors the DLCI value of the Frame Relay PVC assigned to that subinterface.
On point-to-point subinterfaces, you do not need to use the frame-relay map command to perform static address mapping, because it is always assumed that the end point of the point-to-point connection automatically resides on the same subnet as the start point. It is also not required to enable or disable Inverse ARP, because there is only a single remote destination on a point-to-point PVC and discovery is not necessary.
On a Cisco router, by default, physical interfaces are multipoint interfaces. Frame Relay multipoint subinterfaces created on Cisco routers behave very much like the physical interfaces.
When a multipoint subinterface is created under a physical interface, it is necessary to specifically assign DLCIs to the multipoint subinterface. By default, the Cisco IOS software allocates all unassigned DLCIs advertised by the Frame Relay switch to the physical interface on the router. On a multipoint subinterface, the frame-relay interface-dlci dlci command or the frame-relay map protocol protocol-address dlci [broadcast] command in the subinterface configuration mode can be used to associate the multipoint subinterface with specific DLCIs. The frame-relay interface-dlci dlci command performs dynamic address mapping using Inverse ARP to map the next-hop protocol address to the local DLCI on the router. For instance, in the configuration examples in Example 4-22, DLCIs 301, 302, and 304 are automatically associated with the physical interface serial 3/1 on the hub router R3. The frame-relay interface-dlci 301 and frame-relay interface-dlci 302 commands are configured on multipoint subinterface s3/1.301 to specifically assign both DLCIs to the multipoint subinterface. The same command is used to associate DLCI 304 with point-to-point subinterface s3/1.304. Unlike point-to-point subinterfaces, the frame-relay interface-dlci command can be configured multiple times to associate more than one DLCI to a multipoint subinterface.
Similarly, the frame-relay map protocol protocol-address dlci [broadcast] command can be used to specifically assign DLCIs to the multipoint subinterfaces. The optional broadcast keyword in the frame-relay map command is required if broadcast and multicast traffic are to be sent over the specified dlci. Without the broadcast option, dynamic routing protocols such as EIGRP, OSPF and RIPv2 would not be able to advertise multicast route updates over the specified dlci. In comparison with the frame-relay interface-dlci command, the frame-relay map command performs static addressing mapping and it disables Inverse ARP on the specified dlci. In addition, the frame-relay map command is supported on the physical interface and the frame-relay map command should be used when the far end Frame Relay device does not support Inverse ARP.
NOTE
When a multipoint subinterface is created on a physical interface, the DLCIs of virtual circuits are always assigned to the physical interface until they are specifically assigned to the subinterfaces using the frame-relay interface-dlci dlci command or the frame-relay map protocol protocol-address dlci [broadcast] command.
On multipoint subinterfaces, either dynamic or static mapping can be used, depending on the network configurations.
In the hub-and-spoke network exemplified in Figure 4-3, the hub router R3 uses dynamic mapping via inverse ARP to map the next hop protocol addresses 172.16.1.1/29 and 172.16.1.2/29 of routers R1 and R2 to DLCI 301 and 302, respectively. On the spoke router R1, dynamic Inverse ARP mapping is used to map the next hop protocol address 172.16.1.3/29 at router R3 to local DLCI 301. However, because the spoke routers R1 and R2 do not have direct connectivity with each other on the partially meshed network, static mapping must be used between them. For each additional spoke router added to the 172.16.1.0/29 subnet on the hub-and-spoke network in Figure 4-3, an additional frame-relay map command must be supplied on each spoke router to statically map the next hop protocol address to the local DLCI.
The following example verifies the configurations of the routers in the hub-and-spoke network depicted in Figure 4-3. Example 4-24 shows the output of the show frame-relay map command on the hub router R3 and the results of several connectivity checks via the ping command.
Example 4-24. Verifying the Network in Figure 4-3
R3#show frame-relay map
Serial3/1.301 (up): ip 172.16.1.1 dlci 301(0x67,0x1870), dynamic,
              broadcast,, status defined, active
Serial3/1.302 (up): ip 172.16.1.2 dlci 302(0x68,0x1880), dynamic,
              broadcast,, status defined, active
Serial3/1.304 (up): point-to-point dlci, dlci 304(0x66,0x1860), broadcast
          status defined, active
R3#
R3#ping 172.16.1.1

Type escape sequence to abort.
Sending 5, 100-byte ICMP Echos to 172.16.1.1, timeout is 2 seconds:
!!!!!
Success rate is 100 percent (5/5), round-trip min/avg/max = 56/57/60 ms
R3#ping 172.16.1.2

Type escape sequence to abort.
Sending 5, 100-byte ICMP Echos to 172.16.1.2, timeout is 2 seconds:
!!!!!
Success rate is 100 percent (5/5), round-trip min/avg/max = 56/56/60 ms
R3#ping 192.168.1.2

Type escape sequence to abort.
Sending 5, 100-byte ICMP Echos to 192.168.1.2, timeout is 2 seconds:
!!!!!
Success rate is 100 percent (5/5), round-trip min/avg/max = 56/57/60 ms
R3#

R1#show frame-relay map
Serial4/2 (up): ip 172.16.1.2 dlci 103(0x191,0x6410), static,
              broadcast,
              CISCO, status defined, active
Serial4/2 (up): ip 172.16.1.3 dlci 103(0x191,0x6410), dynamic,
broadcast,, status defined, active
R1#ping 172.16.1.2

Type escape sequence to abort.
Sending 5, 100-byte ICMP Echos to 172.16.1.2, timeout is 2 seconds:
!!!!!
Success rate is 100 percent (5/5), round-trip min/avg/max = 112/115/120 ms
R1#ping 172.16.1.3

Type escape sequence to abort.
Sending 5, 100-byte ICMP Echos to 172.16.1.3, timeout is 2 seconds:
!!!!!
Success rate is 100 percent (5/5), round-trip min/avg/max = 56/59/64 ms

R2#show frame-relay map
Serial3/0 (up): ip 172.16.1.1 dlci 203(0x12D,0x48D0), static,
              broadcast,
              CISCO, status defined, active
Serial3/0 (up): ip 172.16.1.3 dlci 203(0x12D,0x48D0), dynamic,
broadcast,, status defined, active
R2#ping 172.16.1.1

Type escape sequence to abort.
Sending 5, 100-byte ICMP Echos to 172.16.1.1, timeout is 2 seconds:
!!!!!
Success rate is 100 percent (5/5), round-trip min/avg/max = 112/115/124 ms
R2#ping 172.16.1.3

Type escape sequence to abort.
Sending 5, 100-byte ICMP Echos to 172.16.1.3, timeout is 2 seconds:
!!!!!
Success rate is 100 percent (5/5), round-trip min/avg/max = 56/57/60 ms
R2#

R4#show frame-relay map
Serial1/2.403 (up): point-to-point dlci, dlci 403(0xC9,0x3090), broadcast
          status defined, active
R4#ping 192.168.1.1

Type escape sequence to abort.
Sending 5, 100-byte ICMP Echos to 192.168.1.1, timeout is 2 seconds:
!!!!!
Success rate is 100 percent (5/5), round-trip min/avg/max = 56/57/60 ms
R4#
Cisco routers can be configured as dedicated Frame Relay switches that act as DCE devices. On a Cisco router configured as a Frame Relay switch, frames from a Frame Relay PVC arriving on an incoming interface are switched to a Frame Relay PVC on outgoing interface During this process, the incoming DLCI in the arriving frames is replaced by an outgoing DLCI. Frame Relay switching is performed completely in Layer 2, and the Frame Relay switch pays no attention to Layer 3 information contained within the frames. The paths taken by the switched frames are completely based on the Frame Relay route table constructed.
We use a simple example depicted in Figure 4-4 with two Frame Relay access routers and a Cisco router configured as a Frame Relay switch.

The simple Frame Relay network in Figure 4-4 shows a Cisco router configured as a Frame Relay switch with two serial interfaces set up as DCE interfaces. The Cisco router behaving as a Frame Relay switch switches Frame Relay frames received from interface serial4/3 on DLCI 403 to interface serial4/1 on the outgoing DLCI to 304. Example 4-25 shows the sample configurations for the router configured as a Frame Relay switch.
Example 4-25. Configurations for Frame Relay Switch
SW#show running-config
Building configuration...
<output omitted>
!
hostname SW
!
<output omitted>
!
frame-relay switching
!
interface Serial4/1
 no ip address
 encapsulation frame-relay
 clockrate 64000
 frame-relay intf-type dce
 frame-relay route 304 interface Serial4/3 403
!
interface Serial4/3
 no ip address
 encapsulation frame-relay
 clockrate 64000
 frame-relay intf-type dce
 frame-relay route 403 interface Serial4/1 304
To configure a Cisco router as a Frame Relay switch, follow the configuration steps listed below:
Enable Frame Relay switching on the router using the command frame-relay switching in the global configuration mode.
Go to the interface configuration mode of the Frame Relay interface where you want to configure Frame Relay switching. Configure the interface as a DCE interface with the frame-relay intf-type dce interface configuration command.
Configure the Frame Relay switching on the interface using the frame-relay route command, specifying the incoming DLCI, the outgoing interface, and the outgoing DLCI. Note that Frame Relay switching can be configured only on physical interfaces.
The clockrate command is required on the serial interface of the Frame Relay switch (attached with the DCE end of the serial cable). It provides clocking signals to the connected Frame Relay routers, which are set up as DTE devices.
The frame-relay route interface configuration command is used to route an incoming DLCI to an outgoing interface and corresponding outgoing DLCI.
Router(config-if)#frame-relay route incoming-DLCI outgoing-interface outgoing DLCI
To verify the contents of the Frame Relay route table, the show frame-relay route privileged EXEC mode command is used. Example 4-26 shows the contents of the table displayed by the show frame-relay route command.
Example 4-26. Contents of show frame-relay route Command
SW#show frame-relay route
Input Intf      Input Dlci      Output Intf     Output Dlci   Status
Serial4/1       304             Serial4/3       403           active
Serial4/3       403             Serial4/1       304           active
SW#
NOTE
Take note that the frame-relay route command must be configured in pairs on both the incoming interface and outgoing interface for the Frame Relay route to become active.
The Cisco Frame Relay switching feature can be used to support a Frame Relay network using only routers. Consider the example in Figure 4-5 in which two Cisco routers are configured as Frame Relay switches implementing a Network-to-Network Interface (NNI) between them. To enable communication between two Frame Relay switches, the NNI signaling protocol is used between them. Configuration examples involving two Frame Relay switches communicating in NNI mode are shown in Example 4-27.
Example 4-27. Configurations for the Frame Relay Switches
SW#show running-config
Building configuration...
<output omitted>
!
hostname SW
!
<output omitted>
!
frame-relay switching
!
interface Serial2/1
 no ip address
 encapsulation frame-relay
 clockrate 64000
 frame-relay intf-type dce
 frame-relay route 100 interface Serial2/3 300
!
interface Serial2/3
 no ip address
 encapsulation frame-relay
 clockrate 64000
 frame-relay intf-type nni
 frame-relay route 300 interface Serial2/1 100

SW2#show running-config
Building configuration...
<output omitted>
!
hostname SW2
!
<output omitted>
!
frame-relay switching
!
interface Serial3/1
 no ip address
 encapsulation frame-relay
 clockrate 64000
 frame-relay intf-type dce
 frame-relay route 200 interface Serial3/3 300
!
interface Serial3/3
 no ip address
 encapsulation frame-relay
 clockrate 64000
 frame-relay intf-type nni
 frame-relay route 300 interface Serial3/1 200

Earlier chapters discussed the concept of DLCI local significance. In the context of local significance on a Frame Relay network, the end devices at two different ends of a connection can use a different DLCI to refer to that same connection. This section discusses setting up a Frame Relay DLCI addressing scheme using the local significance approach to DLCI assignment. Later in the section, an alternate addressing scheme using the global significance approach is examined. Global significance of DLCI is part of the LMI enhancements to Frame Relay.
Figure 4-6 shows a hub-and-spoke Frame Relay network with five nodes using a DLCI scheme that conforms to the concept of local significance.

The configuration files of the Frame Relay switch for the network depicted in Figure 4-6 with the local significance addressing approach are shown in Example 4-28.
Example 4-28. Configuration Files for Frame Relay Switch Using Local Significance Addressing
SW#show running-config
<output omitted>
hostname SW
!
no ip routing
!
frame-relay switching
!
interface Serial1/0
! Connection to Router Spoke A
 no ip address
 encapsulation frame-relay
 clockrate 64000
 frame-relay intf-type dce
 frame-relay route 201 interface Serial4/3 102
!
interface Serial1/1
! Connection to Router Spoke B
 no ip address
 encapsulation frame-relay
 clockrate 64000
 frame-relay intf-type dce
 frame-relay route 301 interface Serial4/3 103
!
interface Serial1/7
! Connection to Router Spoke D
 no ip address
 encapsulation frame-relay
 clockrate 64000
 frame-relay intf-type dce
 frame-relay route 501 interface Serial4/3 105
!
interface Serial4/1
! Connection to Router Spoke C
 no ip address
 encapsulation frame-relay
 clockrate 64000
 frame-relay intf-type dce
 frame-relay route 401 interface Serial4/3 104
!
interface Serial4/3
! Connection to the Hub Router
 no ip address
 encapsulation frame-relay
 clockrate 64000
 frame-relay intf-type dce
 frame-relay route 102 interface Serial1/0 201
 frame-relay route 103 interface Serial1/1 301
 frame-relay route 104 interface Serial4/1 401
 frame-relay route 105 interface Serial1/7 501

SW#show frame-relay route
Input Intf      Input Dlci      Output Intf     Output Dlci   Status
Serial1/0       201             Serial4/3       102           active
Serial1/1       301             Serial4/3       103           active
Serial1/7       501             Serial4/3       105           active
Serial4/1       401             Serial4/3       104           active
Serial4/3       102             Serial1/0       201           active
Serial4/3       103             Serial1/1       301           active
Serial4/3       104             Serial4/1       401           active
Serial4/3       105             Serial1/7       501           active
SW#
On a Frame Relay network using the global addressing approach, a unique DLCI address is assigned to each Frame Relay DTE device, including routers. The global addressing scheme allows Frame Relay devices to be uniquely identified by their assigned DLCIs. However, similar to the constraints of IP addressing, an assigned DLCI value cannot be reused in any other parts of the same Frame Relay network. In addition to this constraint, the number of Frame Relay devices that can be supported by global addressing is limited. Because global addressing requires the DLCI values to be unique, the maximum number of Frame Relay devices allowed is 992 (1024 possible DLCI values – 32 reserved DLCI addresses). Figure 4-7 presents an example of a Frame Relay network utilizing the global addressing scheme.

The configuration files of the Frame Relay switch for the network depicted in Figure 4-7 with the global significance addressing approach are shown in Example 4-29.
Example 4-29. Configuration Files for Frame Relay Switch Using Global Significance Addressing
SW#show running-config
<output omitted>
hostname SW
!
no ip routing
!
frame-relay switching
!
interface Serial1/0
 ! Connection to Router Spoke A
 no ip address
 encapsulation frame-relay
 clockrate 64000
 frame-relay intf-type dce
 frame-relay route 101 interface Serial4/3 201
!
interface Serial1/1
 ! Connection to Router Spoke B
 no ip address
 encapsulation frame-relay
 clockrate 64000
 frame-relay intf-type dce
 frame-relay route 101 interface Serial4/3 301
!
interface Serial1/7
 ! Connection to Router Spoke D
 no ip address
 encapsulation frame-relay
 clockrate 64000
 frame-relay intf-type dce
 frame-relay route 101 interface Serial4/3 501
!
interface Serial4/1
 ! Connection to Router Spoke C
 no ip address
 encapsulation frame-relay
 clockrate 64000
 frame-relay intf-type dce
 frame-relay route 101 interface Serial4/3 401
!
interface Serial4/3
 ! Connection to the Hub Router
 no ip address
 encapsulation frame-relay
 clockrate 64000
 frame-relay intf-type dce
 frame-relay route 201 interface Serial1/0 101
 frame-relay route 301 interface Serial1/1 101
 frame-relay route 401 interface Serial4/1 101
 frame-relay route 501 interface Serial1/7 101
Many Cisco IOS commands that are supported on Cisco routers can be used either to validate users' Frame Relay configuration command changes, to verify the status of the Frame Relay connection, or as a troubleshooting tool. For instance, the show frame-relay map command displays the remote network address to local DLCI mapping and indicates the remote network destinations reachable via the connected Frame Relay network. This section looks at the general IOS show commands most commonly used on Cisco routers for Frame Relay.
The show interface serial privileged EXEC mode command displays detailed information of a physical interface or a subinterface. The information shown by the show interface serial command offers the following information on Frame Relay:
The type of Frame Relay encapsulation used on an interface or PVC
The keepalive interval configured
The Frame Relay LMI type used
The status of Frame Relay LMI
Information on whether the interface is configured as a Frame Relay DTE or a DCE device
Example 4-30 shows a sample output of the show interface serial command. Different hardware interface types might have slightly different output formats.
Example 4-30. Sample Output of show interface serial Command
Router#show interface serial1/2
Serial1/2 is up, line protocol is up
  Hardware is CD2430 in sync mode
  Internet address is 172.16.1.1/24
  MTU 1500 bytes, BW 128 Kbit, DLY 20000 usec,
     reliability 255/255, txload 1/255, rxload 1/255
  Encapsulation FRAME-RELAY, loopback not set
  Keepalive set (10 sec)
  LMI enq sent  131, LMI stat recvd 116, LMI upd recvd 0, DTE LMI up
  LMI enq recvd 0, LMI stat sent  0, LMI upd sent  0
  LMI DLCI 1023  LMI type is CISCO  frame relay DTE
  FR SVC disabled, LAPF state down
  Broadcast queue 0/64, broadcasts sent/dropped 9/0, interface broadcasts 0
  Last input 00:00:03, output 00:00:03, output hang never
  Last clearing of "show interface" counters 00:24:10
  Input queue: 0/75/0/0 (size/max/drops/flushes); Total output drops: 0
  Queueing strategy: fifo
  Output queue :0/40 (size/max)
  5 minute input rate 0 bits/sec, 0 packets/sec
  5 minute output rate 0 bits/sec, 0 packets/sec
     241 packets input, 8933 bytes, 0 no buffer
     Received 0 broadcasts, 0 runts, 0 giants, 0 throttles
     0 input errors, 0 CRC, 0 frame, 0 overrun, 0 ignored, 0 abort
     164 packets output, 2865 bytes, 0 underruns
     0 output errors, 0 collisions, 10 interface resets
     0 output buffer failures, 0 output buffers swapped out
     2 carrier transitions
     DCD=up  DSR=up  DTR=up  RTS=up  CTS=up
The output of the show interface serial command offers other beneficial information for verifying the Frame Relay router's connection to the CSU/DSU. When the output of the show interface serial command shows Serial1/2 is up, line protocol is up, this indicates that the router is communicating properly with the connected CSU/DSU and is successfully exchanging LMI status messages with the Frame Relay switch. The line Serial1/2 is down, line protocol is down reveals that a line problem has occurred with the router's connection to the CSU/DSU. The causes of the problem are typically cabling or signaling issues. The last line of the show interface serial command offers information on the status of the interface's connection with the CSU/DSU. When the output shows Serial1/2 is up, line protocol is down, this means that the local connection to the CSU/DSU is functioning properly, but the router is not exchanging LMI messages properly with the switch.
The show frame-relay lmi privileged EXEC mode command displays LMI statistics of Frame Relay enabled interfaces on the router. Alternatively, the command can be used to display the LMI statistics of a certain interface by specifying the interface type and the interface number. For example, show frame-relay lmi serial4/2 displays the LMI statistics for the Frame Relay operations configured on serial4/2 only. The information displayed by the show frame-relay lmi command shows the LMI type used by the Frame Relay interface as well as the counters for the LMI status exchange sequence, including errors such as LMI timeouts. Example 4-31 shows a sample output of the show frame-relay lmi command.
Example 4-31. Sample Output of show frame-relay lmi Command
Router#show frame-relay lmi
LMI Statistics for interface Serial1/2 (Frame Relay DTE) LMI TYPE = CISCO
  Invalid Unnumbered info 0             Invalid Prot Disc 0
  Invalid dummy Call Ref 0              Invalid Msg Type 0
  Invalid Status Message 0              Invalid Lock Shift 0
  Invalid Information ID 0              Invalid Report IE Len 0
  Invalid Report Request 0              Invalid Keep IE Len 0
  Num Status Enq. Sent 159              Num Status msgs Rcvd 144
  Num Update Status Rcvd 0              Num Status Timeouts 16
The show frame-relay map privileged EXEC mode command shows the contents of the next hop protocol address to DLCI mapping table on the router. The table contains both dynamic mapped and static mapped entries. Example 4-32 shows a sample output of the show frame-relay map command.
Example 4-32. Sample Output of show frame-relay map Command
Router#show frame-relay map
Serial1/2 (up): ip 172.16.1.4 dlci 401(0x191,0x6410), dynamic,
              broadcast,, status defined, active
Serial1/2 (up): ip 172.16.1.5 dlci 501(0x1F5,0x7C50), dynamic,
              broadcast,, status defined, active
Serial1/2 (up): ip 172.16.1.2 dlci 301(0x12D,0x48D0), dynamic,
              broadcast,, status defined, active
The show frame-relay pvc privileged EXEC mode command displays detailed information of the PVC statistics on the router. This is an important command for monitoring Frame Relay connections on the router. It offers information such as all the DLCIs on the router, the interface that a DLCI is associated with, and the status of the PVC, as well as traffic and congestion management parameters such as the number of BECN, FECN, and DE flagged packets received. It also shows the input and output rate information on a per-VC basis.
NOTE
The format of the show frame-relay pvc output changes slightly and presents more information when certain Frame Relay features are configured on the router.
Example 4-33 shows a sample standard output of the show frame-relay pvc command.
Example 4-33. Sample Output of show frame-relay pvc Command
Router#show frame-relay pvc
PVC Statistics for interface Serial3/0 (Frame Relay DTE)

              Active     Inactive      Deleted       Static
  Local          1            0            0            0
  Switched       0            0            0            0
  Unused         0            0            0            0

DLCI = 101, DLCI USAGE = LOCAL, PVC STATUS = ACTIVE, INTERFACE = Serial3/0

  input pkts 12            output pkts 3            in bytes 408
  out bytes 102            dropped pkts 0           in FECN pkts 0
  in BECN pkts 0           out FECN pkts 0          out BECN pkts 0
  in DE pkts 0             out DE pkts 0
  out bcast pkts 3         out bcast bytes 102
  5 minute input rate 0 bits/sec, 0 packets/sec
  5 minute output rate 0 bits/sec, 0 packets/sec
  pvc create time 00:23:41, last time pvc status changed 00:23:41
The show frame-relay route privileged EXEC mode command is used to monitor the Frame Relay route table on the Cisco router configured as a Frame Relay switch. The Frame Relay switch uses the routes constructed in the table to switch frames from an incoming VC on an interface to an outgoing VC on another interface. The table also shows the current status of the switched VCs. This command is useful only on the router configured as a Frame Relay switch. Example 4-34 shows a sample output of the show frame-relay route command.
Example 4-34. Sample Output of show frame-relay route Command
Router#show frame-relay route
Input Intf      Input Dlci      Output Intf     Output Dlci   Status
Serial1/0       101             Serial4/3       201           active
Serial1/1       101             Serial4/3       301           active
Serial1/7       101             Serial4/3       501           active
Serial4/1       101             Serial4/3       401           active
Serial4/3       201             Serial1/0       101           active
Serial4/3       301             Serial1/1       101           active
Serial4/3       401             Serial4/1       101           active
Serial4/3       501             Serial1/7       101           active
This final section discusses the common issues and problems encountered on Frame Relay networks and how several IOS debug commands are used for troubleshooting Frame Relay connections.
In general, debug commands are used on a Cisco router only for diagnostic and troubleshooting purposes. During normal operation, all debug commands should be turned off. Debug commands generate massive overhead by taking up CPU cycles on the router. Enabling many debug commands at once can overwhelm the router and adversely affect its performance.
When using debug commands, the user has several options for logging the debug messages. The debug messages can be logged directly onto the router console, logged to a monitor if the router is accessed via Telnet, logged to a syslog server on the network, or stored in a buffer. Storing the debug messages inside the buffer is an attractive option because it creates less overhead. It is beyond the scope of this book to discuss the troubleshooting methodology of Cisco IOS in detail.
The debug frame-relay events EXEC mode command can be used to identify the cause of end-to-end connection problems during installations of Frame Relay networks. When the router is using Frame Relay dynamic addressing, the debug frame-relay events displays information about Frame Relay Inverse ARP packets exchanged between the local router and the Frame Relay network.
Use the no form of the debug frame-relay events command to disable the debugging output. Example 4-35 shows a sample debug output of the debug frame-relay events command.
Example 4-35. Sample Output of debug frame-relay events Command
Router#debug frame-relay events
*Mar  1 01:16:39.235: Serial1/2: FR ARP input
*Mar  1 01:16:39.235: datagramstart = 0x7D0DE6E, datagramsize = 34
*Mar  1 01:16:39.235: FR encap = 0x64110300
*Mar  1 01:16:39.235: 80 00 00 00 08 06 00 0F 08 00 02 04 00 08 00 00
*Mar  1 01:16:39.239: AC 10 01 04 18 51 00 00 00 00 01 02 00 00
*Mar  1 01:16:39.239:
*Mar  1 01:16:44.899: Serial1/2: FR ARP input
*Mar  1 01:16:44.899: datagramstart = 0x7D0E0EE, datagramsize = 34
*Mar  1 01:16:44.899: FR encap = 0x30910300
*Mar  1 01:16:44.899: 80 00 00 00 08 06 00 0F 08 00 02 04 00 09 00 00
*Mar  1 01:16:44.899: AC 10 01 02 30 91 AC 10 01 01 01 02 00 00
*Mar  1 01:17:44.911: Serial1/2: FR ARP input
*Mar  1 01:17:44.911: datagramstart = 0x7D0CCEE, datagramsize = 34
*Mar  1 01:17:44.911: FR encap = 0x48D10300
*Mar  1 01:17:44.911: 80 00 00 00 08 06 00 0F 08 00 02 04 00 09 00 00
*Mar  1 01:17:44.911: AC 10 01 02 48 D1 AC 10 01 01 01 02 00 00
The debug frame-relay lmi EXEC mode command is used to display information on the LMI packets exchanged by the router and the Frame Relay switch. The information from the debugging output can be used to determine whether the router and the Frame Relay switch are sending and receiving LMI packets properly.
The no form of this command disables the debugging output. Example 4-36 shows the sample debugging output of the debug frame-relay lmi command.
Example 4-36. Sample Output of debug frame-relay lmi Command
Router#debug frame-relay lmi
*Mar  1 01:26:16.063: Serial1/2(out): StEnq, myseq 43, yourseen 42, DTE up
*Mar  1 01:26:16.063: datagramstart = 0x7B00E94, datagramsize = 13
*Mar  1 01:26:16.063: FR encap = 0xFCF10309
*Mar  1 01:26:16.063: 00 75 01 01 00 03 02 2B 2A
*Mar  1 01:26:16.063:
*Mar  1 01:26:16.071: Serial1/2(in): Status, myseq 43
*Mar  1 01:26:16.071: RT IE 1, length 1, type 0
*Mar  1 01:26:16.071: KA IE 3, length 2, yourseq 43, myseq 43
*Mar  1 01:26:16.075: PVC IE 0x7 , length 0x6 , dlci 201, status 0x2 , bw 0
*Mar  1 01:26:16.075: PVC IE 0x7 , length 0x6 , dlci 301, status 0x2 , bw 0
*Mar  1 01:26:16.075: PVC IE 0x7 , length 0x6 , dlci 401, status 0x2 , bw 0
*Mar  1 01:26:16.075: PVC IE 0x7 , length 0x6 , dlci 501, status 0x2 , bw 0
The first line in the debugging output of debug frame-relay lmi is the LMI request the router has sent out to the switch. This is indicated by Serial1/2(out), which shows that the LMI request was sent out on serial1/2 to the switch. The sixth line in the debugging output shows the LMI response received from the switch, indicated by Serial1/2(in). The last four lines in the debugging output show the full LMI status message, which includes a description of the router's active PVCs.
The debug frame-relay packet EXEC command is used to analyze the packets sent on the Frame Relay interface. Because this debug command generates a large amount of debugging output, the command offers options to log the debugging output only to a specific interface or DLCI. Use the no form of the debug frame-relay packet command to disable the logging of the debugging output.
Example 4-37 shows the sample debugging output of the debug frame-relay packet command.
Example 4-37. Sample Output of debug frame-relay packet Command
Router#debug frame-relay packet
*Mar  1 01:37:25.195: Serial1/2(i): dlci 501(0x7C51), pkt type 0x800, datagramsize 53
*Mar  1 01:37:28.195: Serial1/2(i): dlci 501(0x7C51), pkt type 0x800, datagramsize 53
*Mar  1 01:37:31.203: Serial1/2(i): dlci 501(0x7C51), pkt type 0x800, datagramsize 53
*Mar  1 01:37:34.203: Serial1/2(i): dlci 501(0x7C51), pkt type 0x800, datagramsize 53
The debugging output shows that packets are received on Serial1/2 on DLCI 501. The packet type is 0x800 (IP on 10 MB net), and the size of the packets is 53 bytes.
This chapter focused on the practical aspects of Frame Relay technology by discussing the Cisco IOS configuration commands required to enable basic Frame Relay operation on a Cisco router. This chapter started by explaining the configuration tasks required to enable Frame Relay on a supported interface, including configuring LMI. LMI is a set of maintenance protocols for Frame Relay. LMI autosense allows a Cisco router to dynamically learn the LMI type supported by the Frame Relay switch. LMI autosense is enabled by default on Cisco IOS Release 11.2 or later.
This chapter also explained the frame-relay lmi-type configuration command, which allows users to specifically select the LMI type to be used. Dynamic Inverse ARP is enabled by default, and it allows a router to perform the remote network layer address to local DLCI resolution dynamically without user intervention. The frame-relay map configuration command was also introduced. It allows the user to perform static address mapping.
The configuration tasks involved in creating a logical subinterface under the physical interface were discussed. Both point-to-point and multipoint subinterface creation were explained. Because a Cisco router can be set up to function as a Frame Relay switch, the configuration examples for configuring a Frame Relay switch to use both local and global significant addressing were demonstrated. The final sections in this chapter introduced and explained the Cisco IOS show and debug commands, which are valuable for monitoring and troubleshooting basic Frame Relay operations.
This chapter concludes Part I of this book. Part II of this book looks at the Cisco IOS features for performing traffic policing and shaping.
Cisco IOS Release 12.2 Wide Area Network Command Reference: http://www.cisco.com/univercd/cc/td/doc/product/software/wan_r/wrdfrely.htm http://www.cisco.com/unverscd/cc/td/doc/product/software/ios122/122cgcr/fwan_r/frcmds/index.htm