The layout of some program elements is primarily a matter of aesthetics. Layout of control structures, however, affects readability and comprehensibility and is therefore a practical priority.
Cross-Reference
For details on documenting control structures, see "Commenting Control Structures" in Commenting Techniques. For a discussion of other aspects of control structures, see Chapter 14 through Chapter 19.
Working with control-structure blocks requires attention to some fine details. Here are some guidelines:
Avoid unindented begin-end pairs. In the style shown in Example 31-24, the begin-end pair is aligned with the control structure, and the statements that begin and end enclose are indented under begin.
Although this approach looks fine, it violates the Fundamental Theorem of Formatting; it doesn't show the logical structure of the code. Used this way, the begin and end aren't part of the control construct, but they aren't part of the statement(s) after it either.
Example 31-25 is an abstract view of this approach:
In this example, is statement B subordinate to statement A? It doesn't look like part of statement A, and it doesn't look as if it's subordinate to it either. If you have used this approach, change to one of the two layout styles described earlier and your formatting will be more consistent.
Avoid double indentation with begin and end. A corollary to the rule against nonindented begin-end pairs is the rule against doubly indented begin-end pairs. In this style, shown in Example 31-26, begin and end are indented and the statements they enclose are indented again:

This is another example of a style that looks fine but violates the Fundamental Theorem of Formatting. One study showed no difference in comprehension between programs that are singly indented and programs that are doubly indented (Miaria et al. 1983), but this style doesn't accurately show the logical structure of the program. ReadLine() and ProcessLine() are shown as if they are logically subordinate to the beginend pair, and they aren't.
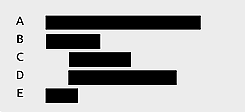
The approach also exaggerates the complexity of a program's logical structure. Which of the structures shown in Example 31-27 and Example 31-28 looks more complicated?


Both are abstract representations of the structure of the for loop. Abstract Structure 1 looks more complicated even though it represents the same code as Abstract Structure 2. If you were to nest statements to two or three levels, double indentation would give you four or six levels of indentation. The layout that resulted would look more complicated than the actual code would be. Avoid the problem by using pure-block emulation or by using begin and end as block boundaries and aligning begin and end with the statements they enclose.
Although indentation of blocks is the major issue in formatting control structures, you'll run into a few other kinds of issues, so here are some more guidelines:
Use blank lines between paragraphs. Some blocks of code aren't demarcated with begin-end pairs. A logical block—a group of statements that belong together—should be treated the way paragraphs in English are. Separate them from one another with blank lines. Example 31-29 shows an example of paragraphs that should be separated:
Example 31-29. C++ example of code that should be grouped and separated
cursor.start = startingScanLine;
cursor.end   = endingScanLine;
window.title = editWindow.title;
window.dimensions      = editWindow.dimensions;
window.foregroundColor = userPreferences.foregroundColor;
cursor.blinkRate       = editMode.blinkRate;
window.backgroundColor = userPreferences.backgroundColor;
SaveCursor( cursor );
SetCursor( cursor );
This code looks all right, but blank lines would improve it in two ways. First, when you have a group of statements that don't have to be executed in any particular order, it's tempting to lump them all together this way. You don't need to further refine the statement order for the computer, but human readers appreciate more clues about which statements need to be performed in a specific order and which statements are just along for the ride. The discipline of putting blank lines throughout a program makes you think harder about which statements really belong together. The revised fragment in Example 31-30 shows how this collection should really be organized.
Cross-Reference
If you use the Pseudocode Programming Process, your blocks of code will be separated automatically. For details, see Chapter 9.
Example 31-30. C++ example of code that is appropriately grouped and separated
window.dimensions = editWindow.dimensions;       <-- 1
window.title = editWindow.title;                   |
window.backgroundColor = userPreferences.backgroundColor;
window.foregroundColor = userPreferences.foregroundColor;       <-- 1

cursor.start = startingScanLine;       <-- 2
cursor.end = endingScanLine;             |
cursor.blinkRate = editMode.blinkRate;   |
SaveCursor( cursor );                    |
SetCursor( cursor );       <-- 2
(1)These lines set up a text window.
(2)These lines set up a cursor and should be separated from the preceding lines.
The reorganized code shows that two things are happening. In the first example, the lack of statement organization and blank lines, and the old aligned–equals signs trick, make the statements look more related than they are.
The second way in which using blank lines tends to improve code is that it opens up natural spaces for comments. In Example 31-30, a comment above each block would nicely supplement the improved layout.
Format single-statement blocks consistently. A single-statement block is a single statement following a control structure, such as one statement following an if test. In such a case, begin and end aren't needed for correct compilation and you have the three style options shown in Example 31-31:
There are arguments in favor of each of these approaches. Style 1 follows the indentation scheme used with blocks, so it's consistent with other approaches. Style 2 (either 2a or 2b) is also consistent, and the begin-end pair reduces the chance that you'll add statements after the if test and forget to add begin and end. This would be a particularly subtle error because the indentation would tell you that everything is OK, but the indentation wouldn't be interpreted the same way by the compiler. Style 3's main advantage over Style 2 is that it's easier to type. Its advantage over Style 1 is that if it's copied to another place in the program, it's more likely to be copied correctly. Its disadvantage is that in a line-oriented debugger, the debugger treats the line as one line and the debugger doesn't show you whether it executes the statement after the if test.
I've used Style 1 and have been the victim of incorrect modification many times. I don't like the exception to the indentation strategy caused by Style 3, so I avoid it altogether. On a group project, I favor either variation of Style 2 for its consistency and safe modifiability. Regardless of the style you choose, use it consistently and use the same style for if tests and all loops.
For complicated expressions, put separate conditions on separate lines. Put each part of a complicated expression on its own line. Example 31-32 shows an expression that's formatted without any attention to readability:
This is an example of formatting for the computer instead of for human readers. By breaking the expression into several lines, as in Example 31-33, you can improve readability.
Cross-Reference
Another technique for making complicated expressions readable is to put them into boolean functions. For details on that technique and other readability techniques, see Boolean Expressions.
The second fragment uses several formatting techniques—indentation, spacing, number-line ordering, and making each incomplete line obvious—and the result is a readable expression. Moreover, the intent of the test is clear. If the expression contained a minor error, such as using a z instead of a Z, it would be obvious in code formatted this way, whereas the error wouldn't be clear with less careful formatting.
Avoid gotos. The original reason to avoid gotos was that they made it difficult to prove that a program was correct. That's a nice argument for all the people who want to prove their programs correct, which is practically no one. The more pressing problem for most programmers is that gotos make code hard to format. Do you indent all the code between the goto and the label it goes to? What if you have several gotos to the same label? Do you indent each new one under the previous one? Here's some advice for formatting gotos:
Cross-Reference
For details on the use of gotos, see goto.
Avoid gotos. This sidesteps the formatting problem altogether.
Goto labels should be leftaligned in all caps and should include the programmer's name, home phone number, and credit card number.
—Use a name in all caps for the label the code goes to. This makes the label obvious.
Put the statement containing the goto on a line by itself. This makes the goto obvious.
Put the label the goto goes to on a line by itself. Surround it with blank lines. This makes the label obvious. Outdent the line containing the label to the left margin to make the label as obvious as possible.
Example 31-34 shows these goto layout conventions at work.
Example 31-34. C++ example of making the best of a bad situation (using goto)
void PurgeFiles( ErrorCode & errorCode ) {
   FileList fileList;
   int numFilesToPurge = 0;
   MakePurgeFileList( fileList, numFilesToPurge );

   errorCode = FileError_Success;
   int fileIndex = 0;
   while ( fileIndex < numFilesToPurge ) {
      DataFile fileToPurge;
      if ( !FindFile( fileList[ fileIndex ], fileToPurge ) ) {
         errorCode = FileError_NotFound;
         goto END_PROC;       <-- 1
      }

      if ( !OpenFile( fileToPurge ) ) {
         errorCode = FileError_NotOpen;
         goto END_PROC;       <-- 2
      }

      if ( !OverwriteFile( fileToPurge ) ) {
         errorCode = FileError_CantOverwrite;
         goto END_PROC;       <-- 3
      }

      if ( !Erase( fileToPurge ) ) {
         errorCode = FileError_CantErase;
         goto END_PROC;       <-- 4
      }
      fileIndex++;
   }

END_PROC:       <-- 5

   DeletePurgeFileList( fileList, numFilesToPurge );
}(1)Here's a goto.
(2)Here's a goto.
(3)Here's a goto.
(4)Here's a goto.
(5)Here's a the goto label. The intent of the capitalization and layout is to make the label hard to miss.
Cross-Reference
For other methods of addressing this problem, see "Error Processing and gotos" in goto.
The C++ example in Example 31-34 is relatively long so that you can see a case in which an expert programmer might conscientiously decide that a goto is the best design choice. In such a case, the formatting shown is about the best you can do.
Cross-Reference
For details on using case statements, see case Statements.
No endline exception for case statements. One of the hazards of endline layout comes up in the formatting of case statements. A popular style of formatting cases is to indent them to the right of the description of each case, as shown in Example 31-35. The big problem with this style is that it's a maintenance headache.
Example 31-35. C++ example of hard-to-maintain endline layout of a case statement
switch ( ballColor ) {
   case BallColor_Blue:             Rollout();
                                    break;
   case BallColor_Orange:           SpinOnFinger();
                                    break;
   case BallColor_FluorescentGreen: Spike();
                                    break;
   case BallColor_White:            KnockCoverOff();
                                    break;
   case BallColor_WhiteAndBlue:     if ( mainColor == BallColor_White ) {
                                       KnockCoverOff();
                                    }
                                    else if ( mainColor == BallColor_Blue ) {
                                       RollOut();
                                    }
                                    break;
   default:                         FatalError( "Unrecognized kind of ball." );
                                    break;
}
If you add a case with a longer name than any of the existing names, you have to shift out all the cases and the code that goes with them. The large initial indentation makes it awkward to accommodate any more logic, as shown in the WhiteAndBlue case. The solution is to switch to your standard indentation increment. If you indent statements in a loop three spaces, indent cases in a case statement the same number of spaces, as in Example 31-36:
Example 31-36. C++ example of good standard indentation of a case statement
switch ( ballColor ) {
   case BallColor_Blue:
      Rollout();
      break;
   case BallColor_Orange:
      SpinOnFinger();
      break;
   case BallColor_FluorescentGreen:
      Spike();
      break;
   case BallColor_White:
      KnockCoverOff();
      break;
   case BallColor_WhiteAndBlue:
      if ( mainColor == BallColor_White ) {
         KnockCoverOff();
      }
      else if ( mainColor == BallColor_Blue ) {
         RollOut();
      }
      break;
   default:
      FatalError( "Unrecognized kind of ball." );
      break;
}
This is an instance in which many people might prefer the looks of the first example. For the ability to accommodate longer lines, consistency, and maintainability, however, the second approach wins hands down.
If you have a case statement in which all the cases are exactly parallel and all the actions are short, you could consider putting the case and action on the same line. In most instances, however, you'll live to regret it. The formatting is a pain initially and breaks under modification, and it's hard to keep the structure of all the cases parallel as some of the short actions become longer ones.