
CHAPTER 3 CorelDRAW’s Ins and Outs: Importing, Exporting, and Saving Design Work
One of the very first things you learn as a new computer user is how to open and close files and how to use the Clipboard to copy data from one document window to another. To accomplish these basic tasks working with CorelDRAW X5, you have nothing new or exotic to do. But version X5 has additional functions and options, such as file handling and data import and export, to make your design experience efficient and the results professional. In this chapter, you’ll learn about file-saving options that let coworkers who are using previous versions of CorelDRAW work with your files and learn how to use timesaving templates and other file types. You’ll also see how to protect your work with CorelDRAW’s automatic backup feature, how to make the Clipboard work overtime for you, as well as how to store and retrieve scrapbook items and symbols and how to import and export graphics, text, and data into and out of CorelDRAW.
NOTE
Download and extract all the files from the Chapter03.zip archive to follow the tutorials in this chapter.
CorelDRAW X5’s Welcome Screen
When CorelDRAW opens, the Welcome/Quick Start tabbed screen appears, where you can quickly open a new or existing drawing file, access learning tools, check for program updates, and set automatic checks for program updates. You can also view the latest gallery of art created by fellow CorelDRAW designers. This launch pad is shown in Figure 3-1.
The first tab along the right edge, Quick Start, is your jumping-off point for opening a file. Here, in the Open Recent section, you are presented with a list of the last files you opened and closed in CorelDRAW. Hover over the name of one of these files, and a thumbnail preview for that file appears along with the document information. Click the name of the file, and the Welcome dialog closes, and the file you selected opens. If you want to open an existing file that is not among the five most recent files you’ve opened, click the Open Other button to close the Welcome screen page and to open a standard Open Drawing dialog.
To start a new drawing document from the Quick Start tab, go to the Start New section, and click the New Blank Document link, or click the New From Template link if you want to create a document from one of the special design layouts that ship with CorelDRAW or from a template you previously created.
The other tabs lead you to the following areas of interest:
• From the What’s New tab, you can click your way through the CorelDRAW New Features Tour slideshow.
• The Learning Tools tab contains links to launch documentation from your hard disk such as CorelTUTOR, and Insights From The Experts as well as a link to Corel’s online learning resources. If you purchased the DVD of the CorelDRAW install instead of the electronic download version, you can also easily access the tutorial videos from this page.
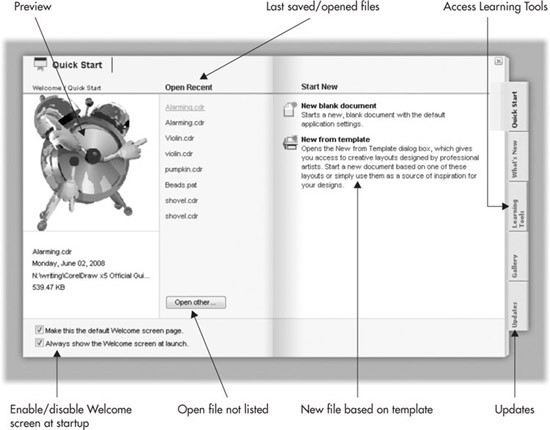
FIGURE 3-1 CorelDRAW welcomes you with a tabbed launch pad after loading.
• The Gallery tab displays a changing selection of artwork created in CorelDRAW. It also contains a link to the CorelDRAW.com Community page, where you can create an online gallery of your artwork for the world to see and enjoy, participate in online forums, and download helpful files like custom media strokes, textures, and macros.
• The last tab is the Updates tab. At the top of the tab window is the word “Settings.” If you click this link, the Update Settings dialog opens. It contains two options that are turned on if the box next to the option is checked, or turned off if it is unchecked. Your choices here are “Notify me of available product updates, news, and tutorials” and “Automatically download product updates and ask me before installing.” These are useful and helpful options to keep up to date both your copy of CorelDRAW and your knowledge of things related to CorelDRAW.
If these boxes are checked (they are by default), every time you start CorelDRAW it will access your Internet connection in the background and check in with the Corel website to see if any updates or files should be downloaded for you. So don’t be alarmed if your computer’s firewall software pops up a notice that CorelDRAW is trying to access the Internet. If CorelDRAW displays a message that it could not find an Internet connection, you will probably have to open your firewall software and give CorelDRAW permission to access the Internet. If you don’t want CorelDRAW checking the website every time you start CorelDRAW, uncheck both of these boxes, and then click the close box in the corner of the Update Settings dialog to apply the changed Updates option settings.
If you don’t want to use the features offered by the Welcome screen, click the close box. To never see the Welcome dialog again, click to uncheck the “Always show the Welcome screen at launch” check box. To open the Welcome screen at any time, choose Help | Welcome Screen, or click the button directly to the left of the zoom percentage field on the standard toolbar.
Opening Your First New Document File
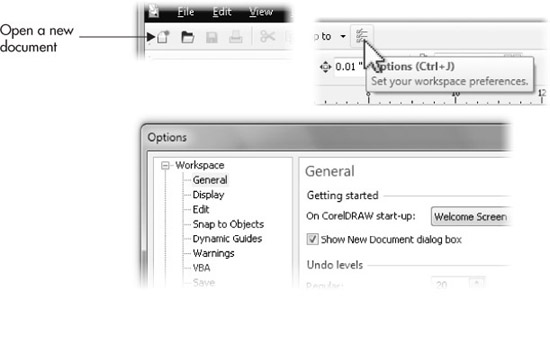
If you are not using the Welcome screen, choosing File | New (CTRL+N) or clicking the New button on the standard toolbar, shown here, opens the Create a New Document dialog, where you choose the settings such as color space and document resolution, and can also choose not to display this dialog in the future. If you check “Do not show this dialog again,” new documents are based on the current settings. If you do want to see this box again because the default settings aren’t right for your type of work, click the Options button on the standard toolbar, and then under Workspace | General, check the “Show New Document dialog box” check box.
Create a New Document that Suits You
The Create a New Document dialog, shown next, is new to version X5, and although new users might feel a little intimidated by the number of options, it’s really quite straightforward to use and to set up a page that reflects your intended output. Here is a brief explanation of the fields and what you choose depending on your printing and export needs:
• Name You don’t have to wait until you save a file to name it. By default, a new document is named “Untitled-1,” using a sequential naming pattern—your next document in a session of CorelDRAW is named “Untitled-2,” and so on. It’s fine to accept the default name, but it’s a better idea to name the file now if you know what you’re going to create.
• Preset Destination “Destination” refers to where the file is ultimately going: to commercial printing, to the Web as an HTML page or graphic…you have five choices here in addition to Custom. If you want to set up a Rendering Resolution or Color Settings entirely of your own choosing, Preset Destination will automatically call your settings “Custom.” If you want to keep and reuse the existing page setup, click the Save button (the diskette icon) to the right of the drop-down list and name the preset. The next time you create a new document, you can choose your preset from the drop-down list and spare yourself defining any other field in this dialog.
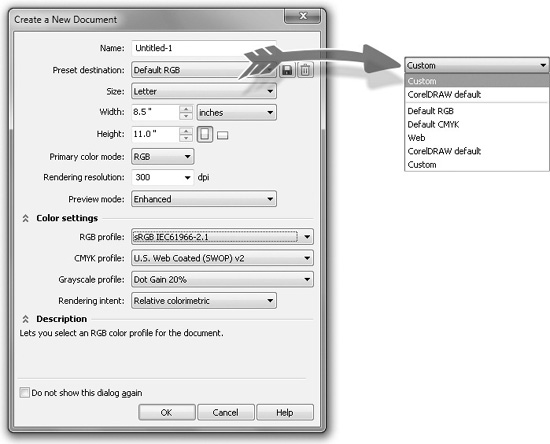
• Size Define the page size you need by choosing from the large selection of preset page sizes, or set your own custom size by typing values into the Height and Width fields below it. Also, next to the Height field, click an orientation icon—portrait or landscape—for your new document.
• Primary Color Mode You have your choice of RGB or CMYK. If you choose CMYK, the Color Palette’s color wells will look duller than you’d expect, because CMYK color mode is print legal—CorelDRAW simulates what the colors you use for object fills will look like when printed, because certain colors you see onscreen cannot be faithfully reproduced using printing inks and other pigments. If you are designing for the Web, choose RGB from the drop-down list. Also, if you are designing for a personal home inkjet printer, choose RGB. Although inkjet printers use cyan, magenta, yellow, and black pigments, today’s inkjets have conversion circuitry that takes—and actually expects—RGB data and automatically converts it to fairly closely matching CMYK-equivalent colors.
• Rendering Resolution Although CorelDRAW is a vector-drawing program, and as such produces resolution-independent vector shapes, you will want to choose a Rendering Resolution that is best for any CorelDRAW effect that is rendered as a bitmap when you print or export your file to a format other than CorelDRAW’s native CDR file format. For example, if you’ve created a drop shadow on an object and intend to print your file to a high-resolution image-setting device, image setters at commercial print houses usually expect 266 to 300 ppi (pixels per inch, frequently called dpi, dots per inch)—so you’d specify 300 dpi to ensure a smooth rendered drop shadow. If you’re printing to a home inkjet, effects can look good at lower resolution settings such as 225 to 260 dpi. Rendering Resolution has no bearing on files you export to bitmap format via File | Export; the resolution for exporting to JPEG, TIFF, and other image formats is set in their Export dialogs.
• Preview Mode There is little reason to specify anything other than Enhanced for previews. If you choose Draft or Wireframe by accident, this is easily changed by choosing Enhanced from the View menu when your document is open.
• Color Settings If you’re concerned about color consistency while you work (hint: you should be!), this is one of the new features in version X5. (By default, this area is “rolled up.”) Windows offers color management in the form of ICC profiles that are located in your Windows | System32 | spool | drivers | color folder. Color profiling is a method by which you can increase your odds that what you see on your monitor is represented in a color print you make. Three components use color management: your monitor (which you calibrate using third-party software, hardware you can buy, or Windows Control Panel settings for your video card); your application (which is CorelDRAW, and here is where you tell CorelDRAW which color profile to use when it imports and how to tag images when it exports); and your printer (most printers today understand color management and have settings you manage through a proprietary control panel or through Windows Printer options). If you’re a home-printing or Web-designer sort of person, note that most users access one or two RGB color profiles. sRGB is used by many home inkjet printers and digital cameras, so sRGB is a safe color setting to ensure consistent color output from what you see onscreen, what your photos look like when you import them to CorelDRAW, and when you print your work. Many designers own more than one application, and as a result, it’s hard not to accumulate color profiles that other applications installed, perhaps without your realizing it. Scroll down the list of color profiles in the color folder: if you see CIE RGB or Adobe RGB, you might want to use it as your color setting. Adobe RGB is an optimized version of CIE RGB—color profiles “live” in something called a color space—an area of the visible spectrum within which certain colors can be expressed while those outside this area cannot. CIE RGB color occupies a greater color space than sRGB. If you deal with delicate shades of color and you need great control of a precise color, such as in fashion design and corporate logos, CIE RGB gives your document a much larger color space than sRGB.
NOTE
Rendering Intent is used when importing and exporting an image or other bitmap graphic that has been tagged with a color profile: CorelDRAW X5 can both read and write information into the header of a bitmap that tells the application importing it how to handle color data. Often, the color space of a bitmap you import to a page either doesn’t have a compatible color profile, or the image is not tagged with a color profile at all. Relative Colorimetric is the default option for reassigning imported images the color space of the file you’re working on, and it’s probably the best choice for most images. Relative Colorimetric compares the brightest areas in the imported image’s color space to those of the destination color space (your document) and shifts all colors to fit within the color space. Out-of-gamut colors, colors that cannot be expressed in your CorelDRAW document’s assigned color space, are shifted to the closest color in the destination color space, thus preserving more of the original colors in an image than the Perceptual option, which would be a good second choice if the colors in the imported or exported image look wrong.
Working with Multiple Documents
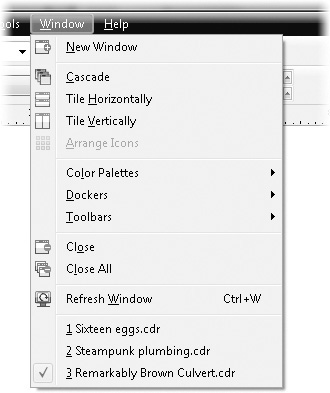
Like many graphics applications, CorelDRAW can keep more than one document open in the interface. Each open document, whether it is new or is a previously created document, is listed at the bottom of the Window menu. If you’ve opened several documents, you might notice that each document window is maximized, but only the most recently opened document appears in view, indicated by the document default name in CorelDRAW’s application title bar. This is because while document windows are maximized, only the document in the forefront is visible. Any other opened documents are hidden from view. To navigate between document windows in the maximized state, choose Window | Filename, as shown here.
TIP
To see all open document windows and automatically arrange them in your CorelDRAW application window, choose Cascade, Tile Horizontally, or Tile Vertically from the Window command menu.
Opening Document Files
To open an existing document, choose from one of these three actions: click the Open Other button from the Welcome screen, click the Open button in the standard toolbar, or choose File | Open (CTRL+O). In any case, the Open Drawing dialog appears, as shown in Figure 3-2. The Open Drawing dialog is mostly a standard Windows 7 configuration with some interesting and useful CorelDRAW additions. You can choose different-sized icon views of documents, and CorelDRAW files do indeed display graphical thumbnails of your saved work. Also, an application identifier tick at the bottom right of the icons lets you instantly tell that a folder contains either CorelDRAW files or Corel Presentation Exchange (CMX) documents. Additionally, if you click the All File Formats drop-down arrow, a comprehensive list of all the file types CorelDRAW can open appears; this is a handy way to filter out file types when you’ve opened a folder containing CorelDRAW files, video, and audio files, for example. To open a file, click its title or icon, and then choose Open. If you’ve recently opened a CorelDRAW-supported file type, you can click the down arrow to the right of the selected File Name, and you can choose from a list of CorelDRAW files from all over your hard drive.
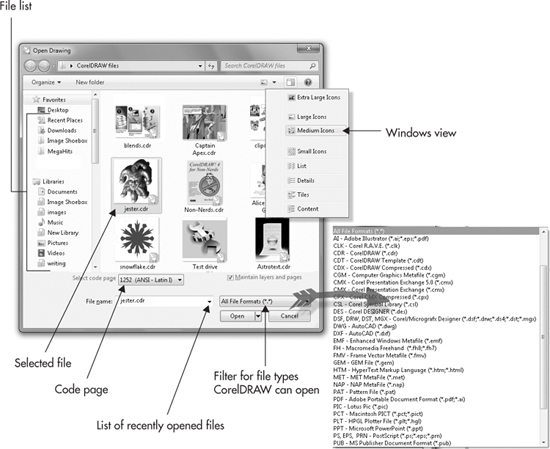
FIGURE 3-2 The Open Drawing dialog in CorelDRAW is an enhanced version of the standard Windows Open dialog.
If you’re new to both CorelDRAW and Windows 7, note some areas of interest in the Open dialog, some of which are standard Windows conventions, while others are CorelDRAW enhancements to the Open dialog:
• Windows View Click the drop-down list (as was done in Windows XP) to set how a folder you open displays its contents. You can usually get a good view for locating a file you need to open using the Large Icons view. Another useful view configuration is to use Details view in combination with the preview pane (the button directly to the right of the Windows View drop-down list). With the Details view enabled, you can then sort files by date, type, and size.
• Filter By default, CorelDRAW will show you all files within a folder. If you’re not organizationally fastidious with your hard disk(s), finding the CorelDRAW file you seek can be a nightmare, but not if you choose, for example, CDR-CorelDRAW (*.CDR) from the file formats list. The list of files that can be opened is a comprehensive one in version X5, with over two dozen vector-type files recognized, not simply CorelDRAW native files. See the section later in this chapter about the important differences between opening a non-CorelDRAW file and importing one to an open file in CorelDRAW’s workspace.
NOTE
CorelDRAW X5 can open files that are saved in CorelDRAW 1 or later in the CDR file format, although if you used CorelDRAW version 1’s proprietary WFN fonts, the PANOSE Font Substitution box will pop up; Corel doesn’t support WFN typefaces today. CorelDRAW X5 can also save as far back as version 7 in case you need to share a file with a coworker who hasn’t upgraded to the 21st century.
• Recently Opened Files If you do filter for only CDR files and then click the down arrow at the right of the File Name field, you can access several of the most-recently opened CorelDRAW files that can be located anywhere on your hard drive(s), not just in the current folder’s contents. If you click to select a file, its name appears in the File Name area, and if you type in the wildcard characters *.*, the filter list resets to display All File Formats.
TIP
When you’re currently working on a page in CorelDRAW, to open your most-recently accessed documents, go to File | Open Recent, where the 15 most-recently opened files are listed.
• Code Page If you are working with files that were created in a version of CorelDRAW that uses a different language than your copy does, you might need to change the code page before you open the file. Code pages control mapping: which character in a typeface is used when you press a specific key on your keyboard. If you have a lot of square boxes displayed where you know you should have text (and you have the document’s typeface installed), try reopening the file using a different code page. The code page chosen in the drop-down list should match that used when the file was created. For example, if you are using a copy of CorelDRAW that uses US English, the code page that is used by default is 1252 (ANSI – Latin 1). However, if the file you are opening was created in the Korean language edition of CorelDRAW, then you should choose 949 (ANSI/OEM— Korean) from the Select Code Page drop-down when you open that file.
• Maintain Layers And Pages CorelDRAW has supported layers and multi-page files for seemingly forever; if you want to preserve the layer order between different versions of saved files, check this box. If you leave this box unchecked, you might create a mess of the document you open—all objects on all pages will be merged to a single, one-layer CDR page.
TIP
In a work environment where users have different versions of CorelDRAW, it’s a good idea when you save a file to also save a copy of the file in Corel’s CMX (Corel Presentation Exchange) file format. CMX is covered later in this chapter, and it’s your gateway to saving copies of files from version X5 that users of almost any version of CorelDRAW can open.
In the Open Drawing dialog, locate and select your document file, and then click the Open button (or double-click the filename) to open it. CorelDRAW supports multiple file–opening using modifier keys. You can open neighboring files on the directory list (in the same folder) by holding SHIFT while selecting your files. Open nonadjacent files in the file list (in the same folder) by holding CTRL while clicking to select the filenames, and then click the Open button. This is a standard Windows convention, as is marquee-dragging to select multiple file icons.
Opening Files from Other Applications
You can open many other files that are not native to CorelDRAW, such as Adobe Illustrator or Microsoft PowerPoint, in CorelDRAW. When a file originally created in a different application is opened, CorelDRAW automatically converts its contents to CorelDRAW format. If you look at the title bar of the drawing window, you will see that CorelDRAW has opened the file, preserved the filename, but has given it a .CDR extension. The original application file remains on the hard disk unchanged. In a way, opening a nonnative CorelDRAW file is similar to importing nonnative graphics data.
When you open nonnative application files supported by CorelDRAW’s Import filters, the graphics and text objects contained in the file are converted as closely as possible to compatible equivalents supported in CorelDRAW. Although the Open command is like an Import operation, certain file formats might not open flawlessly, depending on their type and contents. You might get better results if you import the files as objects into an open CorelDRAW document by pressing CTRL+I (File | Import). If CorelDRAW is unable to interpret a file’s contents while trying to open it, an alert dialog appears.
Warning Messages
When you open files—especially older files or files created on a different system or using a third-party application—warning messages might appear before the file actually opens. For the most part, these messages aren’t meant to cause alarm, but instead to advise. Two of the most common messages warn of inappropriate data types and fonts.
If, for example, you try to use the Open dialog to open a GIF bitmap, CorelDRAW alerts you that the file cannot be opened and suggests that you try using the Import command instead. As far as opening a document that was originally created using fonts that you don’t have installed, the Font Substitution For Missing Fonts dialog will appear and give you the chance to view a list of the fonts used in the document and to substitute ones you do have installed. An alternative measure is to jot down the names of the typefaces used, click Cancel, and then install the needed fonts if you have identical or similar ones. Then reopen the document; if the font you installed is similarly but not identically named, you will need to work through the Font Substitution choices, but after a few moments you can be assured that the file looks mostly like it did when created.
Pantone and Basic Font-Matching
Font-matching sounds good in theory, and in the Font Substitution For Missing Fonts dialog, you have the option to let CorelDRAW try to match a missing font, to locate a compatible font manually (click the Substitute Font With button and then choose from the drop-down list), or choose the Use The Panose Suggested Match. Usually, you’re best off noting the name of the missing font, canceling the Open dialog, finding a similar font yourself, installing it, reopening the document, and choosing the font you just installed.
You’ll soon notice a problem with letting any computer program try to match a font. It doesn’t use its eyes (it doesn’t have any), but instead relies on metadata (data about data) that is written into the header of a typeface. The problem isn’t with CorelDRAW: if someone who created a digital typeface didn’t bother to write the correct metadata into the file, you indeed will get suggested matches of Arial for Windsor Condensed. CorelDRAW can’t find a match, there’s no file information listed for the missing font, and it’s as simple and as frustrating as that. The good news is that if you point the Font Substitution box to an installed font you want to use, CorelDRAW remembers it for this and all other documents with the missing typeface.
Saving and Closing Documents
Whether you save often (pressing CTRL+S at regular intervals is a good idea) or you’re saving your document for the first time, you’ll want to define some file information for your saves, and to practice good hard-drive housekeeping by saving to user-defined folders. When you know you’ll want to retrieve a document in the near future, setting a save location, applying a name, adding user data, and other options go along with the job.
Saving Your First Document
You can save an existing document simply by clicking the Save button on the standard toolbar or by choosing File | Save (CTRL+S), which causes your most recent changes to the page to be saved immediately without opening any dialogs.
CorelDRAW X5’s Save Drawing dialog contains more than just options on where to save and what name to use when saving the file. For a practical exercise that explores the additional options you have when saving, follow these steps.
 Saving Files with User Info
1. If you’ve just started a new document and want to save it, click the Save button in the standard toolbar, use the CTRL+S shortcut, or choose File | Save. The Save Drawing dialog appears, as shown in Figure 3-3.
2. With the Save Drawing dialog open, use the dialog options to set a location for your document, and type a unique name in the File Name box. If you’re saving your document to a format other than CorelDRAW’s native CDR format, choose a file format from the Save As Type menu. Doing this is similar to choosing File | Export. The disadvantage to saving in a non-CorelDRAW file type is that it’s usually going to be hard to open this file again and edit it using all of CorelDRAW’s features.
3. Saving as a CDR file gives you the option to choose a version from the Version drop-down. Unless you must save to an older file format to allow the saved file to be used with legacy software, always choose the most recent (highest number) version. If you choose an older file version, some of the work you did in your file may not save as you expect, because an effect or other feature used may not have existed in the file version you selected.
4. If saving your document in CorelDRAW file or template file (CDT) format, you can enter (optional) Title, Subject, and a star rating as part of the file’s metadata. If you take a moment to fill in the Title or Subject field with a word or two about the file you save, it becomes much easier to sort through your saved files a month or a year later, especially with the new CorelCONNECT utility that ships with version X5. You and every CorelDRAW user (so be tasteful with your descriptive text) can use the File | Document Properties dialog to view and edit any information you appended to your file.

FIGURE 3-3 The Save Drawing dialog can save a file with user information and other options.
5. If you want to save only the object(s) you currently have selected, check the Selected Only check box. Everything that is not selected will not be saved to the file.
6. Decide if you want to check the Embed Fonts Using TrueDoc™ check box. Checking this check box increases the saved file size just a little because the font(s) are rewritten as very small document information when you save. This can be a useful feature when you’re working with fonts you don’t have loaded every day or if you are giving the file to a coworker who does not have the font. TrueDoc technology originally developed by Bitstream embeds the font data so you or anyone else can make changes and print the file using the correct font. However, TrueDoc does not install a typeface embedded in a CDR document on your computer or anyone else’s—the typeface stays inside of CorelDRAW.
7. You can choose to embed the color profile you used to create a document by checking the Embed Color Profiles box upon saving. This is usually a good idea, and it adds only marginally to the overall saved file size. Embedding the color profile means that you and anyone else who opens the document will view it as it’s intended to be output for the screen and for printing. The only time you wouldn’t want to embed the color profile is if the document was created with the wrong profile for a printing job, for example. To change a document’s color profile before saving it, choose Tools | Color Management | Document Settings.
Advanced Save Drawing Options
The Save Drawing dialog sports still more refinements you can make when saving a file. Clicking the Advanced button opens the same Options dialog that you can navigate to at any time by choosing Tools | Options (CTRL+J), expanding the tree directory under Document, and then clicking the Save item. In this area you can make choices about File Optimization, Textures, and Blends And Extrudes. These options are set on a document basis, not a global one, so you can make different choices for each file you save.
• Save Presentation Exchange (CMX). Check this box if you want to place or edit the file in other applications that accept this file format, such as Corel WordPerfect or Xara Xtreme, and older versions of CorelDRAW. For example, CorelDRAW 5 can’t open an X5 CDR file, but version 5 can open a CMX file. The CMX file format can hold both bitmap and vector data. It is a subset of the CDR format and as such is not as capable of certain recently added features, but it is a good way to use graphics created in CorelDRAW in other applications and for users of previous versions to open your files in case you saved to version X5.
• Use Bitmap Compression. Bitmaps and bitmap effects in a drawing can really plump up the final file size of a document. To save precious hard disk storage space, put a check in this box. The compression used is lossless, so you don’t have to worry that choosing this option will degrade the quality of your file onscreen or when printed.
• Use Graphic Object Compression. Checking this box reduces saved file sizes by compressing the vector elements in the file. This is particularly welcome if you’ve created a lot of extrude objects in a document whose component objects can number in the 30s, 40s, or even hundreds if you’ve used complex shading options.
• Save Textures With The File or Rebuild Textures When Opening The File. Choose the radio button next to one of these mutually exclusive options. Saving the textures increases the file’s size and uses more hard disk space. Rebuilding the textures saves hard disk space, but it then takes longer to open and save a file. Your choice here is between maximizing your hard disk space or your time.
• Save Blends And Extrudes With The File or Rebuild Blends And Extrudes When Opening The File. As with saving or rebuilding textures, here your choice is really between maximizing hard disk space or your time. Click the radio button next to the choice that suits you best.
After you’ve made your selections, click the OK button to be returned to the Save Drawing dialog. With all your options for this file spent, go ahead and click the Save button, or click the Cancel button to abandon the save.
Save As Command
The Save As command (CTRL+SHIFT+S) is useful for saving copies of your document using the same or different Save command settings. The Save As command is often used to save a file at regular intervals throughout the creation of a graphic—so you can go back to an earlier version of the file or see what different color schemes or layouts look like. Using the Save As command in combination with the Selected Only option (available only while objects are selected) is a truly useful option; if you’ve been working with a lot of objects you won’t need later, you don’t have to delete them all to tidy up—you simply use Selected Only. Otherwise, the options available in the Save As command dialog are identical to those in the Save dialog.
Although using the Save As command may seem similar to using the Export command in some ways, the two are quite different; in some cases it might be better to use one command instead of the other. Usually the Save As command is the best option to choose when saving native CorelDRAW files.
The Export command (File | Export) is best for saving your document or selected objects as any other type of file format, particularly bitmap formats like CPT, GIF, JPEG, PNG, or a wide variety of text formats as well as other specialized vector formats such as EPS and SVG. In CorelDRAW you can save—but not export—files in CorelDRAW (CDR), Corel Pattern file (PAT), and CorelDRAW Template (CDT) format.
Using File Backup Options
Countless hours of work can be saved using CorelDRAW’s Backup feature. When it comes to saving and backing up your document files, CorelDRAW lets you take full control over how, where, and when backup files are created. Backup files let you retrieve recent changes made to documents should something unfortunate (such as a power failure) occur while you’re working. Backup files created automatically are named auto_backup_of_filename.cdr, where FILENAME is the name of your original CorelDRAW document. It’s best to specify a custom folder for your auto-saves instead of accepting the default location, so you can quickly locate and proceed with your work after a mishap.
CAUTION
If CorelDRAW closes unexpectedly, the next time you open CorelDRAW, the File Recovery dialog prompts you to open the Auto-Backup file that it found. Click OK to open the file. If you click Cancel and do not open the file, the Auto-Backup file will be deleted when you exit CorelDRAW. So open and save the file when you can—you won’t be prompted to do so again.
At your command, backup files can be created every time you save a file. The naming convention for these files is in the form of backup_of_filename.cdr, and these backup files are stored in the same folder location as the file you saved. You can open backup files the same way as with any CorelDRAW document file, by using the File | Open command (CTRL+O).
To access CorelDRAW’s backup controls, use the Workspace | Save page of the Options dialog (shown in Figure 3-4). Choose Tools | Options | Workspace | Save.
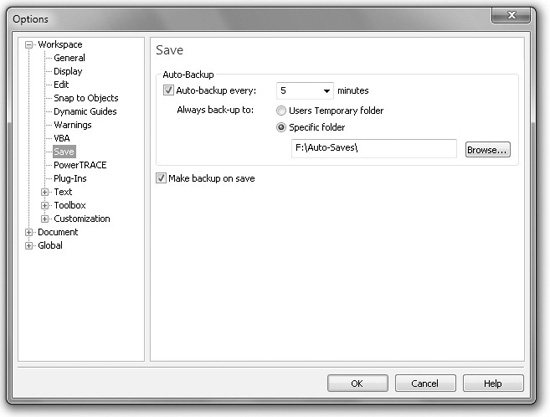
FIGURE 3-4 Use these options to control where and when backup files are created.
This list should help you decide which options to choose:
• Auto-Backup Every While this option is selected (the default), your document files are backed up at specified time intervals. The default is 20 minutes and can be set to anywhere between 1 and 60 minutes (or never).
• Always Back-Up To Specify the location of the backups to be saved in your temporary folder (the default), or choose Specific Folder and use the Browse button to specify a drive and folder location.
• Make Backup On Save Activating the Make Backup On Save option (selected by default) causes CorelDRAW to update the backup file to match your original document file each time you use the File | Save command (CTRL+S). This backup system is in addition to the Auto-Backup feature and complements it, because the files are in a more accessible location and are not automatically deleted (although they are overwritten each time you save a file), which leaves you with a backup of the most recent version of the file. It is handy to have this kind of backup file because you can revert to the last saved version of the file if you should make a mistake while editing a file—or if you just want to start over.
Working with Templates
Templates are special files that can be saved based on existing settings and/or document content. Templates can be used as starting points to avoid repetitive page setup and document defaults. You can recognize template files by the .CDT file extension.
Opening Templates
To open an existing template file with the aim of creating a new document based on the template, choose File | New From Template to open the New From Template dialog, as shown in Figure 3-5. Here you can choose from a list containing many categories of professionally designed templates that came with CorelDRAW. Additional templates are found on the CorelDRAW DVD and on CorelDRAW.com.
NOTE
Some of the templates use typefaces you might not have installed from the CorelDRAW CD. If you choose to open a new document based on a template containing text, it’s possible you’ll get the Font Substitution dialog, discussed earlier in this chapter. If this happens, you can certainly open a new file based on the template, and then replace the typeface used in the document. Alternatively, you can install the fonts listed in this dialog and come back to the document later.
Templates are organized in two general groups: Type and Industry. Choose Type in the View By drop-down to see a list of template categories that is broken down by kind of document produced—a catalog, a flyer, a letterhead, and so on. Choose Industry to see the templates arranged in categories that correspond to various industries such as Hospitality, Retail, or Services. To use any templates you’ve created and saved, either search the list in the My Templates section on the left side of the dialog, or, if you didn’t specify the Type or Industry of your own template, choose All, and then go to Not Specified.
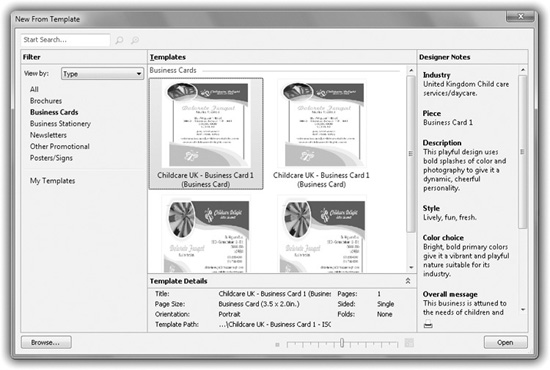
FIGURE 3-5 Choose from these template categories to begin your new document.
Clicking a category such as Business Cards or Brochures in the list on the left opens (in the center of the dialog) thumbnail views of the templates available. Click once on a thumbnail to load information about the template into the Template Details section at the bottom of the dialog and into Designer Notes on the right of the dialog. To increase the size of the thumbnail for a better view or to decrease the size of the thumbnail to view more thumbnails, click-drag the slider at the bottom of the dialog.
While a template is selected, the preview window displays a thumbnail of the first page of the template. Click Open or double-click the file to open a new (unsaved) document using the template’s content and page layout.
The Browse button opens a Windows standard file Open dialog that you can use to locate, select, and open a new document based on a template somewhere on your computer or network other than CorelDRAW’s default location for templates.
Opening and Saving Templates
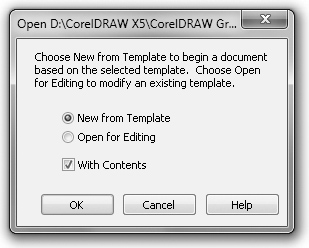
You can open any template file that has a .CDT extension you’ve saved from X5 or from any previous version for editing, and change its actual template format and/or its content. Use the File | Open command and choose CorelDRAW Template (CDT) as the file type. Before the file opens, a dialog (shown at right) will ask whether you want to open the template as a new document or for editing. If your aim is to open a new document based on the template content and structure, leave New From Template selected in combination with the With Contents option. If your intention is to edit the template file itself, choose Open For Editing.
When saving an edited template file, performing a Save command automatically saves the file as a template without opening any dialogs—and without the need to re-specify the file as a CDT template file in the Save dialog. Additionally, a CDT file you opened will appear on the File | Open Recent list, and if you choose it, it will simply open without the dialog shown in the illustration.
Clipboard Commands
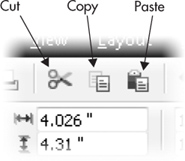
As you probably already know, the Windows Clipboard is a temporary “place” that’s capable of storing the last objects copied and is a feature of your computer’s operating system. While the data you copied or cut is stored in your system’s RAM, you can “paste” duplicates of the data into your document. The three most common Clipboard commands you’ll likely use are Copy, Cut, and Paste—each of which is accessible either from the Edit menu or from the standard toolbar, as shown here. Cut, Copy, and Paste are also standard Windows commands, so you can use the keyboard shortcuts CTRL+C (Copy), CTRL+V (Paste), and CTRL+X (Cut) to speed up your work.
TIP
To create duplicates of your selected objects immediately, press the + key on your keyboard’s numeric keypad. Copies immediately are placed in front of the selected objects in the document and in exactly the same page position. This action does not use Windows’ Clipboard, so your current Clipboard contents remain intact.
Copying vs. Cutting
Each time an object is copied to the Windows Clipboard, the previous Clipboard contents are overwritten. To copy selected objects onto your Clipboard, choose Edit | Copy. Better yet, click the Copy button on the standard toolbar, or use the standard CTRL+C shortcut. The older Windows SHIFT+INSERT shortcut also works. After being copied, the items remain unaltered in your document.
TIP
Windows 7 only supports a Clipboard Viewer under a virtual machine such as one running XP, so Windows 7 users can’t see important content that might be on the Clipboard from moment to moment. However, Karen Kenworthy offers a free Clipboard Viewer at http://www.karenware.com/powertools/ptclpvue.asp. It’s a good idea to download it and to thank Karen.
The Cut command automatically deletes the selected items from your document and puts a copy on the Clipboard. To cut items, click the Cut button in the standard toolbar, choose Edit | Cut, or use the standard CTRL+X shortcut. The older Windows SHIFT+DELETE shortcut also applies.
TIP
If what you’ve copied to the Clipboard is something that you will use again in this document or that might be useful in future creations, consider saving it to the scrapbook covered later in this chapter, or as a symbol, which is covered in Chapter 13.
Paste vs. Paste Special
Copies of items on your Clipboard can be placed into your current document by using the Paste command. Each time you use the Paste command, another copy is pasted. When an item is pasted into CorelDRAW, it is placed on the very top or front of the active layer. To paste Clipboard contents, perform one of these actions: click the Paste button in the standard toolbar, choose Edit | Paste, or use the CTRL+V shortcut. The older Windows SHIFT+INSERT shortcut also applies.
Paste Special in the Edit menu is used to place “unusual” data into a CorelDRAW document: text that is specially formatted, a graphic that the Clipboard doesn’t completely understand, or data that CorelDRAW has no way of clearly understanding as text, vector art, or bitmap data. Windows Clipboard can assign any of 27 data types, frequently more than one type, to media that is copied to it; one of the ways that the mechanism Paste Special operates is to offer you a choice as to how the media on the Clipboard is interpreted by CorelDRAW as it puts a copy of this media on a page.
Paste Special should be used on three occasions (possibly more) when you need something in a CorelDRAW document that wasn’t created in CorelDRAW and pressing CTRL+V results in nothing pasted:
• When you’ve copied formatted text from WordPerfect, MS Word, or a desktop publishing application, and you do not want the text formatted. Suppose you’ve created a table and used fancy bullets and an equally fancy font in your word-processing program, and you want the text imported to CorelDRAW via the Clipboard only. You want to reformat the data in CorelDRAW with different fonts, you don’t want bullets, but you also don’t want to retype the text. You use Edit | Paste Special, and then choose Rich Text Format, or better still you choose Text, and then click OK.
• When you’ve copied data from an application that creates things that are completely inappropriate for CorelDRAW to import. For example, you own a 3D modeling program and want to use a model you’ve created in a CorelDRAW page. CorelDRAW has no 3D tools, but it will accept a special pasted interpreted bitmap copy of the model. In this case, the Special Paste of the model cannot be edited in CorelDRAW, but the bitmap interpretation of the model program’s data can be scaled, moved, rotated, and the document will print with the bitmap and any other CorelDRAW media on the page.
• When you want to update data you need to paste, especially with text. By default, CorelDRAW’s Paste Special dialog is set to Paste, not to Paste Link, and you really need to think carefully and read this section twice before choosing Paste Link and then clicking OK. Paste Link embeds, for example, a section of MS Word text that can be later edited using MS Word, and not CorelDRAW. The data you Paste Special and Paste Link falls into that fuzzy category of data that doesn’t actually “belong” to the CorelDRAW document—the data requires both a valid link to its source, and that the application that was used to create the data is still installed on your computer a month from now when it’s editing time. A linked pasted object is not directly editable in CorelDRAW, although it can be printed, moved, and scaled as an embedded object. To edit the object, you double-click it with the Pick Tool, and the program you used to generate this media pops up…and you can edit away. When you’re finished editing, you save the document in the program, you can close it, and when you come back to CorelDRAW, the media has been updated. If you work extensively with CorelDRAW and a word processor, and your client requests revisions as often as leaves fall from a tree, the Link Paste Special feature can be a charm. However, if you don’t save documents regularly or uninstall programs frequently, do not use the link feature. The next time you open the document, the link might not be linked, and there goes part of your design. Figure 3-6 shows the Paste Special dialog and the different options on the list when (at left) a 3D model has been copied to the Clipboard, and when (at right) a word-processing document has been copied.
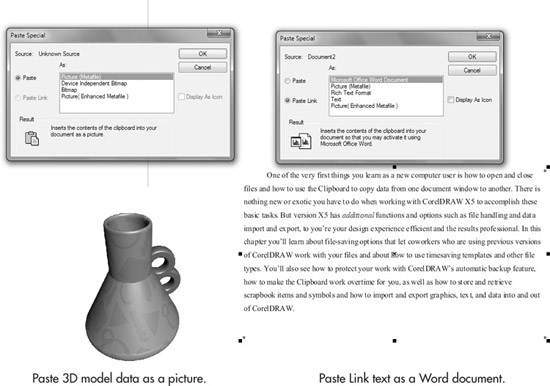
FIGURE 3-6 Paste Special is for data that cannot be imported as regular data, and for when you want to use an editor other than CorelDRAW.
TIP
Paste Special does not have a keyboard shortcut assigned to it by default. It can be handy to assign it one yourself by using the Customization | Commands section of the Options dialog.
Undoing and Redoing Changes
Albert Einstein might have said (under his breath) that for every action, there is an equal and opposite mistake. Then again, Mr. Einstein probably never used CorelDRAW, so he was unaware that you have several ways to undo a mistake. Or to redo something you originally thought was a mistake, and even to back up and undo a mistake you made a dozen steps ago. It’s a shame that Life isn’t as forgiving as CorelDRAW.
Basic Undo Commands
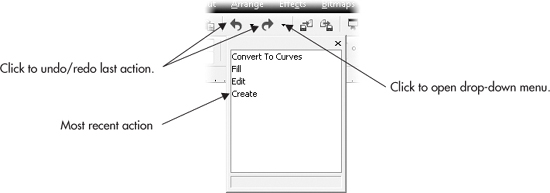
Choose Edit | Undo or use the standard CTRL+Z shortcut. To reverse an Undo command, choose Edit | Redo or use the CTRL+SHIFT+Z shortcut. CorelDRAW takes both of these commands further by offering Undo and Redo buttons in the standard toolbar; they can be used either to undo or redo single or multiple commands. The buttons even have drop-down menus, as shown next. Clicking the toolbar button applies to the most recent action; clicking the toolbar button’s drop-down arrow lets you choose a specific Undo or Redo command. To reverse either an Undo or Redo action using the drop-downs, click one of the listed commands. Doing so takes your composition back or forward to the point you specified in the dropdown. Undo and Redo drop-downs show your most recent actions at the top of the listing.
NOTE
You can customize the number of Undo levels CorelDRAW performs. The default setting records your 20 most recent actions, but this value can be set as high as 99,999 actions (provided your system has the available resources). To access Undo options, open the Options dialog (click the Options button on the standard toolbar), and then at left click Document | General.
Using the Undo Docker
For even more control over your most recent actions, you might try the Undo docker opened by choosing Window | Dockers | Undo. The Undo docker, shown in Figure 3-7, provides different views of your drawing as it appeared before certain recent actions. The Undo docker can also be used to save your recent actions as a Visual Basic for Applications (VBA) macro, which is terrific when you want to apply, for example, a dozen complex edits to different objects in different documents (on different days!).
The Undo docker displays your most recent actions in reverse order of the Undo and Redo drop-down menus, with recent actions placed at the bottom of the docker list. Selecting a command on the list shows you a view of your document as it appeared before your most recent actions were performed.
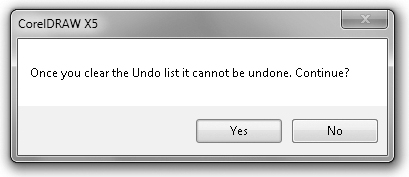
Clicking the Clear Undo List icon clears the entire list of actions in the Undo docker list, providing you with a clean slate. You cannot clear or delete some of the actions; clearing is an all or nothing decision. By default, an alert dialog, shown in the following illustration, appears, warning you that clearing the Undo list can’t be undone. Having a robust Undo list can be a much-needed safety net, so don’t clear the list unless you have so many undos in the list that it is bogging down your system resources.

FIGURE 3-7 The Undo docker features all sorts of ways to undo or redo recent actions.
When you save and then close a file, the Undo docker list is automatically cleared—you will be starting fresh when you reopen the document. If you Save the document but don’t close it, and continue to work on the file, the actions in the Undo docker remain, and your new actions continue to be added to the list.
The Undo docker is also a great way to create VBA macros. Clicking the Save List To A VBA Macro button in the docker opens the Save Macro dialog, where you provide a name and description for the new macro and store it either with your open document or to CorelDRAW’s main Global Macros list. Keep in mind when naming your macros that spaces are not valid characters, but underscores are.
Scrapbooks, An Old Favorite
If you are a longtime user of CorelDRAW, you may also be a fan of the Scrapbook docker, which can be used to store and retrieve drawings, photos, text, or floating photo objects. Many users have found it useful for searching through vast collections of clip art. The Scrapbook docker is still available for you to use, but is no longer installed by default—the Symbol Manager docker is proving to be a better feature for storing work because in X5 all the Corel clip art and your own work can be searched for using XP and Vista’s native search engines.
But it’s natural to stick with what works for you; if you want to use the Scrapbook, you can use CorelDRAW’s customization options to bring the Scrapbook out into the open. Here’s how.
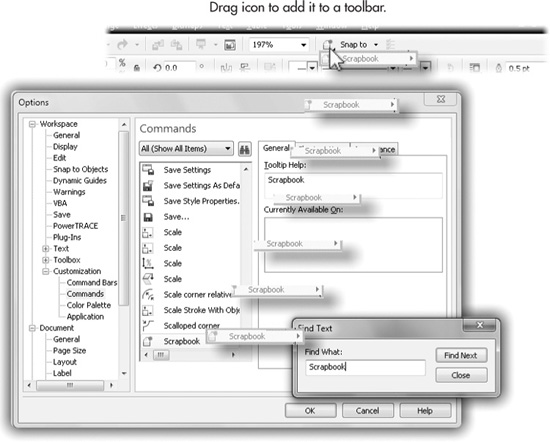
Revealing the CorelDRAW Scrapbook
1. Click the Options button on the standard toolbar, and then choose Workspace | Customization | Commands in the tree on the left.
2. Click the Search icon (the one with the binoculars on it) next to the drop-down list in the center of the dialog.
3. In the Find What field of the Find Text dialog, type in Scrapbook and then click the Find Next button. The Scrapbook command is highlighted in the list of commands. Click the close box for Find Text.
4. Click-drag the Scrapbook command out of the list, and drop it on the toolbar or menu of your choice. The standard toolbar is a good location if you use the Scrapbook often.
5. Click OK to close the Options dialog.
Importing and Exporting Files
CorelDRAW’s Import and Export filter collection is one of the largest in any graphics application. Here is a list of the document types that version X5 can import and export.
Support for new file formats:
• Microsoft Publisher (versions 2002, 2003, and 2007)
• Microsoft Word 2007
• AutoCAD DXF
• AutoCAD DWG (versions R2.5 to 2007)
• Corel Painter 11
Enhanced export options when working with Adobe products including:
• Adobe Photoshop CS4 and previous versions
• Adobe Illustrator CS4 (you can now choose to export text to Illustrator as Curves or as Text; compressed Illustrator files are not currently supported)
• PDF 1.7, PDF/A (an ISO-approved format for long-term document archiving)
• Adobe Acrobat
Filters are data translators for files created in other applications or in formats not native to CorelDRAW. Import filters take the data from other applications and translate that data into information that can be viewed and edited from within CorelDRAW. Export filters translate data from your CorelDRAW document to a format recognized by a different program or publishing medium. As with Import filters, Export filters frequently contain dialogs where you set up options to export the precise data you need for the target application or publishing medium.
NOTE
When you export a file, the new file format may not support all the features that CorelDRAW’s native file format (CDR) supports. For this reason, even when exporting work, you should always save a copy of your work in CorelDRAW’s native file format.
Set Up Color Management Before Importing
Earlier, in the “Create a New Document that Suits You” section, the importance of color management was discussed. Enabling and using a color profile is your best bet to ensure color consistency between your monitor, CorelDRAW, and your personal or commercial printer. Because CorelDRAW can import so many different graphics file types, especially documents created with Adobe products, you will want to be alerted when importing a photo that was tagged with a color profile. Go to Tools | Color Management | Default Settings right now. In Figure 3-8 you can see four check boxes toward the right of the dialog: check them. You can always uncheck these alert options if you feel pestered by them in your work, but you really shouldn’t. When you import, for example, a coworker’s Photoshop PSD file, the chances are very good that this image was saved with a color profile. The chances are also fairly good that this color-profile tagged photo won’t have the same color profile as the CorelDRAW document you’ve created. When an imported image has a profile that doesn’t match the current CorelDRAW document’s color profile, the imported photo might look dull, overly saturated, or too dark or too light. And it will print that way, and then you have an unhappy client, coworker, or most importantly, you have an unhappy you. Fortunately, it only takes two seconds to be happier.
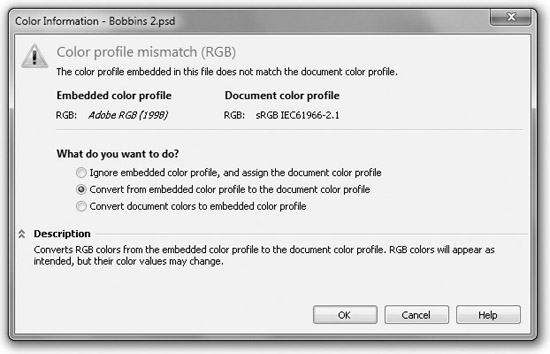
Now that the alerts have been checked, here’s what happens when you import a PSD, TIFF, JPEG, and even CDR and Corel CMX documents that have been embedded with a color profile: you click to import it (the exact method is covered in the following section), and before anything happens, a dialog appears. In this box, you’re told exactly what color profile the incoming document is tagged with, what your current document’s color profile is, and you have three options (shown next) to choose from to remedy the mismatch:
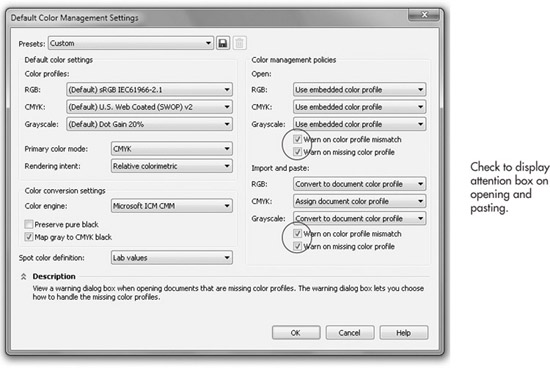
FIGURE 3-8 Enable an alert that gives you the chance to correct a mismatched or missing color profile when you import a document.
• Ignore the import’s color profile and assign it the CorelDRAW document’s profile. This is not the best solution if the imported photo or graphic is really important to the design and your client.
• Convert the document’s color profile to match your CorelDRAW document’s color profile. This is a much better option; see “Create a New Document that Suits You” for the reason why and the color conversion CorelDRAW uses.
• Convert the CorelDRAW document’s colors to accommodate the imported document’s color profile. Don’t choose this option if you’ve worked for hours on other native elements in your CorelDRAW document design, but consider this option if the import is the first element you’re working with in a new document.
Click OK with the confidence that you’ve just accessed one of the most powerful, new features in CorelDRAW X5.
Importing Files and Setting Options
You import a file by clicking File | Import, clicking the Import button on the standard toolbar, or using the CTRL+I shortcut. All of these moves open the Import dialog (see left, Figure 3-9), which can show thumbnails, provide information such as date and file size depending on which Windows view you have the panes set up for, and options for importing in this box, and possibly a subsequent box, depending on the file you choose to import. For example, at right in Figure 3-9, an Acrobat PDF file has been chosen, and after clicking Import in the first dialog, a box with options on which page and whether the import should convert Text to Curves appears. Bitmaps such as BMPs, JPEG photos, PNG files, and TIFFs are imported with no further questions asked (except about color profiles) because these image types are generated by dozens of applications, and CorelDRAW understands these data types. The Import dialog looks similar to the Open Drawing dialog, but it has a few more check boxes and options that are available depending on the kind of file you are importing. Check For Watermark is a common Import option; if you choose this, CorelDRAW informs you that the photo has been tagged by its creator. If you choose a file type not supported by CorelDRAW, such as an MP3 audio file, CorelDRAW lets you know (politely) that the file format is not supported.
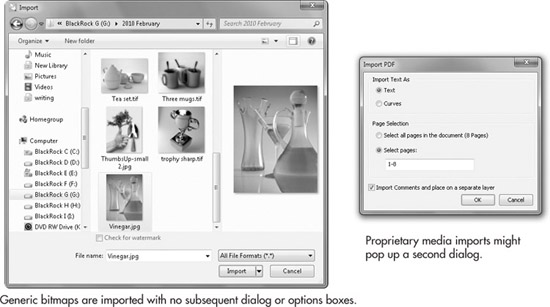
FIGURE 3-9 The Import dialog might trigger a second options box for additional import features, depending on the type of file you want to import.
If you choose to filter the contents of a folder—exactly the same way as when you choose to Open a file (covered earlier), you not only simplify your search for the file you seek, but you also simplify the number of options for importing a specific media type. For getting various file formats into your document, CorelDRAW’s list of file types is pretty comprehensive. Of the importable file types, Corel provides support for all its own formats, including CorelDRAW (CDR), Corel Symbol Library (CSL), Corel Painter (RIFF), CorelDRAW Compressed (CDX), Corel Presentation Exchange (CMX), Corel ArtShow 5 (CPX), Corel R.A.V.E. (CLK), Corel WordPerfect (WPD and WPG), Corel Quattro Pro (WB, WQ), Corel/Micrografx Designer (DES, DSF, and DRW), Corel Picture Publisher (PP5, PP4, and PPF), Corel Paint Shop Pro (PSP), and Corel PHOTO-PAINT (CPT).
You’ll also find filter support for importing files from third-party products such as Adobe Photoshop (PSD), Adobe Illustrator (AI), Adobe Acrobat (PDF), Visio (VSD), and other Microsoft Office products. Other filters support popular PostScript, CAD, bitmap, text, and word processor file formats, and a selection of specialty file formats. Certain file types (such as PDF, discussed earlier) might have multiple pages; depending on the file type, you might see additional check boxes in the Import dialog:
• Do Not Show Filter Dialog For a few import file formats, a secondary dialog may appear, offering further options for handling inherent properties in the imported file. Choosing this option kills the display of this secondary dialog and is particularly useful for uninterrupted importing of multiple images. By default, this option is not selected.
• Maintain Layers And Pages If the file you are importing contains multiple pages and/or multiple layers, this option becomes available. By default, this option is selected. As the file is imported, additional pages are automatically added to your current document and/or layers are automatically added. Layers are controlled using the Object Manager docker.
TIP
You can import multiple files if they are stored in the same folder. Click one of the files you want to open, and then hold the CTRL key while clicking additional files. You can open an entire folder’s contents: click the first file, then hold the SHIFT key, and finally, click the last file in the folder.
Exporting Files and Choosing Options
If this is the first chapter you’re reading in The Official Guide, you’re in for a treat—much of the rest of this guide shows you how to create exotic, intricate, and expressive artwork, logos, layouts, and other visuals that communicate your ideas. However, the world doesn’t own CorelDRAW (yet), so you need to convert your media by using export filters. Keep in mind (reading the rest of this guide will help you) that choosing the best export options affects your design’s appearance, quality, and compatibility with other applications.
From the File menu, CorelDRAW offers a general-purpose Export command that is used to export your work to formats the world can view, plus a special Export For Office command for when your work will be used in a Corel WordPerfect Office application or in a Microsoft Office application. First, let’s look at the Export command that offers the greatest variety of export formats.
Export
File | Export (CTRL+E) contains all of the export filters you chose to install during the installation of CorelDRAW. If you installed the recommended set of import/export filters, you’ll find over 40 different file formats available in the Export dialog. If you need or just want to, you can always run the CorelDRAW installation program again to install additional export filters—the Secondary Import/Export File types: CUR, EXE, FMV, ICO, PCD, PCX, SCT, VSD, XCF, XPM, and/or the Tertiary Import/Export File types: GEM, HTM, IMG, MET, NAP, PIC, SHW, MOV, and QTM.
The options available to you in the Export dialog vary depending on your document’s properties, such as whether you have anything selected, how many pages are in your file, and what type of file format you have chosen in the Save As Type drop-down. Secondary dialogs can also appear depending on the export file format. In Figure 3-10, this logo needs to be shared with a client as an email attachment. The JPG - JPEG Bitmaps file format for email attachments is one of the smallest file size, yet highest quality bitmap, file formats; this is chosen from the Save As Type drop-down list. General options are then displayed in this dialog, and version X5 offers a secondary dialog after you choose a file location, a filename, and then click Export. For JPEG images, you almost never want to check the Do Not Show Filter Dialog check box. CorelDRAW X5 has a host of options for writing JPEG copies of your work that you do not want to pass by. A short tutorial provided next explains JPEG options so your work is crisp, hi-fi, and as small in file size as possible.
The following Export dialog options are available:
• Export This Page Only If your document consists of multiple pages, this option becomes available when exporting to EPS or to any file format supporting text as characters (such as text or word processor formats). Choosing this option causes only your current page to be exported.
• Selected Only Choose this option to export only your currently selected object(s) instead of your entire page or document.
• Do Not Show Filter Dialog Choose this option to export your file immediately using the options currently set in some secondary filter dialogs; this can be useful when exporting multiple individual files in identical ways. However, as a rule, skipping the secondary filter dialog is like skipping a meal—you might feel okay at the moment, but you’ll regret it in the long run.
To get a good working idea of how to export a CorelDRAW design as a JPEG image, open Famous Elmer’s.cdr now. There’s an excellent possibility you can draw a better logo than Elmer did, but that’s not the point—this happens to be a representative image with colors and the drop shadow effect that you might use in your own work, and you’ll see shortly how visible quality and saved file size are affected by the options you use in the secondary filter dialog.
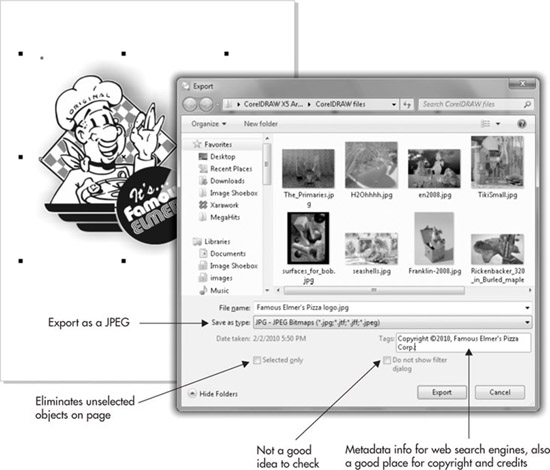
FIGURE 3-10 The Export dialog is the first step to exporting your current document page or selected objects.
Exporting a Design
1. Let’s assume your client (Elmer) doesn’t want a sea of white around the logo you’re presenting—he only wants to see the logo. Select the grouped object using the Pick Tool. Always do this before proceeding with your Export operation.
2. Choose File | Export (CTRL+E) or click the Export button in the standard toolbar to open the Export dialog.
3. Choose a folder and/or location, and enter a unique name for your exported file. Elmer’s Terrific Logo.jpg seems to fit the bill here.
4. Choose JPEG - JPEG Bitmaps from the Save As Type drop-down menu.
5. Check the Selected Only option.
6. Date Taken is an optional field into which you can enter a date that a photo was taken, but obviously this isn’t a photo you’re exporting. As a rule, when you send anything to a web page or attach it as an email, fill in as many metadata tags as are offered. Metadata adds very little to a saved file’s size, and it really helps web search engines identify and publicize your work. Type keywords or credits and copyright information in the Tags field, too.
7. Click Export to proceed with your export operation.
8. Here’s where the action happens: the secondary filter dialog specific to JPEG images, as shown in Figure 3-11. First, click the Two Vertical Previews button near the top left. Now you have two previews and can compare, for example, 100% quality versus 50% quality settings for export. JPEG compression discards some original photo information, but you get to set the level of compression in this dialog, and you can preview an acceptable and an unacceptable amount of visual compression. To use the preview panes, click inside one to select it, and then choose a JPEG setting from the Presets drop-down at right or enter it manually. Then compare what you see onscreen.
9. You can choose a preset from the Presets list; however, this list only provides the most general and basic amount of control over your exported image: Low, Medium, High—you get the picture. Setting quality with JPEGs is inversely proportional to saved file size, and you can do this manually by using the Quality spin box (or by entering a value in the number box). Look at the image in the right pane to see the quality, and then look below it to see the estimated saved file size. As a rule, Medium Quality compression generally provides excellent quality, except when your design has a billion different colors sitting right next to each other, such as in a drawing of confetti. JPEG doesn’t work very well for what is called high-frequency images, and if this is the case, a GIF file would work better, display better, and have a much smaller file size.
10. In the Advanced section, you can choose to tag the image with a color profile, the profile your document is defined with. You can also check Optimize, which helps compress the image a little more with little cost to the final rendered quality. You probably don’t want to check Progressive—doing this causes the JPEG to stream as it is downloaded to the recipient. The streaming image increases its resolution until it’s completely downloaded; it appears a little weird to the recipient, and Progressive should be reserved for large JPEGs (over 3 or 4MB) you send to people who only have dial-up connections.
11. You can scale your exported JPEG without scaling your original; use the percentage boxes in the Transformation field. It’s not usually a good idea to uncheck Maintain Aspect Ratio unless you deliberately want to stretch or “smoosh” your exported image.
12. Once you’ve performed all your customization in all the Export areas, check one last time and decide on the quality you see in the preview frame that displays the compression you’ve decided upon, take a look at the approximate saved file size, and then click OK to export your image to the specified folder on your hard drive.
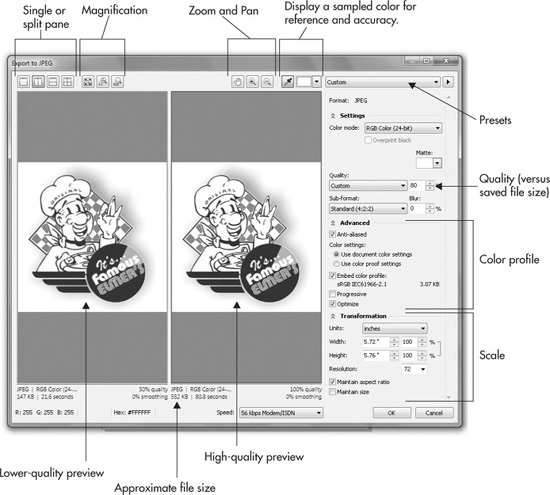
FIGURE 3-11 When an Export displays a secondary dialog, use it to your advantage. Create the right size dimensions and file size for your intended audience.
NOTE
When you export your design to certain bitmap file formats such as TIFF and PSD, these file types can retain color profiles. Color profiles add to total saved file size, and this is also true when you save CorelDRAW documents. If you absolutely, positively have to conserve hard drive space, you might forego saving color profiles along with a document. As accurately estimated in the Export and Save dialogs, color profiles can “cost” up to 500K of additional file size. Generally, it’s worth the price; very few professional designers and commercial printers work without color profiles, but embedding color profiles is one area where you can conserve on saved file sizes.
Choosing Export File Formats
The preceding tutorial covers you for exporting your CorelDRAW work to one of the most common and popular bitmap file formats used today for email attachments and web graphics. You can also choose third-party application file formats such as Photoshop, Acrobat PDF, and even AutoDesk CAD data. Where you begin your adventures exporting CorelDRAW design work depends completely on who your final audience or target is—a friend, a commercial press house, or a different application to add a finishing touch to a composition. The following is a brief summary of the available export filters:
• Bitmap formats Specific bitmap types whose format is openly used and supported by many software vendors—such as BMP (Windows and OS2), CALS, GIF, JPEG (JPG, JP2), PCX, PNG, TGA, TIF, WI—feature their own filter dialogs, custom tailoring your export for the application that receives the work. Third-party bitmap formats such as Photoshop PSD display a secondary dialog so you can set options specific to Photoshop data. Corel programs such as Painter and Paint Shop Pro will accept file formats such as PSD, TIFF, and other types.
• Metafile formats Metafile formats such as CGM, EMF, FMV, and WFM can contain both vector and bitmap information, but in practice they commonly contain only vector or bitmap information. It is usually better to choose a dedicated bitmap or vector format.
• Text formats When exporting to text formats (such as native word processor or simple text formats), no additional dialogs appear. Choose from ANSI Text (TXT), Rich Text Format (RTF), or virtually any version of Microsoft Word (DOC), WordPerfect (WPD), or WordStar 7 and 2000 (WSD).
• Font formats You have the choice of exporting to TTF to create a TrueType Font or to PFB (PostScript Font Binary) to create an Adobe Type 1 font format to create your own font. A secondary dialog opens where you specify the properties for the font and character you are exporting. See “Creating Your Own Font,” an online downloadable bonus chapter that covers font creation using CorelDRAW (http://theboutons.com/index.php?option=com_content&view=article&id=21:creating-your-own-font-with-coreldraw-x4&catid=14:font-creation&Itemid=428).
• Vector formats CorelDRAW includes the following vector graphics filters: Frame Vector Metafile (FMV) and a Scalable Vector Graphics filter (SVG and SVGZ compressed), as shown in the SVG Export dialog in Figure 3-12. SVG has become quite popular as an alternative to vector-based Flash media; if you’re considering posting a graphic to Wikipedia, the audience will appreciate SVG. Also included in this Export dialog is a preflight tab for correcting incorrect option choices (such as ICC color profiling; note the “1 Issue” remark in this figure) and options to create saved presets.
• CAD/Plotter formats You can now export files to AutoCAD (DXF and DWG) as well as to HPGL 2 Plotter files (PLT). These filters include their own specific dialog filter options.
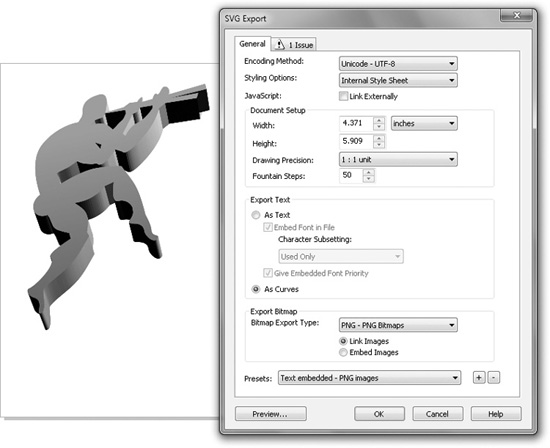
FIGURE 3-12 The improved Scalable Vector Graphics filter offers property options such as embedding a subset of fonts used and compression schemes for bitmaps in your document.
• EPS formats When you choose to export to Encapsulated PostScript (EPS) format, CorelDRAW’s filter offers a comprehensive set of PostScript-related options, organized into General and Advanced tabbed areas in the EPS Export dialog, as shown in Figure 3-13. EPS files are the coin of the realm in desktop publishing, and CorelDRAW can write an EPS graphics file that is Mac and Windows compatible.
• Third-party application formats Export to Adobe Illustrator (AI), Adobe Photoshop (PSD), Macromedia Flash (SWF), or Kodak FlashPix Image (FPX)— each of which opens a dialog filter with specific options. The Macintosh OS native file formats, MACPaint Bitmap (MAC) and Macintosh PICT (PIC), are also available.
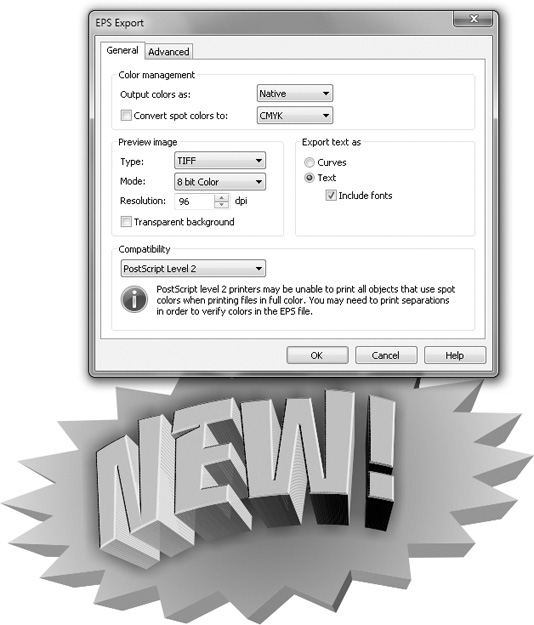
FIGURE 3-13 The EPS Export dialog offers full control over all aspects of your exported graphics and images.
• Corel native formats Export to any of Corel’s own native formats: Corel WordPerfect Graphic (WPG), Corel PHOTO-PAINT (CPT), Picture Publisher (PPF or PP5), or Corel Presentation Exchange 5.0 (CMX)—each of which features its own filter dialogs.
Export for Office
Corel WordPerfect Office and Microsoft Office are used by tens of millions of people every day to produce letters, reports, charts, and presentations. These people often do not have graphics training or graphics software, but want and need graphics in their documents. To address these needs, Office suites not only accept graphics for placement in documents, but also provide simple tools to create and edit graphics within the suite. The tools are limited and the file formats that work best with office suites are also limited when compared with graphics applications.
CorelDRAW’s Export For Office feature makes it easy for you to be sure that any graphics you supply for use in WordPerfect and Microsoft Office are optimized for their use in an Office document. Export For Office also helps you and your client avoid delays, bum documents, and other migraine-inducing issues.
Choose File | Export For Office to display the Export For Office dialog and kick off the process of creating a file for your customer that’s Office-suite optimized. The Export For Office dialog has a large preview window in the center that shows what will be exported. You can navigate around the preview window and zoom in and out by clicking on the appropriate Zoom or Hand Tool icon on the side of the dialog, shown next.
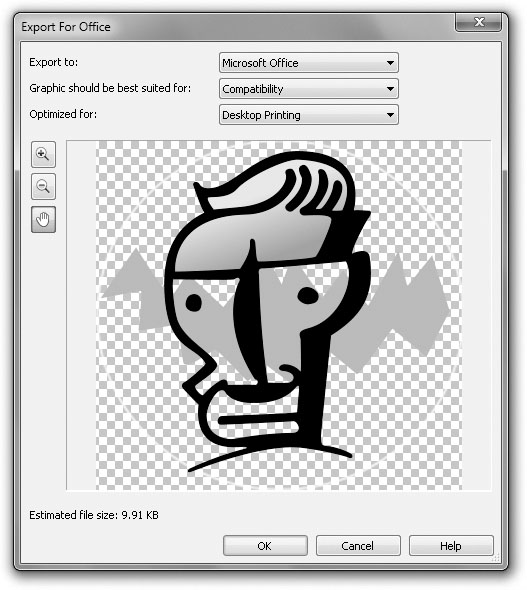
Export For Office cannot export multiple pages; it only works with the page you have active at the time you opened the dialog. If you have a multi-page document that you want to export, you’ll need to do this page by page. And unlike with the Export dialog, there is no Selected Only check box; however, you can, indeed, export a selected object only. In the Export For Office process, if you have any object(s) selected before you open the dialog, only the objects you had selected appear in the preview window. On the other hand, if you have nothing selected, everything you have on the page and partially on the page is what is saved by the Export For Office process.
The gray checkerboard background to the preview area corresponds to areas of transparency. Vector objects and text have no background, but any bitmaps you created from vector objects will have a white background around them unless you explicitly checked the Transparent Background check box in the Convert To Bitmap dialog when converting the object for export. Bitmaps you imported into your original document that contained transparent backgrounds will retain the transparent areas.
The drop-down lists at the top of the dialog are where you make some preparations for the intended use of the exported graphic. To make good choices here, you really need to know what your customer is likely to do with the file. First, you need to know which Office suite they will be using the graphics file with: Corel’s or Microsoft’s. The answer to this question determines which file format you choose in the Export To drop-down list. Also, ask yourself (and your coworker receiving the file): Will you edit this file using the Office suite’s tools, or will you just place it in their document as finished work? You also should know what the final destination for their document will be: an onscreen presentation or on the Web, printing to a low-resolution desktop printer or to a professional, commercial printer.
If your customer is using Corel WordPerfect Office, choose that in the Export To dropdown list, and all other options gray out. Your exported file will be saved as a WordPerfect Graphics (WPG) file. The Estimated File Size of the saved WPG file appears at the bottom of the dialog. Click OK and the now-familiar Save As dialog appears with Corel WordPerfect Graphic already selected in the Save As Type drop-down. Navigate to where you want to save your file, give it a name in the File Name field, click Save, and you are done.
If your customer uses Microsoft Office, choose that in the Export To drop-down. Next, choose either Compatibility or Editing in the Graphic Should Be Best Suited For drop-down. If you choose Compatibility, your exported file will be saved as a bitmap in the PNG file format. As a bitmap your graphic will look just like you see it onscreen, but it can no longer be edited using vector tools.
If you choose Editing, the file will be saved in the Extended Metafile Format (EMF), which can retain some (but not all) vector information and some CorelDRAW effects. EMF files can be easily edited in Microsoft Office, but fancy effects such as Distort may not travel well or at all, so you will want to open the document yourself in Microsoft Office to see how it looks. As a measure to ensure that the export looks like the original does in CorelDRAW, you can make a copy of the graphic, particularly if it has dynamic effects such as envelopes or extrude. Then use Arrange | Break Apart and similar commands on the Arrange menu to “genericize” the vector information, adding to the saved file size, but also adding to your chances that an elegant graphic displays in a Word document as you intend it to.
If you choose Compatibility, which will save your work as a bitmap, the Optimized For drop-down needs your attention. If you choose Editing, the Optimized For drop-down will be grayed out. Here your choices are Presentation, which basically means it will be displayed on a monitor and not printed, or one of the two print options on the list—Desktop Printing or Commercial Printing. The PNG format bitmap file saved with the Presentation setting saves at 96 dpi; the Desktop Printing setting saves at 150 dpi; and Commercial Printing saves at 300 dpi.
As you make your choices, you will notice that the Estimated File Size changes. As when you selected WordPerfect Office as your export option, click OK to open the Save As dialog where the file type is already selected in the Save As Type drop-down. Navigate to where you want to save your file, give it a name in the File Name field, click Save, deliver the goods, and ask for a (large) check!
Saving, importing, and exporting might not be as exciting as the headlines on supermarket tabloids, but they’re essential skills that are a prerequisite to reaping your rewards as a CorelDRAW designer. Compare it to the ennui of learning how to use a knife and fork— they’re essential to being able to savor the meal that comes after learning Silverware 101! If you’ve read Chapter 2, you now know where a lot of the Good Stuff is in CorelDRAW’s interface, and how to save anything you’ve created using the Good Stuff. Now it’s time to get a handle on navigating this interface in Chapter 4. You know how to bring stuff in and copy stuff out of CorelDRAW; it’d be nice if you first had the best view of these objects, on layers and on multiple pages you’re soon going to be cranking out.