
CHAPTER 4 Navigation and Page Setup
Artists who have embraced digital media enjoy not only new tools, but also new ways to look at our artwork. Because your CorelDRAW designs can be extremely large, intricate, and composed on several different layers, now’s the time to discover the ways you can look at your work. This chapter covers the different ways you can view dimensions of the drawing page and the level of detail displayed on your screen as you preview and work. You’ll work smarter and more efficiently—regardless of your skill level—when you understand how wide, tall, and deep your drawings can be, and how to view the details you need at any given second. Learning the ins and outs of CorelDRAW document navigation might just be your ticket to better artwork in less time!
NOTE
Download and extract all the files from the Chapter04.zip archive to follow the tutorials in this chapter.
Setting View Mode
Because the type of artwork you usually design in CorelDRAW is vector artwork, the objects you create need to be written to screen from moment to moment: the process is called rasterizing. With today’s video cards and computer processors, the response time between changing an element in a file and seeing the change can usually be measured in a fraction of a second. CorelDRAW has always supported different levels of detail with which you view your CorelDRAW work. They’re accessed through the View menu, and these view modes can help you find an object and draw an object when your design becomes intricate and the page gets cluttered.
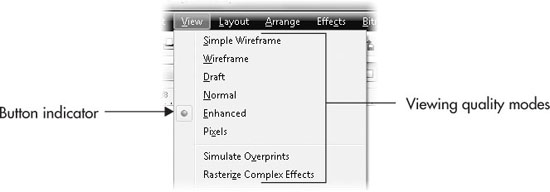
View modes are used to specify how your drawing appears onscreen. Modes offer feedback as to how a design will print or export, and lower-quality view modes can help you locate an object hidden by other objects. You switch between view modes by using the View menu and through keyboard shortcuts. The View menu itself indicates the current view using a button indicator to the left of each menu item.
You have the option of choosing from one of six display qualities: Simple Wireframe, Wireframe, Draft, Normal, Enhanced, and Pixels. The default mode is Enhanced, and this is the best proofing quality for working and displaying your work to others. Additionally, you can check or uncheck Simulate Overprints and Rasterize Complex Effects when viewing in Enhanced mode. The following section explains how these display modes render to screen paths and objects that have different fills and effects. Here you can see the list of View commands:
Wireframe and Simple Wireframe
The views listed make a top-to-bottom progression from low to high detail. At the top, Simple Wireframe and Wireframe provide the least detail and refresh onscreen almost immediately when you make edits or change the zoom level of your document. In Simple Wireframe viewing mode, all you see is the silhouette of vector objects: a thin black outline with no fill. This is a very useful view mode for locating a shape on the page when you don’t have the time to perform a search in CorelDRAW (covered in Chapter 14). Simple Wireframe mode provides no view of object fills, but it does reveal the structure of effects objects such as extrudes and blends. Figure 4-1 is a visual comparison of Simple Wireframe, Wireframe, Pixels view, and the default viewing mode in CorelDRAW, Enhanced. Clearly, you’re not going to apply fills to objects in Wireframe mode while you work; however, these different modes indeed provide user information about objects you don’t usually see, and you can edit paths, copy objects, and perform most other necessary design tasks in any of these view modes.
Getting a Draft View
Draft view is the middle-ground of view quality between Wireframe and Enhanced modes. In Draft viewing mode, the objects in your drawing are rendered with color fills, but only Uniform fills are displayed with any accuracy. Outline properties such as dashed lines, width, and color are displayed. The two greatest visual differences between Draft and Enhanced views are that there is no anti-aliasing in Draft mode (so object edges look harsh and jaggy), and bitmaps and Fountain fills do not display as you’d expect them to. Figure 4-2 shows a Fountain fill, a Bitmap fill, and a PostScript fill viewed in (the default) Enhanced view at the top and then at bottom in Draft mode. There is a subtle visual indication that you can use to tell the difference between a Bitmap fill and a Fountain fill in this mode, but it’s hardly worth the challenge. Draft mode is best used to evaluate basic color schemes in a vector drawing and for quickly navigating incredibly dense and complex illustrations such as CAD architecture designs and a single page containing 45,000 Extrude effect objects.
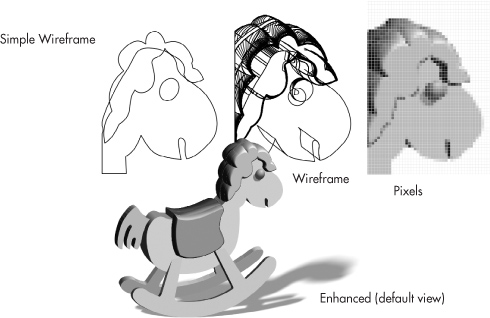
FIGURE 4-1 View modes can help you see the structure of complex objects and provide you with “unseen” clues where editing might be desired.
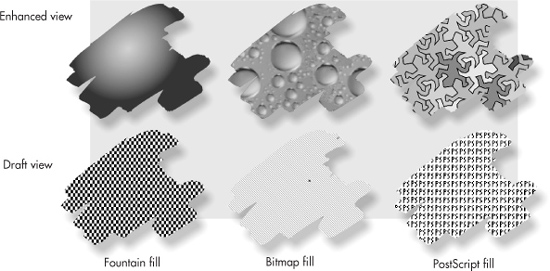
FIGURE 4-2 Draft view provides Uniform color fill views and outline colors, but not more elaborate object fills.
Using Normal View
Normal view displays all object properties—Bitmap fills, Fountain fills, and PostScript fills— correctly, unlike Draft and Wireframe views. The only difference between Enhanced and Normal view modes is that Normal mode does not anti-alias the edges of objects. Anti-aliasing is part of the rasterization process because visual data is written to the screen that creates a smooth transition, whereas image areas have very different colors and brightness. This is usually done by adding pixels to the color edge of an object whose color is a blend between the neighboring, contrasting areas. The effect of anti-aliasing is particularly evident along edges of objects that travel diagonally across the page, and in curved areas such as circles and ellipses. Without anti-aliasing, the Normal view might remind you of Microsoft Paint back in 1991, when the best monitor you could buy was a VGA and you ran Windows 3. x.
Normal view mode will appeal to users whose video card doesn’t have a lot of RAM, and to artists who create thousands of objects on a page. Screen refreshes are quicker, and if you don’t mind the stair-steppy edges of aliased object edges, you can pick up some speed using Normal mode.
NOTE
Bitmaps—whether they’re imported photos or bitmap fills you define using the Interactive fill tool—do not change their screen appearance if you switch from Normal to Enhanced view mode. Bitmaps do not update or refresh in CorelDRAW because the pixel color definitions are set within the image or fill.
Using Enhanced View
When you use Enhanced view, all vector objects (text is a vector object, too) are anti-aliased around the edges. It’s your best view of your work and is the default setting in CorelDRAW.
Previewing with Pixels View
New to version X5 is a view option that displays both vector and bitmap data onscreen as though the objects all were constructed from pixels. Pixels view quality depends on the resolution of your document, another new X5 feature. When you open a new document, you’re presented with the Create A New Document screen; there, you set the Rendering Resolution—the factory default setting is 300 dpi (dots, or pixels, per inch). As an example, suppose you’re creating a web graphic. Because CorelDRAW artwork is vector- and resolution-independent in nature, you can’t truly preview what a bitmap version of your vector design will look like on the Web, because every zoom level you choose displays the vector graphic smoothly using Enhanced view. The previewing solution is simple—before you draw, set up your document to 96 dpi in the Create A New Document box, and then use Pixels view mode to preview your artwork before delivering it and getting paid handsomely for it.
The higher the resolution of the document, the smoother that Pixels view displays your artwork.
TIP
To change the resolution of a document, double-click the gray page border to bring up the Page Size tab in Options. Change the Rendering Resolution to suit your current need, and go to town.
Simulate Overprints
Simulate Overprints is a print production preview mode. Overprinting is part of the standard commercial printing process used to simulate how colors actually will print to a physical page and also is used to check for any gaps between printed objects due to any printing registration problems. If you have no need for commercial printing, Simulate Overprints will be a seldom-used view. However, if you use CorelDRAW for physical commercial output, bear in mind two things:
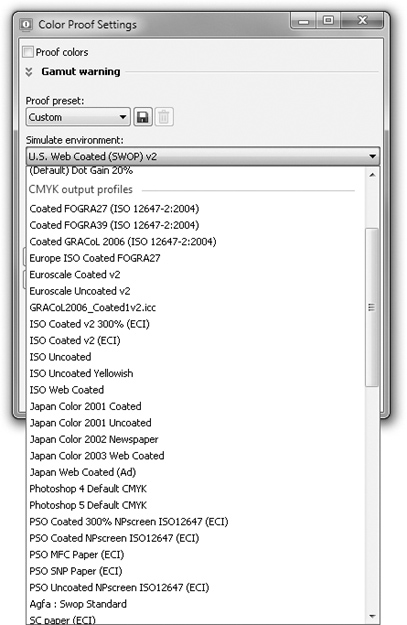
• You need to check in with Window | Dockers | Color Proof Settings and to ensure that your intended output device is chosen from the Simulate Environment list (shown next). If you don’t find the printing press of your choice, contact the commercial printer and request the drivers or ICM profile they use. By default, SWOP is the color space when proofing, and chances are good that the simulation of a CMYK color space will display colors as accurately as any monitor can.
• “Simulation” means exactly that. It is physically impossible to proof physical pigments rendered to a physical surface with total accuracy by using a monitor that displays virtual artwork. However, CorelDRAW’s color simulation of real-world color output is excellent, and “close” is far better than “none” when it comes to proofing printed material on your screen.
TIP
To quickly switch between your current view mode and the last-used view mode, press SHIFT+F9.
Zooming and Panning Pages
There are at least two meanings in CorelDRAW for the term view, and the previous sections have covered only one of them: view quality, the level of detail with which you see your work. Zooming—increasing and decreasing the resolution of a page—and panning (sliding your view without zooming, similar to using the scroll bars on the edge of a document window) are the topics of the sections to follow. In the real world, evaluating the progress of a design from different perspectives is a chore when compared to CorelDRAW’s workspace: you back into a ladder in your artist’s loft, you can’t find your favorite magnifying glass, and you wear the carpet thin moving toward and away from your canvas! One way to work faster (and usually smarter) is through a digital design program such as CorelDRAW. Another good way is to master all the features for zooming your view, covered next.
Using the Zoom Tool and Property Bar
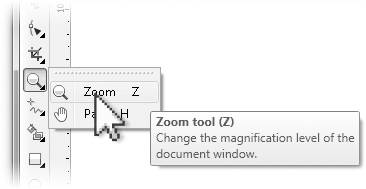
The Zoom tool is in the fourth group of tools from the top on the toolbox and is marked by its magnifying glass icon. If you see a hand icon and not the magnifying glass, click-hold on the icon to reveal the group. The tool is used to zoom in and zoom out of a page.
When you’ve chosen the Zoom tool, the property bar displays buttons plus a drop-down list that provides just about every common degree of magnification you could ask for, as shown in Figure 4-3. You therefore have at least two methods for page navigation when you select the Zoom tool: clicking with the tool in the document workspace, and choosing degrees of magnification from the property bar (not including click or click-drag actions with the cursor).
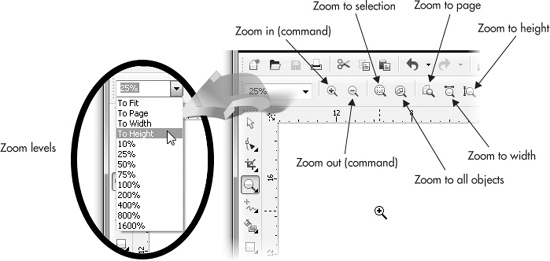
FIGURE 4-3 Here are all the property bar options you’ll need to navigate a magnified CorelDRAW document.
The following list describes the purpose of these options on the property bar:
• Zoom Levels To increase your current view by a preset magnification, use the Zoom Levels drop-down selector from the standard property bar when the Zoom tool is not chosen. When the tool is chosen, you’ll want to use the Zoom tool property bar. You’ll find selections ranging from 10 percent to 1,600 percent, along with some quick views for zooming based on page size. You can also type a value directly in the Zoom Levels combo box and then press ENTER; however, the zoom levels always increase and decrease beginning at the center of the drawing window. The option to “zoom in to 1,600 percent, but zoom toward the lower left of the window” isn’t an option. Views saved in the View Manager (discussed later in this chapter) are also included on the drop-down list.
• Zoom In Zoom In is the default state while the Zoom tool is selected. Clicking once in the drawing window increases your view magnification by twice the current percentage of zoom—100 percent goes to 200 percent with a click, then to 400 percent with another click in the window. Here’s an important point: when you zoom in this way, using the tool and not the Zoom Levels selections, you zoom in centered relative to the tool’s cursor location onscreen. You direct the final point of your zoom by centering it with your cursor. You can also use the Zoom tool to perform marquee zooming, shown in Figure 4-4. You place your cursor at the corner of the area you want to magnify, and then click-drag diagonally to the opposing corner of an imaginary bounding box that defines the area to which you want to zoom. You can target any two opposing corners, but most users tend to diagonally drag from upper left to lower right of an area.
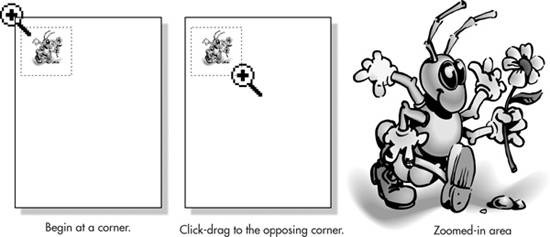
FIGURE 4-4 Marquee-dragging is the easy way to pinpoint a location and zoom in.
TIP
CorelDRAW’s zooming extent runs from a minimum of 1 percent to a maximum of 264,583 percent. You’d be hard-pressed to need a greater magnification range. The Royal Observatory in Edinburgh is currently looking into CorelDRAW X5—they downloaded the trial version.
• Zoom Out To decrease your view magnification using the Zoom tool, click the right mouse button anywhere on or off your document page, or hold SHIFT in combination with the left mouse button (in case your right mouse button is broken). Alternatively, click the Zoom Out button (shown next) on the property bar. Doing so decreases your view to your last-used magnification or by a power of 2, and the center of the zoom out is the center of the drawing window. Just as with zooming in, zooming out while using the Zoom tool is directed by the location of the Zoom tool cursor onscreen. If you want, for example, to zoom out to the upper right of a page, you put the cursor at the upper right of the page and then right-click. To zoom out while any tool is selected, press F3.

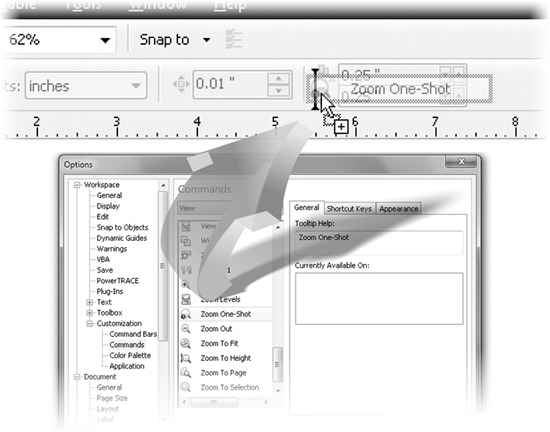
• Zoom One-Shot The Zoom One-Shot command is for selecting the Zoom tool momentarily for a single Zoom In or Zoom Out command while you are using any tool. Once the zoom has been accomplished, your previous tool reappears. This zoom command is available in CorelDRAW, but you won’t find it on any toolbar or on the property bar. Instead, it’s an unassigned feature that you can access only through customization using a button. If you prefer to use keyboard shortcuts, F2 is your key. To make the Zoom One-Shot command appear as a button in a logical and convenient place, the property bar is ideal—the Zoom One-Shot button can be seen there whenever the Pick tool is chosen. First, make sure nothing is selected with the Pick tool, or this isn’t going to work. Open the Options dialog (CTRL+J), click Workspace | Customization | Commands to display the command customization page, and choose View from the drop-down menu. Then, find the Zoom One-Shot button, drag the button to the property bar (between the Nudge Distance and Duplicate Distance boxes is good), and then release the button, though only after you see an I-beam to confirm that you’re adding the button to the desired location.
• Zoom To Selected When you have one or more objects selected in the drawing window, choosing this command changes your view magnification and viewing position of the page to show the entire selection in the window. Choose Zoom To Selected from either the Zoom property bar or the Zoom Levels drop-down menu. You can also Zoom to a selected object while any tool is selected by pressing SHIFT+F2.
• Zoom To All Objects Zoom To All Objects changes your view magnification to display all objects visible in your document window, regardless of whether the objects are on or off the current document page. Choose Zoom To All Objects from either the Zoom property bar or the Zoom Levels drop-down menu. Alternatively, use the F4 shortcut while any tool is selected.
• Zoom To Page This changes your view to fit your current page size completely within the document window. Choose Zoom To Page from either the Zoom property bar or the Zoom Levels drop-down menu, or press SHIFT+F4 while any tool is selected.
• Zoom To Page Width/Height These two commands enable you to zoom your view to the entire width or height of the current page. You’ll find these tool buttons in the Zoom property bar or the Zoom Levels drop-down menu.
Using the Mouse Wheel for Zooming
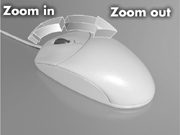
Affordable, high-quality input devices such as the mouse and even some styli for graphics tablets have had a combo wheel/button between the left and the right since the 1990s. Applications (when the engineers wrote the feature in) can scroll a document window and also zoom a document window. Happily, Corel engineers built in this capability for zooming (it’s enabled by default). To zoom into a page, push the scroll wheel away from you; zooming out is done by dragging the mouse (or stylus) wheel toward you, as shown here. If you don’t care for this feature, you can restore mouse wheel action to scrolling by choosing Options (CTRL+J) | Workspace | Display, and then choosing Scroll from the Default Action For Mouse Wheel drop-down list.
NOTE
If your zooms feel jerky when you’re using the scroll wheel, this is not a CorelDRAW problem, but rather that of the physical wheel (the way it was designed). But you may be able to fine-tune the scroll action using the manufacturer’s mouse driver options. The best place to check for mouse options is in Windows Start Menu | Control Panel | Whatever icon you see for your mouse (if any). If there’s no icon for your mouse (or other input device) in the Control Panel, check Start | All Programs.
Customizing View Shortcuts
Many of the Zoom and Hand tool commands in CorelDRAW have preassigned shortcut keys that can be changed. To access these shortcut key commands for viewing, follow these steps:
1. Open the Options dialog (CTRL+J) or choose Tools | Options.
2. On the left side of the dialog, under Workspace, click to expand Customization, and then click Commands to view the Commands page.
3. Choose View from the drop-down menu at the top-left corner of the right side of the dialog, and notice that a list of view items appears below it. In this list, click to select the tool or command to change, as shown next.
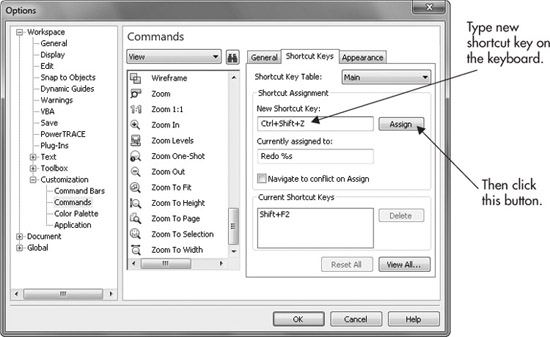
4. Click the Shortcut Keys tab at the top of the rightmost section of the dialog to display the shortcut key options. Click to make an insertion point in the New Shortcut Key box, and then press the key combination (or single key) that you want to assign as the new shortcut. If, as shown in this example, you want Zoom To Selection to be CTRL+SHIFT+Z instead of the default SHIFT+F2, you press CTRL and SHIFT and Z at the same time (you don’t type “Shift” or “Ctrl”). If a conflict appears in the Currently Assigned To field, you can rethink your custom keyboard combo, or dismiss (overwrite) the default key assignment by just clicking Assign. Click the Assign button when you’ve got the keyboard key combo of your dreams entered.
5. To delete a shortcut that has already been assigned, click the shortcut in the Current Shortcut Keys box, and then click the Delete button.
6. Click OK to close the dialog and apply the shortcut key changes.
TIP
You can quickly Zoom To All Objects on or off the document page by double-clicking the Zoom Tool button in the toolbox.
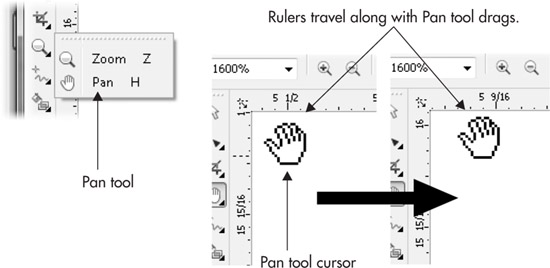
Using the Pan Tool
The Pan tool—also commonly called the Hand tool—is a convenient alternative to using document scroll bars; it’s your avatar for your physical hand while in CorelDRAW. The Hand tool’s keyboard shortcut is H (for “hand”), and it works exactly as you’d anticipate. To use it, click-drag in the drawing window, and your view will travel in the same direction. The principal advantage to using the Hand tool over the document window scroll bar “thumbs” (that screen element in the center of a scroll bar you use to click-drag) is one of economy; you don’t have to put in several “mouse miles” to change your view, and the Hand tool is great for adjusting your document view by a fraction of an inch, with precision.
The Hand tool’s cursor looks like a hand (Corel engineers gave a lot of consideration to the cursor), and with a click-drag, you can scroll your view in any direction (often called panning) as you would with a camera. As you do this, the scroll bars and document rulers move in unison to reflect the new position.
TIP
Double-click the Pan Tool button in the toolbox to instantly center your page view.
Controlling Zoom and Pan Tool Behavior
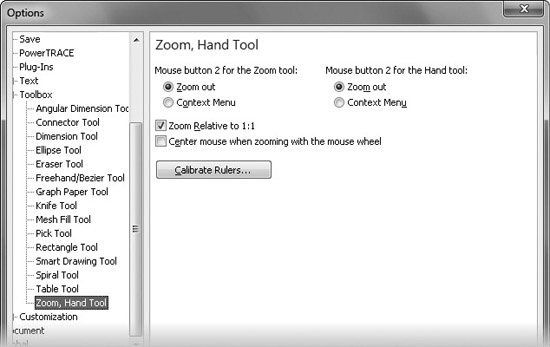
The Options dialog is where you can customize certain actions when using the Zoom and Hand tools. Right-clicks, by default, trigger Zoom Out for both the Zoom and Hand tools. However, you might want to reassign right-clicking for the Hand and Zoom tools to be more consistent with the right-click behavior—in other words, to display a pop-up context menu like the other toolbox tools do.
If this is your preference, you can change your right-clicks by opening the Options dialog (CTRL+J) and clicking to expand the tree directories under Toolbox | Zoom, Hand Tool, as shown here. In this dialog, you can set the behavior of the right-clicks, using either tool to open the pop-up menu instead.
Several shortcuts are available while using the Pan tool, some of which are for zooming, not panning. A right-click using the Pan tool results in a Zoom Out command, and a double-click causes a Zoom In command. You can also use the keyboard to pan the view of your document while any tool is selected by using these shortcuts:
• Pan left Press and hold ALT+LEFT ARROW.
• Pan right Press and hold ALT+RIGHT ARROW.
• Pan up Press and hold ALT+UP ARROW.
• Pan down Press and hold ALT+DOWN ARROW.
Special View Modes
Other types of views are found in CorelDRAW. In addition to viewing quality and resolution, you might have the need to change the page order in a multi-page document for a tidier presentation. Hey, you could certainly do with a preview setting that eliminates the workspace and puts the focus on your artwork!
The following sections explore these features, how to work with them, and how to provide views of your work you might not even have considered. You’re going to love this stuff.
Page Sorter View
CorelDRAW Page Sorter view (covered in detail in Chapter 6) becomes available as a special view mode when your document has at least one page; two or more pages will be more useful, because it’s silly to try to sort one page (and impossible if you have less than one page). To go into Page Sorter View mode, choose View | Page Sorter View. While viewing a document in the Page Sorter, you can browse several pages at one time and manage their properties as a collection instead of thumbing through single pages. While you’re using this view, your pages and all their contents are displayed in miniature, but no other view in CorelDRAW can show you a complete document page flow and offer you the chance to reorder pages and their properties in one fell swoop. The Pick tool is the only available tool in this view, and the property bar displays several options unique to this document view. You can reorder pages by dragging them to different locations in the current order, or right-click specific pages to rename, insert, and delete them (see Figure 4-5).
Full-Screen Preview
To fill the entire screen with a view of your current document page at the current zoom level, use View | Full-Screen Preview, or press the F9 shortcut key. This view hides all of the CorelDRAW interface—including your cursor—and shows only the current view rendered in Enhanced view mode (the Full-Screen Preview default view). To return your view to Normal, press any key or click either mouse button.
NOTE
Depending on any desktop utilities you might have installed, there might be a conflict between the F9 shortcut to get to Full-Screen Preview and something such as a desktop calendar or local weather applet. You can use a number of remedies: you can define a different keyboard shortcut, use the View menu or the pop-up menu instead of a keyboard shortcut, or remove the desktop utility that probably doesn’t tell you the correct weather in Kazakhstan anyway.
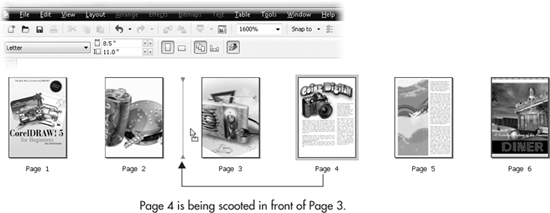
FIGURE 4-5 Page reordering in a multi-page document is as easy as drag and drop.
While you’re using Full-Screen Preview, the view mode and page border view appearance is set according to preferences in the Options dialog. To access these options, choose Tools | Options (CTRL+J) and click Display under the Workspace category on the left side of the dialog to access the Display options. Full-Screen Preview options, located in the lower part of the dialog, let you choose either draft or enhanced (the default) view as the view mode, and either show or hide the page border.
Previewing Selected Only
The Preview Selected Only command, available from the View menu, lets you preview only what’s selected on the page before entering this mode. This option works using the Full-Screen Preview preferences and takes a toggle state either On or Off when selected. There are two caveats to using this command: if no objects are selected, the Full-Screen Preview offers a nice, energy-wasting white blank screen; you’ll also get similar all-white views if the selected object is not in view before entering this mode. The result you get with Preview Selected Only depends entirely on what’s framed in the document window at what viewing resolution you have defined before using the command.
Using the View Navigator
The View Navigator is a pop-up viewer that is indispensable for navigating your entire document page when you’ve zoomed in to 10,000 percent and need to quickly move to a different design area without zooming out to get your bearings. The View Navigator pop-up window is at the point where the vertical and horizontal scroll bars meet at the lower-right corner of the document window. To open the View Navigator pop-up, click-hold the button, the magnifying glass icon.
Click-holding the icon displays a pop-up thumbnail that represents the outermost region of the page and the application’s desktop. The preview frame—the tiny rectangle with the crosshairs through it—within the View Navigator window indicates the viewing limitations according to your current Zoom settings. Click-drag within the View Navigator pop-up window to pan around your drawing in the document window; it’s panning by proxy. As you drag, releasing the mouse button ends the navigation.
In Figure 4-6 you can see the View Navigator put to the test. Let’s say you need to view or edit one of the gumballs in the machine. At 100 percent viewing resolution this would be a true hassle; luckily, by zooming in, it’s easy to see the gumballs to such a detailed extent that you could wipe the foolish grin off the center one with the Shape tool, simply by homing in on this roguish piece of candy by panning the window using the View Navigator.
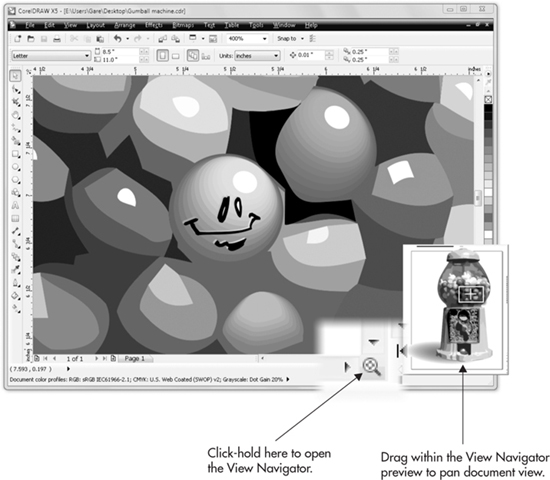
FIGURE 4-6 The View Navigator steers you in the right direction for precise editing in very tight views.
Using the View Manager Docker
Imagine a bookmark feature in CorelDRAW that takes you to a location and viewing resolution on one or more pages just by clicking the link. This is what the View Manager does: you can define zoom levels and page locations, you can browse to any number of pages in the same document, and your document is not only better organized for future edits, but View Manager is a darned good presentation tool as well!
To open the View Manager, choose Window | Dockers | View Manager or press CTRL+F2. Figure 4-7 shows a practical use for the View Manager: here you can see an architectural drawing. All the different parts of the room have been “viewed,” and different pans and zooms have been defined for the sunroom, the dining room, and so on. Now the illustrator or client can click around the structure to get a comprehensive virtual tour of the proposed design. The View Manager is also useful for tagging and returning to an exact point in a drawing where you might need to take a break! If you have a multi-page document, View Manager can accommodate your need to pinpoint any view on any page.
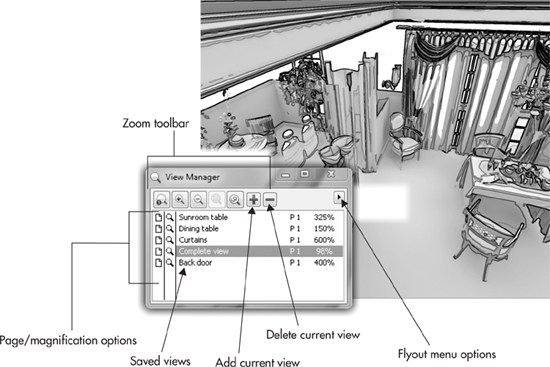
FIGURE 4-7 When you’re working with complex drawings, the View Manager provides a quick way of saving and recalling views.
Exploring View Manager Commands
When a view is saved, its page number, position, and view magnification are recorded and become a new view in the View Manager docker window. The view mode isn’t saved—such as Simple Wireframe, Draft, Normal, Enhanced, and so on—but this is trivial because you learned earlier in this chapter how to manually define view quality with any document at any time.
This sort of feature calls for a hands-on review, tutorial style. There are no “right” or “wrong” steps—this is just an exploration by-the-numbers!
 Making and Taking a Structured View of a Document
1. Open an existing document containing a drawing, either completed or in progress, and the more complex the better, and then open the View Manager docker window (CTRL+F2).
2. Using page navigation commands and the Zoom tool, the Zoom command buttons on the Zoom property bar, and/or the View Navigator feature, go to a specific part of your drawing in the document window.
3. To create and save your current view, click the Add Current View button in the docker. Notice that a new item appears in the View Manager docker. By default, the new view is automatically named View-nn-nnnn%; the first numbers after “View” represent a sequence in which you save views, while the last digits before the percent symbol tell you the magnification level of the saved view. At the right on the docker is the page number for the saved view and the zoom percentage again. The zoom percentage is an important label at the right of each saved zoom and cannot be edited. However, you’ll definitely want to replace the first zoom percentage with an evocative name for the zoom—this first zoom percentage field is just a default name for the saved zoom.
4. To name the view, right-click the name, choose Rename from the pop-up menu, and then type a name to enter the new view name. Your view is now saved. If you want, save more new views using the same procedure; change the view display in your document window each time, and then click the Add Current View button each time to save each view.
5. To go to a view, click either the page number or the view magnification title of the saved view on the docker’s list. Your view is then changed to the exact point at which it was saved.
6. To delete a specific view in the View Manager docker, click to select the view, and then click the Delete Current View button. The view is immediately deleted.
TIP
In addition to the interactive methods you can use to save, name, recall, and delete saved views, the same operations can be accomplished by choosing commands on the flyout menu located on the View Manager’s docker window.
Using Page and Zoom Options
To the left of each saved view in the View Manager, two options will appear. These options give you control over how your saved views are recalled and restored. For each view saved, you can toggle display of the Page Only and the Magnification Only to On or Off. Single-clicks toggle these options on and off; grayed-out options indicate an inactive state.
When the page symbol is deactivated, recalling the corresponding saved view causes only the magnification to be recalled; when the zoom symbol is deactivated, only the page display is recalled. While both are deactivated, the saved view does absolutely nothing.
Working with Views of a Document’s Depth: Layers
CorelDRAW’s layer feature provides invaluable ways not only to organize but also to view complex drawings. You can create several layers and move shapes between layers. You can also name layers, control their order and appearance, change object ordering within layers, group objects, and quickly see object information. One immediate advantage to adopting layers in your composition work is that you can hide layers. Suppose you have a lot of objects that need labels, and you need to print the objects with and without labels. The solution is to put all the labels on a layer. Hide the layer, print just the objects, and then unhide the layer and make a second print: easy!
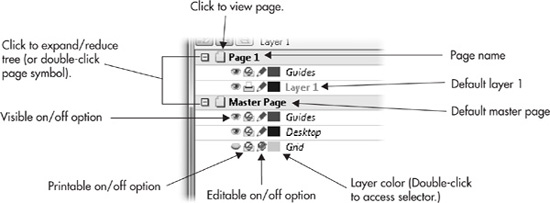
Exploring the Object Manager
The Object Manager docker is your resource for viewing layer content and using layers options. With the Object Manager you can perform a whole range of actions: navigate document pages, create and name layers, select and move objects between layers, and set layers as editable, printable, and visible. To open the Object Manager docker, choose Tools | Object Manager; this is a good opportunity to give the Object Manager a shortcut key command, as described earlier: CTRL+ALT+O is available.
The Object Manager shows a listing of the layers, each accompanied by options and a flyout menu. A master page also appears and includes default layers for controlling guides, the desktop, and grid objects. Figure 4-8 shows a drawing and what the Object Manager reports for this composition. There is only one page, the drawing was created on two layers on Page 1, and highlighted on the Object Manager list is a group of ten objects, none of which has an outline color or width.
Navigating Pages, Objects, and Layers
The best way to use the Object Manager docker to navigate through your document, select layers, and to control layer options is by experimenting; the following steps are a guide.
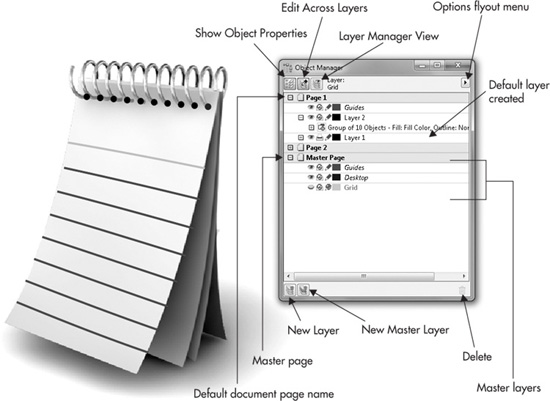
FIGURE 4-8 View, name, and alter info with the Object Manager.
You’ll learn exactly how these operations are performed. Look at the next illustration, which shows a default layer structure for a new document.
Navigating and Mastering Layers
The next steps have no right or wrong execution; rather, they’re simply exploration steps to get you comfortable with working with layers. This is why an illustration has already been created for you. You just work the steps and see how any of several techniques can be applied to your own work, future and present.
1. Open Alarming.cdr in CorelDRAW.
2. Open the Object Manager docker: choose Tools | Object Manager. Look at the status of the layers. The background—the pattern fill of the clocks—is locked so it cannot be moved at present. Also, there’s a layer on top with a default name, and it’s hidden, which means it’s locked. Investigate a little now; unhide the top layer to see what’s inside.
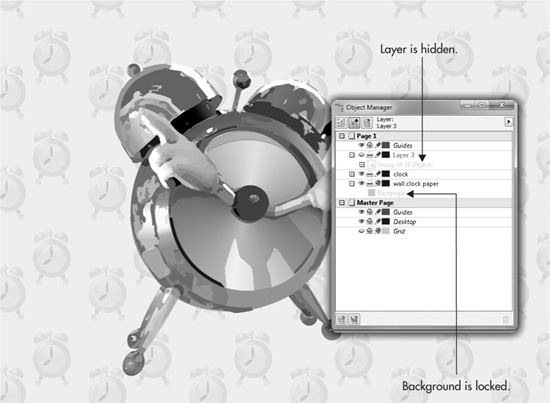
3. Okay, the author is trying to be funny here. The layer contains a third hand, yet within the context of an alarm clock, it’s really a second hand. It’s possible now to select the group of objects on Layer 3 by clicking them with the Pick tool, and if you click a second time, you can rotate the hand by dragging the rotation handles, and turn time itself back to Chapter 1. Click twice (slowly, don’t double-click) on the name of Layer 3 on the Object Manager, and then type a name in the field that’s more descriptive than “Layer 3” for future reference. Try extra hand, because why not?
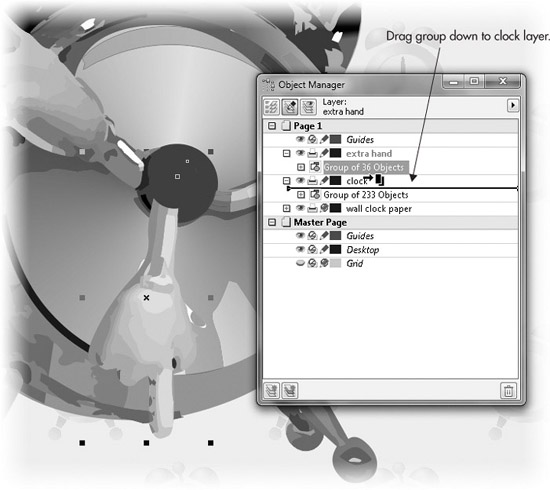
4. Double-click the Extra Hand layer title to open its contents. The hand is several grouped objects, and they can be moved to the Clock layer. First, rename the group: click Group Of 36 Objects twice, and then type third hand in the field. Notice that control nodes are visible when a group or a single object is selected, and if you chose to assign Zoom To Selected to a keyboard shortcut earlier in this chapter, selecting items from the Object Manager is an easy way to select and then zoom into an object you want to work on.
5. Double-click the Clock layer title to open it, and then drag the Third Hand group down below the layer title, but above the Group Of 233 Objects entry. Layers have a hierarchy, and if you put the group below the Group Of 233 Objects, the third hand would be hidden from view by the 233 other objects.
6. Double-click the Extra Hand layer title. This action produces precisely nothing, which indicates that there is nothing nested within the layer. So it’s okay to delete it—with the layer title highlighted, click the trash icon. Poof.
CAUTION
There is no confirmation box with the Delete trash icon; it’s very similar to pressing the keyboard DELETE key. Be careful how you use it; to undo an inadvertent deletion, click the workspace to put the document (and not the Object Manager) “in focus,” and then press CTRL+Z (Edit | Undo).
7. Similarly, the background is expendable in this composition. Click the Wall Clock Paper layer title to select it. The layer is locked and you can confirm this by trying to move the clock pattern with the Pick tool. Click the Lock or Unlock pencil icon with the red slash over it to make the layer editable, and then click the Delete button.
TIP
Every object on the Object Manager’s list can be renamed, down to single objects. Consider giving a very important object a custom name in your own work. Then, at any time, you can locate the object by conducting a search (see Chapter 14) with the Edit | Find feature, or just by scrolling through the list of objects.
8. Create a new layer by clicking the New Layer button. Name it and then drag its title to the bottom of the layer stack on this page.
9. Lock the Clock layer.
10. Click the new layer highlighted on the Object Manager list, choose the Rectangle tool from the toolbox, create a rectangle as a background for the clock, and then apply a fill. Figure 4-9 shows a linear gradient fill (covered in Chapter 15) and a blend with transparency added to the new background layer—see Chapter 21 for the scoop on blends and contours.
Using Object Manager Editing and View States
Objects can be on different layers, and you can edit across layers in CorelDRAW. Create a new file that has objects on, let’s say, three layers, to better learn through example about the editing and view states of CorelDRAW layers. Open the Object Manager docker. You’ll see three view state buttons at the top of the docker where information about viewing and editing behavior is set. Clicking each button toggles its state on or off. Each button has the following effects:
TIP
You can use Combine, Group, or Convert To Curves commands on objects in the Object Manager docker by selecting the objects, right-clicking them, and choosing a command from the pop-up menu.
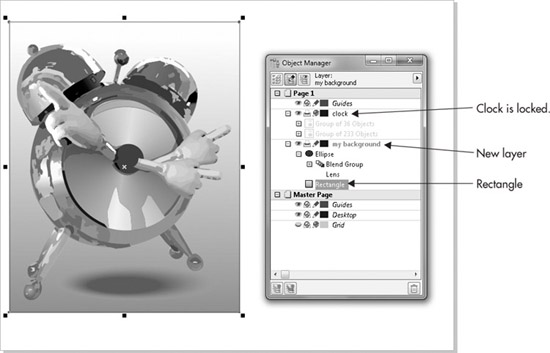
FIGURE 4-9 Working with layers takes full advantage of CorelDRAW’s search capabilities and makes it easy to modify only certain elements in a complex drawing.
• Show Object Properties Click the Show Object Properties button to set whether you want to view a detailed name for a layer’s contents (color, type of object, and so on), or just the name, default, or your own custom name.
• Edit Across Layers Click the Edit Across Layers button to set whether objects can be selected, moved, and copied between layers. While cross-layer editing is disabled, only objects on your current page layer and/or on the desktop can be selected or edited. While cross-layer editing is enabled, you can select, move, or edit any object on an unlocked layer.
TIP
Use the Object Manager to PowerClip, change object order, copy object properties, and group objects by using a right-click-drag action to drag one object onto another. After you do so, the pop-up menu lists the available commands. Grouping and PowerClip commands apply only when right-click-dragging objects within the same layer. PowerClip is discussed in detail in Chapter 11.
• Layer Manager View The Layer Manager View button toggles your view to show only your document’s layers. When working with complex drawings that have many pages, layers, and objects, using this view can make managing layer properties a lot easier. In this state, all page and object information is omitted.
Controlling Layer Properties
Using the Layer Properties dialog, you can control specific properties for each layer. To access these options, right-click a specific layer in the Object Manager docker, and choose Properties from the pop-up menu. You can access properties directly from the pop-up menu, or display a modeless dialog for defining the properties of a specific layer. There is a minor difference between using the dialog and the pop-up menu: the pop-up (right-click) menu has the Rename command, grouped with Delete, Cut, Copy, and Paste.
Options in this dialog control the following layer properties:
• Visible This option enables you to toggle the view state of a layer between visible or hidden. You can also control the visibility of objects on a layer by clicking the eye symbol to the left of the layer name.
• Printable This option toggles on or off the printing state of objects on the layer. You can also set whether layer objects are printable by clicking the Printer symbol beside the layer in the Object Manager docker to toggle the printing state of objects on the layer.
NOTE
Nonprinting layers will also not export. If you need objects selected on a nonprinting layer to be included when exporting, you’ll need to turn on the layer’s Printable option.
• Editable Use this option to lock or unlock all objects on a layer. While a layer is locked, its objects can’t be edited (or even selected), which is a little different from the Lock (object) command. You can also set whether layer objects are editable by clicking the pencil symbol beside the layer in the Object Manager docker to toggle the editing state of objects on the layer.
• Master Layer This option is only available after you’ve dragged a layer on the Object Manager onto the Master Page icon. Changing a layer to a master layer causes it to become part of the master page structure. Any objects on a master page appear on all pages. For details on working with master pages and master layers, see the next section.
• Layer Color This selector sets the color swatch as it appears in the docker listing directly to the left of a layer name, for easy recognition. Layer Color also determines object colors when viewed using Normal or Enhanced views while the Override Full Color View option is selected. You can also set the color coding for a layer by double-clicking the color indicator next to a layer name to open a typical color selector menu and then clicking any color from the drop-down color picker.
• Override Full Color View Use this option to control how the objects on the layer appear when viewed using either Normal or Enhanced view. While selected, it has the effect of displaying all objects in wireframe style, using the layer color specified.
Working with Master Page Layers
Whenever a new document is created, a master page is automatically created. The master page isn’t a physical page in your document, but instead a place where document objects can be placed so that they appear on every page of your document. Objects on a master page layer are visible and printable on every page in your document, making this an extremely powerful feature. For example, a text header or footer, or a company logo, on a master page layer becomes a quick and easy way to label all the pages in a pamphlet or brochure.
Moving any object onto a layer on the master page makes it a master page object and causes it to appear on each page. Let’s try out this feature.
Working with Master Page Items
1. Open the Object Manager docker by choosing Tools | Object Manager.
2. Click the New Master Layer button at the lower-left corner of the docker and press ENTER. A new layer is automatically added to the master page with the default name “Layer 2.”
3. With this new master layer as your current layer, create the object(s) you wish to appear on every page in their final position and appearance. By creating the object while the master layer is selected, you cause the object automatically to become a master layer object. You can also move objects from other pages onto the master layer by click-dragging them in the docker list from their position under a layer name to the master layer name.
4. Click to select the new master page object(s) on your document page. Notice that you can still select, move, and edit it. To toggle the lock or unlock state of your master layer objects, click the Edit button (the pencil symbol) beside the master page in the docker. Locking prevents any accidental editing of the master page objects.
5. Add pages to your document by clicking the + button at the lower left of the workspace. As you browse through the pages, you’ll see the same object on all pages.
Several default layers already exist on your document’s master page for controlling special items that appear in your document, such as Guides, Grid, and Desktop. These layers have the following purposes:
• Guides layer This is a global layer for guides you create; if you click the Master Guides entry on the Object Manager to select it, and then drag a guide onto the page, all pages in the document will display this guide. If you need a guide on only one page, you choose that Guides entry on the page you’re working on, drag a guide from the Rulers, and that guide belongs to the page and is not a master item. Guides are covered in detail in Chapter 7.
TIP
You can move a local guide, a guide you created on a page, to the Master Guides entry on the Object Manager to make it global—it will then appear on every page of your document.
• Grid layer This controls the appearance of grid lines. You can control the grid color and visibility, but you can’t set the Grid layer to be printable, nor can you change its editable objects or add objects to that layer. Options in the Grid Layer Properties dialog enable you to control the grid display color and to gain quick access to the Grid page of the Options dialog by clicking the Setup button in the dialog. To open the Grid Layer Properties dialog, right-click the Grid layer under the master page in the Object Manager docker, and choose Properties from the pop-up menu.
TIP
Grid layer visibility can be toggled on or off by clicking its eye icon on the Object Manager.
• Desktop layer This is a global desktop, the place outside of your drawing page. If you want to keep objects handy but don’t want to print them on your page, drag the object to this entry on the Object Manager. If you put an object on the desktop from a layer, you can’t hide it or keep it from printing, but if it’s explicitly placed on the master desktop, you can hide it, keep it from being edited, and keep it from printing.
Hopefully, this chapter has shown you the way—both as an allegory and literally—to better get a fix on what it is you’ve drawn, what you want to draw, and what appears to need an edit or two. Thanks to zoom features that let you home in on a fly’s eye or zoom out to a scaled drawing of Chicago, you now have a handle on the magnifying glass and other tools for panning, navigating, and recalling areas of interest in your work.
Chapter 5 is a departure from “The Basics” and a dive into just a little pure fun with CorelDRAW. If you’ve read Chapters 1–4 in sequence, believe it or not, you’re ready to start creating amazing stuff. And even if you haven’t, the steps are guided, the theme is designing a commercial logo, and your own results are going to astound you. Turn the page and help an author keep his promise!