CHAPTER 27 Printing: Professional Output
Print is not dead! It’s alive and well, thank you, in almost every enterprise, and outputting your work so your clients can hold it in their hands is just as much an art as designing a piece in CorelDRAW. This chapter takes you through professional output—CorelDRAW’s features that extend beyond the now-familiar File | Print command—and what it takes from CorelDRAW and you to make every dot of ink on a page look exactly like every pixel you designed on the screen.
CorelDRAW’s print engine is organized into several well-defined and easy to understand areas for setting printer hardware parameters, previewing your print selection, and using various other options to enhance your finished printed work. In this chapter, you’ll learn to set options from beginner to advanced levels in these areas.
Printing a Document to a Personal Printer
Let’s suppose that you want to print a “one off,” perhaps to show to your boss or coworkers as a proof of concept, or for personal pleasure, or to see if everything is arranged on the page correctly before packing off a copy to a commercial press. If your artwork is black and white (you used no color, but only shades of black in the design), you’ll probably print to a laser printer. Laser printers don’t really have any color-critical settings, so you’re probably as ready to go as you’d be if you were printing a text document. If you’re printing to an inkjet, most of today’s inkjet circuitry does an automatic conversion from RGB color space and the color ink space (usually CMYK, although many affordable printers use six inks), and again, you really don’t have to jump through any hoops if you’ve designed a document that uses RGB, LAB, or CMYK color spaces to define the colors you filled objects with.
Here’s a tutorial that covers the basics for outputting your work to a personal printer. Before you begin, make sure on the Object Manager docker that the layers you want to print are visible and that printing is enabled for the layers; a tiny red international “no” appears on layer properties that are disabled—you click the “no” symbol to enable the layer property.
 Printing Single- and Multiple-Page Documents
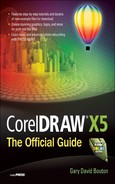
1. Open the document you want to print, and then choose File | Print (CTRL+P), or click the Print button on the standard toolbar. Any of these actions opens the Print dialog, shown next. Pay attention to the orientation of the page with respect to the orientation of the paper as it will print. The Page drop-down offers to match the orientation of the page, or to use the printer default orientation settings. Changing the orientation doesn’t change your document, but only the way it prints.
2. In the General tab, choose your printer from the Printer drop-down menu, and then click Preferences to set any printer properties such as the print material page size, orientation, and so on. Keep in mind that any special features specific to your printer might override any CorelDRAW-specific features, in particular, color management (discussed later in this chapter). In general, it’s not a good idea to have a color management feature enabled on your printer when CorelDRAW color manages the document. Two color-management systems will contend with each other, and what you see onscreen will not be what you get in your print.
3. Click the Quick Preview button to expand the dialog to show a preview window if you’d like to check the document for position on the printable page. A dashed line appears in the preview window, indicating document areas that are close to or that go over the printable page margin. If you see this, you might want to cancel the print operation and rework your page. Alternatively, you can click the Layout tab and then check Fit To Page, although doing this scales the objects in your document (so forget about the CD label you want to print fitting perfectly on a physical CD).
4. If you have more than one document open in CorelDRAW, you can choose which document to print by clicking the Documents radio button in the Print Range area; make certain that all documents you want to print have the same portrait or landscape orientation before printing, or you’re inviting a headache. In a multi-page CorelDRAW document, choose the page(s) you want to print from the Print Range area, and then enter the print quantity in the Number Of Copies box. See the following Tip.
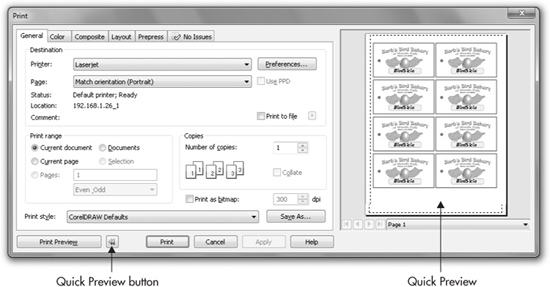
5. Before you click Print, check to see whether any issues are on the Issues tab. If the tab reads “No Issues,” proceed to step 6 and collect $200. However, if there’s an issue, you should address it (or them) first. Issues come in two varieties: showstoppers, indicated by a triangular traffic sign with an exclamation mark, and trivial stuff, indicated by an info (i) icon. A common example of trivial stuff is printing blank pages; the Issues tab will inform you, and you can easily correct this by changing the Pages value in the Print Range area of the General tab. Showstoppers require careful reading of the explanation provided on the Issues tab; the remarks and explanations are quite clear—such as attempting to print a low-resolution image to a high-resolution printer. Your best bet is to cancel the print and to read the rest of this chapter…and save paper and ink. Here’s what the issues icons look like:
6. Click Print, go get your favorite refreshment, wait a moment, and then get your print.
TIP
To print contiguous (consecutive) pages of a document, in the Print Range area’s Pages box, enter the page numbers separated by a hyphen (for example, type 6-8 to print pages 6, 7, and 8). To print noncontiguous pages, for example, pages 6, 8, and 16, type commas between specific page numbers: 6, 8, 16 in this example. You can also combine these two conventions to print both contiguous and noncontiguous pages by separating each entry by a comma. For example, entering 6-8, 10-13, 16 will print pages 6, 7, 8, 10, 11, 12, 13, and 16.
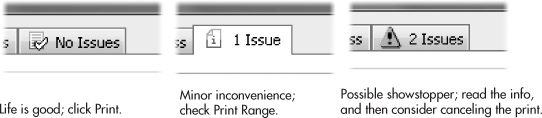
The Quick Preview deserves a little more coverage here. After clicking the Quick Preview button, you’re shown a preview window and page-browsing controls (see Figure 27-1). While you’re previewing, a right-click offers invaluable commands from the pop-up menu to Show Image, Preview Color, Preview Separations, and to toggle the view of rulers. When you want to print a multi-page CorelDRAW file, you can quickly turn pages in Quick Preview to make sure you’re printing within page boundaries and that all the pages contain what you want to print. To print the preview page at the current settings, choose Print This Sheet Now from the pop-up menu.
FIGURE 27-1 Use the buttons on the bottom of the dialog to more easily choose what pages you’d like to print.
Setting Print Options
The tabbed areas of the Print dialog more or less follow from left to right a progression from personal printing options to more ambitious endeavors such as printing separations for process color composite (commercial) printing. Some of the areas on the tabs are device dependent and appear only after CorelDRAW evaluates your printer’s capabilities; Use PPD (PostScript Printer Description), for example, is dimmed on the General tab until you’ve chosen a printer that is PostScript capable. This is why selecting your printing device must be your first step in printing from CorelDRAW. Depending on the printer defined, you’ll see tabbed areas for General, Layout, Separations, Prepress, PostScript, Misc, and Issues.
Setting General Options
The General tab of the Print dialog, shown in Figure 27-2, offers control over some of the most common printing options.
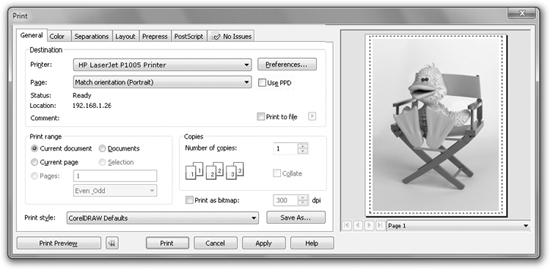
FIGURE 27-2 Use the General tab of the Print dialog to set the most basic printing options.
Here’s a description of what each option in the General tab controls:
• Destination This area represents the feedback provided by the printer driver used for your selected printer showing the Printer name, Status, Location (local port, or on a network), and Comment information. Direct, network, or spooler printers are indicated according to their connection status. If CorelDRAW cannot find a printer connected directly or remotely (through a network) to your computer, you’ll need to pay a visit to the Windows Start menu | Devices and Printers, and then choose to Add A Printer. The good news is that this is a wizard-style process and that Windows ships with just about every conceivable print driver for popular makes and models. You might be prompted for a specific print driver, so it’s a good idea to have the manufacturer’s disk handy or to download the latest drivers from their website. Clicking the Preferences button provides control over printer-specific properties and output material sizes. Choosing Use PPD lets you assign a PostScript Printer Description file; checking this box displays the Open PPD dialog, where you locate and then select an appropriate PPD file. Unless you’re already familiar with what Print To File does, don’t check this box in your everyday printing; see “Saving a Print File” later in this chapter.
• Print Range This area contains options to select pages from the file you have maximized in the drawing window—or from any document you have open in CorelDRAW; it can be minimized, and you can print it as long as it’s open. Choose Current Page to print the page currently in view in your CorelDRAW document, or enter specific page numbers in the Pages box. If you go into the Print command with one or more objects selected in your document, the Selection option becomes available, so you can print only your selection; this is quite handy for printing only a part of your document without rearranging or hiding objects, or for changing your document before printing. If you have more than one document open, choosing the Documents option displays a list of the open documents, so you can choose which document to print. Choose Even and/or Odd from the drop-down menu to print only certain pages. By default, both Even and Odd pages are printed.
• Copies This area has two options for setting the Number Of Copies to print either collated or not. When Collate is chosen, a picture appears indicating the effect of collating. Collating is a great timesaver when you want to publish a multi-page presentation and don’t need the hassle of reordering pages as they come out of the printer.
Using Print Styles
Print styles remove the repetitive task of setting up the same (or similar) printing parameters by letting you choose to save all the selected options in the Print dialog in one tidy print style file. If your printing options have already been saved as a style, open the Print Style drop-down menu on the General tab of the Print dialog, and choose the style from the list.
To create a style that includes all the settings you have currently selected, follow these steps:
1. On the General tab, click Save As to open the Save Settings As dialog, shown here. As you can see, this dialog includes a Settings To Include tree directory listing the categorized print options and check boxes according to current settings.

2. Click to select the options you want to save with your new style, enter a unique name for your style, and then click Save to store the settings, after which they are available from the Print Style drop-down list.
Saving a Print File
Print To File goes back to the days of DOS, and today you’d be hard-pressed to use this option more than twice in your career. However, Print To File is supported in CorelDRAW, and you might want to generate this huge, text-based PostScript file for a couple of reasons:
• If you’re handing the document over to a third party to print because you don’t have a specific printer hooked up to your computer, and you don’t want them editing the document in any way. Print To File files are text-based printing instructions; they contain no graphics as graphics, so they are nearly impossible to edit using a graphics application.
• If (and this is a big “if”) someone has specifically requested a Print To File document because they like the intellectual challenge of decoding the PostScript printing instructions to reconstruct the graphic using Ghostscript or a similar PostScript deciphering program.
Throughout the history of PC printing, printing to file has served a valuable purpose. It enables someone who doesn’t own CorelDRAW to print your CorelDRAW file; a dozen years ago, high-resolution printers such as Linotronic image-setting devices were the only game in town when you wanted coffee table–book printing quality. If a service bureau that owned the device didn’t own CorelDRAW, you printed to file. Today there are alternatives to making a CorelDRAW document portable for a service bureau to render, but if Print To File is a client’s mandate, here are the steps to use:
1. Choose the Print To File check box in the General tab of the Print dialog, and then choose from four options in the adjacent flyout menu. Choose For Mac if the file is to be printed from a Macintosh system. Choose Single File (the default), Pages To Separate Files, or Plates To Separate Files to set how the files are prepared. Single File creates one, usually huge, print file for the entire printout. Pages To Separate Files creates separate files for each page. The Plates To Separate Files option creates a single file to represent each page and each of the color separations you’ve chosen to print if your printing destination is to CMYK process color printing.
2. Click Print to start creating the print files, and the Print To File dialog will open, where you choose a destination for the PRN file.
NOTE
Even if you’ve specified a PRN file type in the Save As Type drop-down list, a file with the extension .PS (example: MyFile.ps) will be generated if you’ve designated a PostScript printer as your default computer. However, if your computer’s printer is non-PostScript—and inkjet printers are non-PostScript—the file extension written will be .PRN as expected.
You then copy the PRN file to removable media, and take it to the party who will print the file; alternatively, many service bureaus offer FTP (file transfer protocol) upload sites for getting files to them. Traditionally, before artists use Print To File, they have a target device’s print driver installed—this is done just like you install a printer in Windows, except you’re only installing a device driver and not the physical printer itself. Service bureaus like to provide you with their print drivers because if you write a Print To File using an incompatible driver, you’re left with a job the service bureau can’t print, and you’ve wasted time and hard disk space.
Also, if the CorelDRAW file you print to file contains fonts, you either need to convert all text to curves (which significantly increases the saved PRN file’s size), or you need to include the typefaces on the disk you give to the service bureau, which is a thorny legal issue. Users give service bureaus digital typefaces all the time, but according to most font licenses, this isn’t legal. On the other hand, you cannot depend on a service bureau or commercial press house to have exactly the same font as the one you used—if a high-resolution printer reads a Print To File and cannot find the typeface on its operating system, chances are you’ll get a beautiful high-resolution print that uses Courier instead of your typeface.
In short, before you send out work for printing:
• Find a service bureau that owns CorelDRAW and save yourself some headaches.
• Failing that, find a service bureau that accepts Acrobat PDF documents (more on this later in this chapter).
• Export a copy of your CorelDRAW to Illustrator file format. It might not export perfectly, and certain CorelDRAW-specific effects will not translate, but Windows and especially Macintosh service bureaus are likely to own a copy of Illustrator.
• Use Print To File.
Using the Color Tab Settings
In version X5, users of previous versions will find additional options for printing that have been moved from other tabs to streamline the printing process. The following sections document color-related operations.
Print Composite/Print Separations
At the top of this tab is the area where you choose to print color separations (covered later in this chapter) or to print a composite—which is the standard way most users print color documents to a home inkjet printer. If you choose separations, the Print Composite tab in the Print box changes to Print Separations options and vice versa.
Document/Proof Settings
Clicking either of these buttons determines whether your print uses your current document color settings—found under Tools | Color Management—or disregards color settings you’ve made in the file, by using the settings you pick in the Print box here.
Color Conversions Performed By
This drop-down list provides you a way to convert the color space of the document using CorelDRAW’s features or lets your printer handle the conversion from your monitor’s color space to the slightly smaller and duller color space of physical pigments. If you’re undecided, it’s a safe bet to let CorelDRAW handle the conversion if your printer is an inkjet and not a PostScript printer. If you choose Device Independent PostScript File, it will display on the Color tab. However, this is not a Color Conversion option—the option is missing on the tab—if you’ve defined another printer, even a PostScript printer. Basically you have two options: use CorelDRAW’s engine, or use the printer’s print driver.
Output Colors As
When you’re printing to a personal, non-PostScript device such as an inkjet, your options are only RGB and Grayscale, which is fair enough: laser printers can only reproduce grayscale halftones, and inkjets usually use the RGB color space to then convert colors to the color space of CMYK. When a PostScript device is defined, your options are:
• Native CorelDRAW handles the reconciliation between any different color models you’ve used when filling objects and the colors in any imported bitmaps image.
• RGB The file is sent to the printer using the RGB color model. This is an appropriate option to use when you’re printing a composite image (not separations) and you’re lucky enough to own a color PostScript printer.
• CMYK This is a good mode to use when you want to proof your work and get a good idea of what your colors will print like when sending a file to a commercial printer (composite printing). Similarly, if you’re printing separations, CorelDRAW forces all colors in your document into the CMYK color space using the rendering intent you’ve selected (covered next).
• Grayscale Choosing this mode sends all color information to the printer as percentages of black. When choosing this option, you will also see a Convert Spot Colors To Grayscale option, something you might not want to choose if you want a plate to print of your spot colors.
• Convert Spot Colors to CMYK If for some reason your budget doesn’t allow a spot color, clicking this check box will force any spot color plates to be rendered as CMYK process color equivalents. Forget about color fidelity and accuracy, but the option is available.
Correct Colors Using
When printing to a non-PostScript device, you have the option to choose to correct colors to the color profile of a specific printer, or to choose from the list of available ICC color profiles installed on your computer.
TIP
You might be surprised at the lush colors you’ll render to a home inkjet printer by choosing sRGB IE6C 1966-2.1 as the color correction option instead of relying on your printer’s color correction. sRGB is a widely used color space for today’s consumer-level scanners and printing devices.
When you’ve defined a PostScript printer as your target device, you can choose from several presets defined from many different image-setting manufacturers, or choose a predefined color space, the same ones as if you were using a non-PostScript printer.
Rendering Intent
You have four options for how CorelDRAW handles the conversion of color space to another. In a nutshell:
• Perceptual and Relative produce the best color conversions for digital photographs.
• Saturation preserves highly saturated color areas, at the expense of rendering photos like comic book art. Use this conversion type for business graphics such as charts and detergent labels.
• Absolute Colormetric maintains the original white point of the composition, but shifts hues in photographs in an unrealistic way.
Choosing a Layout
Options on the Layout tab give you the control to set how the page is laid out on the printing material you’ve loaded into your rendering device. Although the options are set to defaults for the most common print tasks, you can customize options in each area.
Setting Image Position and Size
Image Position And Size options control the position of the layout of each page. These settings will override settings you’ve defined in Printer Properties (your system’s printing preferences, which aren’t related to CorelDRAW). The following options are available:
• As In Document This option (the default) leaves the current layout unchanged.
• Fit To Page Choose this to enlarge or reduce your page layout to fit exactly within the printable area for your selected output material size. Understand that choosing this option immediately ruins as a print any precise measurements you’ve created in your file. For example, if you’ve labored on a fancy spine design for a presentation booklet that’s 12″ high, CorelDRAW will scale the design for print to the maximum dimension of your media, such as an 8½×11″ sheet of paper. If you run into this problem, hang on and check out the Print Tiled Pages option covered shortly.
• Reposition Images To Choose this option to change the position of images as they print relative to how they’re arranged on your CorelDRAW page. By default, images are automatically positioned to Center Of Page on your printing material. However, you can align images to the top, left, right, and bottom corners of the printing material page size—a very convenient way to save paper and to make trimming a printed piece easier. Using this option, you can also individually specify the position of images on each page of a multi-page document differently by choosing a document page number from the Settings For Page menu. Use the Position, Size, and Scale Factor boxes to enter specific values. Unlocking the horizontal/vertical lock by clicking the nearby lock icon gives you the opportunity to set the horizontal and/or vertical Scale Factor separately for non-proportional scaling, although you might not want a distorted print.
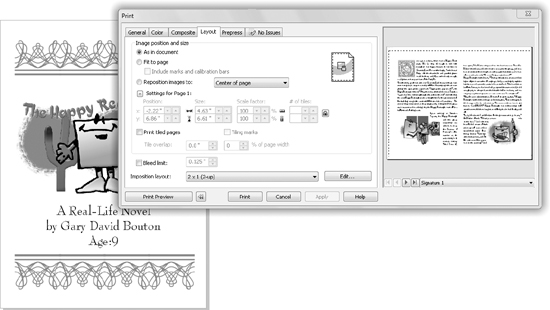
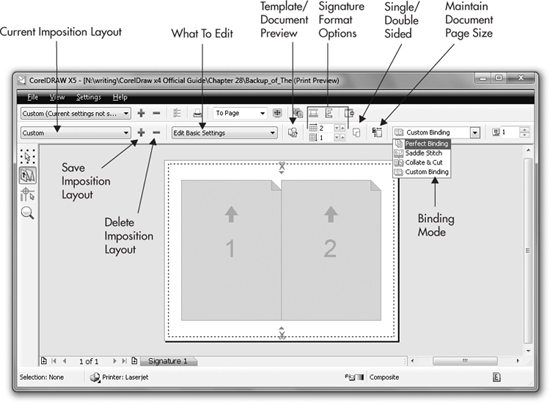
• Imposition Layout Imposition is the orientation and position of multiple pages to create a book signature—pages are ordered and rotated so that a commercial press can print a large page, and then the pages can be trimmed and bound so the book looks like a finished product. If you intend to print to high-resolution output, this option must be set exactly according to the specifications given to you by the printing service or other vendor you are using. It’s always wise to talk with press operators (or their boss) before an expensive print job, because the owners of the press know the characteristics of it better than you do. Clicking the Edit button opens a preview feature, where you can customize the imposition requirements; you can rotate pages, move gutters, and even reorder pages at the last minute. However, Imposition Layout is also an important feature even if you’re at home printing a single copy of a booklet from your inkjet printer. Next you can see a layout defined from a four-page CorelDRAW document; a template was not used to set up the file, and yet by choosing from the Imposition Layout drop-down, you ensure that the pages will indeed be printed in book fashion.
Tiling Your Printed Document
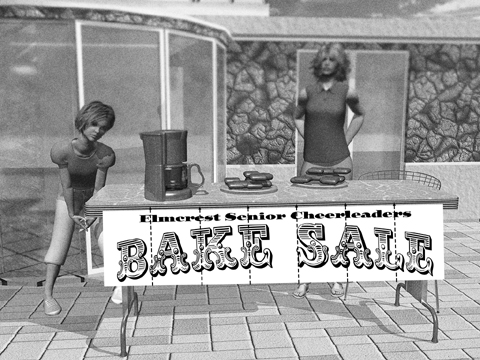
Often you’ll need to print a piece that is much larger than the maximum output size of a personal printer: a bake sale banner, for example, or other display that exceeds even the output dimensions of today’s wide-format inkjet printers. This need calls for using the Print Tiled Pages option. After printing, get a utility blade, a metal ruler, some adhesive, and a cutting surface, and you’re in business. The options for setting how each tile is printed are as follows:
• Print Tiled Pages Choose this option to print pages in portions. Once selected, the # (Number) Of Tiles, Tiling Marks (you want to use Tile Overlap if you use this, to avoid showing the marks in your finished project), and Tile Overlap options are available. The # Of Tiles option lets you print your document in vertical or horizontal tiles, up to 24 portions for each. Setting the Tile Overlap option gives you control over how much image portion is repeated around the edges of each tile, based on unit measure or a percentage of the original page width. By default, Tile Overlap is set to 0 inches.
• Tiling Marks Choose this to have crop-style marks print around your tiles, making it easier to realign the tile pages when you put the tiles together.
• Tile Overlap This option adds an extra printed portion around each tile to make it easier to align the tiles for your large sign. Overlap can be set from 0 through 2.125 inches.
• % of Page Width Use this to specify the tile overlap as a percentage of the page size between 0 and 25 percent.
• Bleed Limit Choosing this check box lets you use a portion of the area surrounding your document page. For example, if certain objects overlap the page border of a document, this option lets you print a portion outside the limits of the page. Bleed Limit can be set within a range of 0 to 40 inches, the default of which is a standard 0.125 inch.
The illustration here shows dashed lines (which would not be in the finished banner) where the single sheets tile in the bake sale banner, only one of scores of needs for tiling a print when your budget prohibits extra-extra-large-format prints.
Printing Separations
If you know what color separations are and you work at a commercial printer, this next section is for you. If you hire a commercial printer when you have a color job and only have a working understanding of process color and separations, read on to learn a little more, but don’t provide a commercial press operator with your own color separations! CorelDRAW creates terrific color separation work, but you really need to output to a high-resolution (expensive, you don’t buy them at a department store) image-setting device that can render to film or another reproduction medium. You need to know as much about the printing characteristics of a printer as you do about color separations to prepare your own job for printing presses—for example, trapping margin of error, undercolor removal, ink characteristics, and other factors. You probably wouldn’t practice brain surgery on yourself—similarly, don’t do your own separations (“seps”) if you’re inexperienced in the field of standard web-offset printing.
If you’re a silk screener or know a commercial press inside-out, when Print Separations is selected in the Color tab of the Print dialog, you have control over how each ink color prints; see Figure 27-3.
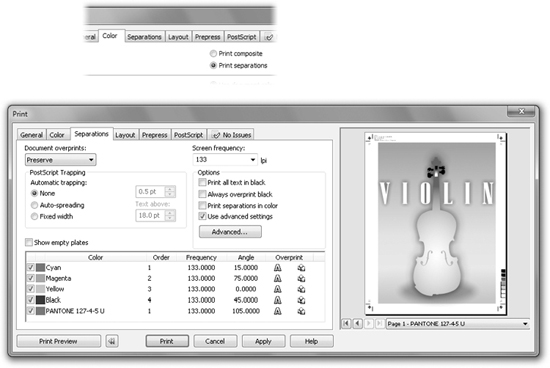
FIGURE 27-3 Use the Separations tab options to specify ink colors and trapping preferences.
Choosing Separation Options
If you’ve first chosen Print Separations on the Color tab, you’ll now see the Separations tab in the dialog. Here is the rundown on your color separation options as shown in the dialog in Figure 27-3:
• Print Separations in Color This option is available only if the printer you’ve defined is a color printer such as a personal inkjet, which prints a simulation of a coated printing plate, each plate reproduced in its respective color. This option is sometimes used for printing progressive proofs, checking registration, and checking color accuracy. Understand that if you use this option on a personal inkjet printer, you’ll print several pages, each containing a single color; this could use a lot of ink, particularly if your CorelDRAW is dense with colored objects! Printing separations in color results in a good test for separations, but it’s nothing you would want to frame and hang in the den later.
• Convert Spot Colors To This option has been moved to the Color tab in version X5. Choosing this option is often a wise choice in non-color-critical printing, when you can’t afford to print a fifth plate using a spot color. This option converts non-CMYK colors such as fixed-palette, spot-ink colored objects to the closest process color equivalent when printing. You can usually get away with this if your spot color is not a special ink, such as a metallic. Letting CorelDRAW convert a metallic, fluorescent, or other specialty spot ink to process will dull the final print job; the results will look amateurish at best.
• Show Empty Plates While unchecked (the default), this option causes pages without any objects to be skipped during printing to avoid printing blank pages. To include the blank pages, check this option. This can save you time, for example, if you have a spot color on only one page but not on others in a multi-page document.
Frequency and Angle and Overprint Options
When separations are selected to print, the ink colors used in your document are listed at the bottom of the Separations tab. Each ink includes options for choosing if and how they will be printed. You’ll see a series of columns that show how each ink color is set to print, with its color reference, ink color name, screen frequency, screen angle, and overprint options. The inks will ultimately print in order from top to bottom as you see them on the list.
First, don’t change the frequency or line angle unless you’re a professional—the default values are standard among the printing community. To change the Frequency and/or Angle of a specific ink color, first check the Use Advanced Settings check box, then click directly on the value, and then enter a new value. To change overprinting properties of a specific ink color, click directly on the Overprint symbols for text and/or graphic objects to toggle their state. As a visual reminder the Overprint symbols turn darker when set to overprint. The following list explains what each of these options controls:
• Order Use the selector for each ink to set the order in which separations are printed based on the number of available ink colors.
• Frequency This option sets the output resolution in lines per inch (lpi); high-resolution image setters that speak PostScript organize dots for printing into lines. A typical line frequency for high-quality printing is 133 lpi, which results in color process prints of 2,500 dots per inch and higher. In comparison, a home laser printer, the 1,200 dpi variety, is only capable of rendering 80 lines per inch—you would not get magazine-quality prints using 80 lpi for color separations. Screen frequency values are automatically set to the default values of the image setter or printer selected on the General tab. Screen frequency values are also controlled by settings in the Advanced Separations Settings dialog.
• Angle This option sets the angle at which the rows of resolution dots align. When separating process color inks, the following standard default screen angles are set automatically: Cyan = 15°, Magenta = 75°, Yellow = 0°, and Black = 45°. When separating fixed palette ink colors such as Pantone, TOYO, DIC, and so on, all colors are set to the default 45° value. You occasionally need to check the Issues tab when custom inks are used for spot-color plates to ensure that the spot plate is not at the same or even similar angle to the process plate screen angles. Change the angle if necessary; an incompatible spot-color screen angle can result in moiré patterning in your print, an effect similar to laying a screen window on top of another one at a certain angle.
• Overprint Click directly on the symbols for text (the A symbol) and/or objects (the page symbol) to set whether text and/or objects for each ink are printed. Both states toggle on or off when clicked, and a gray overscore above the icons confirms your alterations.
NOTE
If you’ve used even one spot-ink color in your document—or perhaps more than just one—these inks will separate at the default 45°. Consult with your print vendor for the correct screening angles for overlapping fixed-palette, spot-ink colors.
The Use Advanced Settings option is always dimmed unless you have a PostScript printer selected. When it’s enabled, advanced settings will override settings in the Separations tab. Clicking the Advanced button displays the Advanced Separations Settings dialog, shown next.
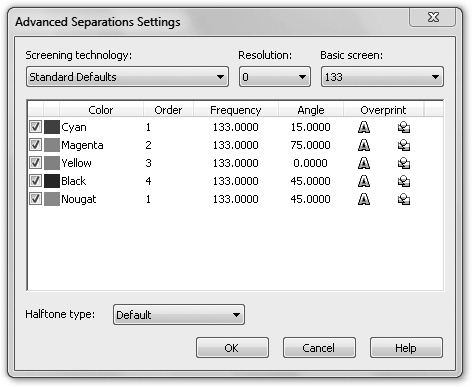
Here’s what the options in this dialog control:
• Screening Technology This selector drop-down contains scripts for specific printing technologies such as Agfa and Linotronic image-setting devices. When Standard Defaults is used as the Screening Technology, other options are set according to settings for your specific printer driver, accessed through Properties on the General tab.
• Resolution This displays the output resolution of your printed material, the default value of which is set according to the Screening Technology selected. A service bureau or your print vendor will know the specifics.
• Basic Screen This option sets the resolution as measured in lines per inch of the screens rendered in your output material. Check with your print vendor for the exact setting needed. If you need to adjust this value, various choices will appear depending upon which Screening Technology and image setter Resolution is currently selected. The options shown in the Basic Screen section will also be available back in the Separations main tab.
• Halftone Type The Halftone Type selector is used to set the shape of the actual dots that compose the screens in the final output. Using this drop-down menu, you can choose to use such shapes as the Default (Dot), Line, Diamond, Elliptical, Euclidean, Lines, Grid, Microwaves, Rhomboid, and Star. If you’re just getting into commercial printing, anything other than a dot halftone shape is used either because the print press pulls better prints, or because you really know what you’re doing and want to create an effect in the finished print job. Microwaves, for example, is a special effect that sounds interesting, but you would need to have already seen the effect on a printed sample before choosing it, and then you would do a short run to see whether the example produces the same effect in your own piece. On the other hand, Elliptical and Star shapes can be used to sharpen the output of a print, and therefore are more of an enhancer than an effect.
Setting Trapping Options
Trapping involves either spreading or overprinting portions of colored objects to avoid printing inaccuracies, the most common one being paper white showing at the edge between two color objects. Overprinting causes one ink color to print over another, resulting in two layers of ink—it’s a technique used to work around imprecise ink alignment. You can set the overprinting of fills and outlines applied to objects directly in your document; you cancel out of the Print dialog and return to the open document. Then with the Pick tool, right-click one or more objects, and choose Overprint Fill or Overprint Outline from the pop-up menu options.
Overprinting can be set in three ways: directly in your document for each object, in the Separations tab using either fill or outline ink overprinting options, or using automated trapping. Where options have been set manually in your document or for each ink color, overprinting operates on a three-level hierarchy, which creates a condition where one overprinting setting overrides another one, as follows:
1. When printing, the objects in the drawing are first examined for any selected fill and/or outline overprinting properties. Applying overprint properties directly to an object in a drawing overrides all other overprinting functions.
2. Next, ink color overprinting options are examined. If an ink color is set to overprint and no object fill or outline overprint properties are applied, the ink color overprints the objects beneath it.
3. Finally, the trapping options you have chosen in the Separations tab of the Print dialog are examined. If no overprint options are set, then automatic trapping will be applied if either Auto-spreading or Fixed Width is selected.
Automatic trapping and overprinting options in the Separations tab have the following effects on how colors in your document are printed:
• Preserve Document Overprints This option preserves the overprint options applied directly to your drawing objects, regardless of the settings selected elsewhere. Your other option (on the drop-down list), Ignore, lets you work with the settings in the Separations tab, and any custom overprinting you’ve applied directly to objects in your document is ignored.
• Always Overprint Black When this option is selected, all objects that have color tints between 95 and 100 percent black will overprint underlying ink colors. Usually, you want black to overprint; black is the key plate for all the fine details, particularly necessary if you’re using a bitmap image in part of your design.
• Auto-spreading This option causes CorelDRAW’s print engine automatically to create an overprinting outline of identical ink color around objects where they overlap other ink colors. When the option is selected, you can set the Maximum width of the spread within a range of 0 to 10 points (0.5 point is the default, a little wider than a hairline). Automatic width values vary according to the difference between the color being overprinted and the underlying color. Choose Fixed Width to set the Auto-spreading width of the outline to a constant width regardless of this color difference. When Auto-spreading is selected, choosing the Text Above option makes CorelDRAW ignore text sizes below a certain size; small text is often distorted by the spread effect. Choose a size between 0 and 200 points; the default is 18 points.
In-RIP Trapping Settings
If your output device is equipped with its own In-RIP trapping software, you can use this option. The term RIP stands for raster image processor, the process of converting mathematical chunks of information to a map of where dots of ink go on the page to represent what you see onscreen. Many high-end image setters are equipped with internal software with which certain In-RIP trapping makes the whole trapping process faster and more efficient.
This option is dimmed unless the output device defined on the General tab is PostScript compatible, PostScript 3 is selected in the Compatibility area of the PostScript tab, and Print Separations is disabled in the Color tab. With the feature enabled, choose the In-RIP Trapping option, and then click the Settings button to open the In-RIP Trapping Settings dialog, shown in Figure 27-4.
Here you’ll find an ink listing similar to the one in the Separations tab, plus other options for setting these items:
• Neutral Density This is a value based upon the relative darkness of each process ink, ranging from 0.001 to 10.000. Trapping software derives neutral density for spot colors based upon their CMYK equivalents. Default values often work, or the value can be set according to advice from your print vendor. Most third-party ink swatches list the neutral density values for each ink color.
• Type You choose the Type for an individual ink by clicking its type in the top list to reveal an options drop-down. Although Neutral Density is the default for Image Trap Placement, this option becomes available when you have a specialty ink defined for a spot plate, such as a spot varnish. You can choose from Neutral Density, Transparent, Opaque, or Opaque Ignore. Opaque is often used for heavy nontransparent inks such as metallic inks, to prevent the trapping of underlying colors while still allowing trapping along the ink’s edges. Opaque Ignore is used for heavy nontransparent inks to prevent trapping of underlying color and along the ink’s edges.
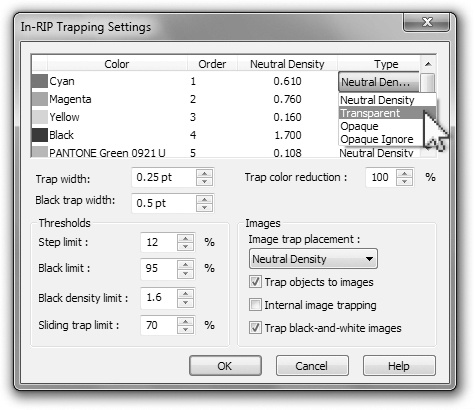
FIGURE 27-4 If your output device is equipped with In-RIP trapping, these options are available.
• Trap Width This option controls the overlap of adjacent colored objects into each other. The slightly overlapping colors prevent the appearance of white gaps due to misregistration when printing. The default Trap Width is 0.25 point. A larger number will accommodate larger printing errors due to older machinery.
• Black Trap Width This option controls the distance that inks spread into solid black, or the distance between black ink edges and underlying inks. It is used when the amount of black ink reaches the percentage specified in the Black Limit field (in the Thresholds area).
• Trap Color Reduction Use this option to prevent certain butt-aligned colors (areas on different plates that meet one another) from creating a trap that is darker than both colors combined. Values smaller than 100 percent lighten the color of the trap.
• Step Limit This option controls the degree to which components of butt-aligned color must vary before a trap is created, usually set between 8 and 20 percent. Lower percentages increase sensitivity to color differences and create larger traps.
• Black Limit This value controls the minimum amount of black ink required before the value entered in the Black Trap Width field is applied.
• Black Density Limit This option controls the neutral density value at, or above, the value at which the In-RIP feature considers it solid black. To treat a dark spot-color as black, enter its Neutral Density value in this field.
• Sliding Trap Limit This value sets the percentage difference between the neutral density of butt-aligned colors at which the trap is moved from the darker side of the color edge toward the centerline. Use this option when colors have similar neutral densities, to prevent abrupt shifts in trap color along a fountain fill edge, for example.
• Trap Objects to Images Choosing this option lets you create traps between vectors and bitmaps.
• Image Trap Placement This option sets where the trap falls when trapping vector objects to bitmap objects to either Neutral Density, Spread, Choke, or Centerline in this option’s drop-down list. Neutral Density applies the same trapping rules used elsewhere in the printed document. Using this option to trap a vector to a bitmap can cause uneven edges because the trap moves from one side of the edge to the other. Spread produces a trap in areas where bitmaps meet vector objects. Choke causes vector objects to overlap the bitmap (the bitmap is choked). Centerline creates a trap that straddles the edge between vectors and bitmaps. Trap Objects To Images must be checked for Image Trap Placement to have any effect.
• Internal Image Trapping This option creates traps within the area of a bitmap, which is useful when very high contrast and posterized images are part of a design.
• Trap Black-And-White Images Choosing this option performs trapping between vectors and black-and-white (monochrome) bitmaps.
Setting Prepress Options
The term prepress is used to describe the preparing of film for various printing processes. Choosing the Prepress tab displays all options controlling how your printing material will be produced, and which information is included on the page, as shown in Figure 27-5.
Here’s what the options in the Prepress tab offer:
• Paper/Film Settings These two options specify negative/positive printing and on which side of the film the light-sensitive emulsion layer appears. Choose Invert to cause your output to print as a negative; choose Mirror to cause the image to print backward. Ask the press operator or service bureau which way their image setter is set up for film.
• Print File Information A Job Name/Slug Line text box is printed on each separation, to better visually identify each printed sheet. The path and filename of your document is used by default, but you can enter your own information. Choose Print Page Numbers to print page numbers as defined in your CorelDRAW document; choose Position Within Page to print this information inside the page boundaries—outside is the default.
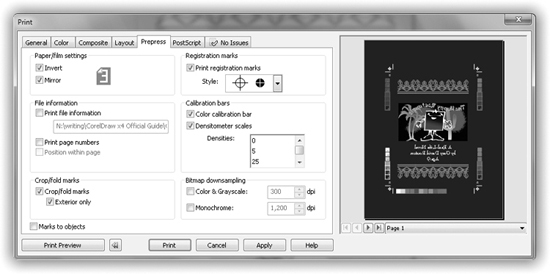
FIGURE 27-5 Use these options to control how your output is produced and to add prepress information and markings.
• Crop/Fold Marks Crop marks help locate your document’s page corners; fold marks indicate folds for a specific layout. Choose Crop/Fold Marks to print these markings. While this is selected, you can also choose Exterior Only to cause the marks to print only outside the page boundaries on your printing material, which produces a more polished final presentation. Both options are selected by default.
• Registration Marks and Styles Registration marks help to align each separation plate; the film print is used to make the plate, and the plates need to be precisely aligned when your piece is printed, or you get a “Sunday Funny Pages” finished output. Choosing Print Registration Marks (selected by default) includes these marks on your output. Use the Style selector to specify a mark shape; the selector includes a preview of both positive and negative versions.
• Calibration Bars and Densitometer Scales These two options enable you to include color calibration bars and densitometer scales outside the page boundaries of your printed material. Calibration bars are useful for evaluating color density accuracy by printing a selection of grayscale shades that may be used for measuring the density—or blackness value—of film or paper output.
• Bitmap Downsampling Unless you’ve imported a bitmap image whose resolution as placed in a document exceeds the maximum output resolution of the printing device, it’s not necessary to check either the Color & Grayscale or the Monochrome check boxes. This feature is provided as a time-saver: for example, if an image is greater than 300 dpi and your output device is only capable of a maximum of 300 dpi, time is wasted as excess data is spooled to the printer … and then discarded.
• Marks to Objects Choosing this option places the currently selected prepress marks around the bounding box containing the objects on each page. These appear regardless of whether the Crop/Fold Marks option is selected to print.
Choosing PostScript Options
None of the preceding information on separations and advanced trapping features will be meaningful if your chosen output is not to a PostScript device. If you don’t currently see the PostScript tab, shown in Figure 27-6, you need to define a different print driver on the General tab. PostScript options offer control over a specific type of page description language, Level 2, Level 3, the type of device, compatibility, and features covered next.
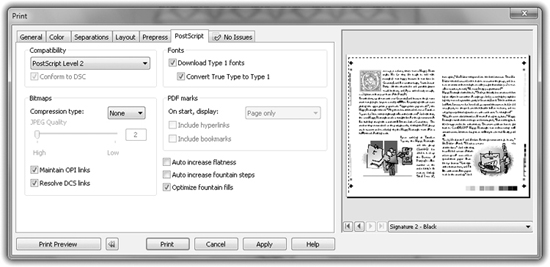
FIGURE 27-6 These options become available if your selected printer is PostScript compatible.
You set the following options on the PostScript tab:
• Compatibility In most cases, the printer and the PPD (PostScript Printer Description) file you choose are automatically set with the Compatibility option, which determines which PostScript features the output device is capable of handling. Older printers may be limited to PostScript Level 1 or 2 technology; most new models are compatible with Level 3. If you’re unsure which to choose, check out the manufacturer’s FAQ area on their website or the physical printer documentation.
• Conform to DSC Document Structuring Convention (DSC) is a special file format for PostScript documents. It includes a number of comments that provide information for postprocessors. Postprocessors can shuffle the order of pages, print two or more pages on a side, and perform other tasks often needlessly performed by humans.
• Bitmaps Selecting Level 2 or 3 PostScript-compatible printers offers you the Compression Type option of Use JPEG to reduce printing time if you have bitmap images in your document. When this option is selected, the JPEG Quality slider is available for setting the quality of the bitmaps being printed. Keep in mind that JPEG is a lossy compression standard; some of the original image information is discarded, quality is compromised, and at high compression settings, a photograph can take on visual noise.
• Maintain OPI Links This option preserves links to server-based bitmap images, provided you have imported temporary low-resolution versions using the Open Prepress Interface (OPI) option when you created your CorelDRAW document. Using OPI, you can store high-resolution bitmap images in a printer’s memory, and work temporarily with an imported low-resolution version. When your document is printed, the lower-resolution version is swapped with the higher-resolution version. By default, this option is selected.
• Resolve DCS Links Desktop Color Separation (DCS) technology is similar to OPI; you use placeholders in your document that have links to digitally separated images for use in process or multi-ink printing. When this option is enabled, the linked images automatically replace the placeholder images at print time. By default, this option is selected. If this option is not selected, a prompt will appear while the document is being printed, so you can relink the files manually through directory boxes.
• Fonts PostScript printing devices can print Type 1, True Type, and OpenType fonts. Type 1 fonts are often preferred because the font data is written in PostScript language. OpenType fonts, when a typographer creates them, can be coded to Bézier curves (in which case programs recognize them as PostScript encoded) or to Quadratic B-Splines—which are usually interpreted by an application as True Type in structure. A good reason to lean toward Type 1 fonts when you output to PostScript is that there is no ambiguity to the structure of a Type 1 font. CorelDRAW’s options let you control which fonts are used during printing. It’s more reliable to download the fonts to the printing device; this speeds printing and produces better-looking text. To enable this feature, select Download Type 1 Fonts. If this option is disabled, fonts are printed as curves, which can take a lot of printing time when you have a lot of text on a page. When you select the Download Type 1 Fonts option, the Convert True Type To Type 1 option becomes available (and selected by default).
• PDF Marks If your document is being prepared for printing as a composite to an Adobe PDF distiller, these options become available. You can specify how your PDF file initially displays when viewed in Adobe Acrobat Reader or in a third-party reader by using options in the On Start, Display selector. Choose Page Only, Full Screen, or Thumbnail view. You can also choose whether to Include Hyperlinks and/or Include Bookmarks in the resulting PDF file. If you’re preparing a PDF to send to a service bureau for high-resolution output, don’t use hyperlinks; they mess up the appearance of your printed piece, and let’s get real—how does your intended audience click on a piece of paper to visit a website?
• Auto Increase Flatness This option lets you simplify the printing of curves by decreasing the number of straight vector lines that describe the curve. This option can be used as a last resort if you run into problems printing highly complex shapes in your CorelDRAW document, usually a printer memory problem, as in not enough memory.
• Auto Increase Fountain Steps This option makes the print engine examine your document for opportunities to increase the number of fountain steps in an effort to avoid fountain fill banding. Banding is the visible effect of not having enough sequential steps in a fountain fill; you see bands of gradually changing color instead of a smooth transition from one object area to another. Increasing the number of steps that describe a fountain fill will cause fountain fills to appear smoother, but it will also increase printing complexity and output time.
• Optimize Fountain Fills This option works in reverse of the previous option by setting the print engine to decrease the number of fountain steps set for objects in your document to the number of steps your printer is capable of reproducing.
CorelDRAW’s Printing Issues Tab
The process of verifying that every last detail in your document will print as expected is often called preflight, and the good news is that the Issues tab is your flight attendant. CorelDRAW examines the contents of your document and the printing options you’ve selected and then compares them with the capabilities of your selected printer and your selected output material. Printing snafus are found automatically and flagged by warning symbols, as shown in the earlier illustration in this chapter about issues icons. Figure 27-7 is the Issues tab, which is divided into two sections; with Print Preview turned on, it’s both documented and visually obvious what this proposed print has going against it.
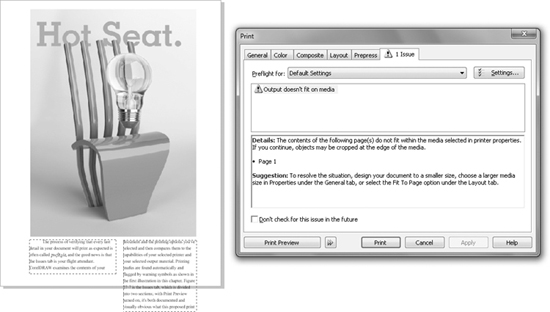
FIGURE 27-7 If CorelDRAW anticipates printing problems, they’ll be explained in this dialog.
The top half of the Issues dialog lists the preflight issues detected with a brief explanation. The bottom half explains the causes, identifies the exact problems, and offers suggestions and recommendations for correcting them.
The Issues feature will not prevent you from printing your document. If you want, you can deactivate the feature by selecting the found issue in the upper portion of the tab and choosing “Don’t check for this issue in the future” at the bottom of the tab. This disables the detection of the issue in the Preflight Settings dialog. Clicking the Settings button opens this dialog, which also lets you save and load current settings for future use.
Previewing Your Printed Document
CorelDRAW’s Print Preview feature provides a very good way of viewing your document and performing minor touchups, and it’s fully integrated with CorelDRAW’s print engine. To open the Print Preview feature, click the Print Preview button from within the Print dialog. Print Preview also is available in the File menu.
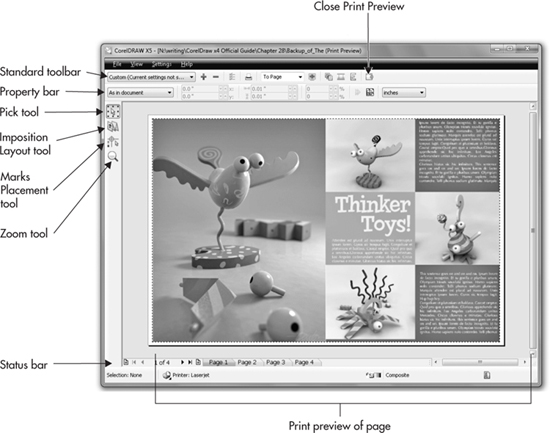
FIGURE 27-8 Print Preview is a program within a program, with its own interface, tools, shortcuts, and commands.
Print Preview (see Figure 27-8) is a separate application window and includes its own command menus, toolbars, property bar, status bar, and toolbox. When Print Preview is open, CorelDRAW is still open in the background. The Print Preview utility provides a higher level of control over the finished print than preferences you set in the File | Print dialog.
Browsing and Viewing Previews
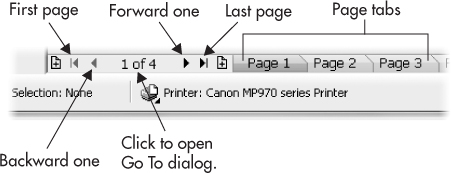
The first thing you’ll want to do in Print Preview is to examine how your printed pages will look. Across the bottom of the Print Preview window, you’ll find page controls, shown next, so you can browse each printed page. Use the arrow buttons to move forward or backward in the sequence, or click a page tab to display a specific page. As you do this, you’ll discover each printed page is represented—including individual ink separation pages for each page in your document when you’re printing separations.
You can view your pages in a number of different ways based on output mode, color, and object type. To change view modes, choose one of the following from the View menu:
• Show Image Choosing this lets you hide the display of page contents to speed screen redraw times when you’ve got a lot of objects on a specific page.
• Preview Colors Choose this to access three basic previewing states. Auto (Simulate Output) shows each page’s color according to your selected options and your printer’s capabilities. If your chosen printer driver does not print in color, you’ll see only grayscale color on your pages. To override this, choose either Color or Grayscale, which forces a specific view.
• Preview Separations Choose Preview Separations to access three basic states. Auto (Simulate Output) displays separations according to your printer driver and selected print options. If Separations are not selected to print, only a composite is shown, and vice versa. You can override this by choosing either Composite or Separations to force a specific separation display state. Overprints do not display accurately in Print Preview, and trapping cannot be seen.
• Printable Area This varies from printer to printer; the printable area is the physical area that the printer can render onto a page. Choose this option (selected by default) to show a dotted line representing the maximum extent to which the printer can render.
• Render PostScript Fills Use this option to have PostScript fills display as they will print. Deactivating this option can free up system resources when viewing documents where you used a lot of PostScript-filled objects.
• Show Current Tile This option highlights individual tiles as you hover your cursor over them when previewing, and it’s useful when printing large documents in sections onto small output material (called tile printing, covered earlier in this chapter). To use tile printing from within Print Preview, choose Settings | Layout to open the Print Options dialog to the Layout tab, and then click to activate the Print Tiled Pages option.
TIP
To get to Print Options without leaving Print Preview, press CTRL+E to bring up the General tab, and then click your way to the tab you seek.
Print Preview Tools and the Property Bar
The key to using Print Preview to its fullest is learning where all the options are, what each tool does, and what print properties are available while using each. Four tools are on the toolbox—the Pick tool, Imposition Layout tool, Marks Placement tool, and the Zoom tool—each of which is discussed in the sections to follow. The standard toolbar, shown next, contains printing options, viewing options, and shortcuts you can use to open print-related dialogs.

First is the Print Style selector, which is used to choose all printing options according to a saved set of print parameters. As with other CorelDRAW Preset features, you can select, save, delete, or modify print styles in the selector. Choose an existing Print Style, use the current unsaved settings on the current print job, or choose Browse to show the Open dialog so you can work with a saved Print Style. To delete a selected Print Style, click the Delete Print Style (–) button. To save a Print Style, click the Save Print Style As (+) button (or use the F12 shortcut) to open the Save Settings As dialog. Use the Settings To Include options to specify which print options to save with your new style, and click Save to add the Print Style to the selector.
The remaining options in the standard toolbar have the following functions, many of which are covered earlier in this chapter:
• Print Options This button opens the Print Options dialog.
• Print This button immediately sends the document to the printer using the current options. Use CTRL+T as a shortcut; CTRL+P works, too, as a common Windows command for applications that can print.
• Zoom Select a predefined zoom level from the list to change the view magnification level.
• Full Screen Preview This button is self-explanatory. Press ESC to return to Print Preview. You can also use CTRL+U as a shortcut.
• Enable Color Separations This button sends the printing of color separations to the output device using color selected in the Separations tab of the Print Options dialog.
• Invert This button inverts the printed image to print in reverse. This is for film using an image-setting device, but can also provide an amusing special effect (and use a lot of ink!).
• Mirror This button flips the printed document to print backward to set emulsion orientation on image-setting devices. You can also use this to print to T-shirt transfers.
• Close Print Preview Pressing this button (or using the ALT+C shortcut) returns you to the current CorelDRAW document.
Pick Tool Property Bar Options
The Pick tool in Print Preview is used in much the same way it’s used in the drawing window; with it you select and move (by click-dragging) the contents of the current page. While the Pick tool and objects on a page are selected, the property bar features a variety of printing options, shortcuts, position settings, and tool settings, as shown here:

Many of these options are for positioning and scaling the contents or whole pages in relation to the printed output page size that your printer is currently set to use. Click-dragging the object control handles lets you scale the objects interactively.
Imposition Layout Tool Property Bar Options
The Imposition Layout tool provides control over the print layout. Only certain image setters are capable of printing multiple pages in signature formats, so it’s best to check with the person doing your print job before making changes using the imposition options.
When the Imposition Layout tool is selected, the preview is changed to display imposition-specific properties. This tool has four separate editing states, each of which is chosen on the Edit Settings selector. Options accessible on the property bar while Edit Basic Settings is selected, shown next, give you control over imposition layout options. Choosing Edit Page Placements, Edit Gutters & Finishing, or Edit Margins from this selector displays a set of imposition options for each state.
Marks Placement Tool Property Bar Options
The Marks Placement tool lets you alter the position of crop and fold marks, registration marks, color calibration bars, printing information, and Densitometer (density scale) positions. When the Marks Placement tool is selected, the property bar features options for positioning and printing certain mark types, as shown in Figure 27-9.
To position crop and fold marks, click-drag the top, bottom, or sides of the rectangle defining their position, or enter values in the property bar boxes. To change the position of other marks you have selected to print with your document page, choose the Marks Placement tool, and drag directly on the marks.
Zoom Tool Property Bar Options
The Zoom tool in the Print Preview window is used much the same way as the Zoom tool in CorelDRAW, so you can increase or decrease the view of your Print Preview. Many of the functions of the Zoom tool are performed interactively or by using hot keys. While the Zoom tool is selected, the property bar features all Zoom options and magnification commands, as shown here:
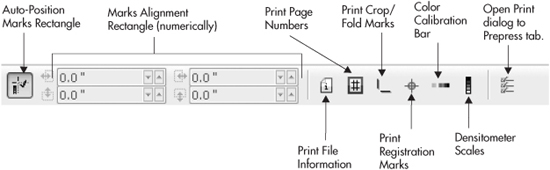
FIGURE 27-9 While the Marks Placement tool is selected, the property bar features these options.
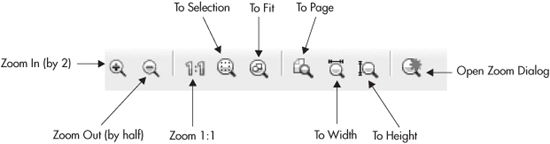
You can also change Zoom settings by choosing View | Zoom (CTRL+Z) to open the Zoom dialog to choose among all Zoom tool functions. Use shortcuts to change your view magnification while using Print Preview’s Zoom tool: Zoom Out using F3, Zoom To Page using SHIFT+F4, Zoom To Selection using SHIFT+F2, and Zoom To Fit using F4.
TIP
Print Preview doesn’t have an Undo command; to reset options quickly, click the Print Styles selector and then choose CorelDRAW Defaults. All crop marks vanish, imposition settings revert, and any repositioned object reverts.
Setting Printing Preferences
Once you’re familiar with the ocean of printing options, what your output device is capable of, and what you want from a specific print job, Printing Preferences can be your one-stop shop for most of the items covered in this chapter. Choose Settings | Printing Preferences (CTRL+F is the shortcut) while in the Print Preview window to open the Printing Preferences dialog, shown in Figure 27-10. Preferences are subdivided into General, Driver Compatibility, and Preflight options. To change any of the options, click a Setting title; a drop-down selector appears, and then you make your change.
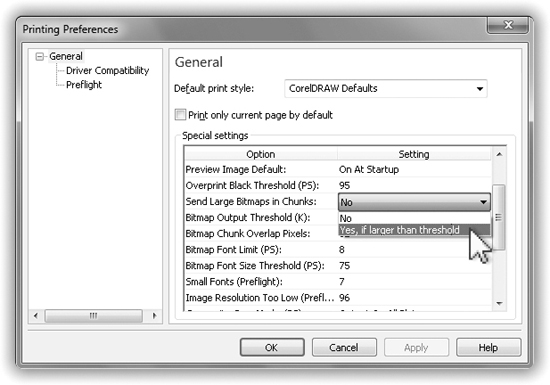
FIGURE 27-10 The Printing Preferences dialog offers comprehensive control over output settings.
General Printing Preferences
Options in the General tab provide control over fonts, crop mark color, driver banding, and so on, and they set the parameters for potential preflight issues or warning dialogs that appear before and during printing. These options are set by default to the highest fault tolerance for most printing jobs; 99 percent of the time your prints will come out fine if you don’t change the settings. Here’s a list explaining the most common states:
• Spot Color Separations Warning This option lets you control the warning state while printing color separations. The warning can be set to appear if more than one, two, three, or any spot colors are used in the document being printed.
• Preview Color Default This option sets the initial color display of your printed document when the Print Preview window is first opened. Choose Auto (Simulate Output), Color, or Grayscale.
• Preview Separations Default This option sets the initial color display of your separations when the Print Preview window is first opened. Choose Auto (Simulate Output) or Composite.
• Preview Image Default This controls whether your document image is automatically set to show when the Print Preview window first opens. Choose On At Startup (the default) or Off At Startup.
• Overprint Black Threshold (PS) During overprinting, CorelDRAW X5 sets a default value for overprinting black objects only if they contain a uniform fill of 95 percent or more black. The Overprint Black Threshold setting can be changed using this option, so you can further customize the global overprinting function. The threshold limit can be set between 0 and 100 percent black.
• Send Large Bitmaps in Chunks This option works in combination with the Bitmap Output Threshold setting and can be set to Yes, If Larger Than Threshold (referring to the Bitmap Output Threshold value), or No.
• Bitmap Output Threshold (K) When printing to non-PostScript printers, this option lets you set a limit on the size of bitmaps, as measured in kilobytes, sent to the printing device. By default, this value is set to the maximum, but you can set it to specific values within a range of 0 to 4,096 (the default). This is a good option to change if your non-PostScript printer doesn’t have a lot of memory and you’re pulling prints that are unfinished due to lack of RAM for processing the image.
• Bitmap Chunk Overlap Pixels If a printing device has insufficient memory or another technical problem processing very large bitmap images, you can have CorelDRAW tile sections of such a bitmap. The overlap value is used to prevent seams from showing between “chunks” of the large image. When you’re printing to non-PostScript printers, this option lets you define the number of overlap pixels within a range of 0 to 48 pixels. The default is 32 pixels.
• Bitmap Font Limit (PS) Usually, font sizes set below the Bitmap Font Size Threshold preference are converted to bitmap and stored in a PostScript printer’s internal memory. This can be a time-consuming operation that usually increases the time your document takes to print. You can limit the number of fonts to which this occurs, forcing the printer to store only a given number of fonts per document. The default setting here is 8, but it can be set anywhere within a range of 0 to 100. Unless your document is a specimen sheet of all the fonts you have installed, 8 is a good number to set this option to.
• Bitmap Font Size Threshold (PS) Most of the time CorelDRAW converts very small sizes of text to bitmap format when printing to PostScript printers, such as 4-point legal type on a bottle label. This option lets you control how this is done, based on the size of the font’s characters. The default Bitmap Font Size Threshold is 75 pixels, but it can be set within a range of 0 to 1,000 pixels. The actual point size converted to bitmap varies according to the resolution used when printing a document. The threshold limit will determine exactly which font sizes are affected. For example, the equivalent font size of 75 pixels when printing to a printer resolution of 300 dpi is roughly 18 points, while at 600 dpi it’s about 9 points. The higher the resolution, the lower the point size affected. A number of provisions determine whether these controls apply, including whether the font has been scaled or skewed, and whether envelope effects, fountain or texture fills, or print scaling options such as Fit To Page have been chosen.
• Small Fonts This controls a warning that appears if the document you’re printing includes fonts below a 7-point size threshold by default. The Small Fonts warning option can be set between 3 and 18 points. Resolution plays an important part in rendering small point size typefaces, as does the design of the characters within the font. For example, a 1,200 dpi laser printer can render 4-point Helvetica quite legibly, less so with a serif typeface such as Times Roman because the serifs at this size are about equal to insect parts. Choose a simple sans serif font for extremely small font sizes. Do not expect a perfect rendering of a very small typeface, because the dots of ink or toner cartridge can render only a finite number of dots to represent very small text.
• Image Resolution Too Low By default, this value is set to 96 ppi, alerting you if bitmaps have a resolution below this value. This is probably too low for even today’s personal inkjets; it’s recommended that you increase this value to at least 225 ppi.
• Composite Crop Marks (PS) This is a useful feature for setting the pen color of crop marks either to Output In Black Only or to Output On All Plates—in process (CMYK) color, making the crop marks print to every color plate during process color separation printing.
• PostScript 2 Stroke Adjust (PS) The PostScript Level 2 language has a provision particularly useful for graphics programs such as CorelDRAW. Stroke Adjust produces strokes of uniform thickness to compensate for uneven line widths due to the conversion of vector artwork to raster printed graphics, which is what all printers do. The PostScript 2 Stroke Adjust option should not be used for older printers that are not compatible with PostScript Level 2 or Level 3 technology. Most recently manufactured printing devices are at least PostScript Level 2 compatible. If you are not sure what level your printing device is, leave this setting off or consult the docs that came with the device.
• Many Fonts This controls a warning that appears if the document you’re printing includes more than ten different fonts. If you’re new to CorelDRAW and are experimenting with all the cool fonts that came on the CD, your file can easily exceed this limit. If your printer’s memory and/or your system resources are capable of handling large numbers of different fonts, consider increasing this value. The Many Fonts warning option can be set within a range of 1 to 50 fonts. Tangentially related to this option is a creative design issue: very few professionals use more than ten different typefaces in a design; five can express an idea using text quite well in most situations.
• Render to Bitmap Resolution This option by default is set to Automatic, which causes bitmaps to be output at the same resolution as vector objects and text in your document. To specify the resolution of bitmaps to be printed at lower or higher resolutions than the rest of the document, choose specific settings within a range of 150 to 600 dpi.
Driver Compatibility
The Driver Compatibility area, shown in Figure 27-11, provides control over specific driver features for non-PostScript printers. Choose a Printer from the drop-down menu, and then choose specific options in the dialog to make changes. Clicking Apply saves and associates your changes with the selected driver.
Printing Issues Warning Options
You can customize issues found by CorelDRAW’s built-in preflight feature using options in the Preflight page of the Printing Preferences dialog (CTRL+F), which can be accessed only from within Print Preview by choosing Settings | Printing Preferences and clicking Preflight in the tree directory, as shown in Figure 27-12.

FIGURE 27-11 Use the Driver Compatibility options to specify how non-PostScript printers handle specific object types.
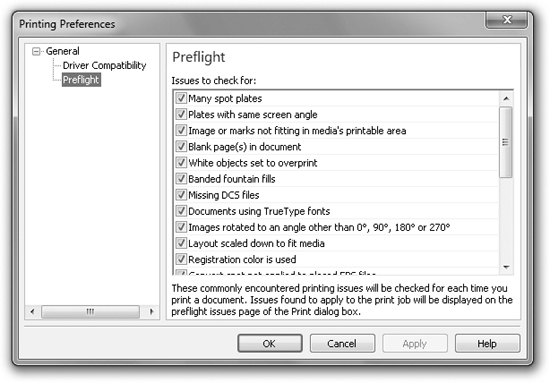
FIGURE 27-12 Preflight options let you control how and when detected printing issues appear.
This is a comprehensive list covering specific issues ranging from mismatched layout sizes to spot colors with similar names. Use the check box options in the list to activate or deactivate each option, or use the “Don’t check for this issue in the future” option, located at the bottom of the Issues tab of the Print Options dialog when an issue is discovered.
Corel’s Duplexing Wizard
You can create booklets and other double-sided printed documents on your personal printer by using the Duplexing Wizard. You can access this feature independently of CorelDRAW by choosing Start | All Programs | Corel Graphics Suite | Duplexing Wizard, or by pressing CTRL+D while in Print Preview.
This wizard is fairly self-explanatory and straightforward to use. When a driver is set to use the duplex printing feature, the Manual Double-Sided Printing dialog displays when CorelDRAW’s print engine starts to print, asking whether you want to print on both sides of a printed page. For specific page-insertion directions, you’ll find an option that will print an instruction sheet to show you which way you should reinsert the sheet of paper after printing the first side.
NOTE
The Duplexing Wizard is not intended for use with a PostScript printer.
Using the Collect for Output Wizard
CorelDRAW provides a wizard that collects all the information, fonts, and files required to display and print your documents correctly if you don’t own an image setter or other high-end output device and need to send your document to press.
Corel has a service bureau affiliate program, and service bureaus approved by Corel can provide you with a profile to prepare your document with the Collect for Output Wizard. This profile can also contain special instructions that a service bureau needs you to follow before sending your files. Check with your vendor to see whether it is a Corel Approved Service Bureau (CASB). If it’s not, and your printing need is a do-or-die situation, it’s easy to use File | Export. Choose PDF-Adobe Portable Document Format (*.PDF) from the Export Save As Type drop-down list, and then choose Prepress from the PDF Preset drop-down list in the PDF Settings dialog box. The PDF file is usually accepted by commercial press places and the results can be quite good.
To launch the wizard, choose File | Collect for Output. From there, the wizard guides you through a series of question-and-answer pages that gather the information you need to upload or put on a disk to deliver to a printer or service bureau. When you finish the process, all necessary files are copied to a folder you define, and optional documents specifying your required output are included, depending on your wizard option choices. Figure 27-13 shows the succession of wizard dialogs from the beginning to the end of the process. At the end, CorelDRAW offers a final screen with a summary; click Finish.
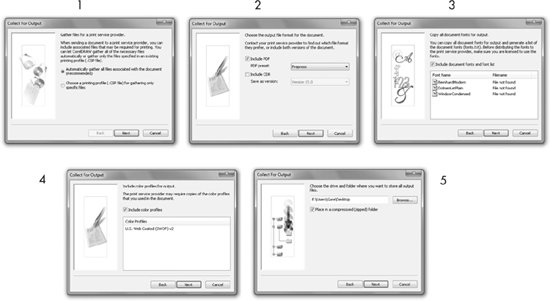
FIGURE 27-13 In five steps your files are prepared for sending to a service bureau.
Print Merge
Print Merge gives you the design and business opportunities to merge database information with specific fields of your CorelDRAW documents at print time, to print personalized documents with only a click or two. If you create mailing labels, short runs targeted at a specific audience, and marketing documents, this feature will be invaluable. By creating special fields, you can merge specific database information into your document and set properties such as color, font style, and so on. This feature also lets you use ODBC Data Sources from database management systems that use Structured Query Language (SQL) as a standard.
Follow these steps when you need to create a Print Merge:
1. Choose File | Print Merge | Create/Load Merge Fields. Choosing this command opens the Print Merge Wizard, and you either create a database from scratch or choose an existing one.
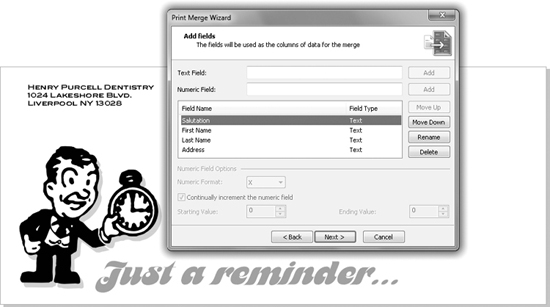
FIGURE 27-14 Create your custom database fields by typing in the Text and/or Numeric Field box and then click Add.
2. If you need to create a custom merge document, choose the Create New Text option and then click Next. Create fields for your custom database by entering unique names in the Text Field and/or Numeric Field, shown in Figure 27-14, and then click the Add button. As you build your field list, you can change the order of the fields by clicking to highlight a field in the Field Name list, and then clicking the Move Up and Move Down buttons. You can also edit the fields you’ve created by using the Rename and Delete buttons to change or remove a selected field. Choose the Incremental Field Data option while a field is selected in the list to number each entry in the field automatically. If you need numeric data, enter the value in the Numeric Field; when this option is used, new fields display, letting you specify the numeric sequence of your data and formatting. You can also choose the “Continually increment the numeric field” box to save time making your field entries. Once your list is created, click Next to proceed.
3. The next page of the wizard, shown in Figure 27-15, gets you right into building your database by entering values to build sets of field entries. To begin a new entry, click the New button, and then fill in the fields with the appropriate data; click the spreadsheet-like box to highlight it, and then type your entry. You can quickly revise an entire field by highlighting it and then pressing DELETE or BACKSPACE. To delete an entire record, make sure it is the only one with a check to the left of it, and then click the Delete button. Browse your database entries using the navigation buttons, or search for specific entries by clicking the Find button. Once your database is complete, click Next to proceed.
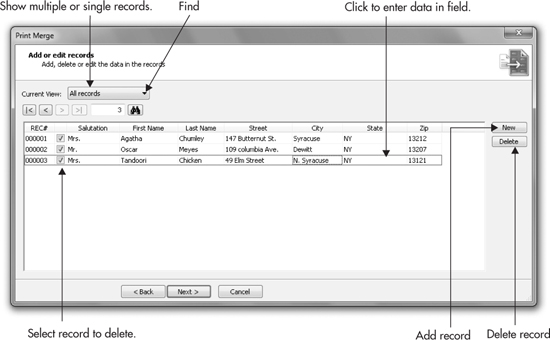
FIGURE 27-15 Use this page of the wizard to begin building your field entry sets.
4. The final wizard page is where you save your database to reuse and update in the future. Choose the Save Data Settings As box, and then browse your hard drive for a location to save the file in Windows Rich Text Format, Plain Text, or File With A Comma Used As A Delimiter (CSV Files). You probably also want to save the incremental field data to make looking up a record easier in the future. Click Finish to exit the wizard and automatically open the Print Merge toolbar, shown here. If you are still running Windows XP, you must navigate to a folder to be able to save your database. You’ll receive an error telling you that CorelDRAW failed to save the print merge data if you don’t “spell out” the save path for CorelDRAW.
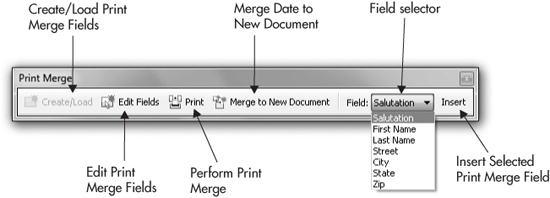
5. By default, the toolbar opens with your newly created database open and the individual fields it includes listed in the Field selector. To load your fields from a different database, click the Create/Load Print Merge Fields button to relaunch the Print Merge Wizard.
6. By inserting fields, you’re creating a link from entries in your database to insertion points in your document. To insert a field into your document, make a selection from the Field selector, and then click the Insert button. Use the cursor to define an insertion point in your document with a single click. As you insert a field, a code appears in your document with the name of the field bracketed, such as <Street Address>. Repeat your insertion procedure for each field you want to include in your print merge operation.
7. The print merge fields can be formatted as artistic text, so you can apply any properties associated with artistic text to the field text to format it as you would like it to appear when printed. This includes color, alignment, font, size, style, and so on. Fields can be inserted as stand-alone text objects, inserted into paragraph text, or simply typed using the same code format.
8. Once your fields have been placed and formatted, the print merge document is all set up, and you might want to click the Merge To New Document button to proof the different pages with the data entered. When it comes to merging your printed document with the Print Merge feature, use the Print button on the Print Merge toolbar. If you simply press CTRL+P, CorelDRAW will prompt you to choose to Perform Print Merge, or to Print As A Template. Alternatively, choose File | Print Merge | Perform Merge. Doing so immediately opens the Print dialog, where you proceed with printing using your print option selections.
9. Finally, if you want to import text from a file or ODBC database, you must do this by first opening up a new document, or by closing a merge document, reopening it, and choosing File | Print Merge | Create | Load Merge Fields.
This chapter has shown you where the print options are for both PostScript and non-PostScript output, how to check for errors and correct them before you send your CorelDRAW file to an output device, and how to make your work portable so someone with more expensive equipment than mere mortals own can print your work to magazine quality. But this is only half the story of CorelDRAW output. Take a trip to the following chapter, where output for the Web is explored; you’ll want companion pieces up on your website in addition to printed material. Regardless of whether you put dots of ink on a page or broadcast pixels to a screen 10,000 miles away, today it’s called publishing your work.