
CHAPTER 28 Basic HTML Page Layout and Publishing
Whether it’s for personal pleasure or selling your wares, the Web connects your ideas with your business and social contacts. It’s far less expensive than other publication media such as television and print, and the really great thing about it is that it’s hot. You don’t have to be a rocket scientist to get media up on your website using CorelDRAW, and once you’ve designed a piece for print, it’s practically ready to go on the Web. Create once, publish many times!
In this chapter you learn about the many tools and features at your disposal in CorelDRAW for optimizing your work for the Web, and about how to create special web graphics such as rollover buttons that turn your art into interactive art.
NOTE
Download and extract all the files from the Chapter28.zip archive to follow the tutorials in this chapter.
Web Page Navigation Buttons and Hotspots
What makes the Web a web are the links that connect pages to other pages. The World Wide Web is engineered by connecting this bit of this page to that bit of that page on the same site—or on any other website in the world. The engine that performs all this interconnecting magic is actually the text-based hyperlink. Although text-based hyperlinks are the foundation of the Web, text links by themselves aren’t very visually attractive, and the links themselves often are just a bunch of letters and numbers that mean something to a computer, but mean nothing to a human.
However, if you put a graphic face on a link—perhaps one that changes as a visitor hovers over or clicks it—you have a web page that speaks well of your artistic skills. You also get a chance to provide nonverbal communication, the sort that plays to a worldwide audience, many of whom might not speak your native tongue. With a graphic, you can clearly point out that Area X is a link and not part of your text message. Using a graphic also gives you the opportunity to provide a visual clue about where the link goes. How about the humble shopping cart icon? A great many people in this world now know that clicking a shopping cart button takes them to a page that has something to do with buying something. That’s a pretty all-encompassing message using only a few pixels.
Creating and applying attractive, well-thought-out navigational aids to a web page are a must in the competitive online marketplace. The following sections take a look at how you can combine CorelDRAW’s tools with your input and ingenuity to create web pages worth a thousand words.
CorelDRAW’s Internet Toolbar
You’ll find that several web tools and resources are located throughout CorelDRAW, but the central location for many of these resources is the Internet toolbar. Here’s a look at the toolbar; you choose Window | Toolbars | Internet, or right-click any visible toolbar and then choose Internet from the pop-up menu. The buttons on this toolbar are dimmed unless you have an object or two on the current drawing page; now is a good time to create a few button-shaped graphics for tutorial steps you can follow a little later.
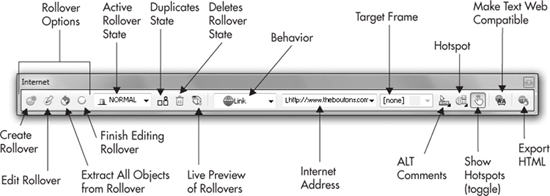
From the Internet toolbar, you can apply web-specific properties to objects, such as hyperlinks, rollover effects, and image maps. Hyperlinks are links to existing web pages (or to bookmark links applied to objects in your CorelDRAW document). Rollovers are objects that can change their appearance and perform an event in response to a user’s cursor action over the object. Image maps are objects that have one or more linked areas to web page destinations. Rollovers are unique object types (that this chapter shows you how to make); however, hyperlinks can be applied to any single object or to specific characters in a paragraph text object.
CAUTION
Arial, Verdana, Times New Roman, and several other typefaces are web compatible; when CorelDRAW exports these fonts—when you use them as paragraph text on a page—they will appear as editable text in the audience’s browser. Be sure to click the Make Text Web Compatible button before exporting your HTML; otherwise CorelDRAW will export the text as a bitmap graphic, as you’ll see when you get to the Images tab while exporting. See “Web Text Options” later in this chapter.
The Internet toolbar provides a convenient hub for applying nearly all web object properties. Many of these properties can also be found and applied elsewhere in CorelDRAW, but it’s more convenient to use the toolbar. Making your graphics actually perform the duties you’ve assigned to them (by applying web properties) requires that a matching piece of HTML code is added to the web page HTML. CorelDRAW will write this code for you when you export your Corel document. You will need to provide the HTML along with the graphic to your client or to the webmaster to make the interactive graphics you’ve created do what they’re supposed to do. In the sections to follow, you’ll learn what options are available, and where to find them.
Creating Rollover Buttons
Almost any object you draw can be made into a rollover that reacts to cursor actions, so you can liven up your published document with simple animated effects and hyperlinks. Cursor actions are events such as when a user holds or passes a cursor over the object, or clicks the object by using a mouse.
When you’re creating rollovers, three basic states can be defined: Normal, Over, and Down. The Normal state sets how an object appears in its “static” state—when the cursor is not over or clicked on the object on the web page. The Over state sets the appearance of the object whenever a cursor is over it. The Down state reveals the object in the rollover group when the user’s cursor is above the object and has clicked their mouse button. By varying what the graphic looks like in these states, you can create interesting visual effects and give your users meaningful feedback related to their cursor movement.
This is fun stuff and deserves a tutorial. The following steps show how to make a region interactive when an object (or group of objects) is displayed on a web page. Although the button will react to cursor actions when you’ve completed the tutorial, the actions will not link to anything; linking a button is covered later in this chapter—let’s concentrate on the art for the button first. Let’s suppose you want a button that tells the visitor that something is for sale: a button with a $ symbol plays in several countries, or use a currency symbol of your preference in this example. To continue the concept here, the action a visitor would take would be to click to buy the item; therefore, when visitors hover their cursor over and/or click the button, the button should change to a different look. In this example the button will change its text from a $ symbol to an official-looking “SOLD” message. Yep, as ambitious as this might sound, all you need to do is to follow these steps…
 Creating Different Looks for Rollover States
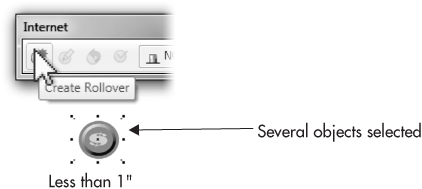
1. Create a button object, make it as fancy as you like (Effects | Emboss works well), but keep the size of the button to approximately the size you’d want it on your web page—under an inch is fine for this example. Then with the Text tool, type $ and give the symbol a fill color that contrasts with the button color.
2. Select all the objects (CTRL+A), and then click the Create Rollover button on the toolbar to let CorelDRAW know this is going to be a rollover button once you’ve finished, as shown here.
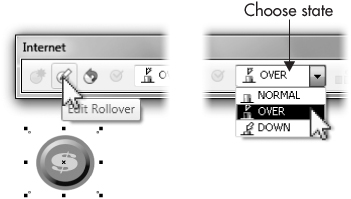
3. With the object now defined as a rollover object, all the states on the Active Rollover State selector display the same group of objects you selected…and it’s time to create a change now. Click the Edit Rollover button to enter the editing state, as shown here, and then choose Over from the selector list.
4. Edit your button; in the next illustration the embossed circle has actually been replaced with a polygon object. You can replace objects, change the fill, do just about anything you like because this editing state is not a “normal” page view in CorelDRAW’s drawing window. Some tricky stuff is going on behind the scenes, and if you choose to delete a shape and replace it now, you haven’t really deleted it. You remove an object from a state’s view, in this case from the Over state, but in the Normal state all your original objects are still there. Similarly, delete the $ and then with the Text tool, type SOLD in an interesting font.

5. For the sake of testing all these features, let’s suppose that the Over state, the SOLD button, is also good for the Down state, the state that occurs when the visitor clicks the button. By default, the Normal state was assigned to all three available states when you first made the collection of objects a rollover button. First, click the Active Rollover State selector and choose Down; a view of the Normal state objects appears.
6. Trash the contents of the Down state by clicking the Deletes Rollover State trashcan button.
7. Choose Over from the selector, and then click the Duplicates State button. The Over state now duplicates the following unassigned state (Down).
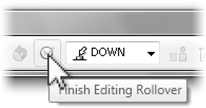
8. Mission accomplished! Click the Finish Editing Rollover button (shown here), and save this file to CDR file format.
9. Oh, yeah, you want to see your creation in action! CorelDRAW will preview your interactive button right on the drawing page. Click the Live Preview Of Rollovers button; before you move your cursor over the button, it should look like it did when you set it to Normal—your original group of objects. Move your cursor over the button, and it should show the Over state, as it will in the Down state (when you click the button) because you duplicated Over to Down in the tutorial. After previewing the effect, click the Live Preview Of Rollovers icon again to deactivate the live preview, because live drawings can get a little disconcerting.
Look at rollover.cdr and take it apart to better see the wealth of creative possibilities in your own work. This setup has three different states, and when you click the button, it changes shape and sort of squishes away from you. Just about any edit you can perform on objects, including totally replacing them, can be used in a Rollover button.
The Internet toolbar also has other rollover-related commands to objects, as follows:
• Edit Rollover This was covered earlier, but you should know that even after you think you’re finished, rollovers can be edited a week or a year from now.
• Extract All Objects From Rollover This is a destructive edit! Think about this command twice before you undo all your rollover work. Depending on the replacement objects you’ve built into a rollover, use this button to view and edit everything CorelDRAW has hidden while the document was a rollover. The objects will be stacked on top of each other, so you will have to change the stack order or drag them apart to see them.
TIP
Rollover buttons can’t be edited while the Live Preview Of Rollovers option is on. To edit any button, first disable this option by clicking the button. You can turn on Live Preview again when you finish editing the button.
• Duplicates State Covered briefly in the tutorial, this button is used to copy the Normal state to Over and Down states if you have deleted them using the command button, discussed next.
• Deletes Rollover State This deserves a little more quality time: while editing any rollover state, you can delete the object(s) representing it by clicking this button. After a state has been deleted, there will be no object to represent it, so the rollover state will appear blank. If needed, use the Duplicates State button to create an exact copy of the Normal state back into a blank state to avoid the need to re-create the object(s) used for this state. If you’ve deleted a state, be sure to set the Active Rollover State list back to Normal, or your button will be blank during an action when it’s put up on a web page.
You’ve just created a three-step rollover button! It is an interesting graphic effect, and sometimes you might want to use it just the way it is—a sort of graphic hide-and-seek game. Most of the time, however, you’ll want something additional to happen; you want the action of clicking the link to activate a hyperlink, and the user to be taken to the link’s destination. The destination can be a bookmark location on the current page, like the top or bottom of the page, or the destination might be another web page or URL location altogether. How to make the rollover or any other element do something is presented in the following section.
Setting Internet Object Behavior
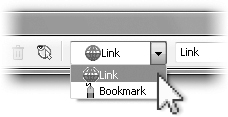
While any individual object or rollover state is selected, you can set its behavior as a web object to either a URL or an Internet bookmark using options in the Behavior selector on the Internet toolbar, shown here.
Adding URL Behavior
You can apply hyperlinks to any object using this option. For example, Corel’s URL is http://www.corel.com. Internet addresses must be preceded with the correct Internet protocol prefix (such as http://, https://, or ftp://). For example, if you’re linking to www.corel.com, the format must be http://www.corel.com. You can also use a “mailto” protocol to link to an email address, such as by entering mailto:someone@somewhere.com. This is a great way to get, for example, a potential client to write to you. By default, the http://protocol is automatically added to precede your URL, but you can edit it as needed.
To set a URL as the behavior for your web object, click to select the object, and use the Behavior selector on the Internet toolbar to specify the URL. With this option selected, type the actual URL in the Internet Address box, pressing ENTER to apply the address link. Once a URL has been applied, the Internet toolbar displays other options. Here are the URL-specific things you can define:
• Target Frame Use this option to specify an optional browser window location for the new page to open into. Unless you specify differently using this drop-down, the page that is called by the assigned URL address will open in the current browser window, replacing the page that contained the link. This produces the same results as the Default [None] setting in the Target Frame list. Choosing the _blank option from the list causes a new web browser window to open to display the linked page.
If your web page uses frames for its display, you can specify where in the frameset the new content will open. Choosing _self opens the new URL to the same frame where the web object is located. The _top option opens the new URL in the full body of the window, and all frames are replaced with a single frame containing the new document. The _parent option opens the new document in the current frame’s Parent frameset. You can also enter custom frame names by typing them in the Target Frame combo box.
NOTE
Frame-based web pages cannot be searched by most search engines such as Google, and onscreen readers for the visually impaired cannot read the contents of frames. Think very carefully if you choose a frame-based web document, and consider the audience you might lose and annoy.
• ALT Comments This option is covered in more detail later in this chapter. Briefly, use the comments. If you don’t, your visitors who have graphics turned off in their browser won’t know what your message is.
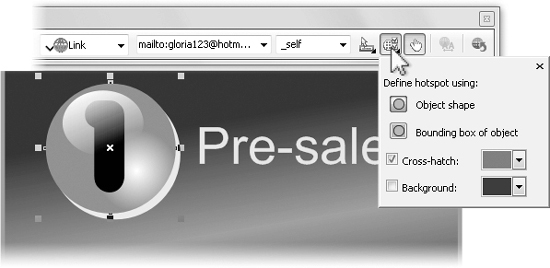
• Hotspots A hotspot in a graphic can be a great way to create one graphic and yet tag several different areas to different links. Once you’ve entered a link for an object, click this icon to choose whether an object’s shape or its bounding box will define the clickable area. Choose either Object Shape or Bounding Box Of Object in the selector, as shown. You can choose the Cross-hatch and Background colors if the currently set colors are difficult to distinguish from other colors in your document. These don’t show on your published web page; they’re only a visual convenience while you work in CorelDRAW.
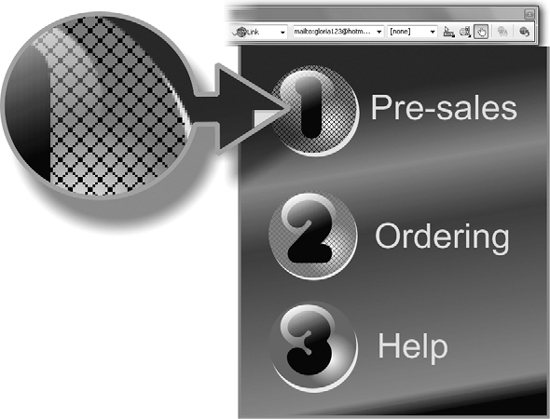
• Show Hotspot This option in the middle of the toolbar can be toggled on or off, and it can activate or deactivate the display of the crosshatch pattern, which indicates hotspots applied to web objects, shown here.
Adding Bookmark Behavior
Assigning a bookmark to a graphic object is a method you can use to provide a convenient way for users to navigate between web pages on your site. For example, you could use a bookmark if you wanted your audience to be able to click a button or other link and return to the first page of your site from another page in your site. This is a two-step process. In the first part of the process, you define a fixed location to which one or more URL links can point. The fixed location is an anchor or bookmarked object. The second step in the process would be to create a button or text link elsewhere that points to the object’s bookmark. Let’s walk through the process.
Creating Bookmark Links
1. Select an object that you want to serve as the anchor or bookmark, for example, a graphic at the top of the page. The object that is bookmarked must be a graphic, not text.
2. From the Behavior drop-down list in the Internet toolbar choose Bookmark.
3. In the Internet Bookmark box enter a descriptive name for the bookmark, such as “home_page” or “page_4_bottom” and press ENTER, as shown in Figure 28-1.
4. Select another object or button or piece of paragraph text on the same page or on another page in your document. This is the object that when clicked will take your user to the object you previously bookmarked.
5. From the Behavior drop-down list in the Internet toolbar, choose Link.
6. From the Internet Address drop-down list, choose the Bookmark name you gave to the object in step 3. For example, if “Home page” was the bookmark name you used, you would see an entry like this: _PAGE1#Home page, as shown in Figure 28-2.
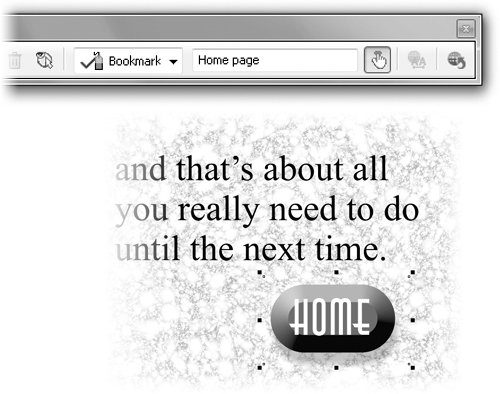
FIGURE 28-1 A bookmark object can be on any page of a multi-page document you want to publish as a website.
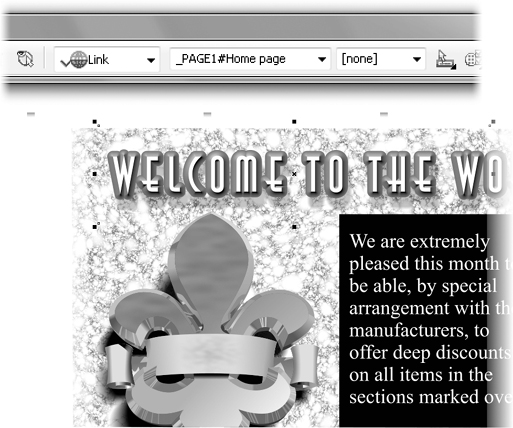
FIGURE 28-2 Use the target for the Bookmark you find on the Internet Address drop-down selector.
You can also enter a fully qualified URL in the Internet Address field to link to the bookmark. The URL would take the form of the web page’s address, followed by a pound (#) sign and then the bookmark name. For example, a website’s home page is usually named index.html. So a bookmark named “picture” on the index.html page would be typed in as http://www.mysite/index.html#picture.
TIP
If you are not familiar with how to write valid HTML hyperlinks and link anchor names or IDs (called bookmarks in CorelDRAW), consult your favorite HTML manual or the World Wide Web Consortium (W3C) page on Links and Anchors at http://www.w3.org/TR/html4/struct/links.html#h-12.2.1.
Web Properties and the Object Properties Docker
You can use the Object Properties docker, shown in Figure 28-3, as an alternative to using the Internet toolbar. While you can apply many of the same settings from here, rollovers cannot be created from this docker. To open the Object Properties docker to display web object properties for a selected object, choose Window | Dockers | Properties, or more simply press ALT+ENTER. With the Object Properties docker open, click the Internet (globe icon) tab.
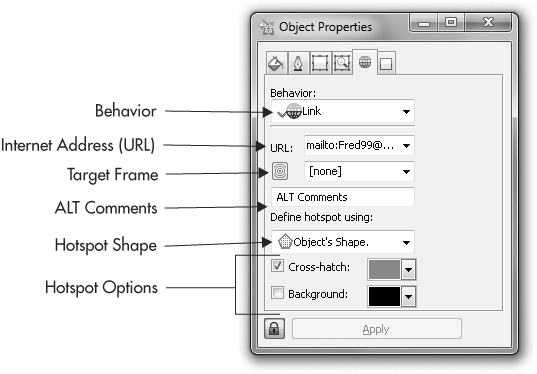
FIGURE 28-3 The Object Properties docker provides an alternative way of applying common Internet properties to objects.
Using the Links and Bookmarks Docker
Use the Links and Bookmarks docker to view, name, and apply preexisting bookmarks to objects. To open the docker, shown in Figure 28-4, choose Window | Dockers | Links and Bookmarks.
Purely for convenience, this docker automatically lists the currently applied bookmarks and includes commands for linking, selecting, and deleting existing bookmark links. The bookmarks can be created only by using the Bookmarks option from the Behavior selector in the Internet toolbar. You will find this docker most useful if you are trying to find a particular bookmarked graphic in a multi-page document that contains a lot of bookmarked items.
To find a bookmark in your document, open the Links and Bookmarks docker, and then double-click an entry in the Name column. You’re automatically taken to the page, and the bookmarked object is selected.
To create a link to a bookmark, first select the object to which you want to link a bookmark, click the New Link button, and then type the name in the open field on the Name list.
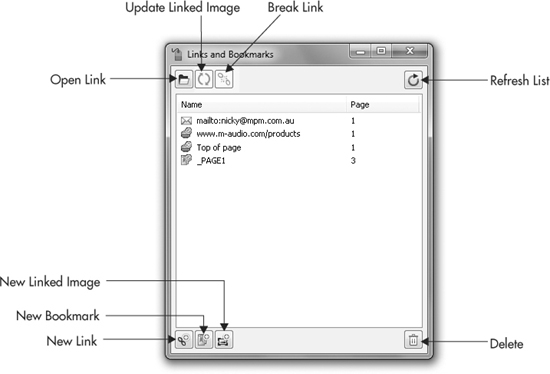
FIGURE 28-4 The Links and Bookmarks docker provides a convenient way for you to manage bookmarks applied to objects.
Applying a Page Background
If the background of your web page design calls for something other than white, you’ll need to apply a unique background color or tiling background pattern. Page background is applied using the Page Setup pane of the Options dialog (CTRL+J), shown in Figure 28-5. To access this dialog quickly, click to expand the listing under Document, and then click Background in the tree directory to view the available options.
Although it might seem logical to create a separate background object for your page and to apply your background properties to it, this can cause problems when it comes time to export your page. The Background should be chosen in this dialog as No Background (the default), a Solid color, or a saved Bitmap.
Choose Solid to access the color selector for choosing a uniform color. Choose Bitmap and click the Browse button to select a bitmap image as the tiling background.
While Bitmap is selected and a bitmap file has been specified, the Source and Bitmap Size options in the dialog become available. The Source option lets you link to and embed the bitmap with your document, but it has no bearing on how exported web pages are created. The Bitmap Size options let you use either Default Size (the inherent size of the original bitmap) or a Custom Size as the size. By default, the Print And Export Background option is selected, which should remain so to be included as one of your web page elements.
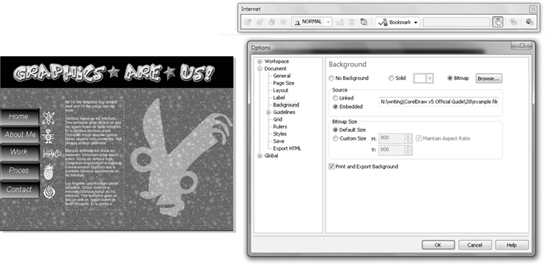
FIGURE 28-5 Use these options to apply color or tiling bitmap backgrounds to your web document pages.
Publishing Web Documents
The Publish To The Web command is used to export your CorelDRAW document to web page file format. To access this command, choose File | Export HTML or click the Export HTML button in the Internet toolbar. Doing either opens the same Export HTML dialog, shown in Figure 28-6, which has options for you to set exactly how your web page content will be exported. The tabbed dialog looks like and is arranged similarly to CorelDRAW’s Print Options dialog.
You’ll find everything you need to save your web page and images. You can also use options to upload your page and the image content to a web server. The dialog itself is divided into six option areas ranging from General to Issues. You can also view a detailed Summary of the exported content and any web export preflight issues that CorelDRAW detects. Use the Browser Preview button to check the appearance of your web page; by default, CorelDRAW launches Internet Explorer for previews. The sections that follow provide a close look at all the options available.
Setting General Options
Use the General tab to set options such as the destination folder for your exported files. You can specify a separate subfolder for your graphics, or remove the default subfolder name (images) to have the graphics saved in the same folder as your HTML document. To give the graphics subfolder the same name as the HTML document, select “Use HTML name for image sub-folder.”
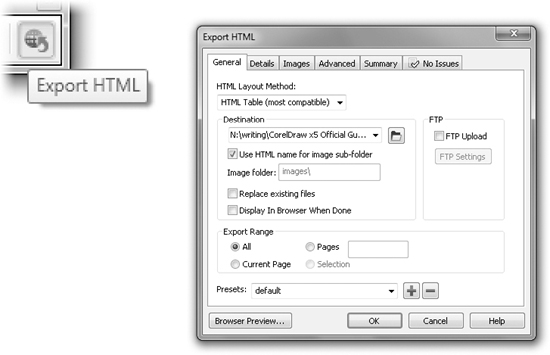
FIGURE 28-6 You can use these options for total control over how your page content will be exported.
As for the HTML Layout Method area, the best choice for the majority of users is the HTML Table (Most Compatible) method. If you’re using the export filter to export the HTML code only for an image map (rather than for an entire web page), you should select Single Image With Image Map.
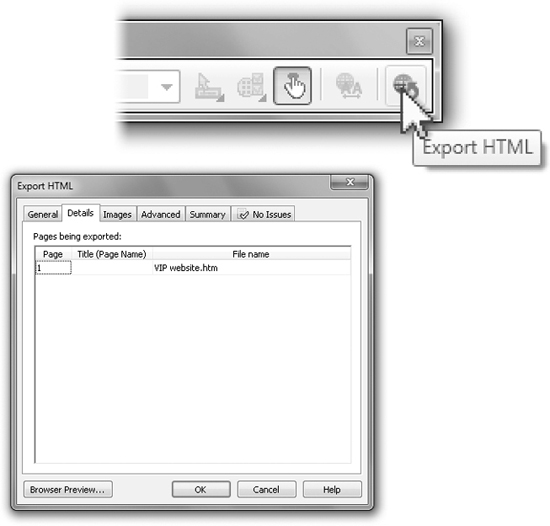
Examining Web Page Details
The Details tab, shown next, provides information regarding exactly what you selected for export and what the exported file(s) will be named. If you want, you can apply unique page titles and/or HTML filenames to your exported web pages by clicking the existing fields and typing in the current names.
Reviewing Web Images
The Images tab, shown in Figure 28-7, provides a detailed list of the images that will be exported and their default filenames. For a thumbnail preview of each image, click the Image Name. To change the type of format to which an image is exported, click the field adjacent to the Image Name under the Type heading.
To change the settings used for each type of exported image, click and then choose from the Type drop-down list. This dialog is where you choose an export format for GIFs, JPEGs, and PNGs.
Setting Advanced HTML Options
The Advanced tab provides options for maintaining links you may have made to external files, including JavaScript in your HTML output, and for adding cascading style sheets (CSS) information in your web page. If you’re using rollovers, be sure to choose the JavaScript option.
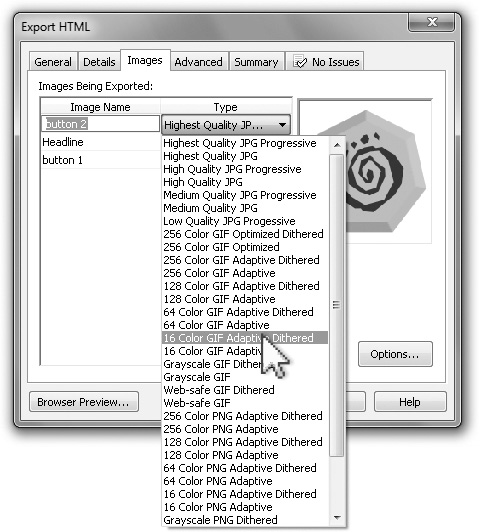
FIGURE 28-7 Use the Images tab to locate a bitmap and to change the type of file CorelDRAW exports.
Browsing the Web Page Export Summary
The Summary tab, shown in Figure 28-8, provides information on the total size of your web page and on how long it will take users to download your page at various modem speeds. The information is then itemized for each HTML page and image, so you can see if something in particular (such as a large image) might cause an unnecessarily long download time.
Preflight Web Issues
The Issues tab, shown in Figure 28-9—where an object that’s off the web page has been flagged—detects and displays potential HTML export problems by using a series of preflight conditions. Preflight issues are found and displayed according to the options set throughout the Publish to the Web dialog, most commonly regarding issues surrounding color model use, text compatibility issues, and image size and resolution. The top portion of the Issues tab lists any found issues, while the bottom portion offers suggestions for correcting the problems. Images should be RGB for web images.
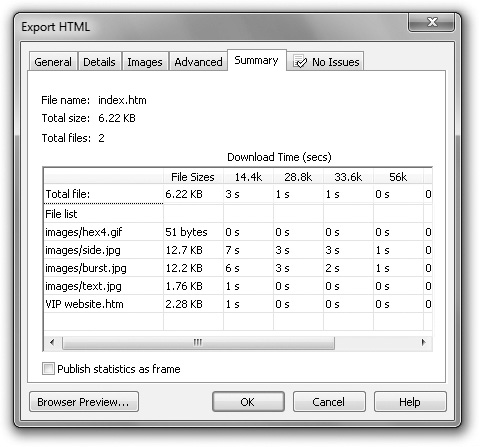
FIGURE 28-8 The information in this page helps you to measure download times against connection speeds for each of your web pages.
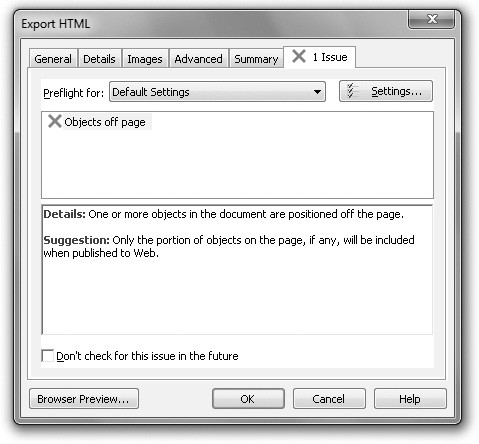
FIGURE 28-9 Use this page to troubleshoot problems and to resolve them before exporting.
To change the issues the preflight feature detects, click the Settings button to open the Preflight Settings dialog, and then click to expand the tree directory under Issues To Check For, shown here. You can also use options in this dialog to Add (+) saved preflight issue sets or to Delete (–) existing issue sets in the list. HTML preflight rules are a function only of the web document HTML that you are exporting. If you have, for example, more than three issues flagged, it’s often a good idea to make a mental note of the problems, cancel out of the Export HTML dialog, and then manually correct the issues in your drawing.

Setting Web Publishing Preferences
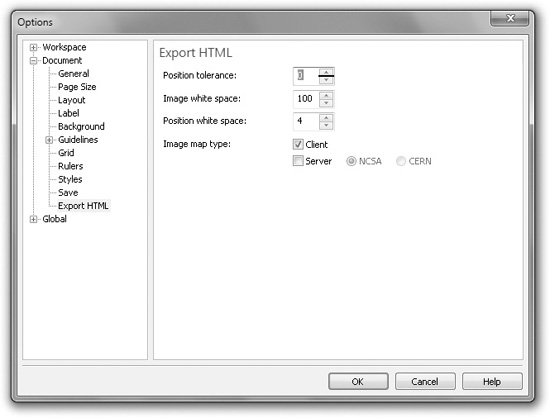
CorelDRAW gives you complete control over your web-publishing preferences by enabling you to set Export HTML options. These options let you predetermine many of the settings used when your documents are exported to HTML format, as described earlier. To access these options, open the Options dialog (CTRL+J), click to expand the tree directory under Document, and click Export HTML, shown next.
When this Options page is selected, you’ll see three options for setting conditions under which object position and white space are handled when your web page is exported:
• Position Tolerance Here you can specify the number of pixels that text objects can be nudged to avoid creating very short rows or narrow columns when the page is converted to HTML during export. Position Tolerance can be set within a range of 0 (the default) to 100. Increasing this value adds extra space.
• Image White Space Here you specify the number of pixels an empty cell may contain before being merged with an adjacent cell to avoid unnecessary splitting of graphic images.
• Position White Space This option controls the amount of white space to be added to simplify your exported HTML document. By default, the white space is set to 4 pixels.
• Image Map Type Choosing Client for the Image Map Type is best because client image maps provide faster interaction with your user than server image maps do. Only use Server if your provider specifically requests it.
Exporting Images for the Web
Although you can specify PNG, GIF, and JPEG file formats for images in your HTML page, you don’t have access to nearly the variety of compression types or transparency options unless you pass your images through File | Export for Web. This is a process separate from Export HTML, and to get images that feature transparency so they “float” against a page background, follow this procedure:
1. Export your HTML document and allow images to be exported to the Images folder CorelDRAW creates.
2. Export images you’d like to treat as special elements—such as PNGs and GIFs with transparent backgrounds—using File | Export for Web.
3. Save these files and then replace the ones in the Images folder with your new files, using the same filenames as the ones in the Images folder.
Create a graphic you’d like to appear on a web page against a background, and follow these steps to learn how to export the graphic with transparency.
Exporting a Graphic with Transparency
1. Select the graphic on the page with the Pick tool. If the graphic has a background, don’t select the background and you’ll save a step.
2. Choose File | Export for Web.
3. In the Export for Web dialog, choose GIF from the Format drop-down list.
4. Click the eyedropper tool to select it, and then click over the background in the GIF preview pane, not the one marked “Original” at its bottom. You can arrange the preview panes to top and bottom, left and right, or other multiple views by clicking the buttons in the upper left of this dialog.
5. Click the Makes The Selected Color Transparent button; in a moment, you’ll see the preview of the graphic with a checkerboard background indicating the transparent areas of your intended export.
6. Because GIF images can drop out only one color and not a range of colors, if the background of your document isn’t black, consider using one of the Matte colors, selected from the Matte mini-palette. If, for example, your web page is solid blue, choose solid blue. Doing this has nothing to do with the color you selected to drop out as the background color, but instead has to do with fringing. You choose a compatible background color from the Matte colors to disguise aliased edges around your graphic.
7. Set the unique number of colors for the export. By default, it’s 256, but to save transfer time, many simple graphics can look fine using 128 or even 32 colors. You specify the number of colors from the Number Of Colors drop-down below the preview of the Color Palette, or you can type a value into the box.
8. If you need to resize the graphic, use the Percentage boxes in the Transformation field of this dialog. But think twice about this: your HTML page won’t display the image properly if you’re replacing, for example, a 400×300-pixel GIF that CorelDRAW just exported to the Images folder with a new graphic that’s 375×285 pixels.
9. Click Save As, and after you’re done, replace the original exported image with this one, renaming the file to match the original filename. See Figure 28-10 for the location of the features used in this tutorial.
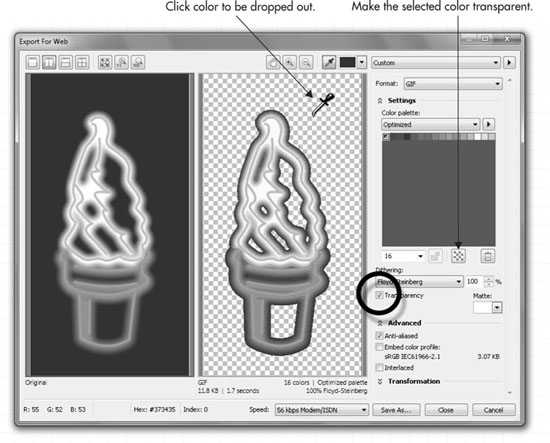
FIGURE 28-10 Export at the file size and with the options you need with the Export for Web dialog.
Swapping graphics into an HTML page has to be done with precision. The filename, the file type, and image dimensions have to be identical, because the image dimensions are written into the HTML code. And very few artists want to backwards-correct an HTML document!
Web Text Options
Fonts that you use when designing a web page will not always show up on a visitor’s web browser: web browsers such as Internet Explorer, Mozilla Firefox, and Apple’s Safari are almost completely dependent on which typefaces are installed on the visitor’s computer. There is no true “default” font for the Web, but over the years, Microsoft has quietly provided your system—and tens of millions of others—with system fonts that you basically can be assured reside on more than 90 percent of all computers used to surf the Web. Here are the current “web safe” typefaces:
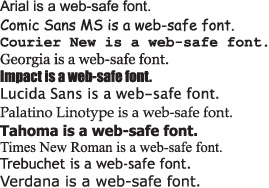
It’s considered discourteous on the Web to post long sections of text as bitmap graphics: visitors can’t copy or bookmark the text, and it violates the rules of accessibility—text-to-speech readers can’t decipher text-as-graphics, and indexing services will ignore what to you might be valuable information. Therefore, when you create paragraph text for a web page, use one of the typefaces listed in the previous illustration, for at least two more important reasons:
• Your web page will load more slowly with text displayed as a graphic instead of as editable text.
• Small text, such as 10 point, probably will not be legible. Consider that a screen pixel is approximately 1/72 inch, and a typographic point is approximately equal in size to one pixel. Therefore, 10-point text has to be rendered to screen using only 10 pixels in height. That’s the size of the font previews on CorelDRAW’s Fonts drop-down list, and many of the fancier fonts are not legible at this size as bitmap renders.
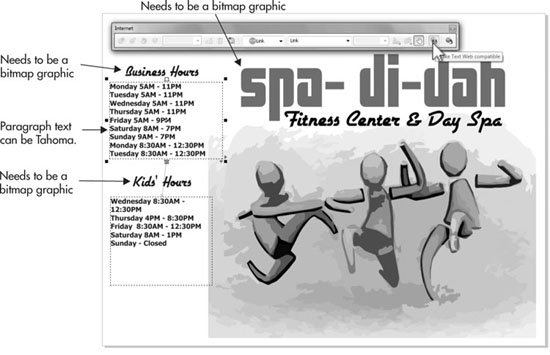
FIGURE 28-11 Text that uses distinctive typefaces has to be exported as bitmaps to retain its look on the Web.
Figure 28-11 is an example of a web page layout, and as you can see, the text for the business hours is small and formatted as paragraph text. This text needs to be exported as text and not as a bitmap. On the other hand, the name of the fictitious spa, and the elegant headlines above business hours can be exported as bitmap graphics, especially if the designer wants to retain the style of the typeface.
Follow these steps with any web page layout you have that contains text, to learn how to make the document conform to web standards for text.
Formatting Text for the Web
1. Format any text you want to be editable text on the web page using the fonts enumerated earlier.
2. The first thing to do is to check to see that any text you want displayed as text on the web page is paragraph text. Select any text in question with the Pick tool, and then choose Text from the menu. If the command Convert To Paragraph Text is available, choose this command. If it’s not available, the text is already paragraph text, and it’s easy to spot on the page because a nonprinting frame is around paragraph text.
3. Conversely, any headlines or other ornate large, short text entries should be artistic text. With the Pick tool, select any text that’s paragraph text but needs to be artistic text, and then choose Text | Convert to Artistic Text.
4. Choose Window | Toolbars | Internet. Select a paragraph text block, and then click the Make Text Web Compatible button. Do this again for any remaining paragraph text blocks.
5. If there is nothing left to link on your web page, click Export HTML.
You will not see paragraph text change in any way on your CorelDRAW page; the Make Text Web Compatible button is a toggle—you can select tagged text and then turn off its web compatibility, and this compatibility is just an instruction on how CorelDRAW writes the HTML. You need to look at the finished HTML page in a web browser—on a computer other than your own—to truly see how the web-compatible paragraph text looks. Because web browsers examine your installed fonts, you have no other way to see the text as the rest of the world will see it unless you go through the unpleasant process of temporarily uninstalling several typefaces from your own computer.
Use ALT Tags
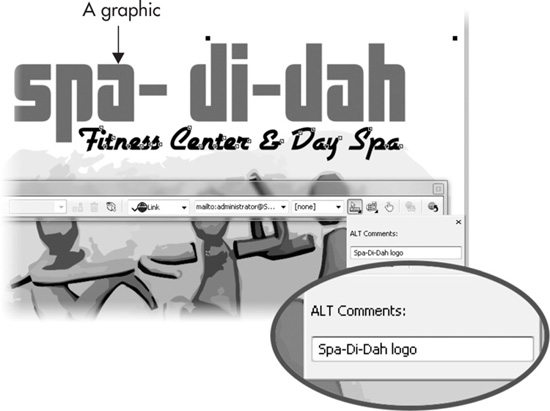
The ALT Comments button on the Internet toolbar is used to provide descriptive information—popularly known as ALT tags—about a graphic for those in your web audience who either are surfing with graphics disabled (it’s a fast way to perform text searches), or have a visual impairment. It’s good “netiquette” to label graphics on a web page with an ALT tag, particularly if your logo is a graphic and it’s the only time it’s seen on a web page. Applying ALT tags takes only a second, and here’s an example: the fictitious SPA-Di-Dah Health Club’s logo is a special typeface and therefore has to go out to the Web as a bitmap graphic. Here, the logo is selected, the ALT Comments button is clicked, and a description of the graphic is typed in.
SVG: Export as Vector Objects
Scalable Vector Graphics (SVG) are web objects CorelDRAW can both import and export. Since 1999, the SVG file format has been under development by the World Wide Web Consortium (W3C). SVG is based on the text-based Extended Markup Language (XML) for describing 2D vector graphics. All current web browsers except Internet Explorer can directly render an SVG web page element to screen; IE 9 is expected to adopt this capability.
One of the most useful properties of an SVG graphic is that it is scalable, with no loss of image detail. This means that you can post a graphic, for example, of directions as a map, and if the SVG file is coded properly into a page, a visitor to your site can enlarge or decrease the size of the map to exactly find a location. Also, SVG files are very small because they are text based, and if a friend or client doesn’t own CorelDRAW, SVG is an ideal medium for sharing graphics, a good alternative to the PDF file format.
Open Map.cdr in CorelDRAW now, and follow these steps to see how to export a graphic to the Scalable Vector Graphics file format.
Exporting Vectors as Vectors for the Web
1. Select the graphic with the Pick tool, or press CTRL+A to Select All.
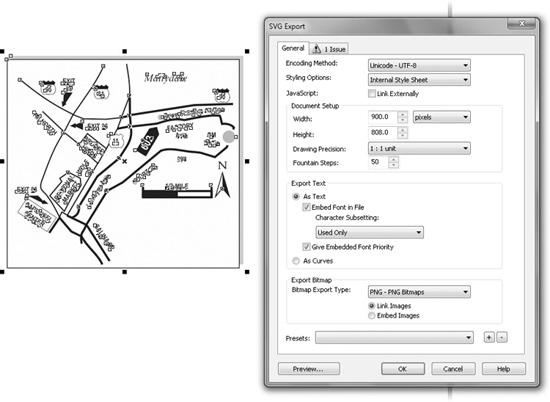
2. Choose File | Export (or click the Export button on the standard toolbar). Choose SVG Scalable Vector Graphics (*.SVG), pick a filename and location, and then click Export.
3. Choose Unicode UTF 8 as the encoding method. This produces a smaller file than UTF 16 because it encodes words to 8 bits, eliminating some multilingual parameters used in non-Latin text.
4. In the Export Text area, you can choose to export any text in the selected objects as text or as curves. If you chose UTF 8, you should export as curves if you’ve used non-Latin characters such as those available in fonts such as Arial and Georgia—Chinese and Greek glyphs are present in Unicode fonts.
5. In the Styling Options list box, you can choose to embed a style sheet (a cascading style sheet, CSS) internally or externally with the exported SVG file. If you choose an external style sheet, it’s linked to the graphic and can help a webmaster embed the graphic in a web page. You can also make the SVG part of a rollover button if you check the Link Externally box in the JavaScript area.
6. Choose to embed fonts if you’re using a typeface that’s not web compatible.
7. You can create smooth fountain fill steps by increasing the value using the Fountain Steps box. Doing this increases the saved file size, however.
8. Choose the dimensions at which you want the SVG graphic to display in a browser window. It makes no sense, in this example, to make it a small graphic, so a width of 900 pixels is chosen.
9. Export Bitmap is only a relevant field in this export box if objects you’ve selected cannot be interpreted as vectors. Choose this option if you’ve used drop shadows, mesh fills, texture fills, and any effect such as lens effects. You can embed or export the bitmaps-linked files. Embedding the bitmaps makes the SVG file much larger; if you choose to do this, JPEG—a highly compressed image file type—is probably a smarter choice than PNG.
10. Click OK to export the SVG file. If you have Firefox, Safari, Opera, or an Internet browser other the Internet Explorer, try dragging the SVG file into an open browser window to see the results.
Flash and Web Pages
Flash is an openly published media standard, owned by Adobe Systems, that is yet another web-worthy vector file format. If you bought the physical DVD installation of CorelDRAW X5, you have a copy of SwishMiniMax v2.0, and you can make incredibly small animation files by working between CorelDRAW and SwishMiniMax. If you bought the download version of X5, you didn’t get the animation application, but you can still export non-animating SWF (Flash) vector graphics you can put on the Web. In either case, animation is an exciting part of the Web, and the tutorial that follows guides you through some basic steps on using the Swish animation program.
Exploring SWF Files
CorelDRAW can add some fill and outline properties to objects that the Flash file format doesn’t support. As with SVG files, if a Flash file can’t write a vector, a bitmap copy of the graphic is included in the exported file. Exporting bitmaps within a Flash file sort of defeats the purpose of this compact vector-enabled file type, so reviewing what can export as vector objects, and what cannot, is a good idea here.
Objects and Fills that Flash Supports
You can create certain shapes and fills in CorelDRAW that Flash animation can’t handle, and you’re warned of this before you export an animation. The good news is that everything that Flash can handle, CorelDRAW can create. The following list describes what you should and shouldn’t use when making a scene for animation:
• Outline Properties Standard Flash export supports outline width and color, but only rounded line caps and joins for the Flash standard previous to version 8; CorelDRAW’s export filter doesn’t do 8, so press ALT+ENTER, click the Outline tab, and then click Advanced before exporting any outlines, and change the connections to round. Flash does not support dashed lines, arrowheads, or artistic media strokes. However, if your design calls for a fancy outline stroke, you can convert the line to a shape by choosing Arrange | Break Artistic Media Apart, and then delete the parent stroke choosing when an outline is selected. The Export dialog also offers to convert only dashed outlines to be compatible with Flash.
• Fill Properties Flash will render Uniform color fills, plus Linear and Radial fountain fills. A gradient can contain up to eight color transitions (color stops).
• Transparency If you apply transparency to a gradient-filled shape, you are limited to the Uniform transparency type. However, when a shape is filled with a flat (solid) color, you can use Linear and Radial transparency types.
• Text You can use any typeface you have installed. However, if you want fancy text animations, it’s best to type your text directly in SwishMiniMax instead of in your design. SwishMiniMax reads imported vector text as one solid block of graphic and can’t animate individual characters as a single object.
• Bitmaps Photos and digital paintings can be exported to a Flash animation, but they cannot be as efficiently compressed as vector shapes. It’s a good idea to make a copy of high-resolution images at the size you intend to use, in JPEG file format.
• Effects All effects—contours, blends, and envelopes—applied to shapes can be exported; using these effects is a good workaround to certain types of fountain fills that don’t work as a flash vector object.
Exporting a Static Flash Vector Design
Open Solutions Graphic.cdr in CorelDRAW now. This design has been created in a tricky sort of way to make an interesting animation, but first let’s check out how to export a static, nonmoving Flash file from CorelDRAW. Here’s the procedure and your options.
Making a Single-Frame Flash File
1. Select all the objects using the diagonal-drag, marquee technique around the objects. They are on different layers, so CTRL+A doesn’t work here.
2. Click the Export button on the standard toolbar, and then choose SWF - Macromedia Flash (.SWF) from the Save As Type drop-down list. Choose a location for the saved file and name it, and then click Export.
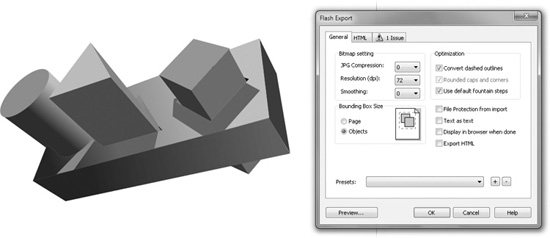
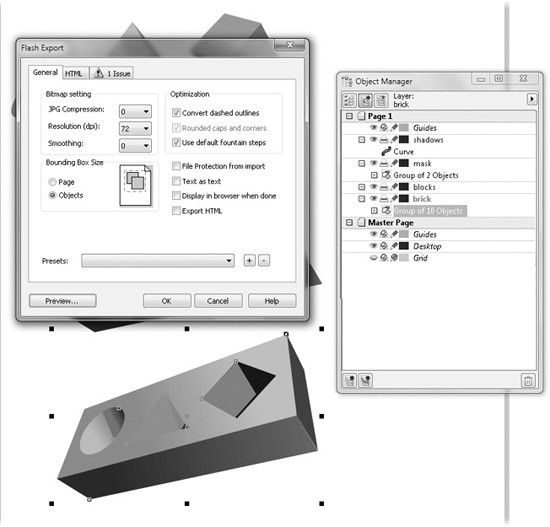
3. On the General tab, bitmap settings are only relevant when objects have fills that the export engine cannot recognize. In your own exporting adventures, use JPG Compression of 0 or 10 percent to preserve the appearance of vector objects that have texture or other non-acceptable fills.
4. Click Objects in the Bounding Box Size area; you have the objects already selected in step 1, so this option is the smart one.
5. Check Convert Dashed Outlines just as a matter of practice. Use Default Fountain Steps is a handy option if your objects have only subtle fills or fewer than 8 color transitions. Unchecking this box can create larger files, but unchecking this box might cause visible banding when you look at the Flash file.
6. The HTML tab really contains only one item of interest: Image Size. If you want to export this graphic at any size, select the size using the spin boxes or by typing a specific value here.
7. If the Issues tab reports that non-RGB colors are in the selection, ignore it. Click OK to export the graphic as a flash media object.
8. Internet Explorer needs the help of a JavaScript to display a Flash file directly in a web browser window, but if you have a copy of Firefox, you can drag the SWF file into its browser pane, and you’ll see the graphic full screen. Also, Adobe’s Flash Player 10 will display the file if you’ve downloaded the player; chances are good that some application has already fetched it for you and made the file association. Double-clicking the file icon might bring up Flash Player.
NOTE
CorelDRAW X5’s Flash Export options aren’t correct on the HTML tab. No Play or Loop options are exported for files that contain no animation. This is why you should read on and learn about SwishMiniMax, which does indeed use sound and full vector animation when it creates an SWF file.
Exporting SWFs to SwishMiniMax
The documentation for SwishMiniMax 2 will tell you that WMF (Windows Metafile) and SWF files are accepted for import as vector-based media. Unfortunately, the WMF file format is quite limited in translating your handsome CorelDRAW artwork, but SWF files do, indeed, translate your CorelDRAW drawings with quite high fidelity. SwishMiniMax thinks all SWF files are vector movies, but that’s okay; you’re not going to tell SwishMiniMax a word, and your SWF imports will look splendid. The following sections walk you through an example scenario: Solutions, Inc., a fictitious company, wants an animated logo—the block with the three pegs in the Solutions Graphic.cdr file. What do you say you knock their socks off and deliver an animated logo, animated text, and music playing during the animation?
Building the Architecture of Animated Graphics
Open the Object Manager now to get a better look at the trickery beneath this graphic (Tools | Object Manager). Figure 28-12 shows the composition taken apart: if you move any of the objects marked yellow, orange, or magenta, you’ll see that they appear to fit through the holes in the brick object. The reason this illusion works is that on the top layer in this drawing is a mask that hides the bottom of the brick object; thus, you can duplicate this 2D illusion—making a composition move in “3D” if you build a similar mask group of shapes in compositions of your own that you want to animate.
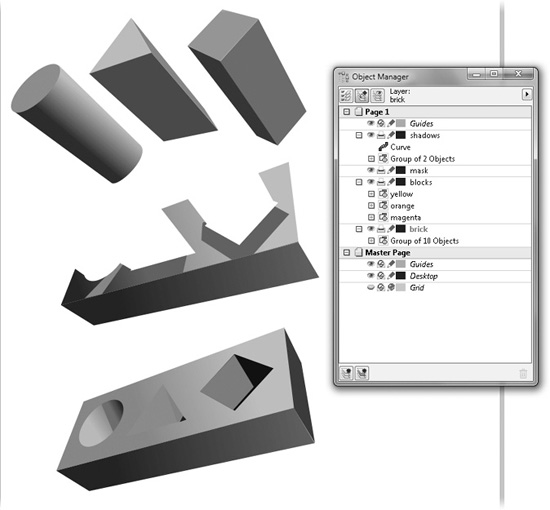
FIGURE 28-12 Stage a composition with carefully designed objects on layers to create the illusion that objects pass through a hole in other shapes.
Move the Composition to SwishMiniMax
As mentioned earlier, SwishMiniMax will accept CorelDRAW-exported SWF files. The next trick is to export the drawing as six separate objects: the three pegs, the brick, the mask group, and the shadow for the pegs on the brick. Create a new folder on your hard disk for these project files. Additionally, put the Solutions.mp3 file you downloaded in this new folder—it’s the music for this big-time animation.
Select one object at a time, click the Export button on the standard toolbar, and then choose SWF as the File Of Type when you export—make certain Selected Only is checked. Give each export a name you’ll remember; SwishMiniMax understands layers and it’s quite easy to order all six shapes, but you need to select an object before exporting, as shown here, or you’ll wind up exporting the entire page of objects.
A Taxi-Driver’s Tour of SwishMiniMax
The Official Guide cannot possibly comprehensively document SwishMiniMax’s features; the following sections you’ll work through, however, will give you a base education on its animation options. By just following the steps, you’ll learn how to build a basic, finished animation, and use variations on the steps later to build a handsome Flash movie of your own.
Setting Up Your SwishMiniMax Stage
A number of terms might be new to you after opening SwishMiniMax; there are equivalents in CorelDRAW, but some terms have no equivalents, and they’ll be described as you need to use the features in the tutorials. Two items are of immediate importance, though:
• The Stage Flash movies can have different scenes—scenes are out of the scope of this book to describe—and every scene has a stage. For the purposes of this tutorial, a stage is the drawing window, into which you import and create actors.
• Actors You put several automatable elements on the page (the stage), but the most common one is an actor. Actors in this example are objects: text objects, a background you’ll manually add, and the music MP3 file.
• Frame Rate Digital video usually is measured in frames per second (fps). This frame rate has very little to do with how fast an animation plays, but instead controls how smoothly or jittery a video plays back. If you remember the (relatively!) old NASA footage of spacewalks, the video was at a frame rate of anywhere from 8 to 10 fps. And although the footage was breathtaking, it looks a little on the Keystone Cops side. By default, SwishMiniMax offers you a new video project at 25 fps, which is a good, all-purpose frame rate. If there’s not a lot of dramatic action in a video, you can customize a project to play at 20 or even 12 frames per second. How fast an object moves in an animation depends on how many frames there are between keyframes—you’ll work with keyframes in the examples to follow.
Let’s open SwishMiniMax now, define the size and frame rate, and create and import an object or two.
Beginning an Animation
1. Click the SwishMiniMax icon to launch it, or use the Windows Start menu to launch it. The very first screen is a wizard, where you pick a default template. Choose the Default template and then click OK.
2. Choose File | Save As, and then save your project to the folder you created with the Flash objects in it.
3. On the Properties panel, click Movie Properties.
4. Here’s the deal: animations can be any time length you like, but this animation will have a soundtrack, which is 4 seconds long. This 4 seconds is something you can’t change, so the concept is to make a 4-second-long animation so both the video and the audio end at the same time. To be on the lazy side here, type 30 in the Frame Rate box (30 frames per second × 4 seconds = 120 frames). Now you know how long you have to animate on SwishMiniMax’s timeline to make a perfect little flash video that loops continuously while staying in synch with the audio.
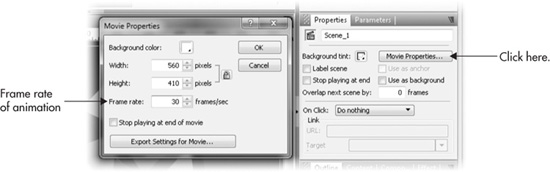
5. As you can see, the Width and Height are predetermined by the Default template, and this is fine: 560 pixels wide × 410 pixels high will work because the Solutions graphic.cdr file was carefully measured beforehand to scale to these dimensions. Usually, it’s a good idea to preplan this way in your own work, but it’s not a showstopper because the SWF files you exported are vector objects, and vector objects can be scaled in SwishMiniMax smoothly, exactly like in CorelDRAW. Click OK to apply the frame rate and close the box.
6. Unless you like black or transparent, this scene could use a background. Let’s make it a circular gradient background, going from a white interior to black at the outside edges. Choose the Rectangle tool from the toolbox, and then drag from upper left to bottom right in the scene window. It’s okay if you go outside the frame a little: Flash files truncate any object area outside of the stage.
7. On the Properties panel, click the Fill drop-down list and choose Gradient. Now click the Gradient Type button and choose the Radial button.
8. To invert the gradient, drag the white marker from its position on the right, nearly over to the black marker at left. Then move the black marker to the far right. Finally, move the white marker to far left. You’re more prone to accidentally delete a marker if you put two in the same position—that’s why you took the extra step here.
9. It’s time to bring the brick—the backmost imported actor—to the stage. Choose File | Import to Stage | Animation. Choose Brick.swf (or whatever you named the brick) from the directory list and then click Open.
10. In the Import dialog, Animated Movie Clip is the only button that needs to be clicked—SwishMiniMax doesn’t know the file isn’t an animation, and you’re not going to tell it. Click Import, save the file again, and take a break for a moment. Your screen should look like the one in Figure 28-13.

FIGURE 28-13 The brick imported object is in the scene, on top of the background you created.
Finishing the Imports
Procedurally, it’s a good idea to have all your actors in the scene before animating them. Once you become familiar with SwishMiniMax, you might want to bring your actors to the scene all at once—you can do this by multiple-selecting SWF files in the Import box. But for now, let’s keep it simple and keep the actors in the proper order for the animation. One at a time, import the yellow, the orange, and the magenta pegs, then import the mask, and finally import the shadow object. You should have no problem aligning them. With SwishMiniMax’s Selector tool (it’s the same as CorelDRAW’s Pick tool), first select the name of an actor from the Outline list, place the Selector tool in the scene window, and after it turns into a four-headed “move” cursor, move the objects. Then import the MP3 file as an actor to the scene: File | Import to Stage | Sound. Then press CTRL+S!
How to Move an Actor
This section will be the most demanding for users who have never worked with a timeline or a video application. Here is the strategy, and then you’ll actually work through the procedure as tutorial steps:
• The concept is to make first the left peg, then the middle, and finally the right magenta peg come out of the holes. So first, position all the pegs in a retracted state.
• These peg actors are in the scene, but not on the stage yet. This is admittedly a confusing screen convention, but it’s the way Flash animates things. So after the pegs are in their first frame position, on its track on the timeline, right-click the first frame, and then choose Place from the pop-up menu. You’ve placed the actor (the peg) in its initial position.
• You want to move the peg up and to the left over time, so you right-click anywhere to the right of the little Place icon on its track (the traffic light icon), and then choose Move from the right-click menu.
• You now move the actor: you click the last segment of the Move segment on the track—the diamond dot at the right end of the arrow—and then you put your Selector tool in the window and move the object. You’ll see a preview line over the object in the scene window indicating its movement.
• If you want to change this movement at the beginning or end, you need to click either the Place icon at the beginning, or you need to be at the diamond marker at the end of the Move segment. At any point in between, you cannot move the actor.
• To move where the movement starts, you drag the Move marker on the track in the timeline.
• To make an object move slower or faster along the path you’ve created, you need to increase or decrease the number of frames for the transition. To do this, click-drag either the head or the tail of the Move marker. You know your cursor is in position when the cursor changes to a double-headed arrow with a brace between the arrows.
So much for explanations: the best way to get results is by actually doing these moves.
Creating Animation
1. Begin by selecting the orange round peg at left. On its track on the timeline, right-click the first frame, and then choose Place from the pop-up menu.
2. Click Frame 2 on the track in the timeline. Right-click and then choose Move. By default, this puts a 10-frame movement segment on the track, which is too frenetic for a 30 fps animation, but you’ll correct that in a moment.
3. Click the end of the Move event, at the diamond dot.
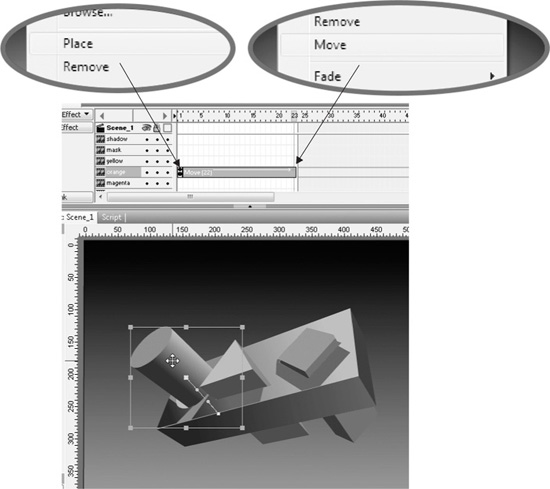
4. Put your cursor in the scene window, and then carefully move the orange peg up and left so it sticks out of the brick.
5. Click the tail of the Move event on the track, and then drag it out to about Frame 20. The Move event marker should tell you how many frames you have the move specified for in parentheses.
6. As a reward for getting this far, click the Play button below the main menu bar. Then click the Stop button and get back to work!
7. Repeat step 1 with the yellow and magenta animation tracks.
8. For the yellow peg, click over Frame 3, and then right-click and choose Move from the menu. Click the last frame of the Move event, and then move the yellow peg in the scene, as you did with the orange peg in step 4.
9. Drag the track out to about 20 frames in duration so that Move ends at about Frame 39.
10. Do the Magenta peg’s animation now. Start the Move at Frame 30, and end it at about Frame 58.
11. File | Save. Keep it open.
Gosh: all the action is over with at Frame 60, and we have a whole 60 frames to spare. This is by design! In the sections to follow, you’ll add a fancy animated piece of text, and then add the music to make a perfectly timed Flash video.
Applying a Canned Effect
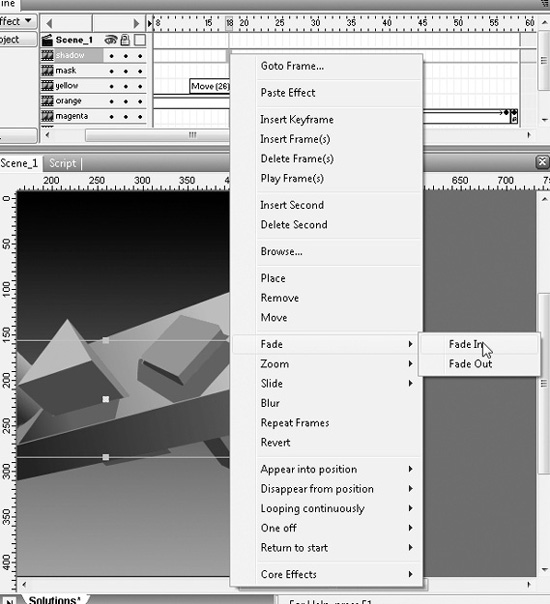
In addition to the Place and Move commands on the pop-up menu, this menu is also a handy shortcut to accessing canned scripts that auto-animate object properties. The shadow object is a perfect example of an element that’s in need of a certain scripted effect. It would be too time-consuming to animate the movement of the shadow so it’s in synch with the movement of the pegs apparently casting the shadow—what will work almost as well is to fade it in. Here’s how to script an event using a SwishMiniMax preset.
Using the Fade in Preset
1. The precise entry point and duration of the shadow object fading in is based on your artistic taste, or on having had experience in traditional animation. Click the shadow object in the Outline panel first.
2. Click at about Frame 15 on the shadow’s track on the timeline to move the current time to Frame 15.
3. Right-click over Frame 30, and then on the pop-up menu, choose Fade | Fade In. Because this object is making its stage appearance by fading in, the Place marker is not needed for this track. Play the movie back now to see how you’re doing, and to amaze anyone watching over your shoulder.
Adding and Animating Text
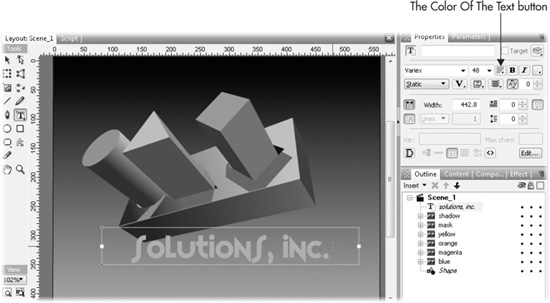
Here’s the part where not using CorelDRAW text as a graphic begins to make sense. You can access any installed system font in SwishMiniMax via the Text tool and the Properties panel. Let’s cut to the chase now and add text, and then animate it. No one knows this is Solutions, Inc.’s logo. Yet.
Text as Flash Actor
1. Choose the Text tool from the toolbox.
2. Move the current time to Frame 54 on the timeline.
3. Marquee-drag a text box below the design in the scene window. It’s perfectly okay if objects overlap in a Flash composition, and it’s okay to drag a large defined area. “Large” is easier to correct later than making a box that’s too small for your text—then you have to resize the box.
4. Type Solutions, Inc. in the open text field in the scene window.
5. Choose a typeface in the Properties panel, then choose a point size, choose center alignment from the Text Justification drop-down, and finally, click The Color Of The Text button to reveal the palette of web-compatible colors. Choose a bright gold.
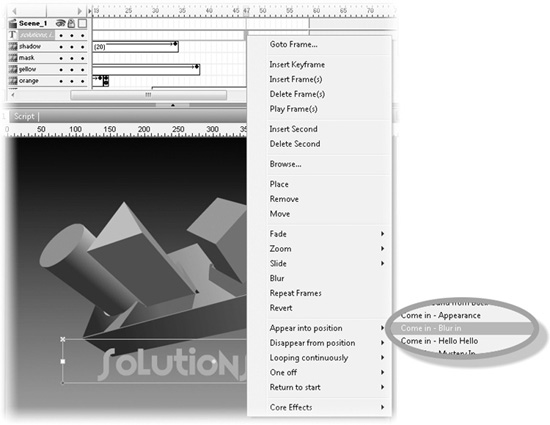
6. File | Save. Now, with the Selector tool, right-click over Frame 54 on the text track in the timeline, and hover over Appear Into Position. Don’t freak out over the arm’s length of preset animation scripts here. Save some for future use, and choose any of the presets that end in the word “in,” such as Burn In, Blur In, or Flip And Shrink In. Make this action about 20 frames long.
Adding the Finishing Touches
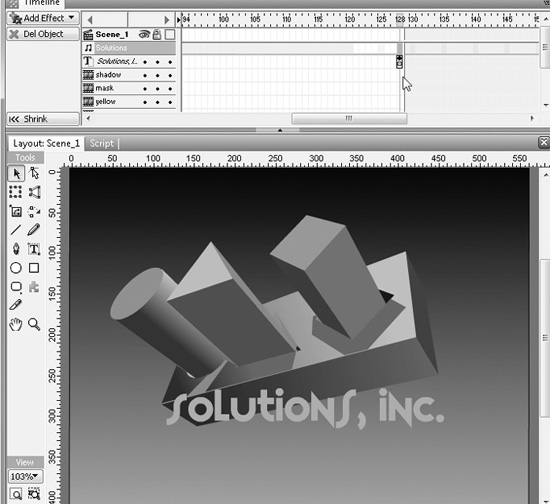
Because you added the MP3 file as an actor to this project, it’s placed on the timeline, and if you locate it for a moment, you’ll see a faint red stripe on its track, which tells you in absolute frame count (at 30 fps) where it ends, which is at Frame 120. Now ensure that the longest-duration actor in the scene stays on stage until the music is over. This forces the Flash video you’ll export shortly to keep the audio in synch with the video, and the other placed actors will inherit this duration because they’ve appeared and have no cue to disappear until the animation loops back to Frame 1.
Setting an Overall Flash Video Duration
1. The text entered the scene last, so it’s a good candidate for the Place command. Make the current time 120 frames by clicking the timeline.
2. Right-click over Frame 128 on the Solutions, Inc. track. It’s just a little after the end of the MP3 music.
3. Choose Place. Done! It’s time to go live with this hot piece of motion picture entertainment!
4. Press CTRL+E (File | Export…SWF).
5. Choose a name and location for the saved Flash file, click Save, and then save one last time in SwishMiniMax; then you can close the program.
Gather as many friends as possible, and then seat them around your monitor. Get popcorn, and break out the non-alcoholic sparkling grape juice. What you’ve just exported is only 68K (some typefaces are larger and not as entertaining), yet it has music and plays for 4 seconds at any size dimensions you set up a web page for to place this media. If you have Firefox or any Internet browser other than IE Explorer, just drag the file icon into an open browser window to play it. Alternatively, you probably have Adobe Flash Player 10 installed—an application or your browser might have installed it for you. If the icon is a page with a big “f” on it, it’s associated with Adobe’s Flash Player, and all you need to is double-click the icon to play it.
The End-Of-Book Special
The preceding tutorial is by no means the end of this chapter or The Official Guide. You have some serious playtime ahead of you! In the ZIP archive you downloaded is the finished SWI SwishMiniMax file you can load in SwishMiniMax to verify that you did everything like the steps showed, plus:
• Several other “ambient” MP3 sound files for your use in the future. These are completely free for commercial and private use, created by the author, so there are no sticky encumbrances with royalty-free online music or commercial restrictions.
• A full-frame animation of the Solutions, Inc. logo. This SWF file was created as a movie from a 3D modeling and rendering program. Full-frame animations are larger than vector animations because every frame is totally different from the previous one. If you have a movie you’d like to turn into a Flash file with SwishMiniMax, give this experiment a go with Solutions 3D.swf first. All you need to do is follow the steps in this chapter with SwishMiniMax, but import the Solutions 3D.swf as an animated movie clip, exactly as you did with the CorelDRAW exported SWF still vector images.
• The finished SWF files can be found in the Gallery subfolder of the ZIP archive, for viewing and examining. Figure 28-14 shows two different versions of the Solutions, Inc. assignment. If you don’t have the typeface Variex installed on your computer, SwishMiniMax will inform you that the typeface the author used is unavailable. This is okay—let SwishMiniMax substitute a font, probably Arial, and you can choose a different typeface as you experiment with the file.
As far as embedding Flash files to play in an HTML document you’ve exported from CorelDRAW, SwishMiniMax provides the HTML code snippet if you choose File | Export | SWF+HTML. However, you do need to know a little about HTML code to manually insert the code so the movie plays on your CorelDRAW exported web page. Alternatively, if you really want moving content on your website, consider a free HTML editor such as the one offered by Coffee Cup software. You can import your CorelDRAW exported file, and perform a little embedding with the WYSIWYG editor.
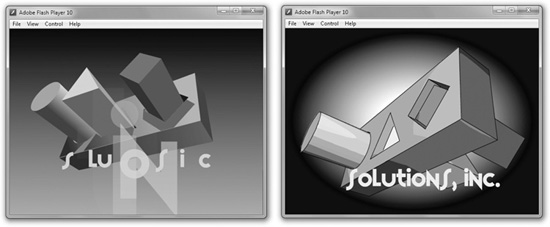
FIGURE 28-14 Flash files can contain static vector objects and also can contain complete full-frame animations.
The last word in animation is that as a designer, it’s probably best to turn your work over to a webmaster or other expert in HTML coding, and to ask them to embed your work on an HTML page. You’ve learned a lot in this chapter; don’t overdo it!
This chapter has shown you how to take just about any media on a CorelDRAW page, be it a drawing, a photo, or text, and make your design compatible as a web page. With links, your web page connects you to a community and keeps you connected with business associates, friends, and potential customers you haven’t even met yet.