Advanced Programming Features
Now that we have covered the basic program flow of a CLI application, it is time to look at some more advance features. CLI and DB2 offer many APIs that can be used to finely control your application, such as the ability to scroll forwards and backwards through a result set. You can also retrieve multiple rows of data directly into an array of bound parameters and then turn around and insert or update these values with a single API call. In the next few sections we will take a look at two examples to do this. First we will discuss the different types of cursors that are supported for retrieving data.
Supported Cursor Types
DB2 CLI supports scrollable cursors; the ability to scroll through a cursor.
Forward by one or more rows
Backward by one or more rows
From the first row by one or more rows
From the last row by one or more rows
From a previously stored location in the cursor
Two types of scrollable cursors are supported by DB2 CLI.
Static, Read-Only Cursor
Keyset-Driven Cursor
Static, Read-Only Cursor
This type of scrollable cursor is static; after it is created, no rows will be added or removed, and no values in any rows will change. The cursor is not affected by other applications accessing the same data.
The cursor is also read-only. It is not possible for the application to change any values. How the rows of the cursor are locked, if at all, is determined by the isolation level of the statement used to create the cursor. Refer to the DB2 UDB SQL Reference Guide for a complete discussion of isolation levels and their effect.
Keyset-Driven Cursor
This type of scrollable cursor adds two features that static cursors do not have; the capability to detect changes to the underlying data, and the ability to use the cursor to make changes to the underlying data.
When a keyset-driven cursor is first opened, it stores the keys in a keyset for the life of the entire result set. This is used to determine the order and set of rows that are included in the cursor. As the cursor scrolls through the result set, it uses the keys in this keyset to retrieve the current data values for each row. Each time the cursor refetches the row, it retrieves the most recent values in the database, not the values that existed when the cursor was first opened. For this reason, no changes will be reflected in a row until the application scrolls past the row.
There are various types of changes to the underlying data that a keyset-driven cursor may or may not reflect:
Changed values in existing rows— The cursor will reflect these types of changes. Because the cursor refetches the row from the database each time it is required, keyset-driven cursors always detect changes made by themselves and others.
Deleted rows— The cursor will also reflect these types of changes. If a row in the rowset is deleted after the keyset is generated, it will appear as a “hole” in the cursor. When the cursor attempts to refetch the row from the database, it will realize that it is no longer there.
Added rows— The cursor will NOT reflect these types of changes. The set of rows is determined once, when the cursor is first opened. It does not reissue the select statement to determine whether new rows have been added that should be included.
Keyset-driven cursors also can be used to modify the rows in the result set with calls to either SQLBulkOperations() or SQLSetPos().
Deciding which Cursor Type to Use
The first decision to make is between a static cursor and a scrollable cursor. If your application does not need the additional features of a scrollable cursor, then a static cursor should be used.
If a scrollable cursor is required, you have to decide between a static or keyset-driven cursor. A static cursor involves the least overhead. If the application does not need the additional features of a keyset-driven cursor, a static cursor should be used.
If the application needs to detect changes to the underlying data, or needs to add, update, or delete data from the cursor, then it must use a keyset-driven cursor.
To determine the types of cursors supported by the driver and DBMS, the application should call SQLGetInfo().
Catalog Functions
Often, one of the first tasks an application performs is to display to the user a list of tables from which one or more tables are selected by the user to work with. Although the application can issue its own queries against the database system catalog to get this type of catalog information, it is best that the application calls the DB2 CLI catalog functions instead. These catalog functions provide a generic interface to issue queries and return consistent result sets across the DB2 family of servers. This allows the application to avoid server-specific and release-specific catalog queries.
The catalog functions operate by returning a result set through a statement handle to the application. After calling these functions, the application can fetch individual rows of the result set as it would process column data from an ordinary SQLFetch(). The DB2 CLI catalog functions are list in Table 11.3.
| Function | Description |
|---|---|
| SQLColumnPrivileges | Get privileges associated with the columns of a table |
| SQLColumns | Get column information for a table |
| SQLForeignKeys | Get the list of foreign key columns |
| SQLPrimaryKeys | Get primary key columns of a table |
| SQLProcedureColumns | Get input/output parameter information for a procedure |
| SQLProcedures | Get list of procedure names |
| SQLSpecialColumns | Get special (row identifier) columns |
| SQLStatistics | Get index and statistics information for a base table |
| SQLTablePrivileges | Get privileges associated with a table |
| SQLTables | Get table information |
| SQLGetTypeInfo | Get Data Type Information |
The result sets returned by these functions are defined in the descriptions for each catalog function in the DB2 UDB Call Level Interface Guide and Reference. The columns are defined in a specified order. In future releases, other columns may be added to the end of each defined result set, therefore applications should be written in a way that would not be affected by such changes.
Some of the catalog functions result in execution of fairly complex queries, and for this reason should only be called when needed. It is recommended that the application save the information returned rather than making repeated calls to get the same information.
Executing Statements
Preparing
An SQL statement can either be executed directly (SQLExecDirect()) or it can first be prepared (SQLPrepare()) and then executed (SQLExecute()). Statements that are executed directly are sent to the server to be prepared and processed as a single step. This method allows for an ease of use for the programmer and performs satisfactorily if the statement being executed is only going to be performed once.
SQLREAL     var1;
SQLUINTEGER var2;
SQLINTEGER   var1Ind=0, var2Ind=0;

/* Prepare a statement to insert data into a table */
SQLPrepare(hstmt, "INSERT into table1 values (?,?)",
           SQL_NTS);

/* Bind the data to the parameter markers */
SQLBindParameter(hstmt, 1, SQL_PARAM_INPUT,
                 SQL_C_FLOAT, SQL_REAL, 7, 0,
                 &var1, 0, &var1Ind);
SQLBindParameter(hstmt, 2, SQL_PARAM_INPUT,
                 SQL_C_ULONG, SQL_INTEGER, 10, 0,
                 &var2, 0, &var1Ind);

/* Repeatedly execute the statement */
while(GetData(&var1, &var1Ind, &var2, &var2Ind))
SQLExecute(hstmt);
If the statement is to be executed more than once, then it is better to prepare the statement first and then execute it multiple times. This action causes the access plans to be generated only once (during the prepare phase) and results with faster subsequent execution of the statement. It is not necessary that the statement being processed multiple times be exactly the same, just that it have the same structure. For example, a statement that inserts values into a database will have the same statement structure but may insert different values upon each execution.
To achieve this, parameter markers are used in the statement and then host variables are bound to these markers. In this way CLI will use the values from the bound parameters during the SQL statement processing but will have bound the statement only once during the SQLPrepare().
Binding Parameters
As was seen in the example in the previous section, each parameter marker in the SQL statement must be associated with a variable. This association is called binding and is established with the SQLBindParameter() function call. This function describes the variable from the application as well as the SQL data in the SQL statement. For the variable, it gives the address, the C data type, and NULL indicator. For the SQL data it describes the SQL data type and precision. These two descriptions must be compatible with each other because data conversion may occur.
For SQL statements, only input parameters (SQL_PARAM_INPUT) are allowed. For CALL statements to a stored procedure, output parameters and input-output parameters are allowed. To bind a variable to a parameter, the parameter must be identified by specifying the parameter's position as shown in the previous example. All parameters are positioned within the SQL statement from left to right starting with position number 1.
Parameters can be bound or rebound as many times as the application likes before the statement is executed. Also, a parameter can be rebound after the statement is executed once and before it is executed a second time.
Arrays of Parameters
For some data entry and update applications (especially graphical), users often insert, delete, or change many cells in a data entry form and then ask for the data to be sent to the database. For these situations of bulk insert, delete, or update, DB2 CLI provides an array input method to save the application from having to call SQLExecute() repeatedly on the same INSERT, DELETE, or UPDATE statement. In addition, there are significant savings in network flows.
An application can bind the parameter markers in an SQL statement to arrays in two ways:
Column-Wise Array Insert (uses column-wise binding)— A different array is bound to each parameter.
Row-Wise Array Insert (uses row-wise binding)— A structure is created to store a complete set of parameters for a statement. An array of these structures is created and bound to the parameters. Parameter binding offsets (described in the next section) can only be used with row-wise bindings.
SQLBindParameter() is still used to bind buffers to parameters, the only difference is that the addresses passed are array addresses, not single-variable addresses. The application must also set the SQL_ATTR_PARAM_BIND_TYPE statement attribute to specify whether column-wise or row-wise binding will be used.
Column-Wise Array Insert
This method involves the binding of parameter marker(s) to array(s) of storage locations via the SQLBindParameter() call. For character and binary input data, the application uses the maximum input buffer size argument (BufferLength) on the SQLBindParameter() call to indicate to DB2 CLI the location of values in the input array. For other input data types, the length of each element in the array is assumed to be the size of the C data type. The statement attribute SQL_ATTR_PARAMSET_SIZE must be set (with a call to SQLSetStmtAttr()) to the size of the array before the execution of the SQL statement.
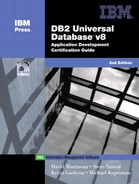
Suppose for Figure 11.4 there is an application that allows the user to change values in the col1 and col2 columns of a data-entry form. Also suppose that the primary key of the underlying table1 table is col3. The application can then request to prepare the following SQL statement:
UPDATE table1 SET col1= ? and col2= ? WHERE col3=?
Figure 11.4. Column-wise array insert.

When the user has entered all the changes, the application counts that n rows are to change and allocates m = 3 arrays to store the changed data and the primary key. Then it calls SQLBind-Parameter() to bind the three parameter markers to the location of three arrays in memory. Next it sets the statement attribute SQL_ATTR_PARAMSET_SIZE (with a call to SQLSetStmtAttr()) to specify the number of rows to change (the size of the array). Then it calls SQLExecute() once and all the updates are sent to the database. This is the flow shown on the right side of Figure 11.4.
The basic method is shown on the left side of Figure 11.4 where SQLBindParameter() is called to bind the three parameter markers to the location of three variables in memory. SQLExecute() is called to send the first set of changes to the database. The variables are updated to reflect values for the next row of changes and again SQLExecute() is called. Note that this method has n–1 extra SQLExecute() calls.
See the upcoming section, “Retrieving Diagnostic Information,” for information on errors that can be accessed by the application.
Row-Wise Array Insert
The first step when using row-wise array insert, is to create a structure that contains two elements for each parameter. The first element for each parameter holds the length/indicator buffer, and the second element holds the value itself. After the structure is defined, the application must allocate an array of these structures. The number of rows in the array corresponds to the number of values that will be used for each parameter.
struct { SQLINTEGER La; SQLINTEGER A;  /* Information for parameter A */
         SQLINTEGER Lb; SQLCHAR B[4];  /* Information for parameter B */
         SQLINTEGER Lc; SQLCHAR C[11]; /* Information for parameter C */
       } R[n];
Figure 11.5 shows the structure R with three parameters in an array of n rows. The array can then be populated with the appropriate data.
Figure 11.5. Row-wise array insert.

After the array is created and populated, the application must indicate that row-wise binding is going to be used. It does this by setting the statement attribute SQL_ATTR_PARAM_BIND_TYPE to the length of the structure created. The statement attribute SQL_ATTR_PARAMSET_SIZE must also be set to the number of rows in the array.
Each parameter can now be bound to the appropriate two elements of the structure (in the first row of the array) using SQLBindParameter():
/* Parameter A */
rc = SQLBindParameter(hstmt, 1, SQL_PARAM_INPUT, SQL_C_LONG, SQL_INTEGER,
         5, 0, &R[0].A, 0, &R.La);

/* Parameter B */
rc = SQLBindParameter(hstmt, 2, SQL_PARAM_INPUT, SQL_C_CHAR, SQL_CHAR,
         10, 0, R[0].B, 10, &R.Lb);

/* Parameter C */
rc = SQLBindParameter(hstmt, 3, SQL_PARAM_INPUT, SQL_C_CHAR, SQL_CHAR,
         3, 0, R[0].C, 3, &R.Lc);
At this point the application can call SQLExecute() once and all of the updates are sent to the database.
See the next section, “Retrieving Diagnostic Information,” for information on errors that can be accessed by the application.
Retrieving Diagnostic Information
A parameter status array can be populated after the SQLExecute() or SQLExecDirect() call. The array contains information about the processing of each set of parameters. See the statement attribute SQL_ATTR_PARAM_STATUS_PTR, or the corresponding IPD descriptor header field SQL_DESC_ARRAY_STATUS_PTR, for complete details.
The statement attribute SQL_ATTR_PARAMS_PROCESSED or the corresponding IPD descriptor header field SQL_DESC_ROWS_PROCESSED_PTR can be used to return the number of sets of parameters that have been processed. See these attributes in the description of SQLSetStmtAttr() or SQLSetDescField().
After the application has determined which parameters had errors, it can use the statement attribute SQL_ATTR_PARAM_OPERATION_PTR, or the corresponding APD descriptor header field SQL_DESC_ARRAY_STATUS_PTR (both of which point to an array of values), to control which sets of parameters are ignored in a second call to SQLExecute() or SQLExecDirect(). See these attributes in the description of SQLSetStmtAttr() or SQLSetDescField().
Retrieving Results with Scrollable Cursors
Previously, in the “Processing Transactions” section, you saw an example that illustrated the use of SQLBindCol() to bind data from a result set prior to SQLFetch() to fetch each row from the result set. This example illustrated the sequential fetching of rows starting with the first row and ending with the last row. What if you have an application in which you want to allow the user to scroll through a set of data? You might want to allow the user to scroll forward and backward through this list as well as jump to the end or the beginning of the list. To accomplish this, you can use scrollable cursors with the use of SQLScrollFetch(). Let's first define the meaning of some terms before looking at an example of scrollable cursors.
Result set— The complete set of rows that are generated by the SQL SELECT statement. Once created, the result set will not change.
Rowset— The subset of rows from the result set that is returned after each fetch. The application indicates the size of the rowset before the first fetch of data, and can modify the size before each subsequent fetch. Each call to SQLFetchScroll() populates the rowset with the appropriate rows from the result set.
Bookmark— Makes it possible to store a pointer to a specific row in the result set. Once stored, the application can continue to move throughout the result set, and then return to the bookmarked row to generate a rowset. See the “Bookmarks with Scrollable Cursors,” for complete details.
If you have a screen-based application that displays n-rows of data at a time, you might want to allow the user to jump through this display using the cursor keys or the Pg Up and Pg Dn keys. To accomplish this, you need to be able to position the rowset within the result set as dictated by the user's actions.
The position of the rowset within the result set is specified in the call to SQLFetchScroll() (Table 11.4). For example, the following call would generate a rowset starting on the 11th row in the result set (step 5 in Figure 11.6):
SQLFetchScroll(hstmt,   /* Statement handle */
    SQL_FETCH_ABSOLUTE, /* FetchOrientation value */
    11);                /* Offset value */
Figure 11.6. Example of retrieving rowsets.
Scroll bar operations of a screen-based application can be mapped directly to the positioning of a rowset. By setting the rowset size to the number of lines displayed on the screen, the application can map the movement of the scroll bar to calls to SQLFetchScroll().
| Rowset Retrieved | FetchOrientation Value | Scroll Bar |
|---|---|---|
| First rowset | SQL_FETCH_FIRST | Home: Scroll bar at the top |
| Last rowset | SQL_FETCH_LAST | End: Scroll bar at the bottom |
| Next rowset | SQL_FETCH_NEXT (same as calling SQLFetch()) | Page Down |
| Previous rowset | SQL_FETCH_PRIOR | Page Up |
| Rowset starting on next row | SQL_FETCH_RELATIVE with FetchOffset set to 1 | Line Down |
| Rowset starting on previous row | SQL_FETCH_RELATIVE with FetchOffset set to –1 | Line Up |
| Rowset starting on a specific row | SQL_FETCH_ABSOLUTE with FetchOffset set to an offset from the start (a positive value) or the end (a negative value) of the result set | Application generated |
| Rowset starting on a previously bookmarked row | SQL_FETCH_BOOKMARK with FetchOffset set to a positive or negative offset from the bookmarked row (see “Using Bookmarks” with Scrollable Cursors for more information) | Application generated |
Figure 11.6 demonstrates a number of calls to SQLFetchScroll() using various FetchOrientation values. The result set includes all of the rows (from 1 to n), and the rowset size is 3. The order of the calls is indicated on the left, and the FetchOrientation values are indicated on the right.
The statement attribute SQL_ATTR_ROW_ARRAY_SIZE is used to declare the number of rows in the rowset. For example, to declare a rowset size of 35 rows, the following call would be used:
/*...*/
#define ROWSET_SIZE 35
/*...*/
    rc = SQLSetStmtAttr(
                hstmt,
                SQL_ATTR_ROW_ARRAY_SIZE,
                (SQLPOINTER) ROWSET_SIZE,
                0);
The application cannot assume that the entire rowset will contain data. It must check the rowset size after each rowset is created because there are instances where the rowset will not contain a complete set of rows. For instance, consider the case in which the rowset size is set to 10, and SQLFetchScroll() is called using SQL_FETCH_ABSOLUTE and FetchOffset set to -3. This will attempt to return 10 rows starting 3 rows from the end of the result set.
Only the first three rows of the rowset will contain meaningful data, however, and the application must ignore the rest of the rows.
Typical Scrollable Cursor Application
Each application that will make use of scrollable cursors must complete the following steps, in the following order:
After the application has finished retrieving information, it should follow the usual DB2 CLI process for freeing a statement handle.
Bookmarks with Scrollable Cursors
You can save a pointer to any row in the result set with a bookmark. The application can then use that bookmark as a relative position to retrieve a rowset of information. You can retrieve a rowset starting from the bookmarked row, or specify a positive or negative offset.
After you have positioned the cursor to a row in a rowset using SQLSetPos(), you can obtain the bookmark value from column 0 using SQLGetData(). In most cases, you will not want to bind column 0 and retrieve the bookmark value for every row, but use SQLGetData() to retrieve the bookmark value for the specific row you require.
A bookmark is only valid within the result set in which it was created. The bookmark value will be different if you select the same row from the same result set in two different cursors.
The only valid comparison is a byte-by-byte comparison between two bookmark values obtained from the same result set. If they are the same, they both point to the same row. Any other mathematical calculations or comparisons between bookmarks will not provide any useful information. This includes comparing bookmark values within a result set and between result sets.
To use bookmarks, the following steps must be followed in addition to the steps described previously for use with scrollable cursors:
Retrieving a Result Set into an Array
One of the most common tasks performed by an application is to issue a query statement, and then fetch each row of the result set into application variables that have been bound using SQLBindCol(). If the application requires that each column or each row of the result set be stored in an array, each fetch must be followed by either a data copy operation or a new set of SQLBindCol() calls to assign new storage areas for the next fetch.
Alternatively, applications can eliminate the overhead of extra data copies or extra SQLBindCol() calls by retrieving multiple rows of data (called a rowset) at a time into an array.
NOTE
A third method of reducing overhead, which can be used on its own or with arrays, is to specify a binding offset. Rather than rebinding each time, an offset can be used to specify new buffer and length/indicator addresses that will be used in a subsequent call to SQLFetch() or SQLFetchScroll(). This can only be used with row offset binding, and is described in the upcoming “Column Binding Offsets” section.
When retrieving a result set into an array, SQLBindCol() is also used to assign storage for application array variables. By default, the binding of rows is in column-wise fashion: this is symmetrical to using SQLBindParameter() to bind arrays of input parameter values as described in the previous section.
SQLFetchScroll() supports scrollable cursors, the ability to move forward and backward from any position in the result set. This can be used with both column-wise and row-wise binding. See “Scrollable Cursors” earlier for more information.
Returning Array Data for Column-Wise Bound Data
Figure 11.7 is a logical view of column-wise binding. The right side of Figure 11.7 shows the function flows for column-wise retrieval.
Figure 11.7. Column-wise binding.

To specify column-wise array retrieval, the application calls SQLSetStmtAttr() with the SQL_ATTR_ROW_ARRAY_SIZE attribute to indicate how many rows to retrieve at a time. When the value of the SQL_ATTR_ROW_ARRAY_SIZE attribute is greater than 1, DB2 CLI knows to treat the deferred output data pointer and length pointer as pointers to arrays of data and length rather than to one single element of data and length of a result set column.
The application then calls SQLFetchScroll() to retrieve the data. When returning data, DB2 CLI uses the maximum buffer size argument (BufferLength) on SQLBindCol() to determine where to store successive rows of data in the array; the number of bytes available for return for each element is stored in the deferred length array. If the number of rows in the result set is greater than the SQL_ATTR_ROW_ARRAY_SIZE attribute value, multiple calls to SQLFetchScroll() are required to retrieve all the rows.
Returning Array Data for Row-Wise Bound Data
The application also can do row-wise binding, which associates an entire row of the result set with a structure. In this case, the rowset is retrieved into an array of structures, each of which holds the data in one row and the associated length fields. Figure 11.8 gives a pictorial view of row-wise binding.
Figure 11.8. Row-wise binding.

To perform row-wise array retrieval, the application needs to call SQLSetStmtAttr() with the SQL_ATTR_ROW_ARRAY_SIZE attribute to indicate how many rows to retrieve at a time. In addition, it must call SQLSetStmtAttr() with the SQL_ATTR_ROW_BIND_TYPE attribute value set to the size of the structure to which the result columns will be bound. DB2 CLI treats the deferred output data pointer of SQLBindCol() as the address of the data field for the column in the first element of the array of these structures. It treats the deferred output length pointer as the address of the associated length field of the column.
The application then calls SQLFetchScroll() to retrieve the data. When returning data, DB2 CLI uses the structure size provided with the SQL_ATTR_ROW_BIND_TYPE attribute to determine where to store successive rows in the array of structures.
Figure 11.9 shows the required functions for each method. The left side shows n rows being selected, and retrieved one row at a time into m application variables. The right side shows the same n rows being selected, and retrieved directly into an array.
Figure 11.9. Array retrieval.
The diagram shows m columns bound, so m calls to SQLBindCol() are required in both cases. If arrays of less than n elements had been allocated, then multiple SQLFetchScroll() calls would be required.
Column Binding Offsets
When an application needs to change bindings (for a subsequent fetch for example) it can call SQLBindCol() a second time. This will change the buffer address and length/indicator pointer used.
Instead of multiple calls to SQLBindCol(), DB2 CLI also supports column binding offsets. Rather than rebinding each time, an offset can be used to specify new buffer and length/indicator addresses that will be used in a subsequent call to SQLFetch() or SQLFetchScroll(). This can only be used with row-wise binding, but will work whether the application retrieves a single row or multiple rows at a time.
To make use of column binding offsets, an application follows these steps: